

-
Business continuity management for Microsoft SharePoint Foundation 2010
Microsoft Corporation
Published: April 2011
Author: Microsoft Office System and Servers Team (itspdocs@microsoft.com)
- Abstract
This book provides information about business continuity management, which consists of the business decisions, processes, and tools you put in place in advance to handle crises. Information includes features of Microsoft SharePoint Foundation 2010 that are likely to be part of your business continuity management strategy.
The content in this book is a copy of selected content in the SharePoint Foundation 2010 technical library (http://go.microsoft.com/fwlink/?LinkId=181463) as of the publication date. For the most current content, see the technical library on the Web.

This document is provided “as-is”. Information and views expressed in this document, including URL and other Internet Web site references, may change without notice. You bear the risk of using it.
Some examples depicted herein are provided for illustration only and are fictitious. No real association or connection is intended or should be inferred.
This document does not provide you with any legal rights to any intellectual property in any Microsoft product. You may copy and use this document for your internal, reference purposes.
© 2011 Microsoft Corporation. All rights reserved.
Microsoft, Access, Active Directory, Backstage, Excel, Groove, Hotmail, InfoPath, Internet Explorer, Outlook, PerformancePoint, PowerPoint, SharePoint, Silverlight, Windows, Windows Live, Windows Mobile, Windows PowerShell, Windows Server, and Windows Vista are either registered trademarks or trademarks of Microsoft Corporation in the United States and/or other countries.
The information contained in this document represents the current view of Microsoft Corporation on the issues discussed as of the date of publication. Because Microsoft must respond to changing market conditions, it should not be interpreted to be a commitment on the part of Microsoft, and Microsoft cannot guarantee the accuracy of any information presented after the date of publication.
Plan for business continuity management (SharePoint Foundation 2010) 1
Business continuity management capabilities 1
Plan to protect content by using recycle bins and versioning (SharePoint Foundation 2010) 5
Protecting content by using recycle bins 5
Protecting content by using versioning 7
Plan for backup and recovery (SharePoint Foundation 2010) 8
Define business requirements 8
Choose what to protect and recover in your environment 9
Plan for enhanced backup and recovery performance 15
Backup and recovery overview (SharePoint Foundation 2010) 17
Backup and recovery scenarios 17
Plan for availability (SharePoint Foundation 2010) 28
Choosing an availability strategy and level 30
Plan for disaster recovery (SharePoint Foundation 2010) 37
Choose a disaster recovery strategy 38
Planning for cold standby data centers 39
Planning for warm standby data centers 39
Planning for hot standby data centers 39
System requirements for disaster recovery 43
Backup (SharePoint Foundation 2010) 44
Back up all or part of a farm 44
Back up a farm (SharePoint Foundation 2010) 46
Considerations when backing up a farm 46
Use Windows PowerShell to back up a farm 47
Use Central Administration to back up a farm 48
Use SQL Server tools to back up a farm 49
Back up a farm configuration (SharePoint Foundation 2010) 51
Use Windows PowerShell to back up a farm configuration 52
Use Central Administration to back up a farm configuration 53
Back up a Web application (SharePoint Foundation 2010) 55
Considerations when backing up a Web application 55
Use Windows PowerShell to back up a Web application 56
Use Central Administration to back up a Web application 57
Use SQL Server tools to back up a Web application 58
Back up a service application (SharePoint Foundation 2010) 60
Use Windows PowerShell to back up a service application 61
Use Central Administration to back up a service application 62
Back up a site collection (SharePoint Foundation 2010) 64
Use Windows PowerShell to back up a site collection 64
Use Central Administration to back up a site collection 66
Back up customizations (SharePoint Foundation 2010) 67
Backing up solution packages 68
Backing up authored site elements 70
Backing up changes to the Web.config file 71
Backing up third-party products 71
Backing up changes made by direct editing 71
Backing up developed customizations that are not packaged as solutions 72
Back up a content database (SharePoint Foundation 2010) 73
Use Windows PowerShell to back up a content database 74
Use Central Administration to back up a content database 75
Use SQL Server tools to back up a content database 76
Back up databases to snapshots (SharePoint Foundation 2010) 77
Use SQL Server tools to back up a database to a snapshot 77
Export a site, list, or document library (SharePoint Foundation 2010) 79
Use Windows PowerShell to export a site, list, or document library 79
Use Central Administration to export a site, list, or document library 80
Back up or archive logs (SharePoint Foundation 2010) 82
[Essential] Back up transaction logs 82
[Recommended] Collect usage data 83
[Recommended] Archive diagnostic logs 83
Configuring permissions for backup and recovery (SharePoint Foundation 2010) 86
Permissions for the SPTimerV4 timer service and SQL Server account 86
Group memberships required to run backup and restore operations in Central Administration 86
Setting permissions for running backup and restore operations by using Windows PowerShell 87
Configuring permissions for backup and recovery (SharePoint Server 2010) 89
Permissions for the SPTimerV4 timer service and SQL Server account 89
Group memberships required to run backup and restore operations in Central Administration 89
Setting permissions for running backup and restore operations by using Windows PowerShell 90
Recovery (SharePoint Foundation 2010) 92
Recover all or part of a farm 92
Restore a farm (SharePoint Foundation 2010) 94
Considerations when recovering a farm 94
Use Windows PowerShell to restore a farm 96
Use Central Administration to restore a farm 97
Use SQL Server tools to restore a farm 98
Restore a farm configuration (SharePoint Foundation 2010) 101
Use Windows PowerShell to restore a farm’s configuration 101
Use Central Administration to restore a farm’s configuration 102
Use SQL Server to restore a farm’s configuration 103
Document farm configuration settings (SharePoint Foundation 2010) 104
Copy configuration settings from one farm to another (SharePoint Foundation 2010) 110
Back up and recover a farm without content databases to copy configuration settings 111
Back up and recover configuration settings only 112
Create a scripted deployment to copy configuration settings 112
Restore a Web application (SharePoint Foundation 2010) 113
Considerations when restoring a Web application 113
Use Windows PowerShell to restore a Web application 113
Use Central Administration to restore a Web application 114
Use SQL Server tools to restore databases associated with a Web application 115
Additional steps to restore a Web application that uses forms-based authentication 116
Restore a service application (SharePoint Foundation 2010) 118
Use Windows PowerShell to restore a service application 119
Use Central Administration to restore a service application 120
Use SQL Server tools to restore the databases for a service application 121
Restore a site collection (SharePoint Foundation 2010) 122
Use Windows PowerShell to restore a site collection 122
Restore customizations (SharePoint Foundation 2010) 124
Restoring solution packages 124
Restoring authored site elements 126
Restoring changes to the Web.config file 127
Recovering changes made by direct editing 127
Restoring developed customizations that are not packaged as solutions 128
Restore a content database (SharePoint Foundation 2010) 129
Use Windows PowerShell to restore a content database 129
Use Central Administration to restore a content database 130
Use SQL Server tools to restore a content database 131
Attach and restore a read-only content database (SharePoint Foundation 2010) 133
Use Windows PowerShell to attach and restore a read-only content database 133
Import a list or document library (SharePoint Foundation 2010) 135
Import a site, list or document library 135
Availability configuration (SharePoint Foundation 2010) 137
Configure availability by using SQL Server clustering (SharePoint Foundation 2010) 138
Configure availability by using SQL Server database mirroring (SharePoint Foundation 2010) 139
Configure high-availability database mirroring 143
Configure SharePoint 2010 Products to be aware of mirrored databases 143
User experience during a failover 144
Monitoring and troubleshooting mirroring 144
Sample script for configuring SQL Server mirroring (SharePoint Foundation 2010) 145
Configure database mirroring with certificates and full recovery 145
Transfer permissions to the mirror server 152
Removing mirroring from a server 152
- Abstract
-
Getting help
Every effort has been made to ensure the accuracy of this book. This content is also available online in the Office System TechNet Library, so if you run into problems you can check for updates at:
http://technet.microsoft.com/office
If you do not find your answer in our online content, you can send an e-mail message to the Microsoft Office System and Servers content team at:
itspdocs@microsoft.com
If your question is about Microsoft Office products, and not about the content of this book, please search the Microsoft Help and Support Center or the Microsoft Knowledge Base at:
http://support.microsoft.com
-
Plan for business continuity management (SharePoint Foundation 2010)
Published: May 12, 2010
Business continuity management consists of the business decisions, processes, and tools you put in place in advance to handle crises. A crisis might affect your business only, or be part of a local, regional, or national event.
Features of Microsoft SharePoint Foundation 2010 are likely to be part of your business continuity management strategy, but your overall plan should be much more comprehensive and include the following elements:
- Clearly documented procedures.
- Offsite storage of key business records.
- Clearly designated contacts.
- Ongoing staff training, including practices and drills.
- Offsite recovery mechanisms.
In this article:
-
Business continuity management capabilities
Microsoft SharePoint Foundation 2010 includes the following capabilities that support business continuity management.
-
Versioning Users can lose data by overwriting a document. With versioning, users can keep multiple versions of the same document in a document library. In the event of an unwanted change, an overwritten document, or document corruption, the previous version can easily be restored by the user. When versioning is enabled, users can recover their data themselves.
For more information, see Plan to protect content by using recycle bins and versioning (SharePoint Foundation 2010).
-
Recycle Bin SharePoint Foundation 2010 includes a two-stage Recycle Bin. Users who have the appropriate permissions can use the first-stage Recycle Bin to recover documents, list items, lists, and document libraries that have been deleted from a site. Site collection administrators can use the second-stage Recycle Bin, also called the Site Collection Recycle Bin, to recover items that have been deleted from the first-stage Recycle Bin. When the first-stage Recycle Bin is enabled, users can recover their data themselves.
For more information, see Plan to protect content by using recycle bins and versioning (SharePoint Foundation 2010).
- Backup and recovery You can use Windows PowerShell cmdlets or the SharePoint Central Administration Web site to back up and recover farms, databases, Web applications, and site collections. There are also many external and third-party tools that you can use to back up and recover data. For more information, see Plan for backup and recovery (SharePoint Foundation 2010).
-
Availability No single feature provides availability within a SharePoint Foundation 2010 environment. You can choose among many approaches to improve availability, including the following:
- Fault tolerance of components and the network.
-
Redundancy of server roles and servers within a farm.
For more information about availability, see Plan for availability (SharePoint Foundation 2010).
-
Disaster recovery No single feature provides disaster recovery within a SharePoint Foundation 2010 environment. You can choose among many approaches to improve availability when a data center goes offline, including the following:
- Offsite storage of backups, both within and outside your region.
- Shipping images of servers to offsite locations.
-
Running multiple data centers, but serving data only through one, keeping the others available on standby.
For more information about disaster recovery, see Plan for disaster recovery (SharePoint Foundation 2010).
-
-
Service level agreements
Business continuity management is a key area in which IT groups offer service level agreements (SLAs) to set expectations with customer groups. Many IT organizations offer various SLAs that are associated with different chargeback levels.
The following list describes common features of business continuity management SLAs:
-
Versioning
- Whether offered.
- Amount of space allocated.
-
Recycle Bins
- Whether offered.
- Amount of space allocated for the first-stage Recycle Bin and second-stage Recycle Bin.
- Length of time that items are held before they are permanently deleted in each Recycle Bin.
- Additional charges for recovering items that have been permanently deleted from the second-stage Recycle Bin.
-
Backup and recovery
Backup and recovery SLAs usually identify objects and services that can be backed up and recovered, and the recovery time objective, recovery point objective, and recovery level objective for each. The SLA may also identify the available backup window for each object. For more information about backup and recovery SLAs, see Plan for backup and recovery (SharePoint Foundation 2010).
- Recovery time objective (RTO) is the objective for the maximum time a data recovery process will take. It is determined by the amount of time the business can afford for the site or service to be unavailable.
- Recovery point objective (RPO) is the objective for the maximum amount of time between the last available backup and any potential failure point. It is determined by how much data the business can afford to lose in the event of a failure.
- Recovery level objective (RLO) is the objective that defines the granularity with which you must be able to recover data — whether you must be able to recover the entire farm, Web application, site collection, site, list or library, or item.
-
Availability
For each component within a farm that is covered by an availability plan, an availability SLA may identify availability as a percentage of uptime, often expressed as the number of nines — that is, the percentage of time that a given system is active and working. For example, a system with a 99.999 uptime percentage is said to have five nines of availability.

Note:When calculating availability, most organizations specifically exempt or add hours for planned maintenance activities.
For more information, see Plan for availability (SharePoint Foundation 2010).
-
Disaster recovery
For each component within a farm that is covered by a disaster recovery plan, an SLA may identify the recovery point objective and recovery time objective. Different recovery time objectives are often set for different circumstances, for example a local emergency versus a regional emergency.
For more information, see Plan for disaster recovery (SharePoint Foundation 2010).
-
-
Related content
-
Plan to protect content by using recycle bins and versioning (SharePoint Foundation 2010)
Published: May 12, 2010
Plan to use recycle bins and versioning in an environment to help users protect and recover their data. Recycle bins and versioning are key components of a business continuity strategy.
Recycle bins Users can use recycle bins to retrieve deleted objects. Microsoft SharePoint Foundation 2010 supports two stages of recycle bins, the first-stage Recycle Bin and the Site Collection — also called the second-stage — Recycle Bin. When Recycle Bins are enabled, users can restore items that are in them, including deleted files, documents, list items, lists, and document libraries.
Versioning Users can use versioning to help prevent data loss that is caused by overwriting a document. When a site owner turns on versioning in a document library or a list, the library or list keeps multiple copies of a document, item, or file. In the event of an unwanted change, an overwritten file, or document corruption, the previous version can be easily restored by the user.
In this article:
-
Protecting content by using recycle bins
SharePoint Foundation 2010 supports two stages of recycle bins, the first-stage Recycle Bin and the Site Collection, or second-stage, Recycle Bin. The recycle bins are enabled and configured at the Web application level. The recycle bins collect deleted documents and list items. When a list item is deleted, any attachments to the item are also deleted and can be restored from the Recycle Bin.
The Recycle Bins can contain multiple copies of a document that each have the same file name and source. These documents cannot be restored over an existing copy of a document. The Recycle Bins cannot be used to recover previous versions or accidental overwrites of documents — you must use versioning to enable this functionality.
The following table describes how an item is deleted and recovered from the first-stage Recycle Bin and the second-stage Recycle Bin.
When a user does this
The item is
The item can be restored by
Deletes an item
Held in the first-stage Recycle Bin until the item is deleted from the Recycle Bin or the item has been in the Recycle Bin longer than the time limit configured for an item to be held in the Recycle Bin.
Users or site collection administrators
Deletes an item from the Recycle Bin
Held in the second-stage Recycle Bin
Site collection administrators
Turning off the Recycle Bin for a Web application empties all Recycle Bins and permanently deletes all items in them.
First-stage Recycle Bin
The first-stage Recycle Bin is located at the site level and is available to users who have Contribute, Design, or Full Control permissions on a site.When a user deletes an item from a Web site, the item is sent to the site’s first-stage Recycle Bin. Items located in the first-stage Recycle Bin count toward the site quota.Items remain in one of the first-stage Recycle Bins in the site until a specified time period has been reached (the default setting is 30 days).
When an item is deleted from the Recycle Bin, the item is sent to the second-stage Recycle Bin.

Note:The time limit for the Recycle Bins applies to the total time after the item was first deleted — not the time spent in either Recycle Bin stage.
Second stage (Site Collection) Recycle Bin
The second-stage Recycle Bin is located at the site collection administrator level. The second-stage Recycle Bin is organized into two views: objects in the first-stage Recycle Bins of all sites in the site collection, and objects in the second-stage Recycle Bin. When an item is deleted from the first-stage Recycle Bin, it can be recovered only by a site collection administrator from the second-stage Recycle Bin.
Items remain in the second-stage Recycle Bin until a specified time period has been reached (the default setting is 30 days) or until the second-stage Recycle Bin reaches its size limit, at which time the oldest items are deleted. The time limit for the Recycle Bins applies to the total time after the item was initially deleted — not the time spent in either Recycle Bin stage.
When a second-stage Recycle Bin is enabled for a Web application, we recommend that you designate how much disk space is available to the second-stage Recycle Bin as a percentage of the quota allotted to the Web application. Items stored in the second-stage Recycle Bin do not count toward the site quota; however, the size that is specified for the second-stage Recycle Bin increases the total size of the site and the content database that hosts it. If no site quota has been set, there is no limit on the size of the second-stage Recycle Bin.
For example, if you have allotted 100 megabytes (MB) of space for the Web application, allotting a 50 percent quota for the second-stage Recycle Bin allots 50 MB for the second-stage Recycle Bin and 150 MB for the Web application as a whole. You can allot up to 100 percent for the second-stage Recycle Bin quota.
For more information about setting quotas, see
- Plan for site maintenance and management (SharePoint Foundation 2010)
- Create quota templates (SharePoint Foundation 2010)
For more information about how users can use the Recycle Bin in SharePoint Foundation 2010, see View, restore, or delete items in the Recycle Bin (http://go.microsoft.com/fwlink/?LinkId=90917&clcid=0x409)
For information about configuring the Recycle Bins, see Configure the Recycle Bin (SharePoint Foundation 2010).
-
Protecting content by using versioning
Versioning addresses the issue of losing data by overwriting a document. It allows the document library to keep multiple copies of the same document. In the event of an unwanted change, an overwrite, or a document corruption, the previous version can easily be restored by the user. Versioning can be enabled at the library or list level. Items and files can be versioned.
Before configuring versioning, be sure to read Plan for site maintenance and management (SharePoint Foundation 2010) .
For more information about configuring versioning, see Enable and configure versioning (SharePoint Foundation 2010) .
Administrators must closely manage versioning, because if sites have many versions of files and documents, the sites can become quite large. If you do not restrict the size of sites, your sites can surpass your storage capacity. Farm administrators can manage this issue by establishing service level agreements with site owners and by setting size quotas on sites. For more information about managing versioning, see Manage versioning by using quotas (SharePoint Foundation 2010).
-
Plan for backup and recovery (SharePoint Foundation 2010)
Updated: July 8, 2010
This article describes the stages involved in planning for backup and recovery, which include determining backup and recovery strategies for a Microsoft SharePoint Foundation environment and deciding which tools to use. The stages do not need to be done in the order listed, and the process may be iterative.
When you plan for how you will use backup and recovery for disaster recovery, consider common events, failures, and errors; local emergencies; and regional emergencies.
For detailed information about Microsoft SharePoint Foundation backup and recovery, see Backup and recovery overview (SharePoint Foundation 2010).
In this article:
-
Define business requirements
To define business requirements, determine the following for each farm and service in the environment:
- Recovery point objective (RPO) is the objective for the maximum amount of time between the last available backup and any potential failure point. It is determined by the amount of data that the business can afford to lose in the event of a failure.
- Recovery time objective (RTO) is the objective for the maximum time a data recovery process will take. It is determined by the amount of time the business can afford for the site or service to be unavailable.
- Recovery level objective (RLO) is the objective that defines the granularity with which you must be able to recover data — whether you must be able to recover the entire farm, Web application, site collection, site, list or library, or item.
Shorter RPO and RTO, and greater granularity of RLO, all tend to cost more.
A worksheet to help you plan your strategies for backup and recovery for your SharePoint Foundation 2010 environment can be downloaded from SharePoint 2010 Products backup and recovery planning workbook (http://go.microsoft.com/fwlink/?LinkID=184385).
-
Choose what to protect and recover in your environment
Your business requirements will help you determine which components of the environment you need to protect, and the granularity with which you need to be able to recover them.
The following table lists components of a SharePoint environment that you might decide to protect, and the tools that can be used to back up and recover each component.
Component
SharePoint backup
Microsoft SQL Server 2008 with Service Pack 1 (SP1) and Cumulative Update 2
System Center Data Protection Manager (DPM) 2010
File system backup
Farm
Yes
Yes6
Service applications
Yes
Web application
Yes
Content databases
Yes
Yes
Yes
Site collection
Yes1, 2
Yes1, 2
Yes1, 2
Site
Yes2
Yes2
Yes
Document library or list
Yes2
Yes2
Yes
List item or document
Yes
Content stored in remote BLOB stores
Yes3
Yes3
Yes3
Customizations deployed as solution packages
Yes7
Yes7
Yes6, 7
Changes to Web.config made by using Central Administration or an API
Yes
Yes
Yes4
Configuration settings (SharePoint)
Yes2, 8
Yes2, 8
Yes 2, 9
Customizations not deployed as solution packages
Yes. Files can be recovered if protected as files.4, 5
Yes
Changes to Web.config not made by using Central administration or an API
Yes4
Yes
IIS configurations not set through SharePoint
Yes5
Yes
SQL Server Reporting Services databases
Yes
Yes
1. Farm-level and database-level backup and restore can be used for site collection recovery if a single site collection is stored in a database.
2. Farm-level and database-level backups can be used with SharePoint Foundation unattached database recovery to restore site collections, sites, lists, and configurations.
3. Content stored in remote BLOB stores is backed up and restored with other content, as long as the Remote BLOB Storage (RBS) provider in use has this capability.
4. Changes to Web.config can be backed up by using file system backup from DPM 2010.
5. IIS configurations can be recovered by using a bare metal backup from DPM 2010.
6. DPM 2010 can recover this item by using a combination of a bare metal backup and SharePoint Foundation backup. It cannot be backed up and recovered as an object.
7. Fully-trusted solution packages are stored in the configuration database, and sandboxed solutions are stored in content databases. They can be recovered as part of farm or content database recovery.
8. Configuration settings can be recovered from farm-level backups. For more information, see Restore a farm (SharePoint Foundation 2010).
9. The Central Administration content database and the configuration database for a SharePoint Foundation 2010 farm can be recovered but only as part of a full-farm recovery to the same farm, with the same computers.

Note:You can register SharePoint Foundation 2010 with Windows Server Backup by using the stsadm.exe -o -registerwsswriter operation to configure the Volume Shadow Copy Service (VSS) writer for SharePoint Foundation. Windows Server Backup then includes SharePoint Foundation 2010 in server-wide backups. When you restore from a Windows Server backup, you can select Microsoft SharePoint Foundation (no matter which version of SharePoint 2010 Products is installed), and all components reported by the VSS writer forSharePoint Foundation 2010 on that server at the time of the backup will be restored.
Windows Server Backup is recommended only for use with for single-server deployments.
Choose what to recover from within SharePoint content databases
From within a content database, you can recover site collections, sites, lists and libraries.
Backup and recovery tools provide different levels of recovery for content within a content database. Recovering an object from within a content database is always more complex than recovering an entire content database.
Protecting customizations
Customizations to SharePoint sites can include:
- Master pages, page layouts and cascading style sheets. These objects are stored in the content database for a Web application.
- Web Parts, site or list definitions, custom columns, new content types, custom fields, custom actions, coded workflows, or workflow activities and conditions.
- Third-party solutions and their associated binary files and registry keys, such as IFilters.
- Changes to standard XML files.
- Custom site definitions (Webtemp.xml).
- Changes to the Web.config file.
How customizations are deployed, and how changes are made to the Web.config file, have a significant effect on which tools can be used to back up and recover customizations. To provide the greatest opportunity for recovery, we recommend that you deploy customizations by using solution packages and make changes to the Web.config file by using Central Administration or the SharePoint APIs and object model.
Protecting workflows
Workflows are a special case of customizations that you can back up and recover. Make sure that your backup and recovery plan addresses any of the following scenarios that apply to your environment:
- Declarative workflows, such as those created in Microsoft SharePoint Designer 2010, are stored in the content database for the site collection to which they are they are deployed. Backing up the content database protects these workflows.
- Custom declarative workflow actions have components in the following three locations:
- The Visual Studio assemblies for the Activities are stored in the global assembly catalog (GAC).
- The XML definition files (.ACTIONS files) are stored in the 14\TEMPLATE\{LCID}\Workflow directory.
-
An XML entry to mark the activity as an authorized type is stored in the Web.config file for the Web applications in which it is used.
If your farm workflows use custom actions, you should use a file backup system to protect these files and XML entries. Similar to SharePoint Foundation features such as Web parts and event receivers, these files should be reapplied to the farm as needed after recovery.
- Workflows that depend on custom code, such as those that are created by using Visual Studio, are stored in two locations. The Visual Studio assemblies for the workflow are stored in the global assembly catalog (GAC), and the XML definition files are stored in the Features directory. This is the same as other types of SharePoint Foundation features such as Web parts and event receivers. If the workflow was installed as part of a solution package, backing up the content database protects these workflows.
- If you create a custom workflow that interacts with a site collection other than the one where the workflow is deployed, you must back up both site collections to protect the workflow. This includes workflows that write to a history list or other custom list in another site collection. Performing a farm backup is sufficient to back up all site collections in the farm and all workflows that are associated with them.
- Workflows that are not yet deployed must be backed up and restored separately like any other data file. When you are developing a new workflow but have not yet deployed it to the SharePoint Foundation farm, make sure that you back up the folder where you store your workflow project files by using Windows Backup or another file system backup application.
Protecting service applications
Service applications in a SharePoint Foundation environment can be made up of both service settings and one or more databases, or just service settings. You cannot restore a complete service application by restoring the database only; however, you can restore the databases for a service application and then reprovision the service application. For more information, see Restore a service application (SharePoint Foundation 2010).
Protecting SQL Server Reporting Services databases
SharePoint Foundation backup and recovery does not include SQL Server Reporting Services databases. You must use SQL Server tools. For more information, see Backup and Restore Operations for a Reporting Services Installation (http://go.microsoft.com/fwlink/?LinkId=186642).
-
Choose tools
To choose the right tools for backup and recovery, you need to determine whether you can meet the continuity requirements you have set for your business within your budget for time and resources.
Key factors to consider when choosing tools include:
- Speed of backup: Can the tool perform within the maintenance window for your databases? You should test any backup system to ensure that it meets your needs on your hardware.
- Completeness of recovery.
- Granularity of objects that can be recovered.
- Backup type supported (full, differential, or incremental).
- Complexity of managing the tool.
The following table compares the type of backup and size of farm that can be backed up in a six-hour window for backup and recovery tools available from Microsoft.
Tool
Backup type
Size of backup completed in six hours1
SharePoint farm backup and recovery
Full, differential
600 GB
SQL Server
Full, differential
600 GB
System Center Data Protection Manager
Incremental
Terabytes
1Backup size was determined by backing up a system that totals the specified size on the test hardware listed in the following section.

Note:The SharePoint Foundation and SQL Server backups were performed with backup compression turned on.
Test hardware
The following table lists the hardware used in the tests that determined the size of backup that could be completed in a six-hour window.
Component
Description
Processor
64-bit dual processor, 3 GHz
RAM
8 GB
Disk
2 terabyte NTFS file system-formatted partition
Network
100 megabits per second (Mbps) or faster connection between client computers and server
Network share
Network share with 1.25 terabytes free space

Note:The upper size limit for performing SharePoint Foundation 2010 site collection backups is 85 GB.
For detailed information about the backup and recovery systems that can be used with Microsoft SharePoint Foundation, see the following resources:
-
Determine strategies
Based on your business requirements, recovery needs, and the tools you have chosen, determine and document the backup and recovery strategies for your environment.
It is not uncommon for IT departments that support SharePoint Foundation environments to decide to use more than one tool to protect the environment, as they determine the strategies that they will use.
For example, in an environment with databases that are managed by DBAs, the strategies in the following list might be employed:
-
All databases are backed up by SQL Server. The backup interval that is set for each database is based on the following:
- The business impact of the content or service.
- The standard rate of change for the database.
- The effect on performance that the backup has on the environment.
-
Small, rapidly changing, very high-business-impact content databases are additionally protected by SQL Server database snapshots that are stored on a separate physical disk. Only one snapshot is stored per database, and snapshots are discarded regularly, so that the effect on performance is minimized. The snapshot interval that is set for each database is based on the following:
- The business impact of the content or service.
- The standard rate of change for the database.
- The effect on performance that the snapshot has on the environment.
-
The amount of space required to store the snapshot.
Recovering from a snapshot is faster than standard recovery because a snapshot, along with its underlying database, can be treated by SharePoint Foundation as an unattached database. However, the process of creating snapshots can decrease the performance of the underlying database. We recommend that the effect that snapshots have on the performance of your system be tested before they are implemented, and that snapshots be discarded regularly to reduce the space required.

Note:If you are using RBS, and the RBS provider that you are using does not support snapshots, you cannot use snapshots for backup. For example, the SQL FILESTREAM provider does not support snapshots.
-
SharePoint Foundation backup is used to protect service applications. The backup interval is based on the following:
- The business impact of the service.
- The standard rate of change for the database.
- The effect on performance that the backup has on the database.
- All restore operations are performed through SharePoint Foundation. The choice of which restore system to use is determined by the type of backup that is available and the object being restored.
Other tools should be part of your business continuity strategy. Consider how you will use Recycle Bins and versioning in site collections throughout the environment. For more information, see Plan for business continuity management (SharePoint Foundation 2010).
-
-
Plan for enhanced backup and recovery performance
As you plan your backup and recovery strategy, consider the following recommendations to help you decrease the effect of backup and recovery on system performance.
By design, most backup jobs consume as many I/O resources as they can to finish the job in the available time for maintenance; therefore, you might see disk queuing and you might see that all I/O requests come back more slowly than usual. This is typical and should not be considered a problem.
Follow recommendations for configuring SQL Server and storage
Follow the general recommendations for configuring SQL Server and storage for a SharePoint Foundation environment. For more information, see Plan for SQL Server, storage and BLOB configuration (SharePoint Foundation 2010) (http://technet.microsoft.com/library/dc219657-46b7-49fe-aa57-03e229ac9bc0(Office.14).aspx).
Minimize latency between SQL Server and the backup location
In general, it is best to use a local disk, not a network drive, for backups. If you are backing up multiple servers, you may want to have a directly connected computer that both servers can write to. Network drives that have 1 millisecond or less latency between them and the computers that are running SQL Server will perform well. If your farm has multiple servers in it (including the computer that is running SQL Server), you must use UNC network paths for the SharePoint farm backup location.
Avoid processing conflicts
Do not run backup jobs during times in which users require access to the system.
To avoid I/O bottlenecks, perform the main backup to a separate disk, and only then copy to tape.
Consider staggering backups so that not all databases are backed up at the same time.
SharePoint Foundation backups use SQL Server backups. When using compression with your backups, be mindful not to overwhelm SQL Server. For example, some third-party backup tools compress data during backup, which can disrupt SQL Server performance. There are tools available to throttle the compression processes and control the effect on SQL Server.
Follow SQL Server backup and restore optimization recommendations
If you are running SQL Server 2008 Enterprise, we recommend that you use backup compression. For more information, see Backup Compression (SQL Server) (http://go.microsoft.com/fwlink/?LinkId=179525).
If you are using SQL Server backups, use a combination of full, differential, and transaction log backups for the full recovery model to minimize recovery time.
Differential database backups are usually faster to create than full database backups, and they reduce the amount of transaction log required to recover the database.
If you are using the full recovery model in SQL Server 2008, we recommend that you use the truncate option during backup to avoid maintenance issues.
For detailed recommendations about how to optimize SQL Server backup and restore performance, see Optimizing Backup and Restore Performance in SQL Server (http://go.microsoft.com/fwlink/?LinkId=126630).
Ensure sufficient write performance on the backup drive
Carefully consider whether to use redundant array of independent disks (RAID) on your disk backup device. For example, RAID 5 has low write performance, approximately the same speed as for a single disk. (This is because RAID 5 maintains parity information.) Using RAID 10 for a backup device may provide faster backups. For more information about how to use RAID with backups, see Configure RAID for maximum SQL Server I/O throughput (http://go.microsoft.com/fwlink/?LinkId=126632).
-
Related content
-
Backup and recovery overview (SharePoint Foundation 2010)
Updated: October 21, 2010
This article describes the backup architecture and recovery processes that are available in Microsoft SharePoint Foundation 2010, including farm and granular backup and recovery, and recovery from an unattached content database. Backup and recovery operations can be performed through the user interface or through Windows PowerShell cmdlets. Built-in backup and recovery tools may not meet all the needs of your organization.
In this article:
-
Backup and recovery scenarios
Backing up and recovering data supports many business scenarios, including the following:
- Recovering unintentionally deleted content that is not protected by the Recycle Bin or versioning.
- Moving data between installations as part of a hardware or software upgrade.
- Recovering from an unexpected failure.
-
Backup architecture
SharePoint Foundation 2010 provides two backup systems: farm and granular.
Farm backup architecture
The farm backup architecture in SharePoint Foundation 2010 starts a Microsoft SQL Server database backup of content and service application databases and also writes configuration content to files.
The following illustration shows the farm backup system.

Both full and differential backups are supported. Full backups create a new backup of the complete system. Differential backups create a backup of all the data that is stored in databases that has changed since the last full backup.
The farm backup system is organized hierarchically. The components in a farm that can be selected for backup include the following:
-
Farm The farm is the highest-level object. You can select from the following options when you perform a farm backup:
-
Content and configuration data (default)
The whole server farm is backed up. This includes settings from the configuration database.
-
Configuration only
Configuration database settings are backed up so that you can apply configurations across farms. For more information, see Configuration-only backup use and benefits later in this article.
-
-
Web application Within a Web application, you can select one or more of the content databases to back up.
A Web application backup includes the following:
- Application pool name and application pool account
- Authentication settings
- General Web application settings such as alerts and managed paths
- Internet Information Services (IIS) binding information, such as the protocol type, host header, and port number
- Changes to the Web.config file that have been made through the object model or Central Administration

Note:Changes to the Web.config file that have been made to support claims-based application that uses forms-based authentication are not included in backups, because those changes are made manually. For more information, see Considerations for using farm backups later in this article.
-
Sandboxed solutions
For recommendations about how to protect these settings, see Plan for backup and recovery (SharePoint Foundation 2010).

Important:Backups of service applications do not include the related proxy. To back up both the service application and the service application proxy, you must either back up the farm or perform two consecutive backups, selecting the service application in one backup, and selecting the associated service application proxy in the second backup.
Many service application databases cannot be backed up individually from SharePoint Foundation 2010. To back up service application databases only, you must use SQL Server backup.
- Proxies for service applications that are not shared.
- Shared Services Shared services require both a service application and a service application proxy to run. If you select the Shared Services node, all of the service applications and the related service application proxies on the farm will be backed up.

Note:The backup hierarchy enables you to select individual service applications and service application proxies to back up. However, when you select one or all service applications, or one or all proxies, the related objects are not backed up by default. To back up both parts of a specific service, you must either select the Shared Services node or perform two consecutive backups, selecting the service application in one backup, and selecting the associated service application proxy in the second backup.

Note:Some settings in the SharePoint Foundation environment are not included in a farm backup. They include the following settings that are stored on Web servers:
- Application pool account passwords
- HTTP compression settings
- Time-out settings
- Custom Internet Server Application Programming Interface (ISAPI) filters
- Computer domain membership
- Internet Protocol security (IPsec) settings
- Network Load Balancing settings
- Secure Sockets Layer (SSL) certificates
- Dedicated IP address settings
Configuration-only backup use and benefits
A configuration-only backup extracts and backs up the configuration settings from a configuration database. By using built-in tools, you can back up the configuration of any configuration database, whether it is currently attached to a farm or not. For detailed information about how to back up a configuration, see Back up a farm configuration (SharePoint Foundation 2010).
A configuration backup can be restored to the same — or any other — server farm. When a configuration is restored, it will overwrite any settings present in the farm that have values that are set in the configuration backup. If any settings present in the farm are not contained in the configuration backup, they will not be changed. For detailed information about how to restore a farm configuration, see Restore a farm configuration (SharePoint Foundation 2010).

Note:Web application and service application settings are not included in a configuration backup. You can use Windows PowerShell cmdlets to document and copy settings for service applications. For more information, see Document farm configuration settings (SharePoint Foundation 2010) and Copy configuration settings from one farm to another (SharePoint Foundation 2010).
Situations in which you might want to restore a configuration from one farm to another farm include the following:
- Replicating a standardized farm configuration to be used throughout an environment.
- Moving configurations from a development or test environment to a production environment.
- Moving configurations from a stand-alone installation to a farm environment.
- Configuring a farm to serve as part of a standby environment.
SharePoint Foundation stores the following kinds of settings in the configuration-only backup:
- Antivirus
- Information rights management (IRM)
- Outbound e-mail settings (only restored when you perform an overwrite).
- Customizations deployed as trusted solutions
- Diagnostic logging
Considerations for using farm backups
Consider the following before you use farm backups:
- There is no built-in scheduling system for backups. To schedule a backup, we recommend that you create a backup script by using Windows PowerShell, and then use Windows Task Scheduler to run the backup script on a regular basis.
- We do not recommend that you use IIS metabase backup to protect IIS settings. Instead, document all IIS configurations for each Web server by using a tool that provides the configuration monitoring you want, such asMicrosoft System Center Configuration Manager 2010.
-
SharePoint Foundation 2010 backup and recovery can be run together with SQL Server Enterprise features such as backup compression and transparent data encryption.
If you are running SQL Server Enterprise, we strongly recommend that you use backup compression. For more information about backup compression, see Backup Compression (SQL Server) http://go.microsoft.com/fwlink/?LinkID=129381).
If you decide to run databases with transparent data encryption, you must manually back up the key and restore the key — SharePoint Foundation 2010 backup and restore will not remind you about the key.
For more information about transparent data encryption, see Understanding Transparent Data Encryption (TDE) (http://go.microsoft.com/fwlink/?LinkID=129384).
- If a content database is set to use the SQL FILESTREAM remote BLOB storage (RBS) provider, the RBS provider must be installed both on the database server that is being backed up and on the database server that is being recovered to.
-
SharePoint Foundation 2010 backup does not protect:
- Changes to the Web.config file on Web servers that are not made through Central Administration or the object model.
- Customizations to a site that are not deployed as part of a trusted or sandboxed solution.
-
If you are sharing service applications across farms, be aware that trust certificates that have been exchanged are not included in farm backups. You must back up the certificate store separately or keep the certificates in a separate location. When you restore a farm that shares a service application, you must import and redeploy the certificates and then re-establish any inter-farm trusts.
For more information, see Exchange trust certificates between farms (SharePoint Foundation 2010) (http://technet.microsoft.com/library/679d334b-913d-49b3-b086-66a60093b261(Office.14).aspx).
- When you restore a farm or Web application that is configured to use any kind of claims-based authentication, duplicate or additional providers may appear to be enabled. If duplicates appear, you must manually save each Web application zone to remove them.
-
Additional steps are required when you restore a farm that contains a Web application that is configured to use forms-based authentication. You must re-register the membership and role providers in the Web.config file, and then redeploy the providers. You must perform these steps whether you are restoring at the Web application level or at the farm level.
For more information, see Back up a Web application (SharePoint Foundation 2010), Plan authentication methods (SharePoint Foundation 2010) (http://technet.microsoft.com/library/b6bc8fec-c11c-4ed7-a78d-3ad61c7ef6c0(Office.14).aspx) and Configure claims authentication (SharePoint Foundation 2010) (http://technet.microsoft.com/library/ef8c3024-26de-4d06-9204-3c6bbb95fb14(Office.14).aspx).
Granular backup and export architecture
The granular backup and export architecture uses Transact-SQL queries and export calls. Granular backup and export is a more read-intensive and processing-intensive operation than farm backup.
From the granular backup system, a user can back up a site collection, or export a site or list.

Note:Workflows are not included in exports of sites or lists.
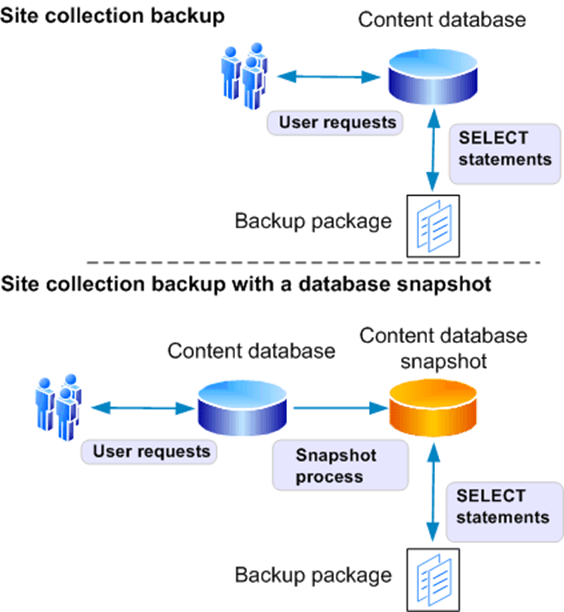
If you are running SQL Server Enterprise, the granular backup system can optionally use SQL Server database snapshots to ensure that data remains consistent while the backup or export is in progress. When a snapshot is requested, a SQL Server database snapshot of the appropriate content database is taken, SharePoint Foundation uses it to create the backup or export package, and then the snapshot is deleted. Database snapshots are linked to the source database where they originated. If the source database goes offline for any reason, the snapshot will be unavailable. For more information about database snapshots, see Database Snapshots (http://go.microsoft.com/fwlink/?LinkId=166158).
Benefits of backing up a site collection by using a snapshot include the following:
- The snapshot ensures that the data that is being read remains consistent while the operation is being performed.
- Users can continue to interact with the site collection while it is being backed up from the database snapshot. This includes adding, editing, and deleting content. However, the changes that users make to the live site will not be included in the site collection backup because the backup is based on the database snapshot.
However, database snapshots can adversely affect performance. For more information about database snapshots and performance, see Limitations and Requirements of Database Snapshots (http://go.microsoft.com/fwlink/?LinkId=166159).
You can use granular backup and export for content that is stored in a database that is configured to use the SQL FILESTREAM RBS provider.

Note:If the RBS provider that you are using does not support snapshots, you cannot use snapshots for content deployment or backup. For example, the SQL FILESTREAM provider does not support snapshots.

Note:We do not recommend that you use SharePoint Foundation 2010 site collection backup for site collections larger than 85 GB.
The following illustration shows the granular backup and export system.
-
-
Recovery processes
SharePoint Foundation 2010 supports the following primary, built-in recovery options:
- Restore from a farm backup that was created by using built-in tools, or restore from the backup of a component taken by using the farm backup system.
- Restore from a site collection backup.
- Connect to a content database by using the unattached content database feature, back up or export data from it, and then restore or import the data.
Restoring from a farm backup
Items that can be recovered from a farm backup include the following:
-
Farm
-
Content and configuration data (default)
The whole server farm is restored. This includes settings from the configuration database, and trusted solution packages.
-
Configuration only
Only the configuration data is restored. This overwrites any settings in the farm that have values that are set within the configuration-only backup.
-
-
Web applications
Restores Web applications.
-
Service applications
Restores service applications. Service application recovery can be complex because SharePoint Foundation 2010 cannot fully reconfigure service application proxies during the restore process. Service application proxies are restored, but are not put in proxy groups. Therefore, they are not associated with any Web applications. For specific information about the operations involved in restoring specific service applications, see Restore a service application (SharePoint Foundation 2010).
-
Content databases
When content databases are restored, the sandboxed solutions associated with the related site collections are also restored.
Restoring as new versus restoring as overwrite
By default, SharePoint Foundation 2010 recovery restores any object as a new instance of the object, instead of overwriting any existing instances with the same name.
When you restore a farm or object as new, the following objects will not work without adjustments, because all GUIDs for objects are assigned new values:
-
Farm. When you restore a farm as new, you must do the following:
- Re-create alternate access mapping settings. SharePoint Foundation 2010 recovery only restores the Default zone of the Web application.
- Re-associate service application proxies with proxy groups because service application proxies are not assigned to proxy groups when restored. All Web applications will be associated with the default proxy group. You must associate Web applications with other proxy groups if you want to do that.
-
Web application.
- If the Web application name and URL that you provide match a Web application name and URL that already exist in the farm, SharePoint Foundation 2010 recovery combines them.
- If you do not want to combine Web applications, you must rename the Web application when you restore it as new.
- When you restore a Web application as new in the same environment but do not combine Web applications, many other parameters and objects must also be changed. For example, you may have to provide different database file paths and different database names.
-
Service applications and service application proxies
- If you recover a service application and also recover the related service application proxy, you must associate the service application proxy with a proxy group.
- If you recover a service application and do not also recover the related service application proxy, you must re-create the service application proxy.

Note:You cannot restore a service application as new in the same farm. You can restore a service application as new in another farm.
When you restore an object and overwrite the existing object, no changes are necessary.
Restoring from a site collection backup
Only site collections can be recovered from a site collection backup.
Recovering from an unattached content database
SharePoint Foundation 2010 provides the ability to connect to, and back up from, a content database that is attached to an instance of SQL Server but is not associated with a local SharePoint Web application. Unattached databases that you can connect to include read-only content databases that have been restored from any supported backup technology and SQL Server database snapshots of content databases.
Recovery is the following two-stage process:
- Back up or export the object from the unattached content database.
- Restore or import the output of the prior step into SharePoint Foundation 2010.
The following items can be backed up or exported from an unattached database by using granular backup and export, and then restored:
-
Site collection
Back up by using site collection backup, and then recover by using a site collection restore.
-
Site
Export, and then import.
-
Lists and libraries
Export, and then import.
You can use import to recover content that you backed up from a database configured to use the SQL FILESTREAM RBS provider. The recovered content will be stored by SharePoint Foundation 2010 using the currently defined storage provider for that content database — that is, if the content database is not set to use RBS, the data will be stored in the content database; if the content database is set to use RBS, the data will be stored in RBS.
-
Related content
-
Plan for availability (SharePoint Foundation 2010)
Updated: June 17, 2010
This article describes key decisions in choosing availability strategies for a Microsoft SharePoint Foundation 2010 environment.
As you carefully review your availability requirements, be aware that the higher the level of availability and the more systems that you protect, the more complex and costly your availability solution is likely to be.
Not all solutions in an organization are likely to require the same level of availability. You can offer different levels of availability for different sites, different services, or different farms.
In this article:
-
Availability overview
Availability is the degree to which a SharePoint Foundation environment is perceived by users to be available. An available system is a system that is resilient — that is, incidents that affect service occur infrequently, and timely and effective action is taken when they do occur.
Availability is part of business continuity management (BCM), and is related to backup and recovery and disaster recovery. For more information about these related processes, see Plan for backup and recovery (SharePoint Foundation 2010) and Plan for disaster recovery (SharePoint Foundation 2010).

Note:When calculating availability, most organizations specifically exempt or add hours for planned maintenance activities.
One of the most common measures of availability is percentage of uptime expressed as number of nines — that is, the percentage of time that a given system is active and working. For example, a system with a 99.999 uptime percentage is said to have five nines of availability.
The following table correlates uptime percentage with calendar time equivalents.
Acceptable uptime percentage
Downtime per day
Downtime per month
Downtime per year
95
72.00 minutes
36 hours
18.26 days
99 (two nines)
14.40 minutes
7 hours
3.65 days
99.9 (three nines)
86.40 seconds
43 minutes
8.77 hours
99.99 (four nines)
8.64 seconds
4 minutes
52.60 minutes
99.999 (five nines)
0.86 seconds
26 seconds
5.26 minutes
If you can make an educated guess about the number of total hours downtime you are likely to have per year, you can use the following formulas to calculate the uptime percentage for a year, a month, or a week:
% uptime/year = 100 – (8760 – number of total hours downtime per year)/8760
% uptime/month = 100 – ((24 × number of days in the month) – number of total hours downtime in that calendar month)/(24 × number of days in the month)
% uptime/week = 100 – (168 – number of total hours downtime in that week)/168
Costs of availability
Availability is one of the more expensive requirements for a system. The higher the level of availability and the more systems that you protect, the more complex and costly an availability solution is likely to be. When you invest in availability, costs include the following:
- Additional hardware and software, which can increase the complexity of interactions among software applications and settings.
- Additional operational complexity.
The costs of improving availability should be evaluated in conjunction with your business needs — not all solutions in an organization are likely to require the same level of availability. You can offer different levels of availability for different sites, different services, or different farms.
Availability is a key area in which information technology (IT) groups offer service level agreements (SLAs) to set expectations with customer groups. Many IT organizations offer various SLAs that are associated with different chargeback levels.
Determining availability requirements
To gauge your organization’s tolerance of downtime for a site, service, or farm, answer the following questions:
- If the site, service, or farm becomes unavailable, will employees be unable to perform their expected job responsibilities?
- If the site, service, or farm becomes unavailable, will business and customer transactions be stopped, leading to loss of business and customers?
If you answered yes to either of these questions, you should invest in an availability solution.
-
Choosing an availability strategy and level
You can choose among many approaches to improve availability in a SharePoint Foundation environment, including the following:
- Improve the fault tolerance of server hardware components.
- Increase the redundancy of server roles within a farm.
Hardware component fault tolerance
Hardware component fault tolerance is the redundancy of hardware components and infrastructure systems such as power supplies at the server level. When planning for hardware component fault tolerance, consider the following:
- Complete redundancy of every component within a server may be impossible or impractical. Use additional servers for additional redundancy.
- Ensure that servers have multiple power supplies connected to different power sources for maximum redundancy.
In any system, we recommend that you work with hardware vendors to obtain fault-tolerant hardware that is appropriate for the system, including redundant array of independent disks (RAID) arrays.
Redundancy within a farm
SharePoint Foundation 2010 supports running server roles on redundant computers (that is, scaling out) within a farm to increase capacity and to provide basic availability.
The capacity that you require determines both the number of servers and the size of the servers in a farm. After you have met your base capacity requirements, you may want to add more servers to increase overall availability. The following illustration shows how you can provide redundancy for each server role.
Availability within a server farm

The following table describes the server roles in a SharePoint Foundation 2010 environment and the redundancy strategies that can be used for each within a farm.
Server role
Preferred redundancy strategy within a farm
Front-end Web server
Deploy multiple front-end Web servers within a farm, and use Network Load Balancing (NLB).
Application server
Deploy multiple application servers within a farm.
Database server
Deploy database servers by using clustering or high-availability database mirroring.
Database availability strategies
You can use Microsoft SQL Server failover clustering or SQL Server high-availability database mirroring to support availability of databases in a SharePoint Foundation environment.
SQL Server failover clustering
Failover clustering can provide availability support for an instance of SQL Server. A failover cluster is a combination of one or more nodes or servers, and two or more shared disks. A failover cluster instance appears as a single computer, but has functionality that provides failover from one node to another if the current node becomes unavailable. SharePoint Foundation can run on any combination of active and passive nodes in a cluster that is supported by SQL Server.
SharePoint Foundation references the cluster as a whole; therefore, failover is automatic and seamless from the perspective of SharePoint Foundation.
For detailed information about failover clustering, see Getting Started with SQL Server 2008 Failover Clustering (http://go.microsoft.com/fwlink/?LinkID=102837&clcid=0x409) and Configure availability by using SQL Server clustering (SharePoint Foundation 2010).
SQL Server high-availability mirroring
Database mirroring is a SQL Server technology that can deliver database redundancy on a per-database basis. In database mirroring, transactions are sent directly from a principal database and server to a mirror database and server when the transaction log buffer of the principal database is written to disk. This technique can keep the mirror database almost up to date with the principal database. SQL Server Enterprise Edition provides additional functionality that improves database mirroring performance.
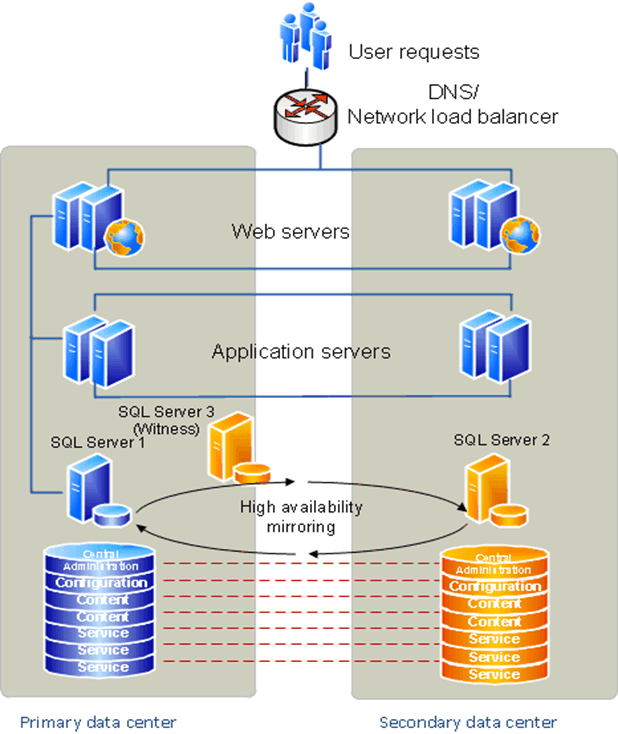
For mirroring within a SharePoint Foundation farm, you must use high-availability mirroring, also known as high-safety mode with automatic failover. High-availability database mirroring involves three server instances: a principal, a mirror, and a witness. The witness server enables SQL Server to automatically fail over from the principal server to the mirror server. Failover from the principal database to the mirror database typically takes several seconds.
A change from previous versions is that SharePoint Foundation is mirroring-aware. After you have configured a database mirror instance of SQL Server, you then use SharePoint Central Administration or Windows PowerShell cmdlets to identify the failover (mirror) database server location for a configuration database, content database, or service application database. Setting a failover database location adds a parameter to the connection string that SharePoint Foundation uses to connect to SQL Server. In the event of a SQL Server time-out event, the following occurs:
- The witness server that is configured for SQL Server mirroring automatically swaps the roles of the primary and mirror databases.
- SharePoint Foundation automatically attempts to contact the server that is specified as the failover database.
For information about how to configure database mirroring, see Configure availability by using SQL Server database mirroring (SharePoint Foundation 2010).
For general information about database mirroring, see Database Mirroring (http://go.microsoft.com/fwlink/?LinkID=180597).
|
|
|
Databases that have been configured to use the SQL Server FILESTREAM remote BLOB store provider cannot be mirrored. |

Comparison of database availability strategies for a single farm: SQL Server failover clustering vs. SQL Server high-availability mirroring
The following table compares failover clustering to synchronous SQL Server high-availability mirroring.
|
SQL Server failover clustering |
SQL Server high-availability mirroring |
|
|
Time to failover |
Cluster member takes over immediately upon failure. |
Mirror takes over immediately upon failure. |
|
Transactional consistency? |
Yes |
Yes |
|
Transactional concurrency? |
Yes |
Yes |
|
Time to recovery |
Shorter time to recovery (milliseconds) |
Slightly longer time to recovery (milliseconds). |
|
Steps required for failover? |
Failure is automatically detected by database nodes; SharePoint Foundation 2010 references the cluster so that failover is seamless and automatic. |
Failure is automatically detected by the database; SharePoint Foundation 2010 is aware of the mirror location, if it has been configured correctly, so that failover is automatic. |
|
Protection against failed storage? |
Does not protect against failed storage, because storage is shared between nodes in the cluster. |
Protects against failed storage because both the principal and mirror database servers write to local disks. |
|
Storage types supported |
Shared storage (more expensive). |
Can use less-expensive direct-attached storage (DAS). |
|
Location requirements |
Members of the cluster must be on the same subnet. |
Principal, mirror, and witness servers must be on the same LAN (up to 1 millisecond latency roundtrip). |
|
Recovery model |
SQL Server full recovery model recommended. You can use the SQL Server simple recovery model, but the only available recovery point if the cluster is lost will be the last full backup. |
Requires SQL Server full recovery model. |
|
Performance overhead |
Some decrease in performance may occur while a failover is occurring. |
High-availability mirroring introduces transactional latency because it is synchronous. It also requires additional memory and processor overhead. |
|
Operational burden |
Set up and maintained at the server level. |
The operational burden is larger than clustering. Must be set up and maintained for all databases. Reconfiguring after failover is manual. |
Service application redundancy strategies
The redundancy strategy you follow for protecting service applications that run in a farm varies, depending on where the service application stores data.
Service applications that store data in databases
To help protect service applications that store data in databases, you must follow these steps:
- Install the service on multiple application servers to provide redundancy within the environment.
- Configure SQL Server clustering or mirroring to protect the data.
The following service applications store data in databases:
- Business Data Connectivity service application
-
Application Registry service application
We do not recommend mirroring the Application Registry database, because it is only used when upgrading Windows SharePoint Services 3.0 Business Data Catolog information to SharePoint Foundation 2010.
- Usage and Health Data Collection service application
|
|
|
We recommend that you do not mirror the Usage and Health Data Collection service application Logging database. |

- Microsoft SharePoint Foundation Subscription Settings service
-
Redundancy and failover between closely located data centers configured as a single farm (“stretched” farm)
Some enterprises have data centers that are located close to one another with high-bandwidth connections so that they can be configured as a single farm. This is called a “stretched” farm. For a stretched farm to work, there must be less than 1 millisecond latency between SQL Server and the front-end Web servers in one direction, and at least 1 gigabit per second bandwidth.
In this scenario, you can provide fault tolerance by following the standard guidance for making databases and service applications redundant. The following illustration shows a stretched farm.
Stretched farm
-
Plan for disaster recovery (SharePoint Foundation 2010)
Updated: March 3, 2011
This article describes key decisions in choosing disaster recovery strategies for a Microsoft SharePoint Foundation 2010 environment.
In this article:
-
Disaster recovery overview
For the purposes of this article, we define disaster recovery as the ability to recover from a situation in which a data center that hosts SharePoint Foundation becomes unavailable.
The disaster recovery strategy that you use for SharePoint Foundation must be coordinated with the disaster recovery strategy for the related infrastructure, including Active Directory domains, Exchange Server, and Microsoft SQL Server. Work with the administrators of the infrastructure that you rely on to design a coordinated disaster recovery strategy and plan.
The time and immediate effort to get another farm up and running in a different location is often referred to as a hot, warm, or cold standby. Our definitions for these terms are as follows:
Hot standby A second data center that can provide availability within seconds or minutes.
Warm standby A second data center that can provide availability within minutes or hours.
Cold standby A second data center that can provide availability within hours or days.
Disaster recovery can be one of the more expensive requirements for a system. The shorter the interval between failure and availability and the more systems you protect, the more complex and costly a disaster recovery solution is likely to be.
When you invest in hot or warm standby data centers, costs include:
- Additional hardware and software, which often increase the complexity of operations between software applications, such as custom scripts for failover and recovery.
- Additional operational complexity.
The costs of maintaining hot or warm standby data centers should be evaluated based on your business needs. Not all solutions within an organization are likely to require the same level of availability after a disaster. You can offer different levels of disaster recovery for different content, services, or farms — for example, content that has high impact on your business, or search services, or an Internet publishing farm.
Disaster recovery is a key area in which information technology (IT) groups offer service level agreements (SLAs) to set expectations with customer groups. Many IT organizations offer a variety of SLAs that are associated with different chargeback levels.
When you implement failover between server farms, we recommend that you first deploy and tune the core solution within a farm, and then implement and test disaster recovery.
-
Choose a disaster recovery strategy
You can choose among many approaches to provide disaster recovery for a SharePoint Foundation environment, depending on your business needs. The following examples show why companies might choose cold, warm, or hot standby disaster recovery strategies.
-
Cold standby disaster recovery strategy: A business ships backups to support bare metal recovery to local and regional offsite storage on a regular basis, and has contracts in place for emergency server rentals in another region.
Pros:
- Often the cheapest option to maintain, operationally.
-
Often an expensive option to recover, because it requires that physical servers be configured correctly after a disaster has occurred.
Cons: The slowest option to recover.
-
Warm standby disaster recovery strategy: A business ships virtual server images to local and regional disaster recovery farms.
Pros: Often relatively inexpensive to recover, because a virtual server farm can require little configuration upon recovery.
Cons: Can be very expensive and time consuming to maintain.
-
Hot standby disaster recovery strategy: A business runs multiple data centers, but serves content and services through only one data center.
Pros: Often relatively fast to recover.
Cons: Can be quite expensive to configure and maintain.

Important:No matter which disaster recovery solution you decide to implement for your environment, you are likely to incur some data loss.
-
-
Planning for cold standby data centers
In a cold standby disaster recovery scenario, you can recover by setting up a new farm in a new location, (preferably by using a scripted deployment), and restoring backups. Or, you can recover by restoring a farm from a backup solution such as Microsoft System Center Data Protection Manager 2007 that protects your data at the computer level and lets you restore each server individually. This article does not contain detailed instructions for how to create and recover in cold standby scenarios. For more information, see:
-
Planning for warm standby data centers
In a warm standby disaster recovery scenario, you can create a warm standby solution by making sure that you consistently and frequently create virtual images of the servers in your farm that you ship to a secondary location. At the secondary location, you must have an environment available in which you can easily configure and connect the images to re-create your farm environment.
This article does not contain detailed instructions for creating warm standby solutions. For more information about how to plan to deploy farms by using virtual solutions, see Plan for virtualization (SharePoint Foundation 2010) (http://technet.microsoft.com/library/4cf78c3a-d466-4a69-a067-af03ae069749(Office.14).aspx).
-
Planning for hot standby data centers
In a hot standby disaster recovery scenario, you can set up a failover farm to provide disaster recovery in a separate data center from the primary farm. An environment that has a separate failover farm has the following characteristics:
- A separate configuration database and Central Administration content database must be maintained on the failover farm.
- All customizations must be deployed on both farms.

Note:We recommend that you use scripted deployment to create the primary and failover farm by using the same configuration settings and customizations.
- Updates must be applied to both farms, individually.
- SharePoint Foundation content databases can be successfully asynchronously mirrored or log-shipped to the failover farm.

Note:SQL Server mirroring can only be used to copy databases to a single mirror server, but you can log-ship to multiple secondary servers.
- Service applications vary in whether they can be log-shipped to a farm. For more information, see Service application redundancy across data centers later in this article.
This topology can be repeated across many data centers, if you configure SQL Server log shipping to one or more additional data centers.
Consult with your SAN vendor to determine whether you can use SAN replication or another supported mechanism to provide availability across data centers. The following illustration shows primary and failover farms before failover.
Primary and failover farms before failover

Service application redundancy across data centers
To provide availability across data centers for service applications, we recommend that for the services that can be run cross-farm, you run a separate services farm that can be accessed from both the primary and the secondary data centers.
For services that cannot be run cross-farm, and to provide availability for the services farm itself, the strategy for providing redundancy across data centers for a service application varies. The strategy employed depends on whether:
- There is business value in running the service application in the disaster recovery farm when it is not in use.
- The databases associated with the service application can be log-shipped or asynchronously mirrored.
- The service application can run against read-only databases.
The following sections describe the disaster recovery strategies that we recommend for each service application. The service applications are grouped by strategy.
Databases that can be log-shipped or asynchronously mirrored
After a service application has been initially deployed on a secondary farm, the databases that support the following service applications can be asynchronously mirrored or log-shipped across farms:
-
Application Registry service application
Databases: Application Registry service
-
Usage and Health Data Collection service application
Databases: Logging

Note:It is possible to log-ship or mirror the Logging database. However, we recommend that you do not run the Usage and Health Data Collection service on the disaster recovery farm, and that you do not mirror nor log-ship the Logging database.
Service applications and databases that cannot be log-shipped or asynchronously mirrored
The following service applications must be deployed on both the primary and failover farms, and cannot be log-shipped or asynchronously mirrored. For most of these service applications, we recommend that you deploy them and then verify that the failover farm has the same configuration settings as the primary farm. If configuration changes that affect the service are made on the primary farm, you must update the failover farm.
-
Business Data Connectivity service application
Databases: Business Data Connectivity
-
Microsoft SharePoint Foundation Subscription Settings service application
Database: Subscription Settings

Note:Log-shipping the Subscription Settings database is not supported.
-
System requirements for disaster recovery
In an ideal scenario, the failover components and systems match the primary components and systems in all ways: platform, hardware, and number of servers. At a minimum, the failover environment must be able to handle the traffic that you expect during a failover. Keep in mind that only a subset of users may be served by the failover site. The systems must match in at least the following:
- Operating system version and all updates
- SQL Server versions and all updates
- SharePoint 2010 Products versions and all updates
Although this article primarily discusses the availability of SharePoint 2010 Products, the system uptime will also be affected by the other components in the system. In particular, make sure that you do the following:
- Ensure that infrastructure dependencies such as power, cooling, network, directory, and SMTP are fully redundant.
- Choose a switching mechanism, whether DNS or hardware load balancing, that meets your needs.
-
Backup (SharePoint Foundation 2010)
Published: May 12, 2010
The articles in this section are written to meet the requirements of information technology (IT) professionals who are responsible for the planning, design, deployment, and operations of backup and recovery solutions. These solutions might be in enterprise, corporate, or branch office environments. The IT professionals who are responsible for backup and recovery solutions are expected to have an understanding of the technical details that are contained in this section.
A backup is a copy of data that is used to restore and recover that data after a system failure. Backups allow you to restore data after a failure. If you make the appropriate backups, you can recover from many system failures, including the following:
- Media failure
- User errors (such as deleting a file by mistake)
- Hardware failures (such as a damaged hard disk or permanent loss of a server)
- Natural disasters
Additionally, it is useful to keep backups of data for routine purposes. Those purposes include copying a database from one server to another, setting up database mirroring, and archiving to comply with regulatory requirements.
-
Back up all or part of a farm
The following tasks for backup and recovery are performed on the entire farm, farm databases, sites, subsites, or files:
-
This article describes the procedures that you can use to back up the entire farm.
-
This article describes the procedures that you can use to back up farm configuration settings.
-
This article describes the procedures that you can use to copy configuration settings from one farm to another, including how to back up and recover a farm without the content databases, how to back up and recover configurations only, and how to create a deployment script.
-
This article describes the procedures that you can use to back up a Web application that is associated with the farm, including configuration and content databases.
-
This article describes the procedures that you can use to back up a service application that is associated with the farm, including configuration and content databases.
-
This article describes the procedures that you can use to back up a site collection that is associated with the farm.
-
This article describes the procedures that you can use to back up a content database that is associated with the farm.
-
This article describes the procedures that you can use to back up a content database that is associated with the farm by saving the database to a snapshot.
-
This article describes the procedures that you can use to back up customizations that are associated with the farm.
-
This article describes the procedures that you can use to export a list, site, or document library that is associated with the farm. You can then import the items into another farm or move them to another place in this farm.
-
This article describes the procedures that you can use to back up or archive log files that are associated with the farm.
-
-
Concepts
Recovery (SharePoint Foundation 2010)
-
Back up a farm (SharePoint Foundation 2010)
Updated: September 16, 2010
This topic describes how to back up a whole server farm.
Procedures in this task:
- Use Windows PowerShell to back up a farm
- Use Central Administration to back up a farm
- Use SQL Server tools to back up a farm
For information about which tool to use for backups, see Plan for backup and recovery (SharePoint Foundation 2010).
We recommend that you regularly back up the complete farm by backing up both the configuration and content. Regularly backing up the farm reduces the possibility of data losses that might occur from hardware failures, power outages, or other problems. It is a simple process and helps to ensure that all the farm data and configurations are available for recovery, if that is required.
-
Considerations when backing up a farm
Consider the following when you prepare to back up a farm:
- Performing a backup does not affect the state of the farm. However, it does require resources and might slightly affect farm performance when the backup is running. You can avoid performance issues by backing up the farm during hours when farm use is lowest, such as outside office hours.
- The farm backup process does not back up any certificates that you used to form trust relationships. Endure that you have copies of these certificates before you back up the farm. You must re-establish these trust relationships after restoring the farm.
- Backing up the farm backs up the configuration and Central Administration content databases, but these cannot be restored using Microsoft SharePoint Foundation 2010 tools. For more information about backing up and restoring all the farm databases, see Move all databases (SharePoint Foundation 2010) (http://technet.microsoft.com/library/0aaf3261-f06b-4f4f-96d0-96fecdf78bc6(Office.14).aspx).
- When you back up a farm that contains a Web application that is configured to use forms-based authentication, you must also use a file backup system to protect the Web.config files because the Web.config files have been updated manually to register the membership and role providers, and manual changes to the Web.config files are not backed up. Similarly, Web.config files are not restored when you restore a Web application. After recovery, you must update the Web.config files and redeploy the providers. For more information, see Plan authentication methods (SharePoint Foundation 2010) (http://technet.microsoft.com/library/b6bc8fec-c11c-4ed7-a78d-3ad61c7ef6c0(Office.14).aspx) and Configure claims authentication (SharePoint Foundation 2010) (http://technet.microsoft.com/library/ef8c3024-26de-4d06-9204-3c6bbb95fb14(Office.14).aspx).
-
SharePoint Foundation 2010 backup backs up the Business Data Connectivity service external content type definitions but does not back up the data source itself. To protect the data, you should back up the data source when you back up the Business Data Connectivity service or the farm.
If you restore the Business Data Connectivity service or the farm and then restore the data service to a different location, you must change the location information in the external content type definition. If you do not, the Business Data Connectivity service might not be able to locate the data source.
-
SharePoint Foundation 2010 backup backs up remote Binary Large Object (BLOB) stores but only if you are using the FILESTREAM remote BLOB store provider to put data in remote BLOB stores.
If you are using another provider, you must manually back up the remote BLOB stores.
- If you are using SQL Server with Transparent Data Encryption (TDE), and you are backing up your environment by using either SharePoint tools or SQL Server tools, the TDE encryption key in not backed up or restored. You must back up the key manually. When restoring, you must manually restore the key before restoring the data. For more information, see Understanding Transparent Data Encryption (TDE) (http://go.microsoft.com/fwlink/?LinkID=196394).
-
Task requirements
Before you begin, you must create a folder on the local computer or the network in which to store the backups. For better performance, we recommend that you back up to the local computer and then move the backup files to a network folder. For more information about how to create a backup folder, see Prepare to back up and recover (SharePoint Foundation 2010) (http://technet.microsoft.com/library/cca219c4-4930-454b-9d6e-3ce1ad4799f5(Office.14).aspx).
-
Use Windows PowerShell to back up a farm
You can use Windows PowerShell to back up the farm manually or as part of a script that can be run at scheduled intervals.
To back up a farm by using Windows PowerShell
- Verify that you meet the following minimum requirements: See Add-SPShellAdmin.
- On the Start menu, click All Programs.
- Click Microsoft SharePoint 2010 Products.
- Click SharePoint 2010 Management Shell.
- At the Windows PowerShell command prompt, type the following command:
|
Backup-SPFarm -Directory <BackupFolder> -BackupMethod {Full | Differential} [-Verbose] |
Where <BackUpFolder> is the path of a folder on the local computer or the network in which you want to store the backups.
|
|
|
If you are backing up the farm for the first time, you must use the Full option. You must perform a full backup before you can perform a differential backup. |

For more information, see Backup-SPFarm (http://technet.microsoft.com/library/c37704b5-5361-4090-a84d-fcdd17bbe345(Office.14).aspx).
|
|
|
We recommend that you use Windows PowerShell when performing command-line administrative tasks. The Stsadm command-line tool has been deprecated, but is included to support compatibility with previous product versions. |

-
Use Central Administration to back up a farm
You can use Central Administration to back up the farm.
To back up a farm by using Central Administration
- To perform this procedure, you must be a member of the Farm Administrators group on the computer that is running Central Administration.
- In Central Administration, on the Home page, in the Backup and Restore section, click Perform a backup.
- On the Perform a Backup — Step 1 of 2: Select Component to Back Up page, select the farm from the list of components, and then click Next.
- On the Start Backup — Step 2 of 2: Select Backup Options page, in the Backup Type section, select either Full or Differential.
|
|
|
If you are backing up the farm for the first time, you must use the Full option. You must perform a full backup before you can perform a differential backup. |

- In the Back Up Only Configuration Settings section, click Back up content and configuration settings.
- In the Backup File Location section, type the UNC path of the backup folder, and then click Start Backup.
-
You can view the general status of all backup jobs at the top of the Backup and Restore Status page in the Readiness section. You can view the status for the current backup job in the lower part of the page in the Backup section. The status page updates every 30 seconds automatically. You can manually update the status details by clicking Refresh. Backup and recovery are Timer service jobs. Therefore, it may take several seconds for the backup to start.
If you receive any errors, you can review them in the Failure Message column of the Backup and Restore Job Status page. You can also find more details in the Spbackup.log file at the UNC path that you specified in step 6.
-
Use SQL Server tools to back up a farm
If you want to back up the complete farm, you must use either Windows PowerShell or Central Administration. You cannot back up the complete farm by using the SQL Server tools because you cannot use the tools to back up the farm’s configuration. However, you can back up all the databases that are associated with the farm.
To back up the databases associated with a farm by using SQL Server tools
- To use SQL Server tools to back up SharePoint Foundation 2010 databases, the account that is used to back up the databases must be a member of the SQL Server db_backupoperator fixed database role on the database server where each database is stored.
- Open SQL Server Management Studio and connect to the database server.
- In Object Explorer, expand Databases.
- Right-click the database that you want to back up, point to Tasks, and then click Back Up.
- In the Back Up Database dialog box, in the Source area, select the kind of backup that you want to perform from the Backup type list. For more information about which backup type to use, see Overview of Recovery Models (http://go.microsoft.com/fwlink/?LinkId=114396).
- In the Backup component area, click Database.
- Either use the default name provided or specify a name for the backup set in the Name text box.
- Specify the expiration date for the backup set. This date determines how long, or when, the backup set can be overwritten by any later backups that have the same name. By default, the backup set is set to never expire (0 days).
- In the Destination area, specify where you want to store the backup.
- Click OK to back up the database.
- Repeat steps 1-10 for each farm database.
-
Related content
-
Back up a farm configuration (SharePoint Foundation 2010)
Published: May 12, 2010
This article describes how to back up the configuration of a server farm.
In earlier versions of Microsoft SharePoint Foundation, you could not back up or restore the configuration database. In Microsoft SharePoint Foundation 2010, you can perform the equivalent operation by backing up or restoring the configuration of the server farm.
We recommend that you regularly back up the complete farm by backing up both the configuration and content. However, you might want to perform configuration-only backups in test or development environments. Similarly, if you are using Microsoft SQL Server tools to back up the databases for the farm, you will want to back up the configuration. Regularly backing up the farm reduces the possibility of data losses that can occur from hardware failures, power outages, or other problems. It helps to ensure that all the farm data and configurations are available for recovery. For more information about what to back up, see Plan for backup and recovery (SharePoint Foundation 2010).
The configuration backup will extract and back up the configuration settings from a SharePoint Foundation 2010 configuration database. You can back up configuration from any configuration database that includes the configuration database for the current farm or another farm, or a configuration database that is not associated with any farm.
For information about which tool to use for backups, see Plan for backup and recovery (SharePoint Foundation 2010).
Procedures in this task:

Note:You cannot use either SQL Server tools or Data Protection Manager to back up the farm configuration.
-
Task requirements
Before you begin, you must create a folder on the local computer or the network in which to store the backups. For better performance, we recommend that you back up to the local computer and then move the backup files to a network folder. For more information about how to create a backup folder, see Prepare to back up and restore (SharePoint Foundation) (http://technet.microsoft.com/library/cca219c4-4930-454b-9d6e-3ce1ad4799f5(Office.14).aspx).

Important:Backing up the farm configuration will not back up the information you have to have to restore service applications. If you want to restore a service application, you must perform a configuration and content backup of the farm. For more information about backing up service applications, see Back up a service application (SharePoint Foundation 2010).
-
Use Windows PowerShell to back up a farm configuration
You can use Windows PowerShell to back up the configuration from any configuration database on the current farm, on another farm, or from a configuration database that is not associated with any farm. You can back up a farm configuration manually or as part of a script that can be run at scheduled intervals.
To back up the configuration from any configuration database by using Windows PowerShell
- Verify that you meet the following minimum requirements: See Add-SPShellAdmin.
- On the Start menu, click All Programs.
- Click Microsoft SharePoint 2010 Products.
- Click SharePoint 2010 Management Shell.
- At the Windows PowerShell command prompt (that is, PS C:\>), type the following command, and then press ENTER:
|
Backup-SPConfigurationDatabase -Directory <BackupFolder> -DatabaseServer <DatabaseServerName> -DatabaseName <DatabaseName> -DatabaseCredentials <WindowsPowerShellCredentialObject> [-Verbose] |
Where:
- <BackupFolder> is the path to the folder with the correct backup files.
- <DatabaseServerName> is the name of the database server for the farm that you are backing up.
- <DatabaseName> is the name of the farm configuration database.
-
If you are not logged on with an account with db_backupoperator fixed database role on the database server where the configuration database is stored, you must specify the value for DatabaseCredentials
parameter.
For more information, see Backup-SPConfigurationDatabase (http://technet.microsoft.com/library/28ddc176-1b7f-47dd-868f-39b7c403a900(Office.14).aspx).
|
|
|
We recommend that you use Windows PowerShell when performing command-line administrative tasks. The Stsadm command-line tool has been deprecated, but is included to support compatibility with previous product versions. |

-
Use Central Administration to back up a farm configuration
You can use Central Administration to back up the configuration of the farm that Central Administration is running on. To back up the configuration of a remote farm, you must use the Central Administration Web site that is running on the remote farm. You cannot use Central Administration to back up an unattached configuration database.
To back up a farm configuration by using Central Administration
- Verify that the user account performing this procedure is a member of the Farm Administrators group.
- On the Central Administration Home page, in the Backup and Restore section, click Perform a backup.
- On the Perform a Backup — Step 1 of 2: Select Component to Back Up page, select the farm from the list of components, and then click Next.
|
|
|
You can back up the configuration for any service or application. However, common practice is to back up configuration at the farm level. |

- On the Start Backup — Step 2 of 2: Select Backup Options page, in the Backup Type section, select Full.
- In the Backup Only Configuration Settings section, select the Backup only configuration settings option.
- In the Backup File Location section, type the Universal Naming Convention (UNC) path of the backup folder, and then click Start Backup.
- You can view the general status of all backup jobs at the top of the Backup and Restore Job Status page in the Readiness section. You can view the status for the current backup job in the lower part of the page in the Backup section. The status page updates every 30 seconds automatically. You can manually refresh the status details by clicking Refresh. Backup and recovery are Timer service jobs. Therefore, it may take several seconds for the backup to start.
If you receive any errors, you can review them in the Failure Message column of the Backup and Restore Job Status page. You can also find more details in the Spbackup.log file at the UNC path that you specified in step 5.
-
Concepts
Restore a farm configuration (SharePoint Foundation 2010)
-
Back up a Web application (SharePoint Foundation 2010)
Updated: September 16, 2010
This article describes how to back up a Web application. Regularly backing up a Web application reduces the possibility of data losses that might occur from hardware failures, power outages, or other problems. It is a simple process that can help to ensure that all the Web application-related data and configurations are available for recovery, if that is required. We recommend that Web application backups be created in addition to regular backups at the farm level.
This topic describes how to back up a single Web application.
In this topic:
-
Considerations when backing up a Web application
Consider the following when you prepare to back up a Web application.
- You can back up only one Web application at a time by using the procedures in this article. However, you can simultaneously back up all Web applications by backing up the entire farm.
- Backing up a Web application does not affect the state of the farm. However, it does require resources and might slightly affect farm performance when the backup is running. You can avoid performance issues by backing up the Web application during hours when farm use is lowest, such as outside office hours.
- If the Web application uses the object cache, you must manually configure two special user accounts for the Web application after you restore the Web application. For more information about the object cache and how to configure these user accounts, see Configure object cache user accounts (http://technet.microsoft.com/library/cd646bb3-28c6-4040-866c-7d7936837ade(Office.14).aspx).
- When you back up a Web application, the Internet Information Services (IIS) settings and all content databases that are associated with the Web application are also backed up.
- When you back up a Web application that is configured to use forms-based authentication, you must also use a file backup system to protect the Web.config files because the Web.config files have been updated manually to register the membership and role providers, and manual changes to the Web.config files are not backed up. Similarly, Web.config files are not restored when you restore a Web application. After recovery, you must update the Web.config files and redeploy the providers. For more information, see Plan authentication methods (SharePoint Foundation 2010) (http://technet.microsoft.com/library/b6bc8fec-c11c-4ed7-a78d-3ad61c7ef6c0(Office.14).aspx) and Configure claims authentication (SharePoint Foundation 2010) (http://technet.microsoft.com/library/ef8c3024-26de-4d06-9204-3c6bbb95fb14(Office.14).aspx).
-
Task requirements
Before you begin, you must create a network folder in which to store the backups. Both the Windows SharePoint Services Timer V4 service account and the server farm user account must have Full Control permissions to this folder. For more information about how to create a backup folder, see Prepare to backup and recover (SharePoint Foundation) (http://technet.microsoft.com/library/cca219c4-4930-454b-9d6e-3ce1ad4799f5(Office.14).aspx).
-
Use Windows PowerShell to back up a Web application
You can use Windows PowerShell to back up a Web application manually or as part of a script that can be run at scheduled intervals.
To back up a Web application by using Windows PowerShell
- Verify that you meet the following minimum requirements: See Add-SPShellAdmin. Additionally, the user account performing this procedure must be a member of the SQL Server db_backupoperator fixed database role on the database server where each database is stored.
- On the Start menu, click All Programs.
- Click Microsoft SharePoint 2010 Products.
- Click SharePoint 2010 Management Shell.
- At the Windows PowerShell command prompt (that is, PS C:\>), type the following command, and then press ENTER:
|
Backup-SPFarm -Directory <BackupFolder> -BackupMethod {Full | Differential} -Item <WebApplicationName> [-Verbose] |
Where:
- <BackupFolder> is the path of the folder you use for storing backup files.
- <WebApplicationName> is the name of the Web application.
|
|
|
If you are backing up the Web application for the first time, you must use the Full option. You must perform a full backup before you can perform a differential backup. |

For more information, see Backup-SPFarm (http://technet.microsoft.com/library/c37704b5-5361-4090-a84d-fcdd17bbe345(Office.14).aspx).
|
|
|
We recommend that you use Windows PowerShell when performing command-line administrative tasks. The Stsadm command-line tool has been deprecated, but is included to support compatibility with previous product versions. |

-
Use Central Administration to back up a Web application
You can use Central Administration to back up a Web application.
To back up a Web application by using Central Administration
- Verify that the user account that is performing this procedure is a member of the Farm Administrators group.
- In Central Administration, on the Home page, in the Backup and Restore section, click Perform a backup.
- On the Perform a Backup — Step 1 of 2: Select Component to Back Up page, select the Web application from the list of components, and then click Next.
|
|
|
The Web application might consist of several components. You must select the top-level component. |

- On the Start Backup — Step 2 of 2: Select Backup Options page, in the Backup Type section, select either Full or Differential.
|
|
|
If you are backing up the Web application for the first time, you must use the Full option. You must perform a full backup before you can perform a differential backup. |

- In the Back Up Only Configuration Settings section, click Back up content and configuration settings.
- In the Backup File Location section, type the Universal Naming Convention (UNC) path of the backup folder, and then click Start Backup.
-
You can view the general status of all backup jobs at the top of the Backup and Restore Job Status page in the Readiness section. You can view the status for the current backup job in the lower part of the page in the Backup section. The status page updates every 30 seconds automatically. You can manually update the status details by clicking Refresh. Backup and recovery are Timer service jobs. Therefore, it may take several seconds for the backup to start.
If you receive any errors, you can review them in the Failure Message column of the Backup and Restore Job Status page. You can also find more details in the Spbackup.log file at the UNC path that you specified in step 6.
-
Use SQL Server tools to back up a Web application
You cannot back up the complete Web application by using SQL Server tools. However, you can back up all the databases that are associated with the Web application. To back up the complete Web application, use either Windows PowerShell or Central Administration.
To back up a Web application by using SQL Server tools
- Verify that the user account that is used to back up the databases is a member of the SQL Server db_backupoperator fixed database role on the database server where each database is stored. Additionally, verify that the user account has Full Control permissions on the backup folder.
- Open SQL Server Management Studio and connect to the database server.
- In Object Explorer, expand Databases.
- Right-click the database that you want to back up, point to Tasks, and then click Back Up.
- In the Back Up Database dialog box, in the Source area, select the kind of backup that you want to perform from the Backup type list. For more information about which backup type to use, see Overview of Recovery Models (http://go.microsoft.com/fwlink/?LinkId=114396).
- In the Backup component area, click Database.
- Either use the default name provided or specify a name for the backup set in the Name text box.
- Specify the expiration date for the backup set. This date determines how long, or when, the backup set can be overwritten by any later backups that have the same name. By default, the backup set is set to never expire (0 days).
- In the Destination area, specify where you want to store the backup.
- Click OK to back up the database.
- Repeat steps 1-10 for each database that is associated with the Web application.
-
Related content
-
Back up a service application (SharePoint Foundation 2010)
Published: May 12, 2010
We recommend that you regularly back up at the farm level. However, business or IT requirements might require that you back up a service application. Regularly backing up a service application reduces the possibility of data losses that might occur from hardware failures, power outages, or other problems. It is a simple process that helps to ensure that all the service application-related data and configurations are available for recovery, if that is required. You can back up one service application at a time, or you can back up all service applications at once.
For information about what to back up and which tools to use, see Plan for backup and recovery (SharePoint Foundation 2010). For more information, see Back up a farm (SharePoint Foundation 2010).
Backing up a service application does not affect the state of the farm. However, it does require resources. Therefore, backing up a service application might affect farm performance while the backup is running. You can avoid performance issues by backing up the service application during hours when farm use is lowest.

Note:SharePoint Foundation 2010 backup backs up remote Binary Large Object (BLOB) stores but only if you are using the FILESTREAM remote BLOB store provider to put data in remote BLOB stores.
If you are using another provider, you must manually back up the remote BLOB stores.
Procedures in this topic:
- Use Windows PowerShell to back up a service application
- Use Central Administration to back up a service application

Note:You cannot use SQL Server tools or Data Protection Manager to back up a service application.
-
Task requirements
Before you begin, you must create a folder on the local computer or the network in which to store the backups. For better performance, we recommend that you back up to the local computer and then move the backup files to a network folder. For more information about how to create a backup folder, see Prepare to backup and recover (SharePoint Foundation) (http://technet.microsoft.com/library/cca219c4-4930-454b-9d6e-3ce1ad4799f5(Office.14).aspx).

Note:Microsoft SharePoint Foundation 2010 backup backs up the Business Data Connectivity service external content type definitions but does not back up the data source itself. To protect the data, you should back up the data source when you back up the Business Data Connectivity service or the farm.
If you back up the Business Data Connectivity service or the farm and then restore the data source to a different location, you must change the location information in the external content type definition. If you do not, the Business Data Connectivity service might not be able to locate the data source.
-
Use Windows PowerShell to back up a service application
You can use Windows PowerShell to back up one or more service applications manually or as part of a script that can be run at scheduled intervals.
To back up a service application by using Windows PowerShell
- Verify that you meet the following minimum requirements: See Add-SPShellAdmin.
- On the Start menu, click All Programs.
- Click Microsoft SharePoint 2010 Products.
- Click SharePoint 2010 Management Shell.
-
At the Windows PowerShell command prompt, type the following command:
Backup-SPFarm -Directory <BackupFolder> -BackupMethod {Full | Differential} -Item <ServiceApplicationName> [-Verbose]
Where:
- <BackupFolder> is the path of a folder on the local computer or on the network in which you want to store the backups.
- <ServiceApplicationName> is the name of the service application that you want to back up.
|
|
|
To back up all the service applications, at the Windows PowerShell command prompt, type the following command: Backup-SPFarm -Directory <BackupFolder> -BackupMethod {Full | Differential} -Item “Farm\Shared Service Applications” [-Verbose] |
|
|
|
If you are backing up the service application for the first time, you must use the Full option. You must perform a full backup before you can perform a differential backup. Some service applications always require a full backup. For these service applications, even if you select the Differential option, the system performs a full backup. |


For more information, see Backup-SPFarm (http://technet.microsoft.com/library/c37704b5-5361-4090-a84d-fcdd17bbe345(Office.14).aspx).
|
|
|
We recommend that you use Windows PowerShell when performing command-line administrative tasks. The Stsadm command-line tool has been deprecated, but is included to support compatibility with previous product versions. |

-
Use Central Administration to back up a service application
You can use Central Administration to back up a service application.
To back up a service application by using Central Administration
- Verify that the user account that performs this procedure is a member of the Farm Administrators group.
- In Central Administration, on the Home page, in the Backup and Restore section, click Perform a backup.
- On the Perform a Backup — Step 1 of 2: Select Component to Back Up page, select the service application from the list of components, and then click Next. To back up all the service applications, select the Shared Service Applications node.
|
|
|
The service application might consist of several components. You must select the top-level component. |

- On the Start Backup — Step 2 of 2: Select Backup Options page, in the Backup Type section, select either Full or Differential.
|
|
|
If you are backing up the service application for the first time, you must use the Full option. You must perform a full backup before you can perform a differential backup. Some service applications always require a full backup. For these service applications, the system performs a full backup even if you select the Differential option. |

- In the Backup File Location section, in the Backup location box, type the path of the backup folder, and then click Start Backup.
-
You can view the general status of all backup jobs at the top of the Backup and Restore Job Status page in the Readiness section. You can view the status for the current backup job in the lower part of the page in the Backup section. The status page updates every 30 seconds automatically. You can manually update the status details by clicking Refresh. Backup and recovery are Timer service jobs. Therefore, it may take several seconds for the backup to start.
If you receive any errors, you can review them in the Failure Message column of the Backup and Restore Job Status page. You can also find more details in the Spbackup.log file at the UNC path that you specified in step 5.
-
Concepts
Restore a service application (SharePoint Foundation 2010)
-
Back up a site collection (SharePoint Foundation 2010)
Published: May 12, 2010
This article describes how to back up an individual site collection. We recommend that you regularly back up the complete farm. However, IT practices might require that you also back up a site collection. For more information about what to back up, see Plan for backup and recovery (SharePoint Foundation 2010).

Note:If the site collection’s Lock status is set to Not locked or Adding content prevented, Microsoft SharePoint Foundation 2010 temporarily sets the site to Read-Only while the backup operation is occurring. SharePoint Foundation 2010 does this to reduce the possibilities of users changing the site collection while it is being backed up. After the backup is finished, the setting is changed back its normal status.
Performing a site collection backup might require resources and might slightly affect farm performance when the backup is running. You can help avoid performance issues by backing up the farm during hours when farm use is lowest, such as outside office hours.
Procedures in this task:
-
Task requirements
Before you begin, you must create a folder on the local computer or the network in which to store the backups. For better performance, we recommend that you back up to the local computer and then move the backup files to a network folder.
For more information about how to create a backup folder, see Prepare to backup and recover (SharePoint Foundation) (http://technet.microsoft.com/library/cca219c4-4930-454b-9d6e-3ce1ad4799f5(Office.14).aspx).
-
Use Windows PowerShell to back up a site collection
You can use Windows PowerShell to back up a site collection manually or as part of a script that can be run at scheduled intervals.
To back up a site collection by using Windows PowerShell
- Verify that you meet the following minimum requirements: See Add-SPShellAdmin.
- On the Start menu, click All Programs.
- Click Microsoft SharePoint 2010 Products.
- Click SharePoint 2010 Management Shell.
-
At the Windows PowerShell command prompt type the following command:
Backup-SPSite -Identity <Site collection name> -Path <backup file> [-Force] [-NoSiteLock] [-UseSqlSnapshot] [-Verbose]
If you want to overwrite a previously used backup file, use the Force
parameter. You can use the NoSiteLock
parameter to keep the read-only lock from being set on the site collection while it is being backed up. However, using this parameter can allow users to change the site collection while it is being backed up and might lead to possible data corruption during backup.
If the database server is running an Enterprise Edition of Microsoft SQL Server, we recommend that you also use the UseSqlSnapshot
parameter for more consistent backups. You can also export sites or lists from these snapshots.
|
|
|
When you perform a backup that uses the UseSqlSnapshot parameter, a backup will be completed successfully. However, you will see an error similar to the following: Backup-SPSite : Operation is not valid due to the current state of the object. At line:1 char:14 + Backup-SPSite <<<< http://site -Path + CategoryInfo : NotSpecified: (:) [Backup-SPSite], InvalidOperationException + FullyQualifiedErrorId : System.InvalidOperationException,Microsoft.SharePoint.PowerShell.SPCmdletBackupSite\\yourpath |
|
|
|
If the RBS provider that you are using does not support snapshots, you cannot use snapshots for content deployment or backup. For example, the SQL FILESTREAM provider does not support snapshots. |


For more information about using SQL snapshots, see Back up databases to snapshots (SharePoint Foundation 2010).
For more information, see Backup-SPSite (http://technet.microsoft.com/library/d4c31a1a-82a7-425f-b1bb-22e70bedd338(Office.14).aspx).
|
|
|
We recommend that you use Windows PowerShell when performing command-line administrative tasks. The Stsadm command-line tool has been deprecated, but is included to support compatibility with previous product versions. |

-
Use Central Administration to back up a site collection
You can use Central Administration to back up a site collection.
To back up a site collection by using Central Administration
- Verify that the user account performing this procedure is a member of the Farm Administrators group. Additionally, verify that the Windows SharePoint Services Timer V4 service has Full Control permissions on the backup folder.
- In Central Administration, on the Home page, in the Backup and Restore section, click Perform a site collection backup.
- On the Site collection backup page, select the site collection from the Site Collection list.
- Type the local path of the backup file in the Filename box.
|
|
|
If you want to reuse a file, select the Overwrite existing file check box. |

- Click Start Backup.
-
You can view the general status of all backup jobs at the top of the Granular Backup Job Status page in the Readiness section. You can view the status for the current backup job in the lower part of the page in the Site Collection Backup section. The status page updates every 30 seconds automatically. You can manually update the status details by clicking Refresh. Backup and recovery are Timer service jobs. Therefore, it may take several seconds for the backup to start.
If you receive any errors, you can review them in the Failure Message column of the Granular Backup Job Status page.
-
Concepts
Restore a site collection (SharePoint Foundation 2010)
-
Back up customizations (SharePoint Foundation 2010)
Updated: August 12, 2010
This article describes how to back up customizations that have been made to Microsoft SharePoint Foundation 2010 sites.
The following kinds of customizations can be made to sites:
-
Customizations packaged as solutions (.wsp files). Solutions contain developed site elements, and are typically created by developers. Developed site elements include the following:
- Web Parts
- Workflows
- Site and list definitions
- Document converters
- Event receivers
- Timer jobs
- Assemblies
-
Authored site elements, which are typically created by Web designers, are not explicitly compiled and reside in a content database. Authored site elements include the following:
- Master pages
- Cascading style sheets
- Forms
- Layout pages
- Changes to the Web.config file
- Third-party solutions and their associated binary files and registry keys, such as IFilters
- Changes to sites created by direct editing through the browser
- Developed customizations that are not packaged as solutions
Each of these kinds of customizations requires a different type of backup.
In this article:
-
-
Backing up solution packages
Solution packages can be created by using Microsoft SharePoint Designer 2010 or Microsoft Visual Studio 2010. We strongly recommend that all customizations be deployed as solution packages.
A solution package is a deployable, reusable file that can contain a set of Features, site definitions, and assemblies that apply to sites, and that you can enable or disable individually. Solution packages can include Web Parts, site or list definitions, custom columns, new content types, custom fields, custom actions, coded workflows, or workflow activities and conditions.
The method that you use to back up solution packages is determined by whether the customizations are deployed as trusted solutions or sandboxed solutions.
Trusted solutions are solution packages that farm administrators deploy. Trusted solutions are deployed to the entire farm and can be used on any site within the farm. Trusted solutions are stored in the configuration database. Trusted solutions are backed up when a farm is backed up by using SharePoint Foundation 2010 backup, and are included in configuration-only backups. You can also back up trusted solutions as a group or individually. Trusted solutions are visible in the backup hierarchy.
Sandboxed solutions are solution packages that site collection administrators can deploy to a single site collection. Sandboxed solutions are stored in the content database that is associated with the site collection to which the solution packages are deployed. They are included in SharePoint Foundation 2010 farm, Web application, content database, and site collection backups, but are not visible in the backup hierarchy and cannot be selected or backed up individually.
We recommend that you keep a backup of the original .wsp file as well as the source code used to build the .wsp file for both trusted solutions and sandboxed solutions.
To back up trusted solutions by using Central Administration
- Verify that the user account that is performing this procedure is a member of the Farm Administrators group.
- In Central Administration, on the Home page, in the Backup and Restore section, click Perform a backup.
-
On the Perform a Backup — Step 1 of 2: Select Component to Back Up page, select Solutions, and then click Next.
You can also select an individual solution, if you only want to back up a single solution.
- On the Start Backup — Step 2 of 2: Select Backup Options page, in the Backup Type section, select either Full or Differential.
|
|
|
If you are backing up the solution for the first time, you must use the Full option. You must perform a full backup before you can perform a differential backup. |

- In the Backup File Location section, type the Universal Naming Convention (UNC) path of the backup folder, and then click Start Backup.
-
You can view the general status of all backup jobs at the top of the Backup and Restore Job Status page in the Readiness section. You can view the status of the current backup job in the lower part of the page in the Backup section. The status page updates every 30 seconds automatically. You can manually update the status details by clicking Refresh. Backup and recovery are Timer service jobs. Therefore, it may take several seconds for the backup to start.
If you receive any errors, review the Failure Message column of the Backup and Restore Job Status page. You can also find more details in the Spbackup.log file at the UNC path that you specified in step 4.
To back up trusted solutions by using Windows PowerShell
- Verify that you meet the following minimum requirements: See Add-SPShellAdmin.
- On the Start menu, click All Programs.
- Click Microsoft SharePoint 2010 Products.
- Click SharePoint 2010 Management Shell.
- At the Windows PowerShell command prompt, type the following command to back up all of the solutions in the farm. To back up a single solution, add the name of the solution to the item path “farm\solutions”.
|
Backup-SPFarm -backupmethod full -directory <UNC location> -item “farm\solutions” |
Where:
- <UNC location> is UNC location of the directory that you want to back up to.
For more information, see Backup-SPFarm (http://technet.microsoft.com/library/c37704b5-5361-4090-a84d-fcdd17bbe345(Office.14).aspx).
|
|
|
We recommend that you use Windows PowerShell when performing command-line administrative tasks. The Stsadm command-line tool has been deprecated, but is included to support compatibility with previous product versions. |

Backing up sandboxed solutions
You cannot back up only sandboxed solutions. Instead, you must back up the farm, Web application, or content database with which the sandboxed solution is associated. For more information about these methods of backing up, see Related content.
-
Backing up authored site elements
You cannot back up only authored site elements. Instead, you must back up the farm, Web application, or content database with which the authored site element is associated. For more information about these methods of backing up, see Related content.
-
Backing up workflows
Workflows are a special case of customizations that you can back up. Make sure that your backup and recovery plan addresses any of the following scenarios that apply to your environment:
- Declarative workflows, such as those created in Microsoft SharePoint Designer 2010, are stored in the content database for the site collection to which they are they are deployed. Backing up the content database protects these workflows.
- Custom declarative workflow actions have components in the following three locations:
- The Visual Studio 2010 assemblies for the actions are stored in the global assembly cache (GAC).
- The XML definition files (.ACTIONS files) are stored in the 14\TEMPLATE\<LCID>\Workflow directory.
-
An XML entry to mark the action as an authorized type is stored in the Web.config file for the Web applications in which it is used.
If the farm workflows use custom actions, you should use a file backup system to protect these files and XML entries. Similar to SharePoint Foundation features such as Web Parts and event receivers, these files should be reapplied to the farm as needed after recovery.
- Workflows that depend on custom code, such as those that are created by using Visual Studio 2010, are stored in two locations. The Visual Studio 2010 assemblies for the workflow are stored in the GAC, and the XML definition files are stored in the Features directory. This is the same as other types of SharePoint Foundation features such as Web Parts and event receivers. If the workflow was installed as part of a solution package, backing up the farm, Web application, content database, or site collection protects these workflows.
- If you create a custom workflow that interacts with a site collection other than the one where the workflow is deployed, you must back up both site collections to protect the workflow. This includes workflows that write to a history list or other custom list in another site collection. Performing a farm backup is sufficient to back up all site collections in the farm and all workflows that are associated with them.
- Workflows that are not yet deployed must be backed up and restored separately. When you are developing a new workflow but have not yet deployed it to the SharePoint Foundation farm, make sure that you back up the folder where you store the workflow project files by a file system backup application.
-
Backing up changes to the Web.config file
A common customization to SharePoint Foundation 2010 is to change the Web.config file. We strongly recommend that you make changes to the Web.config file by using Central Administration or the SharePoint Foundation 2010 APIs and object model. Because these changes are stored in the configuration database, they can be recovered from a farm or configuration-only backup.
Changes to the Web.config file that are not made by using Central Administration or the SharePoint Foundation 2010 APIs and object model should be protected by using a file system backup.

Note:If you are using forms-based authentication, provider registration in the Web.config file is manual, and is not protected by SharePoint Foundation 2010 backup. In this case, be sure to back up the Web.config file by using a file system backup.
-
Backing up third-party products
If third-party products are deployed as solution packages, they are protected by SharePoint Foundation 2010 backup. We recommend that you keep all the original files, distribution media, documentation, and the license and product keys that are required for installation.
-
Backing up changes made by direct editing
Changes made directly to a site by directly editing through the browser can be difficult to back up. The following table describes backup strategies for specific objects.
Edited object
Backup strategy
List
Use SharePoint Designer 2010 and save as a template. For more information, see Save a SharePoint site as a template (http://go.microsoft.com/fwlink/?LinkId=199515).
Site
Use SharePoint Designer 2010 and save as a template. For more information, see Save a SharePoint site as a template (http://go.microsoft.com/fwlink/?LinkId=199515).
Site collection
Use site collection backup. For more information, see Back up a site collection (SharePoint Foundation 2010).
-
Backing up developed customizations that are not packaged as solutions
Backing up developed customizations that are not deployed as solution packages can be a complex process because the customization file locations might not be stored in standardized places and SharePoint Foundation 2010 does not automatically back them up.
Consult with the development team or customization vendor to determine whether the customizations involve additional add-in software or files in other locations. We recommend that you back up these directories with a file system backup solution. The following table lists locations where developed customizations are typically stored on Web servers.
Location
Description
%COMMONPROGRAMFILES%\Microsoft Shared\Web Server Extensions\14
Commonly updated files, custom assemblies, custom templates, custom site definitions
Inetpub
Location of IIS virtual directories
%WINDIR%\Assembly
Global assembly cache (GAC): a protected operating system location where the Microsoft .NET Framework code assemblies are installed to provide full system access
-
Related content
-
Back up a content database (SharePoint Foundation 2010)
Updated: June 24, 2010
Microsoft SharePoint Foundation 2010 content databases can grow to be very large. Therefore, you might want to back them up separately from farm backups. Regularly backing up content databases reduces data losses that might occur from hardware failures, power outages, or other problems. It is a simple process and helps to ensure that all the data is available for recovery, if that is required. You can only back up one content database at a time.
This topic describes how to back up a single content database.
Procedures in this task:
-
Task requirements
Before you begin, you must create a folder on the local computer or the network in which to store the backups. For better performance, we recommend that you back up to the local computer and then move the backup files to a network folder.

Note:SharePoint Foundation 2010 backup backs up remote Binary Large Objects (BLOB) stores but only if you are using the SQL Filestream remote BLOB store provider to place data in remote BLOB stores.
If you are using another provider you must manually back up these remote BLOB stores.

Important:If you are using SQL Server with Transparent Data Encryption (TDE), and you are backing up your environment by using either SharePoint tools or SQL Server tools, the TDE encryption key in not backed up or restored. You must backup the key manually. When restoring, you must manually restore the key before restoring the data. For more information, see Understanding Transparent Data Encryption (TDE) (http://technet.microsoft.com/en-us/library/bb934049.aspx)
-
Use Windows PowerShell to back up a content database
You can use Windows PowerShell to back up a content database manually or as part of a script that can be run at scheduled intervals.
To back up a content database by using Windows PowerShell
- Verify that you meet the following minimum requirements: See Add-SPShellAdmin.
- On the Start menu, click All Programs.
- Click Microsoft SharePoint 2010 Products.
- Click SharePoint 2010 Management Shell.
-
At the Windows PowerShell command prompt (that is, PS C:\>), type the following command, and then press ENTER:
Backup-SPFarm -Directory <Backup folder> -BackupMethod {Full | Differential} -Item <Content database name> [-Verbose]
|
|
|
If you are backing up the content database for the first time, you must use the Full option. You must perform a full backup before you can perform a differential backup. |

For more information, see Backup-SPFarm (http://technet.microsoft.com/library/c37704b5-5361-4090-a84d-fcdd17bbe345(Office.14).aspx)
|
|
|
We recommend that you use Windows PowerShell when performing command-line administrative tasks. The Stsadm command-line tool has been deprecated, but is included to support compatibility with previous product versions. |

-
Use Central Administration to back up a content database
You can use Central Administration to back up a content database.
To back up a content database by using Central Administration
- Verify that the user account that is performing this procedure is a member of the Farm Administrators group.
- In Central Administration, on the Home page, in the Backup and Restore section, click Perform a backup.
- On the Perform a Backup — Step 1 of 2: Select Component to Back Up page, select the content database that you want to back up from the list of components, and then click Next.
|
|
|
Not all content databases can be selected in the list. If a database is not selectable, you must use Windows PowerShell to back up the content database. |

- On the Start Backup — Step 2 of 2: Select Backup Options page, in the Backup Type section, select either Full or Differential.
|
|
|
If you are backing up the content database for the first time, you must use the Full option. You must perform a full backup before you can perform a differential backup. |

- In the Backup File Location section, type the Universal Naming Convention (UNC) path of the backup folder, and then click Start Backup.
-
You can view the general status of all backup jobs at the top of the Backup and Restore Job Status page in the Readiness section. You can view the status of the current backup job in the lower part of the page in the Backup section. The status page updates every 30 seconds automatically. You can manually update the status details by clicking Refresh. Backup and recovery are Timer service jobs. Therefore, it may take several seconds for the backup to start.
If you receive any errors, review the Failure Message column of the Backup and Restore Job Status page. You can also find more details in the Spbackup.log file at the UNC path that you specified in step 4.
-
Use SQL Server tools to back up a content database
You can use SQL Server tools to back up a content database.
To back up a content database by using SQL Server tools
- Verify that the user account that is performing this procedure is a member of the SQL Server db_backupoperator fixed database role on the database server where each database is stored.
- Open SQL Server Management Studio and connect to the database server.
- In Object Explorer, expand Databases.
- Right-click the database that you want to back up, point to Tasks, and then click Back Up.
- In the Back Up Database dialog box, in the Source area, select the kind of backup that you want to perform from the Backup type list. For more information about which backup type to use, see Overview of Recovery Models (http://go.microsoft.com/fwlink/?LinkId=114396) in SQL Server Books Online.
- In the Backup component area, click Database.
- Either use the default name provided or specify a name for the backup set in the Name text box.
- Specify the expiration date for the backup set. This date determines how long, or when, the backup set can be overwritten by any later backups that have the same name. By default, the backup set is set to never expire (0 days).
- In the Destination area, specify where you want to store the backup.
- Click OK to back up the database.
- Repeat steps 1-9 for each content database that you want to back up.
-
Concepts
Restore a content database (SharePoint Foundation 2010)
-
Back up databases to snapshots (SharePoint Foundation 2010)
Published: May 12, 2010
This topic describes how to back up a farm database to a snapshot.
You can only use SQL Server tools to back up a farm database to a snapshot.

Important:You must be running Microsoft SQL Server 2008 with Service Pack 1 (SP1) and Cumulative Update 2 Enterprise Edition to take database snapshots.
We recommend that you regularly back up the complete farm. Regularly backing up the farm reduces data losses that might occur from hardware failures, power outages, or other problems. It is a simple process and helps to ensure that that all the farm data and configurations are available for recovery, if that is required. For more information, see Back up a farm (SharePoint Foundation 2010). However, IT requirements might require that you backup databases to snapshots. Although you can back up any farm database to a snapshot, you typically back up content databases.
A database snapshot provides a read-only, static view of a source database as it existed at snapshot creation, minus any uncommitted transactions. Uncommitted transactions are rolled back in a newly created database snapshot because the Database Engine runs recovery after the snapshot has been created (transactions in the database are not affected). For more information about database snapshots, see Database Snapshots (http://go.microsoft.com/fwlink/?LinkId=163950).
-
Task requirements
Before you begin, you must create a folder on the database server. If you want to store the snapshots at another location, you can move the backup files to a backup folder on the network after the operation is finished.
-
Use SQL Server tools to back up a database to a snapshot
If you want to back up databases to snapshots, you must use SQL Server tools. The databases that are associated with the farm are determined by the features that you have installed on the farm.
To back up a database to a snapshot by using SQL Server tools
- Verify that the account that is used to back up the databases is a member of the SQL Server db_owner fixed database role.
- Open SQL Server Management Studio and connect to the database server.
- In Object Explorer, expand Databases.
- Select the database that you want to back up, and then click New Query.
- Copy the following text, and then paste it to the query pane.
|
CREATE DATABASE <snapshot name> |
-
Other Resources
Database Snapshots (http://go.microsoft.com/fwlink/?LinkId=163950)
-
Export a site, list, or document library (SharePoint Foundation 2010)
Published: May 12, 2010
We recommend that you regularly back up the complete farm. However, business or IT requirements might require that you export a site, list, or document library. Regularly exporting sites, lists, and document libraries reduces data losses that might occur from hardware failures, power outages, or other problems. It is a simple process and helps to ensure that data is available for recovery, if that is required. You can only export one site, list, or document library at a time.
For information about what to back up and which tools to use, see Plan for backup and recovery (SharePoint Foundation 2010).
Procedures in this task:
- Use Windows PowerShell to export a site, list, or document library
- Use Central Administration to export a site, list, or document library

Note:You cannot use SQL Server tools or Data Protection Manager to export a site, list or document library.
-
Task requirements
Before you begin, you must create a folder on the local computer or the network in which to store the export file. For better performance, we recommend that you export to the local computer and then move the export file to a network folder.
-
Use Windows PowerShell to export a site, list, or document library
You can use Windows PowerShell to export a site, list, or document library manually or as part of a script that can be run at scheduled intervals.
To export a site, list or document library by using Windows PowerShell
- Verify that you meet the following minimum requirements: See Add-SPShellAdmin.
- On the Start menu, click All Programs.
- Click Microsoft SharePoint 2010 Products.
- Click SharePoint 2010 Management Shell.
-
At the Windows PowerShell command prompt (that is, PS C:\>), type the following command, and then press ENTER:
Export-SPWeb -Identity <Site URL> -Path <Path and file name> [-ItemUrl <URL of site, list, or library>] [-IncludeUserSecurity] [-IncludeVersions] [-NoFileCompression] [-GradualDelete] [-Verbose]
If you are exporting a large site, list, or document library, you can use the GradualDelete
parameter. When this parameter is used, the site collection is marked as deleted, which immediately prevents any further access to its content. The data in the deleted site collection is then deleted gradually over time by a timer job instead of all at once, which reduces its impact on the performance of farm servers and SQL Server.
To specify which version of the site, list, or document library to include, use the IncludeVersions
parameter and specify “LastMajor” (default), “CurrentVersion”, “LastMajorandMinor”, or “All”. To include the user security settings with the list or document library, use the IncludeUserSecurity
parameter. If you want to overwrite the file that you specified, use the Force
parameter. To view the progress of the backup operation, use the Verbose
parameter.
The NoFileCompression
parameter lets you specify that no file compression is performed during the export process. Using this parameter can lower resource usage up to 30% during the export process. Using this parameter will result in a backup folder being created instead of a compressed file. If you use the NoFileCompression
parameter in the Export-SPWeb
command, you must also use it when you import the content by using the Import-SPWeb
command.
For more information, see Export-SPWeb (http://technet.microsoft.com/library/cd85bf19-6f24-4f13-bd9c-37bbf279ea2b(Office.14).aspx)
|
|
|
We recommend that you use Windows PowerShell when performing command-line administrative tasks. The Stsadm command-line tool has been deprecated, but is included to support compatibility with previous product versions. |

-
Use Central Administration to export a site, list, or document library
You can use Central Administration to export a site, list, or document library. You can only export one site, list, or document library at a time.
To export a site, list, or document library by using Central Administration
- Verify that the user account that is performing this procedure is a member of the Farm Administrators group.
- In Central Administration, on the Home page, click Backup and Restore.
- On the Backup and Restore page, in the Granular Backup section, click Export a site or list.
- On the Site or List Export page, in the Site Collection section, select the site collection from the Site Collection list, and then select the site from the Site list.
- If you are exporting a site, skip this step, Select the list or document library from the List list.
- In the File Location section, in the Filename box, type the UNC path of the shared folder and the file to which you want to export the list or document library. The file name must use the .cmp extension.
- If the file already exists and you want to use this file, select the Overwrite existing files check box. Otherwise, specify a different file name.
- If you want to export all the security and permissions settings with the list or library, in the Export Full Security section, select the Export full security check box.
- If you want to specify which version of the list or library to export, select one of the following versions from the Export versions list:
- All Versions
- Last Major
- Current Version
- Last Major and Last Minor
- When you have specified the settings that you want, click Start Export.
-
You can view the status of all backup jobs at the top of the Granular Backup Job Status page. You can view the status of the current backup job in the Content Export section of the page. The status page updates every 30 seconds automatically. You can manually update the status details by clicking Refresh. Backup and recovery are Timer service jobs. Therefore, it may take several seconds for the backup to start.
If you receive any errors, you can review them in the Failure Message column of the Backup and Restore Job Status page. You can also find more details in the <file name>.export.log file at the UNC path that you specified in step 6.
-
Back up or archive logs (SharePoint Foundation 2010)
Published: May 12, 2010
A system-wide strategy for data protection should include backing up or archiving the logs in which data related to Microsoft SharePoint Foundation 2010 is recorded. This data can be useful for performance analysis, troubleshooting, monitoring compliance with service level agreements, and legal, regulatory, or business reasons. Therefore, protect this data as part of the routine maintenance by backing up or archiving the logs.
The following sections are labeled in the following manner to indicate how important it is to back up or archive this kind of log:
- [Essential] means that the log contains data that is essential to the environment. The data would be lost if a disk failure or other problem occurred.
- [Recommended] means that the log contains data that is useful in most environments for troubleshooting, operational, legal, or other needs.
In this article:
-
[Essential] Back up transaction logs
Microsoft SQL Server 2008 R2, SQL Server 2008 with Service Pack 1 (SP1) and Cumulative Update 2, and SQL Server 2005 with SP3 and Cumulative Update 3 transaction logs record all changes that were made to a database since the last checkpoint or full backup. These logs contain required data for restoring the farm.
We recommend that you back up these logs every 5–10 minutes. When you back up these logs, they are automatically truncated. You can use the Microsoft SQL Server 2008 R2, SQL Server 2008 with Service Pack 1 (SP1) and Cumulative Update 2, and SQL Server 2005 with SP3 and Cumulative Update 3 tools to back up the transaction log. For more information, see Creating Transaction Log Backups (http://go.microsoft.com/fwlink/?LinkId=124881) in the Microsoft SQL Server 2008 R2, SQL Server 2008 with Service Pack 1 (SP1) and Cumulative Update 2, and SQL Server 2005 with SP3 and Cumulative Update 3 documentation.
Transaction logs are also automatically backed up when you back up the farm, Web application, or databases by using either the SharePoint Central Administration Web site or the Windows PowerShell. For more information, see Back up a farm (SharePoint Foundation 2010).
How transaction log size affects farm backup times
When you back up SharePoint Foundation 2010, the size of the transaction log can affect how long the backup operation takes. Because the transaction log records all changes to a database since the last checkpoint or full backup, the log can grow very large over time. If the transaction log has grown very large, backups might take a very long time. For more information, see How to stop the transaction log of a SQL Server database from growing unexpectedly (http://go.microsoft.com/fwlink/?LinkID=111458).
The recommended way to truncate the transaction log if you are using a full recovery model is to back up the log. Microsoft SQL Server 2008 R2, SQL Server 2008 with Service Pack 1 (SP1) and Cumulative Update 2, and SQL Server 2005 with SP3 and Cumulative Update 3 automatically truncates the inactive parts of the transaction log when you back up the log. We also recommend that you pre-grow the transaction log to avoid auto-growing the log. For more information, see Managing the Size of the Transaction Log File (http://go.microsoft.com/fwlink/?LinkId=124882). For more information about using a full recovery model, see Backup Under the Full Recovery Model (http://go.microsoft.com/fwlink/?LinkId=127985). For more information about using a simple recovery model, see Backup Under the Simple Recovery Model (http://go.microsoft.com/fwlink/?LinkId=127987).
We do not recommend that you manually shrink the transaction log size or manually truncate the log by using the Truncate method.
-
[Recommended] Collect usage data
Usage analysis enables you to track how Web sites are being used. Log files are created daily to track usage. You can configure the setting for the collection of usage data. One of the most important settings is the location of the log files. By default, the log folder is configured to be on the same drive partition where SharePoint Foundation 2010 is installed. To make sure that the log files to not fill up that drive, you should change the log folder to be on a separate drive.
The location of the log directory is a farm-level setting, and the directory that is specified in this setting must exist on all servers in the farm. These logs are automatically backed up when you back up the farm.
For most environments, the default settings are adequate. For more information about configuring usage data collection settings, see Configure usage and health data collection (SharePoint Foundation 2010) (http://technet.microsoft.com/library/5c97fd40-008a-4fbc-8b3a-98244d8f0016(Office.14).aspx).
-
[Recommended] Archive diagnostic logs
Diagnostic logs provide detailed information about the operation of the farm. You can configure the level of detail that is logged. We recommend that you archive these logs when you archive the farm. You can archive the logs for the whole farm or a specific server. You can archive these files by manually copying them to a shared folder, or by using the Windows PowerShell Merge-SPlogFile cmdlet. You can use the Merge-SPLogFIle cmdlet to archive the log files on all of the farm servers at once.
You can use the Windows PowerShell Copy-Item cmdlet to archive log files from a single server. The Copy-Item cmdlet does not provide filtering and you must copy the entire log file.
For more information about how to configure diagnostic logging, see Configure diagnostic logging (SharePoint Foundation 2010) (http://technet.microsoft.com/library/a5641210-8224-4e11-9d93-4f96fa4c327c(Office.14).aspx)
To archive diagnostic logs from all farm servers by using Windows PowerShell
- Verify that you meet the following minimum requirements: See Add-SPShellAdmin.
- On the Start menu, click All Programs.
- Click Microsoft SharePoint 2010 Products.
- Click SharePoint 2010 Management Shell.
-
At the Windows PowerShell command prompt, type the following command:
Merge-SPLogFile -Path “<path to merged log file>.log” -Overwrite
For example, Merge-SPLogFile -Path “C:\Logs\MergedFiles\AllFarm_merged_12.20.2009.log” -Overwrite
|
|
|
Merging all log entries for all farm servers can take a long time and use resources. We recommend filtering the entries to match a specific set of criteria before merging. |

To merge log entries that match a specific set of criteria, type the following command:
Merge-SPLogFile -Path “<path to merged log file>.log” -Area “<Area>” -Category “<Category>”
You can filter by one or more of the following:
- Area (one or more, wildcard)
- Category (one or more, wildcard)
- Level
- Correlation (one or more)
- EventID (one or more, wildcard)
- Message (wildcard)
- StartTime
- EndTime
- Process (one or more, wildcard)
- ThreadID (one or more)
|
|
|
You can name the merged log file however you want. We recommend that you use a naming convention that makes it easy to determine what the log file contains, such as “<date merged>_<farm name>_<filtering criteria>. For example, to signify all the farm server log entries forSharePoint Foundation 2010 that involve the database category and are marked as “High” use, “Dec_2009_ContosoInternet_Foundation_Database_High.log”. |

For more information, see Merge-SPLogFile (http://technet.microsoft.com/library/759702d7-bda2-4302-9345-abb43b609ad4(Office.14).aspx)
To archive diagnostic logs for a specific server by using Windows PowerShell
- Verify that you meet the following minimum requirements: See Add-SPShellAdmin.
- On the Start menu, click All Programs.
- Click Microsoft SharePoint 2010 Products.
- Click SharePoint 2010 Management Shell.
-
At the Windows PowerShell command prompt, type the following command:
Copy-Item <Log folder path> -Destination <Archive folder path> -Recurse
For more information, type Get-Help Copy-Item -Full
.
|
|
|
We recommend that you use Windows PowerShell when performing command-line administrative tasks. The Stsadm command-line tool has been deprecated, but is included to support compatibility with previous product versions. |

-
Configuring permissions for backup and recovery (SharePoint Foundation 2010)
Published: May 12, 2010
Before backing up or restoring Microsoft SharePoint Foundation 2010, you must ensure that the timer service account, SQL Server service account, and users running the backup or restore operations have the correct permissions or are members of the correct Windows security groups or SharePoint groups.
These permissions and group memberships must be configured initially. Subsequently, they must be updated when new farm components are added to the environment and if you want to add users who will perform backup and restore operations.
In this topic:
-
Permissions for the SPTimerV4 timer service and SQL Server account
The Windows SharePoint Services Timer V4 (SPTimerV4) and the SQL Server service account in SharePoint Foundation 2010 perform backup and restore operations on behalf of the user. These service accounts require Full Control permissions on any backup folders.
-
Group memberships required to run backup and restore operations in Central Administration
You must ensure that all user accounts that will be backing up or restoring your farm and farm components by using Central Administration have the group memberships that are described in the following table.
Required group memberships
Farm component
Member of Administrators group on the local computer
Member of Farm Administrators SharePoint group
Farm
Yes
No
Content Database
Yes
No
Site Collection
No
Yes
Site, list, document library
No
Yes
-
Setting permissions for running backup and restore operations by using Windows PowerShell
You must ensure that all user accounts that will be backing up or restoring your farm and farm components by using Windows PowerShell are added to the SharePoint_Shell_Access role for a specified database and have the permissions described in the table later in this section.
You can run the Add-SPShellAdmin
cmdlet to add a user account to this role. You must run the command for each user account. Moreover, you must run the command for all databases to which you want to grant access.

Note:You only need to grant a user account access to back up and restore a specific farm component one time. You will have to perform this task again only when new farm components are added to your environment or when you want to add users to perform backup and restore operations.
To add a user to or remove a user from the SharePoint_Shell_Access role by using Windows PowerShell
- Verify that you meet the following minimum requirements: See Add-SPShellAdmin.
- On the Start menu, click All Programs.
- Click Microsoft SharePoint 2010 Products.
- Click SharePoint 2010 Management Shell.
-
At the Windows PowerShell command prompt (that is, PS C:\>), type the following command, and then press ENTER:
Add-SPShellAdmin -Username <User account> -Database <Database ID>
To add a user account to all the databases in the farm, type the following command, and then press ENTER:
ForEach ($db in Get-SPDatabase) {Add-SPShellAdmin -Username <User account> -Database $db}
To remove a user account from all the databases in the farm, type the following command, and then press ENTER:
ForEach ($db in Get-SPDatabase) {Remove-SPShellAdmin -Username <User account> -Database $db}
To view the user accounts currently added to the databases in the farm, type the following command, and then press ENTER:
ForEach ($db in Get-SPDatabase) {Get-SPShellAdmin -Database $db}
For more information, see Add-SPShellAdmin (http://technet.microsoft.com/library/2ddfad84-7ca8-409e-878b-d09cb35ed4aa(Office.14).aspx)
You might also have to grant additional permissions to the users running the backup or restore operation by using Windows PowerShell. The following table shows the permissions that are required.
Required permissions for Windows PowerShell
|
Farm component |
Member of Administrators group on the local computer |
Member of Farm Administrators SharePoint group |
Full Control on backup folder |
|
Farm |
Yes |
No |
Yes |
|
Content database |
Yes |
No |
Yes |
|
Site collection |
No |
Yes |
Yes |
|
Site, list, document library |
Yes |
No |
Yes |
-
Configuring permissions for backup and recovery (SharePoint Server 2010)
Published: May 12, 2010
Before backing up or restoring Microsoft SharePoint Foundation 2010, you must ensure that the timer service account, SQL Server service account, and users running the backup or restore operations have the correct permissions or are members of the correct Windows security groups or SharePoint groups.
These permissions and group memberships must be configured initially. Subsequently, they must be updated when new farm components are added to the environment and if you want to add users who will perform backup and restore operations.
In this topic:
-
Permissions for the SPTimerV4 timer service and SQL Server account
The Windows SharePoint Services Timer V4 (SPTimerV4) and the SQL Server service account in SharePoint Foundation 2010 perform backup and restore operations on behalf of the user. These service accounts require Full Control permissions on any backup folders.
-
Group memberships required to run backup and restore operations in Central Administration
You must ensure that all user accounts that will be backing up or restoring your farm and farm components by using Central Administration have the group memberships that are described in the following table.
Required group memberships
Farm component
Member of Administrators group on the local computer
Member of Farm Administrators SharePoint group
Farm
Yes
No
Service Application
Yes
No
Content Database
Yes
No
Site Collection
No
Yes
Site, list, document library
No
Yes
-
Setting permissions for running backup and restore operations by using Windows PowerShell
You must ensure that all user accounts that will be backing up or restoring your farm and farm components by using Windows PowerShell are added to the SharePoint_Shell_Access role for a specified database and have the permissions described in the table later in this section.
You can run the Add-SPShellAdmin
cmdlet to add a user account to this role. You must run the command for each user account. Moreover, you must run the command for all databases to which you want to grant access.

Note:You only need to grant a user account access to back up and restore a specific farm component one time. You will have to perform this task again only when new farm components are added to your environment or when you want to add users to perform backup and restore operations.
To add a user to or remove a user from the SharePoint_Shell_Access role by using Windows PowerShell
- Verify that you meet the following minimum requirements: See Add-SPShellAdmin.
- On the Start menu, click All Programs.
- Click Microsoft SharePoint 2010 Products.
- Click SharePoint 2010 Management Shell.
-
At the Windows PowerShell command prompt (that is, PS C:\>), type the following command, and then press ENTER:
Add-SPShellAdmin -Username <User account> -Database <Database ID>
To add a user account to all the databases in the farm, type the following command, and then press ENTER:
ForEach ($db in Get-SPDatabase) {Add-SPShellAdmin -Username <User account> -Database $db}
To remove a user account from all the databases in the farm, type the following command, and then press ENTER:
ForEach ($db in Get-SPDatabase) {Remove-SPShellAdmin -Username <User account> -Database $db}
To view the user accounts currently added to the databases in the farm, type the following command, and then press ENTER:
ForEach ($db in Get-SPDatabase) {Get-SPShellAdmin -Database $db}
For more information, see Add-SPShellAdmin (http://technet.microsoft.com/library/2ddfad84-7ca8-409e-878b-d09cb35ed4aa(Office.14).aspx)
You might also have to grant additional permissions to the users running the backup or restore operation by using Windows PowerShell. The following table shows the permissions that are required.
Required permissions for Windows PowerShell
|
Farm component |
Member of Administrators group on the local computer |
Member of Farm Administrators SharePoint group |
Full Control on backup folder |
|
Farm |
Yes |
No |
Yes |
|
Service application |
Yes |
No |
Yes |
|
Content database |
Yes |
No |
Yes |
|
Site collection |
No |
Yes |
Yes |
|
Site, list, document library |
Yes |
No |
Yes |
-
Recovery (SharePoint Foundation 2010)
Published: May 12, 2010
The articles in this section are written to meet the requirements of information technology (IT) professionals who are responsible for the planning, design, deployment, and operations of backup and recovery solutions. These solutions might be in enterprise, corporate, or branch office environments.
The IT professionals who are responsible for backup and recovery solutions are expected to have an understanding of the technical details that are contained in this section. However, service-level expertise is not needed to understand the enterprise-level discussions and decisions.
Before you restore a farm, ensure that the following requirements are met:
- To restore a farm by using the SharePoint Central Administration Web site, you must be a member of the Farm Administrators group.
- To restore a farm by using Windows PowerShell, you must meet the following minimum requirements: See Add-SPShellAdmin.
- The database server’s SQL Server account, the Timer service account, and the Central Administration application pool account must have Read permissions to the backup locations. (The Timer service account and the Central Administration application pool account are usually the same.) The database server’s SQL Server account must be a member of the sysadmin fixed server role.
- Your login account must have Read permissions to the backup locations.
- Ensure that the SharePoint Foundation Administration service is started on all farm servers. By default, this service is not started on stand-alone installations.
Consider the following before you restore a farm:
- Restoring from one version of SharePoint Products and Technologies to a different version is not supported.
- After recovery, search might take as long as 15 minutes to be available again. It can take longer than 15 minutes if the search system has to crawl all the content again. If you back up and restore the complete service, the system does not have to perform a full crawl.
- You can only perform one recovery or one backup operation at a time.
-
Recover all or part of a farm
The following tasks for recovery are performed on the entire farm, farm databases, sites, subsites, or lists:
-
This article describes the procedures that you can use to restore the entire farm from a backup.
-
This article describes the procedures that you can use to restore the farm configuration to the same farm from a backup.
-
This article describes how to use Windows PowerShell to document the configuration settings for your farm. Documenting configuration settings is important both so that you can create scripted deployments for your environment, and so that you can quickly re-create a set of configurations in the event of a failure.
-
This article describes the procedures that you can use to copy configuration settings from one farm to another, including how to back up and recover a farm without the content databases, how to back up and recover configurations only, and how to create a deployment script.
-
This article describes the procedures that you can use to restore a Web application that is associated with the farm, including configuration and content databases, from a backup.
-
This article describes the procedures that you can use to restore a service application that is associated with the farm, including configuration and content databases, from a backup.
-
This article describes the procedures that you can use to restore a content database from a backup.
-
This article describes the procedures that you can use to restore a site collection from a backup.
-
This article describes the procedures that you can use to restore customizations that are associated with the farm from backups.
-
This article describes the procedures that you can use to attach a read-only content database to the farm.
-
This article describes the procedures that you can use to restore a site, list, or document library from a backup.
-
-
Concepts
Backup (SharePoint Foundation 2010)
-
Restore a farm (SharePoint Foundation 2010)
Updated: September 16, 2010
This article describes how to restore a Microsoft SharePoint Foundation 2010 farm. Farm-level recovery is usually performed only after a failure that involves the complete farm, or where partial recovery of part of the farm is not possible. If you only have to restore part of the farm, a specific database, a service application, a list, or document library, or a specific document, use another recovery method. For more information about alternate forms of recovery, see Related content.
Farm recovery is usually performed for any of the following reasons:
- Restoring a farm after a fire, disaster, equipment failure, or other data-loss event.
- Restoring farm configuration settings and data to a specific previous time and date.
- Moving a SharePoint Foundation 2010 deployment from one farm to another farm.
In this article:
-
Considerations when recovering a farm
When you prepare to recover a farm, be aware of the following issues:
- You cannot restore a multiple-server farm to a single-server farm or a single-server farm to a multiple-server farm.
- You cannot back up from one version of Microsoft SharePoint Foundation and restore to another version of SharePoint Foundation.
- Backing up the farm will back up the configuration and Central Administration content databases, but these cannot be restored using Microsoft SharePoint Foundation 2010 tools. For more information about backing up and restoring all the farm databases, see Move all databases (SharePoint Foundation 2010) (http://technet.microsoft.com/library/0aaf3261-f06b-4f4f-96d0-96fecdf78bc6(Office.14).aspx)
- When you restore the farm by using Microsoft SharePoint Foundation 2010, the restore process will not automatically start all of the service applications. You must manually start them by using Central Administration or Windows PowerShell. Do not use SharePoint Products Configuration Wizard to start the services because doing so will also re-provision the services and service proxies.
- The identifier (ID) of each content database is retained when you restore or reattach a database by using built-in tools. Default change log retention behavior when using built-in tools is as follows:
- The change logs for all databases are retained when you restore a farm.
-
The change log for content databases is retained when you reattach or restore a database.
When a database ID and change log are retained, the search system continues crawling based on the regular schedule that is defined by crawl rules.
When you restore an existing database and do not use the overwrite option, a new ID is assigned to the restored database, and the database change log is not preserved. The next crawl of the database will add data from the content database to the index.
If a restore is performed and the ID in the backup package is already being used in the farm, a new ID is assigned to the restored database and a warning is added to the restore log. The ability to perform an incremental crawl instead of a full crawl depends on the content database ID being the same as before and the change log token that is used by the search system being valid for the current change log in the content database. If the change log is not preserved, the token is not valid and the search system has to perform a full crawl.
-
SharePoint Foundation 2010 backup backs up the Business Data Connectivity service external content type definitions but does not back up the data source itself. To protect the data, you should back up the data source when you back up the Business Data Connectivity service or the farm.
If you restore the Business Data Connectivity service or the farm and then restore the data source to a different location, you must change the location information in the external content type definition. If you do not, the Business Data Connectivity service might be unable to locate the data source.
-
SharePoint Foundation 2010 restores remote Binary Large Objects (BLOB) stores only if you are using the FILESTREAM remote BLOB store provider to put data in remote BLOB stores.
If you are using another provider, you must manually restore the remote BLOB stores.
- If a user has taken copies of content for off-line editing in Microsoft SharePoint Workspace 2010 and the content is restored from a backup on the server, when the user re-connects, the server automatically synchronizes the off-line content with the restored content. This might result in data loss on the user’s copies of the content.
-
If you are sharing service applications across farms, be aware that trust certificates that have been exchanged are not included in farm backups. You must back up your certificate store separately or retain the certificates in a separate location. When you restore a farm that shares a service application, you must import and redeploy the certificates, and then re-establish any inter-farm trusts.
For more information, see Exchange trust certificates between farms (SharePoint Foundation 2010) (http://technet.microsoft.com/library/679d334b-913d-49b3-b086-66a60093b261(Office.14).aspx)
- After a Web application that is configured to use claims-based authentication has been restored, duplicate or additional claims providers are often visible. If duplicates appear, you must then manually save each Web application zone to remove them. For more information, see Restore a Web application (SharePoint Foundation 2010).
- Additional steps are required when you restore a farm that contains a Web application that is configured to use forms-based authentication. For more information, see Restore a Web application (SharePoint Foundation 2010).
-
Use Windows PowerShell to restore a farm
You can use Windows PowerShell to restore a farm.
To restore a farm by using Windows PowerShell
- Verify that you meet the following minimum requirements: See Add-SPShellAdmin.
- On the Start menu, click All Programs.
- Click Microsoft SharePoint 2010 Products.
- Click SharePoint 2010 Management Shell.
- At the Windows PowerShell command prompt, type the following command:
|
Restore-SPFarm -Directory <BackupFolder> -RestoreMethod Overwrite [-BackupId <GUID>] |
Where:
- <BackupFolder> is the path of the folder you use for storing backup files.
- <GUID> is the identifier of the backup to restore from.
|
|
|
If you are not logged on as the Farm account, you are prompted for the Farm account’s credentials. |

If you do not specify the BackupId
, the most recent backup will be used. To view the backups for the farm, type the following command:
|
Get-SPBackupHistory -Directory <BackupFolder> -ShowBackup [-Verbose] |
Where:
-
<BackupFolder> is the path of the folder you use for storing backup files.
You cannot use a configuration-only backup to restore content databases together with the configuration.
- To restart a service application, type the following command:
|
Start-SPServiceInstance -Identity <ServiceApplicationID> |
Where:
-
<ServiceApplicationID> is the GUID of the service application.
Start-SPServiceInstance
For more information about restarting service applications by using Windows PowerShell, see Start-SPServiceInstance (http://technet.microsoft.com/library/fcb4a4f8-a95f-468e-918b-d9a2d736cd2d(Office.14).aspx)
For more information about restoring the farm by using Windows PowerShell, see Restore-SPFarm (http://technet.microsoft.com/library/8e18ea80-0830-4ffa-b6b6-ad18a5a7ab3e(Office.14).aspx)
|
|
|
We recommend that you use Windows PowerShell when performing command-line administrative tasks. The Stsadm command-line tool has been deprecated, but is included to support compatibility with previous product versions. |

-
Use Central Administration to restore a farm
You can use the Central Administration Web site to restore a farm.
To restore a farm by using Central Administration
- Verify that the user account that is performing this procedure is a member of the Farm Administrators SharePoint group.
- In Central Administration, on the Home page, in the Backup and Restore section, click Restore from a backup.
- On the Restore from Backup — Step 1 of 3: Select Backup to Restore page, from the list of backups, select the backup job that contains the farm backup, and then click Next. You can view more details about each backup by clicking the (+) next to the backup.
|
|
|
If the correct backup job does not appear, in the Backup Directory Location text box, type the Universal Naming Convention (UNC) path of the correct backup folder, and then click Refresh. You cannot use a configuration-only backup to restore the farm. |

- On the Restore from Backup — Step 2 of 3: Select Component to Restore page, select the check box that is next to the farm, and then click Next.
-
On the Restore from Backup — Step 3 of 3: Select Restore Options page, in the Restore Component section, ensure that Farm appears in the Restore the following component list.
In the Restore Only Configuration Settings section, ensure that the Restore content and configuration settings option is selected.
In the Restore Options section, under Type of Restore, select the Same configuration option. A dialog box will appear that asks you to confirm the operation. Click OK.
|
|
|
If the Restore Only Configuration Settings section does not appear, the backup that you selected is a configuration-only backup. You must select another backup. |

Click Start Restore.
-
You can view the general status of all recovery jobs at the top of the Backup and Restore Job Status page in the Readiness section. You can view the status for the current recovery job in the lower part of the page in the Restore section. The status page updates every 30 seconds automatically. You can manually update the status details by clicking Refresh. Backup and recovery are Timer service jobs. Therefore, it may take several seconds for the recovery to start.
If you receive any errors, you can review them in the Failure Message column of the Backup and Restore Job Status page. You can also find more details in the Sprestore.log file at the UNC path that you specified in step 3.
- When the restore process has completed, you may need to restart one or more service applications. In Central Administration, on the Home page, in the Application Management section, click Manage services on server.
- On the Services on Server page, start any services related to service applications that you want to run by clicking Start in the Actions column next to the service application.
- Re-establish any trust relationships. For more information, see Exchange trust certificates between farms (SharePoint Foundation 2010) (http://technet.microsoft.com/library/679d334b-913d-49b3-b086-66a60093b261(Office.14).aspx).
-
Use SQL Server tools to restore a farm
Although you cannot restore the complete farm by using SQL Server tools, you can restore most of the farm databases. If you restore the databases by using SQL Server tools, you must restore the farm configuration by using Central Administration or Windows PowerShell. For more information about how to restore the farm’s configuration settings, see Restore a farm configuration (SharePoint Foundation 2010).

Note:The search index is not stored in SQL Server. If you use SQL Server tools to back up and restore search, you must perform a full crawl after you restore the content database.
Before you restore SharePoint Foundation 2010, we recommend that you configure a recovery farm for site and item recovery.
Restore the databases by following these steps:
- If possible, back up the live transaction log of the current database to protect any changes that were made after the last full backup.
- Restore the last full database backup.
- Restore the most recent differential database backup that occurred after the most recent full database backup.
- Restore all transaction log backups that occurred after the most recent full or differential database backup.
To restore a farm by using SQL Server tools
- Verify that the user account that is performing this procedure is a member of the sysadmin fixed server role.
- If the Windows SharePoint Services Timer service is running, stop the service and wait for several minutes for any currently running stored procedures to finish. Do not restart the service until after you restore all the databases that you have to restore.
- Start SQL Server Management Studio and connect to the database server.
- In Object Explorer, expand Databases.
-
Right-click the database that you want to restore, point to Tasks, point to Restore, and then click Database.
The database is automatically taken offline during the recovery operation and cannot be accessed by other processes.
-
In the Restore Database dialog box, specify the destination and the source, and then select the backup set or sets that you want to restore.
The default values for destination and source are appropriate for most recovery scenarios.
- In the Select a page pane, click Options.
- In the Restore options section, select only Overwrite the existing database. Unless your environment or policies require otherwise, do not select the other options in this section.
- In the Recovery state section:
- If you have included all the transaction logs that you must restore, select RECOVER WITH RECOVERY.
- If you must restore additional transaction logs, select RECOVER WITH NORECOVERY.
- The third option, RECOVER WITH STANDBY is not used in this scenario.
|
|
|
For more information about these recovery options, see Restore Database (Options Page) (http://go.microsoft.com/fwlink/?LinkId=114420). |

- Click OK to complete the recovery operation.
- Except for the configuration database, repeat steps 4 through 9 for each database that you are restoring.
- To restore the configuration settings, you must use the existing configuration database or manually create a new database and restore the configuration to that database. For more information about restoring the farm configuration, see Restore a farm configuration (SharePoint Foundation 2010).
- Start the Windows SharePoint Services Timer service.
-
Related content
-
Restore a farm configuration (SharePoint Foundation 2010)
Published: May 12, 2010
This topic describes how to a restore the configuration of a farm.

Note:In previous versions of Microsoft SharePoint Foundation 2010, you could not restore the configuration database and, therefore, you could not restore the configuration of a farm. In this version of SharePoint Foundation 2010, you do not have to restore the configuration database because you can restore the farm configuration directly.
Procedures in this task:
-
Overview
Farm-level configuration recovery is performed only after a failure that involves the configuration database but does not involve other farm data, such as a content database or Web application. If restoring the farm configuration does not solve the problems, you must restore the complete farm.
For more information about restoring the complete farm, see Restore a farm (SharePoint Foundation 2010).
You can restore the configuration from a farm backup that used either the Backup content and configuration settings option or the Backup only configuration settings option.
-
Use Windows PowerShell to restore a farm’s configuration
You can use Windows PowerShell to restore a farm’s configuration.
To restore a farm’s configuration by using Windows PowerShell
- Verify that you meet the following minimum requirements: See Add-SPShellAdmin.
- On the Start menu, click All Programs.
- Click SharePoint 2010 Products.
- Click SharePoint 2010 Management Shell.
-
From the Windows PowerShell command prompt (that is, PS C:\>), type the following command and press ENTER:
Restore-SPFarm -Directory <RestoreShare> -RestoreMethod Overwrite -ConfigurationOnly
You must use the ConfigurationOnly
parameter. To view the progress of the operation, use the Verbose
parameter.
For more information, see Restore-SPFarm (http://technet.microsoft.com/library/8e18ea80-0830-4ffa-b6b6-ad18a5a7ab3e(Office.14).aspx)
|
|
|
We recommend that you use Windows PowerShell when performing command-line administrative tasks. The Stsadm command-line tool has been deprecated, but is included to support compatibility with previous product versions. |

-
Use Central Administration to restore a farm’s configuration
You can use Central Administration to restore a farm’s configuration.
To restore a farm’s configuration by using Central Administration
- Ensure that you are a member of the Farm Administrators SharePoint group on the computer that is running Central Administration and a member of the sysadmin fixed server role on the database server where each database is stored.
- In Central Administration, on the Home page, in the Backup and Restore section, click Restore from a backup.
- On the Restore from Backup — Step 1 of 3: Select Backup to Restore page, select the backup job that contains the farm backup from the list of backups, and then click Next.
|
|
|
You can view additional information about the backups by expanding the row that contains the backup. |
|
|
|
If the correct backup job does not appear, in the Backup Directory Location text box, enter the UNC path of the correct backup folder, and then click Refresh. |


- On the Restore from Backup — Step 2 of 3: Select Component to Restore page, select the check box that is next to the farm, and then click Next.
-
On the Restore from Backup — Step 3 of 3: Select Restore Options page, in the Restore Component section, ensure that “Farm” appears in the Restore the following content list.
In the Restore Only Configuration Settings section, ensure that the Restore content and configuration settings option is selected.
In the Restore Options section, select the Type of Restore option. Use the Same configuration setting. A dialog box will appear that asks you to confirm the operation. Click OK.
|
|
|
If the Restore Only Configuration Settings section does not appear, then the backup that you selected is a configuration-only backup. |

Click Start Restore.
-
You can view the general status of all recovery jobs at the top of the Backup and Restore Status page in the Readiness section. You can view the status of the current recovery job in the lower part of the page in the Restore section. The status page updates every 30 seconds automatically. You can manually update the status details by clicking Refresh. Backup and recovery are Timer service jobs. Therefore, it may take several seconds for the recovery to start.
If you receive any errors, you can review them in the Failure Message column of the Backup and Restore Job Status page. You can also find more details in the Sprestore.log file at the UNC path that you specified in step 2.
-
Use SQL Server to restore a farm’s configuration
You cannot restore a farm’s configuration by using SQL Server tools.
-
Concepts
Back up a farm configuration (SharePoint Foundation 2010)
-
Document farm configuration settings (SharePoint Foundation 2010)
Published: May 12, 2010
This article describes how to use Windows PowerShell 2.0 to document the configuration settings for your farm. Documenting configuration settings is important both so that you can create scripted deployments for your environment, and so that you can quickly re-create a set of configurations in the event of a failure.
To document configuration settings by using Windows PowerShell
- Verify that you meet the following minimum requirements: See Add-SPShellAdmin.
- On the Start menu, click All Programs.
- Click Microsoft SharePoint 2010 Products.
- Click SharePoint 2010 Management Shell.
- Using Notepad, create a text file and then copy and paste the following script into the file. The commands in the example create XML files that document the configurations of the Web applications and service applications in the current farm. Choose only those commands that are relevant to your environment.
|
## #Retrieve custom layout information. #Determine how SharePoint designer access is configured #Retrieve information about alternate access mapping #Retrieve information about content databases #Retrieve database properties for each database #Retrieve information about all SharePoint Products installed in the farm, and the versions of all updates installed for each product. #Retrieve farm information #Retrieve information about the servers in the farm #Retrieve information about installed features #Retrieve information about globally-installed site templates #Retrieve information about deployed solutions #Retrieve information about sandboxed solutions deployed in a site collection #Retrieve information about installed Help #Retrieve information about the logging levels that have been set #Retrieve information about the sites in the farm #Retrieve ULS logging information #Retrieve information about accounts registered in the configuration database #Retrieve information about the Mobile Messaging account. ## #Retrieve information about the services running in the farm #Retrieve information about common Web service settings ## #Application Discovery and Load Balancer Service Application #Business Data Connectivity Service #Security Token Service Application #Usage and Health data collection ###Note: These cmdlets are commented out because you are unlikely to want to run them. ### # Get-SPSite | %{$web=Get-SPWeb $_.Url;$webid=$web.Id;$web | Export-Clixml .\Get-SPWeb-$webid.xml} |
- To run the script, in the Windows PowerShell console, at the command prompt (that is, PS C:\>), type the following command and press ENTER:C:\<path>\<filename>.ps1
For more information, see Export-Clixml (http://technet.microsoft.com/en-us/library/dd347657.aspx) Get-SPWebApplication (http://technet.microsoft.com/library/11d6521f-f99c-433e-9ab5-7cf9e953457a(Office.14).aspx), Get-SPServiceApplication (http://technet.microsoft.com/library/71a467dc-3b95-4b65-af93-0d0d6ebb8326(Office.14).aspx).
-
Example of using a cmdlet
This section provides an example of ways that you can use one of the recommended cmdlets.
The Get-SPAlternateURL cmdlet provides information about alternate access mapping. Piping the cmdlet to the Export-Clixml cmdlet writes the information to an XML file.
Get-SPAlternateURL | Export-Clixml .\Get-SPAlternateURL.xml
The following section lists the content of the Get-SPAlternateURL.xml file. Some sections are collapsed.
– <Objs Version=”1.1.0.1″ xmlns=”http://schemas.microsoft.com/powershell/2004/04″>
+ <Obj RefId=”0″>
– <Obj RefId=”7″>
<TNRef RefId=”0″ />
<ToString>Microsoft.SharePoint.Administration.SPAlternateUrl</ToString>
– <Props>
<S N=”IncomingUrl”>http://servername</S>
<URI N=”Uri”>http://servername/</URI>
+ <Obj N=”UrlZone” RefId=”8″>
– <Obj N=”Collection” RefId=”9″>
<TNRef RefId=”2″ />
– <IE>
– <Obj RefId=”10″>
<TNRef RefId=”0″ />
<ToString>Microsoft.SharePoint.Administration.SPAlternateUrl</ToString>
+ <Props>
– <MS>
<S N=”Zone”>Default</S>
<S N=”PublicUrl”>http://servername</S>
</MS>
</Obj>
</IE>
– <Props>
<I32 N=”Count”>1</I32>
<B N=”IsReadOnly”>false</B>
<S N=”TypeName”>Alternate Access Mapping Collection</S>
<S N=”DisplayName”>SharePoint – 80</S>
<U64 N=”DiskSizeRequired”>0</U64>
<B N=”CanSelectForBackup”>false</B>
<B N=”CanRenameOnRestore”>false</B>
<B N=”CanSelectForRestore”>false</B>
<S N=”Name”>SharePoint – 80</S>
<G N=”Id”>5b65a69a-222d-4fe0-904b-0fb928bc7a89</G>
<S N=”Status”>Online</S>
<S N=”Parent”>SPFarm Name=SERVERNAME_SharePoint_Configuration_Database</S>
<I64 N=”Version”>3661</I64>
+ <Obj N=”Properties” RefId=”12″>
<TNRef RefId=”3″ />
<DCT />
</Obj>
<S N=”Farm”>SPFarm Name=SERVERNAME_SharePoint_Configuration_Database</S>
<Ref N=”UpgradedPersistedProperties” RefId=”11″ />
</Props>
</Obj>
<Ref N=”UpgradedPersistedProperties” RefId=”11″ />
</Props>
+ <MS>
+ <Obj N=”Zone” RefId=”13″>
<TNRef RefId=”1″ />
<ToString>Default</ToString>
<I32>0</I32>
</Obj>
<S N=”PublicUrl”>http://servername</S>
</MS>
</Obj>
</Objs>This example imports the output from the XML file, so that you can see its contents more easily.
Import-Clixml .\Get-SPAlternateURL.xml
Once an XML file is imported, you can use the objects in the pipeline as though they were real objects of the given type.
Import-Clixml .\Get-SPAlternateURL.xml | %{$_.Uri}
You can also pipe the objects as part of the cmdlet, and view all of the expected properties, methods, and TypeNames. The following example pipes URIs.
Import-Clixml .\Get-SPAlternateURL.xml | %{$_.Uri | Get-Member}
For more information, see Export-Clixml (http://technet.microsoft.com/en-us/library/dd347657.aspx), Import-Clixml (http://technet.microsoft.com/en-us/library/dd315355.aspx), Get-SPAlternateURL (http://technet.microsoft.com/library/ea38119d-a535-48a3-b498-9daa443399fb(Office.14).aspx), ForEach-Object (http://technet.microsoft.com/en-us/library/dd347608.aspx), Get-Member (http://technet.microsoft.com/en-us/library/dd315351.aspx).
-
Copy configuration settings from one farm to another (SharePoint Foundation 2010)
Published: May 12, 2010
This article describes how to copy configuration settings from one Microsoft SharePoint Foundation 2010 farm to another SharePoint Foundation 2010 farm. Copying the configuration settings of one farm to another can be useful in the following circumstances:
- Setting up similar development, test, and production environments.
- Establishing an organization standard for farm configuration settings.
- Setting up a disaster recovery environment.
In this article:
- Back up and recover a farm without content databases to copy configuration settings
- Back up and recover configuration settings only
- Create a scripted deployment to copy configuration settings
There are many ways in which you can copy configurations from one farm to another. Determine which method to use based on the configuration settings that you want to copy and how often you need to copy them.
- Back up and recover a farm without the content databases attached. This method provides you with farm settings and Web application settings, in addition to the settings for any service applications that you select.
- Back up and recover configurations only. This method provides you with the core SharePoint Foundation 2010 settings only.

Note:This method does not include Web application or service application settings. If Web application settings are required in the recovered farm, use one of the other methods.
- Create a deployment script, based on your documented configuration. This method may be more work initially, but is easy to use to maintain standardization.
-
Back up and recover a farm without content databases to copy configuration settings
To copy configuration settings by using a farm backup, we recommend that you first detach the content databases from the farm. This is not a step that we recommend that you take with a live production farm.

Note:Creating a farm backup without content databases does back up the service applications.
To back up and recover a farm without content databases by using Windows PowerShell
- Verify that you meet the following minimum requirements: See Add-SPShellAdmin.
- On the Start menu, click All Programs.
- Click Microsoft SharePoint 2010 Products.
- Click SharePoint 2010 Management Shell.
- At the Windows PowerShell command prompt, type the following command to document the current Web application URLs and content database mappings.
|
Get-SPWebApplication | %{$_.Name;$_.Url;%{$_.ContentDatabases|%{$_.Name};Write-Host “”}} |
- Either dismount all content databases, as in the following example:
|
Get-SPContentDatabase | Dismount-SPContentDatabase |
Or dismount a specific content database, as in the following example:
|
Get-SPContentDatabase WSS_Content | Dismount-SPContentDatabase |
- Back up the farm.
|
Backup-SPFarm -Directory \\servername\share -BackupMethod Full |
|
|
|
You can view the progress of the backup by looking at the \\servername\share\spbr####\spbackup.log file. |

- After the backup is complete, re-mount the content databases. Replace <WSS_Content> and <http://servername> with each of the mappings documented in step 5).
|
Mount-SPContentDatabase -Name <WSS_Content> -WebApplication <http://servername> |
-
Back up and recover configuration settings only
As part of farm backup, you can choose to back up only configuration settings. A configuration-only backup extracts and backs up many, but not all, configuration settings from a configuration database. By using built-in tools, you can back up the configuration of any configuration database, whether it is currently attached to a farm or not. For detailed information about how to back up a configuration, see Back up a farm configuration (SharePoint Foundation 2010) .A configuration backup can be restored to the same — or any other — server farm. When a configuration is restored, it will overwrite any settings present in the farm that have values that are set within the configuration backup. If any settings present in the farm are not contained in the configuration backup, they will not be overwritten. For detailed information about how to restore a farm configuration, see Restore a farm configuration (SharePoint Foundation 2010).
-
Create a scripted deployment to copy configuration settings
When you create a scripted deployment of SharePoint Foundation 2010, you are creating copies of configuration settings.
-
Restore a Web application (SharePoint Foundation 2010)
Updated: January 20, 2011
This article describes how to restore a Web application. When you restore a Web application, you also restore the Internet Information Services (IIS) settings and all content databases that are associated with the Web application.
In this article:
- Considerations when restoring a Web application
- Use Windows PowerShell to restore a Web application
- Use Central Administration to restore a Web application
- Use SQL Server tools to restore databases associated with a Web application
- Additional steps to restore a Web application that uses forms-based authentication
- Additional steps to remove duplicate claims providers after restoring a Web application that uses claims-based authentication
-
Considerations when restoring a Web application
Consider the following information as you prepare to restore a Web application:
- You can only restore one Web application at a time by using the procedures in this article. However, you can simultaneously restore all the Web applications in the farm by restoring the complete farm.
- You cannot use SQL Server tools to restore a Web application.
- When you restore a Web application that is configured to use claims-based authentication, there are additional steps that you must follow after restoring the Web application to restore claims-based authentication.
-
Use Windows PowerShell to restore a Web application
You can use Windows PowerShell to restore a Web application manually or as part of a script that can be run at scheduled intervals.
To restore a Web application by using Windows PowerShell
- Verify that you meet the following minimum requirements: See Add-SPShellAdmin.
- On the Start menu, click All Programs.
- Click Microsoft SharePoint 2010 Products.
- Click SharePoint 2010 Management Shell.
- At the Windows PowerShell command prompt, type the following command:
|
Restore-SPFarm -Directory <BackupFolderName> -RestoreMethod Overwrite -Item <WebApplicationName> [-BackupId <GUID>] [-Verbose] |
Where:
- <BackupFolderName> is the full path to the folder you use for backup files.
- <WebApplicationName> is the name of the Web application that was backed up.
-
<GUID> is the identifier of the back up to use for the restore operation.
If you do not specify the value of the BackupID
parameter, the most recent backup will be used. You cannot restore a Web application by using a configuration-only backup. You can view the backups for the farm by typing the following:
|
Get-SPBackupHistory -Directory <BackupFolderName> -ShowBackup |
For more information, see Restore-SPFarm (http://technet.microsoft.com/library/8e18ea80-0830-4ffa-b6b6-ad18a5a7ab3e(Office.14).aspx).
|
|
|
We recommend that you use Windows PowerShell when performing command-line administrative tasks. The Stsadm command-line tool has been deprecated, but is included to support compatibility with previous product versions. |

-
Use Central Administration to restore a Web application
You can use Central Administration to restore a Web application.
To restore a Web application by using Central Administration
- Verify that the user account performing this procedure is a member of the Farm Administrators group. Additionally, verify that the Windows SharePoint Services Timer V4 service and the Farm Database Access account have Full Control permissions on the backup folder.
- In Central Administration, on the Home page, in the Backup and Restore section, click Restore from a backup.
- On the Restore from Backup — Step 1 of 3: Select Backup to Restore page, from the list of backups, select the backup job that contains the farm or Web application backup, and then click Next. You can view more details about each backup by clicking the (+) next to the backup.
|
|
|
If the correct backup job does not appear, in the Current Directory Location text box, type the Universal Naming Convention (UNC) path of the correct backup folder, and then click Refresh. You cannot use a configuration-only backup to restore the Web application. |

- On the Restore from Backup — Step 2 of 3: Select Component to Restore page, select the check box that is next to the Web application, and then click Next.
-
On the Restore from Backup — Step 3 of 3: Select Restore Options page, in the Restore Component section, make sure that Farm\<Web application> appears in the Restore the following content list.
In the Restore Only Configuration Settings section, make sure that the Restore content and configuration settings option is selected.
In the Restore Options section, under Type of Restore, select the Same configuration option. A dialog box appears that asks you to confirm the operation. Click OK.
|
|
|
If the Restore Only Configuration Settings section does not appear, the backup that you selected is a configuration-only backup. You must select another backup. |

Click Start Restore.
-
You can view the general status of all recovery jobs at the top of the Backup and Restore Job Status page in the Readiness section. You can view the status for the current recovery job in the lower part of the page in the Restore section. The status page updates every 30 seconds automatically. You can manually update the status details by clicking Refresh. Backup and recovery are Timer service jobs. Therefore, it may take several seconds for the recovery to start.
If you receive any errors, you can review them in the Failure Message column of the Backup and Restore Job Status page. You can also find more details in the Sprestore.log file at the UNC path that you specified.
-
Use SQL Server tools to restore databases associated with a Web application
You cannot restore the complete Web application by using SQL Server tools. However, you can restore all the databases that are associated with the Web application. To restore the complete Web application, use either Windows PowerShell or Central Administration.
To restore databases associated with a Web application by using SQL Server tools
- Verify that the user account performing this procedure is a member of the sysadmin fixed server role.
- If the Windows SharePoint Services Timer service is running, stop the service and wait for several minutes for any currently running stored procedures to finish. Do not restart the service until after you restore the databases.
- Start SQL Server Management Studio and connect to the database server.
- In Object Explorer, expand Databases.
-
Right-click the database that you want to restore, point to Tasks, point to Restore, and then click Database.
The database is automatically taken offline during the recovery operation and cannot be accessed by other processes.
-
In the Restore Database dialog box, specify the destination and the source, and then select the backup set or sets that you want to restore.
The default values for destination and source are appropriate for most recovery scenarios.
- In the Select a page pane, click Options.
- In the Restore options section, select only Overwrite the existing database. Unless the environment or policies require otherwise, do not select the other options in this section.
- In the Recovery state section:
- If you have included all the transaction logs that you must restore, select RECOVER WITH RECOVERY.
- If you must restore additional transaction logs, select RECOVER WITH NORECOVERY.
- The third option, RECOVER WITH STANDBY is not used in this scenario.
|
|
|
For more information about these recovery options, see Restore Database (Options Page) (http://go.microsoft.com/fwlink/?LinkId=114420). |

- Click OK to complete the recovery operation.
- Repeat steps 4 through 10 for each database that you are restoring.
- Start the Windows SharePoint Services Timer service.
-
Additional steps to restore a Web application that uses forms-based authentication
After you restore a Web application that uses forms-based authentication, you must perform the following steps to reconfigure the Web application to use forms-based authentication.
- Re-register the membership and role providers in the Web.config file.
- Redeploy the providers.
For more information, see Configure forms-based authentication for a claims-based Web application (SharePoint Foundation 2010) (http://technet.microsoft.com/library/f7b57d4b-87d7-41e6-9e55-350d6ad41894(Office.14).aspx).
-
Additional steps to remove duplicate claims providers after restoring a Web application that uses claims-based authentication
After a Web application that is configured to use claims-based authentication has been restored, duplicate or additional claims providers are often visible. You must use the following process to remove the duplicate providers:
- In Central Administration, click Manage Web application, select a Web application that uses claims-based authentication, and then click Authentication Providers.
- Select a zone that the Web application is associated with to open the Edit Authentication page, and then click Save.
- Repeat for each zone, and then for each Web application that uses claims-based authentication.
-
Related content
-
Restore a service application (SharePoint Foundation 2010)
Updated: July 8, 2010
There are situations in which you might have to restore a specific service application instead of restoring the complete farm. Some service applications — for example, the Business Data Connectivity service application — provide data to other services and sites. As a result, users might experience some service interruption until the recovery process is finished.
For information about how to simultaneously restore all the service applications in a farm, see Restore a farm (SharePoint Foundation 2010).

Important:You cannot back up from one version of Microsoft SharePoint Foundation and restore to another version of SharePoint Foundation.

Note:SharePoint Foundation 2010 backs up the Business Data Connectivity Service metadata store, which includes external content types, external systems, and BDC models. For more information, see Business Data Connectivity service administration (SharePoint Foundation 2010) (http://technet.microsoft.com/library/203a1cbd-49d9-49cb-be83-598753e8b07e(Office.14).aspx). Note that this does not back up the external data sources. To protect the data, the external data sources must be backed up.
If you restore the service application or the farm and then restore the data source to a different location, you must change the location information in the external content type definition. If you do not, the Business Data Connectivity Service might not be able to locate the data source.

Note:SharePoint Foundation 2010 restores remote Binary Large Object (BLOB) stores but only if you are using the FILESTREAM provider to put data in remote BLOB stores.
If you are using another provider, you must manually restore remote BLOB stores.
Procedures in this article:
- Use Windows PowerShell to restore a service application
- Use Central Administration to restore a service application
- Use SQL Server tools to restore the databases for a service application

Note:You cannot restore the complete service application but you can restore the databases associated with the service application.
-
Use Windows PowerShell to restore a service application
You can use Windows PowerShell to restore a service application.
To restore a service application by using Windows PowerShell
- Verify that you meet the following minimum requirements: See Add-SPShellAdmin.
- On the Start menu, click All Programs.
- Click Microsoft SharePoint 2010 Products.
- Click SharePoint 2010 Management Shell.
-
At the Windows PowerShell command prompt, type the following command:
Restore-SPFarm -Directory <BackupFolder> -Item <ServiceApplicationName> -RecoveryMethod Overwrite [-BackupId <GUID>] [-Verbose]
To specify which backup to use, use the BackupId
parameter. You can view the backups for the farm by typing the following: Get-SPBackupHistory -Directory <Backup folder> -ShowBackup
. If you do not specify the BackupId
, the most recent backup will be used. You cannot restore a service application from a configuration-only backup.
For more information, see Restore-SPFarm (http://technet.microsoft.com/library/8e18ea80-0830-4ffa-b6b6-ad18a5a7ab3e(Office.14).aspx).
|
|
|
We recommend that you use Windows PowerShell when performing command-line administrative tasks. The Stsadm command-line tool has been deprecated, but is included to support compatibility with previous product versions. |

-
Use Central Administration to restore a service application
Use the following procedure to restore a service application by using the SharePoint Central Administration Web site.
To restore a service application by using Central Administration
- Verify that the user account that is performing this procedure is a member of the Farm Administrators SharePoint group.
- In Central Administration, on the Home page, in the Backup and Restore section, click Restore from a backup.
- On the Restore from Backup — Step 1 of 3: Select Backup to Restore page, select the backup job that contains the service application backup, or a farm-level backup, from the list of backups, and then click Next. You can view more details about each backup by clicking the (+) next to the backup.
|
|
|
If the correct backup job does not appear, in the Backup Directory Location text box, type the path of the correct backup folder, and then click Refresh. You cannot use a configuration-only backup to restore the farm. |

- On the Restore from Backup — Step 2 of 3: Select Component to Restore page, expand Shared Services Applications, select the check box that is next to the service application, and then click Next.
-
On the Restore from Backup — Step 3 of 3: Select Restore Options page, in the Restore Component section, make sure that Farm\Shared Services Applications\<Service application> appears in the Restore the following component list.
In the Restore Options section, under Type of restore, select the Same configuration option. A dialog box will appear that asks you to confirm the operation. Click OK.
Click Start Restore.
-
You can view the general status of all recovery jobs at the top of the Backup and Restore Job Status page in the Readiness section. You can view the status for the current recovery job in the lower part of the page in the Restore section. The status page updates every 30 seconds automatically.
You can manually update the status details by clicking Refresh. Backup and recovery are Timer service jobs. Therefore, it may take a several seconds for the recovery to start.
If you receive any errors, you can review them in the Failure Message column of the Backup and Restore Job Status page. You can also find more details in the Sprestore.log file at the UNC path that you specified in step 3.
-
Use SQL Server tools to restore the databases for a service application
You cannot restore the complete service application by using SQL Server tools. However, you can use SQL Server tools to restore the databases that are associated with the service application. To restore the complete service application, use either Windows PowerShell or Central Administration.
To restore the databases for a service application by using SQL Server tools
- Verify that the user account that you are using to restore the databases is a member of the SQL Server sysadmin fixed server role on the database server where each database is stored.
- Open SQL Server Management Studio and connect to the database server.
- In Object Explorer, expand Databases.
- Right-click the database that you want to restore, point to Tasks, point to Restore, and then click Database.
- In the Restore Database dialog box, on the General page, select the database to restore to from the To database drop-down list.
- Select the restore source from the From database drop-down list.
- In the Select the backup sets to restore section area, select the check box next to the database.
-
On the Options tab, select the recovery state from the Recover state section.
For more information about which recovery type to use, see Overview of Recovery Models (http://go.microsoft.com/fwlink/?LinkId=114396) in SQL Server Books Online.
- Click OK to restore the database.
- Repeat steps 1-9 for each database that is associated with the service application.
-
Restore a site collection (SharePoint Foundation 2010)
Updated: June 24, 2010
You can use only Windows PowerShell to restore a site collection.
-
Use Windows PowerShell to restore a site collection
You can use Windows PowerShell to restore a site collection manually or as part of a script that can be run at scheduled intervals.

Note:If a user has taken copies of content for off-line editing in Microsoft SharePoint Workspace 2010 and the content is restored from a backup on the server, when the user re-connects, the server automatically synchronizes the off-line content with the restored content. This might result in data loss on the user’s copies of the content.
To restore a site collection by using Windows PowerShell
- Verify that you meet the following minimum requirements: See Add-SPShellAdmin. Additionally, verify that the user account performing this procedure has read permissions to the backup folder and is a member of the db_owner fixed database role on both the farm configuration database and the content database where the site collection is being restored.
- On the Start menu, click Administrative Tools.
- Click SharePoint 2010 Management Shell.
-
At the Windows PowerShell command prompt (that is, PS C:\>), type the following command, and then press ENTER:
Restore-SPSite -Identity <Site collection URL> -Path <Backup file> [-DatabaseServer <Database server name>] [-DatabaseName <Content database name>] [-HostHeader <Host header>] [-Force] [-GradualDelete] [-Verbose]
If you want to restore the site collection to a specific content database, use the DatabaseServer
and DatabaseName
parameters to specify the content database. If you do not specify a content database, the site collection will be restored to a content database chosen by Microsoft SharePoint Foundation 2010.
If you are restoring a host-named site collection, use the Identity
parameter to specify the URL of the host-named site collection and use the HostHeader
parameter to specify the URL of the Web application that will hold the host-named site collection.
If you want to overwrite an existing site collection, use the Force
parameter.
|
|
|
If the site collection that you are restoring is 1 gigabyte or larger, you can use the GradualDelete parameter for better performance during the restore process. When this parameter is used, the site collection that is overwritten is marked as deleted, which immediately prevents any additional access to its content. The data in the marked site collection is then deleted gradually over time by a timer job instead of all at the same time, which reduces the impact on server performance. |

For more information, see Restore-SPSite (http://technet.microsoft.com/library/90f19a58-0455-470c-a8ee-3129fc341f62(Office.14).aspx).
|
|
|
We recommend that you use Windows PowerShell when performing command-line administrative tasks. The Stsadm command-line tool has been deprecated, but is included to support compatibility with previous product versions. |

-
Concepts
Back up a site collection (SharePoint Foundation 2010)
-
Restore customizations (SharePoint Foundation 2010)
Updated: August 12, 2010
This article describes how to restore customizations that have been made to sites in a Microsoft SharePoint Foundation farm.
This article assumes that you are familiar with the concepts and procedures in Back up customizations (SharePoint Foundation 2010).
In this article:
-
Restoring solution packages
The method that you use to restore solution packages is determined by whether the customizations were deployed as trusted solutions or sandboxed solutions.
Trusted solutions are solutions that farm administrators deploy. They are deployed to the entire farm, and can be used on any site within the farm. Trusted solutions are stored in the configuration database. Trusted solutions are backed up when a farm is backed up by using SharePoint Foundation 2010 backup, and are included in configuration-only backups, and can also be backed up as a group, or individually. They are visible in the restore hierarchy.
Sandboxed solutions are solutions that site collection administrators can deploy to a single site collection. Sandboxed solutions are stored in the content database associated with the site collection that they are deployed to. They are included in SharePoint Foundation 2010 farm, Web application, content database, and site collection backups, but are not visible in the restore hierarchy, and cannot be selected or restored individually.
We recommend that you keep a backup of the original .wsp file as well as the source code used to build the .wsp file for both trusted and sandboxed solutions.
To restore a trusted solution by using Central Administration
- Verify that the user account that is performing this procedure is a member of the Farm Administrators SharePoint group.
- In Central Administration, on the Home page, in the Backup and Restore section, click Restore from a backup.
- On the Restore from Backup — Step 1 of 3: Select Backup to Restore page, from the list of backups, select the backup job that contains the solution package, and then click Next. You can view more details about each backup by clicking the (+) next to the backup.
|
|
|
If the correct backup job does not appear, in the Backup Directory Location text box, type the Universal Naming Convention (UNC) path of the correct backup folder, and then click Refresh. |

- On the Restore from Backup — Step 2 of 3: Select Component to Restore page, select the check box that is next to the solution, and then click Next.
-
On the Restore from Backup — Step 3 of 3: Select Restore Options page, in the Restore Component section, ensure that Solution appears in the Restore the following component list.
In the Restore Only Configuration Settings section, ensure that the Restore content and configuration settings option is selected.
In the Restore Options section, under Type of Restore, select the Same configuration option. A dialog box appears that asks you to confirm the operation. Click OK.
Click Start Restore.
-
You can view the general status of all recovery jobs at the top of the Backup and Restore Job Status page in the Readiness section. You can view the status for the current recovery job in the lower part of the page in the Restore section. The status page updates every 30 seconds automatically. You can manually update the status details by clicking Refresh. Backup and recovery are Timer service jobs. Therefore, it may take several seconds for the recovery to start.
If you receive any errors, you can review them in the Failure Message column of the Backup and Restore Job Status page. You can also find more details in the Sprestore.log file at the UNC path that you specified in step 3.
To restore a trusted solution by using Windows PowerShell
- Verify that you meet the following minimum requirements: See Add-SPShellAdmin.
- On the Start menu, click All Programs.
- Click Microsoft SharePoint 2010 Products.
- Click SharePoint 2010 Management Shell.
- At the Windows PowerShell command prompt, type the following command:
|
Restore-SPFarm -Directory <BackupFolder> -RestoreMethod Overwrite -BackupId <GUID> -Item <SolutionPath> |
Where:
- <BackupFolder> is the UNC location of the directory that you want to restore from.
- <GUID> is the GUID of the backup ID that you want to restore from. If you do not specify a backup, the most recent one is used.
- <SolutionPath> is the path of the solution within the backup tree (usually farm\solutions\SolutionName).
For more information, see Restore-SPFarm (http://technet.microsoft.com/library/8e18ea80-0830-4ffa-b6b6-ad18a5a7ab3e(Office.14).aspx).
|
|
|
We recommend that you use Windows PowerShell when performing command-line administrative tasks. The Stsadm command-line tool has been deprecated, but is included to support compatibility with previous product versions. |

Restoring a sandboxed solution
You cannot restore only customizations that were deployed as sandboxed solutions. Instead, you must restore the farm, Web application, content database, or site collection with which the customization is associated. For more information about these methods of restoring, see Related content later in this article.
-
Restoring authored site elements
You cannot restore only authored site elements. Instead, you must restore the farm, Web application, or content database with which the authored site element is associated. For more information about these methods of backing up, see Related content.
-
Restoring workflows
Workflows are a special case of customizations that you can restore. Make sure that the backup and recovery plan includes any of the following scenarios that apply to the environment:
- Declarative workflows, such as those created in Microsoft SharePoint Designer 2010, are stored in the content database for the site collection to which they are they are deployed. Restoring the content database or site collection restores these workflows.
- Custom declarative workflow actions have components in the following three locations:
- The Microsoft Visual Studio 2010 assemblies for the actions are stored in the global assembly cache (GAC).
- The XML definition files (.actions files) are stored in the 14\TEMPLATE\<LCID>\Workflow directory.
-
An XML entry to mark the action as an authorized type is stored in the Web.config file for the Web applications in which it is used.
If the farm workflows use custom actions, you should use a file restore system to restore these files and XML entries. You can reapply the files as needed after recovery.
- Workflows that depend on custom code, such as those that are created by using Visual Studio 2010, are stored in two locations. The Visual Studio 2010 assemblies for the workflow are stored in the GAC, and the XML definition files are stored in the Features directory. This is the same as other types of SharePoint Foundation features such as Web Parts and event receivers. If the workflow was installed as part of a solution package, follow the instructions for restoring solution packages.
- If you create a custom workflow that interacts with a site collection other than the one where the workflow is deployed, you must restore both site collections to recover the workflow. Restoring a farm is sufficient to recover all site collections in the farm and all workflows that are associated with them.
- Workflows that have not been deployed must be restored separately by using a file system backup application.
-
Restoring changes to the Web.config file
You can recover changes to the Web.config file made by using Central Administration or the SharePoint Foundation 2010 APIs and object model by performing a farm or configuration-only restore. You should use a file system backup to protect changes to the Web.config file that are not made by using Central Administration or the SharePoint APIs and object model. You can recover the backup by using a file system restore.
-
Recovering changes made by direct editing
Changes made directly to a site by directly editing through the browser can be difficult to recover. The following table describes recovery strategies for specific objects.
Edited object
Backup strategy
List
If you have used SharePoint Designer 2010 to save as a template, you can deploy and activate the template. For more information, see Save a SharePoint site as a template (http://go.microsoft.com/fwlink/?LinkID=199515).
Site
If you have used SharePoint Designer 2010 to save as a template, you can deploy and activate the template. For more information, see Save a SharePoint site as a template (http://go.microsoft.com/fwlink/?LinkID=199515).
Site collection
Use site collection recovery. For more information, see Restore a site collection (SharePoint Foundation 2010).
-
Restoring developed customizations that are not packaged as solutions
Restoring developed customizations that are not packaged as solutions can be a complex process because the customization file locations are not standardized.
Consult with the development team or customization vendor to determine whether the customizations involve additional add-in software or files in other locations. We recommend that you restore directories with a file system restore solution. The following table lists locations where customizations are typically stored on Web servers.
Location
Description
%COMMONPROGRAMFILES%\Microsoft Shared\Web Server Extensions\14
Commonly updated files, custom assemblies, custom templates, custom site definitions
Inetpub
Location of IIS virtual directories
%WINDIR%\Assembly
Global assembly cache (GAC): a protected operating system location where the Microsoft .NET Framework code assemblies are installed to provide full system access
-
Related content
-
Restore a content database (SharePoint Foundation 2010)
Updated: June 24, 2010
You can restore any content database or several content databases, one at a time. For information about how to back up all the content databases in a farm at the same time, see Back up a farm (SharePoint Foundation 2010).

Note:SharePoint Foundation 2010 restores up remote Binary Large Objects (BLOB) stores but only if you are using the SQL Filestream remote BLOB store provider to place data in remote BLOB stores.
If you are using another provider you must manually restore these remote BLOB stores.

Note:If a user has taken copies of content for off-line editing in Microsoft SharePoint Workspace 2010 and the content is restored from a backup on the server, when the user re-connects, the server automatically synchronizes the off-line content with the restored content. This might result in data loss on the user’s copies of the content.
Procedures in this task:
-
Use Windows PowerShell to restore a content database
You can use Windows PowerShell to restore a content database.
To restore a content database by using Windows PowerShell
- Verify that you meet the following minimum requirements: See Add-SPShellAdmin.
- On the Start menu, click All Programs.
- Click Microsoft SharePoint 2010 Products.
- Click SharePoint 2010 Management Shell.
-
At the Windows PowerShell command prompt (that is, PS C:\>), type the following command, and then press ENTER:
Restore-SPFarm -Directory <Backup folder name> -RestoreMethod Overwrite -Item <Content database name> [-BackupId <GUID>] [-Verbose]
|
|
|
If you are not logged on as the Farm account, you are prompted for the Farm account’s credentials. |

If you do not use the BackupId
parameter, the most recent backup will be used. To view a list of the backups, including their Backup IDs, type the following command, and then press ENTER:
Get-SPBackupHistory -Directory <Backup folder>
For more information, see Restore-SPFarm (http://technet.microsoft.com/library/8e18ea80-0830-4ffa-b6b6-ad18a5a7ab3e(Office.14).aspx).
|
|
|
We recommend that you use Windows PowerShell when performing command-line administrative tasks. The Stsadm command-line tool has been deprecated, but is included to support compatibility with previous product versions. |

-
Use Central Administration to restore a content database
You can use Central Administration to restore a farm or components of a farm.
To restore a content database by using Central Administration
- Verify that you are logged on as a member of the Farm Administrators group.
- In Central Administration, on the Home page, in the Backup and Restore section, click Restore from a backup.
- On the Restore from Backup — Step 1 of 3: Select Backup to Restore page, from the list of backups, select the backup job that contains the content database backup, and then click Next.
|
|
|
If the correct backup job does not appear, in the Current Directory Location text box, enter the path of the correct backup folder, and then click Refresh. |

- On the Restore from Backup — Step 2 of 3: Select Component to Restore page, select the check box that is next to the content database, and then click Next.
|
|
|
If the content database is not selectable, you must use Windows PowerShell or SQL Server tools to restore the content database. |

-
On the Restore from Backup — Step 3 of 3: Select Restore Options page, in the Restore Options section, under Type of Restore, click the Same configuration option. A dialog box appears that asks you to confirm the operation. Click OK.
Click Start Restore.
-
You can view the general status of all recovery jobs at the top of the Backup and Restore Job Status page in the Readiness section. You can view the status for the current recovery job in the lower part of the page in the Restore section. The status page updates every 30 seconds automatically. You can manually update the status details by clicking Refresh. Backup and recovery are Timer service jobs. Therefore, it may take several seconds for the recovery to start.
If you receive any errors, you can review them in the Failure Message column of the Backup and Restore Job Status page. You can also find more details in the Sprestore.log file at the UNC path that you specified in step 2.
-
Use SQL Server tools to restore a content database
You can use SQL Server tools to restore a content database by following these steps:
- If possible, back up the live transaction log of the content database to protect any changes that were made after the last full backup.
- Restore the last full database backup.
- Restore the most recent differential database backup that occurred after the most recent full database backup.
- Restore all transaction log backups that occurred after the most recent full or differential database backup.
To restore a content database by using SQL Server tools
- Verify that the user account performing this procedure is a member of the sysadmin fixed server role.
- If the Windows SharePoint Services Timer service is running, stop the service and wait for several minutes for any currently running stored procedures to finish. Do not restart the service until after you restore the content databases.
- Start SQL Server Management Studio and connect to the database server.
- In Object Explorer, expand Databases.
-
Right-click the database that you want to restore, point to Tasks, point to Restore, and then click Database.
The database is automatically taken offline during the recovery operation and cannot be accessed by other processes.
-
In the Restore Database dialog box, specify the destination and the source, and then select the backup set or sets that you want to restore.
The default values for destination and source are appropriate for most recovery scenarios.
- In the Select a page pane, click Options.
- In the Restore options section, select only Overwrite the existing database. Unless the environment or policies require otherwise, do not select the other options in this section.
- In the Recovery state section:
- If you have included all the transaction logs that you must restore, select RECOVER WITH RECOVERY.
- If you must restore additional transaction logs, select RECOVER WITH NORECOVERY.
- The third option, RECOVER WITH STANDBY is not used in this scenario.
|
|
|
For more information about these recovery options, see Restore Database (Options Page) (http://go.microsoft.com/fwlink/?LinkId=114420). |

- Click OK to complete the recovery operation.
- Repeat steps 4 through 10 for each database that you are restoring.
- Start the Windows SharePoint Services Timer service.
-
Concepts
Back up a content database (SharePoint Foundation 2010)
-
Attach and restore a read-only content database (SharePoint Foundation 2010)
Published: May 12, 2010
A Microsoft SharePoint Foundation 2010 farm in which content databases have been set to be read-only can be part of a failure recovery environment that runs against mirrored or log-shipped content databases or part of a highly available maintenance or patching environment that provides user access when another version of the farm is being updated. When you re-attach the read-only databases, they become read-write.
For more information about how to use read-only databases, see Run a farm that uses read-only content databases (Windows SharePoint Services “14”) (http://technet.microsoft.com/library/db27f4ab-af50-4400-ad9a-5092868a5398(Office.14).aspx).
-
Use Windows PowerShell to attach and restore a read-only content database
You can use only Windows PowerShell to attach and restore a read-only content database.
To attach and restore a read-only content database by using Windows PowerShell
- Verify that you meet the following minimum requirements: See Add-SPShellAdmin.
- On the Start menu, click All Programs.
- Click Microsoft SharePoint 2010 Products.
- Click SharePoint 2010 Management Shell.
-
At the Windows PowerShell command prompt (that is, PS C:\>), type the following command, and then press ENTER:
Mount-SPContentDatabase -Name <Database name> -WebApplication <Web application ID> [-Verbose]
|
|
|
Attaching a content database by using the Mount-SPContentDatabase cmdlet differs from attaching a database in SQL Server by using SQL Server tools. Mount-SPContentDatabase associates the content database with a Web application so that the contents can be read. |

For more information, see Mount-SPContentDatabase (http://technet.microsoft.com/library/20d1bc07-805c-44d3-a278-e2793370e237(Office.14).aspx).
|
|
|
We recommend that you use Windows PowerShell when performing command-line administrative tasks. The Stsadm command-line tool has been deprecated, but is included to support compatibility with previous product versions. |

-
Concepts
Recovery (SharePoint Foundation 2010)
-
Import a list or document library (SharePoint Foundation 2010)
Published: May 12, 2010
Although you can use either Windows PowerShell or Central Administration to export a site, list, or document library, you can use only Windows PowerShell to import a site, list, or document library. For information about how to export lists or libraries, see Export a site, list, or document library (SharePoint Foundation 2010).
You can use importing as a method of restoring the items, or as a method of moving or copying the items from one farm to another farm. You can import a site, list, or document library from a backup of the current farm, from a backup of another farm, or from a read-only content database. To import from a read-only content database, you must first attach the read-only database. For more information, see Attach and restore a read-only content database (SharePoint Foundation 2010).

Important:You cannot import a site, list or document library exported from one version of Microsoft SharePoint Foundation to another version of SharePoint Foundation.
-
Import a site, list or document library
You can use Windows PowerShell to manually import a site, list, or document library or as part of a script that can be run at regular intervals.
To import a site, list or document library by using Windows PowerShell
- Verify that you meet the following minimum requirements: See Add-SPShellAdmin.
- On the Start menu, click All Programs.
- Click Microsoft SharePoint 2010 Products.
- Click SharePoint 2010 Management Shell.
-
At the Windows PowerShell command prompt (that is, PS C:\>), type the following command, and then press ENTER:
Import-SPWeb -Identity <Site URL> -Path <Export file name> [-Force] [-NoFileCompression] [-Verbose]
|
|
|
The site or subsite that you are importing must have a template that matches the template of the site specified by Identity . |

You can also use the Get-SPWeb
cmdlet and pass the ID to Import-SPWeb
by using the Windows PowerShell pipeline. The value of the Path
parameter specifies the path and file name of the file from which to import the list or library. To include the user security settings with the list or document library, use the IncludeUserSecurity
parameter. To overwrite the list or library that you specified, use the Force
parameter. You can use the UpdateVersions
parameter to specify how versioning conflicts will be handled. To view the progress of the operation, use the Verbose
parameter.
The NoFileCompression
parameter lets you specify that no file compression is performed during the import process. Using this parameter can lower resource usage up to 30% during the export and import process. If you are importing a site, list, or document library that you exported from Central Administration, or if you exported a site, list, or document library by using Windows PowerShell and you did not use the NoFileCompression
parameter in the Export-SPWeb
cmdlet, you cannot use this parameter in the Import-SPWeb
cmdlet.
|
|
|
There is no facility in the Import-SPWeb cmdlet import a subset of the items in the export file. Therefore, the import operation will import everything from the file. |

For more information, see Import-SPWeb (http://technet.microsoft.com/library/2ecc5b6e-1b23-4367-a966-b7bd3377db3a(Office.14).aspx).
|
|
|
We recommend that you use Windows PowerShell when performing command-line administrative tasks. The Stsadm command-line tool has been deprecated, but is included to support compatibility with previous product versions. |

-
Concepts
Export a site, list, or document library (SharePoint Foundation 2010)
-
Availability configuration (SharePoint Foundation 2010)
Published: May 12, 2010
This section describes how to configure availability for Microsoft SharePoint Foundation 2010. The articles assume that you are familiar with the concepts and terms presented in Plan for availability (SharePoint Foundation 2010).
In this section:
-
This article describes how to use SQL Server clustering with SharePoint Foundation 2010.
-
This article describes how to configure SQL Server database mirroring for use with SharePoint Foundation 2010.
-
This article provides a script to use in configuring SQL Server database mirroring for use with SharePoint Foundation 2010 in a test environment. In a production environment, we recommend that a database professional configure mirroring.
-
-
Concepts
Plan for availability (SharePoint Foundation 2010)
-
Configure availability by using SQL Server clustering (SharePoint Foundation 2010)
Published: May 12, 2010
Microsoft SQL Server 2008 with Service Pack 1 (SP1) and Cumulative Update 2 failover clustering can be used to configure availability within a farm for Microsoft SharePoint Foundation 2010. This article assumes that you are familiar with the concepts and terms presented in Plan for availability (SharePoint Foundation 2010).
Failover clustering provides availability support for an instance of SQL Server 2008 with SP1 and Cumulative Update 2. A failover cluster is a combination of one or more nodes or servers and two or more shared disks. A failover cluster instance appears as a single computer, but has functionality that provides failover from one node to another if the current node becomes unavailable.
SharePoint Foundation 2010 references the cluster as a whole; therefore, failover is automatic and seamless from the perspective of SharePoint Foundation 2010.
For detailed information about failover clustering, see Getting Started with SQL Server 2008 Failover Clustering (http://go.microsoft.com/fwlink/?LinkID=102837&clcid=0x409).
There are no instructions specific to setting up clustering for SharePoint Foundation 2010. For instructions on how to set up failover clustering, see Installing a SQL Server 2008 Failover Cluster (http://go.microsoft.com/fwlink/?LinkId=132112&clcid=0x409).
-
Configure availability by using SQL Server database mirroring (SharePoint Foundation 2010)
Published: May 12, 2010
This article describes how to use high-availability database mirroring to configure availability within a farm for Microsoft SharePoint Foundation 2010. The article assumes that you are familiar with the concepts and terms presented in Plan for availability (SharePoint Foundation 2010).
Microsoft SQL Server database mirroring provides availability support by sending transactions directly from a principal database and server to a mirror database and server when the transaction log buffer for the principal database is written to disk. For availability within a Microsoft SharePoint Foundation 2010 farm, you use high-availability database mirroring, also known as high-safety mode with automatic failover. High-availability database mirroring involves three server instances: a principal, a mirror, and a witness. The witness server enables SQL Server to automatically fail over from the principal server to the mirror server. Failover from the principal database to the mirror database typically takes several seconds.
Within a SharePoint Foundation 2010 farm, mirroring can provide redundancy for the content and configuration databases, and for many service databases. Even if your databases are mirrored to the same server, each database fails over individually. The following figure shows how mirroring is configured to provide availability within a SharePoint Foundation 2010 farm.

SharePoint Foundation 2010 is mirroring-aware. To use mirroring in your environment, first configure mirroring, and then set the failover database value in SharePoint Foundation.
In this article:
-
Before you begin
Before you begin to configure mirroring, make sure that your database administrator is aware of the following requirements and supported topologies.
Database mirroring requirements
Become familiar with the recommendations in the following list, and ensure that your databases and system meet any requirements before you configure database mirroring for a SharePoint Foundation environment:
- We recommend that your system have latency no more than 1 millisecond.
- System bandwidth should preferably be 1 gigabyte (GB) per second.
- Logs are copied in real time between the principal and the mirror servers, and copying can affect performance. Make sure that you have sufficient memory and bandwidth on both the principal and mirror server.
- The principal server and mirror server must run the same version and edition of SQL Server, and they must run in the same language. Database mirroring is available only in the Standard, Developer, and Enterprise editions. The witness server can run any version of SQL Server, including SQL Server 2008 Express.
-
Mirroring works only with databases that use the full recovery model.
By default, SharePoint Foundation 2010 databases are configured to use the simple recovery model. To configure database mirroring, the recovery model of the database must be set to Full. For information about how to set the recovery model for a database, see How to: View or Change the Recovery Model of a Database (SQL Server Management Studio) (http://go.microsoft.com/fwlink/?LinkId=132075&clcid=0x409).
- If you plan to mirror databases, consider that the size of the transaction logs for these databases may become very large. To work around this, you can establish a recovery plan that truncates transaction logs as necessary. For more information, see the following article in the Microsoft Knowledge Base: How to stop the transaction log of a SQL Server database from growing unexpectedly (http://go.microsoft.com/fwlink/?LinkId=111458&clcid=0x409).
- Every database mirroring session creates at least two threads for each database. Ensure that your database server has enough threads to allocate for mirroring all the supported databases. If you have insufficient threads, performance can decrease as more databases are added to a session.
For more information about performance for database mirroring, see Database mirroring best practices and performance considerations (http://go.microsoft.com/fwlink/?LinkId=185119).
Security associated with database mirroring
Database mirroring uses TCP sessions to transport the transaction log from one server to another and to monitor the current health of the system for automatic failovers. Authentication is performed at the session level when a port is opened for connection. Database mirroring supports both Windows authentication (NTLM or Kerberos) and certificates.
Unless the network is secure, the data transmitted during the session should be encrypted. Database mirroring supports both Advanced Encryption Standard (AES) and RC4 encryption algorithms. For more information about the security associated with database mirroring, see Database Mirroring Transport Security (http://go.microsoft.com/fwlink/?LinkId=83569&clcid=0x409).
SharePoint 2010 Products security and mirrored servers
When you set up a mirrored database, the SQL Server logins and permissions for the database to be used with a SharePoint farm are not automatically configured in the master and msdb databases on the mirror server. Instead, you must configure the permissions for the required logins. These include, but are not limited to, the following:
- The Central Administration application pool account should be a member of the dbcreator and securityadmin fixed server roles.
- All application pool accounts, the default content access accounts, and any accounts required for service applications should have SQL Server logins, although they should not be assigned to SQL Server fixed server or fixed database roles.
- Members of the Farm Administrators SharePoint group should also have SQL Server logins and should be members of the same SQL Server roles as the Central Administration application pool account.
We recommend that you transfer your logins and permissions from the principal server to the mirror server by running a script. An example script is available in Knowledge Base article 918992 How to transfer the logins and the passwords between instances of SQL Server 2005 (http://go.microsoft.com/fwlink/?LinkId=122053&clcid=0x409). For more information about how to transfer SQL Server metadata between instances, see the SQL Server Books Online article Managing Metadata When Making a Database Available on Another Server Instance (http://go.microsoft.com/fwlink/?LinkId=122055&clcid=0x409).
Supported topologies
We recommend that you maintain a one-to-one mapping of principal server and database instance to mirror server and database instance to ensure compatibility with SharePoint Foundation 2010.
The supported topologies include mirroring all content databases, the configuration database, the Central Administration content database, and the service application databases except for the Web Analytics Staging database and the User Profile Synchronization database.

Note:We do not recommend that you mirror the Usage and Health Data Collection Logging database. A SharePoint environment can continue to run if this database fails, and this data can be quickly regenerated.
Avoid topologies that do not have matching principal server and database instances and mirror server and database instances. Also, keep the configuration database and the administration content database on the same server.
-
Configure high-availability database mirroring
We recommend that a SQL Server database administrator configure high-availability mirroring for a production environment. For a test environment, we have provided Transact-SQL scripts that you can use to configure your environment. For more information, see Sample script for configuring SQL Server mirroring (SharePoint Foundation 2010).
-
Configure SharePoint 2010 Products to be aware of mirrored databases
To make SharePoint Foundation 2010 aware that failover mirrored databases exist, perform the following procedure for all configuration and content databases.

Note:We recommend that you use Windows PowerShell cmdlets to set failover database values. Although you can use the Central Administration Web site to set some failover database values, you cannot use it for all databases.
To configure SharePoint 2010 Products to be aware of mirrored databases by using Windows PowerShell
- Verify that you meet the following minimum requirements: See Add-SPShellAdmin.
- On the Start menu, click All Programs.
- Click Microsoft SharePoint 2010 Products.
- Click SharePoint 2010 Management Shell.
-
At the Windows PowerShell command prompt, type the following commands, and then press ENTER:
$db = get-spdatabase | where {$_.Name -eq “database name“}
$db.AddFailoverServiceInstance(“mirrored database name“)
$db.Update()
For more information, see Get-SPDatabase (http://technet.microsoft.com/library/c9802bf8-5216-4ade-b559-7ee25fcfa666(Office.14).aspx).
-
User experience during a failover
While SQL Server is switching to using a mirrored database, users of a SharePoint site that runs against the database may experience brief connectivity issues and data loss.
-
Monitoring and troubleshooting mirroring
To monitor the status and performance of mirroring within a farm, database administrators can use the Database Mirroring Monitor. Monitoring enables you to determine whether and how well data is flowing in the database mirroring session. Database Mirroring Monitor is also useful for troubleshooting the cause of reduced data flow. For more information, see Database Mirroring Monitor Overview (http://go.microsoft.com/fwlink/?LinkId=185068). Another resource to use in troubleshooting is the SQL Server Books Online article Troubleshooting Database Mirroring Setup (http://go.microsoft.com/fwlink/?LinkId=185069).
-
Other Resources
Database Mirroring (http://go.microsoft.com/fwlink/?LinkID=180597)
-
Sample script for configuring SQL Server mirroring (SharePoint Foundation 2010)
Published: May 12, 2010
This article contains a series of sample scripts that you can use to set up Microsoft SQL Server mirroring for a test Microsoft SharePoint Foundation 2010 environment. We recommend that a SQL Server database administrator configure mirroring for a production environment.
To set up database mirroring with SharePoint Foundation 2010, you must work individually with each database that you want to mirror.
In this article:
- Configure database mirroring with certificates and full recovery
- Set up a witness server
- Transfer permissions to the mirror server
The steps in the following section apply to the following server farm topology:
- One or more front-end Web servers
- Three servers that are running SQL Server 2008: principal server, mirror server, and witness server
- One configuration database
- Multiple content databases
- One or more service application databases
-
Configure database mirroring with certificates and full recovery
Each step lists the server on which it should be performed. Use Transact-SQL to send these commands to SQL Server. Placeholder information is denoted by angle brackets (<>); replace this with information that is specific to your deployment.
To set up the principal server for outbound connections
- On the principal server, create a certificate and open a port for mirroring.
|
–On the master database, create the database master key, if needed |
- On the principal server, back up the certificate.
|
–Back up the HOST_A certificate. |
- On the principal server, back up the database. This example uses the configuration database. Repeat for all databases.
|
USE master; |
- Copy the backup file to the mirror server. Repeat for all databases.
- By using any secure copy method, copy the backup certificate file (C:\HOST_HostA_cert.cer, for example) to the mirror server.
- On the principal server, create a login and user for the mirror server, associate the certificate with the user, and grant the login connect permissions for the partnership.
|
–Create a login on HOST_A for HOST_B |
To set up the mirror server for outbound connections
- On the mirror server, create a certificate and open a port for mirroring.
|
–On the master database, create the database master key, if needed. |
- On the mirror server, back up the certificate.
|
–Back up the HOST_B certificate. |
- By using any secure copy method, copy the backup certificate file (C:\HOST_HostB_cert.cer, for example) to the principal server.
- On the mirror server, restore the database from the backup files. This example uses the configuration database. Repeat for all databases.
|
RESTORE DATABASE SharePoint_Config |
To set up the mirror server for inbound connections
- On the mirror server, create a login and user for the principal server, associate the certificate with the user, and grant the login connect permissions for the partnership.
|
–Create a login on HOST_B for HOST_A |
To set up the principal server for inbound connections
- On the principal server, create a login and user for the mirror server, associate the certificate with the user, and grant the login connect permissions for the partnership.
|
–Create a login on HOST_A for HOST_B |
To set up the mirroring partners
- On the principal server, set up the mirroring partnership. This example uses the configuration database. Repeat for all databases.
|
–At HOST_A, set the server instance on HOST_B as a partner (mirror server). |
- On the mirror server, set up the mirroring partnership. This example uses the configuration database. Repeat for all databases.
|
–At HOST_B, set the server instance on HOST_A as a partner (principal server): |
-
Set up a witness server
Each step lists the server on which it should be performed. Use Transact-SQL to send these commands to SQL Server. Placeholder information is denoted by angle brackets (<>); replace this with information that is specific to your deployment.
- On the witness server, set up the certificate and open the port.
|
–On the master database, create the database master key, if needed |
- On the witness server, back up the certificate.
|
–Back up the HOST_C certificate |
- By using any secure copy method, copy the backup certificate file (C:\WITNESS_HOSTC_cert.cer, for example) to the principal server and the mirror server.
- On the witness server, create logins and users for the principal and mirror servers, associate the certificates with the users, and grant the logins connect permissions for the partnership.
|
–Create a login on witness HOST_C for principal HOST_A |
- On the principal server, create a login and user for the witness server, associate the certificate with the user, and grant the login connect permissions for the partnership. Repeat for the mirror server.
|
–Create a login on master HostA for witness HostC |
- On the principal server, attach the witness server. This example uses the configuration database. Repeat for all databases.
|
–Set up the witness server |
-
Transfer permissions to the mirror server
When you set up a mirrored database, the SQL Server logins and permissions for the database that will be used with a SharePoint farm are not automatically configured in the master and msdb databases on the mirror server. Instead, you must configure the permissions for the required logins.
We recommend that you transfer your logins and permissions from the principal server to the mirror server by running a script. The script that we recommend that you use is available in Knowledge Base article 918992: How to transfer the logins and the passwords between instances of SQL Server 2005 (http://go.microsoft.com/fwlink/?LinkId=122053&clcid=0x409).
-
Removing mirroring from a server
To remove mirroring from a server, see How to: Remove Database Mirroring (Transact-SQL) (http://go.microsoft.com/fwlink/?LinkId=185070).
Discover more from Escape Business Solutions
Subscribe to get the latest posts sent to your email.