

SharePoint Lifecycle Management Solution with Project Server 2010 – Setup Guide
This document is provided “as-is”. Information and views expressed in this document, including URL and other Internet Web site references, may change without notice. You bear the risk of using it.
Some examples depicted herein are provided for illustration only and are fictitious. No real association or connection is intended or should be inferred.
This document does not provide you with any legal rights to any intellectual property in any Microsoft product. You may copy and use this document for your internal, reference purposes.
© 2011 Microsoft Corporation.
Whitepaper: SharePoint Lifecycle Management Solution with Project Server 2010 – Setup Guide
Authors: Scott Jamison and Mark Candelora, Jornata LLC; Christophe Fiessinger, Senior Technical Product Manager, Microsoft
Published: May 2011
Applies to: Microsoft SharePoint Server 2010 and Microsoft Project Server 2010
Summary: This white paper provides instructions for configuring the Microsoft SharePoint
Server 2010 lifecycle management solution that runs atop Microsoft Project Server 2010. (37 printed pages)
Contents
Option 1: Step-by-Step Configuring your SharePoint Lifecycle Management Project Application 6
Create Project Detail Pages (PDP) 10
Install & configure the Workflow Visualization Web Part 12
Install & configure Dynamic Workflow WSP 14
Install the Dynamic Workflow solution 14
Configure the Dynamic Workflow solution 14
Install Project site template 19
Install Custom Site Template 20
Option 2: Restoring From Database Backup Files 21
Deploy Dynamic Workflow and Workflow Visualization solutions 22
Provision a new Project Web Application 24
Installing the Solution in the Information Worker Demonstration and Evaluation Virtual Machine 26
Adapt for your organization 35
Learn about Microsoft Project Server 2010 35
About this white paper
Microsoft SharePoint Server 2010 provides a vast number of capabilities that empower both business users and IT to create solutions quickly. For this reason, many organizations consider implementing SharePoint as a central platform for a wide array of business solutions.
For those organizations that have put SharePoint in place to handle the wide array of business needs (or are planning to do so), it’s likely that they’ll need a good way to track, manage, and prioritize those business requests. The white paper entitled SharePoint Lifecycle Management Solution with Project Server 2010 provides a suggested solution based on Microsoft Project Server 2010. The white paper is available for download at http://go.microsoft.com/fwlink/?LinkID=218030.
This white paper (the one you reading) is an adjunct paper that will walk through the steps necessary to begin using Microsoft Project Server 2010 to help prioritize and schedule the SharePoint projects that have been requested by a business user or group. This document assumes you will be working in a farm that has a working installation of SharePoint 2010 with Microsoft Project Server 2010 fully configured (please refer to Project Server 2010 Tech Center: http://technet.microsoft.com/en-us/projectserver/ee263909).
There are two ways to begin using this Solution:
- A manual, step-by-step creation of each Microsoft Project Server 2010 PWA instance, or
- By restoring the database backups provided in the download.
With the step-by-step process outlined in the section entitled Option 1, you will learn about what each entity does and have the opportunity to customize them as they are created. In the section entitled Option 2, you’ll instead use database backups, which enables you to get started right away. The backups also come pre-populated with sample projects that can be used to view portfolios or create reports. It is not recommended to use the backups as anything other than a demo that can be used to learn and experiment with or to present to others. To implement a solution in a production environment, the entities should be created and finalized in a development or test environment, thoroughly tested, then moved to production using the DM Import/Export tools (found in the Microsoft Project 2010 Solution Starters download).
This solution requires artifacts from a separate download. Before starting this instruction guide, please download the required artifacts from http://go.microsoft.com/fwlink/?LinkID=218030 and the deployment download from http://archive.msdn.microsoft.com/P2010SolutionStarter. Please see the Artifacts section in this document for specific details on the files.
Option 1: Step-by-Step Configuring your SharePoint Lifecycle Management Project Application
Once your Project Server Web Application (PWA) has been properly configured, open your browser to the PWA home page (by default this is http://<server>/pwa).
Create custom fields
Custom fields provide the ability to collect information on different project related objects as required by the business.
- In the quick links, under Settings, select Server Settings. Under Enterprise Data, select Enterprise Custom Fields and Lookup Tables.
Lookup tables
Lookup tables provide a specific list of values for fields that require a limited number of options. These lookup tables will be the options for the fields we create.
- Scroll to the second section called Lookup Tables for Custom Fields and click New Lookup Table
- Create the following tables with the specified values.
|
Roles
|
||||||||||||||||||||||||||||||||||||||||||||||||||||
|
Level |
Value |
|
|
1 |
Developer |
|
|
1 |
Administrator |
|
|
1 |
QA Engineer |
|
|
1 |
Architect |
|
|
1 |
DBA |
|
|
1 |
Business Liaison |
|
|
1 |
Analyst |
|
Display order: By row number
Project Types
Name: ProjectType_LT
Type: Text
Code
Mask: leave default
Lookup Table:
|
Level |
Value |
|
1 |
Feature activation |
|
1 |
Search content source |
|
1 |
Business workflow process |
|
1 |
Executive BI dashboard |
|
1 |
Business entity (BCS) connection |
|
1 |
SharePoint custom software development |
|
1 |
Other |
Display order: By row number
Risk Levels
Name: Risk_LT
Type: Text
Code
Mask: leave default
Lookup Table:
|
Level |
Value |
|
1 |
Very High Risk |
|
1 |
High Risk |
|
1 |
Medium Risk |
|
1 |
Low Risk |
Display order: By row number
|
One To Ten
|
|
Value |
Description |
|
1 |
The project went terribly – possibly due to budgeted time, resources or other estimates were incorrect; changing scope, technology or implementation issues, etc. |
|
2 |
|
|
3 |
|
|
4 |
|
|
5 |
The project was ok – there were some aspects of the project that went smoothly, but other aspects were not. |
|
6 |
|
|
7 |
|
|
8 |
|
|
9 |
|
|
10 |
The project was a complete success – all aspects of the project went according to plan, the project finished on time and under budget. |
Display order: By row number
Create Custom Fields
Project Custom Fields
Project custom fields are used to collect information on projects for reporting or workflow purposes. For more information on how to manage Enterprise Custom Fields and Lookup Tables (Project Server 2010) please go to http://technet.microsoft.com/en-us/library/gg709725.aspx .
- Under the section called Enterprise Custom Fields, click New Field
Create the following fields with the specified values. Attributes not listed in the table below can be left at their default values.
|
Name |
Description |
Entity |
Type |
Custom Attributes |
Behavior |
|
Estimated Cost |
How much it will cost for additional resources i.e. additional hardware, software, licenses, etc. |
Project |
Cost |
Controlled by workflow |
|
|
Estimated Effort |
An estimate of FTE days to complete this project, including all planning, execution, testing, etc… |
Project |
Duration |
Controlled by workflow |
|
|
Additional Technical Description |
Any additional technical information to take note of during planning stages of this project. |
Project |
Text |
Controlled by workflow |
|
|
Risk |
How likely it is that this project will remain within it’s time/scope/budget estimates |
Project |
Text |
Lookup Table -Risk_LT |
Controlled by workflow |
|
SharePoint Project Type |
The type of project this is |
Project |
text |
Lookup Table -ProjectType_LT |
Controlled by workflow |
|
Post Mortem Notes |
Notes gathered from the post mortem discussions. What did we do well? What could have been improved? Any changes to documentation / forms / process? |
Project |
Text |
Controlled by workflow |
|
|
Overall Project Health Rating |
1 – 10 rating of the project’s planning & execution. |
Project |
Number |
Lookup Table -OneToTen_LT |
Controlled by workflow |
Resource custom fields
Resource custom fields are used to add information about resources for reporting or workflow purposes.
- Under the section called Enterprise Custom Fields, click New Field.
Create the following fields with the specified values. Attributes not listed in the table below can be left at their default values.
|
Name |
Description |
Entity |
Type |
Custom Attributes |
Behavior |
|
|
Role |
Resource |
Text |
Lookup Table -Role_LT |
Required |
||
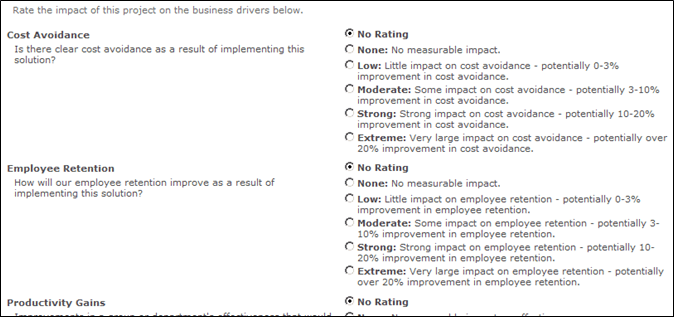
Business drivers
Business drivers are key reasons why your business implements software. Business drivers are used to assess project strategic value and to assure that project selection supports the organizational strategy. These drivers are priorities that allow the business to be more effective. For more information please refer to Portfolio Analysis with Microsoft Project Server 2010 (white paper)
Create Drivers
- From your PWA home page, under Strategy, select Driver Library from the quick links menu.
- Click the New button in the ribbon
Create the following drivers with the specified values. Attributes not listed in the table below can be left at their default values.
|
Name |
Description |
Project Impact Statements |
|
Cost Avoidance |
Is there clear cost avoidance as a result of implementing this solution? |
**Refer to Project Impact Statement table below** |
|
Employee Retention Note: this driver comes with the base Project Server installation |
How will our employee retention improve as a result of implementing this solution? |
**Refer to Project Impact Statement table below** |
|
Productivity Gains |
Improvements in a group or department’s effectiveness that would allow them to get work done faster, or with better quality. |
**Refer to Project Impact Statement table below** |
|
Quality Improvements |
Will we attain a measurable quality improvement as a result of implementing this solution? |
**Refer to Project Impact Statement table below** |
|
Will we reduce risk as a result of implementing this solution? |
**Refer to Project Impact Statement table below** |
|
|
ROI |
Will we obtain a clear return on investment (ROI) as a result of implementing this solution? |
**Refer to Project Impact Statement table below** |
|
Time-to-Market |
How much faster can we get a product to market as a result of implementing this solution? |
**Refer to Project Impact Statement table below** |
Use these Project Impact Statements for each of the above drivers. Be sure to replace “<driver>” with the name of the driver.
|
Project Impact Level |
Description |
|
None |
No measurable impact. |
|
Low |
Little impact on <driver> – potentially 0-3% increase in <driver>. |
|
Moderate |
Some impact on <driver> – potentially 3-10% increase in <driver>. |
|
Strong |
Strong impact on <driver> – potentially 10-20% increase in <driver>. |
|
Extreme |
Very large impact on <driver> – potentially over 20% increase in <driver>. |
Prioritize Drivers
Driver prioritization will help automatically rank projects based on their strategic rating. Your project portfolio will be sorted based on the priorities you set here.
- Select Driver Prioritization in the quick links menu. Click New in the ribbon.
- Enter a Name and Description for your driver prioritization.
-
Select your prioritization type – Calculated or Manual.
- Calculated – you’ll walk through a wizard that will compare the priority of each driver against all the others.
- Manual – you will manually enter the percentage value of each priority. If the amounts do not add up to 100% when save is clicked the numbers will be adjusted to equal 100%
- Calculated – you’ll walk through a wizard that will compare the priority of each driver against all the others.
- Select all of your drivers then click Next: Prioritize Drivers.
-
After walking through the wizard or entering percentages, review your priority levels and click Save.
*Note – If using the Calculated Wizard you cannot edit the Priority Percentages
Create Project Detail Pages (PDP)
Project detail pages collect information from the user at specific points in the project lifecycle. Each stage must have a project detail page associated. Please refer to Workflow and Project Detail Pages for more information.
- In the quick links, select Server Settings. Under the Workflow and Project Detail Pages section, select Project Detail Pages.
- In the Documents tab in the ribbon, click New Document
- Always select “Full Page, Vertical” as Layout Template.
Create the following project detail pages with the specified values. Attributes not listed in the table below can be left at their default values.
|
Name |
Web Part |
WP Configuration |
|
Initial SharePoint Proposal |
Project Fields |
Fields: Project Name |
|
Initial SharePoint Requirements |
Project Fields |
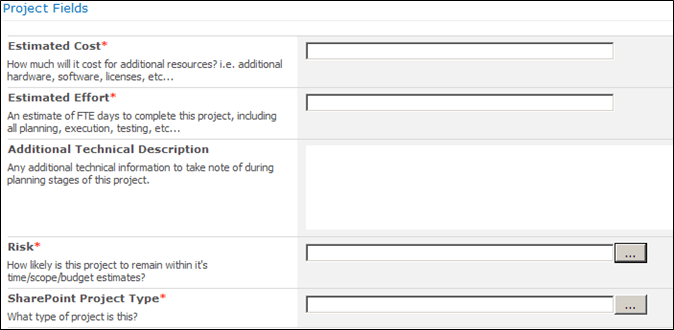
Fields: Estimated Cost Estimated Effort Additional Technical Description Risk Project Type |
|
Initial SharePoint Requirements Strategic Impact |
Project Strategic Impact |
|
|
SharePoint Schedule |
Project Details |
|
|
SharePoint Post Mortem |
Project Fields |
Fields: Post Mortem Notes Overall Project Health Rating |
Create workflow stages
Stages represent specific points in a project lifecycle that a project must move through in order to complete. Each stage has specific requirements that must be met before a project can move on to the next stage.
- From the Server Settings page, select Workflow Stages under Workflow and Project Detail Pages.
- Click New Workflow Stage.
Create the following project detail pages with the specified values. Attributes not listed in the table below can be left at their default values.
|
Name |
Description |
Description for Submit |
Workflow Phase |
Visible Project Detail Pages |
Required Custom Fields |
Strategic Impact Behavior |
Project CheckIn Required |
|
01 – SP Initial Proposal |
A new proposal was submitted. |
Upon submission, this proposal will be forwarded to an administrator who will gather information on requirements, business drivers, and usage to create estimates for budget, timeline, resources, etc. |
Create |
– Initial SharePoint Proposal |
Read Only |
No |
|
|
02 – SP Initial Requirements |
SharePoint Project Administrator will gather the project details to create a baseline estimate for the proposal. |
Upon submission, this proposal will be slated for review. |
Create |
– Initial SharePoint Requirements – Initial SharePoint Requirements Strategic Impact – SharePoint Schedule |
– Estimated Cost – Estimated Effort – Risk – SharePoint Project Type |
Required |
Yes |
|
03 – SP Project Selection |
The proposal is being reviewed for selection. If selected, it will move into the planning stages where resources will be assigned and task estimates created. |
Upon submission the proposal will become a project where baseline estimates will become real tasks for resources to be assigned. |
Select |
– Initial SharePoint Requirements – Initial SharePoint Requirements Strategic Impact – SharePoint Schedule |
Read Write |
No |
|
|
04 – SP Execution |
Work is being done on this project, see the project plan for more specifics on the progress of the project. |
Upon submitted, this project will move into the post-mortem stage where the project execution is reviewed and potential improvements identified. |
Manage |
– SharePoint Schedule |
Read Only |
Yes |
|
|
05 – SP Post Mortem Assessment |
Finished |
– SharePoint Post Mortem – Initial SharePoint Requirements – Initial SharePoint Requirements Strategic Impact – SharePoint Schedule |
– Overall Project Health Rating |
Read Only |
No |
Install & configure the Workflow Visualization Web Part
The Workflow Visualization Web Part (available as part of the Microsoft Project 2010 Solution Starters) provides a graphical display of the project workflow highlighting the current stage that the proposal is currently in. Deploying this Web Part is optional and is not required to implement this solution, it helps visualize workflow execution.
Install the web part
 Under the MS Project Solution Starters Deployment download, open the Workflow Visualization Webpart folder.
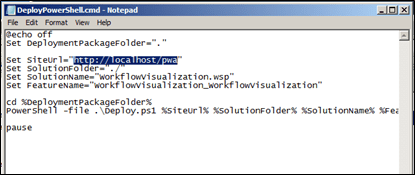
Figure 1 – Deploying the Dynamic Workflow solution
- Open and read the ReadMe.docx then edit the DeployPowerShell.cmd script. Edit the SiteUrl parameter so it equals the URL of your new PWA web app.
- Deploy the solution by running the DeployPowerShell.cmd script.
Configure the web part
- In the PWA site collection, go to Site Actions -> Site Settings, then under Site Collection Administration, select Site collection features
- Find and activate the Workflow Visualization feature.
- Go to Server Settings -> Workflow Stages. Open each workflow stage and expand the System Identification Data section at the bottom. Write down the name of the stage with the GUID that appears for each stage.
- Go to Site Actions -> More Options... In the Create dialog filter by Library on the left, then choose Asset Library in the middle section then click More Options. Enter StagesLibrary for the name, then check No for both Navigation and Item Version History, then click Create at the bottom of the window.
- In your newly created list, in the Documents tab of the ribbon go to Upload Document -> Upload Multiple Documents
- In the file system, find the WF Images folder, then drag and drop all of the images into the upload window.
- Once the files have finished uploading, click the Create Column option in the Library tab of the ribbon.
- In the Create Column dialog, enter StageUID for the name, leave all other options as blank then click OK.
- Under the Library tab in the ribbon, select Datasheet View. For each image enter the GUID into the StageUID field for each stage retrieved from Step 1. The arrow image will have a blank StageUID.
- Once this is complete, go back to Server Settings -> Project Detail Pages. Open the ProposalStageStatus page, then click Site Actions -> Edit Page.
- In the Full Page zone, click Add a Web Part. In the section that opens, select Project Server Add-Ons for the category. The Workflow Visualization web part will be the only option displayed. Click the add button to add the web part to the page.
- In the upper-left corner of the Workflow Visualization web part, click the down arrow, then click Edit Web Part. Enter the following information into the properties:
|
Property |
Value |
|
Document Library Name |
StagesLibrary |
|
Image for the arrow |
Arrow.png |
|
Arrow Image Width |
70 |
|
Stage Image Width |
120 |
|
Stage image Padding |
0 |
|
Rich Highlighting |
Checked |
- Click OK to close the properties dialog, and then click Stop Editing in the Page ribbon.
Install & configure Dynamic Workflow WSP
The Microsoft Project Server 2010 Dynamic Workflow (available as part of the Microsoft Project 2010 Solution Starters) will guide your project through the required lifecycle stages, prompting for approvals and portfolio commitments along the way. The Dynamic Workflow solution starter provides an easy mechanism to build sequential workflows in PWA without using Visual Studio. The tool inserts a custom InfoPath form into the workflow definition process that gathers the custom workflow information. That information is then used to dynamically construct a workflow for the demand management process.
Install the Dynamic Workflow solution
- Under the MS Project Solution Starters Deployment download, unzip the dynamic workflow component.
- Open and read the ReadMe.docx then edit the DeployPowerShell.cmd script. Edit the SiteUrl parameter so it equals the URL of your new PWA web app.
- Deploy the solution by running the DeployPowerShell.cmd script.
- In the PWA site collection, go to Site Actions -> Site Settings, then under Site Collection Administration, select Site collection features
- Find and activate the DemandManagement DynamicWorkflow feature
Configure the Dynamic Workflow solution
- Go back to the Site Settings page and under Site Administration, click Workflow settings
- Click Add a workflow and select DM DynamicWorkflow. Name it SharePoint Lifecycle Management, and leave the other defaults on the form.
- In each section of the form, fill out the details as shown below then click the Add Stage button at the top of the section to add a new stage.
Be sure not to click the Submit button until all stages have been completed.

Figure 2 – Stage 1: Initial Proposal

Figure 3 – Stage 2: Initial Requirements
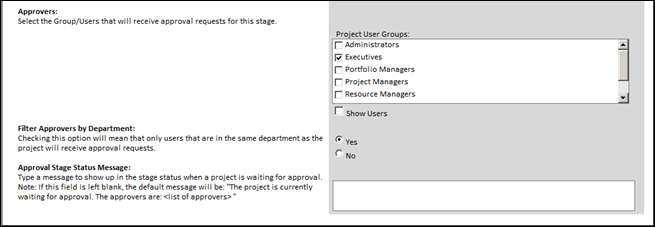
Figure 4 – Stage 2: Approval

Figure 5 – Stage 3: Project Selection
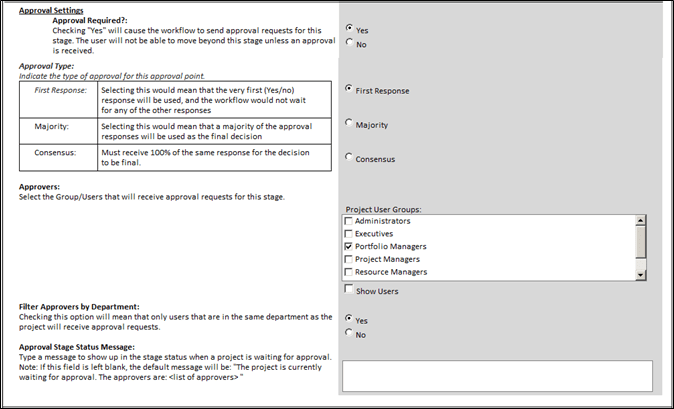
Figure 6 – Stage 3: Approval

Figure 7 – Stage 4: Execution
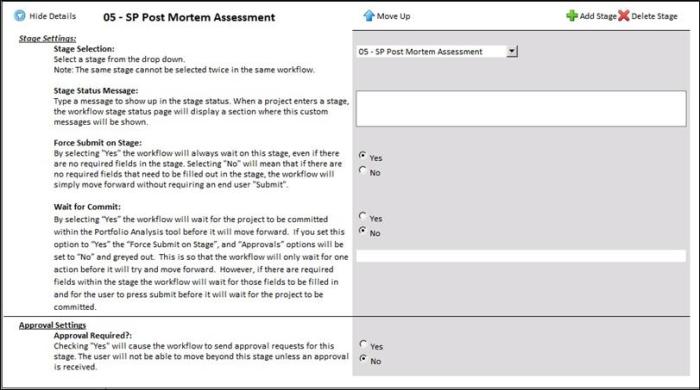
Figure 8 – Stage 5: Post Mortem Assessment
The image below shows how the finished workflow configuration should look.

Figure 9 – Dynamic Workflow Stage Definition
- Once the workflow has been completely configured, click Submit.
- Go to Server Settings -> Change or Restart Workflows and enter the following information into the form:
|
Field |
Value |
|
Choose Enterprise Project Type |
SharePoint Enhancement |
|
Choose Projects |
<all> |
|
Choose new Enterprise Project Type or restart current workflow |
Associate projects with a new Enterprise Project Type: SharePoint Enhancement |
|
Choose Workflow Stage |
Skip until the current workflow stage |
- Once the form has been filled out, click OK at the bottom of the page.
Create generic resources
Generic resources allow you to create estimates and assign resources by skill in order to get baseline cost and timeline estimates without having to assign an actual team. Please refer to http://office.microsoft.com/en-us/project-server-help/create-resources-to-represent-capacity-HA101865477.aspx for more information.
- In the quick links menu, under Resources, click the Resource Center link.
- In the ribbon on the Resource Center page, click New
Resource:
Attributes not listed in the table below can be left at their default values.
|
Display Name |
Generic |
Role |
|
SharePoint Developer |
Yes |
Developer |
|
SharePoint Administrator |
Yes |
Administrator |
|
SharePoint Analyst |
Yes |
Analyst |
|
SharePoint Architect |
Yes |
Architect |
|
Business Liaison |
Yes |
Business Liaison |
|
QA Engineer |
Yes |
QA Engineer |
Install Project site template
A Project site template provides a starting point for your projects. The template can contain predefined tasks, milestones, resource allocations and other items that can then be changed or customized for each project.
- Open MS Project Professional. Connect to your SharePoint Lifecycle Management PWA application.
- From MS Project Professional, open the project template from the SharePoint Lifecycle Solution Accelerator download.
- Under the Resource tab in the ribbon, click Add Resources -> Build Team from Enterprise…
- In the window that opens, select each of the generic resources that were created in the above step and add them to the project. It may help to set the Group by drop down to Generic then collapse the No group.
- Once all generic resources have been added, click the OK button to close the dialog.
- Add one or two resources for each task in the project template.
- Click File -> Save as… In the Save to Project Server dialog, type SharePoint Enhancement Template as the name. Select Template as the type. Leave the other defaults and select Save.
- In the Save as Template dialog box, select all the checkboxes and click Save.
Install Custom Site Template
The custom site template provides custom lists, pages, and other items that can provide a customized starting point for your project collaboration site.
- Open the Solution Gallery – go to Site Actions -> Site Settings, and under Galleries select Solutions.
- In the Solutions tab in the ribbon, select Upload Solution. Browse to the solution files, and find the SPEnhProj.wsp file under the Site Template folder. Click Activate when the popup appears.
- Open the Site collection features (go to Site Actions -> Site Settings then select Site collection features). Find and enable the feature Web Template feature of exported web template SharePoint Enhancement Site Template.
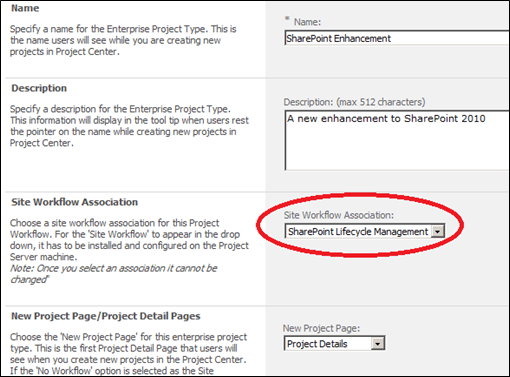
Create EPT
The EPT or Enterprise Project Type combines a workflow (consisting of stages & PDPs) to a project template and a custom site template. Each EPT can we used to model specific work request type in your PWA instance. For more information please refer to http://office.microsoft.com/en-us/project-server-help/enterprise-project-types-HA100955930.aspx
- Open the Project Server Settings page (from the PWA home page, select Server Settings). Under the Workflow and Project Detail Pages section, select Enterprise Project Types.
- Click New Enterprise Project type:
|
Property |
Value |
|
Name |
SharePoint Enhancement |
|
Description |
A new enhancement for SharePoint 2010 |
|
Site Workflow |
SharePoint Lifecycle Management |
|
Default |
No |
|
Departments |
<blank> |
|
Image |
<blank> |
|
Order |
Position at end |
|
Project |
SharePoint Enhancement Template |
|
Project |
SPEnhProj |

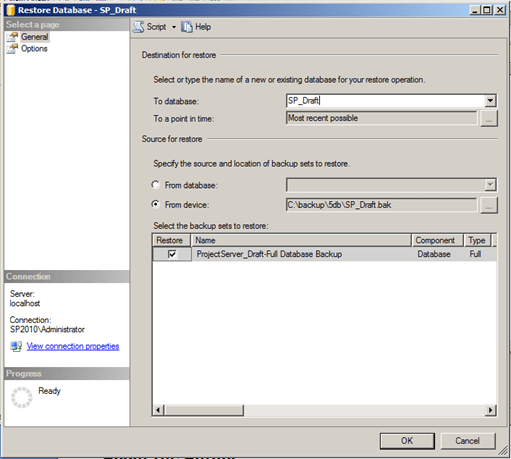
Option 2: Restoring From Database Backup Files
This method will use a five database attach (Draft, Published, Reporting, Archive and Content databases) to restore the SharePoint Lifecycle demo server. The backup files come as backups of the 5 databases required for MS Project Server to function: Archive, Draft, Published, Reporting, and the SharePoint Content database. For more detailed instructions on the five databases attach restore method go see Database-attach full upgrade to Project Server 2010. Please note that the sample databases were created using the February 2011 Project Server 2010 Cumulative Update and hence you will need to apply this update to your test farm in order to perform the database attach procedure: http://support.microsoft.com/kb/2475879 .
Restore & Attach Databases
On your database server, using SQL Server Management Studio, restore each database backup file using the name of the file as the database name.


Attach Content DB
Attach the content database to the farm in central administration. For this restore option to work, the site collection restored from the content database must use the path http://<server>/PWA. If this path is not available, another web application must be selected to restore the content database to.
- Open the Central Administration console, and click Application Management. Under Databases click Manage content databases.
- In the Manage Content Databases page, click Add a content database.
- In the Add Content Database page, select the web application to add the content database to, then enter the SP_PWAContent for the Database Name.
-
Leave the other settings with their defaults and click OK.


Deploy Dynamic Workflow and Workflow Visualization solutions
Deploy the workflow:
- Under the MS Project Solution Starters Deployment download, unzip the dynamic workflow component.
- Open and read the ReadMe.docx then edit the DeployPowerShell.cmd script. Edit the SiteUrl parameter so it equals the URL of your new PWA web app.


- Deploy the solution by running the DeployPowerShell.cmd script.
Deploy the workflow visualization web part:
- Under the MS Project Solution Starters Deployment download, open the Workflow Visualization Webpart folder.
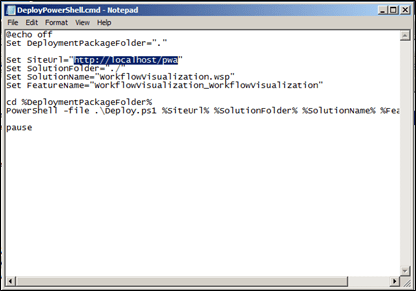
Figure 13 – Deploy Workflow Visualization webpart
- Open and read the ReadMe.docx then edit the DeployPowerShell.cmd script. Edit the SiteUrl parameter so it equals the URL of your new PWA web app.
- Deploy the solution by running the DeployPowerShell.cmd script.
Provision a new Project Web Application
- If you have not already done so, create a new Project Server Service Application under Application Management -> Service Applications-> Manage Service Applications
-
In the Project Server Service Application Management page, click Project
Server.
- **Note – the configuration requires the path http://<server>/pwa. If this site already exists, it must be removed before your new PWA can be attached to the service application.
- **Note – the configuration requires the path http://<server>/pwa. If this site already exists, it must be removed before your new PWA can be attached to the service application.
- Click Create Project Web App Site
- Select the web application that your content database was restored to, then for each database name, enter the name of the corresponding database that was restored as part of the Restore & Attach Databases section. Be sure to leave the Project Web App path as its default PWA value since this is the path that the restored Site Collection is located.


PWA Settings
- Open your browser to your new PWA site. In the quick links bar, select Server Settings, then under Workflow and Project Detail Pages click Project Workflow Settings
- Change Workflow Proxy User account to the administrator account used to provision your PWA site and click Save.
- Go to Site Actions -> Site Settings and under Site Administration, select Workflow Settings.
- Click Add a workflow. Follow the steps detailed above in Configure the Workflow to set up the workflow.
- Once the workflow has been configured, go back to the PWA site and go to Server Settings -> Enterprise Project Types (under work flow and project detail pages). Select the SharePoint Enhancement EPT item.
 Under Site Workflow Association, select the newly created workflow and click Save.

Once you have all of the databases restored and the additional configuration changes made, you should see all of the projects in various stages and will be able to modify the settings to suit your organization’s needs.
Installing the Solution in the Information Worker Demonstration and Evaluation Virtual Machine
If you would like to evaluate this SharePoint Lifecycle Management Solution with Project Server 2010 in an existing demonstration environment, it can easily be achieved by leveraging the publically available demo virtual machine: 2010 Information Worker Demonstration and Evaluation Virtual Machine (RTM).
To deploy and configure this solution in the IW Demonstration & Evaluation VM do the following steps:
- Download, deploy and configure the IW Demonstration & Evaluation VM
- Download and apply at a minimum the February 2011 Project Server 2010 Cumulative Update: http://support.microsoft.com/kb/2475879 (since the PWA database schema has be patched with this latest CU)
- Restore all five databases within the VM’s SQL instance (you can mount the databases as an ISO file)
- Go to the Central Administration and add the Content database to the Intranet site

Figure 17 – Adding Content DB to IW Demo VM
- Deploy the Dynamic Workflow and Workflow Visualization WSP to http://intranet.contoso.com (see detailed steps by steps in earlier)
- Provision a new PWA instance to http://intranet.contoso.com (make sure you use the same database names you used when you restored them: ie. SPPWA_Published, etc.)

Figure 18 – Provision PWA instance in IW Demo VM
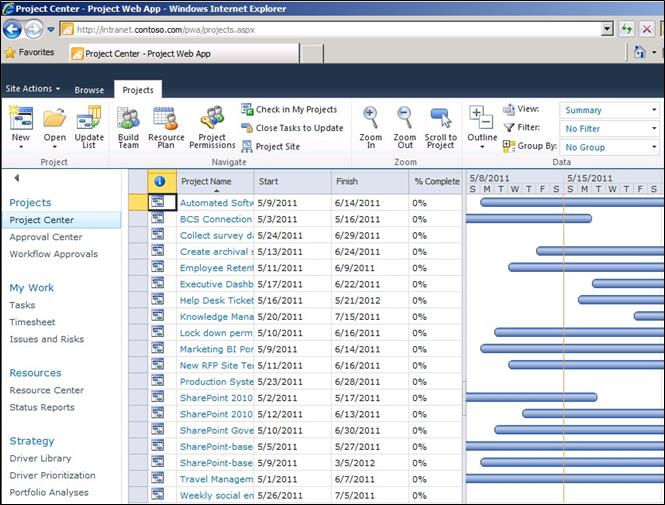
Figure 19 – PWA instance under Intranet.Contoso.Com
Additionally please check out the Microsoft Project 2010 Demonstration and Evaluation Installation Pack to further test out Microsoft Project and Project Server 2010 its capabilities and scenarios (contains hands-on-labs / demo scripts which showcases Microsoft Project 2010).
Using the Solution
Once the solution has been created, we can begin to create new project proposals.
Creating a Proposal
In your SharePoint Lifecycle PWA, go to your project center. In the projects ribbon, select New -> SharePoint Enhancement.
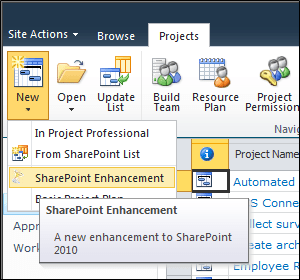
 In the Initial Proposal form that displays, enter a name and description for the proposal. This information will assist the SharePoint Analyst in determining the requirements of the project and creating the initial scope.
Gathering Information
In this stage, the Business Analyst will gather information on the new project proposal, determine the technical requirements, create baseline estimates, and estimate the strategic impact of the project.
- Go to the Project Center. Find and click the new proposal.
- In the Proposal Stage Status page, you will see information regarding what needs to be done for the current stage. Click the Next button in the Project ribbon.
- The Initial Requirements form prompts the SharePoint Analyst to estimate the cost and effort for the project along with the risk associated with completing the project. The page also asks for additional technical information that might be required to complete the project and the SharePoint Project Type.

- Once the information has been entered, click Next in the Project ribbon. This will take you to the Scheduling page.
- A project template has been created with some baseline estimates. These estimates can be changed through the web interface or using MS Project Professional. In the Project tab in the ribbon, click Resource Plan.
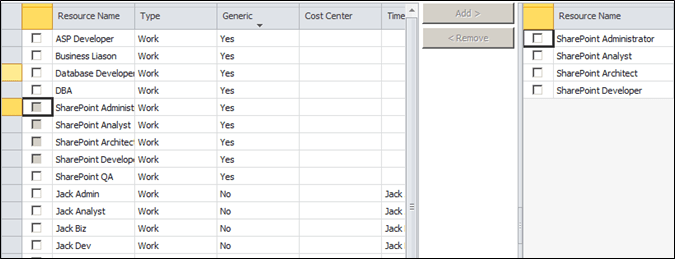
- From the Plan tab, click Build Team. The Team Builder page will allow you to assign generic resources to your project to create your baseline estimates for the project. Select some generic resources for this project then click Save & Close.

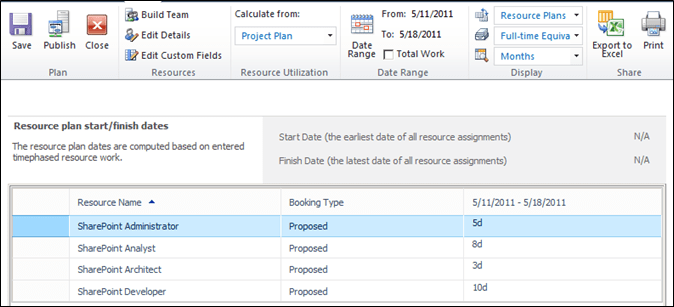
- Once the resources have been selected, you will be able to create your resource plan. In the Plan ribbon, set Work Units to Full-time Equivalent, and Timescale to Months.
- Estimate the amount of FTE’s that will be needed for each resource type. Once that’s done click Save and then close the Resource Plan page.

 After finalizing the estimates for your project, click the Next button in the Project tab in the ribbon.
- The strategic impact page will help evaluate the project proposal against the strategic goals of the company.

- After all strategic impact rankings have been made; click the Commit button in the Project ribbon. This will start the approval process for the project proposal.
Getting Approval
As a part of the Initial Requirements stage, executive approval is required for the project to continue. Once the project requirements, baseline estimates, and strategic impact have been submitted, the SharePoint governance team must meet to discuss the project and its merit along with any potential implications it may have.
- In the quick links bar, click the Workflow Approvals link.
- The approvals page will contain numerous approval tasks that represent pending approvals. Find the approval task for the new project and edit the item.

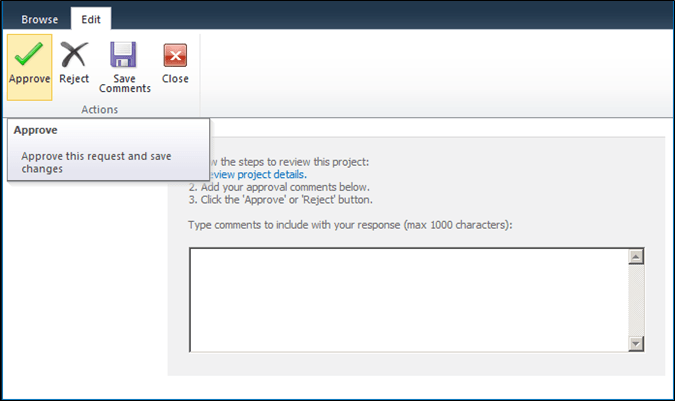
- Click the approve button in the upper-left corner. Once the project has been approved, it will move to the selection stage.
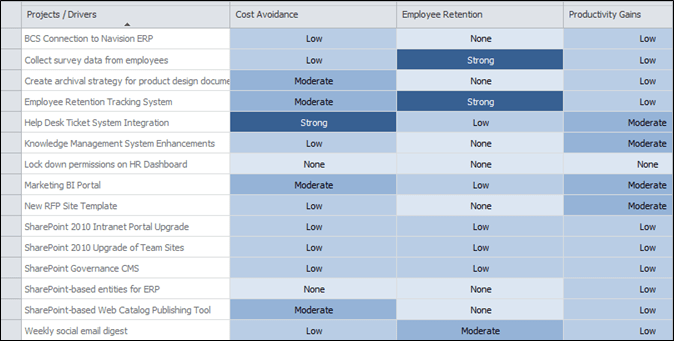
Project Selection
The project selection process will rank each project by their strategic value, then allow you to apply budget or resource constraints against them to determine what projects are feasible to implement.
-
In the quick links bar, select Portfolio Analysis. Click New in the Analyses ribbon to create a new portfolio for analysis.
- Note that before doing this it is common to set up project dependencies to account for projects that may be mutually exclusive, or require other projects to be completed before another project to begin. To do this, select Project Dependencies from the Analyses tab.
- Note that before doing this it is common to set up project dependencies to account for projects that may be mutually exclusive, or require other projects to be completed before another project to begin. To do this, select Project Dependencies from the Analyses tab.
- In the new analysis creation page, enter a name and description for your portfolio analysis. Next select the projects you wish to include. Also, be sure the Primary Cost Constraint is set to Estimated Cost.
- To include resource analysis in your project selection project check the Analyze time-phased project resource requirements checkbox. Be sure to set the following fields:
- Resource role custom field – Role
- Resource capacity impact – Committed and proposed assignments affect capacity
- Click Next: Prioritize Projects to see all of the projects’ strategic impact rankings. Here you can make modifications from what was originally entered in the Initial Requirements stage.

- Click Next: Review Priorities to review the relative priorities of all of the projects in your portfolio. No changes can be made in this screen.
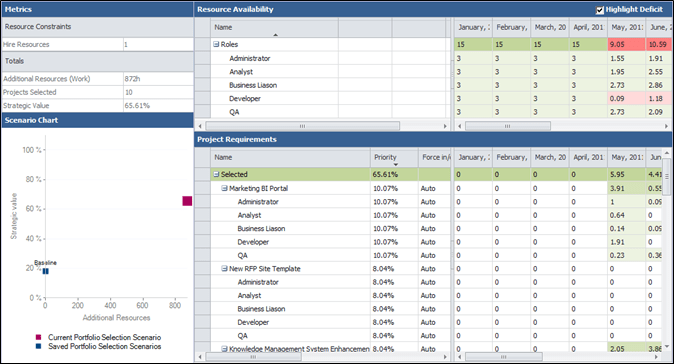
- Click Next: Analyze Cost to see the estimated total cost of all projects in your portfolio. Enter a new budget amount under Cost Limits here to see which projects will be chosen based on your new budget constraint. Click Save As in the ribbon to save your current budget scenario.


- Click Next: Analyze Resources to see which projects can be selected based on resource constraints. Note that projects that were not selected due to budget constraints are not displayed in this part of the analysis. Under each project’s New Start column, select a new start date to stagger the start of your projects throughout the year. You can also choose to hire more resources to bring in more projects into your selected portfolio.
- Click the Requirements Details button in the Analysis ribbon to view the actual resource breakdown of how many hours are required for each type of resource for each project. In the top section, you can see how many FTE’s of each resource are available for allocation for that time period. Cells highlighted in red display a deficit in the required resources for that time period. Click Save As in the ribbon to save your current scenario.

- Once you have the projects that will be selected, the selected projects must be approved by the portfolio manager. In the quick links bar, select Workflow Approvals. Find the pending approval tasks for each of the selected projects to edit, then approve them.
Project Execution
This stage is where project work is executed. This includes actual task planning, detailed requirements gathering, developing test plans, as well as any development, testing, documentation, etc. Much of the task planning, and scheduling can be done by connecting MS Project Professional to your PWA instance. Project teams will have access to the team site for this project as well for collaboration on documentation, discussions, etc.
- Once the execution phase is completed, open the Project Stage Status page and click Submit in the Project ribbon to move to the next stage.
Post Mortem
The Post Mortem stage is where we gather the “lessons learned”. It is common to hold a formal meeting with the project team and stakeholders to gather what went well and what did not.
- Open the Project Stage Status page and click the Next button in the Project ribbon.
- Enter a 1-10 rating of the overall project health (a simple measure of the project’s execution), then enter the notes and action items from the post mortem meeting.
- Click Submit in the Project ribbon to complete the project proposal.
- Check-in the project plan by clicking Close in the ribbon
Where to go from here
Once you’ve completed your evaluation using our sample data and solution accelerator, you can use the example solution to accomplish several additional tasks. For example, use the 5db backup with sample data to demonstrate the solution, update the configuration parameters to accommodate your particular organization’s particular business needs, or even work with a consulting partner to design a full solution based on these concepts; the following outlines what steps you might take.
Business demonstration
Using the backups with sample data provided gives a great starting point for a discussion around Demand Management and how this solution might be employed in your organization.
Adapt for your organization
Since the solution is based on simple configuration with no custom code, it is reasonably straight forward to configure & customize this solution to meet your organization’s business needs. The following items are some simple examples of what can be changed to drastically improve the relevance of this solution for your business:
- Business Drivers
- Project Plan Template
- Enterprise Project Types
- Workflow Phases and Stages
- Project Detail Pages and Custom Fields
Making it real
In order to fully realize the benefit of this solution, you’ll want to engage a Microsoft Partner http://pinpoint.microsoft.com or Microsoft Consulting Services, who can help you with the following items:
- SharePoint Governance & Maturity Model
- Solution Customization
- Business Process Engineering
- End user training
Learn about Microsoft Project Server 2010
For more information on workflows in Project Server please visit Project Server 2010 Demand Management site for more information: http://technet.microsoft.com/en-US/projectserver/ff899331.aspx.
About the Authors
Scott Jamison is Chief Architect and CEO at Jornata (www.jornata.com), the worldwide experts in implementing collaborative solutions based on Microsoft SharePoint. Scott is an experienced leader with almost 20 years directing managers and technology professionals to deliver a wide range of business solutions for customers. Scott is co-author of Essential SharePoint 2010.
Mark Candelora is a Managing Consultant and Development Manager at Jornata. Mark is an experienced developer and architect with almost 10 years’ experience developing and delivering business-centric applications using various technologies including Microsoft SharePoint.
Christophe Fiessinger is Senior Technical Product Manager for Microsoft. As part of the Microsoft Office Division Product Marketing Group he focuses on the enterprise project and portfolio management solution. Be sure to check out the latest blog entries: http://blogs.msdn.com/chrisfie
Artifacts
The files below are required to complete the installation of this solution.
The following files are available for download at http://go.microsoft.com/fwlink/?LinkID=218030
- 5db.zip – contains 5 database backup files (the files are used as part of Option 2: Restoring From Database Backup Files)
- SPEnhProj.wsp – a SharePoint solution file containing the custom site template that will be used for projects in this solution
- SharePoint Enhancement.mpt – a project template for use with the enterprise project type in this solution
- WF Images.zip – contains the images that will be used for the Workflow Visualization web part.
The following files are available as part of the deployment download from the Microsoft Project Server 2010 Solution Starters at http://archive.msdn.microsoft.com/P2010SolutionStarter
- DynamicWorkflow.zip – contains the deployment artifacts for the Dynamic Workflow solution
- Workflow Visualization WebPart.zip – contains the deployment artifacts for the Workflow Visualization Web Part
List of Figures
Figure 1 – Deploying the Dynamic Workflow solution 12
Figure 2 – Stage 1: Initial Proposal 15
Figure 3 – Stage 2: Initial Requirements 16
Figure 4 – Stage 2: Approval 16
Figure 5 – Stage 3: Project Selection 17
Figure 6 – Stage 3: Approval 17
Figure 7 – Stage 4: Execution 18
Figure 8 – Stage 5: Post Mortem Assessment 18
Figure 9 – Dynamic Workflow Stage Definition 19
Figure 10 – Database Restore 22
Figure 11 – Add Content Database 23
Figure 12 – Deploy Dynamic Workflow Solution 24
Figure 13 – Deploy Workflow Visualization webpart 24
Figure 14 – New Project Web Application 25
Figure 15 – Site Workflow Association 26
Figure 16 – Site Workflow Association 26
Figure 17 – Adding Content DB to IW Demo VM 27
Figure 18 – Provision PWA instance in IW Demo VM 28
Figure 19 – PWA instance under Intranet.Contoso.Com 28
Figure 20 – Create a new SharePoint Enhancement 29
Figure 25 – Approving the project allows the proposal to move to the selection stage. 32
Figure 26 – Review your projects’ strategic impact rankings. 33
Figure 27 – View your cost constraints for your project portfolio. 34
References
Microsoft Project 2010 Resources:
Product information
- Project 2010 product site: http://www.microsoft.com/project
- Project Team Blog: http://blogs.msdn.com/project
- Case Studies: http://www.microsoft.com/project/en/us/customer-success.aspx
- White papers: http://www.microsoft.com/project/en/us/articles-white-papers.aspx
End-User Product Help
- Project 2010 Help http://office2010.microsoft.com/project-help
- Project 2010 Help http://office2010.microsoft.com/project-server-help
Interactive content – Videos & Sessions & Webcasts
- http://www.microsoft.com/showcase/en/US/channels/microsoftproject
- http://www.microsoft.com/events/series/epm.aspx
Project Professional 2010 and Project 2010 Demo Image:
- Download: http://go.microsoft.com/?linkid=9713956
- Hosted Virtual Lab: http://go.microsoft.com/?linkid=9713654
IT Professional related – TechNet
- Tech Center: http://technet.microsoft.com/ProjectServer
- Admin Blog: http://blogs.technet.com/projectadministration
Developer related – MSDN
- Developer center: http://msdn.microsoft.com/Project
- Programmability blog: http://blogs.msdn.com/project_programmability
Got Questions? Search or ask in the official Microsoft Forums!
SharePoint 2010 Products: