-
Planning guide for
Microsoft SharePoint Foundation 2010
Microsoft Corporation
Published: November 2010
Author: Microsoft Office System and Servers Team (itspdocs@microsoft.com)
This book provides information and guidelines to lead a team through the steps of planning the deployment of a solution based on Microsoft SharePoint Foundation 2010. The audiences for this book are business application specialists, line-of-business specialists, information architects, IT generalists, program managers, and infrastructure specialists who are planning a solution based on SharePoint Foundation 2010.
The content in this book is a copy of selected content in the SharePoint Foundation 2010 technical library (http://go.microsoft.com/fwlink/?LinkId=181463) as of the publication date. For the most current content, see the technical library on the Web.

This document is provided “as-is”. Information and views expressed in this document, including URL and other Internet Web site references, may change without notice. You bear the risk of using it.
Some examples depicted herein are provided for illustration only and are fictitious. No real association or connection is intended or should be inferred.
This document does not provide you with any legal rights to any intellectual property in any Microsoft product. You may copy and use this document for your internal, reference purposes.
© 2010 Microsoft Corporation. All rights reserved.
Microsoft, Access, Active Directory, Backstage, Excel, Groove, Hotmail, InfoPath, Internet Explorer, Outlook, PerformancePoint, PowerPoint, SharePoint, Silverlight, Windows, Windows Live, Windows Mobile, Windows PowerShell, Windows Server, and Windows Vista are either registered trademarks or trademarks of Microsoft Corporation in the United States and/or other countries.
The information contained in this document represents the current view of Microsoft Corporation on the issues discussed as of the date of publication. Because Microsoft must respond to changing market conditions, it should not be interpreted to be a commitment on the part of Microsoft, and Microsoft cannot guarantee the accuracy of any information presented after the date of publication.
Contents
Getting help xiv
Planning and architecture for SharePoint Foundation 2010 1
Downloadable resources 1
Planning articles 1
Technical diagrams (SharePoint Foundation 2010) 2
Models 2
Tips for printing posters 6
Site and solution planning (SharePoint Foundation 2010) 7
Fundamental site planning (SharePoint Foundation 2010) 8
Sites and site collections overview (SharePoint Foundation 2010) 9
Site collections overview 9
Sites overview 9
Site templates included in SharePoint Foundation 2010 10
Plan sites and site collections (SharePoint Foundation 2010) 14
About planning sites and site collections 14
Determine types of sites 14
Plan sites by organizational hierarchy 15
Plan application sites 15
Plan Internet presence sites 16
Plan other sites 16
Determine site collections 16
Site planning data worksheet 17
Site navigation overview (SharePoint Foundation 2010) 18
Navigation controls overview 18
Navigation controls on master pages 19
Top link bar navigation 19
Quick Launch navigation 19
Breadcrumb navigation 20
Tree view navigation 20
Plan site navigation (SharePoint Foundation 2010) 21
Create a site navigation diagram 21
Understanding inherited navigation 22
Determine which sites inherit the top link bar 23
Determine which additional links to add manually to the top link bar 24
Determine other site navigation options 24
Site planning data worksheet 24
Themes overview (SharePoint Foundation 2010) 25
About using themes 25
Ways to use themes 26
Using a preinstalled theme 26
Uploading your own custom themes to the theme gallery 26
Plan for using themes (SharePoint Foundation 2010) 27
About planning for using themes 27
Decide whether to use themes 27
Determine how many themes are needed 28
Decide who makes the themes 28
Site planning data worksheet 29
Plan for multilingual sites (SharePoint Foundation 2010) 30
About planning multilingual sites 30
Determine language and locale requirements 31
Determine language pack requirements 31
Determine requirements for word breakers and stemmers 33
Multilingual user interface overview (SharePoint Foundation 2010) 35
Use and benefits of the multilingual user interface 35
How the multilingual user interface works 36
What is supported by the multilingual user interface 37
Adding and modifying application content 38
Exporting and importing translated content 39
Limitations of the multilingual user interface 39
Plan for the multilingual user interface (SharePoint Foundation 2010) 40
Determine language requirements for your sites 40
Plan for translating content 40
Plan for installing service packs 41
Security planning for sites and content (SharePoint Foundation 2010) 42
Plan site permissions (SharePoint Foundation 2010) 43
Introduction 43
About site permissions 43
About assigning permissions 44
About permission inheritance 45
Permission inheritance and fine-grained permissions 45
Permission inheritance and subsites 45
About effective permissions 46
Choose permission levels 46
Plan for permission inheritance 47
Determine permission levels and groups (SharePoint Foundation) 49
Review available default groups 49
Review available permission levels 50
Determine whether you need additional permission levels or groups 51
Do you need custom groups? 51
Do you need custom permission levels? 51
Choose security groups (SharePoint Foundation 2010) 53
Introduction 53
Determine which Windows security groups and accounts to use for granting access to sites 53
Decide whether to allow access for all authenticated users 54
Decide whether to allow access for anonymous users 54
Choose administrators and owners for the administration hierarchy (SharePoint Foundation 2010) 56
Introduction 56
Levels of administration 56
Best practices for using fine-grained permissions (white paper) (SharePoint Foundation 2010) 58
Sandboxed solutions planning (SharePoint Foundation 2010) 59
In this section 59
Sandboxed solutions overview (SharePoint Foundation 2010) 60
Deploying and running a sandboxed solution 60
Isolating sandboxed solutions 62
What a sandboxed solution cannot contain 62
Comparison of sandboxed and farm solutions 63
Benefits of using sandboxed solutions 64
Planning sandboxed solutions (SharePoint Foundation 2010) 65
Determine when to use sandboxed solutions 65
Plan to load balance sandboxed solution code 66
Determine where to deploy sandboxed solutions 66
Determine who can deploy sandboxed solutions 67
Determine which site collections will run sandboxed solutions using quotas 67
Plan resource usage quotas for sandboxed solutions 67
Plan sandboxed solutions governance 69
Plan for collaboration sites (SharePoint Foundation 2010) 70
Determine number of collaboration sites 70
Specific paths 70
Additional paths 71
Integration with Microsoft SharePoint Workspace 2010 71
Document management planning (SharePoint Foundation 2010) 72
Document library planning (SharePoint Foundation 2010) 73
Plan document libraries 73
Content types planning (SharePoint Foundation 2010) 75
Plan content types 75
What are content types? 75
Versioning, content approval, and checkout planning (SharePoint Foundation 2010) 78
About versioning, content approval, and check-outs 78
Plan versioning 78
Plan content approval 79
Plan check-out and check-in 80
Co-authoring overview (SharePoint Foundation 2010) 82
Co-authoring functionality in SharePoint Foundation 2010 82
Understanding the end-user experience 83
Important considerations 84
OneNote Notebooks 85
Software Version Requirements 85
Co-authoring in a mixed Office environment 85
Mixed environment that has Microsoft Office PowerPoint and Word 2007 85
Mixed environment that has Microsoft Office OneNote 2007 86
Performance and scalability 86
Business data and processes planning (SharePoint Foundation) 87
Plan for Business Connectivity Services (SharePoint Foundation 2010) 88
Business Connectivity Services overview (SharePoint Foundation 2010) 89
Typical solutions based on Business Connectivity Services 89
Business Connectivity Services security overview (SharePoint Foundation 2010) 91
About this article 91
Business Connectivity Services security architecture 91
Accessing external data 91
Business Connectivity Services authentication overview 93
Configuring Business Connectivity Services for credentials authentication 93
Configuring Business Connectivity Services for claims-based authentication 97
Business Connectivity Service permissions overview 99
What can permissions be set on? 99
Special permissions on the Business Data Connectivity service 103
Common tasks and their related permissions 104
Securing Business Connectivity Services 105
Service account 105
Server to server communication 105
Applications that use FileBackedMetadataCatalog 105
Diagnostic logging in Business Connectivity Services overview (SharePoint Foundation 2010) 106
Diagnostic logging in Business Connectivity Services 106
About Activity IDs 108
Diagnostic logging on servers 109
Example: using diagnostic logging 109
Plan workflows (SharePoint Foundation 2010) 111
Workflows overview (SharePoint Foundation 2010) 112
Workflow overview 112
Benefits of using workflows 113
Automating business processes 113
Workflows improve collaboration 114
Predefined workflows 114
Sample workflow scenario 115
Workflow types: Declarative and compiled 116
Workflow templates 117
Workflow associations 117
Choose a workflow authoring tool (SharePoint Foundation) 119
Authoring workflows with Visual Studio 2010 and WF Workflow Designer 120
Authoring workflows with Microsoft SharePoint Designer 2010 122
Authoring tool comparison 125
Plan for workflow security and user management (SharePoint Foundation 2010) 127
List manager, administrator, and developer roles and responsibilities 127
Workflow developers 127
Site administrators 128
List administrators (anyone with Manage List or Web Designer permissions) 128
Running workflows as an administrator 128
Workflow configuration settings 128
Required permissions to start a workflow 129
Central Administration settings 129
Information disclosure in task and workflow history lists 130
Spoofing and tampering attacks in the task and workflow history lists 131
Security issues in the workflow history list 131
User-Impersonation Step type for declarative workflows 132
Approval Workflow: A Scenario (SharePoint Foundation 2010) 134
Authoring a workflow 134
Associating a workflow 134
Associating a workflow with a site 135
Starting a workflow 135
Interacting with a workflow 136
Summarizing the process 137
Plan site creation and maintenance (SharePoint Foundation 2010) 138
Plan process for creating sites (SharePoint Foundation 2010) 139
Determine who can create sites and a method for site creation 139
Plan for Self-Service Site Management 140
Plan for custom site creation processes 141
Worksheet 141
Plan site maintenance and management (SharePoint Foundation 2010) 142
Plan for site maintenance 142
Plan for managing site collections 143
Plan site collection quotas 143
Plan site use confirmation and deletion 144
Worksheet 144
Plan quota management (SharePoint Foundation 2010) 145
About planning quota management 145
Determine quota template settings 146
Determine recycle bin settings 146
Delete unused Web sites 147
Plan e-mail integration (SharePoint Foundation 2010) 148
Plan incoming e-mail (SharePoint Foundation 2010) 149
About incoming e-mail 149
Key decisions for planning incoming e-mail 149
Using a basic scenario 149
Using an advanced scenario 150
Configuration options and settings modes 154
Plan incoming e-mail worksheet 154
Plan outgoing e-mail (SharePoint Foundation 2010) 156
About outgoing e-mail 156
Key planning phases of outgoing e-mail 157
Outbound SMPT server 157
From and Reply-to addresses 157
Character set 158
Server farm and environment planning (SharePoint Foundation 2010) 159
System requirements (SharePoint Foundation 2010) 160
Hardware and software requirements (SharePoint Foundation 2010) 161
Overview 161
Hardware requirements—Web servers, application servers, and single server installations 161
Hardware requirements—Database servers 162
Software requirements 163
Minimum requirements 163
Optional software 166
Access to applicable software 166
Plan browser support (SharePoint Foundation 2010) 170
About planning browser support 170
Key planning phase of browser support 170
Browser support levels 170
Browser support matrix 171
Browser details 172
ActiveX controls 183
URL path length restrictions (SharePoint Foundation 2010) 184
Understanding URL and path lengths 184
SharePoint URL composition 184
URL Encoding 185
URL parameters 185
URL path length limitations 186
SharePoint URL path length limitations 186
Internet Explorer URL length limitations 187
Resolving URL length problems 187
IP support (SharePoint Foundation 2010) 188
Logical architecture planning 190
Services architecture planning (SharePoint Foundation 2010) 191
About service applications 191
Services infrastructure and design principles 192
Deploying services 192
More granular configuration of services 192
Service application groups 193
Logical architecture 194
Connections for service applications 195
Service application administration 195
Plan for host-named site collections (SharePoint Foundation 2010) 196
About host-named site collections 196
About host headers 197
Create a host-named site collection 198
Programmatically create a host-named site collection 198
Use managed paths with host-named site collections 199
Expose host-named sites over HTTP or SSL 199
Configure SSL for host-named site collections 200
Use host-named site collections with off-box SSL termination 200
Plan authentication (SharePoint Foundation 2010) 201
Plan authentication methods (SharePoint Foundation 2010) 202
Supported authentication methods 202
Authentication modes — classic or claims-based 203
Implementing Windows authentication 205
Implementing forms-based authentication 207
Implementing SAML token-based authentication 208
Choosing authentication for LDAP environments 210
Planning zones for Web applications 210
Architecture for SAML token-based providers 213
Plan security hardening (SharePoint Foundation 2010) 217
Secure server snapshots 217
Web server and application server roles 217
Database server role 219
Specific port, protocol, and service guidance 219
Blocking the standard SQL Server ports 220
Service application communication 221
File and Printer Sharing service requirements 221
Service requirements for e-mail integration 222
SharePoint 2010 Products services 223
Web.config file 223
Plan automatic password change (SharePoint Foundation 2010) 225
Configuring managed accounts 225
Resetting passwords automatically on a schedule 225
Detecting password expiration 226
Resetting the account password immediately 226
Synchronizing SharePoint Foundation account passwords with Active Directory Domain Services 226
Resetting all passwords immediately 226
Credential change process 226
SQL Server and storage (SharePoint Foundation 2010) 228
Overview of SQL Server in a SharePoint environment (SharePoint Foundation 2010) 229
SharePoint 2010 Products and the SQL Server database engine 229
Working with the SQL Server databases that support SharePoint 2010 Products 230
SQL Server as a data platform for business intelligence in SharePoint 2010 Products 230
SQL Server database engine 230
SQL Server Analysis Services (SSAS): multi-dimensional data 230
SQL Server Analysis Services: data mining 231
SQL Server Reporting Services (SSRS) 231
SQL Server Integration Services (SSIS) 231
Business Intelligence Development Studio (BIDS) 232
PowerPivot for Excel and PowerPivot for SharePoint 232
Master Data Services 232
StreamInsight and complex event processing 232
Related content 233
Overview of Remote BLOB Storage (SharePoint Foundation 2010) 234
Introduction to RBS 234
Using RBS together with SharePoint 2010 Products 235
Plan for remote BLOB storage (RBS) (SharePoint Foundation 2010) 237
Review the environment 237
Content database sizes 238
Content type and usage 239
Evaluate provider options 239
Plan for business continuity management (SharePoint Foundation 2010) 241
Business continuity management capabilities 241
Service level agreements 242
Related content 243
Plan to protect content by using recycle bins and versioning (SharePoint Foundation 2010) 245
Protecting content by using recycle bins 245
First-stage Recycle Bin 246
Second stage (Site Collection) Recycle Bin 246
Protecting content by using versioning 247
Plan for backup and recovery (SharePoint Foundation 2010) 248
Define business requirements 248
Choose what to protect and recover in your environment 249
Choose what to recover from within SharePoint content databases 251
Protecting customizations 251
Protecting workflows 251
Protecting service applications 252
Protecting SQL Server Reporting Services databases 253
Choose tools 253
Test hardware 254
Determine strategies 254
Plan for enhanced backup and recovery performance 255
Follow recommendations for configuring SQL Server and storage 256
Minimize latency between SQL Server and the backup location 256
Avoid processing conflicts 256
Follow SQL Server backup and restore optimization recommendations 256
Ensure sufficient write performance on the backup drive 257
Related content 257
Backup and recovery overview (SharePoint Foundation 2010) 258
Backup and recovery scenarios 258
Backup architecture 258
Farm backup architecture 258
Granular backup and export architecture 263
Recovery processes 264
Restoring from a farm backup 265
Restoring from a site collection backup 266
Recovering from an unattached content database 266
Related content 267
Plan for availability (SharePoint Foundation 2010) 268
Availability overview 268
Costs of availability 269
Determining availability requirements 269
Choosing an availability strategy and level 270
Hardware component fault tolerance 270
Redundancy within a farm 270
Redundancy and failover between closely located data centers configured as a single farm (“stretched” farm) 275
Plan for disaster recovery (SharePoint Foundation 2010) 277
Disaster recovery overview 277
Choose a disaster recovery strategy 278
Planning for cold standby data centers 278
Planning for warm standby data centers 279
Planning for hot standby data centers 279
Service application redundancy across data centers 281
System requirements for disaster recovery 282
Virtualization planning (SharePoint Foundation 2010) 283
Virtualization support and licensing (SharePoint Foundation 2010) 284
SharePoint 2010 Products support for virtualization 284
Server virtualization using Hyper-V technology 284
Operating system environment (OSE) licensing 284
SharePoint 2010 Products licensing 285
Hyper-V virtualization requirements (SharePoint Foundation 2010) 286
Hardware 286
Software 286
Plan for virtualization (SharePoint Foundation 2010) 288
Create a plan for deploying SharePoint Foundation 2010 in a virtual environment 288
Performance and capacity test results and recommendations (SharePoint Foundation 2010) 293
Planning worksheets for SharePoint Foundation 2010 294
Planning worksheets by task 294
Planning worksheets by title 296
-
Getting help
Every effort has been made to ensure the accuracy of this book. This content is also available online in the Office System TechNet Library, so if you run into problems you can check for updates at:
http://technet.microsoft.com/office
If you do not find your answer in our online content, you can send an e-mail message to the Microsoft Office System and Servers content team at:
itspdocs@microsoft.com
If your question is about Microsoft Office products, and not about the content of this book, please search the Microsoft Help and Support Center or the Microsoft Knowledge Base at:
http://support.microsoft.com
-
Planning and architecture for SharePoint Foundation 2010
IT pros can use the content in the planning and architecture guides to develop conceptual, logical, and physical designs for configuring Microsoft SharePoint Foundation 2010 features, servers, and topologies. This section also provides recommendations for system designs based on customer scenarios and includes information to help IT pros design a highly reliable, consistently available, and scalable system.
-
Downloadable resources
Technical diagrams
Planning worksheets
-
Planning articles
|
Site and solution planning
|
Server and farm environment planning
|
|
Fundamental site components
Security for sites and content
Sandboxed solutions
Collaboration sites
Document management
Business data and processes
Quota management
|
System requirements
Authentication
Security hardening
Automatic password change
Business continuity management
Virtualization
|
-
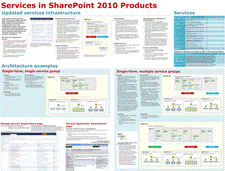
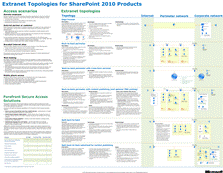
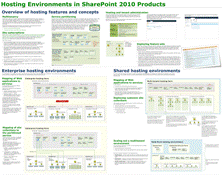
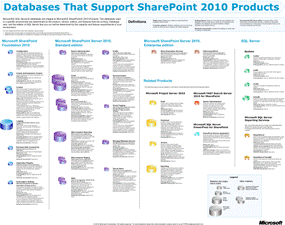
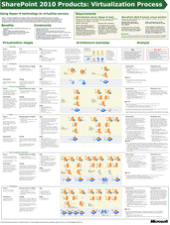
Technical diagrams (SharePoint Foundation 2010)
Many of these resources are visual representations of recommended solutions. They include poster-sized documents available in formats including Microsoft Office Visio 2007 or Microsoft Visio 2010 files (.vsd), PDF files, and XPS files. You might need extra software to view these files. See the following table for information about opening these files.
|
File type
|
Software
|
|
.vsd
|
Office Visio 2007, Microsoft Visio 2010, or the free Visio viewer (http://go.microsoft.com/fwlink/?LinkId=118761&clcid=0x409)
If you use the Visio viewer, right-click the VSD link, click Save Target As, save the file to your computer, and then open the file from your computer.
|
|
.pdf
|
Any PDF viewer, such as Adobe Reader (http://go.microsoft.com/fwlink/?LinkId=134751&clcid=0x409)
|
|
.xps
|
Windows 7, Windows Vista, Windows XP with .NET Framework 3.0, or XPS Essentials Pack (http://go.microsoft.com/fwlink/?LinkId=134750&clcid=0x409)
|
| |
|
-
Models
Models are 34-by-44-inch posters that detail a specific technical area. These models are intended to be used with corresponding articles on TechNet. These models are created by using Office Visio 2007. You can modify the Visio files to illustrate how you plan to incorporate Microsoft SharePoint 2010 Products in your own environment.
-
Tips for printing posters
If you have a plotter, you can print these posters in their full size. If you don’t have plotter, use the following steps to print on smaller paper.
 Print posters on smaller paper
|
1. Open the poster in Visio.
2. On the File menu, click Page Setup.
3. On the Print Setup tab, in the Printer paper section, select the size of paper you want to print on.
4. On the Print Setup tab, in the Print zoom section, click Fit to, and then enter 1 sheet across by 1 sheet down.
5. On the Page Size tab, click Size to fit drawing contents, and then click OK.
6. On the File menu, click Print.
|
-
Site and solution planning (SharePoint Foundation 2010)
This section describes how to plan your site and solution components in a Microsoft SharePoint Foundation 2010 environment.
Plan for collaboration sites (SharePoint Foundation 2010)
Plan for Business Connectivity Services (SharePoint Foundation 2010)
Security planning for sites and content (SharePoint Foundation 2010)
Fundamental site planning (SharePoint Foundation 2010)
Choose a workflow authoring tool (SharePoint Foundation)
Approval Workflow: A Scenario (SharePoint Foundation 2010)
Sandboxed solutions planning (SharePoint Foundation 2010)
Sandboxed solutions overview (SharePoint Foundation 2010)
-
Fundamental site planning (SharePoint Foundation 2010)
This section provides information that helps IT pros plan sites that use Microsoft SharePoint Foundation 2010 features.
The effectiveness of a site or a group of sites depends on many factors, but one of the most important factors is the ability to predictably locate the site and the content that you need within the site. The structure of a site or a group of sites and the navigation inside and among sites are important for helping users find and share information and work together.
In this section:
Sites and site collections overview (SharePoint Foundation 2010) describes site collections and sites, and it contains information about the site templates that are used to create sites in SharePoint Foundation 2010.
Plan sites and site collections (SharePoint Foundation 2010) describes the process and important considerations for planning SharePoint Foundation 2010 sites and site collections.
Site navigation overview (SharePoint Foundation 2010) provides an overview of the types of navigation that are available in a site.
Plan site navigation (SharePoint Foundation 2010) helps you design the navigation for your site.
Themes overview (SharePoint Foundation 2010) provides an overview of themes and how they work.
Plan for using themes (SharePoint Foundation 2010) discusses how to plan for using themes across your sites, and it includes important steps to plan how to use themes for your sites.
Plan for multilingual sites (SharePoint Foundation 2010) discusses how to plan for multilingual SharePoint Foundation 2010 sites.
Multilingual user interface overview (SharePoint Foundation 2010) describes the multilingual user interface in SharePoint Foundation 2010.
Plan for the multilingual user interface (SharePoint Foundation 2010) describes how to plan for using the multilingual user interface in your SharePoint Foundation 2010 site solution.
-
Sites and site collections overview (SharePoint Foundation 2010)
A Microsoft SharePoint Foundation 2010 site collection is a hierarchical site structure that is made up of one top-level site and any sites below it. This article describes site collections and sites and contains information about the site templates that are used to create sites in SharePoint Foundation 2010.
In this article:
Site collections overview
Sites overview
Site templates included in SharePoint Foundation 2010
-
Site collections overview
The sites in a site collection have shared administration settings, common navigation, and other common features and elements. Each site collection contains a top-level site and (usually) one or more sites below it in a hierarchical structure.
You must group your site’s content and features into a site collection. This provides the following benefits:
For site designers, a site collection’s galleries and libraries (such as the master page gallery or the site collection images library) provide a means for creating a unified, branded user experience across all sites in the site collection.
For site collection administrators, a site collection provides a unified mechanism and scope for administration. For example, security, policies, and features can be managed for a whole site collection; Site Collection Web Analytics Reports, audit log reports, and other data can help administrators track site collection security and performance.
For farm administrators, site collections provide scalability for growth based on how much content is stored. Because each site collection can use a unique content database, administrators can easily move them to separate servers.
For site authors, a site collection’s shared site columns, content types, Web Parts, authoring resources, workflows, and other features provide a consistent authoring environment.
For site users, a site collection’s unified navigation, branding, and search tools provide a unified Web site experience.
-
Sites overview
A site collection consists of a top-level site and one or more sites below it. Each top-level site and any sites below it in the site structure are based on a site template and can have other unique settings and unique content. Partition your site collection content into separate sites to obtain finer control of the appearance, content, and features of the various pages in your site collection. The following list includes site features that you can configure uniquely:
Templates You can make each site have a unique template. For more information, see Site templates included in SharePoint Foundation 2010.
Language If language packs have been installed on the Web server, you can select a language-specific site template when you create a new site. Text that appears on the site is displayed in the site template’s language. For more information, see Deploy language packs (SharePoint Foundation 2010) (http://technet.microsoft.com/library/bd2a9863-954a-4e44-bafc-af8c9599cb47(Office.14).aspx).
Security You can define unique user groups and permissions for each site.
Navigation You can fine-tune your site’s navigation experience by configuring unique navigation links in each part of your site’s hierarchy. Site navigation reflects the relationships among the sites in a site collection. Therefore, planning navigation and planning sites structures are closely related activities. For more information, see Site navigation overview (SharePoint Foundation 2010).
Web pages You can make each site have a unique welcome page and other pages.
Site layouts You can make unique layouts or master pages available in a site.
Themes You can change colors and fonts on a site. For more information, see Plan for using themes (SharePoint Foundation 2010).
Regional settings You can change the regional settings, such as locale, time zone, sort order, time format and calendar type.
Search You can make each site have unique search settings. For example, you can specify that a particular site never appears in search results.
Content types You can make each site have unique content types and site columns.
Workflows You can make each site have unique workflows. For more information, see Plan workflows (SharePoint Foundation 2010).
-
Site templates included in SharePoint Foundation 2010
The following section contains information about the site templates that are included in SharePoint Foundation 2010. Although you can use a site template with its default configuration, you can also change the site’s default settings by using the site administration pages, and then saving the site as a new template. In addition, you can modify a template’s design and features by using Microsoft SharePoint Designer 2010 or Microsoft Visual Studio 2010.
The following table lists every site template, describes the purpose of each, and indicates whether the template is available at the site collection level, site level, or both. The category that is used to group the templates might be different, depending on the level at which a site is created.
|
Template
|
Purpose
|
Category in Site Collection
|
Category in Site
|
|
< Select template later>
|
An empty site for which you can select a template later.
|
Custom
|
N/A
|
|
Basic Meeting Workspace
|
A site on which you can plan, organize, and capture the results of a meeting. It provides lists for managing the agenda, meeting attendees, and documents.
|
Meetings
|
Meetings
|
|
Blank Meeting Workspace
|
A blank meeting site that you can customize based on your requirements.
|
Meetings
|
Meetings
|
|
Blank Site
|
A blank site that you can customize based on your requirements.
|
Collaboration
|
Blank & Custom
|
|
Blog
|
A site on which a person or team can post ideas, observations, and expertise that site visitors can comment on.
|
Collaboration
|
Content
|
|
Decision Meeting Workspace
|
A site on which you can track status or make decisions at meetings. It provides lists to create tasks, store documents, and record decisions.
|
Meetings
|
Meetings
|
|
Document Workspace
|
A site on which colleagues can work together on a document. It provides a document library for storing the primary document and supporting files, a tasks list for assigning to-do items, and a links list to point to resources that are related to the document.
|
Collaboration
|
Collaboration, Content
|
|
Group Work Site
|
This template provides a groupware solution that teams can use to create, organize, and share information. It includes the Group Calendar, Circulation, Phone-Call Memo, the document library and the other basic lists.
|
Collaboration
|
Collaboration
|
|
Multipage Meeting Workspace
|
A site on which you can plan a meeting and capture the meeting’s decisions and other results. It provides lists for managing the agenda and meeting attendees. It also provides two blank pages that you can customize based on your requirements.
|
Meetings
|
Meetings
|
|
Social Meeting Workspace
|
A site on which you can plan social occasions. It provides lists for tracking attendees, providing directions, and storing pictures of the event.
|
Meetings
|
Meetings
|
|
Team Site
|
A site on which a team can organize, author, and share information. It provides a document library, and lists for managing announcements, calendar items, tasks, and discussions.
|
Collaboration
|
Collaboration
|
Plan sites and site collections (SharePoint Foundation 2010)
Site navigation overview (SharePoint Foundation 2010)
Plan site navigation (SharePoint Foundation 2010)
-
Plan sites and site collections (SharePoint Foundation 2010)
Microsoft SharePoint Foundation 2010 sites are made up of a site collection, which is a hierarchical structure that includes one top-level site and any sites below it. This article describes the process and important considerations for planning SharePoint Foundation 2010 sites and site collections, and it recommends a method for recording your site structure decisions. For information about sites and site collections, and the site templates that are used to create sites in SharePoint Foundation 2010, see Sites and site collections overview (SharePoint Foundation 2010).
In this article:
About planning sites and site collections
Determine types of sites
Plan sites by organizational hierarchy
Plan application sites
Plan Internet presence sites
Plan other sites
Determine site collections
Site planning data worksheet
-
About planning sites and site collections
In general, you plan your sites and site collections in the following order:
Determine the number and types of top-level sites and any sites below them in the hierarchy that are needed.
Determine the number and types of site collections into which the sites will be organized.
-
Determine types of sites
The first step in planning a solution that is based on SharePoint Foundation 2010 is to determine the types of sites your organization and its customers need. Determining the types of sites affects later planning decisions, such as where the sites will be implemented in your server topology, what features to plan for each site, how processes that span multiple sites are implemented, and how information is made available across one or more sites. This section contains information about how to plan different kinds of sites.
-
Plan sites by organizational hierarchy
Plan the basic sites that you need based on the scale and structure of your organization. Each of these sites can contain information that is needed for a project or division within your larger organization, and each will link to collaboration sites that are relevant to that project or division. Some sites for larger divisions or projects will also aggregate information that is found on all the smaller sites that are devoted to smaller divisions or projects.
Use the following guidelines when you plan sites that are based on your organizational structure:
Divisional or team sites Plan to create one site for a small organization or one site for every division or project of 50–100 people in a medium to large organization. In large organizations, there might be several levels of sites, with each site focusing on the content that is created and managed at its level of the organization.
You can design a site for members of your organization to collaborate on content related to your business or organizational goals. These can be self-contained or they can work with other sites as part of a publishing process. Often, these sites will have a mixture of collaborative content that is used internally and content that is intended for publication to an audience.
Rollup sites A rollup site contains general cross-organization content. It makes it possible for users across divisions to find information, experts, and access to organization-wide processes. It often contains sites that are related to the overall organizational information architecture and that are usually mapped to the structure of the divisional or project sites. For each organization, plan to create a centralized rollup site that uses an aggregated view of all related sites.
An application site organizes team processes and provides mechanisms for running them. Application sites often include digital dashboards and other features to view and manipulate data that is related to the site’s purpose. The information that is presented in an application site usually comes from diverse sources, such as databases or other SharePoint sites.
For example, the human resources organization in an organization could design an application site to provide employees with:
Access to general information, such as employee handbooks and career opportunities.
Ways to do common tasks, such as submitting timecards and expense reports.
Dashboards to view personalized information, such as an employee’s salary and benefits history.
As another example, the internal technical support group in an organization could design a Help Desk application site to provide technical support to members of the organization. Features of the application site could include the following:
Access to a knowledge base of past support incidents and best-practices documentation.
Ways to do common tasks, such as starting a support incident or reviewing the status of an ongoing incident.
Integration with communications features that support online meetings and discussions.
Personalized views of data. For example, support managers could view dashboards that provide views of their team members’ productivity and customer satisfaction ratings. Support engineers could view their current unresolved incidents.
-
Plan Internet presence sites
Internet presence sites are customer-facing sites. They are usually branded and are characterized by consistent stylistic elements, such as colors, fonts, and logos in addition to structural elements such as navigation features and the structure of site pages. Although the appearance of an Internet presence site is tightly controlled, the content of the site can be dynamic and can frequently change.
For example, a corporate Internet presence site communicates important company information to customers, partners, investors, and potential employees. This includes descriptions of products and services, company news, annual reports, public filings, and job openings. As another example, an online news Internet site provides frequently updated information, together with interactive features such as stock tickers and blogs.
You can make it possible for team members to create other sites, such as Document Workspace sites, when they collaborate on documents and other projects. Similarly, you can give users of an Internet site access to collaboration sites as part of a Web-based service. For example, you can give them permissions to create Meeting Workspace sites and participate in online meetings as part of their experience of using your site.
For information about the kinds of sites you can create, see Sites and site collections overview (SharePoint Foundation 2010).
-
Determine site collections
After you determine what types of sites your solution requires, the next step is to plan how these sites are implemented across site collections. A site collection is a hierarchical set of sites that can be managed together. Sites in a site collection have common features, such as shared permissions, galleries for templates, content types, and Web Parts, and they often share a common navigation. A site is often implemented as a site collection with the top-level site as the home page of the site collection.
In general, when you plan a solution that is based on SharePoint Foundation 2010, put the following kinds of sites in separate site collections:
Internet sites (staging)
Internet sites (production)
All team sites related to a divisional site or Internet site
All sites in a site collection are stored together in the same SQL database. This can potentially affect site and server performance, depending on how your site collections and sites are structured, and depending on the purpose of the sites. Be aware of the following limits when you plan how to allocate your content across one or more site collections:
Keep extremely active sites in separate site collections. For example, a knowledge base site on the Internet that allows anonymous browsing could generate lots of database activity. If other sites use the same database, their performance could be affected. By putting the knowledge base site in a separate site collection with its own database, you can make resources available for other sites that no longer have to compete with it for database resources.
Because all content in a site collection is stored in the same content database, the performance of database operations — such as backing up and restoring content — will depend on the amount of content across the site collection; the size of the database; the speed of the servers hosting the database; and other factors. Depending on the amount of content and the configuration of the database, you might have to divide a site collection into multiple site collections to meet service-level agreements for backing up and restoring, throughput, or other requirements. It is beyond the scope of this article to provide prescriptive guidance about how to manage the size and performance of databases.
Creating too many sites below a top-level site in a site collection might affect performance and usability. Limit the number of sites of any top-level site to a maximum of 2,000.
-
Site planning data worksheet
Download an Excel version of the Site planning data worksheet (http://go.microsoft.com/fwlink/?LinkID=167838&clcid=0x409). Use this worksheet to record your site structure.
Sites and site collections overview (SharePoint Foundation 2010)
Site navigation overview (SharePoint Foundation 2010)
Plan site navigation (SharePoint Foundation 2010)
-
Site navigation overview (SharePoint Foundation 2010)
Site navigation provides the primary interface for site users to move around on the sites and pages on your site. Microsoft SharePoint Foundation 2010 includes a set of customizable and extensible navigation features that help orient users of your site so they can move around on its sites and pages. This article describes the navigation controls that are available in SharePoint Foundation 2010. It does not explain how to add navigation controls to Web pages, how to configure navigation controls, or how to create custom navigation controls.
In this article:
Navigation controls overview
Navigation controls on master pages
Top link bar navigation
Quick Launch navigation
Breadcrumb navigation
Tree view navigation
-
Navigation controls overview
Navigation controls can be displayed on master pages, and—by using Web Part zones—directly in a page’s content.
SharePoint Foundation 2010 bases its navigation model on the hierarchical structure of the site collection. By using the navigation features, you can link to the following:
Sites below the current site
A site’s peer sites
Sites higher in the site structure
Web pages in a site
Additionally, you can create links to arbitrary locations, such as to an external Web site.
Navigation links in SharePoint Foundation 2010 are security-sensitive. If a site user does not have permissions to a SharePoint Foundation 2010 site or page that is linked from the site navigation, the user cannot see the link. Other content which has had links manually added to the navigation are still visible to users.
SharePoint Foundation 2010 navigation is based on the ASP.NET features in the .NET Framework version 3.5, which you can use to customize the following:
The site map provider.
The data source, which anchors and filters the structure that is provided by the site map provider.
The menus, which control the visual appearance of the navigation elements and how deep a hierarchy to display.
-
Navigation controls on master pages
A master page defines the outer frame of the Web pages in a site. Master pages contain the elements that you want all pages in your site to share, such as branding information; common commands, such as Search; and navigation elements that you want to be available throughout the site. This includes top link bar navigation, and Quick Launch navigation.
Master pages also provide the menu style of the navigation controls. You can configure master-page menu style by using Microsoft SharePoint Designer 2010 or Microsoft Visual Studio 2010.
The top link bar is a navigation menu which typically links to the sites that are one level below the current site in a site hierarchy. It is common for the top link bar to appear at the top of each page in a site. By default, all sites that are one level below the current site are added to the top link bar, and each site has its own unique top link bar for navigation. Site administrators can customize the navigation for a specific site by removing a site from the top link bar. They can also configure the top link bar so that only the home page link is shown and no other sites in the site hierarchy are displayed.
Site administrators can choose to inherit the top link bar from the parent site. This approach allows users to switch from one site to another from anywhere within the site collection, by allowing the top link bar to stay the same in all the sites in the site collection. For example, an Internet site that is used to market an organization’s products could have a site for each line of its products. By displaying each product’s site in the top link bar of each site, site designers can make it possible for users to easily switch from one site to another without having to return to the site home page.
Other top link bar configuration features include the following:
Linking to specified external sites.
Linking to specified sites or pages that are anywhere in the site.
Manually sorting the items on the top link bar.
All top link bar features, such as linking to external, can be defined uniquely for each site.
By using SharePoint Designer 2010 or Visual Studio 2010, you can additionally customize the appearance and functionality of the top link bar. For example, you can do the following:
Customize the cascading style sheets to change the appearance of the top link bar.
Modify the data source, for example to decrease the number of sites that are displayed in the top link bar.
The Quick Launch navigation typically highlights the important content in the current site, such as lists and libraries. It is common for Quick Launch navigation to appear on the left of each page in a site.
Quick Launch navigation configuration features include the following:
Linking to specific external sites or to pages in the current site.
Organizing links under headings.
Manually sorting the items in the Quick Launch navigation.
Just as you customize the top link bar, you can also customize the appearance and functionality of Quick Launch navigation by using SharePoint Designer 2010 or Visual Studio 2010.
Breadcrumb navigation displays a dynamically generated set of links at the top of Web pages, to show users their current position in the site hierarchy. By using SharePoint Designer 2010 or Visual Studio 2010, you can configure the breadcrumb navigation control. For example, you can specify a custom navigation provider.
Tree view navigation displays site content, such as lists, libraries, and sites that are below the current site, in a hierarchical structure. It is common for tree view navigation to appear on the left of each page in a site.
By default, tree view navigation is turned off. Site administrators can add tree view navigation to a site by using the Tree View page.
Plan site navigation (SharePoint Foundation 2010)
Sites and site collections overview (SharePoint Foundation 2010)
Plan sites and site collections (SharePoint Foundation 2010)
-
Plan site navigation (SharePoint Foundation 2010)
Site navigation provides the primary interface for site users to move around the sites and pages in your site. Microsoft SharePoint Foundation 2010 includes a set of navigation features that can be customized and extended to help orient the users of your site so they can move around its sites and pages. This article contains general guidance about how to plan site navigation for your SharePoint Foundation 2010 sites. This article does not describe the types of navigation controls that are available in SharePoint Foundation 2010, nor does it explain how to add navigation controls to Web pages, how to configure navigation controls, or how to create custom navigation controls. For more information about site navigation controls, see Site navigation overview (SharePoint Foundation 2010).
In this article:
Create a site navigation diagram
Understanding inherited navigation
Determine which sites inherit the top link bar
Determine which additional links to add manually to the top link bar
Determine other site navigation options
Site planning data worksheet
-
Create a site navigation diagram
Make a diagram of the sites that you want to create. For example, the following diagram is for a small travel company named Margie’s Travel. The company has a set of internal sites to help them organize their core business, which is planning conventions.
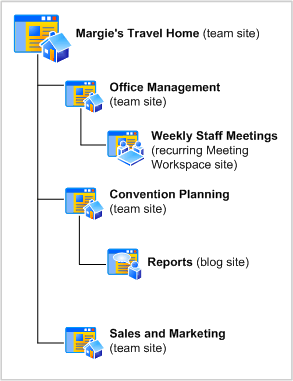
Your diagram might include a single site collection, such as the example for Margie’s Travel, or it might have multiple site collections if you have a more complex set of sites. Be sure to include all top-level Web sites, sites, Meeting Workspace or Document Workspace sites, and other sites that you plan to create, and leave room for future expansion.
You might also want to include the lists and libraries for each site, especially if you are deciding whether to create a site for document storage or one or more document libraries.
-
Understanding inherited navigation
The global navigation, or top link bar, appears at the top of all pages in the site, below the site title. By default, each site uses its own, unique top link bar, or you can decide to allow sites to inherit the top link bar from the parent site.
The top link bar can display two levels of sites in a site collection. For example, the top link bar for the Margie’s Travel site collection might contain links for Margie’s Travel Home, Office Management, Convention Planning, and Sales and Marketing. In this example, the top link bar looks like the following:
Home | Office Management | Convention Planning | Sales and Marketing
 Note:
Note:
Although the top link bar can display two levels of sites, this does not mean that all sites at the second level have to be displayed on the top link bar. You can determine whether a site appears on the top link bar when you create it, or you can configure the navigation later in Site Settings.
However, by default, sites at a third level in the hierarchy do not appear on the top link bar for the top-level site, even if they inherit the navigation. For example, the Reports site would not be displayed on the top link bar of Margie’s Travel Home because it is a site that is below the Convention Planning site. If you want this site to be displayed, you can manually add it to the top link bar or create it at the second level in the site hierarchy (as a site below Margie’s Travel Home, instead of as a site below the Convention Planning site).
The top link bar cannot be shared between sites in different site collections. However, you can always manually add a link to a site in a different site collection.
-
Determine which sites inherit the top link bar
If you want the Home tab of a site to open that site’s home page instead of the inherited navigation site’s home page, then you should use unique navigation. Otherwise, you should use inherited navigation. For example, the Margie’s Travel site collection could inherit the top links among all of the second-level sites so that all sites have the same navigation:
Home | Office Management | Convention Planning | Sales and Marketing
This works for a small team, such as in Margie’s Travel, where all the users in the organization work with all the sites. Each user in the site collection uses each site so an inherited top link bar is useful. However, if the Convention Planning and Sales and Marketing teams work fairly independently and do not need access to each other’s sites, then the navigation for Margie’s Travel could be customized to be inherited at the second level, instead of the top level, as in the following:
Margie’s Travel Home site: Home | Office Management
Convention Planning site: Convention Planning | Reports
Sales and Marketing site: Sales and Marketing
Remember that the global breadcrumb navigation always contains a link back to the top-level site in the site collection. Therefore, even though users of the Convention Planning site cannot visit Margie’s Travel Home from the top link bar, they can visit it directly from the global breadcrumb navigation.
 Note:
Note:
Although the choice of whether to inherit a navigation bar is made during site creation, you can change this option later. You might have to manually create links if you change your mind, but you can do so easily by using the Top Link Bar page in Site Settings for the affected sites.
-
Determine which additional links to add manually to the top link bar
Whether or not you decide to inherit the top link bar, you can customize the top link bar to include links to any other URL that you need. Depending on the extent of customization that you need, you can choose between the following methods to customize the top link bar:
If you want to add, remove, or rearrange the links in a top link bar, use the Top Link Bar page in Site Settings for the site.
If you want to create a completely customized top link bar and apply it to all sites in a site collection or to sites in a different site collection, use Microsoft SharePoint Designer 2010 or Microsoft Visual Studio 2010.
-
Determine other site navigation options
Other site navigation options that you can configure include Quick Launch and the tree view. The Quick Launch navigation typically highlights the important content in the current site.
You can customize the items that are displayed in the Quick Launch by adding new links, adding or changing headings, and changing the order in which links are displayed. To configure the Quick Launch navigation, use the Quick Launch page in Site Settings for the site.
Tree view navigation displays site content such as lists, libraries, and sites below the current site in a hierarchical manner. It is common for tree view navigation to appear on the left of each page in a site. By default, tree view navigation is turned off.
If you want to display your site content in a hierarchical way, you can display the tree view for users of your site. To enable the tree view for a site, use the Tree view page in Site Settings for the site.
-
Site planning data worksheet
Download an Excel version of the Site planning data worksheet (http://go.microsoft.com/fwlink/?LinkID=167838&clcid=0x409). Use this worksheet to help record your decisions about site navigation.
Site navigation overview (SharePoint Foundation 2010)
Sites and site collections overview (SharePoint Foundation 2010)
Plan sites and site collections (SharePoint Foundation 2010)
Themes overview (SharePoint Foundation 2010)
Plan for using themes (SharePoint Foundation 2010)
-
Themes overview (SharePoint Foundation 2010)
Themes provide a quick and easy way to apply colors and fonts to sites in Microsoft SharePoint Foundation 2010. When a theme is applied to a site, the color of most page elements — such as background images, text, and hyperlinks — changes. The fonts used for some page elements, such as titles, also change. Themes can be used with the standard SharePoint Foundation 2010 site templates, or with custom master pages, and then themes can be created that site owners can apply to their sites. This article includes an overview of themes and how they work. This article does not describe how to create custom themes by using Microsoft Office 2010 applications, or how to upload and manage themes in a theme library. It also does not discuss how to plan for the overall branding of sites by using master pages or cascading style sheets. For more information, see Building Block: Pages and User Interface (http://go.microsoft.com/fwlink/?LinkID=201009&clcid=0x409).
In this article:
About using themes
Ways to use themes
-
About using themes
Themes enable lightweight branding of a SharePoint Foundation 2010 site by allowing a site owner or a user with designer rights to make changes to the colors and fonts of user interface elements of a site. Themes are applied directly in the user interface, and do not require knowledge of cascading style sheets or master pages.
 Note:
Note:
If you apply a theme to a SharePoint Foundation 2010 site, anonymous users who browse the site will see only the default theme. To make the selected theme appear for all users, you must add a link in the master page to the generated CSS file.
An advantage of using themes is that developer resources are not needed for site owners and users with designer rights to make basic changes to a site. Themes are a simple method of branding a site; they do not affect the layout of a site.
 Note:
Note:
Themes in SharePoint Foundation 2010 have been redesigned to simplify the process of generating themes. Themes created in Windows SharePoint Services 3.0 are not compatible with SharePoint Foundation 2010. If you are upgrading from Windows SharePoint Services 3.0 to SharePoint Foundation 2010, you can use Visual Upgrade to continue to use sites in the old user interface. However, we recommend that you use the new user interface in SharePoint Foundation 2010 to create themes and apply them to your sites.
-
Ways to use themes
There are two ways to use themes on a site:
Use a preinstalled theme.
Upload a custom theme to the theme library.
-
Using a preinstalled theme
SharePoint Foundation 2010 comes with preinstalled themes, including the default SharePoint theme. When a new site is created, it will use the default SharePoint theme.
-
Uploading your own custom themes to the theme gallery
You can create custom themes by modifying styles in an Office 2010 application, such as Microsoft PowerPoint 2010, and saving the theme. This creates a .thmx file that you can upload to the theme gallery for a site collection. Customized themes in the theme gallery are available to all sites in that site collection.
Plan for using themes (SharePoint Foundation 2010)
-
Plan for using themes (SharePoint Foundation 2010)
Themes provide a quick and easy way to apply colors and fonts to sites in Microsoft SharePoint Foundation 2010. When a theme is applied to a site, the color of most page elements — such as background images, text, and hyperlinks — changes. The fonts used for some page elements, such as titles, also change. Themes can be used with the standard SharePoint Foundation 2010 site templates, or with custom master pages, and then themes can be created that site owners can apply to their sites. For more information, see Themes overview (SharePoint Foundation 2010).
This article discusses how to plan for using themes across your SharePoint Foundation 2010 sites, and includes key steps in planning to use themes for your sites. This article does not describe how to create custom themes by using Microsoft Office 2010 applications, or how to upload and manage themes in a theme library. It also does not discuss how to plan for the overall branding of sites by using master pages or cascading style sheets. For more information, see Building Block: Pages and User Interface (http://go.microsoft.com/fwlink/?LinkID=201009&clcid=0x409).
Before reading this article, be sure to read the article Plan sites and site collections (SharePoint Foundation 2010).
In this article:
About planning for using themes
Decide whether to use themes
Determine how many themes are needed
Decide who makes the themes
Site planning data worksheet
-
About planning for using themes
There are three primary decisions to make as you plan to use themes:
Decide whether or not to use themes.
If you are going to use themes, determine how many themes are needed.
Decide who will make the custom themes.
The remainder of this article will explain these decisions and describe additional planning considerations.
-
Decide whether to use themes
The first step to planning for using themes is to decide whether or not themes are the appropriate option for your scenario. Other options for customizing a site include using an alternate CSS file and creating custom master pages. These options require the skills of either a designer or a developer to implement, and so they may not be appropriate for your scenario.
To decide whether or not to use themes, determine how much change to the existing look and feel is needed for your sites, and then choose the option that most closely fits what you want to do. You can use a combination of one or more of these options, depending on the customization that you want to do for your sites. The following table describes different levels of customization and recommends the option best suited for each level.
|
If you want to
|
Then use
|
|
Allow site owners to change colors and fonts
|
Themes
|
|
Make changes to other design elements such as font size and spacing
|
Cascading style sheets
|
|
Completely change the page structure and design
|
Master Pages
|
 Note:
Note:
If you apply a theme to a SharePoint Foundation 2010 site, anonymous users who browse the site will see only the default theme. To make the selected theme appear for all users, you must add a link in the master page to the generated CSS file.
If you decide to use themes, continue reading the rest of this article.
-
Determine how many themes are needed
After deciding to use themes, you must determine how many themes are needed for your sites. Consider whether the themes that are installed with SharePoint Foundation 2010 are sufficient for your purposes, or if you will need to create custom themes to be used across sites. If you will be creating custom themes, you must also determine how many themes will be needed and decide which sites will use which themes.
Use the site planning data worksheet to record which sites should use a theme, and to determine how many unique themes are needed.
-
Decide who makes the themes
If you will be using custom themes, you must determine who will be responsible for creating the *.thmx files. Because custom themes are created in an Office 2010 application such as PowerPoint, you do not need a graphic designer to make a theme; however, you may want to include a graphic designer during the planning phase to provide guidance on color values and font styles that will be used in the themes.
You must also decide who will be responsible for uploading the themes to the theme gallery. Will the person who creates the themes also be responsible for uploading the *.thmx files to the theme gallery, or will they save the theme files to a directory for a site collection administrator to upload? A user must have either administrator or designer privileges for the site collection that contains the theme gallery in order to upload *.thmx files to the gallery.
-
Site planning data worksheet
Download an Excel version of the Site planning data worksheet (http://go.microsoft.com/fwlink/?LinkID=167838&clcid=0x409). Use this worksheet to help record your decisions about themes.
Themes overview (SharePoint Foundation 2010)
Sites and site collections overview (SharePoint Foundation 2010)
Plan sites and site collections (SharePoint Foundation 2010)
-
Plan for multilingual sites (SharePoint Foundation 2010)
Microsoft SharePoint Foundation 2010 has several features that enable you to support users in different regions or users who speak different languages. You can use these features to create Web sites in different languages.
This article discusses how to plan for multilingual SharePoint Foundation 2010 sites. This article does not describe how to create multilingual sites or how to install language packs. For information about creating multilingual sites, see Create sites in different languages from the default language (http://go.microsoft.com/fwlink/?LinkID=198972&clcid=0x409). For information about language packs, see Deploy language packs (SharePoint Foundation 2010) (http://technet.microsoft.com/library/bd2a9863-954a-4e44-bafc-af8c9599cb47(Office.14).aspx).
In this article:
About planning multilingual sites
Determine language and locale requirements
Determine language pack requirements
Determine requirements for word breakers and stemmers
-
About planning multilingual sites
If your organization has to support users in different regions or users who speak different languages, you must determine what your multilingual requirements are and plan for multilingual site deployment when you plan your overall site structure and navigation.
To determine your multilingual requirements, you must:
Determine the languages and locales that you have to support.
To plan for multilingual site deployment, you must determine which language features and components to install or configure on your servers. These can include:
Language packs.
Word breaker support.
 Note:
Note:
Although Windows SharePoint Services 3.0 supported internationalized domain names (IDNs), SharePoint Foundation 2010 does not. If you currently use IDNs with Windows SharePoint Services 3.0 and you plan to upgrade or migrate to SharePoint Foundation 2010, you must stop using IDNs, delete any IDN settings, and set up a non-IDN environment before you upgrade or migrate to SharePoint Foundation 2010.
-
Determine language and locale requirements
You might have to create sites in multiple languages for any of the following reasons:
You want to provide Web site content to users in different regions.
You are required by government regulation or organizational policy to provide Web site content in more than one language.
Be sure to consult all potential site owners when you determine your language requirements, and be sure to list all languages that you might have to support in the future. It is easier to install language support during initial deployment instead of waiting to install language support when your servers are running in a full production environment. After a site has been created for a specific language, the default language of the site cannot be changed. However, a user who is logged on to the site can use the multilingual user interface to select an alternative language in which to display the site. This changes the way the site user interface is displayed to the user, but it does not change the site content. For example, if the site was provisioned in French, and the Spanish language pack has also been installed on the server, a site user can change the language to Spanish so that when they view the site, the user interface will be in Spanish. This changes the user interface for that user only and does not affect how the site is displayed to other users. Also, any content that was created in French will still be displayed in French. For more information about the multilingual user interface, see Multilingual user interface overview (SharePoint Foundation 2010).
 Note:
Note:
If a user changes their personal site settings to display the site in an alternative language, some site elements, such as column names, might still be displayed in the default site language.
Do not assume that you have to create a Web site or a site collection in multiple languages only because a document library contains documents in multiple languages. A document library can contain documents in multiple languages without requiring you to create Web sites or site collections in multiple languages. For example, the document library for an English site collection can contain documents that are written in French and documents that are written in Japanese.
When you are planning multilingual sites, you should also consider what locales are necessary to support your sites. Locale is a regional setting that specifies the way numbers, dates and times are displayed on a site. However, locale does not change the language in which the site is displayed. For example, selecting the Thai locale changes the default sort order of list items and uses the Buddhist calendar instead of the default calendar. The locale is a setting that is configured independently of the language specified when a site is created, but unlike the language, the locale can be changed at any time. For more information about translation of the user interface, see Determine language pack requirements.
-
Determine language pack requirements
Based on the language requirements of your Web site, determine the language packs that have to be installed on your front-end Web servers. Language packs enable you to create sites and site collections in multiple languages without requiring separate installations of SharePoint Foundation 2010. Language packs are installed on the front-end Web servers in your server farm and contain language-specific site templates. When you create a site or a site collection that is based on a language-specific site template, the user interface text that appears on the site or the site collection is displayed in the language of the specified site template. For example, when you decide to create a site in French, the toolbars, navigation bars, lists, and column headings for that site will appear in French. Likewise, if you decide to create a site in Arabic, the toolbars, navigation bars, lists, and column headings for that site will appear in Arabic, and the default left-to-right orientation of the site changes to a right-to-left orientation to properly display Arabic text.
If your site will have users who cannot work in the default language that you plan to use for the site, you should also install language packs that will enable users to work in their chosen language by using the multilingual user interface. If you do not provide support for additional languages, users might find it difficult to use site features in their non-native language. Language packs provide language-specific translation of user interface elements such as the following:
Ribbon elements
List and site column headers
Site settings interface
Templates for new lists, document libraries, and sites
Relevant search indexing of content that is not in the default language of the site.
 Note:
Note:
Language packs provide translation only of the user interface. They do not translate content that is created and displayed in content pages or Web Parts.
The list of available languages that you can use to create a site or site collection, and which users can select in the multilingual user interface, is generated by the language packs that are installed on the front-end Web servers of your server farm. By default, sites and site collections are created in the language in which SharePoint Foundation 2010 was installed. For example, if you install the Spanish version of SharePoint Foundation 2010, the default language for sites, site collections, and Web pages is Spanish. If you have to create sites, site collections, or Web pages in a language other than the default SharePoint Foundation 2010 language, you must first install the language pack for that other language on the front-end Web servers before you can select another language in which to create a site. For example, if you are information about how to deploy language packs, see Deploy language packs (SharePoint Foundation 2010) (http://technet.microsoft.com/library/bd2a9863-954a-4e44-bafc-af8c9599cb47(Office.14).aspx).
Even though you specify a language for a site, some user interface elements such as error messages, notifications, or dialog boxes might not appear in the language that you choose. This is because SharePoint Foundation 2010 relies on several supporting technologies — such as the .NET Framework, Microsoft Windows Workflow Foundation, ASP.NET, and Microsoft SQL Server — and some of these supporting technologies are localized into only a limited number of languages. If a user interface element is generated by one of the supporting technologies, and if the supporting technology is not localized into the language that the site administrator specified for the site, the user interface element appears in English.
In addition, some text might originate from the original installation language, which can create a mixed-language experience. This type of mixed-language experience is typically seen only by content creators or site administrators and is not seen by site users.running the French version of SharePoint Foundation 2010 and you want to create sites in French, English, and Spanish, then you must install the English and Spanish language packs on the front-end Web servers before you can create the English and Spanish sites.
Language packs for SharePoint Foundation 2010 are not bundled or grouped into multilingual installation packages: you must install a specific language pack for each language that you want to support. Also, language packs must be installed on every front-end Web server in the server farm to ensure that each Web server can render content in the specified language. For information about what language packs are available, see Language packs (SharePoint Foundation 2010) (http://technet.microsoft.com/library/3d599354-863e-4528-9fe8-867df5f45658(Office.14).aspx).
 Note:
Note:
Error logs that SharePoint Foundation 2010 stores on the server are always in English.
For more information about installing language packs, see Deploy language packs (SharePoint Foundation 2010) (http://technet.microsoft.com/library/bd2a9863-954a-4e44-bafc-af8c9599cb47(Office.14).aspx).
-
Determine requirements for word breakers and stemmers
Word breakers and stemmers are components that are part of the indexing and querying processes. A word breaker is a component that is used to break strings of text into individual words during the indexing and querying processes. A stemmer is a component that finds the root word of a term and can also generate variations of that term. The rules for word breaking and stemming differ for different languages, and you can specify different rules for different languages. Word breakers for each language enable the resulting terms to be more accurate for that language. Where there is a word breaker for a language family, but not for a specific sub-language, the major language is used. For example, the French word breaker is used to handle text that is French Canadian. If no word breaker is available for a particular language, the neutral word breaker is used. With the neutral word breaker, words are broken at neutral characters such as spaces and punctuation marks.
If you install any language packs or supplemental language support, we recommend that you install the appropriate word breaker and stemmer for each of the languages that you have to support. Word breakers and stemmers must be installed on all servers that are running the Search service. For a list of the languages for which SharePoint Foundation 2010 provides word breakers and stemmers, see Languages for word breakers and stemmers (SharePoint Foundation 2010) (http://technet.microsoft.com/library/bd2a9863-954a-4e44-bafc-af8c9599cb47(Office.14).aspx).
Multilingual user interface overview (SharePoint Foundation 2010)
Plan for the multilingual user interface (SharePoint Foundation 2010)
-
Multilingual user interface overview (SharePoint Foundation 2010)
This article discusses the new multilingual user interface feature in Microsoft SharePoint Foundation 2010. Previously, in Windows SharePoint Services 3.0, when you created a site collection or site, if language packs were installed on the server, you could also choose the language in which to display the site user interface. However, after the language for a site had been set, it could not be changed. The multilingual user interface feature introduces the concept of secondary languages that users can select. This feature is used to display the site user interface in a secondary language that the user selects and that is different from the primary language that was chosen when the site was created.
This article describes the multilingual user interface in SharePoint Foundation 2010. This article does not describe how to deploy the language packs that are required to use the multilingual user interface or how to configure site settings to enable users to set their preferred language. It also does not discuss how to plan for using the multilingual user interface in your site solution. For information about how to let individual users change the language that is used to display their site’s user interface, see Make multiple languages available for your site’s user interface (http://go.microsoft.com/fwlink/?LinkID=198970&clcid=0x409). For more information about planning to use the multilingual user interface, see Plan for the multilingual user interface (SharePoint Foundation 2010).
In this article:
Use and benefits of the multilingual user interface
How the multilingual user interface works
What is supported by the multilingual user interface
Adding and modifying application content
Exporting and importing translated content
Limitations of the multilingual user interface
-
Use and benefits of the multilingual user interface
The multilingual user interface enables users to collaborate in a single site by using their selected secondary language, regardless of which language was selected when the site was created. When you create a new site, if language packs have been installed on the server, you can specify the primary language for the site. The site will use that primary language to display the site user interface, such as site navigation and administrative pages. If you want site users to be able to view the site user interface in a secondary language, you can specify which languages are available to users by using the Language Settings page. A user who is logged on to the site can use the Select Display Language option on the user menu to select a secondary language in which to display the site user interface. After the user selects a language, all sites within that domain name are displayed in their preferred language. However, this does not change the default, primary language of the site. Other users who view the site still see the site user interface displayed in the primary language. The site user interface is changed only for those users who have selected a different, secondary language in which to display the site.
By using the multilingual user interface, team members can work on documents and projects in a shared, common language, while they are viewing the site and performing tasks in their preferred language. In addition to team collaboration, the multilingual user interface enables farm and site administrators to perform administrative tasks in their preferred language. For example, farm administrators can change the primary language of the Central Administration Web site so that the administrative links and instructions are displayed in their preferred language.
 Note:
Note:
The multilingual user interface displays only site user interface elements in another language. It does not translate or display content such as documents or list items in another language.
In addition to letting users change the primary language for a site, the multilingual user interface also enables users to make changes to new and existing application content, such as list or library titles and descriptions, and it enables users to have those changes be reflected in the user interface for other users of other languages. For example, a team member who uses English as the preferred language creates a new document library named “Team Reports.” Another team member who has the preferred language set to German, logs on to the site and changes the library title to “Mannschaftsberichte.” The next time that a user, who has the preferred language set to German, logs on to the site, the name of the document library is displayed as “Mannschaftsberichte.” However, a user who has the preferred language set to English still sees the document library name displayed as “Team Reports.”
SharePoint Foundation 2010 provides three methods that you can use to translate certain application content, such as list or library titles and descriptions: by using the user interface, by exporting and importing translations for a site, and by using the object model.
-
How the multilingual user interface works
By default, when a new site is created, it is created in the default language of the SharePoint Foundation 2010 installation on the server. A farm administrator must install language packs on the server before sites can be created in languages other than the default language. For more information, see Deploy language packs (SharePoint Foundation 2010) (http://technet.microsoft.com/library/bd2a9863-954a-4e44-bafc-af8c9599cb47(Office.14).aspx).
After language packs have been installed on the server, the Language Settings link is added to the Site Settings page. Site administrators use the Language Settings page to specify which secondary languages the site will support. After the site administrator has enabled secondary languages for a site, users can log on to the site and use the Select Display Language option on the user menu to change the display language when they browse to any page in the site collection. When a user changes the display language of a page, the new display language becomes the user’s preferred language for the whole site collection.
SharePoint Foundation 2010 selects the language in which to display pages of a site collection by using the first of the following rules that applies:
1. Does the user have a preferred language for this site collection on this computer? If so, use the user’s preferred language.
2. Is the language preference that is specified in the Web browser one of the supported languages for the page? If so, use the preferred language of the browser.
3. Otherwise, use the default language for the site collection.
SharePoint Foundation 2010 provides three methods that you can use to modify certain application content, such as list or library titles and descriptions: by using the user interface, by exporting and importing translations for a site, and by using the SPUserResource class in the Microsoft.SharePoint namespace. Not all user interface elements can be changed directly in the user interface. For example, user actions and commands can be changed only by using the SPUserResource class. For more information, see SPUserResource class (http://go.microsoft.com/fwlink/?LinkID=193203&clcid=0x409).
-
What is supported by the multilingual user interface
When a user views a site in a secondary language, certain elements of the user interface are provided in the preferred language. The following list includes examples of items that are supported by the multilingual user interface:
Settings pages, such as those in the _layouts and the _admin virtual directories.
Help.
Application content, such as menus, controls, site actions, site title and description, list or library titles and descriptions, top link bar links, Quick Launch links, local breadcrumbs, site and list content types, and site and list columns.
Developer content, such as features, and solutions.
However, not all user interface elements are translated. The following list includes examples of items that are not supported by the multilingual user interface:
Web Parts (except those that are linked to lists or libraries).
Global breadcrumbs.
User created content, such as list item data, documents and Web pages in libraries, permissions levels, groups, views, and Web Parts.
Although most site templates are supported by the multilingual user interface, the following site templates are not supported:
The Blog template.
Any of the meeting workspace templates.
Any of the Web database templates.
-
Adding and modifying application content
A user can add or modify application content, such as list titles or column names and descriptions, in one of two ways: by adding or modifying content in the primary language or by adding or modifying content in one or more secondary languages.
When a user views a site by using the primary language of the site, any new application content that is created is displayed in the primary language, even when the site is viewed in a secondary language. For example, if the primary language for a site is English, when a user views the site in the primary language and creates a new document library called “Team Documents”, the library title is still displayed as “Team Documents” when a user views the site in any secondary language. To translate new user interface strings into a secondary language, a user must change the user preferences to display the site in a secondary language and then make the change to the user interface element.
When a user views a site by using a secondary language, any new application content that is created is displayed in that language even when the site is viewed in the primary language or in any other secondary language. For example, if the primary language for a site is English, and a user views the site in German and adds a document library called “Mannschaftsdokumente”, the library title is displayed as “Mannschaftsdokumente” even when the site is viewed in English. To translate new user interface strings into the primary language or to other secondary languages, the user must change the user preferences to display the site in the required language and then make the change to the user interface. The Language Settings page contains an Overwrite Translations option that affects how changes to existing application content are made to other languages for the site. If the Overwrite Translations option is enabled, any changes that are made to the user interface in the primary language overwrite any changes that have been made to user interface elements in secondary languages.
By default, when a user views a site by using the primary language of the site, any changes that are made to existing application content are changed for that language only. The strings that are associated with that user interface element in the secondary languages remain unchanged. However, if the Overwrite Translations option is enabled, the strings that are associated with that user interface element for every language are replaced with the new primary language string. For example, if the primary language for a site is English, and a user changes the title of the “Shared Documents” library to “Team Documents”, by default, the title is changed only for the primary language of the site. However, if the Overwrite Translations option is enabled, the title is changed to “Team Documents” for every secondary language, and it must be retranslated.
When a user views a site by using a secondary language, any changes that are made to existing application content are changed for that language only. The strings that are associated with that user interface element in the primary language and other secondary languages remain unchanged. To translate user interface strings into the primary language, or to other secondary languages, the user must change the user preferences to display the site in the required language and then make the change to the user interface.
-
Exporting and importing translated content
The multilingual user interface feature lets you export and import application content for bulk translation. Instead of translating application content one item at a time, you can export the strings for any new or modified application content in the primary language or in one of the secondary languages. To export content, you use the Export Translations link on the Site Settings page. When you export application content for a secondary language, you can decide to export all content or only content that has not been translated.
When the application content is exported, it is saved as a .resx file, which can be opened by using a text editor or any third-party tool that can open resource files. For more information, see Resources in .Resx File Format (http://go.microsoft.com/fwlink/?LinkID=193206&clcid=0x409). After the resource strings have been translated, you use the Import Translations link on the Site Settings page to import the .resx file.
-
Limitations of the multilingual user interface
As mentioned previously, not all user interface elements are supported by the multilingual user interface. The following list describes additional limitations that apply when you use the multilingual user interface:
Search Search indexes content in the default language of the SharePoint installation. Even if content is provided in secondary languages, that content is only searchable by using the default language of the site. For example, if your preferred language is German, but the primary language for the site is English, a search for “Freigegebene Dokumente” does not return any search results. However, a search for “Shared Documents” does return search results.
Web Parts Web Part titles and descriptions do not change in the user interface, unless a Web Part is a list-based Web Part. For example, the title and description for Web Parts that display list and library data, such as Announcements and Shared Documents, are displayed in a user’s preferred language, whereas the title and description for other Web Parts, such as the Content Editor and the Content Query Web Parts, are displayed only in the primary site language.
Plan for the multilingual user interface (SharePoint Foundation 2010)
Plan for multilingual sites (SharePoint Foundation 2010)
-
Plan for the multilingual user interface (SharePoint Foundation 2010)
The new multilingual user interface feature in Microsoft SharePoint Foundation 2010 introduces the concept of a secondary language that the user can select. This feature displays the site user interface in a secondary language that the user selects and that is different from the primary language that was chosen when the site was created.
This article describes how to plan for using the multilingual user interface in your SharePoint Foundation 2010 site solution. This article does not describe how to deploy the language packs that are required to use the multilingual user interface or how to configure site settings to enable users to set their preferred language. For information about how to let individual users change the language that is used to display their site’s user interface, see Make multiple languages available for your site’s user interface (http://go.microsoft.com/fwlink/?LinkID=198970&clcid=0x409). For more information about the multilingual user interface, see Multilingual user interface overview (SharePoint Foundation 2010).
In this article:
Determine language requirements for your sites
Plan for translating content
Plan for installing service packs
-
Determine language requirements for your sites
Before you can use the multilingual user interface in your SharePoint sites, the farm administrator must deploy language packs to the server so that they are available for use on sites. Decide which language packs are needed and when they will be deployed to the server. Site administrators must configure the language settings for individual sites to make specific languages available to site users. You should decide which languages are needed for each site and plan to have the site administrators enable specific languages for the sites they manage. For information about planning multilingual sites, see Plan for multilingual sites (SharePoint Foundation 2010). For information about deploying language packs, see Deploy language packs (SharePoint Foundation 2010) (http://technet.microsoft.com/library/bd2a9863-954a-4e44-bafc-af8c9599cb47(Office.14).aspx).
-
Plan for translating content
If you will enable the multilingual user interface on your site to provide users a way to collaborate while they are using their preferred language, you must decide whether using the default multilingual user interface will be sufficient or whether application content will have to be translated. If you have application content that has to be translated, you should consider the following questions:
How will new and existing application content be translated? Will individual team members translate application content directly in the user interface as it becomes necessary, or will you export resource files in the languages that are needed for the site and have them all translated at once? If users create new application content in a secondary language, you must plan for who will translate that content into the primary language of the site and for the other secondary languages. If you plan to create complex pages, such as new menu pages, or develop custom solutions, such as features that create lists, you must plan to use the object model to provide translations in secondary languages.
Who will translate the application content? Will the translation of resource files be done by someone within your organization, or will you need to have a third-party translate them for you?
How will updates to the application content be handled? Will changes to the user interface be translated as changes are made, or will changes be made on a periodic schedule? This might depend on the size and scale of the sites and the content that is included.
How should translation overwrites be handled? Do you want changes in the primary language to overwrite string values in secondary languages? If so, then you must enable the Overwrite Translations option on the Language Settings page.
What column names must be changed? What column names must be translated, and for which languages? Will the column names be at the list level or at the site level?
-
Plan for installing service packs
If language packs are updated as part of a service pack release for SharePoint, you must update the language packs on the server when the service pack is installed. You should plan to coordinate with the farm administrator to monitor the release of service packs and any associated language packs so that you are aware of updated language packs that need to be installed for your users.
Multilingual user interface overview (SharePoint Foundation 2010)
Plan for multilingual sites (SharePoint Foundation 2010)
-
Security planning for sites and content (SharePoint Foundation 2010)
Some of the sites in your enterprise probably contain content that should not be available to all users. For example, proprietary technical information should be accessible only on a need-to-know basis. An intranet portal for employee benefits should be available only to full-time employees, whereas the home page of an Internet Web site is accessible by anonymous clients.
Permissions control access to your sites and site content. You can manage permissions by using Microsoft SharePoint Foundation 2010 groups, which control membership, and fine-grained permissions, which help to secure content at the item and document level. This section describes permissions for sites and site content and provides considerations for choosing permissions.
In this section:
Plan site permissions (SharePoint Foundation 2010) helps you understand how permissions are assigned and helps you choose the appropriate permissions to use in your site collection or subsite.
Determine permission levels and groups (SharePoint Foundation) reviews the available permission levels and groups, and helps you determine whether you need additional permission levels or groups.
Choose security groups (SharePoint Foundation 2010) helps you determine which Microsoft Windows security groups and user accounts to use to grant access to sites, decide whether to use the Authenticated Users group, and decide whether to allow anonymous access.
Choose administrators and owners for the administration hierarchy (SharePoint Foundation 2010) defines the levels of administration from the server level to the subsite level and helps you choose administrators for each level.
Best practices for using fine-grained permissions (white paper) (SharePoint Foundation 2010) provides guidance for using fine-grained permissions in SharePoint 2010 Products.
-
Plan site permissions (SharePoint Foundation 2010)
This article helps you plan access control at the site collection, site, and subsite levels. This article also describes permission inheritance and fine-grained permissions, and explains how to determine effective permissions for users and groups at different scopes within a site collection hierarchy.
In this article:
About site permissions
About assigning permissions
Permission inheritance and fine-grained permissions
Permission inheritance and subsites
About effective permissions
Choose permission levels
Plan for permission inheritance
-
Introduction
Site and content access is controlled by giving users and groups a set of permissions for a specific site, list or library, folder, document, or item. When you develop your plan for site and content access, you should consider the following issues:
How tightly you want to control permissions for the site or site content. For example, you might want to control access at the site level, or you might need more restrictive security settings for a specific list, folder, or item.
How to use groups to categorize and manage your users. Groups have no permissions until they are assigned a permission level for a specific site or for specific site content. When you assign permission levels to SharePoint groups at the site collection level, by default, all sites and site content inherit those permission levels. For more information about categorizing users into groups, see “Choose security groups”.
This article describes site permissions and helps you determine which sites or site content will require unique permissions. This article does not address planning the security of your entire server or server farm.
-
About site permissions
You should understand the following concepts before you configure access to sites and site content:
Individual user permissions Individual permissions grant a user the ability to perform specific actions. For example, the View Items permission grants the user the ability to view items in a list or folder, but not to add or remove items. For information about available permissions, see User permissions and permission levels (SharePoint Foundation 2010) (http://technet.microsoft.com/library/7238eb84-12d3-4323-a65c-277016f8bc4d(Office.14).aspx).
Permission level This set of permissions grants users permission to perform a set of related tasks. For example, the Read permission level includes the View Items, Open Items, View Pages, and View Versions permissions (and others), all of which are needed to read documents, items, and pages of a SharePoint site. Individual permissions can be included in more than one permission level. Permission levels can be customized by anyone assigned to a permission level that includes the Manage Permissions permission. The default permission levels are Limited Access, Read, Contribute, Design, and Full Control. For information about default permission levels and the permissions included in each level, see User permissions and permission levels (SharePoint Foundation 2010) (http://technet.microsoft.com/library/7238eb84-12d3-4323-a65c-277016f8bc4d(Office.14).aspx).
Group A group can be either a Windows security group or a group, such as Site Owners, Site Members, or Site Visitors. Groups are created and managed at the site collection level. Each SharePoint group is assigned a default permission level, but the permission level for any group can be customized. Anyone assigned to a permission level that includes the Create Groups permission, which is included in the Full Control permission level by default, can create custom SharePoint groups.
User A user is a person with a user account that can be authenticated by the same authentication method that was used for the server. We recommend that you assign permissions to groups instead of users, although you can directly give individual users permissions to a site or specific site content or directly assign a permission level to a user. Because it is inefficient to maintain individual user accounts, you should assign permissions on a per-user basis only as an exception. For more information about user account types, see User permissions and permission levels (SharePoint Foundation 2010) (http://technet.microsoft.com/library/7238eb84-12d3-4323-a65c-277016f8bc4d(Office.14).aspx).
Securable object A securable object is a site, list, library, folder, document, or item for which permission levels can be assigned to users or groups. By default, all lists and libraries within a site inherit permissions from the site. You can use list-level, folder-level, and item-level permissions to additionally control which users can view or interact with site content. For example, if a permission level for a specific securable object includes the Manage Permissions permission, anyone who is assigned that permission level can change the permissions for that securable object. You can resume inheriting permissions from a parent list, the site as a whole, or a parent site at any time.
-
About assigning permissions
You can assign a user or group a permission level for a specific securable object. Individual users or groups can have different permission levels for different securable objects.
-
About permission inheritance
Permissions on securable objects within a site are inherited from the site itself by default. You can use fine-grained permissions — unique permissions on the list or library, folder, or item or document level — to gain more control of the actions users can take on your site.
-
Permission inheritance and fine-grained permissions
You can break permission inheritance for any securable object at a lower level in the site hierarchy by creating a fine-grained permission on that securable object. For example, you can edit the permissions for a document library, which breaks the inheritance from the site. However, the inheritance is broken only for the specific securable object for which you changed permissions; the rest of the site’s permissions are unchanged. You can resume inheriting permissions from the parent list or site at any time.
 Tip:
Tip:
If you are using fine-grained permissions, you should use groups to avoid having to track individual user accounts. For example, because people move in and out of teams and change responsibilities frequently, tracking those changes and updating the permissions for uniquely secured objects would be time-consuming and error-prone.
The following securable objects can accept fine-grained permission assignments:
Site: Controls access to the site as a whole.
List or library: Controls access to a specific list or library.
Folder: Controls access to folder properties (such as the name of the folder).
Item or document: Controls access to a specific list item or document.
-
Permission inheritance and subsites
Inheriting permissions is the default behavior and is the easiest way to manage a group of Web sites. However, if a subsite inherits permissions from its parent, that set of permissions is shared with the parent. If the subsite’s owners edit its permissions, the site’s permissions will also change, which could compromise security or prevent users from accessing content.
If you want to change permissions for the subsite only, you must first stop inheriting permissions from the site and then create fine-grained permissions on the subsite. For example, if specific lists, libraries, folders, items, or documents contain sensitive data that requires an increased level of protection, you can create fine-grained permissions for a specific group or individual user who requires access.
Creating unique permissions copies the groups, users, and permission levels from the parent site to the subsite and then breaks the inheritance. If you restore inherited permissions, the subsite will inherit its users, groups, and permission levels from the parent site again, and you will lose any users, groups, or permission levels that were unique to the subsite.
 Note:
Note:
As a best practice, you should arrange sites and subsites so they can share most of their permissions, and do the same for lists and libraries. Place any sensitive data into separate lists, libraries, or subsites.
-
About effective permissions
Configuring security settings or performing bulk operations requires accurate information about user and group permissions on site resources. For example, many SharePoint sites give all authenticated users (the NTAUTHORITY\AUTHENTICATED USERS domain group) access to at least some site content. If you want to additionally restrict access, you must determine exactly which permissions authenticated users have, and on which site content.
Tracing inherited permissions and areas where inheritance is broken complicates the process of determining the correct permissions. Microsoft SharePoint Foundation 2010 uses effective permissions to determine a user or group’s permissions on all resources within a site collection. You can now find both the user’s directly assigned permissions and the permissions assigned to any groups of which the user is a member.
 Important:
Effective permissions make it easier to find permissions in a site collection. However, they should never be used as a substitute for a carefully planned permissions structure.
-
Choose permission levels
When you create permissions, you must balance ease of administration and performance against the need to control access to individual items. If you use fine-grained permissions extensively, you will spend more time managing the permissions, and users may experience slower performance when they try to access site content.
Use the following guidelines to configure site permissions:
Follow the principle of least privilege: Users should have only the permission levels or individual permissions they need to perform their assigned tasks.
Use standard groups (such as Members, Visitors, and Owners) and control permissions at the site level.
Make most users members of the Members or Visitors groups. By default, users in the Members group can contribute to the site by adding or removing items or documents, but cannot change the structure, site settings, or appearance of the site. The Visitors group has read-only access to the site, which means that they can see pages and items, and open items and documents, but cannot add or remove pages, items, or documents.
Limit the number of people in the Owners group. Only those users you trust to change the structure, settings, or appearance of the site should be in the Owners group.
You can create additional SharePoint groups and permission levels if you need more control over the actions that your users can take. For example, if you do not want the Read permission level on a specific subsite to include the Create Alerts permission, break the inheritance and customize the Read permission level for that subsite.
-
Plan for permission inheritance
It is much easier to manage permissions when there is a clear hierarchy of permissions and inherited permissions. It becomes more difficult when some lists within a site have fine-grained permissions applied, and when some sites have subsites with unique permissions and others with inherited permissions.
For example, it is much easier to manage a site that has permission inheritance, as shown in the following table.
|
Securable object
|
Description
|
Unique or inherited permissions
|
|
SiteA
|
Group home page
|
Unique
|
|
SiteA/SubsiteA
|
Sensitive group
|
Unique
|
|
SiteA/SubsiteA/ListA
|
Sensitive data
|
Unique
|
|
SiteA/SubsiteA/LibraryA
|
Sensitive documents
|
Unique
|
|
SiteA/SubsiteB
|
Group shared project information
|
Inherited
|
|
SiteA/SubsiteB/ListB
|
Non-sensitive data
|
Inherited
|
|
SiteA/SubsiteB/LibraryB
|
Non-sensitive documents
|
Inherited
|
However, it is not as easy to manage a site that has permission inheritance, as shown in the following table.
|
Securable object
|
Description
|
Unique or inherited permissions
|
|
SiteA
|
Group home page
|
Unique
|
|
SiteA/SubsiteA
|
Sensitive group
|
Unique
|
|
SiteA/SubsiteA/ListA
|
Non-sensitive data
|
Unique, but same permissions as SiteA
|
|
SiteA/SubsiteA/LibraryA
|
Non-sensitive documents, but with one or two sensitive documents
|
Inherited, with unique permissions at the document level
|
|
SiteA/SubsiteB
|
Group shared project information
|
Inherited
|
|
SiteA/SubsiteB/ListB
|
Non-sensitive data, but with one or two sensitive items
|
Inherited, with unique permissions at the item level
|
|
SiteA/SubsiteB/LibraryB
|
Non-sensitive documents, but with a special folder that contains sensitive documents
|
Inherited, with unique permissions at the folder and document level
|
-
Determine permission levels and groups (SharePoint Foundation)
This article reviews the default groups and permission levels and helps you decide whether to use them, customize them, or add new groups and permission levels to promote security.
In this article:
Review available default groups
Review available permission levels
Determine whether you need additional permission levels or groups
The most important decision about your site and content security in Microsoft SharePoint Foundation 2010 is to decide how to categorize your users and what permission levels to assign.
There are several default SharePoint groups that are intended to help you categorize your users based on the kinds of actions they need to perform, but you might have unique requirements or other ways of looking at sets of users. Likewise, there are default permission levels, but they might not always align exactly with the tasks that your groups need to perform.
In this article, you review the default groups and permission levels and decide whether to use them as they are, customize them, or create different groups and permission levels.
-
Review available default groups
With SharePoint groups, you manage sets of users instead of individual users. SharePoint groups can be composed of many individual users, can hold a single Windows security group, or can be some combination of the two. SharePoint groups confer no specific rights to the site; they are merely a way to contain a set of users. You can organize users into any number of groups, depending on the size and complexity of your organization or Web site.
The following table shows the default groups that are created for sites in SharePoint Foundation 2010.
|
Group name
|
Default permission level
|
|
<Site name> Visitors
|
Read
|
|
<Site name> Members
|
Contribute
|
|
<Site name> Owners
|
Full Control
|
In addition, the following special users and groups are available for higher-level administration tasks:
Site collection administrators You can designate one or more users as primary and secondary site collection administrators. These users are recorded in the database as the contacts for the site collection, have full control of all sites within the site collection, can audit all site content, and receive any administrative alerts (such as verifying whether the site is still being used). Generally, you designate site collection administrators when you create the site, but you can change them as needed by using the Central Administration site or Site Settings pages.
Farm administrators Controls which users can manage server and server farm settings. The Farm Administrators group replaces the need for adding users to the Administrators group for the server. Farm administrators have no access to site content by default; they must take ownership of the site to view any content. They do this by adding themselves as site collection administrators, which action is recorded in the audit logs. The Farm Administrators group is used in Central Administration only, and is not available for any sites.
Administrators Members of the Administrators group on the local server can perform all farm administrator actions and more, including the following:
Installing new products or applications.
Deploying Web Parts and new features to the global assembly cache.
Creating new Web applications and new IIS Web sites.
Starting services.
Like the Farm Administrators group, members of the Administrators group on the local server have no access to site content, by default.
After you determine the groups you need, determine the permission levels to assign to each group on your site.
-
Review available permission levels
The ability to view, change, or manage a particular site is determined by the permission level that you assign to a user or group. This permission level controls all permissions for the site and for any subsites, lists, document libraries, folders, and items or documents that inherit the site’s permissions. Without the appropriate permission levels, your users might be unable to perform their tasks, or they might be able to perform tasks that you did not intend them to perform.
By default, the following permission levels are available:
Limited Access Includes permissions that enable users to view specific lists, document libraries, list items, folders, or documents when granted permissions.
Read Includes permissions that enable users to view items on the site pages.
Contribute Includes permissions that enable users to add or change items on the site pages or in lists and document libraries.
Design Includes permissions that enable users to change the layout of site pages by using the browser or Microsoft Office SharePoint Designer 2007.
Full Control Includes all permissions.
-
Determine whether you need additional permission levels or groups
The default groups and permission levels provide a general framework for permissions, covering many different organization types and roles within those organizations. However, they might not map exactly to how your users are organized or to the many different tasks that your users perform on your sites. If the default groups and permission levels do not suit your organization, you can create custom groups, change the permissions included in specific permission levels, or create custom permission levels.
-
Do you need custom groups?
The decision to create custom groups is fairly straightforward and has little effect on your site’s security. Essentially, you should create custom groups instead of using the default groups if any of the following applies:
You have more (or fewer) user roles within your organization than are apparent in the default groups. For example, if in addition to Designers, you have a set of people who are tasked with publishing content to the site, you might want to create a Publishers group.
There are well-known names for unique roles within your organization that perform very different tasks in the sites. For example, if you are creating a public site to sell your organization’s products, you might want to create a Customers group that replaces Visitors or Viewers.
You want to preserve a one-to-one relationship between Windows security groups and the SharePoint groups. (For example, your organization has a security group for Web Site Managers, and you want to use that name as a group name for easy identification when managing the site).
You prefer other group names.
-
Do you need custom permission levels?
The decision to customize permission levels is less straightforward than the decision to customize SharePoint groups. If you customize the permissions assigned to a permission level, you must keep track of that change, verify that it works for all groups and sites affected by that change, and ensure that the change does not negatively affect your security or your server capacity or performance.
For example, regarding security, if you customize the Contribute permission level to include the Create Subsites permission that is typically part of the Full Control permission level, Contributors can create and own subsites, potentially inviting malicious users to their subsites or posting unapproved content. Or, regarding capacity, if you change the Read permission level to include the Create Alerts permission that is typically part of the Contribute permission level, all members of the Visitors group can create alerts, which might overload your servers.
You should customize the default permission levels if either of the following situations applies:
A default permission level includes all permissions except one that your users need to do their jobs, and you want to add that permission.
A default permission level includes a permission that your users do not need.
 Note:
Note:
You should not customize the default permission levels if your organization has security or other concerns about a particular permission and wants to make that permission unavailable for all users assigned to the permission level or levels that include that permission. In this case, you should turn off this permission for all Web applications in your server farm, rather than change all of the permission levels.
If you need to make several changes to a particular permission level, it is better to create a custom permission level that includes all of the permissions you need.
You might want to create additional permission levels if either of the following situations applies:
You want to exclude several permissions from a particular permission level.
You want to define a unique set of permissions for a new permission level.
To create a permission level, you can copy an existing permission level and then make changes, or you can create a permission level and then select the permissions that you want to include.
 Note:
Note:
Some permissions depend on other permissions. If you clear a permission that another permission depends on, the other permission is also cleared.
-
Choose security groups (SharePoint Foundation 2010)
This article describes the security and distribution groups that are included in Active Directory Domain Services (AD°DS). This article also provides recommendations for using those groups to organize the users of your SharePoint sites.
In this article:
Determine which Windows security groups and accounts to use for granting access to sites
Decide whether to allow access for all authenticated users
Decide whether to allow access for anonymous users
-
Introduction
Managing users of SharePoint sites is easier if you assign site permissions to groups instead of to individual users. In AD°DS, the following groups are typically used to organize users:
Distribution group A group that is used only for e-mail distribution and that is not security-enabled. Distribution groups cannot be listed in discretionary access control lists (DACLs), which are used to define permissions on resources and objects.
Security group A group that can be listed in DACLs. A security group can also be used as an e-mail entity.
You can use security groups to control permissions for your site by directly adding the security group to the site and granting permissions to the entire group. You cannot directly add distribution groups, but you can expand a distribution group and add the individual members to a SharePoint group. If you use this method, you must manually keep the SharePoint group synchronized with the distribution group. If you use security groups, you do not need to manage the individual users in the SharePoint application. Because you included the security group itself and not the individual members of the group, AD°DS manages the users for you.
 Note
Note
Security groups that contain the following items may be more difficult to manage:
-
Determine which Windows security groups and accounts to use for granting access to sites
Each organization sets up its Windows security groups differently. For easier permission management, security groups should be:
Large and stable enough that you are not continually adding groups to your SharePoint sites.
Small enough that you can assign appropriate permissions.
For example, a security group called “all users in building 2” is probably not small enough to assign permissions, unless all users in building 2 have the same job function, such as accounts receivable clerks. This is rarely the case, so you should look for a smaller, more specific set of users, such as “Accounts Receivable.”
-
Decide whether to allow access for all authenticated users
If you want all users within your domain to be able to view content on your site, consider granting access to all authenticated users (the Domain Users Windows security group). This special group enables all members of your domain to access a Web site (at the permission level that you choose), without your having to enable anonymous access.
-
Decide whether to allow access for anonymous users
You can enable anonymous access to let users view pages anonymously. Most Internet Web sites allow for anonymous viewing of a site, but might ask for authentication when someone wants to edit the site or buy an item on a shopping site. Anonymous access must be granted at the Web application level at the time that the Web application is created.
If anonymous access is enabled for the Web application, site administrators can decide whether to:
Grant anonymous access to a site.
Grant anonymous access only to lists and libraries.
Block anonymous access to a site completely.
Anonymous access relies on the anonymous user account on the Web server. This account is created and maintained by Internet Information Services (IIS), not by your SharePoint site. By default in IIS, the anonymous user account is IUSR. When you enable anonymous access, you are in effect granting that account access to the SharePoint site. Allowing access to a site, or to lists and libraries, grants the View Items permission to the anonymous user account. However, even with the View Items permission, there are restrictions to what anonymous users can do. Anonymous users cannot:
Open sites for editing in Microsoft SharePoint Designer 2010; in other words, they cannot use remote procedure call (RPC).
View sites in My Network Places; in other words, they cannot use Web Distributed Authoring and Versioning (WebDAV), the Web Folders protocol in Windows.
Upload or edit documents in document libraries, including wiki libraries.
 Important:
To improve security for sites, lists, or libraries, do not enable anonymous access. Enabling anonymous access lets users contribute to lists, discussions, and surveys, possibly using up server disk space and other resources. Anonymous access also allows for anonymous users to discover site information, including user e-mail addresses and any content posted to lists, and libraries, and discussions.
You can set permission policies for the anonymous user for different zones (Internet, Extranet, Intranet, Other) if you have the same Web application serving content in those different zones. The policies are described in the following list:
None No policy. This is the default option. No additional permission restrictions or additions are applied to site anonymous users.
Read Anonymous users can read content, unless the site administrator turns off anonymous access.
Deny Write Anonymous users cannot write content, even if the site administrator specifically attempts to grant the anonymous user account that permission.
Deny All Anonymous users cannot have any access, even if site administrators specifically attempt to grant the anonymous user account access to their sites.
-
Choose administrators and owners for the administration hierarchy (SharePoint Foundation 2010)
This article describes the administrator roles that correspond to the Microsoft SharePoint Foundation 2010 server and site hierarchy. Many people can be involved in managing SharePoint Foundation 2010. Administration of SharePoint Foundation 2010 occurs at the following levels:
Server farm
Shared services
Sites
Document library or list
Individual items
In this article:
Levels of administration
-
Introduction
Most levels of the server and site hierarchy have a corresponding administration group. The Web application level does not have a unique administrator group, but farm administrators control the Web applications within their scope. Members of the Farm Administrators group and members of the Administrators group on the local server can define a policy to grant individual users permissions at the Web application level.
-
Levels of administration
The following groups of users have administrative permissions at different levels of the administration hierarchy:
Server or server farm level
Farm Administrators group Members of the Farm Administrators group have permissions to and responsibility for all servers in the server farm. Members can perform all administrative tasks in Central Administration for the server or server farm. Members of this group can also use Windows PowerShell to create and manage configuration database objects. They can assign administrators to manage service applications, which are instances of shared services. This group does not have access to individual sites or their content.
Administrators group Members of the Administrators group on the local server can perform all farm administrator actions. Administrators on the local server can perform additional tasks, such as installing new products or applications, deploying Web Parts and new features to the global assembly cache, creating new Web applications and new Internet Information Services (IIS) Web sites, and starting services. Like farm administrators, members of this group on the local server have no access to site content, by default.
 Note:
Note:
Farm administrators and local administrators can take ownership of specific site collections, if it is necessary. For example, if a site administrator leaves the organization and a new administrator must be added, the farm administrator or a member of the local Administrators group can take ownership of the site collection to make the change.
Shared services level
Service application administrators These administrators are delegated by the farm administrator. They can configure settings for a specific service application within a farm. However, these administrators cannot create service applications, access any other service applications in the farm, or perform any farm-level operations, including topology changes. For example, the service application administrator for a Search service application in a farm can configure settings for that Search service application only.
Feature administrators A feature administrator is associated with a specific feature or features of a service application. These administrators can manage a subset of service application settings, but not the entire service application. For example, a Feature administrator might manage the Audiences feature of the User Profile service application.
Site level
Site collection administrators These administrators have the Full Control permission level on all Web sites within a site collection. They have access to content in all sites in that site collection, even if they do not have explicit permissions on that site.
Site owners By default, members of the Owners group for a site have the Full Control permission level on that site. They can perform administration tasks for the site, and for any list or library within that site. They receive e-mail notifications for events, such as the pending automatic deletion of inactive sites and requests for site access.
-
Best practices for using fine-grained permissions (white paper) (SharePoint Foundation 2010)
This white paper describes best practices for fine-grained permissions (FGP) and how to use them within your organization when implementing Microsoft SharePoint Foundation 2010.
Download the white paper from the following link: http://go.microsoft.com/fwlink/?LinkId=201596 (http://go.microsoft.com/fwlink/?LinkId=201596)
-
Sandboxed solutions planning (SharePoint Foundation 2010)
Sandboxed solutions restrict access to network and local resources to provide greater security and stability. You can use sandboxed solutions for load balancing solutions, for solutions that have not been fully tested, and for deploying user solutions in a hosted environment. Sandboxed solutions run in a separate worker thread so that they cannot access resources that belong to other solutions, and they have limited access to local and network resources.
-
In this section
Sandboxed solutions overview (SharePoint Foundation 2010)
Planning sandboxed solutions (SharePoint Foundation 2010)
-
Sandboxed solutions overview (SharePoint Foundation 2010)
You can deploy a Microsoft SharePoint Foundation 2010 solution directly onto your SharePoint Foundation farm, or you can deploy the solution into a sandbox. A sandbox is a restricted execution environment that enables programs to access only certain resources, and that keeps problems that occur in the sandbox from affecting the rest of the server environment.
Solutions that you deploy into a sandbox, which are known as sandboxed solutions, cannot use certain computer and network resources, and cannot access content outside the site collection they are deployed in. For more information about the restrictions on sandboxed solutions, see What a sandboxed solution cannot contain.
Because sandboxed solutions cannot affect the whole server farm, they do not have to be deployed by a farm administrator. Sandboxed solutions can be deployed by a site collection administrator or, in certain situations, by a user who has full control at the root of the site collection. Only a farm administrator can promote a sandboxed solution to run directly on the farm, outside its sandbox.
It is especially appropriate to use sandboxed solutions in two scenarios:
When an organization want to run code for employees on a production SharePoint Foundation site, and that code has not been stringently code reviewed and tested.
When a hoster wants to let the owners of hosted SharePoint Foundation sites upload and run custom code.
This article introduces the concepts that are related to sandboxed solutions, explains the differences between sandboxed solutions and solutions that are deployed on the farm, and summarizes how sandboxed solutions are deployed and run. This article does not contain detailed procedures for configuring sandboxing or for deploying sandboxed solutions.
In this article:
Deploying and running a sandboxed solution
Isolating sandboxed solutions
What a sandboxed solution cannot contain
Comparison of sandboxed and farm solutions
Benefits of using sandboxed solutions
-
Deploying and running a sandboxed solution
Any page of a SharePoint Foundation application can contain components that run in a sandbox in addition to components that run directly on the farm. The components that are deployed to the farm run in the Internet Information Services (IIS) worker process. The components that are deployed to the sandbox run in a sandboxed process.
The following list identifies several of the components that you might deploy in a sandbox:
Web Parts
Event receivers
Feature receivers
Custom Microsoft SharePoint Designer workflow activities
Microsoft InfoPath business logic
The following steps describe how to deploy a sandboxed solution:
1. A farm administrator performs the following tasks. These have to be done only one time.
A farm administrator enables sandboxing and starts the sandboxing service on each server that will run sandboxed solutions.
A farm administrator determines which load balancing scheme to use. The load balancing scheme applies to all sandboxed solutions in all site collections on the farm.
A farm administrator sets resource quotas that the combination of all sandboxed solutions in a site collection cannot exceed.
2. A site collection administrator or a user who has full control at the root of the site collection uploads a solution the site collection’s solution gallery.
3. A site collection administrator activates the solution. If the solution does not contain an assembly, a user who has full control at the root of the site collection can also activate the solution. Validation tools run against the solution. If the solution fails validation, it is not activated.
When a request to run a sandboxed solution is processed, the following activities occur:
1. Based on load balancing scheme, SharePoint Foundation determines which server to run the solution on. If load balancing is local, the solution runs on the same server that is servicing the request. If load balancing is remote, the server that the solution runs on is selected based on solution affinity. In both cases, the server must be running the sandboxing service.
2. SharePoint Foundation selects a sandbox worker process to run the solution in; loads a “shim” dynamic-link library (dll) into the process; and then loads the solution assembly into the process.
3. As the solution runs, its code passes through the shim before it is executed by SharePoint Foundation. If the solution code attempts to use APIs that sandboxed solutions are restricted from using, the shim signals an exception instead of letting the code pass through and run.
4. SharePoint Foundation monitors the resources that sandboxed solutions use. If the sandboxed solution exceeds a hard limit (for example, if it uses more than a predefined amount of CPU time,) SharePoint Foundation terminates the sandbox worker process. If the combination of all sandboxed solutions in the site collection exceeds the site collection’s resource quota, SharePoint Foundation turns off all sandboxed solutions in the site collection for the rest of the day.
5. A site collection administrator can monitor the resources that sandboxed solutions use, and can deactivate solutions in the site collection.
If necessary, a farm administrator can block a solution from running on the farm. Optionally, a farm administrator can also remove the requirement that a solution be run in a sandbox. If the requirement to run in a sandbox is removed, when the solution runs in any site collection in the farm, it will no longer run in a sandbox.
-
Isolating sandboxed solutions
You can isolate sandboxed solutions to various degrees. Each additional level of isolation increases your ability to protect the main part of your SharePoint Foundation site from code that might consume too many resources. At the first level, sandboxed code runs in a rights-restricted, isolated process. Code Access Security (CAS) limits the operations that the code can perform. You can increase isolation by using remote load balancing and by running the sandboxing service on only specific servers. In a production environment, we recommend that you use remote load balancing and dedicate a separate server to running sandboxed solutions.
-
What a sandboxed solution cannot contain
A SharePoint Foundation solution must contain the configuration file that is named manifest.xml, and may also contain additional configuration files and assemblies. If the solution will run in a sandbox, the assembly and configuration files are limited in what they can contain.
The following list identifies the most common things that an assembly that will run in a sandbox cannot do.
Connect to resources that are not located on the local server.
Access a database.
Change the threading model.
Call unmanaged code.
Write to disk.
Access resources in a different site collection.
The manifest.xml file refers to feature files; feature files refer to element files; and element files contain feature elements. The only feature elements that are permitted in a sandboxed solution are:
ContentType
Field
CustomAction
Module
ListInstance
ListTemplate
Receivers
WebTemplate
WorkflowAssociation
PropertyBag
WorkflowActions
-
Comparison of sandboxed and farm solutions
The following table compares aspects of solutions that run in a farm to solutions that run in a sandbox.
|
Aspect
|
Farm
|
Sandbox
|
|
Deployment process
|
Add the solution, and then deploy it to the farm.
|
Upload the solution to a site collection, and then activate it in the site collection.
|
|
Who can deploy
|
Farm administrator.
|
If the solution contains an assembly, only a site collection administrator can deploy it. If the solution does not contain an assembly, a user who has full control at the root of the site collection can deploy it.
|
|
Data access
|
Unrestricted.
|
The solution can only access content from the site collection in which it was deployed.
|
|
Process the solution runs in
|
Unrestricted IIS worker process, or whichever process the solution is deployed into.
|
Separate worker process that has restricted rights.
|
|
Code access security
|
The solution developer can set the code access security policy when packaging the solution.
|
Restricted. For more information, see Deploying a sandboxed solution (http://go.microsoft.com/fwlink/?LinkId=177369&clcid=0x409).
|
|
Monitoring
|
Not monitored.
|
Monitored, and limited by quotas set by the farm administrator.
|
|
Load balancing
|
Varies, based on the kind of solution.
|
Configurable separately from non-sandboxed solutions.
|
|
Solution functionality
|
Unrestricted.
|
Restricted, as described in What a sandboxed solution cannot contain.
|
-
Benefits of using sandboxed solutions
The main benefits of using sandboxed solutions are as follows:
Solutions can be added to a production SharePoint Foundation environment without the risk of affecting processes outside the sandbox.
Site collection administrators can deploy sandboxed solutions, freeing farm administrators from this task.
Scalability and flexibility are increased because sandboxes run in separate process that can be restricted by quotas, and their effect on the farm can be monitored.
A solution does not have to be modified or recompiled if it is moved from a sandbox to running directly on the farm.
Sandboxed solutions administration (SharePoint Foundation 2010) (http://technet.microsoft.com/library/9202709d-2854-4663-989f-6e2f0d3d930b(Office.14).aspx)
Sandboxed solutions planning (SharePoint Foundation 2010)
Sandboxed solutions architecture (http://go.microsoft.com/fwlink/?LinkId=177368&clcid=0x409)
Deploying a sandboxed solution (http://go.microsoft.com/fwlink/?LinkId=177369&clcid=0x409)
-
Planning sandboxed solutions (SharePoint Foundation 2010)
Sandboxed solutions restrict access to network and local resources to provide greater security and stability. You can use sandboxed solutions for load balancing solutions, for solutions that have not been fully tested, and for deploying user solutions in a hosted environment. Sandboxed solutions run in a separate worker thread so that they cannot access resources that belong to other solutions, and they have limited access to local and network resources.
When you plan sandboxed solutions, decide first whether to use sandboxed solutions at all. You should determine whether your primary consideration is performance or security. A farm that uses sandboxed solutions generates more worker and proxy processes than a farm that does not use sandboxed solutions. Using sandboxed solutions provides more process isolation, which enhances the security of your farm.
For more information about sandboxed solutions, see Sandboxed solutions overview (SharePoint Foundation 2010).
In this article:
Determine when to use sandboxed solutions
Plan to load balance sandboxed solution code
Determine where to deploy sandboxed solutions
Determine who can deploy sandboxed solutions
Determine which site collections will run sandboxed solutions
Plan resource usage quotas for sandboxed solutions
Plan sandboxed solutions governance
-
Determine when to use sandboxed solutions
Using sandboxed solutions is appropriate in scenarios where you want to load balance solutions across multiple servers, or where you want to provide the ability to run code that has not been fully tested or that your organization does not support. Sandboxed solutions can play a valuable part of a scaled deployment path for developers in your organization, from their test environment to a sandboxed solution in the production environment. Sandboxed solutions can later be changed to full trust status by a farm administrator when the solution is shown to be safe for full deployment.
It is especially appropriate to use sandboxed solutions in the following scenarios:
When you want to load balance solutions between multiple SharePoint Foundation servers.
When an organization wants to run code for employees on a production SharePoint Foundation site, and that code has not been stringently code reviewed and tested.
When an Internet hosting provider wants to let the owners of hosted SharePoint Foundation sites upload and run custom code.
When you use sandboxed solutions, you must activate the SharePoint 2010 User Code Host service on each server on which you want to run the sandboxed solutions.
-
Plan to load balance sandboxed solution code
You can select one of two load balancing schemes for sandboxed solutions. Based on the load balancing scheme, Microsoft SharePoint Foundation 2010 determines which server to run the solution on. In local load balancing, the solution runs on the same server that received the request. If you choose remote load balancing, the server that the solution runs on is selected based on solution affinity, and the sandboxed solution is run on a server where it is already loaded and has already been run. This saves time in servicing the request for the solution. In both cases, each server must be running the SharePoint Foundation Sandboxed Code Service.
Your load balancing choice determines the model that is used by the entire SharePoint Foundation farm. You cannot use a mixture of local and remote load balancing, but instead you must choose to implement one or the other. When you are deciding which mode to implement consider the following:
Local mode requires less administration, but its scalability is limited by the resources of the local server.
Remote mode is more scalable than local mode, but it requires administrative tasks to be performed on more servers.
You obtain better performance by using the remote load balancing model in a SharePoint Foundation farm where there are multiple servers on which to run sandboxed solutions. If you are using sandboxed solutions as part of a development process, and you want to keep them restricted to the server from which they are called, use the local mode load balancing.
For more information, see Sandboxed solutions overview (SharePoint Foundation 2010).
-
Determine where to deploy sandboxed solutions
Sandboxed solutions are deployed at the root of a site collection. Anyone who is a site collection administrator can deploy a sandboxed solution. When it is deployed in a site collection, the sandboxed solution can be used anywhere within that site collection.
You can choose to run sandboxed solutions only on certain servers within your SharePoint Foundation farm or to all servers. To enable sandboxed solutions on a server, you must enable the SharePoint Foundation Sandboxed Code Service. This service must be enabled on every server on which you want to run sandboxed solutions.
-
Determine who can deploy sandboxed solutions
When you plan for the user roles that are involved in deploying sandboxed solutions, you must determine who will be authorized to deploy the solutions and who will be authorized to administer the solutions. Members of the site collection administrators group can deploy sandboxed solutions.
You must be a member of the farm administrators group to perform administrative tasks such as enabling or disabling the SharePoint Foundation Sandboxed Code Service, blocking or unblocking a solution, and adjusting or resetting quotas.
 Note:
Note:
It is not enough to be a site collection owner, to deploy and activate a sandboxed solution you must be a site collection administrator for the site collection where you are deploying the sandboxed solution.
Because farm administrators can change sandboxed solutions to fully trusted solutions that can be deployed anywhere on the farm, you should be careful to limit the membership of the farm administrators group to appropriate users. The same consideration applies to adding users to the site collection administrators group if there is any concern over the security of the sandboxed solutions being deployed.
-
Determine which site collections will run sandboxed solutions using quotas
Sandboxed solutions can be enabled or disabled on specific site collections by adjusting their quotas. If you set the quota for sandboxed solutions to 0 on a specific site collection, sandboxed solutions will not run on that site collection. In this way you can fine tune the use of sandboxed solutions in your farm.
To plan where to deploy sandboxed solutions you should consider both which servers will run the SharePoint Foundation Sandboxed Code Service, and which site collections will be able to run sandboxed solutions. If you enable sandboxed solutions on some site collections you should disable them on the remaining site collections by setting the quotas on those site collections to 0.
-
Plan resource usage quotas for sandboxed solutions
Sandboxed solutions are monitored for resource usage based on default resource quotas. If a sandboxed solution exceeds any of the resource quotas, the solution is disabled for the remainder of the day or until a farm administrator manually resets the solution. This helps administrators to know when a particular sandboxed solution is making excessive demands on shared resources or in some cases where a resource-intensive sandboxed solution requires an increased quota.
The default quotas are satisfactory for most scenarios; however, you can adjust individual quota limits to permit higher limits where appropriate.
If you determine that a sandboxed solution is consistently misusing server resources, you can block that solution until the developer can correct the situation. For more information about blocking and unblocking sandboxed solutions, see Block or unblock a sandboxed solution (SharePoint Foundation 2010) (http://technet.microsoft.com/library/6687e357-8531-4904-9c17-faa6908a793d(Office.14).aspx).
The default values that are assigned to sandboxed solution quotas are listed in the following table.
|
Resource
|
Description
|
Units
|
Resources per Point
|
Absolute Limit
|
|
AbnormalProcessTerminationCount
|
Abnormally terminated process
|
occurrence
|
1
|
1
|
|
CPUExecutionTime
|
CPU Execution Time for site
|
seconds
|
3,600
|
60
|
|
CriticalExceptionCount
|
Critical Exception Events
|
events
|
10
|
3
|
|
InvocationCount
|
Solution Invocation Events
|
events
|
<TBD>
|
<TBD>
|
|
PercentProcessorTime
|
Percent CPU usage by solution
|
percentage
|
85
|
100
|
|
ProcessCPUCycles
|
Solution CPU cycles
|
cycles
|
1 x10^11
|
1 x10^11
|
|
ProcessHandleCount
|
Windows handles count
|
items
|
10,000
|
1,000
|
|
ProcessIOBytes
|
Windows handles count
|
items
|
0
|
1 x10^8
|
|
ProcessThreadCount
|
Thread count in overall process
|
instances
|
10,000
|
200
|
|
ProcessVirtualBytes
|
Memory consumed
|
bytes
|
0
|
1.0×10^9
|
|
SharePointDatabaseQueryCount
|
Number of SharePoint database queries
|
instances
|
20
|
100
|
|
SharePointDatabaseQueryTime
|
Elapsed time to execute query
|
seconds
|
120
|
60
|
|
UnhandledExceptionCount
|
Number of unhandled exceptions
|
instances
|
50
|
3
|
|
UnresponsiveProcessCount
|
Number of unresponsive processes
|
instances
|
2
|
1
|
-
Plan sandboxed solutions governance
While you are still planning for sandboxed solutions, you should consider your processes for governance issues, including the following:
At what point will the farm administrator block or unblock a sandboxed solution? Identifying the administrative policy for blocking and unblocking sandboxed solutions will eliminate confusion if there is any doubt about the need to block a solution.
At what point will you transfer a sandboxed solution to the global catalog as a full trust solution? This decision applies to solution code that is developed by your organization’s developers. You should establish a policy for determining what level of testing is required for a sandboxed solution to be considered ready for production use in your organization.
When you are planning for who can deploy sandboxed solutions, will you choose to add people to the site collection administrators group or establish a procedure for a limited number of site collection administrators to deploy sandboxed solutions on behalf of their users? Depending on the security concerns in your organization, you can decide to add people directly to the site collection administrators group rather than requiring them to ask permission to deploy the sandboxed solution.
-
Plan for collaboration sites (SharePoint Foundation 2010)
With Microsoft SharePoint Foundation 2010, you can support collaboration sites in your environment. Collaboration sites store information that individuals and groups can collectively author, share, and revise. These sites do not need to be associated with a particular portal site collection or part of a publishing site collection. They can be stand-alone sites that are available for teams or groups of users who need to collaborate on projects or share information. For example, a team at an engineering firm might want a collaboration site to discuss current project status, assign tasks, or arrange group lunches, without publishing this internal information to the corporate intranet.
Collaboration sites can be made available for searching from your portal or publishing site so that information from these sites is not lost to your organization. However, for easier data recovery and maintenance, collaboration sites should be hosted either on a separate Web application or in separate content databases in the same Web application as your portal or publishing site.
You can create these collaboration sites for your users, or you can allow the users to create these sites on their own.
For more information about collaboration sites and architectural planning, see Logical architecture sample design: collaboration sites.
In this article:
Determine number of collaboration sites
Specific paths
Additional paths
-
Determine number of collaboration sites
Estimate approximately how many collaboration sites to expect in your environment, and how many such sites that you are willing to support. If you require users to request a collaboration site, you can control how many are created. If you let users create their own collaboration sites, you will have many of these sites in your environment.
-
Specific paths
You can use specific paths in Microsoft SharePoint Foundation 2010 to contain the SharePoint site collections, similar to the way that folders contain files or documents in the file system. By default, when you create a Web application, two paths are made available for you:
Root path (/) This is an explicit inclusion that can contain one site collection. For example, if you want a URL to appear as http://company_name/default.aspx, you would create the site collection at this root path.
Sites path (/sites) This is a general path that can contain many site collections. For example, when you use the /sites path, the URL for a site named Site_A would be similar to http://server_name/sites/Site_A/default.aspx.
 Note:
Note:
The name of the /sites path varies depending on the specific language that was used during installation.
-
Additional paths
You can also create additional paths. This enables you to group site collections. Then, when you create a site collection, you can choose from the following alternatives:
Create the site collection at the root of the Web application (if no site collection has already been created there).
Create the site collection under the /sites path.
Create the site collection under any additional paths that have been made available for that Web application.
In general, the /sites path should be sufficient for most installations. However, consider using other paths for the following situations:
You have a complex installation and expect to have many site collections, and you want to group similar sites together.
For example, you could use /personal for individual user sites and /team for group collaboration sites, instead of using /sites for all.
You want to be able to add a filter to your firewall or router to constrain a specific namespace to internal access only.
For example, you could expose the /team path for external collaboration, but not /personal.
-
Integration with Microsoft SharePoint Workspace 2010
Microsoft SharePoint Workspace 2010 provides a rich client for Microsoft SharePoint Foundation 2010, which enables real-time synchronization of desktop content with SharePoint documents and lists. Microsoft SharePoint Workspace 2010 also provides options for creating ad hoc Groove collaboration workspaces and shared folder workspaces. Information can be easily synchronized both online and offline with a designated SharePoint site or with external partners and offsite team members via shared workspaces. Microsoft SharePoint Workspace 2010 is installed automatically with enterprise versions of Microsoft Office 2010 or it can be installed separately from the Microsoft Download Center (http://go.microsoft.com/fwlink/?LinkID=48516&clcid=0x409).
For more information, see Plan for SharePoint Workspace 2010 (http://technet.microsoft.com/library/e8a433c1-ea1f-4cf7-adc8-50972f58d465(Office.14).aspx).
-
Document management planning (SharePoint Foundation 2010)
These articles will guide you in planning the document management features of your solution that is based on Microsoft SharePoint Foundation 2010.
The articles in this section include the following:
Document library planning (SharePoint Foundation 2010)
This article describes how to use document libraries to organize documents in your enterprise.
Content types planning (SharePoint Foundation 2010)
This article describes how to plan content types, which are the SharePoint Foundation 2010 mechanism to define and share the attributes of documents, list items, and folders.
Versioning, content approval, and checkout planning (SharePoint Foundation 2010)
This article describes how to plan content governance by using versioning, check-in and check-out, and approval for publishing content.
Co-authoring overview (SharePoint Foundation 2010) describes the feature and provides administrators an understanding of the settings that can be used to manage co-authoring.
-
Document library planning (SharePoint Foundation 2010)
This article describes how to plan document libraries and integrate libraries into your Microsoft SharePoint Foundation 2010 document management solution.
Document libraries are collections of files on SharePoint Foundation 2010 that you share with other site users. Most document management features are delivered through document libraries. As part of document management planning, you should determine the kind of document libraries that best fit your organization’s needs.
-
Plan document libraries
Document libraries are collections of files on SharePoint Foundation 2010 that you share with other site users. Most SharePoint Foundation 2010 document management features are delivered through document libraries. As part of document management planning, you should determine the document libraries that best fit your organization’s needs.
SharePoint Foundation 2010 includes the following kinds of document libraries:
Document Library Use a Document Library for general purpose document storage, document collaboration, and easy sharing of content.
Picture Library Use a Picture Library to share, manage, and reuse digital pictures.
Use document libraries to store content on which your workgroup is collaborating and to create shared knowledge bases. For example, a workgroup that designs products can use a document library to store works-in-progress such as design proposals, specifications, and supporting information. Using metadata, displayed as columns of information, the status of each design document can be maintained and made public, together with each document’s author, the project name, and so on. Completed documents can be stored separately in a searchable knowledge base document library that is used as source of information when researching new projects
In SharePoint Foundation 2010, document libraries can contain multiple kinds of documents. To implement this, you associate one or more content types with the document library. When multiple content types are associated with a library, the New command for that library will let users create new documents of any content type associated with the library, and metadata for all content types that the library can contain are displayed in document library views. For more information about content types planning, see Content types planning (SharePoint Foundation 2010).
Other document library features that support collaboration include the following:
Templates You can design a template and associate it with a document library to standardize the documents created in the library.
Workflows Using a custom workflow (see Plan workflows (SharePoint Foundation 2010)), business processes can be run on documents. For example, a workflow could send a document for review.
Check in and out You can require that users check documents in and out of a document library before editing them.
Versioning You can choose from three versioning options.
-
Content types planning (SharePoint Foundation 2010)
This article describes content types and workflows and provides guidance about how to plan how you can integrate them into your Microsoft SharePoint Foundation 2010 document management solution.
-
Plan content types
In this section:
What are content types?
Column templates
Folder content types
A content type defines the attributes of a list item, a document, or a folder. Each content type can specify:
Properties to associate with items of its type.
Workflows that can be launched from items of its type.
Document templates (for document content types).
Document conversions to make available (for document content types).
Custom features.
You can associate a content type with a list or library. When you do this, you are specifying that the list or library can contain items of that content type and that the New command in that list or library will let users create new items of that type.
 Note:
Note:
You can also associate properties, workflows, policies, and templates directly with a list or library. However, doing this can limit these associations to the list or library and is not reusable across your solution. In SharePoint Foundation 2010 site level workflows can be associated with multiple lists or libraries.
Document libraries and lists can contain multiple content types. For example, a library can contain both the documents and the graphics related to a project. When a list or library contains multiple content types, the following apply:
By default, the New command in that list or library lets users select from among all available content types when they create a new item. Content type owners can configure the New command to display only certain content types.
The columns associated with all available content types are displayed.
You can define custom content types in a site’s content type gallery. A custom content type must be derived, directly or indirectly, from a core content type such as Document or Item. After it is defined in a site, a custom content type is available in that site and in all sites below that site. To make a content type most widely available within a site collection, define it in the content type gallery of the top-level site.
For example, if your organization uses a particular contract template, in the content type gallery of the top-level site in a site collection you can create a content type that defines the metadata for that contract, the contract’s template, and workflows required to review and complete the contract. Then, any document library in your site collection to which you associate the Contract content type will include all these features and will enable authors to create new contracts based on the template.
In sites based on SharePoint Foundation 2010, each default list item or library item, such as Contact, Task, or Document, has a corresponding content type in the site’s content type gallery. When planning content types, you can use these out-of-box content type definitions as starting points, basing new content types on existing content types as needed or modifying the default types.
Content types are organized into a hierarchy that enables one content type to inherit its characteristics from another content type. This enables classes of documents to share characteristics across an organization, while also enabling teams to customize these characteristics for particular sites or lists.
For example, all customer deliverable documents in an enterprise may require a set of metadata such as account number, project number, and project manager. By creating a top-level Customer Deliverable content type, from which all other customer deliverable document types inherit, you ensure that required information such as account numbers and project numbers will be associated with all variants of customer deliverable documents in your organization. Note that if another required column is added to the top-level Customer Deliverable content type, the content type owner can propagate the changes to all content types that inherit from it, which will add the new column to all customer deliverable documents.
Each item of metadata that is associated with a content type is a column, which is a location in a list to store information. Lists or libraries are often displayed graphically as columns of information. However, depending on the view associated with the list, the columns can appear in other forms, such as days in a calendar display. In forms associated with a list or library, columns are displayed as fields.
You can define columns for use in multiple content types. To do this, create them in a Column Templates gallery. There is a Column Templates gallery in each site in a site collection. As with content types, columns defined in the Column Templates gallery of a site are available in that site and in all sites below it.
Folder content types define the metadata that is associated with a folder in a list or library. When you apply a folder content type to a list or library, the New command in that list or library will include the folder content type, which makes it possible for users create folders of that type.
You can define views in a list or library that are available only in folders of a particular content type. This is useful when you want a folder to contain a particular kind of document and you want views in that folder to only display columns that are relevant to the document type contained in that folder.
By using the SharePoint Foundation 2010 object model, you can customize the New command for a folder content type so that, when a user creates a new folder of that type, the folder is prepopulated with multiple files and documents based on templates stored on the server. This is useful, for example, for implementing a compound document type that requires multiple files to contribute to a single deliverable document.
-
Versioning, content approval, and checkout planning (SharePoint Foundation 2010)
This article describes how to plan to use versioning, content approval, and check-out in Microsoft SharePoint Foundation 2010 to control document versions throughout their life cycle.
In this article:
About versioning, content approval, and check-outs
Plan versioning
Plan content approval
Plan check-out and check-in
-
About versioning, content approval, and check-outs
SharePoint Foundation 2010 includes the following features that can help you control documents in a document library:
Versioning is the method by which successive iterations of a document are numbered and saved.
Content approval is the method by which site members with approver permissions control the publication of content.
Check-out and Check-in are the methods by which users can better control when a new version of a document is created and also comment on changes that were made when a document is checked in.
You configure settings for the content control features discussed in this article in document libraries. To share these settings across libraries in your solution, you can create document library templates that include your content control settings; this ensures that new libraries will reflect your content control decisions.
-
Plan versioning
The default versioning control for a document library depends on the site collection template. However, you can configure versioning control for a document library depending on your particular requirements. Each document library can have a different versioning control that best suits the type of documents in the library. SharePoint Foundation 2010 has three versioning options:
No versioning Specifies that no previous versions of documents are saved. When no versioning is being used, previous versions of documents are not retrievable, and document history is also not retained because comments that accompany each iteration of a document are not saved. Use this option on document libraries that contain unimportant content or content that will never change.
Create major versions Specifies that numbered versions of documents are retained using a simple versioning scheme (such as 1, 2, 3). To control the effect on storage space, you can specify how many previous versions to keep, counting back from the current version.
In major versioning, every time that a new version of a document is saved, all users who have permissions to the document library will be able to view the content. Use this option when you do not want to differentiate between draft versions of documents and published versions. For example, in a document library that is used by a workgroup in an organization, major versioning is a good choice if everyone on the team must be able to view all iterations of each document.
Create major and minor (draft) versions Specifies that numbered versions of documents are retained by using a major and minor versioning scheme (such as 1.0, 1.1, 1.2, 2.0, 2.1). Versions ending in .0 are major versions and versions ending with non-zero extensions are minor versions. Previous major and minor versions of documents are saved together with current versions. To control the effect on storage space, you can specify how many previous major versions to keep, counting back from the current version. You also can specify how many major versions being kept should include their respective minor versions. For example, if you specify that minor versions should be kept for two major versions and the current major version is 4.0, then all minor versions starting at 3.1 will be kept.
In major and minor versioning, any user who has read permissions can view major versions of documents. You can specify which users can also view minor versions. Typically, grant users who can edit items permissions to view and work with minor versions, and restrict users who have read permissions to viewing only major versions.
Use major and minor versioning when you want to differentiate between published content that can be viewed by an audience and draft content that is not yet ready for publication. For example, on a human resources Web site that describes organizational benefits, use major and minor versioning to restrict employees’ access to benefits descriptions while the descriptions are being revised.
 Note:
Note:
Regardless of the versioning control you choose, you must consider the effect that retaining multiple versions of the same document can have on storage space.
-
Plan content approval
Use content approval to formalize and control the process of making content available to an audience. For example, an enterprise that publishes content as one of its products or services might require a legal review and approval before publishing the content. Content publishing can also be scheduled depending on the document state.
A document draft awaiting content approval is in the Pending state. When an approver reviews the document and approves the content, it becomes available for viewing by site users who have read permissions. A document library owner can enable content approval for a document library and optionally can associate a workflow with the library to run the approval process.
The way that documents are submitted for approval varies depending on the versioning settings in the document library:
No versioning If no versioning is being used and changes to a document are saved, the document’s state becomes Pending. SharePoint Foundation 2010 keeps the earlier version of the document so that users with read permissions can still view it. After the pending changes have been approved, the new version of the document is made available for viewing by users who have read permissions and the earlier version is not retained.
If no versioning is being used and a new document is uploaded to the document library, it is added to the library in the Pending state and is not viewable by users who have read permissions until it is approved.
Create major versions If major versioning is being used and changes to a document are saved, the document’s state becomes Pending and the previous major version of the document is made available for viewing by users who have read permissions. After changes to the document are approved, a new major version of the document is created and made available to site users who have read permissions, and the previous major version is saved to the document’s history list.
If major versioning is being used and a new document is uploaded to the document library, it is added to the library in the Pending state and is not viewable by users who have read permissions until it is approved as version 1.
Create major and minor (draft) versions If major and minor versioning is being used and changes to a document are saved, the author has the choice of saving a new minor version of the document as a draft or creating a new major version, which changes the document’s state to Pending. After the changes to the document are approved, a new major version of the document is created and made available to site users who have read permissions. In major and minor versioning, both major and minor versions of documents are kept in a document’s history list.
If major and minor versioning is being used and a new document is uploaded to the document library, it can be added to the library in the Draft state as version 0.1, or the author can immediately request approval in which case the document’s state becomes Pending.
-
Plan check-out and check-in
You can require that users check out documents from a document library before editing the documents. It is always recommended to do this. The benefits of requiring check-out and check-in include the following:
Better control of when document versions are created. When a document is checked out, the author can save the document without checking it in. Other users of the document library will be unable to see these changes and a new version is not created. A new version (visible to other users) is only created when an author checks in a document. This gives the author more flexibility and control.
Better capture of metadata. When a document is checked in, the author can write comments that describe the changes that were made to the document. This promotes creation of an ongoing historical record of the changes that are made to the document.
If your solution requires that users check in and check out documents when editing them, the Microsoft Office 2010 client applications include features that support these actions. Users can check out documents, undo check-outs, and check in documents from Office 2010 client applications.
When a document is checked out, it is saved in the user’s My Documents folder in a subfolder named “SharePoint Drafts.” This folder is displayed in the Office 2010 client applications. When the document is checked out, the user can only save edits to this local folder. When the user is ready to check the document in, the document is saved back to the original server location.
From Office 2010 client applications, users can also decide to leave checked-out documents on the server by changing content editing options.
Document library planning (SharePoint Foundation 2010)
-
Co-authoring overview (SharePoint Foundation 2010)
In today’s highly connected work environment, documents created by multiple authors, editors, and stakeholders are becoming the rule, instead of the exception. Organizations look to the communication and collaboration capabilities of Microsoft SharePoint Foundation 2010 to help them foster communication and collaboration between end-users while reducing administration required to support it. Microsoft Office 2010 continues this trend with co-authoring functionality for Microsoft PowerPoint 2010, Microsoft Word 2010, and Microsoft OneNote 2010 documents on SharePoint Foundation 2010.
Co-authoring removes barriers to server-based document collaboration and helps organizations to reduce the overhead associated with traditional document sharing through attachments. Co-authoring simplifies collaboration by enabling multiple users to work productively on the same document without intruding on one another’s work or locking one another out. This functionality requires no additional server setup and is the default state for documents stored in SharePoint Foundation 2010. Co-authoring functionality is managed by using the same tools and technologies that are already used to manage SharePoint Foundation, helping to minimize the impact on administrators.
In this article:
Co-authoring functionality in SharePoint Foundation 2010
Understanding the end-user experience
Important considerations
OneNote Notebooks
Software Version Requirements
Co-authoring in a mixed Office environment
Performance and scalability
-
Co-authoring functionality in SharePoint Foundation 2010
In traditional collaboration, documents are shared via e-mail attachments. Tracking versions and edits from multiple authors is difficult and time-consuming for users. E-mail systems have to contend with storing multiple copies of the same document, not to mention increased network traffic as documents are sent repeatedly.
The use of SharePoint Foundation to store documents for collaboration has reduced these problems by providing consistent access to up-to-date versions of documents, the ability to track previous versions, and centralized management. Storing a single document, instead of many attachments, also reduces network and storage overhead.
But this solution hasn’t been perfect. When one author has a document open, other authors cannot work on it. If someone forgets to close a document or check it in, other users may be locked out indefinitely, a situation that often requires a call to the IT department to resolve the problem.
Co-authoring in SharePoint Foundation 2010 addresses these issues by making it possible for multiple users to work on a document, at any time, without interfering with each other’s changes. This approach streamlines many common document-collaboration scenarios. For example:
Two or more authors are working on different parts of a composite document. While one author works on his section of the document, another author can work on hers, without either interrupting their work.
Several authors are working on a composite slide show. Each author can add slides to the presentation and edit them, instead of working in isolation and trying to merge several documents and make them consistent all at the same time.
A document is sent out to several experts and stakeholders, each of whom has some edits or additions. No user’s edits are lost, because they are all working on a central, server-stored document.
-
Understanding the end-user experience
Co-authoring is easy to use from the end user’s point of view. When a user wants to work on a document in Word 2010, PowerPoint 2010, or OneNote 2010, he or she merely opens it from SharePoint Foundation, as usual. If another user already has the document open, both users are able to edit the document at the same time; access to the document is not blocked and no error appears
In Word 2010 and PowerPoint 2010, saving to a document notifies other users viewing the document that there are new edits. Those users can refresh their view immediately to see those changes or continue their work and refresh later to see the latest edits. The authors can also see one another’s work, and everyone knows who is working on the document. SharePoint Foundation 2010 versioning and tracking tools protect the document so that authors can roll back unwanted changes. When Office Communication Server is available, users can see the online status of fellow co-authors and initiate instant messaging conversations without leaving the document.
With OneNote 2010, shared notebooks enable users to share notes seamlessly. When a user edits a page of the notebook, those edits are automatically synchronized with other users of that notebook to ensure everybody has a complete set of notes. Edits made by multiple users on the same page appear automatically, enabling near real-time collaboration. Versioning and other shared features in OneNote make it possible for users to roll back edits, show what edits are new, and determine who made a specific edit.
The Excel 2010 client application does not support co-authoring workbooks in SharePoint Foundation 2010. However, the Excel client application does support non-real-time co-authoring workbooks stored locally or on network (UNC) paths by using the Shared Workbook feature. Co-authoring workbooks in SharePoint Foundation is supported by using the Microsoft Excel Web App, included with Office Web Apps. Office Web Apps is available to users through Windows Live and to business customers with Microsoft Office 2010 volume licensing and document management solutions based on Microsoft SharePoint 2010 Products. For more information, see Office Web Apps (Installed on SharePoint 2010 Products) (http://technet.microsoft.com/library/8a58e6c2-9a0e-4355-ae41-4df25e5e6eee(Office.14).aspx).
-
Important considerations
There are several factors that administrators will want to consider when planning how to use co-authoring in their environment.
Co-authoring functionality in SharePoint Foundation is designed to be easy to set up and requires minimal effort to manage. However there are several things to consider when you set up and manage co-authoring:
Permissions – For multiple users to be able to edit the same document, users need edit permissions for the document library where that document is stored. The simplest way to ensure this is to give all users access to the SharePoint site where documents are stored. In cases in which only a subset of users should have permission to co-author documents in a particular library, SharePoint permissions can be used to manage access.
Versioning –SharePoint Foundation versioning keeps track of changes to documents while they are being edited, and even stores previous versions for reference. By default, this feature is turned off in SharePoint Foundation 2010. SharePoint Foundation 2010 supports two kinds of versioning, major and minor. It is best that minor versioning not be turned on for document libraries used for co-authoring in OneNote, as this may interfere with the synchronization and versioning capabilities that are part of the product. This limitation only applies to minor versioning; major versioning may be used with OneNote.
Number of versions – The number of document versions retained affects storage requirements on the server. This number can be tuned in the document library settings to limit the number of versions retained. OneNote notebooks that are frequently updated may result in many versions being stored on the server. To avoid using unnecessary disk space, we recommend that an administrator set the maximum number of versions retained to a reasonable number on document libraries used to store OneNote notebooks.
Versioning period – The versioning period determines how often SharePoint Foundation will create a new version of a Word or PowerPoint document that is being co-authored. Setting this period to a low value will capture versions more often, for more detailed version tracking, but may require more server storage. The versioning period does not impact OneNote notebooks. This value can be altered by adjusting the coAuthoringVersionPeriod property on the server. For more information about adjusting this setting, see Configure the co-authoring versioning period (SharePoint Foundation 2010) (http://technet.microsoft.com/library/21b24d64-74bc-49c4-b91c-35ed1f45bdc4(Office.14).aspx).
Check out – When a user checks out a document for editing, this locks the document for editing to only that user, which prevents co-authoring. Require Check Out should not be enabled in document libraries where co-authoring will be used. By default, Require Check Out is not enabled in SharePoint Foundation 2010. Users should not check out documents manually when co-authoring is being used.
-
OneNote Notebooks
Unlike Microsoft Word and Microsoft PowerPoint, Microsoft OneNote stores version information within the file itself. For this reason, administrators should follow these recommended practices when storing OneNote notebooks in a SharePoint Foundation document library:
Do not enable minor versioning. By default, minor versioning is not enabled in SharePoint Foundation 2010.
If major versioning is enabled, set a reasonable maximum number of versions to store. By default, major versioning is not enabled in SharePoint Foundation 2010.
-
Software Version Requirements
For users to co-author documents by using Office 2010, those documents must be stored in SharePoint Server 2010 or SharePoint Foundation 2010. To take advantage of the co-authoring functionality, users must have Word 2010, PowerPoint 2010, or OneNote 2010.
 Note:
Note:
The co-authoring functionality in Office 2010 can also be used without SharePoint Server 2010 or SharePoint Foundation 2010 if users have Windows Live SkyDrive accounts. Using co-authoring without SharePoint Server 2010 or SharePoint Foundation 2010 is not covered in this article.
-
Co-authoring in a mixed Office environment
Some organizations may want to use co-authoring in an environment where users have different versions of Office.
-
Mixed environment that has Microsoft Office PowerPoint and Word 2007
Users of earlier versions of PowerPoint and Word can share and edit documents stored in SharePoint Foundation 2010 exactly as with previous versions of SharePoint Foundation. However, they cannot use co-authoring to work on them at the same time. To collaborate best in PowerPoint and Word, we recommend that all users work with Office 2010. Users of Office PowerPoint and Word 2007 will not experience any significant difference between their current experience and their user experience on Office 2010. For instance, if Office 2007 users open a document stored in Office 2010 that is currently being edited by another user, they will see a message that the document is being used and will be unable to edit it. If no other user is editing the document, Office 2007 users will be able to open it as usual. When an Office 2007 user opens a document, this creates a lock on the document and prevents users of Office 2010 from using co-authoring to edit the document. This behavior matches earlier versions of SharePoint Foundation.
-
Mixed environment that has Microsoft Office OneNote 2007
OneNote 2010 is backward compatible with the Office OneNote 2007 file format and supports co-authoring with OneNote 2007 users. In mixed environments, notebooks must be saved in the OneNote 2007 file format for OneNote 2007 and OneNote 2010 users to work on it together. By upgrading to the OneNote 2010 file format, however, users gain several key features, including compatibility with the Microsoft OneNote Web App that allows users without any version of OneNote installed to edit and co-author notebooks.
OneNote 2010 includes the ability to upgrade OneNote 2007 files to OneNote 2010 files at any time, providing an easy upgrade path for organizations that are moving from a mixed environment to a unified environment on Office 2010.
-
Performance and scalability
SharePoint Foundation 2010 and Office 2010 applications have been designed to minimize the performance and scalability impact associated with co-authoring in your environment. Office clients do not send or download co-authoring information from the server until more than one author is editing. When a single user is editing a document, the performance impact resembles that of previous versions of SharePoint Foundation.
Office clients are configured to reduce server impact by reducing the frequency of synchronization actions related to co-authoring when the server is under heavy load, or when a user is not actively editing the document, further helping to reduce overall performance impact.
Co-authoring administration (SharePoint Foundation 2010) (http://technet.microsoft.com/library/83f79b8d-4e27-4c3f-819c-3546476fe923(Office.14).aspx)
-
Business data and processes planning (SharePoint Foundation)
The topics in this section will help you plan and build solutions that integrate business processes with your organization’s data.
In this section:
Plan for Business Connectivity Services (SharePoint Foundation 2010)
Plan workflows (SharePoint Foundation 2010)
-
Plan for Business Connectivity Services (SharePoint Foundation 2010)
This section describes how to plan for Business Connectivity Services within a Microsoft SharePoint Foundation 2010 environment.
In this section:
Business Connectivity Services overview (SharePoint Foundation 2010)
Business Connectivity Services security overview (SharePoint Foundation 2010)
Diagnostic logging in Business Connectivity Services overview (SharePoint Foundation 2010)
-
Business Connectivity Services overview (SharePoint Foundation 2010)
Microsoft SharePoint Foundation 2010 includes Microsoft Business Connectivity Services, which are a set of services and features that provide a way to connect SharePoint solutions to sources of external data and to define external content types that are based on that external data. External content types resemble content types and allow the presentation of and interaction with external data in SharePoint lists (known as external lists) and Web Parts. External systems that Microsoft Business Connectivity Services can connect to include SQL Server databases, SAP applications, Web services (including Windows Communication Foundation Web services), custom applications, and Web sites based on SharePoint. By using Microsoft Business Connectivity Services, you can design and build solutions that extend SharePoint collaboration capabilities to include external business data and the processes that are associated with that data.
Microsoft Business Connectivity Services solutions use a set of standardized interfaces to provide access to business data. As a result, developers of solutions do not have to learn programming practices that apply to a specific system or adapter for each external data source. Microsoft Business Connectivity Services also provide the run-time environment in which solutions that include external data are loaded, integrated, and executed.
-
Typical solutions based on Business Connectivity Services
Information workers typically perform much of their work outside the formal processes of a business system. For example, they collaborate by telephone or e-mail messages, use documents and spreadsheets from multiple sources, and switch between being online and offline. Solutions that are based on Microsoft Business Connectivity Services can be designed to fit within these informal processes that information workers use:
They can be built by combining multiple services and features from external data systems to deliver solutions that are targeted to specific roles.
They support informal interactions and target activities and processes that occur mostly outside formal enterprise systems. Because they are built by using SharePoint 2010 Products, solutions that are based on Microsoft Business Connectivity Services promote collaboration.
They help users perform tasks within the familiar user interface of SharePoint 2010 products.
Here are some examples of solutions that are based on Microsoft Business Connectivity Services:
Help desk An enterprise implements its help desk, which provides internal technical support, as a solution that is based on Microsoft Business Connectivity Services. Support requests and the technical support knowledge base are stored in external databases and are integrated into the solution by using the Business Data Connectivity service. The solution displays both support requests and the knowledge base in the Web browser. Information workers can view their current requests and tech support specialists view the requests assigned to them. Workflows take support issues through each of their stages. Managers on the technical support team can view dashboards that display help desk reports. Typical reports indicate the number of support issues assigned to each support specialist, the most critical issues currently, and the number of support incidents that are handled by each support specialist during a given time period.
Sales Dashboard A sales dashboard application helps sales associates in an organization quickly find the information that they need and enter new data. Sales orders and customer information are managed in an external database and integrated into the solution by using Microsoft Business Connectivity Services. Depending on their roles, team members can view sales analytics information, individual team members’ sales performance data, sales leads, and a customer’s contact information and orders. Sales professionals can view their daily calendars, view tasks assigned to them by their managers, collaborate with team members, and read industry news.
noteDXDOC112778PADS Security Note
We recommend that you use Secure Sockets Layer (SSL) on all channels between client computers and front end servers. Also we recommend using Secure Sockets Layer or Internet Protocol Security (IPSec) between servers running Microsoft SharePoint Foundation 2010 and external systems.
-
Business Connectivity Services security overview (SharePoint Foundation 2010)
This article describes the security architecture of the Microsoft Business Connectivity Services server and client, the supported security environments, the authentication modes available to connect external content types to external systems, the authorization options available on stored objects, and the general techniques for configuring Microsoft Business Connectivity Services security.
In this article:
About this article
Business Connectivity Services security architecture
Business Connectivity Services authentication overview
Business Connectivity Service permissions overview
Securing Business Connectivity Services
-
About this article
Microsoft Business Connectivity Services include security features for authenticating users to access external systems and for configuring permissions on data from external systems. Microsoft Business Connectivity Services are highly flexible and can accommodate a range of security methods from within supported Microsoft Office 2010 applications and from the Web browser.
-
Business Connectivity Services security architecture
This section describes the Microsoft Business Connectivity Services security architecture.
noteDXDOC112778PADS Security Note
We recommend that you use Secure Sockets Layer (SSL) on all channels between client computers and front end servers. Also we recommend using Secure Sockets Layer or Internet Protocol Security (IPSec) between servers running Microsoft SharePoint Foundation 2010 and external systems. An exception is that you cannot use SSL when transmitting messages to external systems using the SOAP 1.1 protocol or when connecting to a SQL server database. However, in those cases you can use IPSec to protect the data exchange.
When a user accesses external data from a Web browser, three systems are involved: the logged on user’s client computer, the Web server farm, and the external system.
1. From Web browsers, users typically interact with external data in external lists or by using Web Parts.
2. The BDC Server Runtime on front-end servers uses data from the Business Data Connectivity service to connect to and execute operations on external systems.
3. The Secure Store Service securely stores credential sets for external systems and associates those credential sets to individual or group identities.
 Important:
The Secure Store Service is not included in SharePoint Foundation 2010. If you need a secure store in SharePoint Foundation 2010, you must supply a custom secure store provider.
4. The Security Token Service is a Web service that responds to authentication requests by issuing security tokens made up of identity claims that are based on user account information.
5. Microsoft Business Connectivity Services can pass credentials to databases and Web services that are configured to use claims-based authentication. For an overview of claims-based authentication, see Plan authentication methods (SharePoint Foundation 2010).
-
Business Connectivity Services authentication overview
Microsoft Business Connectivity Services can be configured to pass authentication requests to external systems by using the following types of methods:
Credentials These are typically in the form of name/password. Some external systems may also require additional credentials such as a personal identification number (PIN) value.
Claims Security Assertion Markup Language (SAML) tickets can be passed to claims-aware services that supply external data.
-
Configuring Business Connectivity Services for credentials authentication
Microsoft Business Connectivity Services can use credentials that a user supplies to authenticate requests for external data. The following methods by which users can supply credentials for accessing external data are supported:
Windows authentication:
Windows Challenge/Response (NTLM)
Microsoft Negotiate
Authentication other than Windows
Forms-based
Digest
Basic
When configuring Microsoft Business Connectivity Services to pass credentials, the solution designer adds authentication-mode information to external content types. The authentication mode gives Microsoft Business Connectivity Services information about how to process an incoming authentication request from a user and map that request to a set of credentials that can be passed to the external content system. For example, an authentication mode could specify that the user’s credentials be passed directly through to the external data system. Alternatively, it could specify that the user’s credentials should be mapped to an account that is stored in a Secure Store Service which should then be passed to the external system.
You associate an authentication mode with an external content type in the following ways:
When you create an external content type in Microsoft SharePoint Designer.
If the external system is a Web service, you can use the Microsoft Business Connectivity Services administration pages to specify the authentication mode.
You can specify the authentication mode by directly editing the .XML file that defines the external content type.
The following table describes the authentication modes of the Microsoft Business Connectivity Services:
|
Authentication mode
|
Description
|
|
PassThrough
|
Passes the credentials of the logged-on user to the external system. This requires that the user’s credentials are known to the external system.
 Note: Note:
If the Web application is not configured to authenticate with Windows credentials, the NT Authority/Anonymous Logon account is passed to the external system rather than the user’s credentials.
This mode is called User’s Identity in the Microsoft Business Connectivity Services administration pages and in SharePoint Designer 2010.
|
|
RevertToSelf
|
When the user is accessing external data from a Web browser, this mode ignores the user’s credentials and sends the application pool identity account under which the BCS runtime is running on the Web server to the external system. When the user is accessing external data from an Office client application, this mode is equivalent to PassThrough mode, because Microsoft Business Connectivity Services running on the client will be running under the user’s credentials.
This mode is called BDC Identity in the Microsoft Business Connectivity Services administration pages and in SharePoint Designer 2010.
 Note: Note:
By default, RevertToSelf mode is not enabled. You must use Windows PowerShell to enable RevertToSelf mode before you can create or import models that use RevertToSelf. For more information, see RevertToSelf authentication mode (http://technet.microsoft.com/library/453fa20f-7223-4bb7-96c3-fc92c2eb436d.aspx#BDCIdentity). RevertToSelf mode is not supported in hosted environments.
|
|
WindowsCredentials
|
For external Web services or databases, this mode uses a Secure Store Service to map the user’s credentials to a set of Windows credentials on the external system.
This mode is called Impersonate Windows Identity in the Microsoft Business Connectivity Services administration pages and in SharePoint Designer 2010.
|
|
Credentials
|
For an external Web service, this mode uses a Secure Store Service to map the user’s credentials to a set of credentials that are supplied by a source other than Windows and that are used to access external data. The Web service should use basic or digest authentication when this mode is used.
 Important: Important:
To help preserve security in this mode, we recommend that the connection between the Microsoft Business Connectivity Services and the external system should be secured by using Secure Sockets Layer (SSL) or Internet Protocol Security (IPSec).
This mode is called Impersonate Custom Identity in the Microsoft Business Connectivity Services administration pages and in Office SharePoint Designer.
|
|
RDBCredentials
|
For an external database, this mode uses a Secure Store Service to map the user’s credentials to a set of credentials that are supplied by a source other than Windows. To help preserve security in this mode, we recommend that the connection between the Microsoft Business Connectivity Services and the external system should be secured by using Secure Sockets Layer (SSL) or IPSec.
This mode is called Impersonate Custom Identity in the Microsoft Business Connectivity Services administration pages and in Office SharePoint Designer.
|
|
DigestCredentials
|
For a WCF Web service, this mode uses a Secure Store Service to map the user’s credentials to a set of credentials using Digest authentication.
This mode is called Impersonate Custom Identity – Digest in the Microsoft Business Connectivity Services administration pages and in SharePoint Designer 2010.
|
The following illustration shows the Microsoft Business Connectivity Services authentication modes when it uses credentials.
In PassThrough (User’s Identity) mode (A) the logged-on user’s credentials are passed directly to the external system.
In RevertToSelf (BDC Identity) mode (B) the user’s logon credentials are replaced with the credentials of the process account under which Microsoft Business Connectivity Services is running, and those credentials are passed to the external system.
Three modes use the Secure Store Service: WindowsCredentials (Impersonate Windows ID,) RdbCredentials (Impersonate Custom ID,) and Credentials. In those modes, the user’s credentials are mapped to a set of credentials for the external system and Microsoft Business Connectivity Services passes those credentials to the external system. Solution administrators can either map each user’s credentials to a unique account on the external system or they can map a set of authenticated users to a single group account.
-
Configuring Business Connectivity Services for claims-based authentication
Microsoft Business Connectivity Services can provide access to external data based on an incoming security tokens and it can pass security tokens to external systems. A security token is made up of a set of identity claims about a user, and the use of security tokens for authentication is called “claims-based authentication.” SharePoint Foundation includes a Security Token Service that issues security tokens.
The following illustration shows how the Security Token Service and the Secure Store Service work together in claims-based authentication:

1. A user tries an operation on an external list that is configured for claims authentication.
2. The client application requests a security token from the Secure Token Service.
3. Based on the requesting user’s identity, the Secure Token Service issues a security token that contains a set of claims and a target application identifier. The Secure Token Service returns the security token to the client application.
4. The client passes the security token to the Secure Store Service.
5. The Secure Store Service evaluates the security token and uses the target application identifier to return a set of credentials that apply to the external system.
6. The client receives the credentials and passes them to the external system so that an operation (such as retrieving or updating external data) can be performed.
-
Business Connectivity Service permissions overview
Permissions in Microsoft Business Connectivity Services associate an individual account, group account, or claim with one or more permission levels on an object in a metadata store. By correctly setting permissions on objects in Microsoft Business Connectivity Services, you help enable solutions to securely incorporate external data. When planning a permissions strategy, we recommend that you give specific permissions to each user or group that needs it, in such a way that the credentials provide the least privilege needed to perform the needed tasks.
 Caution:
Properly setting permissions in Microsoft Business Connectivity Services is one element in an overall security strategy. Equally important is securing the data in external systems. How you do this depends on the security model and features of the external system and is beyond the scope of this article.
 Note:
Note:
Business Connectivity Services uses the permissions on the metadata objects and the permissions on the external system to determine authorization rules. For example, a security trimmer can keep external data from appearing in users’ search results. However, if users somehow discover the URL to the trimmed external data, they can access the external data if they have the necessary permissions to the metadata object and the external system. The correct way to prevent users from accessing external data is to set the appropriate permissions both in Business Connectivity Services and in the external system.
-
What can permissions be set on?
Each instance of the Business Data Connectivity service (or, in the hosting case, each partition) contains a metadata store that includes all the models, external systems, external content types, methods, and method instances that have been defined for that store’s purpose. These objects exist in a hierarchy as depicted in the following illustration:

 Note:
Note:
In the previous hierarchy graphic, labels in parentheses are the names of objects as they are defined in the Microsoft Business Connectivity Services metadata schema. The labels that are not in parentheses are the names of each object as it appears in the user interface of the Business Data Connectivity service. For a full discussion of the Microsoft Business Connectivity Services metadata schema, along with walkthroughs of many development tasks, see the Microsoft SharePoint 2010 Software Development Kit (http://go.microsoft.com/fwlink/?LinkId=166117&clcid=0x409).
The hierarchy of objects in a metadata store determines which objects can propagate their permissions to other objects. In the illustration, each object on which permissions can be set, and optionally propagated, is shown with a solid line; each object that takes its permissions from its parent object is shown with a dotted line. For example, the illustration shows that an External System (LobSystem) can be secured by assigning permissions to it, but an Action cannot be assigned permissions directly. Objects that cannot be assigned permissions take the permissions of their parent object. For example, an Action takes the permissions of its parent External Content Type (Entity).
noteDXDOC112778PADS Security Note
When the permissions on an object in a metadata store are propagated, permission settings to all children of that item are replaced by the permissions of the propagating object. For example, if permissions are propagated from an External Content Type, all Methods and Method Instances of that External Content Type receive the new permissions.
Four permission levels can be set on the metadata store and the objects it contains:
Edit
noteDXDOC112778PADS Security Note
The Edit permission should be considered highly privileged. With the Edit permission, a malicious user can steal credentials or corrupt a server farm. We recommend that, in a production system, you give Edit permission only to users whom you trust to have administrator-level permissions.
Execute
Selectable in clients
Set permissions
The following table defines the meaning of these permissions on the various objects for which they can be set.
|
Object
|
Definition
|
Edit permissions
|
Execute permissions
|
Selectable in clients permissions
|
Set permissions permissions
|
|
Metadata store
|
The collection of XML files, stored in the Business Data Connectivity service, that each contain definitions of models, external content types, and external systems.
|
The user can create new external systems.
|
Although there is no “Execute” permission on the metadata store itself, this setting can be used to propagate Execute permissions to child objects in the metadata store.
|
Although there is no “Selectable in clients” permission on the metadata store itself, this setting can be used to propagate these permissions to child objects in the metadata store.
|
The user can set permissions on any object in the metadata store by propagating them from the metadata store.
|
|
Model
|
An XML file that contains sets of descriptions of one or more external content types, their related external systems, and information that is specific to the environment, such as authentication properties.
|
The user can edit the model file.
|
The “Execute” permission is not applicable to models.
|
The “Selectable in clients” permission is not applicable to models.
|
The user can set permissions on the model.
|
|
External system
|
The metadata definition of a supported source of data that can be modeled, such as a database, Web service, or .NET connectivity assembly.
|
The user can edit the external system. Setting this permission also makes the external system and any external system instances that it contains visible in SharePoint Designer.
|
Although there is no “Execute” permission on an external system itself, this setting can be used to propagate Execute permissions to child objects in the metadata store.
|
Although there is no “Selectable in clients” permission on an external system itself, this setting can be used to propagate these permissions to child objects in the metadata store.
|
The user can set permissions on the external system.
|
|
External content type
|
A reusable collection of metadata that defines a set of data from one or more external systems, the operations available on that data, and connectivity information related to that data.
|
Although there is no “Edit” permission on an external content type itself, this setting can be used to propagate these permissions to child objects in the metadata store.
|
The user can execute operations on the external content type.
|
The user can create external lists of the external content type.
|
The user can set permissions on the external content type.
|
|
Method
|
An operation related to an external content type.
|
The user can edit the method.
|
Although there is no “Execute” permission on a method itself, this setting can be used to propagate Execute permissions to child objects in the metadata store.
|
There is no “Selectable in clients” permission on a method.
|
The user can set permissions on the method.
|
|
Method instance
|
For a particular method, describes how to use a method by using a specific set of default values.
|
The user can edit the method instance.
|
The user can execute the method instance.
|
There is no “Selectable in clients” permission on a method instance.
|
The user can set permissions on the method instance.
|
-
Special permissions on the Business Data Connectivity service
Along with the general capabilities of setting permissions described earlier, there is a set of special permissions for the Business Data Connectivity service:
Farm administrators have full permissions to the Business Data Connectivity service. This is necessary, for example, to be able to maintain or repair an instance of the service. However, be aware that the farm administrator does not have execute permissions on any object in the metadata store and this right must be given explicitly by an administrator of an instance of the Business Data Connectivity service if it is required.
Windows PowerShell users are farm administrators and can run commands on the Business Data Connectivity service.
Application pool accounts on front end servers have the same permissions to the Business Data Connectivity service as farm administrators. This permission is necessary to generate deployment packages based on Microsoft Business Connectivity Services.
SharePoint Designer users should, in most cases, be given the following permissions on the whole metadata store: Edit, Execute, and Selectable in clients. SharePoint Designer users should not be given Set permissions permissions. If necessary, you can limit the permissions of the SharePoint Designer user to a subset of the metadata store.
 Caution:
To help ensure a secure solution, SharePoint Designer should be used to create external content types in a test environment in which Edit permissions can be assigned freely. When deploying the tested solution to a production environment, remove the edit permissions to help protect the integrity of the external data.
-
Common tasks and their related permissions
This section describes common tasks in the Business Data Connectivity service and the required permissions to perform them.
|
Task
|
Permissions
|
|
Create a new object in the metadata store
|
To create a new metadata object, a user must have edit permissions on the parent metadata object. For example, to create a new method in an external content type, a user must have permissions on the external content type. See the illustration earlier in this article for child/parent relationships among objects in the metadata store.
|
|
Delete an object from the metadata store
|
To delete a metadata object, a user must have edit permissions on that object. To delete an object and all its child objects (such as deleting an external content type and all its methods) the edit permission is also required on all the child objects.
|
|
Adding an external content type to a model
|
To add an external content type to a model, a user must have edit permissions on the model.
|
|
Importing models
|
To import a model to the metadata store, a user must have edit permissions on the metadata store. If explicit permissions are not assigned on the model, the user who imported it will be given edit permissions on the model.
|
|
Exporting models
|
To export a model from the metadata store, a user must have edit permissions on the model and on all external systems contained in the model.
|
|
Generating a deployment package
|
Deployment packages are generated by the application pool account that is used by the front-end server. This account has full permissions to the metadata store so that it can perform this task.
|
|
Setting initial permissions on the metadata store.
|
When an instance of the Business Data Connectivity service is first created, its metadata store is empty. The farm administrator has full permissions to the store and can set initial permissions.
|
-
Securing Business Connectivity Services
This section discusses additional measures that can be used to help secure Business Connectivity Services
For security isolation, the Business Data Connectivity service application and the front-end server should not use the same service account.
-
Server to server communication
Securing the communication between the Business Data Connectivity service application and external systems helps ensure that sensitive data is not compromised. You need to use an encrypted communication channel to protect data that is sent between servers running SharePoint Foundation 2010 and external systems. Internet Protocol security (IPsec) is one method that can be used to help protect communication. The choice of which method to use depends on the specific communication channels you are securing and the benefits and tradeoffs that are most appropriate for your organization.
-
Applications that use FileBackedMetadataCatalog
For security reasons, RevertToSelf authentication mode is disabled on SharePoint Foundation 2010 by default. However, this does not prevent applications that use the FileBackedMetadataCatalog class from importing models and executing calls that use RevertToSelf authentication. This can result in elevating privileges for users by granting privileges to the application pool account. You should review all applications to ensure that they do not use FileBackedMetadataCatalog class and RevertToSelf authentication before installing them on a production system.
-
Diagnostic logging in Business Connectivity Services overview (SharePoint Foundation 2010)
You can troubleshoot issues related to Microsoft Business Connectivity Services on servers that are running Microsoft SharePoint Foundation 2010 by using event logs and trace logs on either client or server. Also, each entry to the event log or trace log has an associated Activity ID that can be used to track a problem from the server to the external data source.
 Note:
Note:
In addition to the logging methods discussed in this topic, you can use Microsoft System Center Operations Manager Management Pack to monitor a solution that is based on Microsoft Business Connectivity Services. For more information about how to configure System Center Operations Manager Management Pack, see the guide including in the management pack download at Microsoft SharePoint 2010 Products Management Pack (http://go.microsoft.com/fwlink/?LinkId=184971&clcid=0x409).
In this article:
Diagnostic logging in Business Connectivity Services
About Activity IDs
Diagnostic logging on servers
Example: using diagnostic logging
-
Diagnostic logging in Business Connectivity Services
For solutions that are based on Microsoft Business Connectivity Services, diagnostic logging occurs on servers that are running Microsoft SharePoint Foundation. There are two logs: the event log and the trace log. They both record diagnostic information that Microsoft Business Connectivity Services generate. Event logs record error messages. Trace logs contain more in-depth information, such as stack traces and informational messages. In general, trace logs provide more details than event logs.
Each logged item of information includes an Activity ID, which is a unique GUID value. Activity ID values can also be sent to external systems when a Create, Update, or Delete operation occurs on an item. By using Activity IDs, an action can be traced from the server or client to the external data source. For more information about Activity IDs, see About Activity IDs .
You can set the level of diagnostic logging for the event log and for the trace log. This will limit the types and amount of information that will be written to each log. The following tables define the levels of logging available for the event log and trace log:
Event log levels
|
Level
|
Definition
|
|
None
|
No logging occurs.
|
|
Critical
|
This message type indicates a serious error that has caused a major failure in the solution.
|
|
Error
|
This message type indicates an urgent condition. All error events should be investigated.
|
|
Warning
|
This message type indicates a potential problem or issue that might require attention. Warning messages should be reviewed and tracked for patterns over time.
|
|
Information
|
Information messages do not require any action, but they can provide valuable data for monitoring the state of your solution.
|
|
Verbose
|
This event log level corresponds to lengthy events or messages.
|
Trace log levels
|
Level
|
Definition
|
|
None
|
No trace logs are written.
|
|
Unexpected
|
This level is used to log messages about events that cause solutions to stop processing. When set to log at this level, the log will only include events at this level.
|
|
Monitorable
|
This level is used to log messages about any unrecoverable events that limit the solution’s functionality but do not stop the application. When set to log at this level, the log will also include critical errors (Unexpected level).
|
|
High
|
This level is used to log any events that are unexpected but which do not stall the processing of a solution. When set to log at this level, the log will include warnings, errors (Monitorable level) and critical errors (Unexpected level).
|
|
Medium
|
When set to this level, the trace log includes everything except Verbose messages. This level is used to log all high-level information about operations that were performed. At this level, there is enough detail logged to construct the data flow and sequence of operations. This level of logging could be used by administrators or support professionals to troubleshoot issues.
|
|
Verbose
|
When set to log at this level, the log includes messages at all other levels. Almost all actions that are performed are logged when you use this level. Verbose tracing produces many log messages. This level is typically used only for debugging in a development environment.
|
Diagnostic logs are useful both in development and production environments, but requirements for the level of logging will probably differ depending on the kind of environment. When planning for diagnostic logging in Microsoft Business Connectivity Services, consider the business needs and the lifecycle stage of the environment before you set the logging level.
For example, during solution design, you might, for debugging purposes, set both logging levels to Verbose to capture all the messages that are generated about the state of the system. Conversely, in a production environment, you might want to capture only messages in the categories High, Monitorable, and Unexpected for trace logs and the categories Critical and Error for event logs. Doing this will save logging disk space and limit any negative performance effects of logging.
-
About Activity IDs
A unique GUID value called an Activity ID is generated for each Create, Update, or Delete operation on external data in a solution based on Microsoft Business Connectivity Services. Anything related to the operation that is logged in the trace log or event log includes its Activity ID value.
 Important:
In the event logs and trace log files on the server, Activity ID values are labeled as “CorrelationId” values.
The Activity ID value generated for a Create, Update, or Delete operation is sent to the external system along with other information related to that operation. If the external system has a logging mechanism, this value can be captured and logged on that system. Therefore, if an operation causes entries to the SharePoint logs, the same operation can be traced to the external system by using its Activity ID value. This facilitates end-to-end troubleshooting of issues.
Often, an operation such as Create will cause multiple events to be written to the logs. When this happens, the same Activity ID value is used for all events that are logged for the operation. This is useful in troubleshooting issues because the recurring value of the Activity ID facilitates finding all events for a particular operation. Conversely, when the same type of operation occurs repeatedly, a unique Activity ID value is generated for each operation instance. For example, if an item of an external content type is updated twice, each update operation will be associated with a unique Activity ID value.
 Tip:
Tip:
In some circumstances, the Business Data Connectivity service will retry an operation if it failed to go through to the external system. In those cases, the same Activity ID will be used for the retried operation.
-
Diagnostic logging on servers
By default, Microsoft Business Connectivity Services logging is enabled on SharePoint Foundation servers. The default logging levels are:
For the event log: Critical and Error
For the trace log: Medium
Should diagnostic logging of Microsoft Business Connectivity Services become disabled, enable it by selecting Business Connectivity Services on the Diagnostic Logging page in SharePoint Foundation Central Administration. You can also use Windows PowerShell to configure event logs and trace logs on the server. For example, you can change the drive that logging writes to, and you can set the level of verbosity of logging.
For more information about logging in SharePoint Foundation 2010, such as how to set the location of the log files, see Configure diagnostic logging (SharePoint Foundation 2010) (http://technet.microsoft.com/library/a5641210-8224-4e11-9d93-4f96fa4c327c(Office.14).aspx).
You can use Windows PowerShell to view the event logs on the server by and you can export the logs, for example to a spreadsheet program. For more information, see View diagnostic logs (SharePoint Foundation 2010) (http://technet.microsoft.com/library/28a72c44-2c3a-459d-aa64-918c3a71c858(Office.14).aspx).
Microsoft Business Connectivity Services output two categories to the trace log on SharePoint Foundation front end Web servers: BDC_Shared_Services and SS_Shared_Service. You can use the Event Viewer to open the trace log, and you can filter on the relevant log entries by searching on “SPS_BusinessData” (for Microsoft Business Connectivity Services outputs) and “SPS_SecureStoreService”.
-
Example: using diagnostic logging
This short, simplified scenario illustrates the use of diagnostic logging in a production environment. An enterprise has deployed a new time card submission solution based on Microsoft Business Connectivity Services. This solution uses an external system to store timecard information for employees, such as vacation time and sick leave, and to interact with employees and the payroll system when employees report absence from work. Employees use a Web Part to interact with the system.
On the server farm, the logging levels are set to the default values for Microsoft Business Connectivity Services:
For the event log: Critical and Error
For the trace log: Medium
In this scenario, an employee submits a value for the number of sick leave hours but neither the employee nor his manager receives a confirming email message reporting that the sick leave time was successfully submitted. The employee calls the internal technical support service and reports the issue.
The support technician recognizes that the time card application is based on Microsoft Business Connectivity Services. She checks the event log but finds no error associated with the identity of the user at the time the user submitted the time card request. She then checks the trace log, where she finds the evidence of the activity: an Update operation associated with the user at the appropriate time. The Update operation in the trace log includes an Activity ID value which the support technician notes.
The support technician knows that logging is also supported on the external system. Using the Activity ID, she locates the item logged on the external system and finds evidence of an error written to the log at the end of the Update operation: the update failed because the employee had used up all of his allotted sick leave time. She also notes that there is no log entry confirming that an email message was generated on the external system immediately at the end of the Update operation. The support technician concludes that there is an error in the logic of the time card application. Although the application properly did not allocate sick time pay when the employee exceeded his allotted amount of hours, it failed to generate an email message informing the employee of the issue. She reports the problem to the development team that created the application and the development team updates the application.
Monitoring overview (SharePoint Foundation 2010) (http://technet.microsoft.com/library/d2e48b54-1a32-4ec6-8b9e-b884b7faca8f(Office.14).aspx)
Configure diagnostic logging (SharePoint Foundation 2010) (http://technet.microsoft.com/library/a5641210-8224-4e11-9d93-4f96fa4c327c(Office.14).aspx)
Business Connectivity Services overview (SharePoint Foundation 2010)
-
Plan workflows (SharePoint Foundation 2010)
A workflow is a feature of Microsoft SharePoint Foundation 2010 that moves documents or list items through a specific sequence of actions or tasks related to a business process. Workflows can be used to manage common business processes such as document review or approval.
In this section:
Workflows overview (SharePoint Foundation 2010)
This article introduces the types of business processes that workflows can facilitate and describes the workflows included in SharePoint Foundation 2010.
Choose a workflow authoring tool (SharePoint Foundation)
This article describes the different Microsoft supported workflow authoring tools, how they can be used together for rapid workflow authoring.
Plan for workflow security and user management (SharePoint Foundation 2010)
This article highlights some aspects of workflow behavior that relate to security and raises other issues for administrators and workflow developers to consider when they plan to configure and develop workflows.
Approval Workflow: A Scenario (SharePoint Foundation 2010)
This article shows how an approval-type workflow that is created in Microsoft SharePoint Designer 2010 or Workflow Designer in Visual Studio 2010, and that is then hosted by using SharePoint Foundation 2010 might look.
Workflow administration (SharePoint Foundation 2010) (http://technet.microsoft.com/library/30f3251d-53a8-4fd4-ad87-31c48591a0f7(Office.14).aspx)
-
Workflows overview (SharePoint Foundation 2010)
The workflow feature in Microsoft SharePoint Foundation 2010 enables solution architects, designers, and administrators to improve business processes. Fundamentally, a workflow consists of two things: the forms that a workflow uses to interact with its users and the logic that defines the workflow’s behavior. Understanding how workflows are created requires knowledge about both.
In this article:
Workflow overview
Benefits of using workflows
Predefined workflows
Sample workflow scenario
Workflow types: Declarative and compiled
Workflow templates
Workflow associations
-
Workflow overview
Workflows in SharePoint Foundation 2010 enable enterprises to reduce the amount of unnecessary interactions between people as they perform business processes. For example, to reach a decision, groups typically follow a series of steps. The steps can be a formal, standard operating procedure, or an informal implicitly understood way to operate. Collectively, the steps represent a business process. The number of human interactions that occur in business processes can inhibit speed and the quality of decisions. Software that simplifies and manages this “human workflow” enables the automation of interactions among groups who participate in the process. This automation results in more speed, overall effectiveness of the interactions, and often a reduction in errors.
You can model business processes by using flow charts, such as those created using Microsoft Visio 2010 and can represent business processes by using workflow terminology. You can automate business processes, such as document approval, by associating a workflow with data in SharePoint Foundation 2010. For example, you can create a workflow to route a document for review, track an issue through its various stages of resolution, or guide a contract through an approval process.
One problem that many IT departments face when implementing business processes that require participation of information workers is that those processes do not integrate with the way people actually work. For a business process to be effective, it must be integrated with the familiar, everyday tools and applications used in the workplace so that it becomes part of the daily routine of information workers. In the electronic workplace, this includes integration with e-mail, calendars, task lists, and collaboration Web sites.
-
Benefits of using workflows
The primary benefits of using workflows are to facilitate business processes and improve collaboration.
Business processes that enterprises use depend on the flow of information or documents. These business processes require the active participation of information workers to complete tasks that contribute to their workgroup’s decisions or deliverables. In SharePoint Foundation 2010, these types of business processes are implemented and managed by using workflows.
Examples of business processes that could be facilitated by workflows include:
Contract approval Guiding a proposed contract among members of an organization who must approve or reject it.
Expense reporting Managing the submission of an expense report and associated receipts, reviewing the report, approving it, and reimbursing the submitter.
Technical support Guiding the progress of a technical support incident as it is opened by a customer, investigated by a support engineer, routed to technical experts, resolved, and added to a knowledge base.
Interviewing Managing the process of interviewing a job candidate. This includes scheduling and tracking interview appointments, collecting interview feedback as it accumulates, making that feedback available to subsequent interviewers, and facilitating the hire/no-hire decision.
-
Automating business processes
Businesses depend on business processes. Although those processes often involve software, the most important processes in many organizations depend on people. Workflows can automate interactions among the people who participate in a process to improve how that process functions, increase its efficiency, and lower its error rate.
Many processes can benefit from automated support for human interactions. Examples include the following:
Approval A common aspect of human-oriented business processes is the requirement to get approval from multiple participants. What is being approved can vary widely, ranging from a Microsoft Word document that contains next year’s marketing plan to an expense report from a trip to a conference. In every case, some number of people must review the information, perhaps appending comments, and then indicate approval or rejection.
Coordinating group efforts Whether it is preparing a response to a request for proposal (RFP), managing the translation of a document into one or more languages, or something else, many processes require people to work together in an organized way. By defining the steps of the process through an automated workflow, the group’s work can be made more efficient and the process itself more predictable.
Issue tracking Many business processes generate a list of outstanding issues. An automated workflow can be used to maintain that list, assign issues to the people who can resolve them, and track the status of that resolution.
To support these kinds of automated business processes, SharePoint Foundation 2010 can run workflow applications. Based on Windows Workflow Foundation 3.5, these applications interact with people through a Web browser. For more information about Windows Workflow Foundation 3.5, see Windows Workflow Foundation (http://go.microsoft.com/fwlink/?LinkId=127778).
-
Workflows improve collaboration
Workflows help people collaborate on documents and manage project tasks by implementing business processes on documents and items on a SharePoint site or site collection. Workflows help organizations follow consistent business process practices. Workflows increase organizational efficiency and productivity through management of the tasks and steps involved in those business processes. Workflows speed up decision making by helping to ensure that the appropriate information is made available to the appropriate people at the time that they need it. Workflows also help ensure that individual workflow tasks are completed by the appropriate people and in the appropriate sequence. This enables the people who perform these tasks to concentrate on performing the work instead of on the work processes.
For example, on a SharePoint Foundation 2010 site, you can create a workflow to be used with a document library to route a document to a group of people for approval. When the author starts this workflow, the workflow creates document approval tasks, assigns these tasks to the workflow participants, and then sends e-mail alerts to the participants.
When the workflow is in progress, the workflow owner or the workflow participants can check progress on the Workflow Status page. When the workflow participants complete their workflow tasks, the workflow ends, and the workflow owner is automatically notified that the workflow has finished.
-
Predefined workflows
For sites and site collections created in Microsoft SharePoint Foundation 2010, a predefined Three-state workflow is included by default, and is the only predefined workflow available in SharePoint Foundation 2010. The Three-state workflow can be used to manage business processes that require organizations to track a high volume of issues or list items, such as customer support issues, sales leads, or project tasks.
The Three-state workflow is so named because it tracks the status of an issue or item through three different states, and through two transitions between the states. For example, when a Three-state workflow is initiated on an issue in an Issues list, SharePoint Foundation 2010 creates a task for the assigned user. When the user completes the task, the workflow changes from its initial state (Active) to its middle state (Resolved) and creates a task for the assigned user. When the user completes the task, the workflow changes from its middle state (Resolved) to its final state (Closed), and creates another task for the user the workflow is assigned to at that time. Note that when you associate the Three-state workflow with a list, you can choose to specify different state names, other than Active, Resolved, and Closed. Note that the Three-state workflow is not supported for use with libraries.
You can also make a copy of the predefined workflow to use as a starting point when creating a custom workflow.
-
Sample workflow scenario
Imagine that you work for Adventure Works, a sports store franchise that sells bicycles worldwide. This company has sales representatives that visit different countries to help new franchisees open new sports stores.
The scenario described in this section is one where an expense report is submitted for approval. If the expense report is for less than $5,000.00, a manager is required to approve, disapprove, or forward it. If the expense report is equal to, or more than, $5,000.00, a manager must review the expense report, comment on it, and then if the manager recommends approval, it is forwarded to a vice-president, who must approve or disapprove it.
In this scenario, the expense report form is an ASPX form displayed to the user on a SharePoint Web page. The workflow is a sequential type of workflow project created in Microsoft SharePoint Designer 2010, and is composed of both automated tasks and tasks that require human action. The workflow is running on SharePoint Foundation 2010.
1. The sales representative — the first workflow participant — browses to an intranet self-service portal and selects the Expense Report form. A data entry page opens. The sales representative first fills out a simple expense report form that contains entries for the person’s name, the expense purpose, the expense total, and the name and e-mail address of the person’s direct manager. The sales representative then clicks Submit to submit the form.
Upon submission of the form, the data is saved centrally, the workflow is initiated, and the review task is assigned to the approver (in this case, the sales representative’s manager).
2. The workflow notifies the sales representative’s manager. The notification is an e-mail message that contains instructions for completing the task and provides a link to a Web site that displays the Expense Report form.
3. The manager, the second workflow participant, goes to the Web site and reviews the expense report. The workflow task item provides three actions that the manager can perform: Approve, Disapprove or Forward.
If the expense report is less than $5,000.00, the manager sees options to Approve or Disapprove the expense report.
If the expense report is more than $5,000.00, the manager sees options to Forward the expense report to a company vice president, or to Disapprove the expense report at the manager’s level.
4. The manager takes action to approve, disapprove, or forward the expense report, and the workflow continues:
If the expenses are approved by the manager, the task completion sends a message to the workflow indicating that the task is completed, the workflow notifies the sales representative through an e-mail message, and then the workflow adds the expense data to the line-of-business (LOB) accounting system.
If the expenses are not approved by the manger, he types an explanation for his decision. The task completion sends a message to the workflow indicating that the task is completed, and then the workflow notifies the sales representative through an e-mail message.
If the manager selects the option to forward the expense report to a company vice president, the manager makes relevant comments in the form and then clicks Forward. The workflow then notifies the vice president through an e-mail message that contains instructions for completing the task and provides a link to a Web site that displays the Expense Report form.
5. The vice president — the third workflow participant — is given the option to Approve or Disapprove the expense report. When the vice president acts to approve or disapprove the expense report, the workflow continues.
If the vice president approves the expenses, the expense data is added to the accounting system, the workflow notifies the sales representative and manager through e-mail, and then the workflow notifies SharePoint that the task is completed.
If the vice president does not approve the expenses, the vice president types an explanation for the decision into the form. The workflow notifies the sales representative and manager through e-mail, and then the workflow notifies SharePoint that the task is completed.
As you can imagine, there are many ways to expand the functionality of this workflow within the context of this scenario. For example, you can configure the workflow so that if the vice president disapproves the expense report, the report is returned to the sales representative’s manager. The manager can further justify the expense and resubmit it for approval to the vice president, can pass along the disapproval to the sales representative, or take some other action.
In this sample expense report scenario, the business rules are always the same. This workflow solution defines the manager and vice president approvers, defines the business logic for the routing of the workflow, and predefines the content of the notifications. However, many real-world applications have complex business rules. Routing for approval can depend on many business variables. Notifications can also change, depending on other variables.
For example, imagine that in the same expense reporting solution, you have to route the expense report to as many as ten managers, depending on the expense purpose, the expense total, and the date of submission. Additionally, depending on the expense purpose, the content of the notifications sent by the workflow contain some small differences. This means that there can be multiple workflow solutions with different routing levels and notifications.
Microsoft SharePoint Foundation 2010 enables you to create and implement workflow solutions to meet the business needs of your organization. It does this by leveraging the workflow design and customization features of SharePoint Designer 2010 and Microsoft Visual Studio.
-
Workflow types: Declarative and compiled
An important distinction to understand about workflows is whether they are a declarative workflow, such as those created using Microsoft SharePoint Designer 2010 or a compiled workflow, such as those created using Visual Studio 2010. A declarative workflow is a workflow that is built from conditions and actions that are assembled into rules and steps, and that sets the parameters for the workflow without writing any code.
A compiled workflow, like declarative workflows, can also be built from conditions and actions without the workflow author actually writing code but also enable the workflow author to add custom code to the workflow. Regardless of whether a workflow author adds custom code to a code-centric workflow, the most important distinction to understand is the difference in the way that declarative and compiled workflows are run on the server. A compiled workflow is stored on a server running SharePoint Foundation 2010 as a precompiled dll file whereas a declarative workflow is deployed on a server running SharePoint Foundation 2010 as an Extensible Object Markup Language (XOML) file and compiled in the content database each time an instance of the workflow is started.
For more information about the Microsoft supported tools for authoring workflows, see Choose a workflow authoring tool (SharePoint Foundation).
-
Workflow templates
When creating a custom workflow using SharePoint Designer 2010, you can choose to create a workflow that will only be used with a specific list, library, content type, or site. Alternatively, you can choose to create a reusable workflow template, which can be associated with multiple lists, libraries, content types, or sites.
 Note:
Note:
SharePoint Designer 2010 does not support creating reusable workflows for sites. Instead, you can use Visual Studio 2010 to create them.
When authoring a workflow, you can also choose to make it global, which means that once it is activated on a site it will be active for all the sub-sites below that site as well. However, you cannot use SharePoint Designer 2010 to create a global workflow and then save the workflow as a WSP file.
-
Workflow associations
SharePoint Foundation 2010 takes advantage of the Workflow Foundation runtime. One or more workflow templates, each containing the code that defines a particular workflow, can be installed on a server. Once this is done, an association can be created between a specific template and a document library, list, content type, or site. This template can then be loaded and executed by the SharePoint Foundation 2010-hosted Workflow Foundation runtime, creating a workflow instance.
Like all Workflow Foundation workflows, those based on SharePoint Foundation 2010 rely on Workflow Foundation runtime services. The Workflow Foundation standard persistence service allows the state of a persisted workflow to be linked with the document or item, and allows for long-running business processes that can span days, months, or years.
SharePoint workflows can be associated with lists, libraries, and content types. Reusable workflows created using Visual Studio 2010 can also be associated with sites. The following table describes the minimum permissions required to associate a workflow.
|
Associate workflow with
|
Minimum permissions required
|
|
List or library
|
Full Control permission level on the list or library
|
|
List or library content type
|
Member of the Site Owners group on the SharePoint site
|
|
Site content type
|
Member of the Site Owners group on the SharePoint site
|
|
Site
|
Member of the Site Owners group on the SharePoint site
|
For more information about workflow associations, see Add a workflow association (SharePoint Foundation 2010) (http://technet.microsoft.com/library/19872b79-f5ac-4b56-a24b-75af33c89763(Office.14).aspx).
-
Choose a workflow authoring tool (SharePoint Foundation)
What is a workflow? Fundamentally, it consists of two things: the forms a workflow uses to interact with its users and the logic that defines the workflow’s behavior. Understanding how workflows are created requires knowing something about both.
Because it communicates with users through a Web browser, a workflow relies on ASP.NET to display its forms. Accordingly, those forms are defined as .aspx pages. A workflow can potentially display its own forms at four points in its lifecycle:
Association: When an administrator associates a workflow template with a particular document library or list, he might be able to set options that will apply to every workflow instance created from this association. If a workflow author chooses to allow this, she must provide a form that lets the administrator specify this information.
Initiation: The initiator of a workflow might be allowed to specify options when he starts a running instance. In the approval scenario just described, for instance, the options included specifying the list of workflow participants and defining how long each one had to complete his or her task. If a workflow allows this, its author must provide a form to allow the initiator to set these options.
Task Completion: The running workflow instance must display a form to the participants in the workflow to let them complete their task. This form is what allowed the approvers in the earlier scenario to make comments on the document and indicate their approval or rejection.
Modification: The creator of a workflow can allow it to be modified while it’s running. For example, a workflow might allow adding new participants after it has begun executing or extending the due date for completing tasks. If this option is used, the workflow must display a form at this point to let a participant specify what changes should be made.
Workflows built solely on Microsoft SharePoint Foundation 2010 define their forms as .aspx pages. A workflow’s logic is always defined as a group of activities, just as with any workflow based on the Windows Workflow Foundation (WF). To specify the logic and forms for a workflow, Microsoft provides two different tools, each targeting a different audience. Software developers can use the Workflow Designer feature of Windows Workflow Foundation. This tool runs inside Visual Studio 2010 Professional Edition and provides a graphical environment for organizing activities into workflows. Information workers, a less technical group, can use Microsoft SharePoint Designer 2010 to create workflows without writing code. The next two sections examine how workflows can be created by using each of these tools.
-
Authoring workflows with Visual Studio 2010 and WF Workflow Designer
In many ways, a workflow is like a flowchart. Given this, it makes sense to provide a graphical tool that lets developers specify a workflow’s actions. This tool is SharePoint Workflow tools in Visual Studio 2010 Professional, which is a project type that uses the Windows Workflow Foundation (WF) Designer, and adds deployment and forms support for SharePoint Workflows. Developers can use WF Workflow Designer to define graphically a workflow’s activities and the order in which those activities will be executed. The screen below shows a simple example of how this looks in Microsoft Visual Studio.
Collect Feedback Workflow
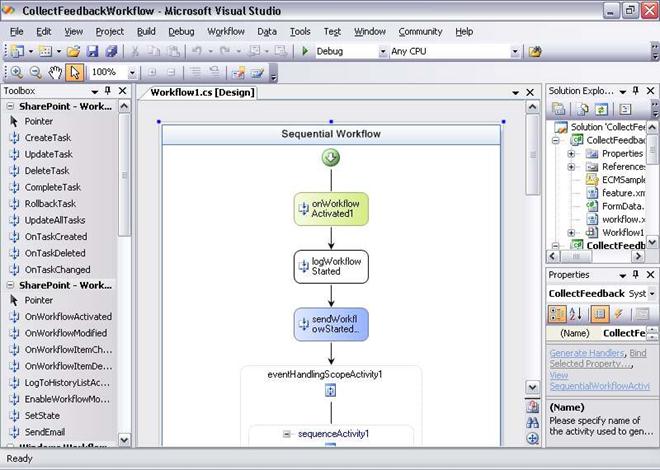
The activities available for use appear in the Toolbox on the left side of the screen. A developer can drag these activities onto the design surface to define the steps in a workflow. The properties of each activity can then be set in the Properties window that appears in the lower right corner.
The Base Activity Library Windows Workflow Foundation provides a group of fundamental activities, as described earlier. Microsoft SharePoint Foundation also provides a set of activities designed expressly for creating workflows. Among the most important of these are the following:
OnWorkflowActivated: provides a standard starting point for a workflow. Among other things, this activity can accept information supplied by a SharePoint administrator by using the Association form when the workflow is associated with a document library, list, content type, or site. It can also accept information supplied by the Initiation form when the workflow is started. Every workflow must begin with this activity.
CreateTask: creates a task assigned to a particular user in a task list. For example, the approval workflow in the scenario described earlier used this activity to add a task to the task list used by each of the participants. This activity also has a SendEmailNotification property that, when set to true, automatically sends an e-mail message to the person for whom this task was created.
OnTaskChanged: accepts information from the Task Completion form. The approval workflow in the earlier scenario used this activity to accept the input of each participant when the document was approved.
CompleteTask: marks a task as completed.
DeleteTask: removes a task from a task list.
OnWorkflowModified: accepts information from the Modification form, which can then be used to change how this instance of the workflow behaves. If the workflow’s creator chooses not to include any instances of this activity in the workflow, that workflow cannot be modified while it’s running.
SendEmail: sends e-mail to a specified person or group of people.
LogToHistoryList: writes information about the workflow’s execution to a history list. The information in this list is used to let users see where a workflow is in its execution, look at the workflow’s history after it’s completed, and more. To allow this kind of monitoring, the workflow’s author must write information to a History list at appropriate points in the workflow’s execution. Because it provides its own mechanism for tracking workflows, Microsoft SharePoint Foundation doesn’t support WF’s standard tracking service.
A typical pattern for a simple workflow begins with an OnWorkflowActivated activity, and then uses a CreateTask activity to assign a task to a participant in the workflow. The BAL’s standard While activity might then be used to wait until the user completes the task. To learn when this has happened (perhaps the user makes multiple changes to the task, then checks a box on the Task Completion form when she’s done), an OnTaskChanged activity executes within the While, extracting whatever information the user has entered on that form. When the user has completed the task, a CompleteTask activity might execute, followed by a DeleteTask. The workflow can then go on to the next participant, using CreateTask to assign a task to him, and so on. And of course, other things can occur, such as sending e-mail, logging information to the history list, or even including the BAL’s Code activity, which allows running arbitrary code.
All of the activities provided by SharePoint Foundation are concerned with letting workflows operate within the SharePoint environment. The business logic a workflow implements is entirely up to the creator of that workflow. In fact, a developer authoring a workflow is free to create and use her own custom activities—she’s not required to use only those provided by SharePoint Foundation and WF.
As described earlier, Windows Workflow Foundation supports sequential, parallel, and state machine workflows. A workflow created with the WF Workflow Designer can also use any of these options. To allow this, SharePoint Foundation adds project types to Visual Studio, one for each of these workflow styles.
Whatever style is chosen, the developer must define more than just the workflow’s logic; he must also specify the .aspx form it should use. To do this, the developer relies on a file named element.xml. This file provides a template that the developer fills in to specify what form, if any, should be displayed at each of the four points at which a workflow is allowed to do this.
A developer must do some work to pass information between a workflow and the .aspx forms it uses. The Microsoft.Windows.SharePoint.Workflow namespace exposes an object model for developers. Using the types in this namespace, the creator of a workflow can pass information from an .aspx form to the workflow and vice-versa.
Once a workflow and its forms have been created, the developer must package them into what is referred to as a Feature. A SharePoint administrator must then install this Feature, which includes installing the workflow’s assemblies to the target system’s global assembly cache. The new workflow will now be visible to the administrator as a workflow template that can be associated with a document library, list, content type, or site.
For a software developer, creating a workflow by using Visual Studio and the WF Workflow Designer isn’t especially hard. The developer needs to understand the specifics of working in this environment, but much of what he’s doing will be familiar. Yet software developers aren’t the only people who’d like to author workflows. As described next, people who aren’t professional developers can also create workflows by using Microsoft SharePoint Designer 2010.
-
Authoring workflows with Microsoft SharePoint Designer 2010
Microsoft SharePoint Designer 2010 is a separate application that is available as a free download. Microsoft SharePoint Designer enables information workers and others to add application logic (implemented as a workflow) to SharePoint sites. This is certainly a useful goal, but Microsoft SharePoint Designer also addresses another important problem. If a developer creates a workflow by using Visual Studio, that workflow must be deployed on a server running SharePoint Foundation like any other feature. Yet many SharePoint administrators won’t allow arbitrary code to be deployed on their servers, believing that the risk of destabilizing the system is too great. Being able to create straightforward business logic tied to documents and list items is very useful, however, and it’s something that many SharePoint users need. Along with allowing less technical people to create workflows, Microsoft SharePoint Designer also addresses this problem by providing a safer way to define and deploy business logic on servers running SharePoint Foundation.
The workflow scenarios that Microsoft SharePoint Designer is intended to address are different in some ways from those addressed by Visual Studio and WF Workflow Designer. While it’s certainly possible to create complex applications, the intent of Microsoft SharePoint Designer is to let users add business logic to SharePoint sites. For example, suppose that a site contains a list that allows its users to submit change requests. Microsoft SharePoint Designer could be used to create a workflow that automatically informs the submitter when her change request is accepted or rejected. Similarly, a custom workflow might inform a particular group of users whenever a new document is added to a particular document library. Performing this kind of custom notification isn’t complicated—creating the workflows is easy—but it’s challenging with earlier versions of SharePoint Foundation because of administrators’ reluctance to install user-written code.
There’s an obvious question here: why should logic created with Microsoft SharePoint Designer be treated any differently? What makes SharePoint administrators willing to allow workflows built with this tool to be deployed on the systems for which they’re responsible? The answer is that workflows built with Microsoft SharePoint Designer can only use activities from an administrator-controlled list. In addition to the activities provided by SharePoint Foundation, a site administrator can choose whether to include custom activities created by a developer on this list. By defining exactly what workflows are allowed to do, a SharePoint administrator can have more confidence that deploying logic created by using Microsoft SharePoint Designer won’t destabilize his system.
Both because it’s intended for information workers rather than developers and because it emphasizes simpler scenarios, Microsoft SharePoint Designer uses a different model for creating workflows than the Visual Studio-hosted WF Workflow Designer. Instead of a graphical approach, Microsoft SharePoint Designer uses a rule-based approach. It’s somewhat similar to the Rules Wizard in Microsoft Outlook, a tool that’s familiar to many people. The screen below illustrates how a user of Microsoft SharePoint Designer defines a step in a workflow. Notice that this workflow runs some actions in parallel; some actions run serially. Earlier versions of SharePoint Foundation supported running actions only serially; actions only ran consecutively.
Process Order Workflow
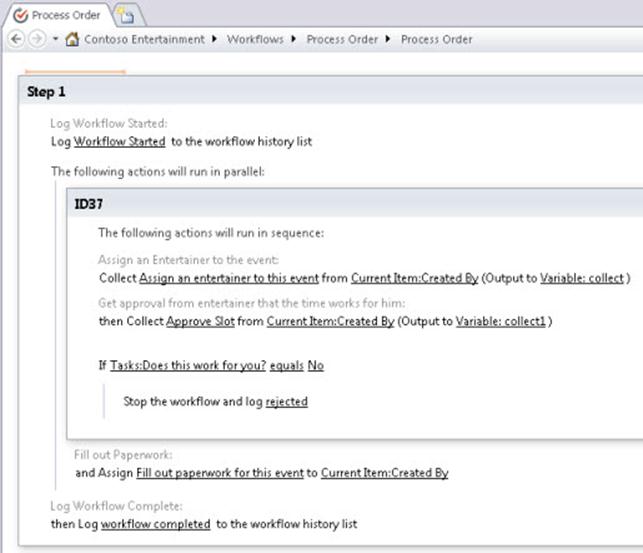
Each step can have a condition and an action. The condition determines whether this step’s action should be executed, as in the If statement shown above. The choices for actions include things such as assigning an entertainer to an event, collecting approval, and many more. Each of these actions is actually carried out by some SharePoint Foundation activity, and the activities used here are the same as with Visual Studio and WF Workflow Designer. The list of actions can also include any other activities allowed by the SharePoint administrator for this site, including custom activities created by developers.
Even though its user interface looks quite different from the graphical approach used with Visual Studio and WF Workflow Designer, Microsoft SharePoint Designer creates a standard WF workflow. What’s actually produced is a workflow that is sequential, parallel, or combination of both with conditions expressed using the WF rules engine. Workflows created with this tool do have some limitations, however. For example, they can’t be modified while they’re running, unlike those built using Visual Studio and WF Workflow Designer, and only sequential and parallel workflows can be created—state machines aren’t supported. Also, workflows built with this tool can be authored against a specific document library, list, or site when they’re designed. Workflow authors can also create a general workflow template that can be later associated with any library, list, or content type. While this does place limits on how a workflow can be used, it also makes deploying the workflow much simpler. In fact, when a user finishes authoring a workflow with Microsoft SharePoint Designer, the tool provides a one-click deployment of the workflow to the target site, which includes activating the workflow. This is significantly less complicated than the multi-step deployment process required for workflows created using Visual Studio and WF Workflow Designer.
Workflows created by using Microsoft SharePoint Designer can also display customized forms. Rather than require workflow authors to create .aspx pages directly, however, the tool instead generates those pages. The author specifies details about how the generated pages should look, such as what fields they should contain, and Microsoft SharePoint Designer takes care of the rest. Of the four points in a workflow’s lifecycle where forms can be used, however, only two are used with workflows created by using Microsoft SharePoint Designer: Initiation and Task Completion. Because every workflow created with this tool must be associated with a particular document library, list, content type, or site there’s no need for an association step and hence no Association form. And since these workflows can’t be modified while they’re running, there’s no need for a Modification form.
Microsoft SharePoint Designer also provides the ability to import workflows that were created using Microsoft Visio 2010. This enables business managers or workflow authors to create the workflow logic using a well known graphical environment. A workflow author can then import the workflow logic into Microsoft SharePoint Designer, modify it if necessary, and then publish it to a SharePoint site.
SharePoint Foundation provides a great deal of functionality for creating document-oriented workflows. Yet ultimately, it’s a platform for development and execution. On its own, it provides no workflow functionality that’s directly usable by end users. Workflows running on SharePoint Foundation also have other restrictions, such as the inability to interact with participants by using Office client applications.
-
Authoring tool comparison
The following table shows the important differences between the tools that Microsoft supports for creating workflows in SharePoint Foundation by using both SharePoint Designer and WF Workflow Designer in Visual Studio 2010 Professional Edition.
|
Capability/Requirement
|
SharePoint Designer
|
WF Workflow Designer in Visual Studio
|
|
Workflows can be created using only actions that are approved by site administrators?
|
Yes
|
No
|
|
Workflows are accessible in client applications (other than the browser)?
|
Yes
|
Yes
|
|
Can use Microsoft Visio Professional to create workflow logic?
|
Yes
|
No
|
|
Need to write code?
|
No
|
Yes
|
|
Additional activities (other than those provided by SharePoint Foundation) are provided?
|
No
|
Yes
|
|
Can create custom activities?
|
No
|
Yes
|
|
Workflow can be modified while it is running?
|
No
|
Yes
|
|
One-click publishing of workflows?
|
Yes
|
Yes
|
|
Workflows can be deployed remotely?
|
Yes
|
No
|
|
Can be made available across the farm?
|
No
|
Yes
|
|
Can be scoped to a site collection?
|
Yes
|
Yes
|
-
Plan for workflow security and user management (SharePoint Foundation 2010)
Before deploying workflows in Microsoft SharePoint Foundation 2010 to users, administrators might have concerns about security issues, such as information disclosure or elevation of privilege. This article highlights some aspects of workflow behavior that relate to security and raises other issues for administrators and workflow developers to consider when they plan to configure and develop workflows.
In this article:
List manager, administrator, and developer roles and responsibilities (http://technet.microsoft.com/library/cda43349-4574-4eec-97cd-78963542d8b6.aspx#BKMK_Rolesandresponsibilities)
Running workflows as an administrator (http://technet.microsoft.com/library/cda43349-4574-4eec-97cd-78963542d8b6.aspx#BKMK_Workflowsrunasadministrator)
Workflow configuration settings (http://technet.microsoft.com/library/cda43349-4574-4eec-97cd-78963542d8b6.aspx#BKMK_Workflowconfigurationsettings)
Information disclosure in task and workflow history lists (http://technet.microsoft.com/library/cda43349-4574-4eec-97cd-78963542d8b6.aspx#BKMK_Disclosure)
Spoofing and tampering attacks in the task and workflow history lists (http://technet.microsoft.com/library/cda43349-4574-4eec-97cd-78963542d8b6.aspx#BKMK_Spoofing)
User-Impersonation Step type for declarative workflows (http://technet.microsoft.com/library/cda43349-4574-4eec-97cd-78963542d8b6.aspx#BKMK_UserStep)
-
List manager, administrator, and developer roles and responsibilities
The following are some common workflow actions and the related responsibilities, which explain the role of administrators and developers in running workflows.
Develop workflow schedule and template Workflow developers are responsible for coding the assembly that contains the business logic that will run on a SharePoint item. This assembly is called a workflow schedule. They are also responsible for packaging the workflow forms and assembly into a workflow feature, or into a workflow template.
Manage Central Administration workflow settings Site administrators can control general workflow settings, such as task alert results and external participant settings on the SharePoint Central Administration Web site.
Deploy Workflow features Site administrators can install workflow features on a site collection to make them available for association.
-
List administrators (anyone with Manage List or Web Designer permissions)
Add workflows List administrators must associate (add) a workflow template to a list or content type, according to the business needs of the list or content type. This association makes the workflow template available to end users, who can then select default values and settings.
Remove workflows List administrators can remove workflow associations from a list or content type, or prevent new instances from running.
Terminate a workflow If a workflow instance fails, list administrators can stop a running workflow instance, such as when a workflow instance produces an error or does not start, by using the Terminate this workflow link on the Workflow Status page. This action is reserved for administrators.
-
Running workflows as an administrator
The most important security concept to be aware of is that workflows run as part of the system account in SharePoint Foundation 2010, through the identity application pool settings on the server computer and domain. This means that within SharePoint Foundation 2010, workflows have administrator permissions. On the server, workflows have the same permissions as the application pool, which frequently has administrator permissions. These permissions enable workflows to perform actions that ordinary users cannot perform, such as routing a document to a specific location or records center, or adding a user account to the system.
This setting, that workflows have administrator permissions, cannot be changed. It is up to the workflow schedule (that is, the workflow code) to detect user actions and, based on those actions, continue or roll back changes, or impersonate a user in order to mimic that user’s permissions.
When they deploy workflows, administrators must understand the actions that the workflow will perform so that they can assess possible risks associated with elevation of permission in a workflow and help the workflow developer reduce any security concerns.
-
Workflow configuration settings
SharePoint Foundation 2010 has some configuration settings that administrators have to set according to their security needs.
-
Required permissions to start a workflow
In addition to preventing the elevation of permissions in the code, list administrators can restrict the permission level that is required to start a workflow during the association process. Administrators can select either of two permission levels to start a specific workflow association: Edit Item or Manage List.
The default setting for associating a workflow is to allow users with Edit Item permissions to manually start a workflow. This means that any authenticated SharePoint Foundation 2010 user on the list who has Edit Item permissions can start an instance of this workflow association. If during workflow creation the administrator selects the option to require that the user have Manage Lists permissions in order to start the workflow, only list administrators can start an instance of this association.
Because workflows are designed to be used by standard contributors, most workflows do not require the restriction to Manage Lists permissions. However, administrators can use this setting for workflows such as a document disposal workflow, where the administrator wants only certain people to execute the disposal actions.
-
Central Administration settings
The following settings can be found on the Central Administration page by clicking Application Management and, in the Web Applications section, clicking Manage web applications. On the Web applications page, select the Web application that you want to configure, and in the Manage group of the ribbon click General Settings, and then select Workflow. The Workflow Settings page opens, and the following settings are displayed:
User-Defined Workflows
Workflow Task Notifications
-
Enable user-defined workflows
By default, user-defined workflows are enabled for all sites on the Web application, as shown in the User-Defined Workflows section of the Workflow Settings page. When this option is selected, users can define workflows in a workflow editor such as the SharePoint Designer 2010 workflow editor. Users who define these workflows must have Manage List permissions on the site to which they are deploying the workflow.
-
Task notification for users without site access
On the Workflow Settings page, in the Workflow Task Notifications section, you can set options for sending notifications about pending workflow tasks to users who do not have access to the site.
Internal users
In SharePoint Foundation 2010 it is possible to resolve the names of internal users in the directory service who are not members of the site or who do not have access to that task. In this case, an administrator can select the Alert internal users who do not have site access when they are assigned a workflow task option in the Workflow Task Notifications section to set whether such users receive a task notification by e-mail. This option means that users are alerted when they are assigned a workflow task. This option is enabled by default, and the e-mail message that users receive contains a link that they can click to request access to the site (administrators must still grant access). This e-mail message might also contain information about the document. This information can include the title of the document and instructions from the workflow owner. If there are information disclosure concerns associated with internal users who are not members of the site, administrators might want to disable the Alert internal users who do not have site access when they are assigned a workflow task setting.
External users
External users who are not in the directory service but who are assigned a well-formed SMTP e-mail address can still be assigned workflow tasks. Because external users will find it difficult to access the document, SharePoint Foundation 2010 includes a setting, Allow external users to participate in workflow by sending them a copy of the document, which makes it possible to send external users a task notification by e-mail with the document attached. When this option is enabled, the task is assigned to the workflow owner, and the external user can complete the task by sending e-mail to the owner.
By default, the option Allow external users to participate in workflow by sending them a copy of the document is disabled. But this setting can be useful in situations that require external participation, such as approval of business documents that involve external customers. Administrators who enable this setting (select Yes) must verify that the workflow schedule supports the external participant setting. For example, when a task is created for an external user, the custom workflow must specify the external e-mail address in the OnBehalfEmail property in the SPWorkflowTaskProperties object that was used to initialize the task). Several built-in workflows in SharePoint Foundation 2010 support this setting.
Custom workflow developers who want to enable this functionality must work with administrators to determine whether there are information disclosure risks in attaching the actual document to an external e-mail message. Administrators must evaluate the benefits and risks when enabling this setting.
-
Information disclosure in task and workflow history lists
Because tasks and history list items can contain data about users and the actions they perform on documents, the items might disclose confidential information. For example, a promotion Approval workflow might collect feedback on its tasks that an organization wants only the workflow owner and each participant in the task to see.
Task and history lists are typical lists in a site. By default, therefore, all readers can view tasks and history items. Administrators and developers must determine the information that cannot be disclosed and decide whether to help secure task and history items that are created by the workflow.
Securing these items can be done in several ways. For example, administrators can set list-level permissions. If disclosure is to be private — that is, not publicly available but available to a specific group of people — administrators can create a new task or history list and set permissions for the list that are targeted to that group. If administrators do not want anyone to see history events on a workflow status page, they can remove view permissions to the workflow history list from which a status page pulls its information. Users who do not have permissions to view the history list itself, or any item on the list, will receive an Access Denied error when they open any status page that pulls data from that history list.
If finer restrictions are required, workflow developers can set per-item permissions when they create tasks or history items. The CreateTask activity has a SpecialPermissions property that gives only specified permissions to access the newly created task. The LogToHistoryList activity does not have such a property, so to set per-item permissions on history list items, administrators must use the object model (OM) in SharePoint Foundation 2010. Per-item permissions can affect performance negatively and should not be used unless they are necessary.
Tasks and history items do not have to be handled in the same manner. Administrators can mix and match list permissions and item-level permissions.
-
Spoofing and tampering attacks in the task and workflow history lists
Any contributor can modify tasks or history items if there are no restrictions on those lists. This means that malicious users can modify task descriptions to give participants incorrect instructions or to order participants to click malicious links. To change the perceived results of a process, malicious users also can add false or inaccurate history events or can modify history events to make them false or inaccurate.
As detailed earlier, task and history lists are normal lists in a site. By default, there are no permission restrictions on either task lists or history lists. To avoid spoofing and tampering attacks, administrators must determine the vulnerabilities that exist and either restrict access to columns in a list (for example, make vulnerable columns such as task descriptions read-only so that only the workflow can set them on item creation), set special permissions on the list, or set item-level permissions on the items in a list.
-
Security issues in the workflow history list
A key benefit of workflows is the ability to track process information to provide visibility into a process. The workflow history list is a repository for this information, where a workflow status page can search for data related to a workflow instance and can make this information available to users. Users can see all items to which they have access in the history list.
However, because the workflow history list tracks information, users might assume that it can be used as an audit trail for events. This is not the case: Workflow history is not a security feature. History lists are standard SharePoint lists that are used for storing events that are visible to any user and that have no special permissions associated with them. By default, users can modify and add events if they have edit and add permissions on the site. To audit events, use the SharePoint’s Audit Log feature. Only administrators can access this log and the log does not require additional work to protect it from tampering attacks.
To better protect the history list, administrators can restrict edit and add permissions to the list, so that only system account administrators (for example, workflow administrators) and list administrators can add items. List administrators must have add permissions to log “Terminate this workflow” events. If edit and add permissions are restricted on the history list, users still must be granted view permissions in order to see status information.
-
User-Impersonation Step type for declarative workflows
The User-Impersonation Step type can be used to run sections of declarative workflows by the person who authored the workflow rather than by the workflow’s initiator. Declarative means a model that you use to create the workflow and set the parameters for the workflow without writing any code.
In SharePoint Foundation 2010, declarative workflows always run in the user context of the workflow initiator unless an impersonation step is encountered. If an impersonation step is encountered, the declarative workflow is run in the context of the workflow associator. The default workflow tasks respect SharePoint permissions by impersonating the user who started a workflow when the workflow is run. This arrangement keeps things fairly safe in SharePoint Foundation 2010, but blocks many scenarios in which a workflow designer with high permission levels wants to author a powerful workflow that can be completed successfully by users who have lower permission levels.
Through a safe and scoped form of privilege elevation, site actions can be automated through workflow. This reduces the burden on a SharePoint site administrator. Automation of a high-security process is useful in publishing and approval scenarios in which existing actions are enabled to impersonate someone other than the workflow’s initiator.
The following are sample scenarios that demonstrate the User-Impersonation Step type:
Publish to a secure list
Jackie has locked down the Pages document library for the public face of her SharePoint site. She has set up an Approval workflow that, by using Microsoft SharePoint Designer 2010, submits content from site contributors for approval. Jackie puts her workflow actions in an impersonation step so that the workflow actions will always impersonate her, a site administrator, as the author of the workflow.
When Connie (a contributor) posts a content draft to the Pages library of the site, and tries to publish her article, that action causes Jackie’s Approval workflow to start so that the post can be reviewed and approved. Tasks are sent out to the approvers in the workflow on behalf of Connie. Upon review and approval by the approvers, the system sets the moderation status of the post to “Approved”, even though Connie does not have permission to approve pages.
Granting permissions to users
Joanne has set up a workflow in SharePoint Designer 2010 that uses a user-impersonation action “Add User to Group” to grant Design permissions to her site. Because the workflow uses an impersonation scope, the action of adding a user to the group will always be performed on Joanne’s behalf.
The rest of the workflow lets contributors visit the site and complete a form to log their access request to a list.
For example, a separate user, Olivier, receives a task when Connie, a user, logs a request, and when he approves the task, Connie is added to the Designer group for the site even though neither Olivier nor Connie has Manage Lists permissions on Joanne’s site.
Templates and taking ownership
William created several workflows in SharePoint Designer 2010 and saved them as templates for reuse across the company, but he soon leaves the company. His account is removed, his administrator status is revoked, and now the SharePoint Designer 2010 workflows that William created fail to complete due to the loss of William’s permissions.
A parent SharePoint site administrator, John, can intervene for each workflow, without having to re-create the workflows in SharePoint Designer 2010. John takes ownership of the administrative symptoms in each broken template. After doing this, secure publishing and access granting now occur under John’s name instead of William’s — and nothing else has changed.
The following are workflow actions that can be impersonated:
Set Content Approval Status (as Owner)
Create List Item (as Owner)
Update List Item (as Owner)
Delete List Item (as Owner)
Add/Remove/Set/Inherit List Item Permissions (as Owner)
As a SharePoint administrator, you must consider the possible security effects of incorporating impersonation into workflows on the SharePoint site. This applies to new actions but also to existing actions such as updating list items.
For example, consider a model in which user-impersonation actions in the workflow could still run as the initiator. If a user has administrator permissions only over a site in the site collection, that user could maliciously create a workflow to gain rights to the parent Web of the site. All that the malicious user would have to do is to persuade the administrator to upload a file to a document library on the malicious user’s site to begin the workflow’s attack and compromise the whole parent Web of the site.
This risk prompted development of the restriction “user-impersonation actions always impersonate their associator” in SharePoint Designer 2010. The associator is the person who associates a workflow to a particular list or Web. In SharePoint Foundation 2010 declarative workflows, the associator is the same person as the workflow author; that is, the user who builds the workflow in SharePoint Designer 2010. However, the associator can also be anyone who associates a declarative workflow template. The concern now is that the author/associator is forced to accept responsibility for anything that occurs because of a User-Impersonation Step type, because the author/associator’s credentials are being used in the elevation. This requires that the authors/associators understand the workflows they design or associate. Therefore, during workflow creation, SharePoint Designer 2010 provides a cautionary message on the workflow creation page to the author/associator about the User-Impersonation Step type.
-
Approval Workflow: A Scenario (SharePoint Foundation 2010)
The most common example of human workflow in most organizations is some variation of approval: A group of people must approve or reject some document, and perhaps add comments to explain their decisions. This article shows how an approval-type workflow that is created in SharePoint Designer 2010 or Workflow Designer in Visual Studio 2010, and that is then hosted by using SharePoint Foundation 2010 might look. Before reading this example, it is useful to define the roles that different people play.
Workflow author The developer or information worker who creates a workflow template.
SharePoint Foundation 2010 administrator The person who installs a workflow template and associates it with a document library or list.
Workflow initiator The person who starts a workflow, causing a workflow instance to be created from a particular workflow association.
Workflow participants The people who interact with a workflow instance to complete the business process that it supports.
As described in the following section, people in each of these roles play their own parts in creating, installing, starting, and using a workflow.
-
Authoring a workflow
Microsoft provides two options for creating workflows in SharePoint Foundation 2010. Developers use Visual Studio 2010 and Workflow Designer, whereas information workers use the rules-based approach that SharePoint Designer 2010 provides. In both cases, the result is a workflow template that must be deployed to a server that is running SharePoint Foundation 2010. This scenario assumes that a workflow template has already been created.
-
Associating a workflow
Before you can use a workflow, you must install a workflow template on a server that is running SharePoint Foundation 2010, and then you must associate the workflow with a particular document library, list, content type, or (in the case of a site workflow) site. You can then start the workflow from any document or item in that library or list. Although workflows cannot be explicitly started from content types, a workflow that is associated with a content type can be started from a document or list item to which that content type is attached. Because workflows operate in the same manner on items and documents, a workflow template can typically be attached to a list, library, or content type. You can also create a template that can be associated only with a particular list or library.
Both installation and association are performed automatically for workflows that are deployed by using SharePoint Designer 2010. However, when you use Visual Studio to deploy workflows, a server administrator must explicitly install the workflow template. In addition, a user must associate the template with a library, list, content type, or site. Whoever creates this association also assigns the association a unique name, which enables users to reference it. Optionally, the workflow author can let the person who creates the association set options for the workflow behavior, such as a default list of people who can always participate in the process. The same template can be associated with multiple libraries, lists, or content types, and each association can be customized as required. After the association is created and any available options are set, a workflow initiator can create a workflow instance from this association, as described in the following section.
-
Associating a workflow with a site
Site workflows are associated with the site itself. An item does not have to be started for the workflow to run.
You can use site workflows for processes that do not have a list item context. For example, you could create a workflow to request permissions for the site, a workflow to request and provision a new site, or a workflow that uses context that is stored outside the SharePoint site, without having to create a corresponding SharePoint list item from which to start the workflow.
Site workflows can be associated with a site through the site’s settings and can be started on the site itself. SharePoint Designer 2010 can also deploy site workflows directly to a site.
Site workflows work in the same way as list items, as described earlier in this article, except that site workflows cannot be started from a document or item in a library or list.
For more information, see Add a workflow association (SharePoint Foundation 2010) (http://technet.microsoft.com/library/19872b79-f5ac-4b56-a24b-75af33c89763(Office.14).aspx).
-
Starting a workflow
SharePoint Foundation 2010 provide three options to start an instance of a workflow. All three options run the workflow from the beginning every time. (If an instance of a workflow that is created from a particular association is already running on a particular document or list item, it is not possible to start another instance of the workflow on the same document or item.) The following are the options for starting a workflow:
A SharePoint Foundation 2010 user can manually start a workflow.
You can configure a workflow to run automatically when a user creates a document or item.
You can configure a workflow to run automatically when a user changes a document or item.
For example, a Microsoft Word user can upload a new document to a site’s document library. This causes an instance of a workflow that is associated with that library to start.
This scenario uses the first of these three options: manually starting an Approval workflow for a document. To start a workflow instance from a document in a document library, a SharePoint Foundation 2010 user does the following:
1. Points to the document and selects Workflows from the drop-down menu.
2. Selects the workflow to start.
This example assumes that a workflow that will route the document for approval has been created.
When a workflow is started (that is, when an instance of a workflow is created), it can also display a screen that enables a user to specify relevant information. For a workflow that routes a document for approval, this information can include the name of each person who must approve the document, an indication of when each approval is due, and a list of people to be notified. After this information is supplied, the user clicks Start. The workflow begins to execute and requests each participant to review the document in the order in which names were entered on this screen.
When a workflow is started, it can also optionally send an e-mail message to the person who started it. Similarly, a workflow can inform its creator by e-mail when it has finished. You can also configure the workflow to notify the participants in the workflow — in this example, the people who are approving the document—by e-mail that the workflow has something for them to do.
-
Interacting with a workflow
The concept of tasks models the interaction between a person and a running workflow. A task is a unit of work that is assigned to an individual. For example, each person on this workflow’s approval list will be assigned a task that requests approval of the document. SharePoint Foundation 2010 can have a task list for every site, and a running workflow can add tasks to this list that specify the person or persons who are assigned to each task. Users of that site can see the work that is awaiting them by accessing their task list through a Web browser. Optionally, you can have a custom task list for just your workflow tasks.
To a SharePoint Foundation 2010 user, the list of waiting tasks is merely another list. In this example, the user browses to the team SharePoint site and selects the option to view the list of Tasks that are assigned to him. To work on a task, the user in this example clicks the task name.
Because the way that a workflow interacts with participants can vary, the workflow itself defines the screen that is displayed to the user. In this example, the workflow provides options to approve or reject the document and a text box in which participants can type comments.
Other available options let users reassign the task to another person or to request a change. Here, the user might type a comment, and then click Approve. The workflow then creates a task in the task list of the next person in its list of approvers. When every participant has responded, the workflow ends.
SharePoint Foundation 2010 workflows also provide other options, including the following:
The initiator of a workflow can check the status of the workflow.
For example, in the scenario described here, the initiator might check the progress of the approval process.
A workflow can be modified while it is executing.
The workflow’s author determines the allowed modifications, if any. An Approval workflow, for example, could allow the addition of a new approver while the workflow is in progress. The ability to modify in-progress workflows is important because it reflects how people actually work. Because spontaneous change to business processes is a part of life within any business, SharePoint Foundation 2010 workflows were designed to let users handle this.
-
Summarizing the process
When a workflow template is installed on a site and associated with a document library, list, site, or content type, a site user can start an instance of a workflow.
1. The process starts when the workflow initiator selects a document and starts an instance of a workflow.
2. The initiator creates a workflow instance from this association.
3. The user customizes this new instance and starts it.
4. The running instance of the workflow adds a task to the task list of a participant.
The approval workflow that is used in this scenario assigns these tasks sequentially. However, you can assign tasks to many participants at the same time, which allows tasks to be performed in parallel.
5. Participants in the workflow can learn about tasks that the workflow has assigned to them by checking their task lists.
6. Each participant interacts with the running instance of the workflow to complete assigned tasks.
In the example described here, this interaction required approving a document, but the interaction could be anything that the workflow author wants.
It is worth noting that the document on which a workflow runs is not itself sent from person to person. Instead, the document remains on the site, and each workflow participant is given a link to it. In fact, there is no requirement that the workflow use the document or item with which it is associated. Another point worth emphasizing is that SharePoint Foundation 2010 itself defines what is displayed to the initiator of the workflow and the participants in the workflow in steps 1, 2, and 5. However, the workflow author defines and creates the ASPX Web pages that are used in step 3 and step 6. This allows the author to control how users customize and interact with the workflow.
-
Plan site creation and maintenance (SharePoint Foundation 2010)
If you plan on having more than a few site collections in your Microsoft SharePoint Foundation 2010 environment, you need to be sure that you have a plan for site creation and maintenance. Without such a plan, it is difficult to control or track when SharePoint sites are created, whether sites are still active, and when you can safely remove inactive sites. Before you deploy and make sites available to users, you need to answer questions such as:
Do you want to tightly control site creation or to allow many users to create sites?
At which level in the site hierarchy should additional sites be created?
How do you find and remove unused sites in your environment?
Articles and worksheets help you design and record a plan for site creation and maintenance. This will help you prepare to manage growth in your environment.
In this section:
Plan process for creating sites (SharePoint Foundation 2010)
Discusses how to determine which type of site creation process will fit your organization, and which method to use to implement that process.
Plan site maintenance and management (SharePoint Foundation 2010)
Discusses how to plan for maintaining your SharePoint sites from the beginning to make sure that your sites stay current, useful, and usable.
Plan quota management (SharePoint Foundation 2010)
Contains guidance about how to determine settings for quota templates and recycle bins, and how to decide whether or when to delete unused Web sites.
-
Plan process for creating sites (SharePoint Foundation 2010)
Some organizations need to maintain tight control over who can create sites, or when sites are created. Other organizations can allow users more access and freedom to create sites when needed. This article helps you determine which type of site creation process will fit your organization, and which method to use to implement that process.
In this article:
Determine who can create sites and a method for site creation
Plan for Self-Service Site Management
Plan for custom site creation processes
Worksheet
-
Determine who can create sites and a method for site creation
By default, new site collections (and therefore new top-level Web sites) can only be created by using Central Administration, which means that they can only be created by members of the Farm Administrators group. This behavior might suit your organization if you want your environment to be tightly controlled and managed, with only a few people allowed to add top-level sites. However, the default top-level site creation method might not suit your organization if you have any of the following requirements:
You want users to be able to easily create informal, perhaps even disposable, top-level sites, such as for short-term projects.
You want to create an informal space for team, group, or community interaction.
You are hosting top-level sites (either internally or externally) and want the process for requesting and receiving a top-level site to be as quick and low cost as possible.
There are several ways to allow users to create their own sites, while still maintaining some control over your environment. Consider which of the following methods will work best for your organization.
Self-Service Site Management In Central Administration, you can turn on Self-Service Site Management to allow users to create site collections under the /sites path (or other path you specify) within a particular Web application. This method is best used when you want to allow groups or communities to create sites. This method also works well if you are hosting sites and want to allow users to create sites without waiting for a complicated process. The sign-up page for Self-Service Site Management can be customized or replaced with a page that includes all of the information you might need to integrate with a billing system or to track custom metadata about the site at creation time. This method does not work well when large numbers of users need access to multiple sites. Because Self-Service Site Management creates site collections, which have separate permissions, users need to be added uniquely to different site collections. If you use subsites instead, the users can be inherited from the parent site in the site collection. Search works within a specific site collection. Therefore, if you want users to be able to find content across multiple sites, make the sites into subsites within a site collection.
Subsites of existing sites Limit users to creating subsites of existing sites, rather than new site collections and top-level sites. Any user who has the Full Control or Manage Hierarchy permission level on an existing site can create a subsite. This method is the most limited, because you still control how many site collections there are. Because the sites are always subsites of other sites, they can either be easy to organize (if there are just a few) or very difficult to organize and browse (for example, if everyone in your organization wants a subsite and they create them at different levels in the site collection’s hierarchy, the site collection can soon become very difficult to navigate).
 Note:
Note:
If you do not want users to have this capability, you can remove the Create Subsites right from the Full Control and Manage Hierarchy permission levels, either at the site collection or Web application level.
 Note:
Note:
Keep in mind that none of these methods can control how much space each site takes up in your content databases. To control site sizes, you should use quotas and set a size limit for site collections. You cannot set individual size limits for subsites. For more information, see Plan site maintenance and management (SharePoint Foundation 2010).
-
Plan for Self-Service Site Management
Self-Service Site Management allows users to create and manage their own top-level Web sites automatically. When you turn on Self-Service Site Management for a Web application, users can create their own top-level Web sites under a specific path (by default, the /sites path). When turned on, this capability advertises itself with an announcement added to the top-level site at the root path of the Web application, so any users who have permission to view that announcement can follow the link.
 Note:
Note:
If you want to use a path other than /sites for Self-Service Site Management, you must add the path as a wildcard inclusion. For more information, see Plan for collaboration sites (SharePoint Foundation 2010).
This capability can obviously affect the security for your Web server. Self-Service Site Management is disabled by default — you must turn on the feature to use it. You enable Self-Service Site Management for a single Web application at a time. If you want to use it on all Web applications in your server farm, you must enable it for every Web application individually.
If you enable Self-Service Site Management, you should consider the following:
Generally, you should require a secondary site collection administrator. Administrative alerts, such as those for when quotas are exceeded, or checking for unused Web sites, go to the primary and secondary administrators. Having more than one contact reduces administrator involvement with these sites because the secondary contact can perform required tasks even if the primary contact is not available.
Define a storage quota and set it as the default quota for the Web application.
Review the number of sites allowed per content database. Combined with quotas, this will help you limit the size of the databases in your system.
Enable unused Web site notifications, so that sites that are forgotten or no longer of value can be identified.
Because Self-Service Site Management creates new top-level Web sites on an existing Web application, any new sites automatically conform to the Web application’s default quota settings, unused Web site notification settings, and other administrative policies.
-
Plan for custom site creation processes
You can, of course, create your own process for site creation by using a custom form to request a site that integrates with a back-end billing system to charge a customer’s credit card or a corporate cost center. If you have a complicated system or process that you want to include as part of site creation, you should create a custom application to call the site creation interface and perform any other tasks you require. However, if you simply want to add a few custom fields to the site creation page (for example, to track which department in your company is requesting a particular site), you should consider using Self-Service Site Management and customize the sign-up page to include the information that you need. You can customize the scsignup.aspx page in the site definition to include the metadata that you need without having to develop an entire application.
For more information about building custom applications or editing pages in a site definition, see the SharePoint 2010 developer portal on MSDN (http://go.microsoft.com/fwlink/?LinkId=178818).
-
Worksheet
Use the following worksheet to plan the process for creating sites:
Site Creation and Maintenance Worksheet (http://go.microsoft.com/fwlink/?LinkId=193521&clcid=0x409)
-
Plan site maintenance and management (SharePoint Foundation 2010)
All Web sites, particularly sites that have more than one author, get cluttered. Periodic review and cleanup can help keep your site functioning well, whether your site is large or small. If you build a plan for maintaining your site or sites from the beginning, you can ensure that they stay current, useful, and usable.
In this article:
Plan for site maintenance
Plan for managing site collections
Worksheet
-
Plan for site maintenance
Your site maintenance plan will be different from that for any other environment, and it will contain different elements. Site maintenance is different for sites managed by an IT department than it is for user-created sites and managed sites. However, some best practices for a site maintenance plan include:
Ask users what they want in IT-managed sites. Perform periodic surveys to determine what your users need from the site.
Use usage logs and reports to find out which areas of the site are being used, and then correlate that with user surveys to find out what can be improved.
Archive obsolete content or sites. However, if you are going to archive or delete obsolete content or sites, be sure that users understand that plan and that you perform these actions only at predictable times. For example, publish a schedule of when you are going to archive content or delete unused sites.
Periodically review site permissions. For example, review the permissions quarterly to remove permissions for any users who have left the group or project.
Select a reasonable time interval for your maintenance activities. For example, if you plan to conduct periodic user surveys, do not conduct them more than twice a year (and preferably, no more than once a year).
Create a plan for regular backups of site content. Determine or discover how often backups will be made, and the process for restoring content when necessary. For more information about planning for backup and restore, see Plan for backup and recovery (SharePoint Foundation 2010).
Start now, during your planning process, to create a plan for site maintenance. Record your plan, including how often to tune up the site and archive content. Get your plan reviewed by members of your team and representatives of your user base. This way, you can identify any concerns that users might have now, determine how best to address these concerns, and have a plan for site maintenance in place by the time your site goes live.
You can record this information in the Site Creation and Maintenance Worksheet (http://go.microsoft.com/fwlink/?LinkId=193521&clcid=0x409).
-
Plan for managing site collections
One part of your site maintenance plan should be a plan for how to manage the size and number of site collections in your environment. This is most important if you are allowing Self-Service Site Management. Most organizations want to be able to predict and control how much growth they can expect from sites because of the impact that they can have on database resources. For example, if a particular content database contains 100 sites, and one of those sites is taking up more than 50 percent of the space, then that site might need to be in its own content database. This will ensure that you preserve some room for additional growth, while maintaining the ability to back up and restore the databases.
Two methods for managing site collections are:
Site collection quotas Use this method to control how large site collections can become.
Site use confirmation and deletion Use this method to monitor and remove unused site collections.
-
Plan site collection quotas
Use quotas to track and limit site storage. You can send a warning e-mail message to site collection administrators when site storage reaches a particular size (in megabytes), and then lock the site to further content when site storage reaches a maximum size. When you perform your database and server capacity planning, determine what size limits (if any) you want to enforce. The following list describes how to take the best advantage of quotas:
Create different quota templates for different site types. For example, you might want different quotas for different divisions, or for different customer types, or for different paths (perhaps sites under the /sites path only get 100 MB per site collection, whereas sites under the /vip path can take up to 300 MB per site collection). Whenever you create a site collection from Central Administration, you can specify on which quota template it is based. Note that sites created by using Self-Service Site Management use the default quota for the Web application. For more information, see Create, edit, and delete quota templates (SharePoint Foundation 2010) (http://technet.microsoft.com/library/6d984258-158b-40d5-b4a5-cdb2cfe8e5f3(Office.14).aspx).
Give enough room for reasonable growth in sites. Depending on what each site is used for, storage space needs can vary dramatically. Sites are designed to grow over time as they are used. A quota limit of 50 MB is unlikely to be enough storage space to start with for most sites, and is unlikely to be anywhere near enough for a site that has a long life.
Allow for reasonable notice between the warning e-mail message and locking the site for exceeding its quota. For example, do not set the warning limit to 80 MB and the site storage limit to 85 MB. If users are in the middle of uploading several large files, they will not be happy if blocked from completing that task with very little notice.
-
Plan site use confirmation and deletion
You need to plan how to handle sites that become inactive after a project has ended, or sites that users created just to test out some ideas, and then abandoned. Site use confirmation and deletion can help you keep your environment cleaner, by helping you identify when sites are no longer needed. This feature works by automatically sending an e-mail message to site owners to see if they consider their site active. If the owner does not respond to the e-mail message (after a specified number of messages over a specified length of time), the site can be deleted.
To plan for site use confirmation and deletion, decide the following:
How long you want to wait before checking to see if a site is inactive. The default length of time for team or project sites is 90 days after site creation, but you should probably give owners longer than that. For a test or personal site, 90 days is probably too long. Usually a site that was created, was actively used, and is now ready to be deleted or archived, took at least six months and probably a few years to complete that life cycle. Reminders every six months are valuable for those situations.
How often you want to send an e-mail message to site owners to see if their sites are inactive. After the first e-mail message, if the site administrator does not respond, you can continue with additional notices at daily, weekly, or monthly intervals.
Whether you want to automatically delete unused sites. If the site administrator does not respond to multiple e-mail messages, do you want to go ahead and delete the site automatically? We recommend that you make a backup first. You can do so by making sure that regular backups are performed. You can use the SharePoint 2010 developer portal on MSDN (http://go.microsoft.com/fwlink/?LinkId=178818) to customize this functionality so that it automatically makes a backup of the site before deletion, but this is not default behavior.
If you are going to automatically delete unused sites, how many e-mail messages will you send to site owners before you do so? By default, four weekly notices are sent before site deletion, but you can increase or decrease this number to suit your needs.
For more information, see Manage unused Web sites (SharePoint Foundation 2010) (http://technet.microsoft.com/library/eb760fce-48e0-43a8-9bcf-febb868f7115(Office.14).aspx).
-
Worksheet
Use the following worksheet to plan for site maintenance and management:
Site Creation and Maintenance Worksheet (http://go.microsoft.com/fwlink/?LinkId=193521)
-
Plan quota management (SharePoint Foundation 2010)
A quota specifies storage limit values for the maximum amount of data that can be stored in a site collection. Quotas also specify the storage size that, when reached, triggers an e-mail alert to the site collection administrator. Quota templates apply these settings to any site collection in a SharePoint farm.
By default, a quota contains 300 points. A point is a relative measurement of resource usage, for example, CPU cycles, memory, or page faults. Points enable comparisons between measurements of resource usage that could not be compared otherwise. For example, it takes millions of CPU cycles to make up one point, but each time a sandboxed solution stops working is counted as one point. For more information about sandboxed solutions, see Sandboxed solutions overview (SharePoint Foundation 2010).
Quotas are particularly useful when you are using Microsoft SharePoint Foundation 2010 in enterprise environments, such as a company-wide intranet or an Internet Service Provider (ISP). You should use quotas in these environments to ensure that one site collection cannot use so many resources that other site collections can no longer function. You can assign a quota template to a site collection when you create the site collection, or you can assign a quota template at a later time. You can also reverse a decision to use quotas at any place in the site collection hierarchy.
In this article:
About planning quota management
Determine quota template settings
Determine recycle bin settings
Delete unused Web sites
-
About planning quota management
The basic steps to plan quota management are the following:
1. Determine quota template settings
2. Determine recycle bin settings
3. Delete unused Web sites
This article contains guidance about how to determine the quota settings for site collections in an enterprise. This article does not include prerequisite information such as how to configure outgoing e-mail, start the Disk Quota Warning timer job, or plan performance and capacity.
-
Determine quota template settings
There is no default quota template for site collections in a SharePoint Foundation 2010 environment. For example, a quota for a site collection might use the following settings as a starting point:
1. Automated e-mail is sent to a site collection administrator when the size of the site reaches 450 megabytes (MB).
2. Users are prevented from uploading additional documents when the size of a site collection reaches 500 MB.
You must evaluate the size and number of items that you expect users to store in their sites. You must also adjust these settings appropriately to ensure that the sites are used in accordance with an organization’s best practices. For example, if a specific team or group in an organization has a business need to store a greater volume of content on its team site, you can adjust the quota limits for that site collection.
The size of the data reported by quotas does not necessarily match the size of the storage in the database. This is because the quota feature estimates storage figures for empty sites (that is, sites that contain no user content) and includes those figures in the quota, in addition to the actual storage from the database. The estimated size of an empty site includes the real size of the template pages for SharePoint Foundation 2010, for example, the forms pages and the pages in the _layouts directory.
If you change the values for a quota template, those changes apply only to new site collections to which you apply the template. SharePoint Foundation 2010 does not apply the changed quota values to existing sites collections unless you use the object model to update the quota values in the database.
-
Determine recycle bin settings
The recycle bin can help to prevent the permanent deletion of content. The recycle bin enables site owners to retrieve items that users have deleted, without requiring administrator intervention such as restoring files from backup tapes. Key planning considerations include whether to use the second-stage recycle bin and how much space to allocate.
The recycle bin is turned on and off at the Web application level. By default, the recycle bin is turned on in all the site collections in a Web application.
The recycle bin has two stages. When a user deletes an item, the item is automatically sent to the first-stage recycle bin. By default, when an item is deleted from the first-stage recycle bin, the item is sent to the second-stage recycle bin. The second-stage recycle bin stores items that users have deleted from their recycle bins. Only site collection administrators can restore items from the second-stage recycle bin. The size that is specified for the second-stage recycle bin increases the total size of the site. You must plan data capacity accordingly.
Consider allocating at least a small amount of space, for example, 10 percent, to the second-stage recycle bin to accommodate cases in which a user mistakenly deletes an important document, a folder in a document library, or a column in a list.
Items in both the first-stage and the second-stage recycle bins are automatically deleted when the time period specified for the deleted items expires (by default, 30 days). However, when the size limit of the second-stage recycle bin is reached, items are automatically deleted starting with the oldest items. Site collection administrators can also empty the second-stage recycle bin manually. For more information, see Configure Recycle Bin settings (SharePoint Foundation 2010) (http://technet.microsoft.com/library/267e6d15-1411-458f-8944-ee8cbf305368(Office.14).aspx).
-
Delete unused Web sites
You can delete a quota template if you change your quota structures. However deleting a quota template does not delete quota values from site collections to which a quota template has been applied. If you want to remove quotas from all site collections that use a specific quota template, you must use the object model or perform a SQL Server query.
Automatic deletion of unused Web sites can help you lessen the risk of deleting data that is critical to business operations. You should include the following tasks in your planning process:
Require a secondary contact for all sites. If the site owner is not available or leaves the organization, the secondary contact can confirm the usage of the site. If you do not have a secondary contact and you shorten the number of days or number of notices that are given before you delete an unused site, you might accidentally delete a site that is still required.
Archive sites before they are deleted automatically. You will be able to restore the sites that contain business-critical information or plan to store the content databases for a longer duration, so that a deleted site can be restored.
For more information, see Manage unused Web sites (SharePoint Server 2010) (http://technet.microsoft.com/library/4737381b-24e5-4c32-bdff-10dd4a81e648(Office.14).aspx).
-
Plan e-mail integration (SharePoint Foundation 2010)
Enabling communication is a critical component for creating Web applications in which group members can interact with each other and keep up with changes to information through the use of alerts. The site collection features that are dependent on communications being properly set up include:
Alerts that notify group members when things have changed.
Administrative messages related to requests for site access and other site administration issues.
Discussion groups.
To make the most effective use of the communications features, planning should include understanding the software requirements and maintenance considerations.
Plan communication by using the following articles:
Plan incoming e-mail (SharePoint Foundation 2010), which provides information on how to set up e-mail for discussion groups.
Plan outgoing e-mail (SharePoint Foundation 2010), which provides information on how to use alerts and administrative messages.
-
Plan incoming e-mail (SharePoint Foundation 2010)
The incoming e-mail feature of Microsoft SharePoint Foundation 2010 enables SharePoint sites to receive and store e-mail messages and attachments in lists and libraries. This article helps server and farm administrators understand the choices they need to make before they deploy the incoming e-mail feature for their organization.
In this article:
About incoming e-mail
Key decisions for planning incoming e-mail
Configuration options and settings modes
-
About incoming e-mail
The incoming e-mail feature enables teams to store the e-mail that they send to other team members without opening the SharePoint site and uploading the content that was sent in e-mail. This is possible because most types of lists and libraries can be assigned a unique e-mail address.
Before configuring incoming e-mail, you must perform the following tasks:
If you are using the basic scenario, each SharePoint front-end Web server must be running the Simple Mail Transfer Protocol (SMTP) service and the Microsoft SharePoint Foundation Web Application service.
If you are using the advanced scenario, you can use one or more servers in the server farm to run the SMTP service and to have a valid SMTP server address. Alternatively, you must know the name of a server outside the farm that is running the SMTP service and the location of the e-mail drop folder.
For more information about installing the SMTP service, see Configure incoming e-mail (SharePoint Foundation 2010) (http://technet.microsoft.com/library/445dd72e-a63b-46d0-b92d-bcf0aa9d8d06(Office.14).aspx).
-
Key decisions for planning incoming e-mail
As you plan to implement incoming e-mail, you must decide whether to use a basic or and advanced scenario, as described below.
You can enable a basic incoming e-mail scenario by installing the Simple Mail Transfer Protocol (SMTP) service on the server running SharePoint Foundation 2010 and enabling incoming e-mail by using the automatic settings mode with all default settings. In this scenario, e-mail is delivered directly to your SMTP server and SharePoint Foundation 2010 periodically checks for e-mail in the default e-mail drop folder that is automatically configured by the SMTP service.
Selecting the automatic settings mode and accepting all the default settings is the easiest way to enable incoming e-mail because all configuration settings are made for you and, therefore, little expertise is required. For most organizations, this configuration is all that is needed.
You enable a basic incoming e-mail scenario in the following steps:
1. The server administrator uses the Add Features Wizard to install the SMTP Server feature on the server from which you want to receive incoming e-mail. This installs and starts the SMTP service on that server.
2. The farm administrator enables incoming e-mail by using the automatic settings mode and accepting all the default values.
3. The site collection administrator enables the incoming e-mail feature on the libraries and lists in which they want to store incoming e-mail and assigns each library and list a unique e-mail address in the form address@SMTPserveraddress, for example, sharedfiles@SMTPserver.contoso.com.
When users send e-mail to the address of a list or library, SharePoint Foundation 2010 detects that new e-mail has been delivered and sends it to the appropriate list or library based on the e-mail address.
 Note:
Note:
You can also use the automatic settings option in an advanced scenario and select whether to use the Microsoft SharePoint Directory Management service, a safe e-mail server, and an incoming e-mail server display address. These options are all discussed in the “Using the advanced scenario” later in this article.
If this basic scenario meets your needs, you can skip the remainder of this article. For more information, see Configure incoming e-mail (SharePoint Foundation 2010) (http://technet.microsoft.com/library/445dd72e-a63b-46d0-b92d-bcf0aa9d8d06(Office.14).aspx).
-
Using an advanced scenario
For more advanced administrators, additional choices are available, some of which require more expertise to deploy than choosing the basic scenario with all default options. This section describes the following configuration options:
SharePoint Directory Management service
Incoming e-mail server display address
Safe e-mail server
E-mail drop folder
If you use the advanced scenario to configure incoming e-mail, you will need to perform additional procedures. For more information, see Configure incoming e-mail (SharePoint Foundation 2010) (http://technet.microsoft.com/library/445dd72e-a63b-46d0-b92d-bcf0aa9d8d06(Office.14).aspx).
-
SharePoint Directory Management service
The SharePoint Directory Management service connects SharePoint sites to your organization’s user directory to provide enhanced e-mail features. The benefit of using this service is that it enables users to create and manage e-mail distribution groups from SharePoint sites. This service also creates contacts in your organization’s user directory so people can find e-mail-enabled SharePoint lists in their address books. However, using SharePoint Directory Management service requires more management because it is communicating with Active Directory Domain Services (AD DS).
 Note:
Note:
It is recommended that you use Microsoft Exchange Server together with SharePoint Directory Management service. If you do not, you must customize your own directory management service.
You can configure the SharePoint Directory Management service by using either the automatic or the advanced settings mode. You can choose to enable the SharePoint Directory Management service in your SharePoint server farm, or you can use the SharePoint Directory Management service of another farm. One advantage of using the service running on another farm is that Active Directory permissions are managed in a centralized place (that is, on the other farm).
To enable this service on a server or server farm runningSharePoint Foundation 2010, the SharePoint Central Administration application pool account used by SharePoint Foundation 2010 must have write access to the container that you specify in Active Directory. This requires an Active Directory administrator to set up the organizational unit (OU) and the permissions on the OU. The advantage of using the SharePoint Directory Management service on a remote farm is that you do not need the help of an Active Directory administrator to create and configure the OU if the OU already exists.
 Note:
Note:
There are a number of procedures that you need to perform if you plan to use SharePoint Directory Management service. For more information, see Configure incoming e-mail (SharePoint Foundation 2010) (http://technet.microsoft.com/library/445dd72e-a63b-46d0-b92d-bcf0aa9d8d06(Office.14).aspx).
A typical directory management scenario proceeds in the following steps:
1. A site collection administrator creates a new SharePoint group.
2. The administrator chooses to create a distribution list to associate with that SharePoint group and assigns an e-mail address to that distribution list.
3. Over time, the administrator adds users to and removes users from this SharePoint group. As users are added to and removed from the group, the SharePoint Directory Management service automatically adds and removes them from the distribution list, which is stored in the Active Directory directory service. Because distribution lists are associated with a particular SharePoint group, this distribution list is available to all members of that SharePoint group.
4. By default, e-mail addresses are automatically generated for discussion boards and calendars on team sites and then added to the team distribution list. The e-mail addresses for these two lists will be in the following form, by default: GroupAddress.discussions and GroupAddress.calendar.
5. By including e-mail addresses for discussion boards and calendars in the distribution list, all e-mail and meeting invitations sent to this distribution list will be archived in the team site.
For more information about SharePoint Directory Management Service, see Inside SharePoint: SharePoint Directory Integration (http://technet.microsoft.com/en-us/magazine/2008.09.insidesharepoint.aspx) (http://go.microsoft.com/fwlink/?LinkId=151766).
-
SharePoint Directory Management Service configuration options
When you configure the SharePoint Directory Management service to create distribution groups and contacts in Active Directory, you must provide the following information:
Name of the Active Directory container in which new distribution groups and contacts will be created. This must be provided in the following format:
OU=ContainerName, DC=DomainName, DC=TopLevelDomainName
Example
OU=SharePointContacts,DC=Contoso,DC=com
Name of the SMTP server to use for incoming e-mail (or accept the default SMTP server if one exists). This must be provided in the following format:
Server.subdomain.domain.top-level_domain
For example, SharePointServer.support.contoso.com
Whether to accept messages from only authenticated users.
Whether to allow users to create distribution groups from SharePoint sites. If you choose yes for this option, you can also choose whether users can do any combination of the following actions:
Create a new distribution group.
Change a distribution group’s e-mail address.
Change a distribution group’s title and description.
Delete a distribution group.
When configuring the SharePoint Directory Management service to create distribution groups and contacts using a remote SharePoint Directory Management service, you must provide the following information:
The URL of the remote directory management service, for example, http://server:adminport/_vti_bin/SharePointEmailWS.asmx.
The name of the SMTP server to use for incoming e-mail.
Whether to accept messages from only authenticated users.
Whether to allow users to create distribution groups from SharePoint sites.
-
Incoming e-mail server display address
Administrators can specify the e-mail server address that will be displayed in Web pages when users create an incoming e-mail address for a site, list, or group. This setting is often used in conjunction with the SharePoint Directory Management service to provide a more friendly e-mail server address for users to type, for example, mylist@example.com.
You can configure SharePoint Foundation 2010 to accept e-mail from any e-mail server or only e-mail that has been routed through a safe-e-mail server application.
You can derive the following benefits by routing e-mail through a safe e-mail server:
User authentication: The SMTP service cannot authenticate users who send e-mail to your site, but Exchange Server can. The server administrator can use the SharePoint Central Administration Web site to specify that the system accept e-mail from authenticated users only if the e-mail is sent through Exchange Server.
Spam filtering:Exchange Server provides spam filtering to eliminate unsolicited commercial e-mail before it is forwarded to its destination — in this case, the server running SharePoint Foundation 2010. Another technique that can reduce spam is to allow members of the team site to archive e-mail only in lists on which you have granted write permissions to members.
Virus protection:Exchange Server provides virus protection for e-mail routed through it.
 Note:
Note:
Because this option is only available in automatic mode, you cannot specify one or more safe e-mail servers and also specify an e-mail drop folder.
If the SMTP service is running on another server than on the SharePoint server, you must specify the location from which SharePoint Foundation 2010 retrieves incoming e-mail. You specify the e-mail drop folder so that SharePoint Foundation 2010 knows from where to retrieve incoming e-mail. However, if you specify a specific e-mail drop folder, SharePoint Foundation 2010 cannot detect configuration changes on the remote e-mail server that is delivering the e-mail to your drop folder. This means that if an administrator configures the e-mail server to no longer deliver e-mail to this folder, SharePoint Foundation 2010 cannot detect that the configuration has changed, and therefore will not be able to retrieve the files from the new location.
 Note:
Note:
When incoming e-mail is set to advanced mode, you must ensure that you have the proper permissions on the e-mail drop folder. For more information, see Configure incoming e-mail (SharePoint Foundation 2010) (http://technet.microsoft.com/library/445dd72e-a63b-46d0-b92d-bcf0aa9d8d06(Office.14).aspx).
 Note:
Note:
Because this option is only available in advanced mode, you cannot specify an e-mail drop folder and also specify one or more safe e-mail servers.
-
Configuration options and settings modes
As a farm administrator, you have two settings modes from which to choose when enabling incoming e-mail: automatic and advanced. As described in the “Using a basic scenario” section, you can choose the automatic settings mode with default settings. However, the automatic settings mode has additional options that you can choose.
The following table describes the configuration options and whether they are configured on the Configure Incoming E-Mail Settings page in Central Administration by using the automatic settings mode or the advanced settings mode.
|
Configuration option
|
Automatic settings mode
|
Advanced settings mode
|
|
Safe e-mail servers
|
Yes
|
No
|
|
E-mail drop folder
|
No
|
Yes
|
|
SharePoint Directory management service
|
Yes
|
Yes
|
|
Incoming e-mail server display address
|
Yes
|
Yes
|
The advanced and automatic settings modes are similar in that they both enable farm administrators to configure the SharePoint Directory Management service and the e-mail server address to display in Web pages. These settings modes differ in that the automatic settings mode replaces the ability to choose what e-mail servers to accept e-mail from with the ability to specify the folder to which e-mail is dropped. SharePoint Foundation 2010 uses this e-mail drop folder to detect new e-mail messages.
 Note:
Note:
The e-mail drop folder setting is not available in automatic mode, because that mode automatically sets the e-mail drop folder to the folder that is specified by the SMTP service.
-
Plan incoming e-mail worksheet
Download a Word version of the Plan incoming e-mail worksheet (http://go.microsoft.com/fwlink/?LinkId=200542). Use this worksheet to plan incoming e-mail in order to enable SharePoint sites to receive and store e-mail messages and attachments in lists and libraries.
Configure incoming e-mail (SharePoint Foundation 2010) (http://technet.microsoft.com/library/445dd72e-a63b-46d0-b92d-bcf0aa9d8d06(Office.14).aspx)
Plan outgoing e-mail (SharePoint Foundation 2010)
Configure outgoing e-mail (SharePoint Foundation 2010) (http://technet.microsoft.com/library/ebb924d4-b9a2-4e40-bcb3-0ee582cc5a21(Office.14).aspx)
-
Plan outgoing e-mail (SharePoint Foundation 2010)
Outgoing e-mail is the foundation on which site administrators can implement several e-mail notification features. These features help end users track changes and updates to individual site collections and allow site administrators to deliver status messages.
This article helps site administrators understand both the uses for integrating outgoing e-mail and the requirements for integrating it into their site collections.
In this article:
About outgoing e-mail
Key planning phases of outgoing e-mail
-
About outgoing e-mail
Properly configuring outgoing e-mail is a requirement for implementing e-mail alerts and notifications. The outgoing e-mail feature uses an outbound Simple Mail Transfer Protocol (SMTP) service to relay e-mail alerts and notifications. These e-mail features include the following:
Alerts
In a large and growing site collection, users need an efficient way to keep up with updates to lists, libraries, and discussions. Setting up alerts provides an effective means to stay on top of changes. For example, if many users work on the same document, the owner of the document can set up alerts to be notified whenever there are changes to this document. Users can specify which areas of the site collection or which documents they want to track and decide how often they want to receive alerts.
 Note:
Note:
Users must have at least View permissions to set up alerts.
Administrative messages
Site administrators might want to receive notices when users request access to a site or when site owners have exceeded their specified storage space. Setting up outgoing e-mail enables site administrators to receive automatic notifications for site administration issues.
Outgoing e-mail support can be enabled at both the server farm level (available in the System Settings section of the Central Administration Web site) and at the Web application level (available in the Application Management section of the Central Administration Web site). Therefore, you can specify different settings for a specific Web application. Outgoing e-mail settings at the Web application level override those set up at the server farm level.
-
Key planning phases of outgoing e-mail
Before you configure outgoing e-mail, you must have an SMTP service to relay e-mail alerts and notifications.
The outgoing e-mail settings include several components that must be considered when planning for this feature:
An SMTP service to relay e-mail alerts and notifications. You will need the DNS name or IP address of the SMTP mail server to use.
An address to use in the header of an alert message that identifies the sender of the message.
A Reply-to address that is displayed in the To field of a message when a user replies to an alert or notification.
A character set to use in the body of alert messages.
The SMTP service is a component of Internet Information Services (IIS); however, it is not enabled by default with IIS. It can be enabled by using Add or Remove Programs in Control Panel.
After determining which SMTP server to use, the SMTP server must be configured to allow anonymous access and to allow e-mail messages to be relayed. Additionally, the SMTP server must have Internet access if you want the ability to send messages to external e-mail addresses.
For more information about installing, configuring, and managing the SMTP service, see Help for Internet Information Services (IIS) Manager (http://go.microsoft.com/fwlink/?LinkId=72343).
 Note:
Note:
Only a member of the Farm Administrators group can configure an SMTP server. The user must also be a member of the local Administrators group on the server.
-
From and Reply-to addresses
When configuring outgoing e-mail, you can configure the following two addresses:
From address
Alerts and notifications are sent from an administrative account on the server farm. This account is probably not the one you want to be displayed in the From field of an e-mail message. The address that you use does not need to correspond to an actual e-mail account; it can be a simple friendly address that is recognizable to an end user. For example, “Site administrator” might be an appropriate From address.
Reply-to address
This is the address that will be displayed in the To field of a message if a user replies to an alert or notification. The Reply-to address should also be a monitored account to ensure that end users receive prompt feedback for issues they might have. For example, a help desk alias might be an appropriate Reply-to address.
When you configure outgoing e-mail, you will need to specify the character set to use in the body of e-mail messages. A character set is a mapping of characters to their identifying code values. The default character set for outgoing e-mail is Unicode UTF-8, which allows most combination of characters (including bidirectional text) to co-exist in a single document. In most cases, the default setting of UTF-8 works well, although East Asian languages are best rendered with their own character set.
Be aware that if you select a specific language code, the text is less likely to appear correctly in mail readers configured for other languages.
Configure outgoing e-mail (SharePoint Foundation 2010) (http://technet.microsoft.com/library/ebb924d4-b9a2-4e40-bcb3-0ee582cc5a21(Office.14).aspx)
-
Server farm and environment planning (SharePoint Foundation 2010)
This section describes how to plan server farms and environments.
In this section:
System requirements (SharePoint Foundation 2010)
Services architecture planning (SharePoint Foundation 2010)
Plan authentication (SharePoint Foundation 2010)
Plan security hardening (SharePoint Foundation 2010)
Plan automatic password change (SharePoint Foundation 2010)
Plan for host-named site collections (SharePoint Foundation 2010)
SQL Server and storage (SharePoint Foundation 2010)
Plan for business continuity management (SharePoint Foundation 2010)
Virtualization planning (SharePoint Foundation 2010)
Performance and capacity test results and recommendations (SharePoint Foundation 2010)
-
System requirements (SharePoint Foundation 2010)
Before you install Microsoft SharePoint Foundation 2010, you must ensure that you have installed all required hardware and software. To effectively plan your deployment, you must understand the level of support provided for the Web browsers that you will be using in your environment and how support for IP versions 4 and 6 is implemented in SharePoint Foundation 2010. You must also understand the URL and path length restrictions in SharePoint Foundation 2010.
The articles in this section help you prepare for the installation of SharePoint Foundation 2010 by providing information about the prerequisites that you need to run SharePoint Foundation 2010.
Hardware and software requirements (SharePoint Foundation 2010)
This article describes the hardware and software requirements that you must meet to successfully install SharePoint Foundation 2010.
Plan browser support (SharePoint Foundation 2010)
This article describes levels of support for Web browsers to use with SharePoint Foundation 2010.
URL path length restrictions (SharePoint Foundation 2010)
This article discusses the specific URL path length and character restrictions in SharePoint Foundation 2010, Internet Explorer 7, and Internet Explorer 8 that you should be aware of when planning sites, navigation, and structure.
IP support (SharePoint Foundation 2010)
This article describes SharePoint Foundation 2010 support for IP version 4 (IPv4) and IP version 6 (IPv6).
-
Hardware and software requirements (SharePoint Foundation 2010)
This article lists the minimum hardware and software requirements to install and run Microsoft SharePoint Foundation 2010.
 Important:
If you contact Microsoft technical support about a production system that does not meet the minimum hardware specifications described in this document, support will be limited until the system is upgraded to the minimum requirements.
In this article:
Overview
Hardware requirements—Web servers, application servers, and single server installations
Hardware requirements—Database servers
Software requirements
Access to applicable software
-
Overview
Microsoft SharePoint Foundation 2010 provides for a number of installation scenarios. Currently, these installations include single server with built-in database installations and single-server or multiple-server farm installations.
-
Hardware requirements—Web servers, application servers, and single server installations
The requirements in the following table apply both to installations on a single server with a built-in database and to servers running SharePoint Foundation 2010 in a multiple server farm installation.
-
Hardware requirements—Database servers
The requirements in the following table apply to database servers in production environments with multiple servers in the farm.
 Note:
Note:
Our definitions of small and medium deployments are those described in the “Reference Architectures” section in Capacity management and sizing for SharePoint Server 2010 (http://technet.microsoft.com/library/031b0634-bf99-4c23-8ebf-9d58b6a8e6ce(Office.14).aspx).
-
Software requirements
The requirements in the following tables apply to single server with built-in database installations and server farm installations that include a single server and multiple servers in the farm.
 Important:
SharePoint Foundation 2010 does not support single label domain names. For more information, see Information about configuring Windows for domains with single-label DNS names (http://support.microsoft.com/kb/300684).
The Microsoft SharePoint Products Preparation Tool — which you access from the SharePoint Foundation 2010 Start page — can assist you in the installation of the software prerequisites for SharePoint Foundation 2010. Ensure that you have an Internet connection, because some of these prerequisites are installed from the Internet. For more information, see Deploy a single server with SQL Server (SharePoint Foundation 2010) (http://technet.microsoft.com/library/58d28a34-7a84-4564-a4cb-0e6b5425f67e(Office.14).aspx), Deploy a single server with a built-in database (SharePoint Foundation 2010) (http://technet.microsoft.com/library/6181fe5b-90ca-40cf-aade-abd59cf3c907(Office.14).aspx), and Multiple servers for a three-tier farm (SharePoint Foundation 2010) (http://technet.microsoft.com/library/246fb1c9-660e-40b5-860b-7d681f04505a(Office.14).aspx).
|
Environment
|
Minimum requirement
|
|
Database server in a farm
|
One of the following:
The 64-bit edition of Microsoft SQL Server 2008 R2.
The 64-bit edition of Microsoft SQL Server 2008 with Service Pack 1 (SP1) and Cumulative Update 2. From the Cumulative update package 2 for SQL Server 2008 Service Pack 1 (http://go.microsoft.com/fwlink/?LinkId=165962) page, click the View and request hotfix downloads link and follow the instructions. On the Hotfix Request page, download the SQL_Server_2008_SP1_Cumulative_Update_2 file. When you install Microsoft SQL Server 2008 SP1 on Windows Server 2008 R2, you might receive a compatibility warning. You can disregard this warning and continue with your installation.
 Note: Note:
We do not recommend that you use CU3 or CU4, but instead CU2, CU5, or a later CU than CU5. For more information, see Cumulative update package 5 for SQL Server 2008 (http://go.microsoft.com/fwlink/?LinkId=196928). Download the SQL_Server_2008_RTM_CU5_SNAC file.
The 64-bit edition of Microsoft SQL Server 2005 with Service Pack 3 (SP3). From the Cumulative update package 3 for SQL Server 2005 Service Pack 3 (http://go.microsoft.com/fwlink/?LinkId=165748) page, click the View and request hotfix downloads link and follow the instructions. On the Hotfix Request page, download the SQL_Server_2005_SP3_Cumulative_Update_3 file.
For more information about choosing a version of SQL Server, see SQL Server 2008 R2 and SharePoint 2010 Products: Better Together (white paper) (SharePoint Server 2010) (http://technet.microsoft.com/library/665876e1-2706-42ad-bd76-8e4d1da0ce92(Office.14).aspx).
|
|
Single server with built-in database
|
The 64-bit edition of Windows Server 2008 Standard, Enterprise, Data Center, or Web Server with SP2, or the 64-bit edition of Windows Server 2008 R2 Standard, Enterprise, Data Center, or Web Server. If you are running Windows Server 2008 without SP2, the Microsoft SharePoint Products Preparation Tool installs Windows Server 2008 SP2 automatically.
 Note: Note:
You must download an update for Windows Server 2008 and Windows Server 2008 R2 before you run Setup. The update is a hotfix for the .NET Framework 3.5 SP1 that is installed by the Preparation tool. It provides a method to support token authentication without transport security or message encryption in WCF. For more information and links, see the “Access to Applicable Software” section later in this article.
KB979917 – QFE for Sharepoint issues – Perf Counter fix & User Impersonation (http://go.microsoft.com/fwlink/?LinkId=192577).
For Windows Server 2008 SP2, download the Windows6.0-KB979917-x64.msu (Vista) file.
For Windows Server 2008 R2, download the Windows6.1-KB979917-x64.msu (Win7) file.
For information, see the related KB article Two issues occur when you deploy an ASP.NET 2.0-based application on a server that is running IIS 7.0 or IIS 7.5 in Integrated mode (http://go.microsoft.com/fwlink/?LinkId=192578).
The preparation tool installs the following prerequisites:
Web Server (IIS) role
Application Server role
Microsoft .NET Framework version 3.5 SP1
SQL Server 2008 Express with SP1
Microsoft Sync Framework Runtime v1.0 (x64)
Microsoft Filter Pack 2.0
Microsoft Chart Controls for the Microsoft .NET Framework 3.5
Windows PowerShell 2.0
SQL Server 2008 Native Client
Microsoft SQL Server 2008 Analysis Services ADOMD.NET
ADO.NET Data Services Update for .NET Framework 3.5 SP1
A hotfix for the .NET Framework 3.5 SP1 that provides a method to support token authentication without transport security or message encryption in WCF.
Windows Identity Foundation (WIF)
 Note: Note:
If you have Microsoft “Geneva” Framework installed, you must uninstall it before you install the Windows Identity Foundation (WIF).
|
|
Front-end Web servers and application servers in a farm
|
The 64-bit edition of Windows Server 2008 Standard, Enterprise, Data Center, or Web Server with SP2, or the 64-bit edition of Windows Server 2008 R2 Standard, Enterprise, Data Center, or Web Server. If you are running Windows Server 2008 with SP1, the Microsoft SharePoint Products Preparation Tool installs Windows Server 2008 SP2 automatically.
 Note: Note:
You must download an update for Windows Server 2008 and Windows Server 2008 R2 before you run Setup. The update is a hotfix for the .NET Framework 3.5 SP1 that is installed by the Preparation tool. It provides a method to support token authentication without transport security or message encryption in WCF. For more information and links, see the “Access to Applicable Software” section.
KB979917 – QFE for Sharepoint issues – Perf Counter fix & User Impersonation (http://go.microsoft.com/fwlink/?LinkId=192577)
For Windows Server 2008 SP2, download the Windows6.0-KB979917-x64.msu (Vista) file.
For Windows Server 2008 R2, download the Windows6.1-KB979917-x64.msu (Win7) file.
For information, see the related KB article Two issues occur when you deploy an ASP.NET 2.0-based application on a server that is running IIS 7.0 or IIS 7.5 in Integrated mode (http://go.microsoft.com/fwlink/?LinkId=192578).
The preparation tool installs the following prerequisites:
Web Server (IIS) role
Application Server role
Microsoft .NET Framework version 3.5 SP1
Microsoft Sync Framework Runtime v1.0 (x64)
Microsoft Filter Pack 2.0
Microsoft Chart Controls for the Microsoft .NET Framework 3.5
Windows PowerShell 2.0
SQL Server 2008 Native Client
Microsoft SQL Server 2008 Analysis Services ADOMD.NET
ADO.NET Data Services Update for .NET Framework 3.5 SP1
A hotfix for the .NET Framework 3.5 SP1 that provides a method to support token authentication without transport security or message encryption in WCF.
Windows Identity Foundation (WIF)
 Note: Note:
If you have Microsoft “Geneva” Framework installed, you must uninstall it before you install the Windows Identity Foundation (WIF).
|
|
Client computer
|
A supported browser. For more information, see Plan browser support (SharePoint Foundation 2010).
|
-
Access to applicable software
To install Windows Server 2008 or Microsoft SQL Server, you can go to the Web sites listed in this section. You can install all other software prerequisites through the SharePoint Foundation Start page. Most of the software prerequisites are also available from Web sites listed in this section. The Web Server (IIS) role and the Application Server role can be enabled manually in Server Manager.
In scenarios where installing prerequisites directly from the Internet is not possible or not feasible, you can install the prerequisites from a network share. For more information, see Install prerequisites from a network share (SharePoint Foundation 2010) (http://technet.microsoft.com/library/3fdf5e00-dffa-46bb-a6b8-abaf66aa583f(Office.14).aspx).
SharePoint Foundation 2010 (http://go.microsoft.com/fwlink/?LinkId=197422)
Language Packs for SharePoint Foundation 2010 (http://go.microsoft.com/fwlink/?LinkId=197424)
Windows Server 2008 (http://go.microsoft.com/fwlink/?LinkId=197426)
Windows Server 2008 R2 (http://go.microsoft.com/fwlink/?LinkId=197428)
SQL Server 2008 R2 (http://go.microsoft.com/fwlink/?LinkId=197429)
SQL Server 2008 (http://go.microsoft.com/fwlink/?LinkID=179611)
SQL Server 2005 (http://go.microsoft.com/fwlink/?LinkId=197431)
Microsoft SQL Server 2008 SP1 (http://go.microsoft.com/fwlink/?LinkId=166490)
Cumulative update package 2 for SQL Server 2008 Service Pack 1 (http://go.microsoft.com/fwlink/?LinkId=165962)
Cumulative update package 5 for SQL Server 2008 (http://go.microsoft.com/fwlink/?LinkId=197434). Download the SQL_Server_2008_RTM_CU5_SNAC file.
Microsoft SQL Server 2005 SP3 (http://go.microsoft.com/fwlink/?LinkId=166496)
Cumulative update package 3 for SQL Server 2005 Service Pack 3 (http://go.microsoft.com/fwlink/?LinkId=165748)
Microsoft Windows Server 2008 SP2 (http://go.microsoft.com/fwlink/?LinkId=166500)
Windows Server 2008 with SP 2 FIX: A hotfix that provides a method to support the token authentication without transport security or message encryption in WCF is available for the .NET Framework 3.5 SP1 (http://go.microsoft.com/fwlink/?LinkID=160770)
Windows Server 2008 R2 FIX: A hotfix that provides a method to support the token authentication without transport security or message encryption in WCF is available for the .NET Framework 3.5 SP1 (http://go.microsoft.com/fwlink/?LinkID=166231)
Microsoft .NET Framework 3.5 Service Pack 1 (http://go.microsoft.com/fwlink/?LinkId=131037)
Microsoft SQL Server 2008 Express Edition Service Pack 1 (http://go.microsoft.com/fwlink/?LinkId=166503)
Windows Identity Foundation for Windows Server 2008 (http://go.microsoft.com/fwlink/?LinkID=160381)
Windows Identity Foundation for Windows Server 2008 R2 (http://go.microsoft.com/fwlink/?LinkID=166363)
Microsoft Sync Framework v1.0 (http://go.microsoft.com/fwlink/?LinkID=141237)
Microsoft Office 2010 Filter Packs (http://go.microsoft.com/fwlink/?LinkId=191851)
Microsoft Chart Controls for Microsoft .NET Framework 3.5 (http://go.microsoft.com/fwlink/?LinkID=141512)
Windows PowerShell 2.0 (http://go.microsoft.com/fwlink/?LinkId=161023)
Microsoft SQL Server 2008 Native Client (http://go.microsoft.com/fwlink/?LinkId=166505)
Microsoft SQL Server 2008 Analysis Services ADOMD.NET (http://go.microsoft.com/fwlink/?linkid=160390)
KB979917 – QFE for Sharepoint issues – Perf Counter fix & User Impersonation (http://go.microsoft.com/fwlink/?LinkId=192577)
For Windows Server 2008 SP2, download the Windows6.0-KB979917-x64.msu (Vista) file.
For Windows Server 2008 R2, download the Windows6.1-KB979917-x64.msu (Win7) file.
ADO.NET Data Services Update for .NET Framework 3.5 SP1 (http://go.microsoft.com/fwlink/?LinkId=163519) for Windows Server 2008 SP2
ADO.NET Data Services Update for .NET Framework 3.5 SP1 (http://go.microsoft.com/fwlink/?LinkId=163524) for Windows Server 2008 R2 or Windows 7
Microsoft Silverlight 3 (http://go.microsoft.com/fwlink/?LinkId=166506)
Microsoft Office 2010 (http://go.microsoft.com/fwlink/?LinkID=195843)
Office Communicator 2007 R2 (http://go.microsoft.com/fwlink/?LinkId=196930)
Microsoft SharePoint Designer 2010 (32-bit) (http://go.microsoft.com/fwlink/?LinkId=196931)
Microsoft SharePoint Designer 2010 (64-bit) (http://go.microsoft.com/fwlink/?LinkId=196932)
Microsoft SQL Server 2008 SP1 (http://go.microsoft.com/fwlink/?LinkId=166490)
Cumulative update package 2 for SQL Server 2008 Service Pack 1 (http://go.microsoft.com/fwlink/?LinkId=165962).
Microsoft SQL Server 2005 SP3 (http://go.microsoft.com/fwlink/?LinkId=166496)
Cumulative update package 3 for SQL Server 2005 Service Pack 3 (http://go.microsoft.com/fwlink/?LinkId=165748).
Microsoft Windows Server 2008 SP2 (http://go.microsoft.com/fwlink/?LinkId=166500)
Windows Server 2008 with SP 2 FIX: A hotfix that provides a method to support the token authentication without transport security or message encryption in WCF is available for the .NET Framework 3.5 SP1 (http://go.microsoft.com/fwlink/?LinkID=160770).
Windows Server 2008 R2 FIX: A hotfix that provides a method to support the token authentication without transport security or message encryption in WCF is available for the .NET Framework 3.5 SP1 (http://go.microsoft.com/fwlink/?LinkID=166231).
Microsoft .NET Framework 3.5 Service Pack 1 (http://go.microsoft.com/fwlink/?LinkId=131037)
Microsoft SQL Server 2008 Express Edition Service Pack 1 (http://go.microsoft.com/fwlink/?LinkId=166503)
Windows Identity Framework for Windows Server 2008 (http://go.microsoft.com/fwlink/?LinkID=160381)
Windows Identity Framework for Windows Server 2008 R2 (http://go.microsoft.com/fwlink/?LinkID=166363)
Microsoft Sync Framework v1.0 (http://go.microsoft.com/fwlink/?LinkID=141237&clcid=0x409)
Microsoft Office 2010 Filter Packs (http://go.microsoft.com/fwlink/?LinkId=191851)
Microsoft Chart Controls for Microsoft .NET Framework 3.5 (http://go.microsoft.com/fwlink/?LinkID=141512)
Windows PowerShell 2.0 (http://go.microsoft.com/fwlink/?LinkId=161023)
Microsoft SQL Server 2008 Native Client (http://go.microsoft.com/fwlink/?LinkId=166505)
Microsoft SQL Server 2008 Analysis Services ADOMD.NET (http://go.microsoft.com/fwlink/?LinkId=130651)
KB979917 – QFE for Sharepoint issues – Perf Counter fix & User Impersonation (http://go.microsoft.com/fwlink/?LinkId=192577)
For Windows Server 2008 SP2, download the Windows6.0-KB979917-x64.msu (Vista) file.
For Windows Server 2008 R2, download the Windows6.1-KB979917-x64.msu (Win7) file.
For information, see the related KB article Two issues occur when you deploy an ASP.NET 2.0-based application on a server that is running IIS 7.0 or IIS 7.5 in Integrated mode (http://go.microsoft.com/fwlink/?LinkId=192578).
Microsoft Office 2010 (http://go.microsoft.com/fwlink/?LinkID=195843)
Microsoft Silverlight 3 (http://go.microsoft.com/fwlink/?LinkId=166506)
ADO.NET Data Services Update for .NET Framework 3.5 SP1 (http://go.microsoft.com/fwlink/?LinkId=163519) for Windows Server 2008 SP2
ADO.NET Data Services Update for .NET Framework 3.5 SP1 (http://go.microsoft.com/fwlink/?LinkId=163524) for Windows Server 2008 R2 or Windows 7
-
Plan browser support (SharePoint Foundation 2010)
Microsoft SharePoint Foundation 2010 supports several commonly used Web browsers. This article describes different levels of Web browser support, and it explains how ActiveX controls affect features.
In this article:
About planning browser support
Key planning phase of browser support
ActiveX controls
-
About planning browser support
SharePoint Foundation 2010 supports several commonly used Web browsers. However, certain Web browsers might cause some SharePoint Foundation 2010 functionality to be downgraded, limited, or available only through alternative steps. In some cases, functionality might be unavailable for noncritical administrative tasks.
As part of planning your deployment of SharePoint Foundation 2010, we recommend that you review the browsers used in your organization to ensure optimal performance with SharePoint Foundation 2010.
-
Key planning phase of browser support
Browser support is an important part of your SharePoint Foundation 2010 implementation. Before you install SharePoint Foundation 2010, ensure that you know which browsers SharePoint Foundation 2010 supports. The information in this topic covers the following areas:
Browser support levels
Browser support matrix
Browser details
Browser support for SharePoint Foundation 2010 can be divided into three different levels, as follows:
Supported
A supported Web browser is a Web browser that is supported to work with SharePoint Foundation 2010, and all features and functionality work. If you encounter any issues, support can help you to resolve these issues.
Supported with known limitations
A supported Web browser with known limitations is a Web browser that is supported to work with SharePoint Foundation 2010, although there are some known limitations. Most features and functionality work, but if there is a feature or functionality that does not work or is disabled by design, documentation on how to resolve these issues is readily available.
Not tested
A Web browser that is not tested means that its compatibility with SharePoint Foundation 2010 is untested, and there may be issues with using the particular Web browser. SharePoint Foundation 2010 works best with up-to-date, standards-based Web browsers.
The following table summarizes the support levels of commonly used browsers.
|
Browser
|
Supported
|
Supported with limitations
|
Not tested
|
|
Internet Explorer 8 (32-bit)
|
X
|
|
|
|
Internet Explorer 7 (32-bit)
|
X
|
|
|
|
Internet Explorer 8 (64-bit)
|
|
X
|
|
|
Internet Explorer 7 (64-bit)
|
|
X
|
|
|
Internet Explorer 6 (32-bit)
|
|
|
X
|
|
Mozilla Firefox 3.6 (on Windows operating systems)
|
|
X
|
|
|
Mozilla Firefox 3.6 (on non-Windows operating systems)
|
|
X
|
|
|
Safari 4.04 (on non-Windows operating systems)
|
|
X
|
|
You should review the details of the Web browser that you have or plan to use in your organization to ensure that the Web browser works with SharePoint Foundation 2010 and according to your business needs.
Internet Explorer 8 (32-bit)
Internet Explorer 8 (32-bit) is supported on the following operating systems:
Windows Server 2008 R2
Windows Server 2008
Windows Server 2003
Windows 7
Windows Vista
Windows XP
Known limitations
There are no known limitations for Internet Explorer 8 (32-bit).
Internet Explorer 7 (32-bit)
Internet Explorer 7 (32-bit) is supported on the following operating systems:
Windows Server 2008
Windows Server 2003
Windows Vista
Windows XP
Known limitations
There are no known limitations for Internet Explorer 7 (32-bit).
Internet Explorer 6 (32-bit)
SharePoint Foundation 2010 does not support Internet Explorer 6 (32-bit).
Internet Explorer 8 (64-bit)
Internet Explorer 8.0 (64-bit) is supported on the following operating systems:
Windows Server 2008 R2
Windows Server 2008
Windows Server 2003
Windows 7
Windows Vista
Windows XP
Known limitations
The following table lists features and their know limitations in Internet Explorer 8 (64-bit).
|
Feature
|
Limitation
|
|
Connect to Outlook, Connect to Office, and Sync to SharePoint Workspace
|
Works with an ActiveX control and the stssync:// protocol. Therefore, functionality may be limited without an ActiveX control, such as the one that is included in Microsoft Office 2010. The feature also requires an application that is compatible with the stssync:// protocol, such as Microsoft Outlook.
|
|
Datasheet view
|
Requires a 64-bit ActiveX control. Microsoft Office 2010 does not provide a 64-bit version of this control.
|
|
Edit in Microsoft Office application
|
Requires a 64-bit ActiveX control. Microsoft Office 2010 does not provide a 64-bit version of this control.
|
|
Explorer view
|
Removed in SharePoint Foundation 2010. Libraries that have been upgraded from earlier versions of SharePoint Foundation 2010 may still have Explorer views and these may not work.
|
|
Export to Excel
|
Downloads a file with an .iqy extension to the Web browser. If Microsoft Excel is not installed, and if no other application is configured to open this file, then this feature will not work.
|
|
File upload and copy
|
Requires a 64-bit ActiveX control. Microsoft Office 2010 does not provide a 64-bit version of this control.
|
|
Microsoft InfoPath 2010 integration
|
Requires a 64-bit ActiveX control. Microsoft Office 2010 does not provide a 64-bit version of this control.
|
|
Microsoft PowerPoint 2010 Picture Library integration
|
Requires a 64-bit ActiveX control, such as the one that is delivered in Microsoft Office 2010. The user can use the following workarounds when no control has been installed:
If a user wants to upload multiple pictures in a picture library, the user must upload one picture at a time by using Upload.aspx.
If a user wants to edit a picture in a picture library, the user must download the picture, edit it, and then upload the picture to the picture library.
If a user wants to download more than one picture from a picture library, the user must download one picture at a time by clicking on the picture link.
|
|
Microsoft Visio 2010 diagram creation
|
Requires a 64-bit ActiveX control. Microsoft Office 2010 does not provide a 64-bit version of this control.
|
|
New Document
|
Requires a 64-bit ActiveX control. Microsoft Office 2010 does not provide a 64-bit version of this control. Although the New Document command may not work, you can use the Upload Document functionality. If you install and configure Office Web Applications on the server, the New Document command works, and you can create an Office document in your browser.
|
|
Send To
|
Can leverage a 64-bit ActiveX control. Microsoft Office 2010 does not provide a 64-bit version of this control. Without the control, files cannot be sent from one SharePoint farm to another SharePoint farm. However, files can still be sent from one site to another site.
|
|
Signing Forms (InfoPath Form Services)
|
Requires a 64-bit ActiveX control. Microsoft Office 2010 does not provide a 64-bit version of this control.
|
|
Spreadsheet and Database integration
|
Require a 64-bit ActiveX control. Microsoft Office 2010 does not provide a 64-bit version of this control. The user can use the following workarounds when no control has been installed:
If a user wants to edit a document, the user must download the document, edit it, and then save it back to the server.
In a list that requires a document to be checked out for editing, a user must use the Edit menu to check out the document, edit it, and then check it in by using the Edit menu.
Export to spreadsheet. Users can export a SharePoint list as a spreadsheet by clicking Export to Spreadsheet on the List tab on the ribbon.
|
|
Web Part to Web Part Connections
|
May require deactivation of browsers pop-up blockers for SharePoint sites.
|
Internet Explorer 7 (64-bit)
Internet Explorer 7 (64-bit) is supported on the following operating systems:
Windows Server 2008
Windows Server 2003
Windows Vista
Windows XP
Known limitations
The following table lists features and their know limitations in Internet Explorer 7 (64-bit).
|
Feature
|
Limitation
|
|
Connect to Outlook, Connect to Office, and Sync to SharePoint Workspace
|
Works with an ActiveX control and the stssync:// protocol. Therefore, functionality may be limited without an ActiveX control, such as the one that is included in Microsoft Office 2010. This feature requires an application that is compatible with the stssync:// protocol, such as Microsoft Outlook.
|
|
Datasheet view
|
Requires a 64-bit ActiveX control. Microsoft Office 2010 does not provide a 64-bit version of this control.
|
|
Edit in Microsoft Office application
|
Requires a 64-bit ActiveX control. Microsoft Office 2010 does not provide a 64-bit version of this control.
|
|
Explorer view
|
Removed in SharePoint Foundation 2010. Libraries that have been upgraded from earlier versions of SharePoint Foundation 2010 may still have Explorer views.
|
|
Export to Excel
|
Downloads a file with an .iqy extension to the Web browser. If Microsoft Excel is not installed, and if no other application is configured to open this file, then this feature will not work.
|
|
File upload and copy
|
Requires a 64-bit ActiveX control. Microsoft Office 2010 does not provide a 64-bit version of this control.
|
|
Microsoft InfoPath 2010 integration
|
Requires a 64-bit ActiveX control. Microsoft Office 2010 does not provide a 64-bit version of this control.
|
|
Microsoft PowerPoint 2010 Picture Library integration
|
Requires a 64-bit ActiveX control, such as the one that is delivered in Microsoft Office 2010. The user can use the following workarounds when no control has been installed:
If a user wants to upload multiple pictures in a picture library, the user must upload one picture at a time by using Upload.aspx.
If a user wants to edit a picture in a picture library, the user must download the picture, edit it, and then upload the picture to the picture library.
If a user wants to download more than one picture from a picture library, the user must download one picture at a time by clicking on the picture link.
|
|
Microsoft Visio 2010 diagram creation
|
Requires a 64-bit ActiveX control. Microsoft Office 2010 does not provide a 64-bit version of this control.
|
|
New Document
|
Requires a 64-bit ActiveX control. Microsoft Office 2010 does not provide a 64-bit version of this control. Although the New Document command may not work, you can use the Upload Document functionality. If you install and configure Office Web Applications on the server, the New Document command works, and you can create an Office document in your browser.
|
|
Send To
|
Can leverage a 64-bit ActiveX control. Microsoft Office 2010 does not provide a 64-bit version of this control. Without the control, files cannot be sent from one SharePoint farm to another SharePoint farm. However, files can still be sent from one site to another site.
|
|
Signing Forms (InfoPath Form Services)
|
Requires a 64-bit ActiveX control. Microsoft Office 2010 does not provide a 64-bit version of this control.
|
|
Spreadsheet and Database integration
|
Require a 64-bit ActiveX control. Microsoft Office 2010 does not provide a 64-bit version of this control. The user can use the following workarounds when no control has been installed:
If a user wants to edit a document, the user must download the document, edit it, and then save it back to the server.
In a list that requires a document to be checked out for editing, a user must use the Edit menu to check out the document, edit it, and then check it in by using the Edit menu.
Export to spreadsheet. Users can export a SharePoint list as a spreadsheet by clicking Export to Spreadsheet on the List tab on the ribbon.
|
|
Web Part to Web Part Connections
|
May require deactivation of browsers pop-up blockers for SharePoint sites.
|
Mozilla Firefox 3.6 (on Windows operating systems)
Mozilla Firefox 3.6 is supported on the following operating systems:
Windows Server 2008 R2
Windows Server 2008
Windows Server 2003
Windows 7
Windows Vista
Windows XP
Known limitations
The following table lists features and their know limitations in Mozilla Firefox 3.6 (on Windows operating systems).
|
Feature
|
Limitation
|
|
Connect to Outlook, Connect to Office, and Sync to SharePoint Workspace
|
Works with an ActiveX control, but requires a Firefox control adaptor. Microsoft Office 2010 does not provide a Firefox control adaptor for this control. The feature also requires an application that is compatible with the stssync:// protocol, such as Microsoft Outlook.
|
|
Datasheet view
|
Requires an ActiveX control, such as the one that is delivered in Microsoft Office 2010, and a Firefox control adaptor. Microsoft Office 2010 does not provide a Firefox control adaptor for this control.
|
|
Drag and Drop Web Parts
|
Cannot be moved by using drag and drop on Web Part pages. Users must click Edit on the Web Part, select Modify Web Part, and then select the zone from the Layout section of the Web Part properties page. Web Parts can be moved using drag and drop on Pages.
|
|
Edit in Microsoft Office application
|
Requires an ActiveX control, such as the one that is delivered in SharePoint Foundation 2010, and a Firefox control adaptor. For more information about Microsoft Office 2010 Firefox Plug-in, see FFWinPlugin Plug-in (http://go.microsoft.com/fwlink/?LinkId=199867). If you install and configure the Office Web Applications on the server, the Edit functionality works and you can modify Office documents in your browser. This functionality only works with Microsoft Office 2010 or an equivalent product together with a Firefox plug-in.
|
|
Explorer view
|
Removed in SharePoint Foundation 2010. Libraries that have been upgraded from earlier versions of SharePoint Foundation 2010 may still have Explorer views, and these may not work. Explorer view requires Internet Explorer.
|
|
Export to Excel
|
Downloads a file with an .iqy extension to the Web browser. If Microsoft Excel is not installed, and if no other application is configured to open this file, then this feature will not work.
|
|
File upload and copy
|
Requires an ActiveX control, such as the one that is delivered in Microsoft Office 2010, and a Firefox control adaptor. Microsoft Office 2010 does not provide a Firefox control adaptor for this control.
|
|
Microsoft InfoPath 2010 integration
|
Requires an ActiveX control, such as the one that is delivered in Microsoft Office 2010, and a Firefox control adaptor. Microsoft Office 2010 does not provide a Firefox control adaptor for this control.
|
|
Microsoft PowerPoint 2010 Picture Library integration
|
Requires an ActiveX control, such as the one that is delivered in Microsoft Office 2010, and a Firefox control adaptor. Microsoft Office 2010 does not provide a Firefox control adaptor for this control. The user can use the following workarounds when no control has been installed:
If a user wants to upload multiple pictures in a picture library, the user must upload one picture at a time by using Upload.aspx.
If a user wants to edit a picture in a picture library, the user must download the picture, edit it, and then upload the picture to the picture library.
If a user wants to download more than one picture from a picture library, the user must download one picture at a time by clicking on the picture link.
|
|
Microsoft Visio 2010 diagram creation
|
Requires an ActiveX control, such as the one delivered in Microsoft Office 2010, and a Firefox control adaptor. Microsoft Office 2010 does not provide a Firefox control adaptor for this control.
|
|
New Document
|
Requires an ActiveX control, such as the one delivered in Microsoft Office 2010, and a Firefox control adaptor. For more information about Microsoft Office 2010 Firefox Plug-in, see FFWinPlugin Plug-in (http://go.microsoft.com/fwlink/?LinkId=199867). Although the New Document command may not work, you can use the Upload Document functionality. If you install and configure Office Web Applications on the server, the New Document command works, and you can create an Office document in your browser.
|
|
Rich Text Editor – Basic Toolbar
|
A user can update the Rich Text Editor basic toolbar to a Full Rich Text Editor that includes the ribbon by changing the field’s properties, as follows: On the FldEdit.aspx, in the List Settings menu, select Specific Field Settings. Next, under Columns, click Description. In the Additional Columns Settings section, under Specify the type of text to allow, select Enhanced rich text (Rich text with pictures, tables, and hyperlinks).
|
|
Send To
|
Can leverage an ActiveX control, such as the one that is delivered in Microsoft Office 2010, and a Firefox control adaptor. Microsoft Office 2010 does not provide a Firefox control adaptor for this control. Without the control, files cannot be sent from one SharePoint farm to another SharePoint farm. However, files can still be sent from one site to another site.
|
|
Signing Forms (InfoPath Form Services)
|
Requires an ActiveX control, such as the one that is delivered in Microsoft Office 2010, and a Firefox control adaptor. Microsoft Office 2010 does not provide a Firefox control adaptor for this control.
|
|
Spreadsheet and Database integration
|
Require ActiveX controls, such as those that are delivered in Microsoft Office 2010, and Firefox control adaptors. Microsoft Office 2010 does not provide a Firefox control adaptor for this control. The user can use the following workarounds when no control has been installed:
If a user wants to edit a document, the user must download the document, edit it, and then save it back to the server.
In a list that requires a document to be checked out for editing, a user must use the Edit menu to check out the document, edit it, and then check it in by using the Edit menu.
Export to spreadsheet. Users can export a SharePoint list as a spreadsheet by clicking Export to Spreadsheet on the List tab on the ribbon.
|
|
Web Part to Web Part Connections
|
May require deactivation of browsers pop-up blockers for SharePoint sites.
|
Mozilla FireFox 3.6 (on non-Windows operating systems)
Mozilla FireFox 3.6 is supported on the following operating systems:
Mac OSX
UNIX/Linux
Known limitations
The following table lists features and their know limitations in Mozilla FireFox 3.6 (on non-Windows operating systems).
|
Feature
|
Limitation
|
|
Connect to Outlook, Connect to Office, and Sync to SharePoint Workspace
|
Requires an application that is compatible with the stssync:// protocol, such as Microsoft Outlook.
|
|
Datasheet view
|
Requires an ActiveX control that is not supported on this platform. Microsoft Office 2010 does not provide a Firefox control adaptor for this control.
|
|
Drag and Drop Web Parts
|
Cannot be moved by using drag and drop on Web Part pages. Users must click Edit on the Web Part, select Modify Web Part, and then select the zone from the Layout section of the Web Part properties page. Web Parts can be moved using drag and drop on Pages.
|
|
Edit in Microsoft Office application
|
Requires an ActiveX control that is not supported on this platform. If you install and configure the Office Web Applications on the server, the Edit functionality works and you can modify Office documents in your browser.
|
|
Explorer view
|
Removed in SharePoint Foundation 2010. Libraries that have been upgraded from earlier versions of SharePoint Foundation 2010 may still have Explorer views, and these may not work. Explorer view requires Internet Explorer.
|
|
Export to Excel
|
Downloads a file with an .iqy extension to the Web browser. Requires an application that is configured to open this file.
|
|
File upload and copy
|
Requires an ActiveX control that is not support on this platform.
|
|
Microsoft InfoPath 2010 integration
|
Requires an ActiveX control that is not support on this platform.
|
|
Microsoft PowerPoint 2010 Picture Library integration
|
Requires an ActiveX control that is not supported on this platform. Microsoft Office 2010 does not provide a Firefox control adaptor for this control. The user can use the following workarounds when no control has been installed:
If a user wants to upload multiple pictures in a picture library, the user must upload one picture at a time by using Upload.aspx.
If a user wants to edit a picture in a picture library, the user must download the picture, edit it, and then upload the picture to the picture library.
If a user wants to download more than one picture from a picture library, the user must download one picture at a time by clicking on the picture link.
|
|
Microsoft Visio 2010 diagram creation
|
Requires an ActiveX control that is not supported on this platform.
|
|
New Document
|
Requires an ActiveX control that is not supported on this platform. Although the New Document command may not work, you can use the Upload Document functionality. If you install and configure Office Web Applications on the server, the New Document command works, and you can create an Office document in your browser.
|
|
Rich Text Editor – Basic Toolbar
|
A user can update the Rich Text Editor basic toolbar to a Full Rich Text Editor that includes the ribbon by changing the field’s properties, as follows: On the FldEdit.aspx, in the List Settings menu, select Specific Field Settings. Next, under Columns, click Description. In the Additional Columns Settings section, under Specify the type of text to allow, select Enhanced rich text (Rich text with pictures, tables, and hyperlinks).
|
|
Send To
|
Can leverage an ActiveX control that is not supported on this platform. Without the control, files cannot be sent from one SharePoint farm to another SharePoint farm. However, files can still be sent from one site to another site.
|
|
Signing Forms (InfoPath Form Services)
|
Requires an ActiveX control that is not supported on this platform.
|
|
Spreadsheet and Database integration
|
Require ActiveX controls that is not supported on this platform. The user can use the following workarounds when no control has been installed:
If a user wants to edit a document, the user must download the document, edit it, and then save it back to the server.
In a list that requires a document to be checked out for editing, a user must use the Edit menu to check out the document, edit it, and then check it in by using the Edit menu.
Export to spreadsheet. Users can export a SharePoint list as a spreadsheet by clicking Export to Spreadsheet on the List tab on the ribbon.
|
|
Web Part to Web Part Connections
|
May require deactivation of browsers pop-up blockers for SharePoint sites.
|
 Note:
Note:
FireFox browsers on UNIX/Linux systems may not work with the Web Part menu.
 Note:
Note:
Some ActiveX features, such as list Datasheet view and the control that displays user presence information, do not work in Mozilla Firefox 3.6. Firefox users can use the Microsoft Office 2010 Firefox Plug-in to launch documents.
Safari 4.04 (on non-Windows operating systems)
Safari 4.0.4 is supported on the following operating systems:
Mac OSX (Version 10.6, Snow Leopard)
Known limitations
The following table lists features and their know limitations in Safari 4.04 (on non-Windows operating systems).
|
Feature
|
Limitation
|
|
Connect to Outlook, Connect to Office, and Sync to SharePoint Workspace
|
Requires an application that is compatible with the stssync:// protocol, such as Microsoft Outlook.
|
|
Datasheet view
|
Requires an ActiveX control that is not supported on this platform.
|
|
Drag and Drop Web Parts
|
Cannot be moved by using drag and drop on Web Part pages. Users must click Edit on the Web Part, select Modify Web Part, and then select the zone from the Layout section of the Web Part properties page. Web Parts can be moved using drag and drop on Pages.
|
|
Edit in Microsoft Office application
|
Requires an ActiveX control that is not supported on this platform. If you install and configure the Office Web Applications on the server, the Edit functionality works and you can modify Office documents in your browser.
|
|
Explorer view
|
Removed in SharePoint Foundation 2010. Libraries that have been upgraded from earlier versions of SharePoint Foundation 2010 may still have Explorer views. Explorer view requires Internet Explorer.
|
|
Export to Excel
|
Downloads a file with an .iqy extension to the Web browser. Requires an application that is configured to open this file.
|
|
File upload and copy
|
Requires an ActiveX control that is not supported on this platform.
|
|
Microsoft InfoPath 2010 integration
|
Requires an ActiveX control that is not supported on this platform.
|
|
Microsoft PowerPoint 2010 Picture Library integration
|
Requires an ActiveX control that is not supported on this platform. The user can use the following workarounds when no control has been installed:
If a user wants to upload multiple pictures in a picture library, the user must upload one picture at a time by using Upload.aspx.
If a user wants to edit a picture in a picture library, the user must download the picture, edit it, and then upload the picture to the picture library.
If a user wants to download more than one picture from a picture library, the user must download one picture at a time by clicking on the picture link.
|
|
Microsoft Visio 2010 diagram creation
|
Requires an ActiveX control that is not supported on this platform.
|
|
New Document
|
Requires an ActiveX control that is not supported on this platform. Although the New Document command may not work, you can use the Upload Document functionality. If you install and configure Office Web Applications on the server, the New Document command works, and you can create an Office document in your browser.
|
|
Rich Text Editor – Basic Toolbar
|
A user can update the Rich Text Editor basic toolbar to a Full Rich Text Editor that includes the ribbon by changing the field’s properties, as follows: On the FldEdit.aspx, in the List Settings menu, select Specific Field Settings. Next, under Columns, click Description. In the Additional Columns Settings section, under Specify the type of text to allow, select Enhanced rich text (Rich text with pictures, tables, and hyperlinks).
|
|
Send To
|
Can leverage an ActiveX control that is not supported on this platform. Without the control, files cannot be sent from one SharePoint farm to another SharePoint farm. However, files can still be sent from one site to another site.
|
|
Signing Forms (InfoPath Form Services)
|
Requires an ActiveX control that is not supported on this platform.
|
|
Spreadsheet and Database integration
|
Require ActiveX controls that are not supported on this platform. The user can use the following workarounds when no control has been installed:
If a user wants to edit a document, the user must download the document, edit it, and then save it back to the server.
In a list that requires a document to be checked out for editing, a user must use the Edit menu to check out the document, edit it, and then check it in by using the Edit menu.
Export to spreadsheet. Users can export a SharePoint list as a spreadsheet by clicking Export to Spreadsheet on the List tab on the ribbon.
|
|
Web Part to Web Part Connections
|
May require deactivation of browsers pop-up blockers for SharePoint sites.
|
-
ActiveX controls
Some of the features in SharePoint Foundation 2010 use ActiveX controls. In secure environments, these controls must be able to work on the client computer before their features will function. Some ActiveX controls, such as those included in Microsoft Office 2010, does not work with 64-bit browser versions. For Microsoft Office 2010 (64-bit), only the following control works with 64-bit browsers:
name.dll – Presence information
-
URL path length restrictions (SharePoint Foundation 2010)
This article discusses the specific URL path length and character restrictions in Microsoft SharePoint Foundation 2010, Internet Explorer 7, and Internet Explorer 8 that you should be aware of when planning sites, navigation, and structure. This article does not discuss URL length limitations in other browsers. For this information, see the browser documentation.
In this article:
Understanding URL and path lengths
URL path length limitations
Resolving URL length problems
-
Understanding URL and path lengths
This section discusses URL composition, how SharePoint Foundation 2010 builds URLs, how URLs are encoded and lengthened, and passed as parameters in other URLs.
-
SharePoint URL composition
The total length of a SharePoint URL equals the length of the folder or file path, including the protocol and server name and the folder or file name, plus any parameters that are included as part of the URL. The formula is as follows:
URL = protocol + server name + folder or file path + folder or file name+ parameters
For example, the following is a typical URL path to a file stored in SharePoint Foundation 2010:
http://www.contoso.com/sites/marketing/documents/Shared%20Documents/Promotion/Some%20File.xlsx
Where the parts of the URL path are as listed in the following table.
|
URL part
|
Example
|
|
Protocol
|
http://
|
|
Server name
|
www.contoso.com/
|
|
Folder or file path
|
sites/marketing/documents/Shared%20Documents/Promotion/
|
|
File name
|
Some%20File.xlsx
|
URL encoding ensures that all browsers will correctly transmit text in URL strings. Characters such as a question marks (?), ampersands (&), slash marks (/), and spaces might be truncated or corrupted by some browsers. SharePoint Foundation 2010 adheres to the standards for URL encoding that are defined in The Internet Engineering Task Force (IETF) RFC 3986 (http://go.microsoft.com/fwlink/?LinkId=195564&clcid=0x409).
If you have non-standard ASCII characters, such as high-ASCII or double-byte Unicode characters, in the SharePoint URL, each of those characters is URL-encoded into two or more ASCII characters when they are passed to the Web browser. Thus, a URL with many high-ASCII characters or double-byte Unicode characters can become longer than the original un-encoded URL. The list below gives examples of the multiplication factors:
High-ASCII characters — for example, (!, “, #, $, %, &, [Space]): multiplication factor = 3
Double byte Unicode characters — for example, Japanese, Chinese, Korean, Hindi: multiplication factor = 9
For example, when you translate the names of sites, library, folder, and file in the URL path http://www.contoso.com/sites/marketing/documents/Shared%20Documents/Promotion/Some%20File.xlsx into Japanese, the resulted encoded URL path will become something like the following:
http://www.contoso.com/sites/%E3%83%9E%E3%83%BC%E3%82%B1%E3%83%86%E3%82%A3%E3%83%B3%E3%82%B0/%E6%96%87%E6%9B%B8/DocLib/%E3%83%97%E3%83%AD%E3%83%A2%E3%83%BC%E3%82%B7%E3%83%A7%E3%83%B3/%E3%83%95%E3%82%A1%E3%82%A4%E3%83%AB.xlsx. This path is 224 characters, whereas the original URL path is only 94 characters.
 Important:
The following characters cannot be used in an un-encoded URL: (~, #, %, &, *, {}, \, :, <>, /, +, |, “).
URL parameters are data that are included as part of the URL that are processed. These parameters are also URL-encoded and can be encoded multiple times, producing very long URLs.
For example, if you browse to a list, the URL might be something like the following: http://www.contoso.com/sites/marketing/documents/Shared%20Documents/Forms/AllItemA.aspx?RootFolder=%2Fsites%2Fmarketing%2Fdocuments%2FShared%20Documents%2FPFPromoti&FolderCTID=0x012000F2A09653197F4F4F919923797C42ADEC&View={CD527605-9A7A-448D-9A35-67A33EF9F766}. This URL is 260 characters.
If you then click Create View on the Library tab, the entire URL is included in the resulting URL as the source parameter and it is encoded to be much longer — for example, http://www.contoso.com/sites/marketing/documents/_layouts/ViewType.aspx?List=%7BED6E21E0%2DDF28%2D4165%2DBC3E%2D5371987CC2D2%7D&Source=http%3A%2F%2Fwww%2Econtoso%2Ecom%2Fsites%2Fmarketing%2Fdocuments%2FShared%2520Documents%2FForms%2FAllItems%2Easpx%3FRootFolder%3D%252Fsites%252Fmarketing%252Fdocuments%252FShared%2520Documents%252FPromotion%26FolderCTID%3D0x012000F2A09653197F4F4F919923797C42ADEC%26View%3D%7BCD527605%2D9A7A%2D448D%2D9A35%2D67A33EF9F766%7D. This URL is 457 characters.
 Important
SharePoint Foundation 2010 truncates the URL source parameter if the total URL length to be passed to Internet Explorer is more than 1950 bytes. The source parameter is a reference to a previously visited page. The result of the truncation of the source parameter is that the user will be referred back to default location rather than the location specified in the source parameter.
Other parameters, such as sort orders, root folder parameters, and views are not truncated.
-
URL path length limitations
This section discusses the different URL length limitations in SharePoint Foundation 2010 and Internet Explorer, and how to plan for URL path lengths.
-
SharePoint URL path length limitations
The limitations In this section apply to the total length of the URL path to a folder or a file in SharePoint Foundation 2010 but not to the length of any parameters. Also, these limitations apply only to un-encoded URLs, not to encoded URLs. There is no limit to encoded URLs in SharePoint Foundation 2010. The limitations are the following:
260 Unicode (UTF-16) code units – the characters in a full file path, not including a domain/server name.
256 Unicode (UTF-16) code units – the characters in a full folder path, not including the file name and the domain/server name.
128 Unicode (UTF-16) code units – characters in a path component, that is, a file or folder name.
260 Unicode (UTF-16) code units – the characters in a full path, including a domain/server name for use with Office clients.
256 Unicode (UTF-16) code units – the characters in a full path including the domain/server name, for use with Active X controls.
For more information, see Microsoft Knowledge Base article 894630, You receive a “The specified file or folder name is too long” error message (http://go.microsoft.com/fwlink/?LinkId=195567&clcid=0x409).
 Note:
Note:
Understanding code units – In most cases, one UTF-16 character equals one UTF-16 code unit. However, characters that use Unicode code points greater than U+10000 will equal two UTF-16 code units. These characters include, but are not limited to, Japanese or Chinese surrogate pair characters. If your paths include these characters, the URL length will exceed the URL length limitation with fewer than 256 or 260 characters.
-
Internet Explorer URL length limitations
Internet Explorer also has limitations that are separate from those in SharePoint Foundation 2010. Even though you make the SharePoint Foundation 2010 URL path shorter than the limitations, you might experience an Internet Explorer URL length limitation because of added parameters and encoding of the URL. You must use the most restrictive limitation as a guideline for planning URL lengths.
Both Internet Explorer 7 and Internet Explorer 8 have a maximum URL length of 2,083 UTF-8 characters and a maximum path length of 2,048 UTF-8 characters. However, in Internet Explorer 7, under certain circumstances, the effective URL length limitation is 1024 UTF-8 characters, not 2083 UTF-8 characters. For more information about the URL length limits in Internet Explorer, see Microsoft Knowledge Base article 208427, Maximum URL length is 2,083 characters in Internet Explorer (http://go.microsoft.com/fwlink/?LinkId=195568&clcid=0x409).
 Important:
Unless all of the browsers in the environment are Internet Explorer 8, use the effective limit of 1024 UTF-8 characters.
-
Resolving URL length problems
There are several ways that you can resolve or mitigate URL length problems in the SharePoint Foundation 2010 environment. The following list provides suggestions:
Upgrade all the end-user browsers to Internet Explorer 8, which has a longer URL length limit.
Use shorter names for sites, folders, and documents and control the depth of the site and folder structures to reduce the lengths of URLs.
If possible or allowed, use ASCII names for sites, folders, and documents. This will avoid situations where the URL will be lengthened by being encoded.
To reduce the risk that the SharePoint Foundation 2010 end-users will encounter problems because of URL length limitations, we recommend that you apply the following effective limits in the deployment:
256 Unicode (UTF-16) Code units – the effective file path length limitation, including a domain/server name
128 Unicode (UTF-16) Code units – the path component length limitation
-
IP support (SharePoint Foundation 2010)
This article explains the support for Internet Protocol Version 4 (IPv4) and Internet Protocol Version 6 (IPv6) addressing in Microsoft SharePoint 2010 Products.
SharePoint 2010 Products support the following environments:
Pure IPv4 environment
Mixed IPv4 and IPv6 environment
Pure IPv6 environment
In a SharePoint environment, “mixed” can be defined as one of the following likely scenarios:
Both IPv4 and IPv6 protocols are running in your environment.
Some of your client computers are using IPv4 and some of them are using IPv6.
Your client computers are using IPv4, but the computer running Microsoft SQL Server is using IPv6.
By default, the IPv6 protocol and the IPv4 protocol are both installed and enabled in Windows Server 2008 and Windows Server 2008 R2. When both IPv4 and IPv6 are enabled, IPv6 is given preference over IPv4. Additionally, you can remove the IPv4 protocol so that the computer runs IPv6 exclusively.
To determine what version is being used, you can use the IPConfig.exe tool. For additional information, see IPConfig (http://go.microsoft.com/fwlink/?LinkId=122336&clcid=0x409).
The following list shows other important considerations regarding IPv6:
For any computer that is authenticated by using a domain controller and is only running IPv6 within a SharePoint 2010 Products environment, the domain controller must be running Windows Server 2008 or Windows Server 2008 R2. Ensure that you use the correct service pack and any additional software prerequisites. For more information, see Hardware and software requirements (SharePoint Foundation 2010).
All versions of Microsoft SQL Server supported for SharePoint 2010 Products also support IPv6. For more information about IPv6 support for SQL Server 2008, see Connecting Using IPv6 (http://go.microsoft.com/fwlink/?LinkId=183115). For more information about IPv6 support for SQL Server 2005, see Connecting Using IPv6 (http://go.microsoft.com/fwlink/?LinkId=183118).
In SharePoint 2010 Products, when using IPv6 protocol, all end-user Uniform Resource Locators (URLs) must be based on DNS names with AAAA records. Browsing to SharePoint URLs that use IPv6 literal addresses is not supported. An example of a literal address URL is http://%5B2001:db8:85a3:8d3:1319:8a2e:370:7344%5D. However, SharePoint 2010 Products support entering IPv6 literal addresses for certain farm administration functionality, such as entering the server name when creating or attaching databases. For server names that use a literal address format, you must enclose the literal address within square brackets. For more information about AAAA records, see Adding a Resource Record to a Forward Lookup Zone (http://go.microsoft.com/fwlink/?LinkId=181956).
For additional information about IPv6, see Internet Protocol Version 6 (IPv6) (http://go.microsoft.com/fwlink/?LinkId=120794&clcid=0x409) and IP Addressing (http://go.microsoft.com/fwlink/?LinkId=120795&clcid=0x409).
Internet Protocol, Version 6 (IPv6) Specification (http://go.microsoft.com/fwlink/?LinkId=183119)
-
Logical architecture planning
This section contains articles to help you learn about and plan logical architectures for Microsoft SharePoint Foundation 2010.
In this section:
Services architecture planning (SharePoint Foundation 2010)
Plan for host-named site collections (SharePoint Foundation 2010)
-
Services architecture planning (SharePoint Foundation 2010)
This article describes the services architecture for sharing service applications and provides example architectures for Microsoft SharePoint Foundation 2010.
In this article:
About service applications
Services infrastructure and design principles
The following poster-size models are also available to use with this article. You can modify the diagrams within the models to represent your own organization plans.
Services in Microsoft SharePoint 2010 Products
Visio (http://go.microsoft.com/fwlink/?LinkID=167090)
PDF (http://go.microsoft.com/fwlink/?LinkID=167092)
XPS (http://go.microsoft.com/fwlink/?LinkID=167091)
Cross-farm services in SharePoint 2010 Products
Visio (http://go.microsoft.com/fwlink/?LinkID=167093)
PDF (http://go.microsoft.com/fwlink/?LinkID=167095)
XPS (http://go.microsoft.com/fwlink/?LinkID=167094)
-
About service applications
SharePoint Foundation 2010 includes a set of services that can be shared across Web applications. These services are called service applications. Some service applications can be shared across farms. Sharing service applications across Web applications and farms greatly reduces the resources required to provide these services across multiple sites.
The following service applications are provided with SharePoint Foundation 2010:
Business Data Connectivity service — Gives access to line-of-business data systems.
Usage and Health Data Collection service — Collects farm wide usage and health data, and provides the ability to view various usage and health reports.
Microsoft SharePoint Foundation Subscription Settings Service — Provides multi-tenant functionality for service applications. Tracks subscription IDs and settings for services that are deployed in partitioned mode. Deployed through Windows PowerShell only.
Some service applications are provided by other Microsoft products, including Microsoft Office Web Apps. Office Web Apps are online companions to Microsoft Word, Excel, PowerPoint, and OneNote, enabling people to access and do light editing or sharing of Office documents from virtually anywhere. Business customers licensed for Microsoft Office 2010 through a Volume Licensing program can run Office Web Apps on-premises on a server running SharePoint Foundation 2010.
The services infrastructure is extensible, and third party companies can create additional service applications that can be used with SharePoint Foundation 2010.
Service applications are different from the services that are started and stopped on specific servers and listed on the Services on Server page in the SharePoint Central Administration Web site. Some of the services listed on this page are associated with service applications, but service applications represent specific instances of services that can be configured and shared in specific ways.
-
Services infrastructure and design principles
SharePoint 2010 Products improves the services infrastructure that was introduced in the previous version. In SharePoint 2010 Products, the infrastructure for hosting services moves into SharePoint Foundation 2010 and the configuration of service offerings is much more flexible. Individual services can be configured independently, and third-party companies can add services to the platform.
You deploy service applications within a farm by using one of the following methods:
Selecting services when you run the SharePoint Products Configuration Wizard.
Adding services one by one on the Manage Service Applications page in the Central Administration site.
Using Windows PowerShell.
-
More granular configuration of services
The service application infrastructure gives you more control over which services are deployed and how service applications are shared:
1. You can deploy only the service applications that are needed to a farm.
2. Web applications can be configured to use only the service applications that are needed, instead of all the services that have been deployed.
3. You can deploy multiple instances of the same service in a farm and assign unique names to the resulting service applications.
4. You can share service applications across multiple Web applications within the same farm.
You can choose the service applications for a Web application when you create the Web application. You can also modify the service applications that are associated with a Web application later.
-
Service application groups
By default, all service applications are included in a default group, unless you change this setting for a service application when it is created. You can add and remove service applications from the default group at any time.
The following diagram shows a typical deployment with all service applications contained in the default service group.
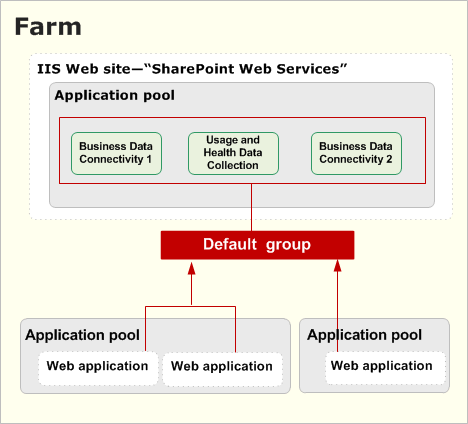
When you create a Web application, you can select the default group or you can create a custom group of service applications. You create a custom group of service applications by selecting only the service applications that you want the Web application to use.
Custom groups that are created in Central Administration are not reusable across multiple Web applications. Each time that you select custom when you create a Web application, you are selecting service applications only for the Web application that you are creating.
Service applications are deployed within a single Internet Information Services (IIS) Web site. This is the default behavior and cannot be changed. However, you can customize the configuration of service application groups and the association of Web applications to service application groups.
The following diagram shows the logical architecture for a more complex deployment.

Notice the following characteristics of the farm in the diagram:
All service applications are contained within the same IIS Web site.
There are two groups of service applications: the default group and a custom group. Not all service applications have to be included in the default group. In the diagram, an additional instance of the Business Data Connectivity service is added to the farm but not included in the default group. It is used only by one Web application.
Web applications connect either to the default group or to a custom group of service applications. In the diagram, there is one custom group.
Service applications can be deployed to different application pools to achieve process isolation. However, if you want to optimize the performance of your farm, we recommend that you deploy service applications to one application pool.
To achieve physical isolation for a service application, choose or create a different application pool for the service application.
-
Connections for service applications
When you create a service application, a connection for the service application is created at the same time. A connection is a virtual entity that connects Web applications to service applications. In Windows PowerShell, these connections are called proxies. “Proxy” appears at the end of the type description for connections on the Manage Service Applications page in Central Administration.
-
Service application administration
Service applications are managed directly in Central Administration rather than through a separate administration site. If needed, service applications can be monitored and managed remotely. Service applications can also be managed and scripted by using Windows PowerShell.
-
Plan for host-named site collections (SharePoint Foundation 2010)
In this article:
About host-named site collections
About host headers
Create a host-named site collection
Programmatically create a host-named site collection
Use managed paths with host-named site collections
Expose host-named sites over HTTP or SSL
Configure SSL for host-named site collections
Use host-named site collections with off-box SSL termination
Microsoft SharePoint Foundation 2010 supports both path-based and host-named site collections. The primary difference between path-based and host-named site collections is that all path-based site collections in a Web application share the same host name (DNS name), and each host-named site collection in a Web application is assigned a unique DNS name.
Path-based site collections provide a corporate hosting solution with all site collections sharing the same host name of the Web application. In a path-based deployment, you can have a single site collection at the root of the Web application and additional site collections under managed paths within the Web application.
Host-named site collections provide a scalable Web hosting solution with each site collection assigned to a unique DNS name. In a Web hosting deployment, each host-named site collection has its own vanity host name URL, such as http://customer1.contoso.com, http://customer2.contoso.com, or http://www.customer3.com.
SharePoint Foundation 2010 provides two significant improvements to host-named site collections: the ability to use managed paths with host-named site collections, and the ability to use off-box SSL termination with host-named site collections.
-
About host-named site collections
Web hosters provide customers with Web server space to host their own Web sites. In a path-based SharePoint Foundation 2010 environment, these sites would typically be assigned to http://www.contoso.com/sites/customer1, http://www.contoso.com/sites/customer2, and so on. However, Web hosting customers typically want to have their Web sites available at a vanity domain name, such as http://customer1.contoso.com, http://customer2.contoso.com, and so on.
One way to support this customer request is to provide each customer with their own Web application and assign the customer’s unique DNS name to the Web application. However, SharePoint Foundation 2010 Web applications do not scale as well as SharePoint Foundation 2010 site collections. SharePoint Foundation 2010 supports host-named site collections as an alternative to creating individual Web applications for each customer. Host-named site collections can scale to thousands of site collections because they can all exist within a single Web application and still offer vanity naming capability.
Because host-named site collections have a single URL, they do not support alternate access mappings and are always considered to be in the Default zone. If you need to support site collections responding to multiple host-name URLs, consider using path-based site collections with alternate access mappings instead of host-named site collections.There are several additional configuration options to consider when provisioning a new SharePoint Foundation 2010 site. Specifying the appropriate site template during site creation will determine which preconfigured Web parts and other user interface elements are available on the new site. In a hosting scenario, you will probably want to select either a team site template (value of “STS#0” when creating the site) or a blank site with no Web parts or prebuilt lists (value of “STS#1”). Also consider specifying site quotas on each newly provisioned site collection.
-
About host headers
Host headers refer to the portion of the HTTP protocol that tells the Web server the DNS name of the site that the client is connecting to. You can apply host headers at two different levels in SharePoint Foundation 2010:
The Web application (IIS Web site) level
The site collection level
It’s important to understand the distinction between these two levels. Host headers at the IIS Web site level are only intended for path-based site collections. Host headers at the site collection level are only intended for host-named site collections. In most cases, applying a host header binding at the IIS Web site level makes it impossible to access host-named site collections through the IIS Web site. This is because IIS will not respond to requests for host names that differ from the host header binding.
Path-based site collections and host-named site collections can co-exist in the same Web application and can exist in multiple Web applications. To ensure that both types of site collections are accessible to users, do not put host header bindings on the IIS Web site assigned to the Default zone of your Web application, if you have host-named site collections in that Web application. You can apply host header bindings to the IIS Web sites in the other zones of your Web application. This enables you to use the Default zone with host-named site collections while allowing you to use alternate access mapping functionality in the other zones for path-based site collections.
You can manually modify host header bindings on the IIS Web site from the IIS Manager, but this is not recommended. Any changes you make using the IIS Manager will not be recorded in SharePoint Foundation 2010. If SharePoint Foundation 2010 tries to provision an IIS Web site on another computer in the farm for the same Web application and zone, the original host header binding is used instead of the modified binding. If you want to modify an existing binding for an IIS Web site, remove the Web application from the zone and then re-extend the Web application into the zone with the binding you want to use.
-
Create a host-named site collection
You must use Windows PowerShell to create a host-named site collection. You cannot use the SharePoint Foundation 2010 Central Administration Web application to create a host-named site collection, but you can use Central Administration to manage the site collection after you have created it.
You can create a host-named site collection by using the Windows PowerShell New-SPSite cmdlet with the -HostHeaderWebApplication parameter, as shown in the following example:
1. To create a host-named site collection using Windows PowerShell, verify that you meet the following minimum requirements: See Add-SPShellAdmin.
2. On the Start menu, click All Programs.
3. Click Microsoft SharePoint 2010 Products.
4. Click SharePoint 2010 Management Shell.
5. From the Windows PowerShell command prompt (that is, PS C:\>), type the following:
New-SPSite http://host.header.site.url -OwnerAlias DOMAIN\username –
HostHeaderWebApplication http://servername
This creates a host-named site collection with the URL http://host.header.site.url in the SharePoint Foundation 2010 Web application with the URL http://servername.
-
Programmatically create a host-named site collection
In addition to using the Windows PowerShell to create host-named sites, you can use the SharePoint Foundation 2010 object model. The following code sample creates the host-named site collection with the URL http://host.header.site.url in the SharePoint Foundation 2010 Web application with the URL http://servername:
SPWebApplication webApp = SPWebApplication.Lookup(new
Uri(“http://www.contoso.com”));
SPSiteCollection sites = webApp.Sites;
SPSite Site = null;
Site = sites.Add(“http://hoster.contoso.com”, “Site_Title”,
“Site_Description”, 1033, “STS#0”, “contoso\owner”,
“Owner_Display_Name”, “Owner_Email”, “contoso\secondaryowner,
“Secondary_Owner_Display_Name”, “Secondary_Owner_Email”, true);
SharePoint Foundation 2010 ships with a set of Web services for various user and administrative tasks. One of these administrative tasks is creating a new site collection. The CreateSite Web service method does not support the creation of host-named site collections. A workaround for this issue is to write a Web service that wraps the API sample code.
-
Use managed paths with host-named site collections
SharePoint Foundation 2010 adds support for managed paths with host-named site collections. Hosters can provide multiple site collections to the same customer with each site collection sharing the customer’s unique host name but differentiated by the URL path after the host name.
Managed paths for host-named site collections are different from managed paths for path-based site collections. Managed paths for host-named site collections do not apply to path-based site collections; nor do managed paths for path-based site collections apply to host-named site collections. Managed paths created for host-named site collections are available to all host-named site collections within the farm regardless of which Web application the host-named site collection is in. You must create a root host-named site collection for a host name before you can create a managed path host-named site collection for that host name.
You can create a managed path for use with host-named site collections by using the Windows PowerShell New-SPManagedPath cmdlet with the -HostHeader parameter, as shown in the following example:
New-SPManagedPath pathname –HostHeader
A host-named site collection created at a managed path is shown in the following example:
New-SPSite http://host.header.site.url/pathname/sitename -OwnerAlias DOMAIN\username -HostHeaderWebApplication http://servername
-
Expose host-named sites over HTTP or SSL
Host-named site collections will use the same protocol scheme as the public URL in the Default zone of their Web application. If you wish to provide the host-named site collections in your Web application over HTTP, ensure that the public URL in the Default zone of your Web application is an HTTP-based URL. If you wish to provide host-named site collections in your Web application over SSL, ensure that the public URL in the Default zone of your Web application is an HTTPS-based URL.
Unlike an earlier version, SharePoint Foundation 2010 does not support a host-named site collection using both HTTP- and SSL-based URLs simultaneously. If some host-named site collections need to be available over HTTP while other host-named site collections need to be available over SSL, separate the host-named site collections into two different Web applications dedicated for that type of access. In this scenario, HTTP host-named site collections should be in a Web application dedicated for HTTP access and SSL host-named site collections should be in a Web application dedicated for SSL access.
-
Configure SSL for host-named site collections
In hosting scenarios, hosters can configure a single Web application with SSL and then create multiple host-named site collections within that Web application. To browse to a site over SSL, a server certificate has to be installed and assigned to the IIS Web site. Each host-named site collection in a Web application will share the single server certificate assigned to the IIS Web site.
Hosters need to acquire a wildcard certificate or subject alternate name certificate and then use a host-named site collection URL policy that matches that certificate. For example, if a hoster acquires a *.contoso.com wildcard certificate, the hoster has to generate host-named site collection URLs such as https://site1.contoso.com, https://site2.contoso.com, and so on, to enable these sites to pass browser SSL validation. However, if customers require unique second-level domain names for their sites, the hoster has to create multiple Web applications rather than multiple host-named site collections.
To configure SSL for host-named site collections, enable SSL when creating the Web application. This will create an IIS Web site with an SSL binding instead of an HTTP binding. After the Web application is created, open IIS Manager and assign a certificate to that SSL binding. You can then create site collections in that Web application.
-
Use host-named site collections with off-box SSL termination
Because SharePoint Foundation 2010 uses the public URL in the Default zone of the Web application to determine whether host-named site collections will be rendered as HTTP or SSL, you can now use host-named site collections with off-box SSL termination. There are 3 requirements to use SSL termination with host-named site collections:
The public URL in the Default zone of the Web application must be an HTTPS-based URL.
The SSL terminator or reverse proxy must preserve the original HTTP host header from the client.
If the client SSL request is sent to the default SSL port (443), then the SSL terminator or reverse proxy must forward the decrypted HTTP request to the front-end Web server on the default HTTP port (80). If the client SSL request is sent to a non-default SSL port, then the SSL terminator or reverse proxy must forward the decrypted HTTP request to the front-end Web server on the same non-default port.
To use host-named site collections with off-box SSL termination, configure your Web application as you normally would for SSL termination and ensure that it meets the requirements described above. In this scenario, SharePoint Foundation 2010 will render links of its host-named site collections in that Web application using HTTPS instead of HTTP.
-
Plan authentication (SharePoint Foundation 2010)
This section describes how to plan for authentication.
In this section:
Plan authentication methods (SharePoint Foundation 2010)
-
Plan authentication methods (SharePoint Foundation 2010)
This article describes the authentication methods and authentication modes that are supported by Microsoft SharePoint Foundation 2010. Authentication is the process of validating a user’s identity. After a user’s identity is validated, the authorization process determines which sites, content, and other features the user can access. Authentication modes determine how accounts are used internally by SharePoint Foundation 2010.
In this article:
Supported authentication methods
Authentication modes — classic or claims-based
Implementing Windows authentication
Implementing forms-based authentication
Implementing SAML token-based authentication
Choosing authentication for LDAP environments
Planning zones for Web applications
Architecture for SAML token-based providers
-
Supported authentication methods
SharePoint Foundation 2010 supports authentication methods that were included in previous versions and also introduces token-based authentication that is based on Security Assertion Markup Language (SAML) as an option. The following table lists the supported authentication methods.
|
Method
|
Examples
|
Notes
|
|
Windows
|
NTLM
Kerberos
Anonymous
Basic
Digest
|
At this time, Windows certificate authentication is not supported.
|
|
Forms-based authentication
|
Lightweight Directory Access Protocol (LDAP)
SQL database or other database
Custom or third-party membership and role providers
|
|
|
SAML token-based authentication
|
Active Directory Federation Services (AD FS) 2.0
Third-party identity provider
Lightweight Directory Access Protocol (LDAP)
|
Supported only with SAML 1.1 that uses the WS-Federation Passive profile.
|
-
Authentication modes — classic or claims-based
SharePoint Foundation 2010 introduces claims-based authentication, which is built on Windows Identity Foundation (WIF). You can use any of the supported authentication methods with claims-based authentication. Or, you can use classic-mode authentication, which supports Windows authentication.
When you create a Web application, you select one of the two authentication modes to use with the Web application, either claims-based or classic-mode.
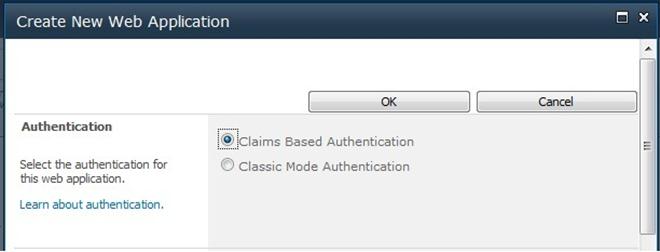
If you select classic-mode, you can implement Windows authentication and the user accounts are treated by SharePoint Foundation 2010 as Active Directory Domain Services (AD DS) accounts.
If you select claims-based authentication, SharePoint Foundation 2010 automatically changes all user accounts to claims identities, resulting in a claims token for each user. The claims token contains the claims pertaining to the user. Windows accounts are converted into Windows claims. Forms-based membership users are transformed into forms-based authentication claims. Claims that are included in SAML-based tokens can be used by SharePoint Foundation 2010. Additionally, SharePoint developers and administrators can augment user tokens with additional claims. For example, user Windows accounts and forms-based accounts can be augmented with additional claims that are used by SharePoint Foundation 2010.
The following chart summarizes the support for authentication types by each authentication mode.
|
Type
|
Classic-mode authentication
|
Claims-based authentication
|
|
Windows
NTLM
Kerberos
Anonymous
Basic
Digest
|
Yes
|
Yes
|
|
Forms-based authentication
LDAP
SQL database or other database
Custom or third-party membership and role providers
|
No
|
Yes
|
|
SAML token-based authentication
AD FS 2.0
Windows Live ID
Third-party identity provider
LDAP
|
No
|
Yes
|
A SharePoint Foundation 2010 farm can include a mix of Web applications that use both modes. Services do not differentiate between user accounts that are traditional Windows accounts and Windows claims accounts. Consequently, a user who belongs to sites that are configured to use a mix of authentication modes will receive search results that include results from all the sites that the user has access to, regardless of the mode that is configured for Web applications. The user is not interpreted as two different user accounts. This is because services and service applications use claims identities for inter-farm communication regardless of the mode that is selected for Web applications and users.
However, users who belong to more than one user repository that is recognized by SharePoint Server Web applications are treated as separate user accounts, depending on which identity they use to log in.
The following guidance will help you decide which mode to select:
For new implementations of SharePoint Foundation 2010, use claims-based authentication. With this option, all supported authentication types are available for Web applications. There is no practical reason to select classic-mode authentication for new deployments, even if your environment includes only Windows accounts. Windows authentication is implemented the same way regardless of the mode that is selected. There are no additional steps to implement Windows authentication when you use the claims-based authentication mode.
If you are upgrading a previous version solution to SharePoint Foundation 2010 and the solution includes only Windows accounts, you can use classic-mode authentication. This lets you use the same design for zones and URLs.
If you are upgrading a solution that requires forms-based authentication, the only option is to upgrade to claims-based authentication.
If you are upgrading from an earlier version to SharePoint Foundation 2010 and you select claims-based authentication, be aware of the following considerations:
Custom code might need to be updated. Web Parts or other custom code that relies on or uses Windows identities will have to be updated. If the custom code uses Windows identities, use classic-mode authentication until the code is updated.
Migrating many Windows users to claims identities takes time. When you change a Web application from classic mode to claims-based during the upgrade process, you must use Windows PowerShell to convert Windows identities to claims identities. This can be a time-consuming process. Be sure to allow enough time during the upgrade process to complete this task.
Search alerts are currently not supported with claims-based authentication.
Claims authentication is built on WIF. WIF is a set of .NET Framework classes that are used to implement claims-based identity. Claims authentication relies on standards such as WS-Federation, WS-Trust, and protocols such as SAML. For more information about claims authentication, see the following resources:
Claims-based Identity for Windows: An Introduction to Active Directory Federation Services 2.0, Windows CardSpace 2.0, and Windows Identity Foundation (white paper) (http://go.microsoft.com/fwlink/?LinkId=198942)
Windows Identity Foundation home page (http://go.microsoft.com/fwlink/?LinkId=198943)
You do not have to be a claims architect to use claims authentication in SharePoint Foundation 2010. However, implementing SAML token-based authentication requires coordination with administrators of your claims-based environment, as described later in this article.
-
Implementing Windows authentication
The process of implementing Windows authentication methods is similar for both authentication modes (classic or claims-based). Choosing claims-based authentication for a Web application does not increase the complexity of implementing Windows authentication methods. This section summarizes the process for each method.
Integrated Windows authentication — Kerberos and NTLM
Both Kerberos protocol and NTLM are Integrated Windows authentication methods, which let clients seamlessly authenticate without being prompted for credentials. Users who access SharePoint sites from Windows Explorer will authenticate by using the credentials the Internet Explorer process is running under. By default, these credentials are the credentials that the user used to log on to the computer. Services or applications that access SharePoint Server in Integrated Windows authentication mode will attempt to authenticate by using the credentials of the running thread, which is the identity of the process by default.
NTLM is the simplest form of Windows authentication to implement. Simply select this option when you are creating a Web application.
Kerberos protocol is a secure protocol that supports ticketing authentication. Use of the Kerberos protocol requires additional configuration of the environment. To enable Kerberos authentication, the client and server computers must have a trusted connection to the domain Key Distribution Center (KDC). Configuring the Kerberos protocol involves setting up service principal names (SPNs) in AD DS before you install SharePoint Foundation 2010.
The following steps summarize the process of configuring Kerberos authentication:
1. Configure Kerberos authentication for SQL communications by creating SPNs in AD DS for the SQL Server service account.
2. Create SPNs for Web applications that will use Kerberos authentication.
3. Install the SharePoint Foundation 2010 farm.
4. Configure specific services within the farm to use specific accounts.
5. Create the Web applications that will use Kerberos authentication.
For more information, see Configure Kerberos authentication (SharePoint Server 2010) (http://technet.microsoft.com/library/3f849874-1580-47d3-af88-042a3494909f(Office.14).aspx).
Additionally, for claims-authentication Web applications, the claims to Windows token service must be configured for constrained delegation. Constrained delegation is required to convert claims to Windows tokens. For environments that include multiple forests, a two-way trust between forests is required to use the claims to Windows token service. For more information about how to configure this service, see Configure Kerberos authentication for the claims to Windows token service (SharePoint Server 2010) (http://technet.microsoft.com/library/9736e391-1dbf-4a37-b95d-3fdaa5baac7d(Office.14).aspx).
Kerberos authentication allows delegation of client credentials to access back-end data systems, which requires additional configuration depending on the scenario. The following table provides examples.
|
Scenario
|
Additional configuration
|
|
Delegating a client’s identity to a back-end server.
Displaying RSS feeds to authenticated content.
|
Configure Kerberos constrained delegation for computers and service accounts.
|
|
Identity delegation for Microsoft SQL Server Reporting Services (SSRS)
|
Configure SPNs for SQL Server Reporting Services accounts.
Configure delegation for SQL Server Reporting Services.
|
|
Identity delegation for Excel Services in SharePoint
|
Configure constrained delegation for servers that run Excel Services.
Configure constrained delegation for the Excel Services service account.
|
For more information about how to configure Kerberos authentication, including configuration steps for common scenarios, see Configuring Kerberos Authentication for Microsoft SharePoint 2010 Products and Technologies (white paper) (http://go.microsoft.com/fwlink/?LinkID=197178).
Digest and Basic
Implementing Digest and Basic authentication requires configuring these authentication methods directly in Internet Information Services (IIS).
-
Implementing forms-based authentication
Forms-based authentication is an identity management system that is based on ASP.NET membership and role provider authentication. In SharePoint Foundation 2010, forms-based authentication is available only when you use claims-based authentication.
Forms-based authentication can be used against credentials stored in AD DS, in a database such as a SQL Server database, or in an LDAP data store such as Novell eDirectory, Novell Directory Services (NDS), or Sun ONE. Forms-based authentication enables user authentication based on validation of credential input from a logon form. Unauthenticated requests are redirected to a logon page, where the user must provide valid credentials and submit the form. If the request can be authenticated, the system issues a cookie that contains a key for reestablishing the identity for subsequent requests.
To use forms-based authentication to authenticate users against an identity management system that is not based on Windows or that is external, you must register the membership provider and role manager in the Web.config file. Registering the role manager is a new requirement for SharePoint Foundation 2010. In the previous version, this was optional. SharePoint Foundation 2010 uses the standard ASP.NET role manager interface to gather group information about the current user. Each ASP.NET role is treated as a domain group by the authorization process in SharePoint Foundation 2010. You register role managers in the Web.config file the same way that you register membership providers for authentication.
If you want to manage membership users or roles from the SharePoint Central Administration Web site, you must register the membership provider and the role manager in the Web.config file for the Central Administration Web site. You must also register the membership provider and the role manager in the Web.config file for the Web application that hosts the content.
For more information about how to configure forms-based authentication, see the following resources:
TechNet article: Configure forms-based authentication for a claims-based Web application (SharePoint Server 2010) (http://technet.microsoft.com/library/fd1391bb-c787-4742-b007-bf57e18dad66(Office.14).aspx)
MSDN blog article: Claims-based authentication “Cheat Sheet” Part 1 (http://go.microsoft.com/fwlink/?LinkId=198944)
MSDN article: Forms Authentication in SharePoint Products and Technologies (Part 2): Membership and Role Provider Samples (http://go.microsoft.com/fwlink/?LinkId=198945)
-
Implementing SAML token-based authentication
SAML token-based authentication requires coordination with administrators of a claims-based environment, whether it is your own internal environment or a partner environment. AD FS 2.0 is an example of a claims-based environment.
A claims-based environment includes an identity provider security token service (IP-STS). The IP-STS issues SAML tokens on behalf of users who are included in the associated user directory. Tokens can include any number of claims about a user, such as a user name and groups the user belongs to.
SharePoint Foundation 2010 takes advantage of claims that are included in tokens provided by an IP-STS to authorize users. In claims environments, an application that accepts SAML tokens is known as a relying party STS (RP-STS). A relying party application receives the SAML token and uses the claims inside to decide whether to grant the client access to the requested resource. In SharePoint 2010 Products, each Web application that is configured to use a SAML provider is added to the IP-STS server as a separate RP-STS entry. A SharePoint farm can include multiple RP-STS entries.
Implementing SAML token-based authentication with SharePoint 2010 Products involves the following processes that require advance planning:
1. Export the token-signing certificate from the IP-STS. This certificate is known as the ImportTrustCertificate. Copy the certificate to a server computer in the SharePoint Foundation 2010 farm.
2. Define the claim that will be used as the unique identifier of the user. This is known as the identity claim. Many examples of this process use the user e-mail name as the user identifier. Coordinate with the administrator of the IP-STS to determine the correct identifier because only the owner of the IP-STS knows which value in the token will always be unique per user. Identifying the unique identifier for the user is part of the claims-mapping process. Claims mappings are created by using Windows PowerShell.
3. Define additional claims mappings. Define which additional claims from the incoming token will be used by the SharePoint Foundation 2010 farm. User roles are an example of a claim that can be used to permission resources in the SharePoint Foundation 2010 farm. All claims from an incoming token that do not have a mapping will be discarded.
4. Create a new authentication provider by using Windows PowerShell to import the token-signing certificate. This process creates the SPTrustedIdentityTokenIssuer. During this process, you specify the identity claim and additional claims that you have mapped. You must also create and specify a realm that is associated with the first SharePoint Web applications that you are configuring for SAML token-based authentication. After the SPTrustedIdentityTokenIssuer is created, you can create and add more realms for additional SharePoint Web applications. This is how you configure multiple Web applications to use the same SPTrustedIdentityTokenIssuer.
5. For each realm that is added to the SPTrustedIdentityTokenIssuer, you must create an RP-STS entry on the IP-STS. This can be done before the SharePoint Web application is created. Regardless, you must plan the URL before you create the Web applications.
6. Create a new SharePoint Web application and configure it to use the newly created authentication provider. The authentication provider will appear as an option in Central Administration when claims mode is selected for the Web application.
You can configure multiple SAML token-based authentication providers. However, you can only use a token-signing certificate once in a farm. All providers that are configured will appear as options in Central Administration. Claims from different trusted STS environments will not conflict.
If you are implementing SAML token-based authentication with a partner company and your own environment includes an IP-STS, we recommend that you work with the administrator of your internal claims environment to establish a trust relationship from your internal IP-STS to the partner STS. This approach does not require adding an additional authentication provider to your SharePoint Foundation 2010 farm. It also allows your claims administrators to manage the whole claims environment.
 Note:
Note:
If you use SAML token-based authentication with AD FS on a SharePoint Foundation 2010 farm that has multiple Web servers in a load-balanced configuration, there might be an effect on the performance and functionality of client Web-page views. When AD FS provides the authentication token to the client, that token is submitted to SharePoint Foundation 2010 for each permission-restricted page element. If the load-balanced solution is not using affinity, each secured element is authenticated to more than one SharePoint Foundation 2010 server, which might result in rejection of the token. After the token is rejected, SharePoint Foundation 2010 redirects the client to reauthenticate back to the AD FS server. After this occurs, an AD FS server might reject multiple requests that are made in a short time period. This behavior is by design, to protect against a denial of service attack. If performance is adversely affected or pages do not load completely, consider setting network load balancing to single affinity. This isolates the requests for SAML tokens to a single Web server.
For more information about how to configure SAML token-based authentication, see the following resources:
TechNet article: Configure authentication using a SAML security token (SharePoint Server 2010) (http://technet.microsoft.com/library/33a9bbc3-fcf5-4aaa-97ec-cd1c7a44d279(Office.14).aspx)
MSDN blog article: Claims-based authentication “Cheat Sheet” Part 2 (http://go.microsoft.com/fwlink/?LinkId=198946)
TechNet blog article: Planning Considerations for Claims Based Authentication in SharePoint 2010 (http://go.microsoft.com/fwlink/?LinkId=198947)
TechNet blog article: Creating both an Identity and Role Claim for a SharePoint 2010 Claims Auth Application (http://go.microsoft.com/fwlink/?LinkId=198948)
TechNet blog article: How to Create Multiple Claims Auth Web Apps in a Single SharePoint 2010 Farm (http://go.microsoft.com/fwlink/?LinkId=198949)
-
Choosing authentication for LDAP environments
LDAP environments can be implemented by using either forms-based authentication or SAML token-based authentication. We recommend that you use forms-based authentication because it is less complex. However, if the environment supports WS-Federation 1.1 and SAML Token 1.1, then SAML is recommended. Profile synchronization is not supported with LDAP providers that are not associated with ADFS 2.0.
-
Planning zones for Web applications
Zones represent different logical paths for gaining access to the same sites in a Web application. Each Web application can include as many as five zones. When a Web application is created, the default zone is created. Additional zones are created by extending the Web application and selecting one of the remaining zone names: intranet, extranet, Internet, or custom.
In previous versions, zones are used to implement different types of authentication for users coming from different networks or authentication providers. In the current version, claims authentication allows multiple types of authentication to be implemented on the same zone.
Your plan for zones will depend on which of the following modes is selected for a Web application:
Classic mode — Similar to previous versions, only one type of authentication can be implemented per zone. However, in the current version, only Windows authentication can be implemented when classic mode is selected. Consequently, multiple zones can be used only to implement multiple types of Windows authentication, or to implement the same type of Windows authentication against different Active Directory stores.
Claims authentication — Multiple authentication providers can be implemented on a single zone. Multiple zones can be used also.
Implementing more than one type of authentication on a single zone
If you are using claims authentication and implementing more than one type of authentication, we recommend that you implement multiple types of authentication on the default zone. This results in the same URL for all users.
When you are implementing multiple types of authentication on the same zone, the following restrictions apply:
Only one instance of forms-based authentication can be implemented on a zone.
Central Administration allows you to use both an Integrated Windows method and Basic at the same time. Otherwise, more than one type of Windows authentication cannot be implemented on a zone.
If multiple SAML token-based authentication providers are configured for a farm, these will all appear as options when you create a Web application or a new zone. Multiple SAML providers can be configured on the same zone.
The following diagram illustrates multiple types of authentication implemented on the default zone for a partner collaboration site.
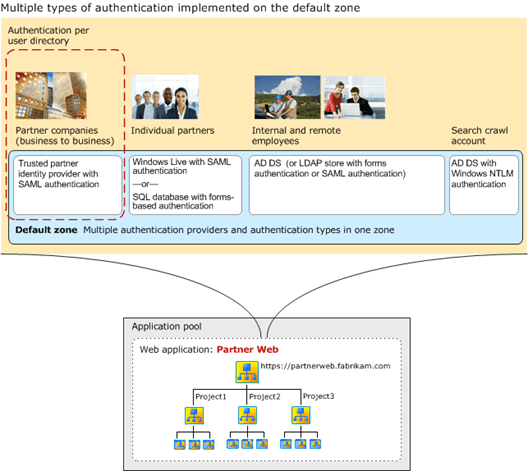
In the diagram, users from different directory stores access the partner Web site by using the same URL. A dashed box surrounding partner companies shows the relationship between the user directory and the authentication type that is configured in the default zone. For more information about this design example, see Design sample: Corporate deployment (SharePoint Server 2010) (http://technet.microsoft.com/library/1cffb278-6497-46fc-abd0-3dd652064c89(Office.14).aspx).
Planning for crawling content
The crawl component requires access to content using NTLM. At least one zone must be configured to use NTLM authentication. If NTLM authentication is not configured on the default zone, the crawl component can use a different zone that is configured to use NTLM authentication.
Implementing more than one zone
If you plan to implement more than one zone for Web applications, use the following guidelines:
Use the default zone to implement your most secure authentication settings. If a request cannot be associated with a specific zone, the authentication settings and other security policies of the default zone are applied. The default zone is the zone that is created when you initially create a Web application. Typically, the most secure authentication settings are designed for end-user access. Consequently, end users are likely to access the default zone.
Use the minimum number of zones that are required to provide access to users. Each zone is associated with a new IIS site and domain for accessing the Web application. Only add new access points when these are required.
Ensure that at least one zone is configured to use NTLM authentication for the crawl component. Do not create a dedicated zone for the index component unless it is necessary.
The following diagram illustrates multiple zones that are implemented to accommodate different authentication types for a partner collaboration site.

In the diagram, the default zone is used for remote employees. Each zone has a different URL associated with it. Employees use a different zone depending on whether they are working in the office or are working remotely.
For more information about this design example, see Design sample: Corporate deployment (SharePoint Server 2010) (http://technet.microsoft.com/library/1cffb278-6497-46fc-abd0-3dd652064c89(Office.14).aspx).
-
Architecture for SAML token-based providers
The architecture for implementing SAML token-based providers includes the following components:
SharePoint security token service This service creates the SAML tokens that are used by the farm. The service is automatically created and started on all servers in a server farm. The service is used for inter-farm communication because all inter-farm communication uses claims authentication. This service is also used for authentication methods that are implemented for Web applications that use claims authentication, including Windows authentication, forms-based authentication, and SAML token-based authentication. You must configure the security token service during the deployment process. For more information, see Configure the security token service (SharePoint Server 2010) (http://technet.microsoft.com/library/156cbd50-a05b-4490-b869-f74e2fc0e09d(Office.14).aspx).
Token-signing certificate (ImportTrustCertificate) This is the certificate that is exported from an IP-STS. The certificate is copied to one server in the farm. Once you use this certificate to create an SPTrustedIdentityTokenIssuer, you cannot use it again to create another one. If you want to use the certificate to create a different SPTrustedIdentityTokenIssuer, you must delete the existing one first. Before you delete an existing one, you must disassociate it from any Web applications that may be using it.
Identity claim The identity claim is the claim from a SAML token that is the unique identifier of the user. Only the owner of the IP-STS knows which value in the token will always be unique for each user. The identity claim is created as a regular claims mapping during the process of mapping all desired claims. The claim that serves as the identity claim is declared when the SPTrustedIdentityTokenIssuer is created.
Other claims These claims consist of additional claims from a SAML ticket that describe users. These can include user roles, user groups, or other kinds of claims such as age. All claims mappings are created as objects that are replicated across the servers in a SharePoint Foundation farm.
Realm In the SharePoint claims architecture, the URI or URL that is associated with a SharePoint Web application that is configured to use a SAML token-based provider represents a realm. When you create a SAML-based authentication provider on the farm, you specify the realms, or Web application URLs, that you want the IP-STS to recognize, one at a time. The first realm is specified when you create the SPTrustedIdentityTokenIssuer. Additional realms can be added after the SPTrustedIdentityTokenIssuer is created. Realms are specified by using syntax similar to the following: $realm = “urn:sharepoint:mysites”. After you add the realm to the SPTrustedIdentityTokenIssuer, you must create an RP-STS trust with the realm on the IP-STS server. This process involves specifying the URL for the Web application.
SPTrustedIdentityTokenIssuer This is the object that is created on the SharePoint farm that includes the values necessary to communicate with and receive tokens from the IP-STS. When you create the SPTrustedIdentityTokenIssuer, you specify which token-signing certificate to use, the first realm, the claim that represents the identity claim, and any additional claims. You can only associate a token-signing certificate from an STS with one SPTrustedIdentityTokenIssuer. However, after you create the SPTrustedIdentityTokenIssuer, you can add more realms for additional Web applications. After a realm is added to the SPTrustedIdentityTokenIssuer, it must also be added to the IP-STS as a relying party. The SPTrustedIdentityTokenIssuer object is replicated across servers in the SharePoint Foundation farm.
Relying party security token service (RP-STS) In SharePoint Foundation 2010, each Web application that is configured to use a SAML provider is added to the IP-STS server as an RP-STS entry. A SharePoint Foundation farm can include multiple RP-STS entries.
Identity provider security token service (IP-STS) This is the secure token service in the claims environment that issues SAML tokens on behalf of users who are included in the associated user directory.
The following diagram illustrates the SharePoint 2010 Products claims architecture.
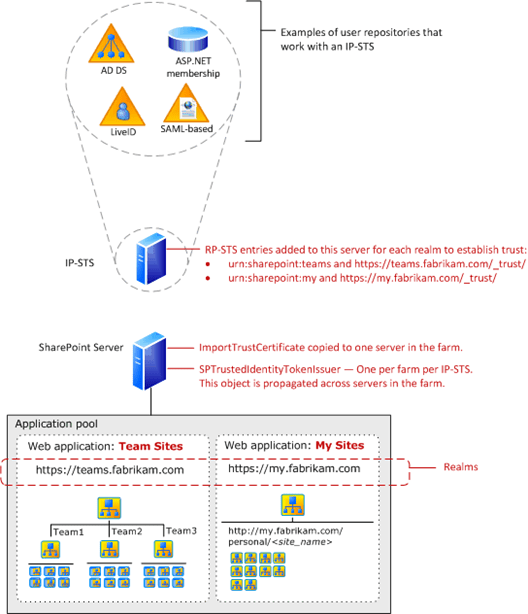
The SPTrustedIdentityTokenIssuer object is created by using several parameters. The following diagram illustrates the key parameters.
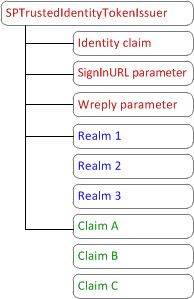
As the diagram illustrates, an SPTrustedIdentityTokenIssuer can include only one identity claim, one SignInURL parameter, and one Wreply parameter. However, it can include multiple realms and multiple claims mappings. The SignInURL parameter specifies the URL to redirect a user request to in order to authenticate to the IP-STS. Some IP-STS servers require the Wreply parameter, which is set to either true or false and is false by default. Only use the Wreply parameter if it is required by the IP-STS.
-
Plan security hardening (SharePoint Foundation 2010)
This article describes security hardening for Microsoft SharePoint Foundation 2010 Web server, application server, and database server roles, and gives detailed guidance about the specific hardening requirements for ports, protocols, and services in Microsoft SharePoint 2010 Products.
In this article:
Secure server snapshots (http://technet.microsoft.com/library/7dcb6a86-f9d4-4c0f-b7c6-fa12a47029c4.aspx#ServerSnapshots)
Specific port, protocol, and service guidance
-
Secure server snapshots
In a server farm environment, individual servers play specific roles. Security hardening recommendations for these servers depend on the role each server plays. This article contains secure snapshots for two categories of server roles:
Web server and application server roles
Database server role
The snapshots are divided into common configuration categories. The characteristics defined for each category represent the optimal hardened state for Microsoft SharePoint 2010 Products. This article does not include hardening guidance for other software in the environment.
-
Web server and application server roles
This section identifies hardening characteristics for Web servers and application servers. Some of the guidance applies to specific service applications; in these cases, the corresponding characteristics need to be applied only on the servers that are running the services associated with the specified service applications.
|
Category
|
Characteristic
|
|
Services listed in the Services MMC snap-in
|
Enable the following services:
File and Printer Sharing
World Wide Web Publishing Service
Ensure that these services are not disabled:
Claims to Windows Token Service
SharePoint 2010 Administration
SharePoint 2010 Timer
SharePoint 2010 Tracing
SharePoint 2010 VSS Writer
Ensure that these services are not disabled on the servers that host the corresponding roles:
SharePoint 2010 User Code Host
SharePoint Foundation Search V4
|
|
Ports and protocols
|
TCP 80, TCP 443 (SSL)
File and Printer Sharing service —either of the following, used by search roles:
Direct-hosted SMB (TCP/UDP 445) — this is the recommended port
NetBIOS over TCP/IP (NetBT) (TCP/UDP ports 137, 138, 139) — disable this port if you do not use it
Ports required for communication between Web servers and service applications (the default is HTTP):
HTTP binding: 32843
HTTPS binding: 32844
net.tcp binding: 32845 (only if a third party has implemented this option for a service application)
UDP port 1434 and TCP port 1433 — default ports for SQL Server communication. If these ports are blocked on the SQL Server computer (recommended) and databases are installed on a named instance, configure a SQL Server client alias for connecting to the named instance.
TCP/IP 32846 for the Microsoft SharePoint Foundation User Code Service (for sandbox solutions) — This port must be open for outbound connections on all Web servers. This port must be open for inbound connections on Web servers or application servers where this service is turned on.
Ensure that ports remain open for Web applications that are accessible to users.
Block external access to the port that is used for the Central Administration site.
TCP/25 (SMTP for e-mail integration)
|
|
Registry
|
No additional guidance
|
|
Auditing and logging
|
If log files are relocated, ensure that the log file locations are updated to match. Update directory access control lists (ACLs) also.
|
|
Code access security
|
Ensure that you have a minimal set of code access security permissions enabled for your Web application. The <trust> element in the Web.config file for each Web application should be set to WSS_Minimal (where WSS_Minimal has its low defaults as defined in 14\config\wss_minimaltrust.config or by your own custom policy file, which is minimally set.)
|
|
Web.config
|
Follow these recommendations for each Web.config file that is created after you run Setup:
Do not allow compilation or scripting of database pages via the PageParserPaths elements.
Ensure <SafeMode> CallStack=””false”” and AllowPageLevelTrace=””false””.
Ensure that the Web Part limits around maximum controls per zone is set low.
Ensure that the SafeControls list is set to the minimum set of controls needed for your sites.
Ensure that your Workflow SafeTypes list is set to the minimum level of SafeTypes needed.
Ensure that customErrors is turned on (<customErrors mode=””On””/>).
Consider your Web proxy settings as needed (<system.net>/<defaultProxy>).
Set the Upload.aspx limit to the highest size you reasonably expect users to upload (default is 2 GB). Performance can be affected by uploads that exceed 100 MB.
|
The primary recommendation forSharePoint 2010 Products is to secure inter-farm communication by blocking the default ports used for Microsoft SQL Server communication and establishing custom ports for this communication instead. For more information about how to configure ports for SQL Server communication, see Blocking the standard SQL Server ports, later in this article.
|
Category
|
Characteristic
|
|
Ports
|
Block UDP port 1434.
Consider blocking TCP port 1433.
|
This article does not describe how to secure SQL Server. For more information about how to secure SQL Server, see Securing SQL Server (http://go.microsoft.com/fwlink/?LinkId=186828).
-
Specific port, protocol, and service guidance
The rest of this article describes in greater detail the specific hardening requirements for SharePoint 2010 Products.
In this section:
Blocking the standard SQL Server ports
Service application communication
File and Printer Sharing service requirements
User Profile service hardening requirements
Connections to external servers
Service requirements for e-mail integration
Service requirements for session state
SharePoint 2010 Products services
Web.config file
-
Blocking the standard SQL Server ports
The specific ports used to connect to SQL Server are affected by whether databases are installed on a default instance of SQL Server or a named instance of SQL Server. The default instance of SQL Server listens for client requests on TCP port 1433. A named instance of SQL Server listens on a randomly assigned port number. Additionally, the port number for a named instance can be reassigned if the instance is restarted (depending on whether the previously assigned port number is available).
By default, client computers that connect to SQL Server first connect by using TCP port 1433. If this communication is unsuccessful, the client computers query the SQL Server Resolution Service that is listening on UDP port 1434 to determine the port on which the database instance is listening.
The default port-communication behavior of SQL Server introduces several issues that affect server hardening. First, the ports used by SQL Server are well-publicized ports and the SQL Server Resolution Service has been the target of buffer overrun attacks and denial-of-service attacks, including the “Slammer” worm virus. Even if SQL Server is updated to mitigate security issues in the SQL Server Resolution Service, the well-publicized ports remain a target. Second, if databases are installed on a named instance of SQL Server, the corresponding communication port is randomly assigned and can change. This behavior can potentially prevent server-to-server communication in a hardened environment. The ability to control which TCP ports are open or blocked is essential to securing your environment.
Consequently, the recommendation for a server farm is to assign static port numbers to named instances of SQL Server and to block UDP port 1434 to prevent potential attackers from accessing the SQL Server Resolution Service. Additionally, consider reassigning the port used by the default instance and blocking TCP port 1433.
There are several methods you can use to block ports. You can block these ports by using a firewall. However, unless you can be sure that there are no other routes into the network segment and that there are no malicious users that have access to the network segment, the recommendation is to block these ports directly on the server that hosts SQL Server. This can be accomplished by using Windows Firewall in Control Panel.
-
Configuring SQL Server database instances to listen on a nonstandard port
SQL Server provides the ability to reassign the ports that are used by the default instance and any named instances. In SQL Server 2005 and SQL Server 2008, you reassign ports by using SQL Server Configuration Manager.
-
Configuring SQL Server client aliases
In a server farm, all front-end Web servers and application servers are SQL Server client computers. If you block UDP port 1434 on the SQL Server computer, or you change the default port for the default instance, you must configure a SQL Server client alias on all servers that connect to the SQL Server computer.
To connect to an instance of SQL Server 2005 or SQL Server 2008, you install SQL Server client components on the target computer and then configure the SQL Server client alias by using SQL Server Configuration Manager. To install SQL Server client components, run Setup and select only the following client components to install:
Connectivity Components
Management Tools (includes SQL Server Configuration Manager)
For specific hardening steps for blocking the standard SQL ports, see Harden SQL Server for SharePoint environments (SharePoint Foundation 2010) (http://technet.microsoft.com/library/2b390dec-8719-4d18-b283-f97140dfea92(Office.14).aspx).
-
Service application communication
By default, communication between Web servers and service applications within a farm takes place by using HTTP with a binding to port 32843. When you publish a service application, you can select either HTTP or HTTPS with the following bindings:
HTTP binding: port 32843
HTTPS binding: port 32844
Additionally, third parties that develop service applications can implement a third choice:
net.tcp binding: port 32845
You can change the protocol and port binding for each service application. On the Service Applications page in Central Administration, select the service application, and then click Publish.
Communication between service applications and SQL Server takes place over the standard SQL Server ports or the ports that you configure for SQL Server communication.
-
File and Printer Sharing service requirements
Several core features depend on the File and Printer Sharing service and the corresponding protocols and ports. These include, but are not limited to, the following:
Search queries All search queries require the File and Printer Sharing service.
Crawling and indexing content To crawl content, servers that include crawl components send requests through the front-end Web server. The front-end Web server communicates with content databases directly and sends results back to the servers that include crawl components. This communication requires the File and Printer Sharing service.
The File and Printer Sharing service requires the use of named pipes. Named pipes can communicate by using either direct-hosted SMB or NetBT protocols. For a secure environment, direct-hosted SMB is recommended instead of NetBT. The hardening recommendations provided in this article assume that SMB is used.
The following table describes the hardening requirements that are introduced by the dependency on the File and Printer Sharing service.
|
Category
|
Requirements
|
Notes
|
|
Services
|
File and Printer Sharing
|
Requires the use of named pipes.
|
|
Protocols
|
Named pipes that use direct-hosted SMB
Disable NetBT
|
Named pipes can use NetBT instead of direct-hosted SMB. However, NetBT is not considered as secure as direct-hosted SMB.
|
|
Ports
|
Either of the following:
Direct-hosted SMB (TCP/UDP 445) — recommended
NetBT (TCP/UDP ports 137, 138, 139)
|
Disable NetBT (ports 137, 138, and 139) if it is not being used
|
For more information about how to disable NetBT, see the Microsoft Knowledge Base article 204279, Direct hosting of SMB over TCP/IP (http://go.microsoft.com/fwlink/?LinkId=76143).
-
Service requirements for e-mail integration
E-mail integration requires the use of two services:
SMTP service
Microsoft SharePoint Directory Management service
E-mail integration requires the use of the Simple Mail Transfer Protocol (SMTP) service on at least one of the front-end Web servers in the server farm. The SMTP service is required for incoming e-mail. For outgoing e-mail, you can either use the SMTP service or route outgoing email through a dedicated e-mail server in your organization, such as a Microsoft Exchange Server computer.
-
Microsoft SharePoint Directory Management service
SharePoint 2010 Products include an internal service, the Microsoft SharePoint Directory Management Service, for creating e-mail distribution groups. When you configure e-mail integration, you have the option to enable the Directory Management Service feature, which lets users create distribution lists. When users create a SharePoint group and they select the option to create a distribution list, the Microsoft SharePoint Directory Management Service creates the corresponding Active Directory distribution list in the Active Directory environment.
In security-hardened environments, the recommendation is to restrict access to the Microsoft SharePoint Directory Management Service by securing the file associated with this service, which is SharePointEmailws.asmx. For example, you might allow access to this file by the server farm account only.
Additionally, this service requires permissions in the Active Directory environment to create Active Directory distribution list objects. The recommendation is to set up a separate organizational unit (OU) in Active Directory for SharePoint 2010 Products objects. Only this OU should allow write access to the account that is used by the Microsoft SharePoint Directory Management Service.
-
SharePoint 2010 Products services
Do not disable services that are installed by SharePoint 2010 Products (listed in the snapshot previously).
If your environment disallows services that run as a local system, you can consider disabling the SharePoint 2010 Administration service only if you are aware of the consequences and can work around them. This service is a Win32 service that runs as a local system.
This service is used by the SharePoint 2010 Timer service to perform actions that require administrative permissions on the server, such as creating Internet Information Services (IIS) Web sites, deploying code, and stopping and starting services. If you disable this service, you cannot complete deployment-related tasks from the Central Administration site. You must use Windows PowerShell to run the Start-SPAdminJob (http://technet.microsoft.com/library/a96146cd-9973-4680-9a0b-d91ec51200d5(Office.14).aspx) cmdlet (or use the Stsadm.exe command-line tool to run the execadmsvcjobs operation) to complete multiple-server deployments for SharePoint 2010 Products and to run other deployment-related tasks.
The .NET Framework, and ASP.NET in particular, use XML-formatted configuration files to configure applications. The .NET Framework relies on configuration files to define configuration options. The configuration files are text-based XML files. Multiple configuration files can, and typically do, exist on a single system.
System-wide configuration settings for the .NET Framework are defined in the Machine.config file. The Machine.config file is located in the %SystemRoot%\Microsoft.NET\Framework\%VersionNumber%\CONFIG\ folder. The default settings that are contained in the Machine.config file can be modified to affect the behavior of applications that use the .NET Framework on the whole system.
You can change the ASP.NET configuration settings for a single application if you create a Web.config file in the root folder of the application. When you do this, the settings in the Web.config file override the settings in the Machine.config file.
When you extend a Web application by using Central Administration, SharePoint 2010 Products automatically create a Web.config file for the Web application.
The Web server and application server snapshot presented earlier in this article lists recommendations for configuring Web.config files. These recommendations are intended to be applied to each Web.config file that is created, including the Web.config file for the Central Administration site.
For more information about ASP.NET configuration files and editing a Web.config file, see ASP.NET Configuration (http://go.microsoft.com/fwlink/?LinkID=73257).
-
Plan automatic password change (SharePoint Foundation 2010)
To simplify password management, the automatic password change feature enables you to update and deploy passwords without having to perform manual password update tasks across multiple accounts, services, and Web applications. You can configure the automatic password change feature to determine if a password is about to expire and reset the password using a long, cryptographically-strong random string. To implement the automatic password change feature, you have to configure managed accounts.
In this article:
Configuring managed accounts
Resetting passwords automatically on a schedule
Detecting password expiration
Resetting the account password immediately
Synchronizing SharePoint Foundation account passwords with Active Directory Domain Services
Resetting all passwords immediately
Credential change process
-
Configuring managed accounts
Microsoft SharePoint Foundation 2010 supports the creation of managed accounts to improve security and ensure application isolation. Using managed accounts, you can configure the automatic password change feature to deploy passwords across all services in the farm. You can configure SharePoint Web applications and services, running on application servers in a SharePoint farm, to use different domain accounts. You can create multiple accounts in Active Directory Domain Services (AD DS), and then register each of these accounts in SharePoint Foundation 2010. You can map managed accounts to various services and Web applications in the farm.
-
Resetting passwords automatically on a schedule
Prior to the implementation of the automatic password change feature, updating passwords required resetting each account password in AD DS and then manually updating account passwords on all of the services running on all the computers in the farm. To do this, you had to run the Stsadm command-line tool or use the SharePoint Central Administration Web application. Using the automatic password change feature, you can now register managed accounts and enable SharePoint Foundation 2010 to control account passwords. Users have to be notified about planned password changes and related service interruptions, but the accounts used by a SharePoint farm, Web applications, and various services can be automatically reset and deployed within the farm as necessary, based on individually configured password reset schedules.
-
Detecting password expiration
IT departments typically impose a policy requiring that all domain account passwords be reset on a regular basis, for example, every 60 days. SharePoint Foundation 2010 can be configured to detect imminent password expiration, and send an e-mail notification to a designated administrator. Even without administrator intervention, SharePoint Foundation 2010 can be configured to generate and reset passwords automatically. The automatic password reset schedule is also configurable to ensure that the impact of possible service interruptions during a password reset will be minimal.
-
Resetting the account password immediately
You can always override any automatic password reset schedule and force an immediate service account password reset, using a specific password value. In this scenario, the password for the service account can also be changed in AD DS by SharePoint Foundation 2010. The new password is then immediately propagated to other servers in the farm.
-
Synchronizing SharePoint Foundation account passwords with Active Directory Domain Services
If AD DS and SharePoint Foundation 2010 account passwords are not synchronized, services in the SharePoint farm will not start. If an Active Directory administrator changes an Active Directory account password without coordinating the password change with a SharePoint administrator, there is a risk of service interruptions. In this scenario, a SharePoint administrator can immediately reset the password from the Account Management page using the password value that was changed in AD DS. The password is updated and immediately propagated to the other servers in the SharePoint farm.
-
Resetting all passwords immediately
If an administrator suddenly leaves your organization, or if the service account passwords need to be immediately reset for any other reason, you can quickly create a Windows PowerShell script that calls the password change cmdlets. You can use the script to generate new random passwords and deploy the new passwords immediately.
-
Credential change process
When SharePoint Foundation 2010 changes the credentials for a managed account, the credential change process will occur on one server in the farm. Each server in the farm will be notified that the credentials are about to change and servers can perform critical pre-change actions, if necessary. If the account password has not yet been changed, then SharePoint Foundation 2010 will attempt to change the password using either a manually entered password, or a long, cryptographically-strong random string. The complexity settings will be queried from the appropriate policy (network or local), and the generated password will be equivalent to the detected settings.SharePoint Foundation 2010 will attempt to commit a password change. If it is unable to commit the password change, it will retry, using a new sequence, for a specified number of times. If the account password update process succeeds, it will proceed to the next dependent service, where it will again attempt to commit a password change. If it does not ultimately succeed, each dependent service will be notified that they can resume normal activity. Either success in committing a password change or failure to commit will result in the generation of an automated password change status notification that will be sent by e-mail to farm administrators.
Configure automatic password change (SharePoint Foundation 2010) (http://technet.microsoft.com/library/a1784b2d-68a4-409d-a8fa-35d0ab885e24(Office.14).aspx)
-
SQL Server and storage (SharePoint Foundation 2010)
This section describes how to plan for Microsoft SQL Server and storage configuration for Microsoft SharePoint Foundation 2010.
In this section:
Overview of SQL Server in a SharePoint environment (SharePoint Foundation 2010)
This article describes the relationship between SharePoint Foundation 2010 and supported versions of SQL Server. It also describes how you can interact with the databases, and introduces ways of using the reporting and business intelligence (BI) features of SQL Server with SharePoint Foundation 2010.
Overview of Remote BLOB Storage (SharePoint Foundation 2010)
This article describes how SharePoint Foundation 2010 works with remote BLOB storage.
Plan for remote BLOB storage (RBS) (SharePoint Foundation 2010)
This article describes the factors to consider when moving to a remote BLOB storage solution.
-
Overview of SQL Server in a SharePoint environment (SharePoint Foundation 2010)
This article describes the relationship between Microsoft SharePoint Foundation 2010 and supported versions of Microsoft SQL Server. It also describes how you can interact with the databases, and it introduces ways of using the reporting and business intelligence (BI) features of SQL Server with SharePoint Foundation 2010.
For more information about the supported versions of SQL Server, see Hardware and software requirements (SharePoint Foundation 2010).
In this article:
SharePoint 2010 Products and the SQL Server database engine
SQL Server as a data platform for business intelligence in SharePoint 2010 Products
-
SharePoint 2010 Products and the SQL Server database engine
SharePoint Foundation 2010 is an application that is built on the SQL Server database engine. Most content and settings in SharePoint Foundation 2010 are stored in relational databases. SharePoint Foundation 2010 uses the following kinds of databases:
Configuration The Configuration database and Central Administration content database are called configuration databases. They contain data about farm settings such as the databases used, Internet Information Services (IIS) Web sites or web applications, solutions, Web Part packages, site templates, default quota, and blocked file types. A farm can only have one set of configuration databases.
Content Content databases store all site content: site documents, such as files in document libraries, list data; Web Part properties; and user names and rights. All the data for a specific site resides in one content database. Each Web application can contain many content databases. Each site collection can be associated with only one content database, although a content database can be associated with many site collections.
Service application Service application databases store data for use by a service application. The databases for service applications vary significantly in what they are used for.
For a full list of all of the databases that support SharePoint Foundation 2010, see Database types and descriptions (SharePoint Server 2010) (http://technet.microsoft.com/library/9b1e8b21-7675-4186-beb6-3adeef4360e6(Office.14).aspx).Database types and descriptions (SharePoint Foundation 2010) (http://technet.microsoft.com/library/da66a206-369d-46bc-b974-cf3564baadff(Office.14).aspx).
-
Working with the SQL Server databases that support SharePoint 2010 Products
The SQL Server databases that support SharePoint Foundation 2010 can be created either by SharePoint Foundation 2010, or by a database administrator. For more information, see Deploy by using DBA-created databases (SharePoint Foundation 2010) (http://technet.microsoft.com/library/c7647e52-2178-4d3d-9376-84b2c9a35a1e(Office.14).aspx).
Microsoft does not support directly querying or modifying the databases that support SharePoint Foundation 2010, except for the Usage and Health Data Collection service application database, which can be queried directly and can have its schema added to.
The SQL Server databases that support SharePoint Foundation 2010 are subject to sizing limitations and to configuration recommendations that are not standard for SQL Server.
-
SQL Server as a data platform for business intelligence in SharePoint 2010 Products
SharePoint Foundation 2010 can be used with SQL Server BI tools to analyze and display BI data in meaningful ways. SQL Server provides the primary data infrastructure and business intelligence platform that gives report authors and business users trusted, scalable, and secure data.
The following sections describe the technologies and features in SQL Server that support business intelligence functionality and features in SharePoint Foundation 2010.
-
SQL Server database engine
The SQL Server database engine is the core service for storing, processing, and securing data. BI data can be collected from the SQL Server database engine. For more information, see SQL Server Database Engine (http://go.microsoft.com/fwlink/?LinkId=199540).
-
SQL Server Analysis Services (SSAS): multi-dimensional data
Microsoft SQL Server Analysis Services (SSAS) multidimensional data enables you to design, create, and manage multidimensional structures that contain detail and aggregated data from multiple data sources. A cube wizard is available in SQL Server 2008 R2 that simplifies how you can create cubes. Dimensional data or cube data is a prototypical data source for the types of analysis that can be done by using the business intelligence-related service applications in SharePoint Foundation 2010. For more information, see SQL Server Analysis Services – Multidimensional Data (http://go.microsoft.com/fwlink/?LinkId=199541).
-
SQL Server Analysis Services: data mining
SQL Server Analysis Services data mining tools provide a set of industry-standard data mining algorithms and other tools that help you discover trends and patterns in your data. The following Excel add-ins help you perform predictive analysis:
Table Analysis Tools for Excel provide easy-to-use tools that take advantage of Analysis Services Data Mining to perform powerful analytics on spreadsheet data. For more information, see SQL Server Analysis Services – Data Mining (http://go.microsoft.com/fwlink/?LinkId=199543).
Data Mining Client for Excel lets users build, test, and query data mining models within Microsoft Office Excel 2007 by using either worksheet data or external data available through Analysis Services.
 Note:
Note:
To enable add-ins, you must have a connection to the server.
-
SQL Server Reporting Services (SSRS)
Microsoft SQL Server Reporting Services (SSRS) and SharePoint Foundation 2010 are easily integrated. SQL Server Reporting Services has a full range of tools with which you can create, deploy, and manage reports for your organization. It also has features that enable you to extend and customize your reporting functionality.
The available functionality includes:
Creating reports with Report Builder 3, one of the SQL Server Reporting Services authoring tools, which you can launch directly from SharePoint Foundation 2010.
Publishing SSRS reports in SharePoint Foundation 2010.
You can publish report server content types to a SharePoint library and then view and manage those documents from a SharePoint site.
For more information about SSRS, see SQL Server Reporting Services (http://go.microsoft.com/fwlink/?LinkId=199545). For more information about how to install the different integration modes, see Overview of documentation for SQL Server Reporting Services reports in SharePoint (http://technet.microsoft.com/library/44be0f8c-e167-4b92-9125-2c03b4e440cf(Office.14).aspx).
-
SQL Server Integration Services (SSIS)
Microsoft SQL Server Integration Services (SSIS) provides rich data integration and data transformation solutions. You can create a repeatable extract, transform, and load (ETL) process to automate moving data from sources such as XML data files, flat files, or relational data sources to one or more destinations. If data comes from disparate sources and is not mined or cleansed for the benefits that are provided in BI applications, SQL Server Integration Services helps prepare the data. For more information, see SQL Server Integration Services (http://go.microsoft.com/fwlink/?LinkId=199546).
-
Business Intelligence Development Studio (BIDS)
Microsoft Business Intelligence Development Studio (BIDS) provides intuitive wizards for building integration, reporting, and analytic solutions in a unified environment. BIDS supports the complete development life cycle of developing, testing, and deploying solutions and reports. BIDS is based on the Visual Studio 2005 development environment but customizes it with the SQL Server services–specific extensions and project types for reports, ETL data flows, OLAP cubes, and data mining structure.
-
PowerPivot for Excel and PowerPivot for SharePoint
PowerPivot is an add-in that enables users to create self-service BI solutions. It also facilitates sharing and collaboration on those solutions in a SharePoint Foundation 2010 environment. PowerPivot also enables IT organizations to increase operational efficiencies through Microsoft SQL Server 2008 management tools. Components of PowerPivot include the following:
PowerPivot for Excel 2010 is a data analysis add-in that delivers computational power directly to Microsoft Excel 2010. PowerPivot for Excel (formerly known as “Gemini”) lets users analyze large quantities of data, and its integration with SharePoint Foundation 2010 helps IT departments monitor and manage how users collaborate. The add-in removes the one-million-row limit for worksheets and provides rapid calculations for large data sets. For more information, see PowerPivot Overview (http://go.microsoft.com/fwlink/?LinkId=199547).
PowerPivot for SharePoint 2010 extends SharePoint Foundation 2010 and Excel Services to add server-side processing, collaboration, and document management support for the PowerPivot workbooks that you publish to SharePoint sites. For more information, see PowerPivot for SharePoint (http://go.microsoft.com/fwlink/?LinkId=199547).
SQL Server Master Data Services lets you centrally manage important data assets companywide and across diverse systems to provide more trusted data to your BI applications. Master Data Services helps you create a master data hub that includes a thin-client data management application for a data steward. The application can also apply workflow to assigned owners, apply extensible business rules to safeguard data quality, and apply hierarchy and attribute management strategies. For more information, see Master Data Services (http://go.microsoft.com/fwlink/?LinkId=199548).
-
StreamInsight and complex event processing
Microsoft StreamInsight is a new feature in SQL Server 2008 R2 that provides a powerful platform for developing and deploying complex event processing (CEP) applications. CEP is a technology for processing streams of events with high-throughput and low-latency. StreamInsight lets you analyze data without first storing it, and helps you monitor data from multiple sources to detect patterns, trends, and exceptions almost instantly. The ability to monitor, analyze, and act on data in motion in an event-driven manner provides significant opportunity to make more rapid, informed business decisions. For more information, see Microsoft StreamInsight (http://go.microsoft.com/fwlink/?LinkId=199549).
-
Related content
-
Overview of Remote BLOB Storage (SharePoint Foundation 2010)
This article describes how you can use Microsoft SharePoint Foundation 2010 together with Remote BLOB Storage (RBS) and Microsoft SQL Server 2008 Express and Microsoft SQL Server 2008 R2 Express to optimize database storage resources.
Before you implement RBS, we highly recommend that you evaluate its potential costs and benefits. For more information and recommendations about using RBS in a SharePoint Foundation 2010 installation, see Plan for remote BLOB storage (RBS) (SharePoint Foundation 2010).
In this article:
Introduction to RBS
Using RBS together with SharePoint 2010 Products
-
Introduction to RBS
RBS is a library API set that is incorporated as an add-on feature pack for Microsoft SQL Server. It can be run on the local server running Microsoft SQL Server 2008 R2, SQL Server 2008 or SQL Server 2008 R2 Express. To run RBS on a remote server, you must be running SQL Server 2008 R2 Enterprise edition. RBS is not supported for Microsoft SQL Server 2005.
Binary large objects (BLOBs) are data elements that have either of the following characteristics:
Unstructured data that has no schema (such as a piece of encrypted data).
A large amount of binary data (many megabytes or gigabytes) that has a very simple schema, such as image files, streaming video, or sound clips.
By default, SQL Server stores BLOB data in its databases. As a database’s usage increases, the total size of its BLOB data can expand quickly and grow larger than the total size of the document metadata and other structured data that is stored in the database. Because BLOB data can consume a lot of file space and uses server resources that are optimized for database access patterns, it can be helpful to move BLOB data out of the SQL Server database, and into a separate file.
Before RBS was supported in SQL Server, expensive storage such as RAID 10 was required for the whole SQL database including BLOB data. By using RBS, you can move 80 to 90 percent of the data (that is, BLOBs) onto less expensive storage such as RAID 5 or external storage solutions.
RBS uses a provider to connect to any dedicated BLOB store that uses the RBS APIs. Storage solution vendors can implement providers that work with RBS APIs. SharePoint Foundation 2010 supports a BLOB storage implementation that accesses BLOB data by using the RBS APIs through such a provider. You can implement RBS for Microsoft SharePoint 2010 Products by using a supported provider that you obtain from a third-party vendor. Most third-party providers store BLOBs remotely.
In addition to third-party providers, you can use the RBS FILESTREAM provider that is available through the SQL Server Remote BLOB Store installation package from the Feature Pack for Microsoft SQL Server 2008 R2. The RBS FILESTREAM provider uses the SQL Server FILESTREAM feature to store BLOBs in an additional resource that is attached to the same database and stored locally on the server. The FILESTREAM feature manages BLOBs in a SQL database by using the underlying NTFS file system.
The location that an RBS provider stores the BLOB data depends on the provider that you use. In the case of the SQL FILESTREAM provider, the data is not stored in the MDF file, but in another file that is associated with the database.
This implementation of the FILESTREAM provider is known as the local FILESTREAM provider. You can conserve resources by using the local RBS FILESTREAM provider to place the extracted BLOB data on a different (cheaper) local disk such as RAID 5 instead of RAID 10. You cannot use RBS with the local FILESTREAM provider on remote storage devices, such as network attached storage (NAS). The FILESTREAM provider is supported when it is used on local hard disk drives only.
A remote RBS FILESTREAM provider that is available in SQL Server 2008 R2 Express can store BLOB data on remote commodity storage such as direct-attached storage (DAS) or NAS. However, SharePoint Foundation 2010 does not currently support the remote RBS FILESTREAM provider.
-
Using RBS together with SharePoint 2010 Products
SharePoint Foundation 2010 supports the FILESTREAM provider that is included in the SQL Server Remote BLOB Store installation package from the Feature Pack for SQL Server 2008 R2. This version of RBS is available at http://go.microsoft.com/fwlink/?LinkID=177388 (http://go.microsoft.com/fwlink/?LinkID=177388). Be aware that this is the only version of RBS that is supported by SharePoint Foundation 2010. Earlier versions are not supported. Third-party RBS providers can also be used with the RBS APIs to create a BLOB storage solution that is compatible with SharePoint Foundation 2010.
In SharePoint Foundation 2010, site collection backup and restore and site import or export will download the file contents and upload them back to the server regardless of which RBS provider is being used. However, the FILESTREAM provider is the only provider that is currently supported for SharePoint 2010 Products farm database backup and restore operations.
When RBS is implemented, SQL Server itself is regarded as an RBS provider. You will encounter this factor when you migrate content into and out of RBS.
If you plan to store BLOB data in an RBS store that differs from your SharePoint Foundation 2010 content databases, you must run SQL Server 2008 with SP1 and Cumulative Update 2. This is true for all RBS providers.
The FILESTREAM provider that is recommended for upgrading from stand-alone installations of Windows SharePoint Services 3.0 that have content databases that are over 4 gigabytes (GB) to SharePoint Foundation 2010 associates data locally with the current content database, and does not require SQL Server Enterprise Edition.
 Important:
RBS does not enable any kind of direct access to any files that are stored in Microsoft SharePoint 2010 Products. All access must occur by using SharePoint 2010 Products only.
In a stand-alone installation of Windows SharePoint Services 3.0, content databases are stored in Windows Internal Database and have no size limitations. Conversely, in SharePoint Foundation 2010, the content databases are stored in SQL Server 2008 Express and have a maximum size of 4 GB per database.
SQL Server 2008 R2 Express supports databases that are as large as 10 GB. If your installation includes databases that are larger than 4 GB but smaller than 10 GB, we recommend that you upgrade to SQL Server 2008 R2 Express for your content database storage solution. SQL Server 2008 R2 Express is a free upgrade that you can download and install from http://go.microsoft.com/fwlink/?LinkID=177388 (http://go.microsoft.com/fwlink/?LinkID=177388).
If you are upgrading from Windows SharePoint Services 3.0 and have content databases that are 10 GB or larger, you must implement RBS. Or, you can use a standard or enterprise edition of Microsoft SQL Server 2008 or .
For additional guidance about how to upgrade from Windows SharePoint Services 3.0 to SharePoint Foundation 2010 together with RBS, see Upgrading from a stand-alone installation of Windows SharePoint Services 3.0 to SharePoint Foundation 2010 when content databases exceed 4 GB (Remote BLOB Storage) (http://technet.microsoft.com/library/393810e0-a520-4bd4-82b5-b858bee46b1a(Office.14).aspx).
FILESTREAM Overview (http://go.microsoft.com/fwlink/?LinkID=166020&clcid=0x409)
FILESTREAM Storage in SQL Server 2008 (http://go.microsoft.com/fwlink/?LinkID=165746&clcid=0x409)
Remote BLOB Store Provider Library Implementation Specification (http://go.microsoft.com/fwlink/?LinkID=166066&clcid=0x409)
-
Plan for remote BLOB storage (RBS) (SharePoint Foundation 2010)
By default, Microsoft SQL Server stores binary large object (BLOB) data in its databases. As a database’s usage increases, the total size of the BLOB data that is stored in it can expand quickly and grow larger than the total size of the document metadata and other structured data that is stored in the database. BLOB data consumes large amounts of file space and uses server resources that are optimized for database access patterns instead of for the storage of large files.
Remote BLOB Storage (RBS) is a library API set that is incorporated as an add-on feature pack for Microsoft SQL Server. It can be run on the local server running Microsoft SQL Server 2008 R2, SQL Server 2008 or SQL Server 2008 R2 Express. To run RBS on a remote server, you must be running SQL Server 2008 R2 Enterprise edition. RBS is designed to move the storage of BLOBs from database servers to commodity storage solutions. RBS saves significant space, conserves expensive server resources, and provides a standardized model for applications to access BLOB data. In Microsoft SharePoint Foundation 2010, RBS can be used for content databases only.
For more background information about RBS, including a discussion about the FILESTREAM provider, see Overview of Remote BLOB Storage (SharePoint Foundation 2010).
RBS can provide the following benefits:
BLOB data can be stored on less expensive storage devices that are configured to handle simple storage.
The administration of the BLOB storage is controlled by a system that is designed specifically to work with BLOB data.
Database server resources are freed for database operations.
These benefits are not free. Before you implement RBS with SharePoint Foundation 2010, you should evaluate whether these potential benefits override the costs and limitations of implementing and maintaining RBS. This article describes this evaluation process.
In this article:
Review the environment
Evaluate provider options
-
Review the environment
To start your analysis of RBS, review the size of the content databases. If the content database sizes meet the criteria for a RBS recommendation, you should then consider what kind of content is being accessed and how it is being used.
You can expect to benefit from RBS in the following cases:
The content databases are larger than 500 gigabytes (GB).
The BLOB data files are larger than 256 kilobytes (KB).
The BLOB data files are at least 80 KB and the database server is a performance bottleneck. In this case, RBS reduces the both the I/O and processing load on the database server.
Although the presence of many small BLOBs can create some decrease in performance, the cost of storage is usually the most important consideration when you evaluate RBS. The predicted decrease in performance is usually an acceptable trade-off for the cost savings in storage hardware.
In the case of SharePoint Foundation 2010, consider implementing RBS if you want to remain on a free version of Microsoft SQL Server, and you estimate that the databases will be larger than 4 GB. If you do not expect that the content databases will grow to 4 GB, we do not recommend that you implement RBS.
 Note:
Note:
If you are upgrading from Windows SharePoint Services 3.0 to SharePoint Foundation 2010, you should read Upgrading from a stand-alone installation of Windows SharePoint Services 3.0 to SharePoint Foundation 2010 when content databases exceed 4 GB (Remote BLOB Storage) (http://technet.microsoft.com/library/393810e0-a520-4bd4-82b5-b858bee46b1a(Office.14).aspx) for additional upgrade advice.
By default, Microsoft SharePoint Foundation 2010 is installed together with Microsoft SQL Server 2008 Express. SQL Server 2008 Express has a 4 GB size limit for any database. You can immediately extend the supported size of the content databases by installing Microsoft SQL Server 2008 R2 Express, which supports databases up to 10 GB. SQL Server 2008 R2 Express is a free download that is available at http://go.microsoft.com/fwlink/?LinkID=189418 (http://go.microsoft.com/fwlink/?LinkID=189418).
The remainder of this section assumes that you will install SQL Server 2008 R2 Express to support SharePoint Foundation 2010 databases. In this case, if you expect that the content databases will be 10 GB or larger, consider the following options:
If the content databases will be up to 16 GB and you do not expect that they contain more than 10 GB of metadata, you should implement RBS. In this case, RBS lets you continue to use a free version of SQL Server. In making this recommendation, we assume that when you migrate a 16 GB content database to RBS, the metadata does not exceed 10 GB.
If the content databases are larger than 16 GB, you must purchase Microsoft SQL Server 2008 R2, SQL Server 2008 with Service Pack 1 (SP1) and Cumulative Update 2, or SQL Server 2005 with SP3 and Cumulative Update 3 to support the databases instead of remaining on a free version of SQL Server.
RBS is most beneficial in systems that store very large files, such as digital media. RBS is typically implemented in environments in which large stored files are infrequently accessed, such as an archive. If this situation describes your environment, you should consider implementing RBS.
If you are storing many small (less than 256 KB) files that are frequently accessed by many users, you might experience increased latency on sites that have many small files that are stored in RBS. Increased latency is one cost factor that you should consider when you evaluate RBS for your storage solution. However, it is unlikely to be the strongest consideration. The amount of increased latency is also related to the RBS provider that you use.
-
Evaluate provider options
RBS requires a provider that connects the RBS APIs and SQL Server. Microsoft SQL Server 2008 Express and Microsoft SQL Server 2008 R2 Express include the FILESTREAM provider.
 Important:
RBS can be run on the local server running Microsoft SQL Server 2008 R2, SQL Server 2008 or SQL Server 2008 R2 Express. To run RBS on a remote server, you must be running SQL Server 2008 R2 Enterprise edition. SharePoint Foundation 2010 requires you to use the version of RBS that is included with the SQL Server Remote BLOB Store installation package from the Feature Pack for Microsoft SQL Server 2008 R2. Earlier versions of RBS will not work with SharePoint Foundation 2010. In addition, RBS is not supported in SQL Server 2005.
BLOBs can be kept on commodity storage such as direct-attached storage (DAS) or network attached storage (NAS), as supported by the provider. The FILESTREAM provider is supported by SharePoint Foundation 2010 when it is used on local hard disk drives only. You cannot use RBS with FILESTREAM on remote storage devices, such as NAS.
The following table summarizes FILESTREAM benefits and limitations.
|
Operational requirement
|
RBS with FILESTREAM
|
RBS without FILESTREAM
|
|
SQL Server integrated backup and recovery of the BLOB Store
|
Yes
|
Yes
|
|
Scripted migration to BLOBs
|
Yes
|
Yes
|
|
Supports mirroring
|
No
|
No
|
|
Log shipping
|
Yes
|
Yes, with provider implementation
|
|
Database snapshots
|
No1
|
No1
|
|
Geo replication
|
Yes
|
No
|
|
Encryption
|
NTFS only
|
No
|
|
Network Attached Storage (NAS)
|
Not supported by SharePoint 2010 Products
|
Yes, with provider implementation
|
1If the RBS provider that you are using does not support snapshots, you cannot use snapshots for content deployment or backup. For example, the SQL FILESTREAM provider does not support snapshots.
If FILESTREAM is not a practical provider for your environment, you can purchase a supported third-party provider. In this case, you should evaluate the following criteria when shopping for a provider:
Backup and restore capability
Tested disaster recovery
Deployment and data migration
Performance impact
Long-term administrative costs
 Important:
We do not recommend that you develop your own provider unless you are an independent software vendor (ISV) that has significant development experience in designing storage solutions.
-
Plan for business continuity management (SharePoint Foundation 2010)
Business continuity management consists of the business decisions, processes, and tools you put in place in advance to handle crises. A crisis might affect your business only, or be part of a local, regional, or national event.
Features of Microsoft SharePoint Foundation 2010 are likely to be part of your business continuity management strategy, but your overall plan should be much more comprehensive and include the following elements:
Clearly documented procedures.
Offsite storage of key business records.
Clearly designated contacts.
Ongoing staff training, including practices and drills.
Offsite recovery mechanisms.
In this article:
Business continuity management capabilities
Service level agreements
-
Business continuity management capabilities
Microsoft SharePoint Foundation 2010 includes the following capabilities that support business continuity management.
Versioning Users can lose data by overwriting a document. With versioning, users can keep multiple versions of the same document in a document library. In the event of an unwanted change, an overwritten document, or document corruption, the previous version can easily be restored by the user. When versioning is enabled, users can recover their data themselves.
For more information, see Plan to protect content by using recycle bins and versioning (SharePoint Foundation 2010).
Recycle Bin SharePoint Foundation 2010 includes a two-stage Recycle Bin. Users who have the appropriate permissions can use the first-stage Recycle Bin to recover documents, list items, lists, and document libraries that have been deleted from a site. Site collection administrators can use the second-stage Recycle Bin, also called the Site Collection Recycle Bin, to recover items that have been deleted from the first-stage Recycle Bin. When the first-stage Recycle Bin is enabled, users can recover their data themselves.
For more information, see Plan to protect content by using recycle bins and versioning (SharePoint Foundation 2010).
Backup and recovery You can use Windows PowerShell cmdlets or the SharePoint Central Administration Web site to back up and recover farms, databases, Web applications, and site collections. There are also many external and third-party tools that you can use to back up and recover data. For more information, see Plan for backup and recovery (SharePoint Foundation 2010).
Availability No single feature provides availability within a SharePoint Foundation 2010 environment. You can choose among many approaches to improve availability, including the following:
Fault tolerance of components and the network.
Redundancy of server roles and servers within a farm.
For more information about availability, see Plan for availability (SharePoint Foundation 2010).
Disaster recovery No single feature provides disaster recovery within a SharePoint Foundation 2010 environment. You can choose among many approaches to improve availability when a data center goes offline, including the following:
Offsite storage of backups, both within and outside your region.
Shipping images of servers to offsite locations.
Running multiple data centers, but serving data only through one, keeping the others available on standby.
For more information about disaster recovery, see Plan for disaster recovery (SharePoint Foundation 2010).
-
Service level agreements
Business continuity management is a key area in which IT groups offer service level agreements (SLAs) to set expectations with customer groups. Many IT organizations offer various SLAs that are associated with different chargeback levels.
The following list describes common features of business continuity management SLAs:
Versioning
Whether offered.
Amount of space allocated.
Recycle Bins
Whether offered.
Amount of space allocated for the first-stage Recycle Bin and second-stage Recycle Bin.
Length of time that items are held before they are permanently deleted in each Recycle Bin.
Additional charges for recovering items that have been permanently deleted from the second-stage Recycle Bin.
Backup and recovery
Backup and recovery SLAs usually identify objects and services that can be backed up and recovered, and the recovery time objective, recovery point objective, and recovery level objective for each. The SLA may also identify the available backup window for each object. For more information about backup and recovery SLAs, see Plan for backup and recovery (SharePoint Foundation 2010).
Recovery time objective (RTO) is the objective for the maximum time a data recovery process will take. It is determined by the amount of time the business can afford for the site or service to be unavailable.
Recovery point objective (RPO) is the objective for the maximum amount of time between the last available backup and any potential failure point. It is determined by how much data the business can afford to lose in the event of a failure.
Recovery level objective (RLO) is the objective that defines the granularity with which you must be able to recover data — whether you must be able to recover the entire farm, Web application, site collection, site, list or library, or item.
Availability
For each component within a farm that is covered by an availability plan, an availability SLA may identify availability as a percentage of uptime, often expressed as the number of nines — that is, the percentage of time that a given system is active and working. For example, a system with a 99.999 uptime percentage is said to have five nines of availability.
 Note:
Note:
When calculating availability, most organizations specifically exempt or add hours for planned maintenance activities.
For more information, see Plan for availability (SharePoint Foundation 2010).
Disaster recovery
For each component within a farm that is covered by a disaster recovery plan, an SLA may identify the recovery point objective and recovery time objective. Different recovery time objectives are often set for different circumstances, for example a local emergency versus a regional emergency.
For more information, see Plan for disaster recovery (SharePoint Foundation 2010).
-
Related content
-
Plan to protect content by using recycle bins and versioning (SharePoint Foundation 2010)
Plan to use recycle bins and versioning in an environment to help users protect and recover their data. Recycle bins and versioning are key components of a business continuity strategy.
Recycle bins Users can use recycle bins to retrieve deleted objects. Microsoft SharePoint Foundation 2010 supports two stages of recycle bins, the first-stage Recycle Bin and the Site Collection — also called the second-stage — Recycle Bin. When Recycle Bins are enabled, users can restore items that are in them, including deleted files, documents, list items, lists, and document libraries.
Versioning Users can use versioning to help prevent data loss that is caused by overwriting a document. When a site owner turns on versioning in a document library or a list, the library or list keeps multiple copies of a document, item, or file. In the event of an unwanted change, an overwritten file, or document corruption, the previous version can be easily restored by the user.
In this article:
Protecting content by using recycle bins
Protecting content by using versioning
-
Protecting content by using recycle bins
SharePoint Foundation 2010 supports two stages of recycle bins, the first-stage Recycle Bin and the Site Collection, or second-stage, Recycle Bin. The recycle bins are enabled and configured at the Web application level. The recycle bins collect deleted documents and list items. When a list item is deleted, any attachments to the item are also deleted and can be restored from the Recycle Bin.
The Recycle Bins can contain multiple copies of a document that each have the same file name and source. These documents cannot be restored over an existing copy of a document. The Recycle Bins cannot be used to recover previous versions or accidental overwrites of documents — you must use versioning to enable this functionality.
The following table describes how an item is deleted and recovered from the first-stage Recycle Bin and the second-stage Recycle Bin.
|
When a user does this
|
The item is
|
The item can be restored by
|
|
Deletes an item
|
Held in the first-stage Recycle Bin until the item is deleted from the Recycle Bin or the item has been in the Recycle Bin longer than the time limit configured for an item to be held in the Recycle Bin.
|
Users or site collection administrators
|
|
Deletes an item from the Recycle Bin
|
Held in the second-stage Recycle Bin
|
Site collection administrators
|
Turning off the Recycle Bin for a Web application empties all Recycle Bins and permanently deletes all items in them.
The first-stage Recycle Bin is located at the site level and is available to users who have Contribute, Design, or Full Control permissions on a site.When a user deletes an item from a Web site, the item is sent to the site’s first-stage Recycle Bin. Items located in the first-stage Recycle Bin count toward the site quota.Items remain in one of the first-stage Recycle Bins in the site until a specified time period has been reached (the default setting is 30 days).
When an item is deleted from the Recycle Bin, the item is sent to the second-stage Recycle Bin.
 Note:
Note:
The time limit for the Recycle Bins applies to the total time after the item was first deleted — not the time spent in either Recycle Bin stage.
-
Second stage (Site Collection) Recycle Bin
The second-stage Recycle Bin is located at the site collection administrator level. The second-stage Recycle Bin is organized into two views: objects in the first-stage Recycle Bins of all sites in the site collection, and objects in the second-stage Recycle Bin. When an item is deleted from the first-stage Recycle Bin, it can be recovered only by a site collection administrator from the second-stage Recycle Bin.
Items remain in the second-stage Recycle Bin until a specified time period has been reached (the default setting is 30 days) or until the second-stage Recycle Bin reaches its size limit, at which time the oldest items are deleted. The time limit for the Recycle Bins applies to the total time after the item was initially deleted — not the time spent in either Recycle Bin stage.
When a second-stage Recycle Bin is enabled for a Web application, we recommend that you designate how much disk space is available to the second-stage Recycle Bin as a percentage of the quota allotted to the Web application. Items stored in the second-stage Recycle Bin do not count toward the site quota; however, the size that is specified for the second-stage Recycle Bin increases the total size of the site and the content database that hosts it. If no site quota has been set, there is no limit on the size of the second-stage Recycle Bin.
For example, if you have allotted 100 megabytes (MB) of space for the Web application, allotting a 50 percent quota for the second-stage Recycle Bin allots 50 MB for the second-stage Recycle Bin and 150 MB for the Web application as a whole. You can allot up to 100 percent for the second-stage Recycle Bin quota.
For more information about setting quotas, see
Plan for site maintenance and management (SharePoint Foundation 2010)
Create quota templates (SharePoint Foundation 2010)
For more information about how users can use the Recycle Bin in SharePoint Foundation 2010, see View, restore, or delete items in the Recycle Bin (http://go.microsoft.com/fwlink/?LinkId=90917&clcid=0x409)
For information about configuring the Recycle Bins, see Configure the Recycle Bin (SharePoint Foundation 2010).
-
Protecting content by using versioning
Versioning addresses the issue of losing data by overwriting a document. It allows the document library to keep multiple copies of the same document. In the event of an unwanted change, an overwrite, or a document corruption, the previous version can easily be restored by the user. Versioning can be enabled at the library or list level. Items and files can be versioned.
Before configuring versioning, be sure to read Plan for site maintenance and management (SharePoint Foundation 2010) .
For more information about configuring versioning, see Enable and configure versioning (SharePoint Foundation 2010) .
Administrators must closely manage versioning, because if sites have many versions of files and documents, the sites can become quite large. If you do not restrict the size of sites, your sites can surpass your storage capacity. Farm administrators can manage this issue by establishing service level agreements with site owners and by setting size quotas on sites. For more information about managing versioning, see Manage versioning by using quotas (SharePoint Foundation 2010).
-
Plan for backup and recovery (SharePoint Foundation 2010)
This article describes the stages involved in planning for backup and recovery, which include determining backup and recovery strategies for a Microsoft SharePoint Foundation environment and deciding which tools to use. The stages do not need to be done in the order listed, and the process may be iterative.
When you plan for how you will use backup and recovery for disaster recovery, consider common events, failures, and errors; local emergencies; and regional emergencies.
For detailed information about Microsoft SharePoint Foundation backup and recovery, see Backup and recovery overview (SharePoint Foundation 2010).
In this article:
Define business requirements
Choose what to protect and recover in your environment
Choose tools
Determine strategies
Plan for enhanced backup and recovery performance
-
Define business requirements
To define business requirements, determine the following for each farm and service in the environment:
Recovery point objective (RPO) is the objective for the maximum amount of time between the last available backup and any potential failure point. It is determined by the amount of data that the business can afford to lose in the event of a failure.
Recovery time objective (RTO) is the objective for the maximum time a data recovery process will take. It is determined by the amount of time the business can afford for the site or service to be unavailable.
Recovery level objective (RLO) is the objective that defines the granularity with which you must be able to recover data — whether you must be able to recover the entire farm, Web application, site collection, site, list or library, or item.
Shorter RPO and RTO, and greater granularity of RLO, all tend to cost more.
A worksheet to help you plan your strategies for backup and recovery for your SharePoint Foundation 2010 environment can be downloaded from SharePoint 2010 Products backup and recovery planning workbook (http://go.microsoft.com/fwlink/?LinkID=184385).
-
Choose what to protect and recover in your environment
Your business requirements will help you determine which components of the environment you need to protect, and the granularity with which you need to be able to recover them.
The following table lists components of a SharePoint environment that you might decide to protect, and the tools that can be used to back up and recover each component.
|
Component
|
SharePoint backup
|
Microsoft SQL Server 2008 with Service Pack 1 (SP1) and Cumulative Update 2
|
System Center Data Protection Manager (DPM) 2010
|
File system backup
|
|
Farm
|
Yes
|
|
Yes6
|
|
|
Service applications
|
Yes
|
|
|
|
|
Web application
|
Yes
|
|
|
|
|
Content databases
|
Yes
|
Yes
|
Yes
|
|
|
Site collection
|
Yes1, 2
|
Yes1, 2
|
Yes1, 2
|
|
|
Site
|
Yes2
|
Yes2
|
Yes
|
|
|
Document library or list
|
Yes2
|
Yes2
|
Yes
|
|
|
List item or document
|
|
|
Yes
|
|
|
Content stored in remote BLOB stores
|
Yes3
|
Yes3
|
Yes3
|
|
|
Customizations deployed as solution packages
|
Yes7
|
Yes7
|
Yes6, 7
|
|
|
Changes to Web.config made by using Central Administration or an API
|
Yes
|
Yes
|
Yes4
|
|
|
Configuration settings (SharePoint)
|
Yes2, 8
|
Yes2, 8
|
Yes 2, 9
|
|
|
Customizations not deployed as solution packages
|
|
|
Yes. Files can be recovered if protected as files.4, 5
|
Yes
|
|
Changes to Web.config not made by using Central administration or an API
|
|
|
Yes4
|
Yes
|
|
IIS configurations not set through SharePoint
|
|
|
Yes5
|
Yes
|
|
SQL Server Reporting Services databases
|
|
Yes
|
Yes
|
|
1Farm-level and database-level backup and restore can be used for site collection recovery if a single site collection is stored in a database.
2Farm-level and database-level backups can be used with SharePoint Foundation unattached database recovery to restore site collections, sites, lists, and configurations.
3Content stored in remote BLOB stores is backed up and restored with other content, as long as the Remote BLOB Storage (RBS) provider in use has this capability.
4Changes to Web.config can be backed up by using file system backup from DPM 2010.
5IIS configurations can be recovered by using a bare metal backup from DPM 2010.
6DPM 2010 can recover this item by using a combination of a bare metal backup and SharePoint Foundation backup. It cannot be backed up and recovered as an object.
7Fully-trusted solution packages are stored in the configuration database, and sandboxed solutions are stored in content databases. They can be recovered as part of farm or content database recovery.
8Configuration settings can be recovered from farm-level backups. For more information, see Restore a farm (SharePoint Foundation 2010) (http://technet.microsoft.com/library/f7fd691f-bcf0-4b21-8bb6-d443be711f1e(Office.14).aspx).
9The Central Administration content database and the configuration database for a SharePoint Foundation 2010 farm can be recovered but only as part of a full-farm recovery to the same farm, with the same computers.
 Note
Note
You can register SharePoint Foundation 2010 with Windows Server Backup by using the stsadm.exe -o -registerwsswriter operation to configure the Volume Shadow Copy Service (VSS) writer for SharePoint Foundation. Windows Server Backup then includes SharePoint Foundation 2010 in server-wide backups. When you restore from a Windows Server backup, you can select Microsoft SharePoint Foundation (no matter which version of SharePoint 2010 Products is installed), and all components reported by the VSS writer forSharePoint Foundation 2010 on that server at the time of the backup will be restored.
Windows Server Backup is recommended only for use with for single-server deployments.
-
Choose what to recover from within SharePoint content databases
From within a content database, you can recover site collections, sites, lists and libraries.
Backup and recovery tools provide different levels of recovery for content within a content database. Recovering an object from within a content database is always more complex than recovering an entire content database.
-
Protecting customizations
Customizations to SharePoint sites can include:
Master pages, page layouts and cascading style sheets. These objects are stored in the content database for a Web application.
Web Parts, site or list definitions, custom columns, new content types, custom fields, custom actions, coded workflows, or workflow activities and conditions.
Third-party solutions and their associated binary files and registry keys, such as IFilters.
Changes to standard XML files.
Custom site definitions (Webtemp.xml).
Changes to the Web.config file.
How customizations are deployed, and how changes are made to the Web.config file, have a significant effect on which tools can be used to back up and recover customizations. To provide the greatest opportunity for recovery, we recommend that you deploy customizations by using solution packages and make changes to the Web.config file by using Central Administration or the SharePoint APIs and object model.
Workflows are a special case of customizations that you can back up and recover. Make sure that your backup and recovery plan addresses any of the following scenarios that apply to your environment:
Declarative workflows, such as those created in Microsoft SharePoint Designer 2010, are stored in the content database for the site collection to which they are they are deployed. Backing up the content database protects these workflows.
Custom declarative workflow actions have components in the following three locations:
a. The Visual Studio assemblies for the Activities are stored in the global assembly catalog (GAC).
b. The XML definition files (.ACTIONS files) are stored in the 14\TEMPLATE\{LCID}\Workflow directory.
c. An XML entry to mark the activity as an authorized type is stored in the Web.config file for the Web applications in which it is used.
If your farm workflows use custom actions, you should use a file backup system to protect these files and XML entries. Similar to SharePoint Foundation features such as Web parts and event receivers, these files should be reapplied to the farm as needed after recovery.
Workflows that depend on custom code, such as those that are created by using Visual Studio, are stored in two locations. The Visual Studio assemblies for the workflow are stored in the global assembly catalog (GAC), and the XML definition files are stored in the Features directory. This is the same as other types of SharePoint Foundation features such as Web parts and event receivers. If the workflow was installed as part of a solution package, backing up the content database protects these workflows.
If you create a custom workflow that interacts with a site collection other than the one where the workflow is deployed, you must back up both site collections to protect the workflow. This includes workflows that write to a history list or other custom list in another site collection. Performing a farm backup is sufficient to back up all site collections in the farm and all workflows that are associated with them.
Workflows that are not yet deployed must be backed up and restored separately like any other data file. When you are developing a new workflow but have not yet deployed it to the SharePoint Foundation farm, make sure that you back up the folder where you store your workflow project files by using Windows Backup or another file system backup application.
-
Protecting service applications
Service applications in a SharePoint Foundation environment can be made up of both service settings and one or more databases, or just service settings. You cannot restore a complete service application by restoring the database only; however, you can restore the databases for a service application and then reprovision the service application. For more information, see Restore a service application (SharePoint Foundation 2010) (http://technet.microsoft.com/library/8fbb74e0-90e2-4143-8e16-3fe902a7e5c9(Office.14).aspx).
-
Protecting SQL Server Reporting Services databases
SharePoint Foundation backup and recovery does not include SQL Server Reporting Services databases. You must use SQL Server tools. For more information, see Backup and Restore Operations for a Reporting Services Installation (http://go.microsoft.com/fwlink/?LinkId=186642).
-
Choose tools
To choose the right tools for backup and recovery, you need to determine whether you can meet the continuity requirements you have set for your business within your budget for time and resources.
Key factors to consider when choosing tools include:
Speed of backup: Can the tool perform within the maintenance window for your databases? You should test any backup system to ensure that it meets your needs on your hardware.
Completeness of recovery.
Granularity of objects that can be recovered.
Backup type supported (full, differential, or incremental).
Complexity of managing the tool.
The following table compares the type of backup and size of farm that can be backed up in a six-hour window for backup and recovery tools available from Microsoft.
|
Tool
|
Backup type
|
Size of backup completed in six hours1
|
|
SharePoint farm backup and recovery
|
Full, differential
|
600 GB
|
|
SQL Server
|
Full, differential
|
600 GB
|
|
System Center Data Protection Manager
|
Incremental
|
Terabytes
|
1Backup size was determined by backing up a system that totals the specified size on the test hardware listed in the following section.
 Note:
Note:
The SharePoint Foundation and SQL Server backups were performed with backup compression turned on.
The following table lists the hardware used in the tests that determined the size of backup that could be completed in a six-hour window.
|
Component
|
Description
|
|
Processor
|
64-bit dual processor, 3 GHz
|
|
RAM
|
8 GB
|
|
Disk
|
2 terabyte NTFS file system-formatted partition
|
|
Network
|
100 megabits per second (Mbps) or faster connection between client computers and server
|
|
Network share
|
Network share with 1.25 terabytes free space
|
 Note:
Note:
The upper size limit for performing SharePoint Foundation 2010 site collection backups is 85 GB.
For detailed information about the backup and recovery systems that can be used with Microsoft SharePoint Foundation, see the following resources:
Backup and recovery overview (SharePoint Foundation 2010)
Backing Up and Restoring Databases in SQL Server (http://go.microsoft.com/fwlink/?LinkID=186643)
Data Protection Manager 2010 Release Candidate Overview (http://go.microsoft.com/fwlink/?LinkID=186655)
-
Determine strategies
Based on your business requirements, recovery needs, and the tools you have chosen, determine and document the backup and recovery strategies for your environment.
It is not uncommon for IT departments that support SharePoint Foundation environments to decide to use more than one tool to protect the environment, as they determine the strategies that they will use.
For example, in an environment with databases that are managed by DBAs, the strategies in the following list might be employed:
All databases are backed up by SQL Server. The backup interval that is set for each database is based on the following:
The business impact of the content or service.
The standard rate of change for the database.
The effect on performance that the backup has on the environment.
Small, rapidly changing, very high-business-impact content databases are additionally protected by SQL Server database snapshots that are stored on a separate physical disk. Only one snapshot is stored per database, and snapshots are discarded regularly, so that the effect on performance is minimized. The snapshot interval that is set for each database is based on the following:
The business impact of the content or service.
The standard rate of change for the database.
The effect on performance that the snapshot has on the environment.
The amount of space required to store the snapshot.
Recovering from a snapshot is faster than standard recovery because a snapshot, along with its underlying database, can be treated by SharePoint Foundation as an unattached database. However, the process of creating snapshots can decrease the performance of the underlying database. We recommend that the effect that snapshots have on the performance of your system be tested before they are implemented, and that snapshots be discarded regularly to reduce the space required.
 Note:
Note:
If you are using RBS, and the RBS provider that you are using does not support snapshots, you cannot use snapshots for backup. For example, the SQL FILESTREAM provider does not support snapshots.
SharePoint Foundation backup is used to protect service applications. The backup interval is based on the following:
The business impact of the service.
The standard rate of change for the database.
The effect on performance that the backup has on the database.
All restore operations are performed through SharePoint Foundation. The choice of which restore system to use is determined by the type of backup that is available and the object being restored.
Other tools should be part of your business continuity strategy. Consider how you will use Recycle Bins and versioning in site collections throughout the environment. For more information, see Plan for business continuity management (SharePoint Foundation 2010).
-
Plan for enhanced backup and recovery performance
As you plan your backup and recovery strategy, consider the following recommendations to help you decrease the effect of backup and recovery on system performance.
By design, most backup jobs consume as many I/O resources as they can to finish the job in the available time for maintenance; therefore, you might see disk queuing and you might see that all I/O requests come back more slowly than usual. This is typical and should not be considered a problem.
-
Follow recommendations for configuring SQL Server and storage
Follow the general recommendations for configuring SQL Server and storage for a SharePoint Foundation environment. For more information, see SQL Server and storage (SharePoint Foundation 2010).
-
Minimize latency between SQL Server and the backup location
In general, it is best to use a local disk, not a network drive, for backups. If you are backing up multiple servers, you may want to have a directly connected computer that both servers can write to. Network drives that have 1 millisecond or less latency between them and the computers that are running SQL Server will perform well. If your farm has multiple servers in it (including the computer that is running SQL Server), you must use UNC network paths for the SharePoint farm backup location.
-
Avoid processing conflicts
Do not run backup jobs during times in which users require access to the system.
To avoid I/O bottlenecks, perform the main backup to a separate disk, and only then copy to tape.
Consider staggering backups so that not all databases are backed up at the same time.
SharePoint Foundation backups use SQL Server backups. When using compression with your backups, be mindful not to overwhelm SQL Server. For example, some third-party backup tools compress data during backup, which can disrupt SQL Server performance. There are tools available to throttle the compression processes and control the effect on SQL Server.
-
Follow SQL Server backup and restore optimization recommendations
If you are running SQL Server 2008 Enterprise, we recommend that you use backup compression. For more information, see Backup Compression (SQL Server) (http://go.microsoft.com/fwlink/?LinkId=179525).
If you are using SQL Server backups, use a combination of full, differential, and transaction log backups for the full recovery model to minimize recovery time. Differential database backups are usually faster to create than full database backups, and they reduce the amount of transaction log required to recover the database.
If you are using the full recovery model in SQL Server 2008, we recommend that you use the truncate option during backup to avoid maintenance issues.
For detailed recommendations about how to optimize SQL Server backup and restore performance, see Optimizing Backup and Restore Performance in SQL Server (http://go.microsoft.com/fwlink/?LinkId=126630).
-
Ensure sufficient write performance on the backup drive
Carefully consider whether to use redundant array of independent disks (RAID) on your disk backup device. For example, RAID 5 has low write performance, approximately the same speed as for a single disk. (This is because RAID 5 maintains parity information.) Using RAID 10 for a backup device may provide faster backups. For more information about how to use RAID with backups, see Configure RAID for maximum SQL Server I/O throughput (http://go.microsoft.com/fwlink/?LinkId=126632).
-
Related content
-
Backup and recovery overview (SharePoint Foundation 2010)
This article describes the backup architecture and recovery processes that are available in Microsoft SharePoint Foundation 2010, including farm and granular backup and recovery, and recovery from an unattached content database. Backup and recovery operations can be performed through the user interface or through Windows PowerShell cmdlets. Built-in backup and recovery tools may not meet all the needs of your organization.
In this article:
Backup and recovery scenarios
Backup architecture
Recovery processes
-
Backup and recovery scenarios
Backing up and recovering data supports many business scenarios, including the following:
Recovering unintentionally deleted content that is not protected by the Recycle Bin or versioning.
Moving data between installations as part of a hardware or software upgrade.
Recovering from an unexpected failure.
-
Backup architecture
SharePoint Foundation 2010 provides two backup systems: farm and granular.
The farm backup architecture in SharePoint Foundation 2010 starts a Microsoft SQL Server database backup of content and service application databases and also writes configuration content to files.
The following illustration shows the farm backup system.

Both full and differential backups are supported. Full backups create a new backup of the complete system. Differential backups create a backup of all the data that is stored in databases that has changed since the last full backup.
The farm backup system is organized hierarchically. The components in a farm that can be selected for backup include the following:
Farm The farm is the highest-level object. You can select from the following options when you perform a farm backup:
Content and configuration data (default)
The whole server farm is backed up. This includes settings from the configuration database.
Configuration only
Configuration database settings are backed up so that you can apply configurations across farms. For more information, see Configuration-only backup use and benefits later in this article.
Web application Within a Web application, you can select one or more of the content databases to back up.
A Web application backup includes the following:
Application pool name and application pool account
Authentication settings
General Web application settings such as alerts and managed paths
Internet Information Services (IIS) binding information, such as the protocol type, host header, and port number
Changes to the Web.config file that have been made through the object model or Central Administration
 Note:
Note:
Changes to the Web.config file that have been made to support claims-based authentication that uses forms-based authentication are not included in backups, because those changes are made manually. For more information, see Considerations for using farm backups later in this article.
Sandboxed solutions
For recommendations about how to protect these settings, see Plan for backup and recovery (SharePoint Foundation 2010).
 Important:
Backups of service applications do not include the related proxy. To back up both the service application and the service application proxy, you must either back up the farm or perform two consecutive backups, selecting the service application in one backup, and selecting the associated service application proxy in the second backup.
Many service application databases cannot be backed up individually from SharePoint Foundation 2010. To back up service application databases only, you must use SQL Server backup.
Proxies for service applications that are not shared.
Shared Services Shared services require both a service application and a service application proxy to run. If you select the Shared Services node, all of the service applications and the related service application proxies on the farm will be backed up.
 Note:
Note:
The backup hierarchy enables you to select individual service applications and service application proxies to back up. However, when you select one or all service applications, or one or all proxies, the related objects are not backed up by default. To back up both parts of a specific service, you must either select the Shared Services node or perform two consecutive backups, selecting the service application in one backup, and selecting the associated service application proxy in the second backup.
 Note
Note
Some settings in the SharePoint Foundation environment are not included in a farm backup. They include the following settings that are stored on Web servers:
-
Configuration-only backup use and benefits
A configuration-only backup extracts and backs up the configuration settings from a configuration database. By using built-in tools, you can back up the configuration of any configuration database, whether it is currently attached to a farm or not. For detailed information about how to back up a configuration, see Back up a farm configuration (SharePoint Foundation 2010) (http://technet.microsoft.com/library/6d006882-8dc4-4e28-9a47-9d2d592437dc(Office.14).aspx).
A configuration backup can be restored to the same — or any other — server farm. When a configuration is restored, it will overwrite any settings present in the farm that have values that are set in the configuration backup. If any settings present in the farm are not contained in the configuration backup, they will not be changed. For detailed information about how to restore a farm configuration, see Restore a farm configuration (SharePoint Foundation 2010) (http://technet.microsoft.com/library/25cffd9e-d1d5-43ef-86c2-e2d966a1f1e8(Office.14).aspx).
 Note:
Note:
Web application and service application settings are not included in a configuration backup. You can use Windows PowerShell cmdlets to document and copy settings for service applications. For more information, see Document farm configuration settings (SharePoint Foundation 2010) (http://technet.microsoft.com/library/dd025503-84ec-40b8-aab3-a58b814d162f(Office.14).aspx) and Copy configuration settings from one farm to another (SharePoint Foundation 2010) (http://technet.microsoft.com/library/6635b76f-ad53-4231-9fda-f111f64dcadb(Office.14).aspx).
Situations in which you might want to restore a configuration from one farm to another farm include the following:
Replicating a standardized farm configuration to be used throughout an environment.
Moving configurations from a development or test environment to a production environment.
Moving configurations from a stand-alone installation to a farm environment.
Configuring a farm to serve as part of a standby environment.
SharePoint Foundation stores the following kinds of settings in the configuration-only backup:
Antivirus
Information rights management (IRM)
Outbound e-mail settings (only restored when you perform an overwrite).
Customizations deployed as trusted solutions
Diagnostic logging
-
Considerations for using farm backups
Consider the following before you use farm backups:
There is no built-in scheduling system for backups. To schedule a backup, we recommend that you create a backup script by using Windows PowerShell, and then use Windows Task Scheduler to run the backup script on a regular basis.
We do not recommend that you use IIS metabase backup to protect IIS settings. Instead, document all IIS configurations for each Web server by using a tool that provides the configuration monitoring you want, such asMicrosoft System Center Configuration Manager 2010.
SharePoint Foundation 2010 backup and recovery can be run together with SQL Server Enterprise features such as backup compression and transparent data encryption.
If you are running SQL Server Enterprise, we strongly recommend that you use backup compression. For more information about backup compression, see Backup Compression (SQL Server) (http://go.microsoft.com/fwlink/?LinkID=129381).
If you decide to run databases with transparent data encryption, you must manually back up the key and restore the key — SharePoint Foundation 2010 backup and restore will not remind you about the key. For more information about transparent data encryption, see Understanding Transparent Data Encryption (TDE) (http://go.microsoft.com/fwlink/?LinkID=129384).
If a content database is set to use the SQL FILESTREAM remote BLOB storage (RBS) provider, the RBS provider must be installed both on the database server that is being backed up and on the database server that is being recovered to.
SharePoint Foundation 2010 backup does not protect:
Changes to the Web.config file on Web servers that are not made through Central Administration or the object model.
Customizations to a site that are not deployed as part of a trusted or sandboxed solution.
If you are sharing service applications across farms, be aware that trust certificates that have been exchanged are not included in farm backups. You must back up the certificate store separately or keep the certificates in a separate location. When you restore a farm that shares a service application, you must import and redeploy the certificates and then re-establish any inter-farm trusts.
For more information, see Exchange trust certificates between farms (SharePoint Foundation 2010) (http://technet.microsoft.com/library/679d334b-913d-49b3-b086-66a60093b261(Office.14).aspx).
When you restore a farm or Web application that is configured to use any kind of claims-based authentication, duplicate or additional providers may appear to be enabled. If duplicates appear, you must manually save each Web application zone to remove them.
Additional steps are required when you restore a farm that contains a Web application that is configured to use forms-based authentication. You must re-register the membership and role providers in the Web.config file, and then redeploy the providers. You must perform these steps whether you are restoring at the Web application level or at the farm level.
For more information, see Back up a Web application (SharePoint Foundation 2010) (http://technet.microsoft.com/library/cb1fa2d2-5dd7-4640-a1b5-99c10561d9ef(Office.14).aspx), Plan authentication methods (SharePoint Foundation 2010) and Configure claims authentication (SharePoint Foundation 2010) (http://technet.microsoft.com/library/ef8c3024-26de-4d06-9204-3c6bbb95fb14(Office.14).aspx).
-
Granular backup and export architecture
The granular backup and export architecture uses Transact-SQL queries and export calls. Granular backup and export is a more read-intensive and processing-intensive operation than farm backup.
From the granular backup system, a user can back up a site collection, or export a site or list.
 Note:
Note:
Workflows are not included in exports of sites or lists.
If you are running SQL Server Enterprise, the granular backup system can optionally use SQL Server database snapshots to ensure that data remains consistent while the backup or export is in progress. When a snapshot is requested, a SQL Server database snapshot of the appropriate content database is taken, SharePoint Foundation uses it to create the backup or export package, and then the snapshot is deleted. Database snapshots are linked to the source database where they originated. If the source database goes offline for any reason, the snapshot will be unavailable. For more information about database snapshots, see Database Snapshots (http://go.microsoft.com/fwlink/?LinkId=166158).
Benefits of backing up a site collection by using a snapshot include the following:
The snapshot ensures that the data that is being read remains consistent while the operation is being performed.
Users can continue to interact with the site collection while it is being backed up from the database snapshot. This includes adding, editing, and deleting content. However, the changes that users make to the live site will not be included in the site collection backup because the backup is based on the database snapshot.
However, database snapshots can adversely affect performance. For more information about database snapshots and performance, see Limitations and Requirements of Database Snapshots (http://go.microsoft.com/fwlink/?LinkId=166159).
You can use granular backup and export for content that is stored in a database that is configured to use the SQL FILESTREAM RBS provider.
 Note:
Note:
If the RBS provider that you are using does not support snapshots, you cannot use snapshots for content deployment or backup. For example, the SQL FILESTREAM provider does not support snapshots.
 Note:
Note:
We do not recommend that you use SharePoint Foundation 2010 site collection backup for site collections larger than 85 GB.
The following illustration shows the granular backup and export system.

-
Recovery processes
SharePoint Foundation 2010 supports the following primary, built-in recovery options:
Restore from a farm backup that was created by using built-in tools, or restore from the backup of a component taken by using the farm backup system.
Restore from a site collection backup.
Connect to a content database by using the unattached content database feature, back up or export data from it, and then restore or import the data.
-
Restoring from a farm backup
Items that can be recovered from a farm backup include the following:
Farm
Content and configuration data (default)
The whole server farm is restored. This includes settings from the configuration database, and trusted solution packages.
Configuration only
Only the configuration data is restored. This overwrites any settings in the farm that have values that are set within the configuration-only backup.
Web applications
Restores Web applications.
Service applications
Restores service applications. Service application recovery can be complex because SharePoint Foundation 2010 cannot fully reconfigure service application proxies during the restore process. Service application proxies are restored, but are not put in proxy groups. Therefore, they are not associated with any Web applications. For specific information about the operations involved in restoring specific service applications, see Restore a service application (SharePoint Foundation 2010) (http://technet.microsoft.com/library/8fbb74e0-90e2-4143-8e16-3fe902a7e5c9(Office.14).aspx).
Content databases
When content databases are restored, the sandboxed solutions associated with the related site collections are also restored.
-
Restoring as new versus restoring as overwrite
By default, SharePoint Foundation 2010 recovery restores any object as a new instance of the object, instead of overwriting any existing instances with the same name.
When you restore a farm or object as new, the following objects will not work without adjustments, because all GUIDs for objects are assigned new values:
Farm. When you restore a farm as new, you must do the following:
Re-create alternate access mapping settings. SharePoint Foundation 2010 recovery only restores the Default zone of the Web application.
Re-associate service application proxies with proxy groups because service application proxies are not assigned to proxy groups when restored. All Web applications will be associated with the default proxy group. You must associate Web applications with other proxy groups if you want to do that.
Web application.
If the Web application name and URL that you provide match a Web application name and URL that already exist in the farm, SharePoint Foundation 2010 recovery combines them.
If you do not want to combine Web applications, you must rename the Web application when you restore it as new.
When you restore a Web application as new in the same environment but do not combine Web applications, many other parameters and objects must also be changed. For example, you may have to provide different database file paths and different database names.
Service applications and service application proxies
If you recover a service application and also recover the related service application proxy, you must associate the service application proxy with a proxy group.
If you recover a service application and do not also recover the related service application proxy, you must re-create the service application proxy.
 Note:
Note:
You cannot restore a service application as new in the same farm. You can restore a service application as new in another farm.
When you restore an object and overwrite the existing object, no changes are necessary.
-
Restoring from a site collection backup
Only site collections can be recovered from a site collection backup.
-
Recovering from an unattached content database
SharePoint Foundation 2010 provides the ability to connect to, and back up from, a content database that is attached to an instance of SQL Server but is not associated with a local SharePoint Web application. Unattached databases that you can connect to include read-only content databases that have been restored from any supported backup technology and SQL Server database snapshots of content databases.
Recovery is the following two-stage process:
1. Back up or export the object from the unattached content database.
2. Restore or import the output of the prior step into SharePoint Foundation 2010.
The following items can be backed up or exported from an unattached database by using granular backup and export, and then restored:
Site collection
Back up by using site collection backup, and then recover by using a site collection restore.
Site
Export, and then import.
Lists and libraries
Export, and then import.
You can use import to recover content that you backed up from a database configured to use the SQL FILESTREAM RBS provider. The recovered content will be stored by SharePoint Foundation 2010 using the currently defined storage provider for that content database — that is, if the content database is not set to use RBS, the data will be stored in the content database; if the content database is set to use RBS, the data will be stored in RBS.
-
Related content
-
Plan for availability (SharePoint Foundation 2010)
This article describes key decisions in choosing availability strategies for a Microsoft SharePoint Foundation 2010 environment.
As you carefully review your availability requirements, be aware that the higher the level of availability and the more systems that you protect, the more complex and costly your availability solution is likely to be.
Not all solutions in an organization are likely to require the same level of availability. You can offer different levels of availability for different sites, different services, or different farms.
In this article:
Availability overview
Choosing an availability strategy and level
Redundancy and failover between closely located data centers configured as a single farm (“stretched” farm)
-
Availability overview
Availability is the degree to which a SharePoint Foundation environment is perceived by users to be available. An available system is a system that is resilient — that is, incidents that affect service occur infrequently, and timely and effective action is taken when they do occur.
Availability is part of business continuity management (BCM), and is related to backup and recovery and disaster recovery. For more information about these related processes, see Plan for backup and recovery (SharePoint Foundation 2010) and Plan for disaster recovery (SharePoint Foundation 2010).
 Note:
Note:
When calculating availability, most organizations specifically exempt or add hours for planned maintenance activities.
One of the most common measures of availability is percentage of uptime expressed as number of nines — that is, the percentage of time that a given system is active and working. For example, a system with a 99.999 uptime percentage is said to have five nines of availability.
The following table correlates uptime percentage with calendar time equivalents.
|
Acceptable uptime percentage
|
Downtime per day
|
Downtime per month
|
Downtime per year
|
|
95
|
72.00 minutes
|
36 hours
|
18.26 days
|
|
99 (two nines)
|
14.40 minutes
|
7 hours
|
3.65 days
|
|
99.9 (three nines)
|
86.40 seconds
|
43 minutes
|
8.77 hours
|
|
99.99 (four nines)
|
8.64 seconds
|
4 minutes
|
52.60 minutes
|
|
99.999 (five nines)
|
0.86 seconds
|
26 seconds
|
5.26 minutes
|
If you can make an educated guess about the number of total hours downtime you are likely to have per year, you can use the following formulas to calculate the uptime percentage for a year, a month, or a week:
Availability is one of the more expensive requirements for a system. The higher the level of availability and the more systems that you protect, the more complex and costly an availability solution is likely to be. When you invest in availability, costs include the following:
Additional hardware and software, which can increase the complexity of interactions among software applications and settings.
Additional operational complexity.
The costs of improving availability should be evaluated in conjunction with your business needs — not all solutions in an organization are likely to require the same level of availability. You can offer different levels of availability for different sites, different services, or different farms.
Availability is a key area in which information technology (IT) groups offer service level agreements (SLAs) to set expectations with customer groups. Many IT organizations offer various SLAs that are associated with different chargeback levels.
-
Determining availability requirements
To gauge your organization’s tolerance of downtime for a site, service, or farm, answer the following questions:
If the site, service, or farm becomes unavailable, will employees be unable to perform their expected job responsibilities?
If the site, service, or farm becomes unavailable, will business and customer transactions be stopped, leading to loss of business and customers?
If you answered yes to either of these questions, you should invest in an availability solution.
-
Choosing an availability strategy and level
You can choose among many approaches to improve availability in a SharePoint Foundation environment, including the following:
Improve the fault tolerance of server hardware components.
Increase the redundancy of server roles within a farm.
-
Hardware component fault tolerance
Hardware component fault tolerance is the redundancy of hardware components and infrastructure systems such as power supplies at the server level. When planning for hardware component fault tolerance, consider the following:
Complete redundancy of every component within a server may be impossible or impractical. Use additional servers for additional redundancy.
Ensure that servers have multiple power supplies connected to different power sources for maximum redundancy.
In any system, we recommend that you work with hardware vendors to obtain fault-tolerant hardware that is appropriate for the system, including redundant array of independent disks (RAID) arrays.
SharePoint Foundation 2010 supports running server roles on redundant computers (that is, scaling out) within a farm to increase capacity and to provide basic availability.
The capacity that you require determines both the number of servers and the size of the servers in a farm. After you have met your base capacity requirements, you may want to add more servers to increase overall availability. The following illustration shows how you can provide redundancy for each server role.
Availability within a server farm

The following table describes the server roles in a SharePoint Foundation 2010 environment and the redundancy strategies that can be used for each within a farm.
|
Server role
|
Preferred redundancy strategy within a farm
|
|
Front-end Web server
|
Deploy multiple front-end Web servers within a farm, and use Network Load Balancing (NLB).
|
|
Application server
|
Deploy multiple application servers within a farm.
|
|
Database server
|
Deploy database servers by using clustering or high-availability database mirroring.
|
-
Database availability strategies
You can use Microsoft SQL Server failover clustering or SQL Server high-availability database mirroring to support availability of databases in a SharePoint Foundation environment.
-
SQL Server failover clustering
Failover clustering can provide availability support for an instance of SQL Server. A failover cluster is a combination of one or more nodes or servers, and two or more shared disks. A failover cluster instance appears as a single computer, but has functionality that provides failover from one node to another if the current node becomes unavailable. SharePoint Foundation can run on any combination of active and passive nodes in a cluster that is supported by SQL Server.
SharePoint Foundation references the cluster as a whole; therefore, failover is automatic and seamless from the perspective of SharePoint Foundation.
For detailed information about failover clustering, see Getting Started with SQL Server 2008 Failover Clustering (http://go.microsoft.com/fwlink/?LinkID=102837&clcid=0x409) and Configure availability by using SQL Server clustering (SharePoint Foundation 2010) (http://technet.microsoft.com/library/069d9586-815b-4e5d-b8f7-dbd161c10e4e(Office.14).aspx).
-
SQL Server high-availability mirroring
Database mirroring is a SQL Server technology that can deliver database redundancy on a per-database basis. In database mirroring, transactions are sent directly from a principal database and server to a mirror database and server when the transaction log buffer of the principal database is written to disk. This technique can keep the mirror database almost up to date with the principal database. SQL Server Enterprise Edition provides additional functionality that improves database mirroring performance.
For mirroring within a SharePoint Foundation farm, you must use high-availability mirroring, also known as high-safety mode with automatic failover. High-availability database mirroring involves three server instances: a principal, a mirror, and a witness. The witness server enables SQL Server to automatically fail over from the principal server to the mirror server. Failover from the principal database to the mirror database typically takes several seconds.
A change from previous versions is that SharePoint Foundation is mirroring-aware. After you have configured a database mirror instance of SQL Server, you then use SharePoint Central Administration or Windows PowerShell cmdlets to identify the failover (mirror) database server location for a configuration database, content database, or service application database. Setting a failover database location adds a parameter to the connection string that SharePoint Foundation uses to connect to SQL Server. In the event of a SQL Server time-out event, the following occurs:
1. The witness server that is configured for SQL Server mirroring automatically swaps the roles of the primary and mirror databases.
2. SharePoint Foundation automatically attempts to contact the server that is specified as the failover database.
For information about how to configure database mirroring, see Configure availability by using SQL Server database mirroring (SharePoint Foundation 2010) (http://technet.microsoft.com/library/142fc165-8f11-4509-b698-d7d44dfdbd22(Office.14).aspx).
For general information about database mirroring, see Database Mirroring (http://go.microsoft.com/fwlink/?LinkID=180597).
 Note:
Note:
Databases that have been configured to use the SQL Server FILESTREAM remote BLOB store provider cannot be mirrored.
-
Comparison of database availability strategies for a single farm: SQL Server failover clustering vs. SQL Server high-availability mirroring
The following table compares failover clustering to synchronous SQL Server high-availability mirroring.
| |
SQL Server failover clustering
|
SQL Server high-availability mirroring
|
|
Time to failover
|
Cluster member takes over immediately upon failure.
|
Mirror takes over immediately upon failure.
|
|
Transactional consistency?
|
Yes
|
Yes
|
|
Transactional concurrency?
|
Yes
|
Yes
|
|
Time to recovery
|
Shorter time to recovery (milliseconds)
|
Slightly longer time to recovery (milliseconds).
|
|
Steps required for failover?
|
Failure is automatically detected by database nodes; SharePoint Foundation 2010 references the cluster so that failover is seamless and automatic.
|
Failure is automatically detected by the database; SharePoint Foundation 2010 is aware of the mirror location, if it has been configured correctly, so that failover is automatic.
|
|
Protection against failed storage?
|
Does not protect against failed storage, because storage is shared between nodes in the cluster.
|
Protects against failed storage because both the principal and mirror database servers write to local disks.
|
|
Storage types supported
|
Shared storage (more expensive).
|
Can use less-expensive direct-attached storage (DAS).
|
|
Location requirements
|
Members of the cluster must be on the same subnet.
|
Principal, mirror, and witness servers must be on the same LAN (up to 1 millisecond latency roundtrip).
|
|
Recovery model
|
SQL Server full recovery model recommended. You can use the SQL Server simple recovery model, but the only available recovery point if the cluster is lost will be the last full backup.
|
Requires SQL Server full recovery model.
|
|
Performance overhead
|
Some decrease in performance may occur while a failover is occurring.
|
High-availability mirroring introduces transactional latency because it is synchronous. It also requires additional memory and processor overhead.
|
|
Operational burden
|
Set up and maintained at the server level.
|
The operational burden is larger than clustering. Must be set up and maintained for all databases. Reconfiguring after failover is manual.
|
-
Service application redundancy strategies
The redundancy strategy you follow for protecting service applications that run in a farm varies, depending on where the service application stores data.
-
Service applications that store data in databases
To help protect service applications that store data in databases, you must follow these steps:
1. Install the service on multiple application servers to provide redundancy within the environment.
2. Configure SQL Server clustering or mirroring to protect the data.
The following service applications store data in databases:
Business Data Connectivity service application
Application Registry service application
We do not recommend mirroring the Application Registry database, because it is only used when upgrading Windows SharePoint Services 3.0 Business Data Catolog information to SharePoint Foundation 2010.
Usage and Health Data Collection service application
 Note:
Note:
We recommend that you do not mirror the Usage and Health Data Collection service application Logging database.
Microsoft SharePoint Foundation Subscription Settings service
-
Redundancy and failover between closely located data centers configured as a single farm (“stretched” farm)
Some enterprises have data centers that are located close to one another with high-bandwidth connections so that they can be configured as a single farm. This is called a “stretched” farm. For a stretched farm to work, there must be less than 1 millisecond latency between SQL Server and the front-end Web servers in one direction, and at least 1 gigabit per second bandwidth.
In this scenario, you can provide fault tolerance by following the standard guidance for making databases and service applications redundant.
The following illustration shows a stretched farm.
Stretched farm
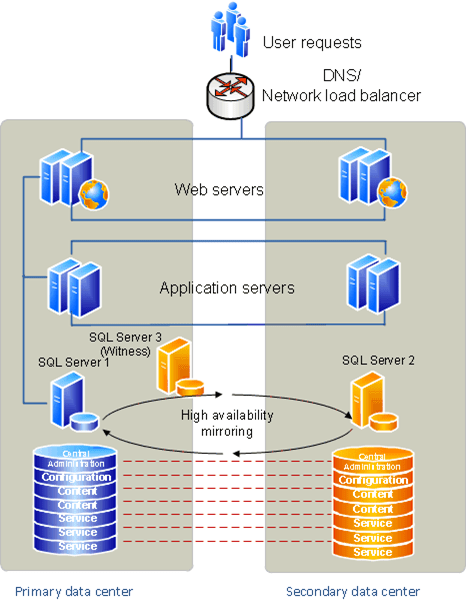
-
Plan for disaster recovery (SharePoint Foundation 2010)
This article describes key decisions in choosing disaster recovery strategies for a Microsoft SharePoint Foundation 2010 environment.
In this article:
Disaster recovery overview
Choose a disaster recovery strategy
Planning for cold standby
Planning for warm standby
Planning for hot standby data centers
System requirements for disaster recovery
-
Disaster recovery overview
For the purposes of this article, we define disaster recovery as the ability to recover from a situation in which a data center that hosts SharePoint Foundation becomes unavailable.
The disaster recovery strategy that you use for SharePoint Foundation must be coordinated with the disaster recovery strategy for the related infrastructure, including Active Directory domains, Exchange Server, and Microsoft SQL Server. Work with the administrators of the infrastructure that you rely on to design a coordinated disaster recovery strategy and plan.
The time and immediate effort to get another farm up and running in a different location is often referred to as a hot, warm, or cold standby. Our definitions for these terms are as follows:
Hot standby A second data center that can provide availability within seconds or minutes.
Warm standby A second data center that can provide availability within minutes or hours.
Cold standby A second data center that can provide availability within hours or days.
Disaster recovery can be one of the more expensive requirements for a system. The shorter the interval between failure and availability and the more systems you protect, the more complex and costly a disaster recovery solution is likely to be. When you invest in hot or warm standby data centers, costs include:
Additional hardware and software, which often increase the complexity of operations between software applications, such as custom scripts for failover and recovery.
Additional operational complexity.
The costs of maintaining hot or warm standby data centers should be evaluated based on your business needs. Not all solutions within an organization are likely to require the same level of availability after a disaster. You can offer different levels of disaster recovery for different content, services, or farms — for example, content that has high impact on your business, or search services, or an Internet publishing farm.
Disaster recovery is a key area in which information technology (IT) groups offer service level agreements (SLAs) to set expectations with customer groups. Many IT organizations offer a variety of SLAs that are associated with different chargeback levels.
When you implement failover between server farms, we recommend that you first deploy and tune the core solution within a farm, and then implement and test disaster recovery.
-
Choose a disaster recovery strategy
You can choose among many approaches to provide disaster recovery for a SharePoint Foundation environment, depending on your business needs. The following examples show why companies might choose cold, warm, or hot standby disaster recovery strategies.
Cold standby disaster recovery strategy: A business ships backups to support bare metal recovery to local and regional offsite storage on a regular basis, and has contracts in place for emergency server rentals in another region.
Pros:
Often the cheapest option to maintain, operationally.
Often an expensive option to recover, because it requires that physical servers be configured correctly after a disaster has occurred.
Cons: The slowest option to recover.
Warm standby disaster recovery strategy: A business ships virtual server images to local and regional disaster recovery farms.
Pros: Often relatively inexpensive to recover, because a virtual server farm can require little configuration upon recovery.
Cons: Can be very expensive and time consuming to maintain.
Hot standby disaster recovery strategy: A business runs multiple data centers, but serves content and services through only one data center.
Pros: Often relatively fast to recover.
Cons: Can be quite expensive to configure and maintain.
 Important:
No matter which disaster recovery solution you decide to implement for your environment, you are likely to incur some data loss.
-
Planning for cold standby data centers
In a cold standby disaster recovery scenario, you can recover by setting up a new farm in a new location, (preferably by using a scripted deployment), and restoring backups. Or, you can recover by restoring a farm from a backup solution such as Microsoft System Center Data Protection Manager 2007 that protects your data at the computer level and lets you restore each server individually. This article does not contain detailed instructions for how to create and recover in cold standby scenarios. For more information, see:
Restore a farm (SharePoint Foundation 2010) (http://technet.microsoft.com/library/f7fd691f-bcf0-4b21-8bb6-d443be711f1e(Office.14).aspx)
Restore customizations (SharePoint Foundation 2010) (http://technet.microsoft.com/library/8d1b2aba-edd3-4089-8255-8f3ef2b1b211(Office.14).aspx)
-
Planning for warm standby data centers
In a warm standby disaster recovery scenario, you can create a warm standby solution by making sure that you consistently and frequently create virtual images of the servers in your farm that you ship to a secondary location. At the secondary location, you must have an environment available in which you can easily configure and connect the images to re-create your farm environment.
This article does not contain detailed instructions for creating warm standby solutions. For more information about how to plan to deploy farms by using virtual solutions, see Plan for virtualization (SharePoint Foundation 2010).
-
Planning for hot standby data centers
In a hot standby disaster recovery scenario, you can set up a failover farm to provide disaster recovery in a separate data center from the primary farm. An environment that has a separate failover farm has the following characteristics:
A separate configuration database and Central Administration content database must be maintained on the failover farm.
All customizations must be deployed on both farms.
 Note:
Note:
We recommend that you use scripted deployment to create the primary and failover farm by using the same configuration settings and customizations.
Updates must be applied to both farms, individually.
SharePoint Foundation content databases can be successfully asynchronously mirrored or log-shipped to the failover farm.
 Note:
Note:
SQL Server mirroring can only be used to copy databases to a single mirror server, but you can log-ship to multiple secondary servers.
Service applications vary in whether they can be log-shipped to a farm. For more information, see Service application redundancy across data centers later in this article.
This topology can be repeated across many data centers, if you configure SQL Server log shipping to one or more additional data centers.
Consult with your SAN vendor to determine whether you can use SAN replication or another supported mechanism to provide availability across data centers.
The following illustration shows primary and failover farms before failover.
Primary and failover farms before failover
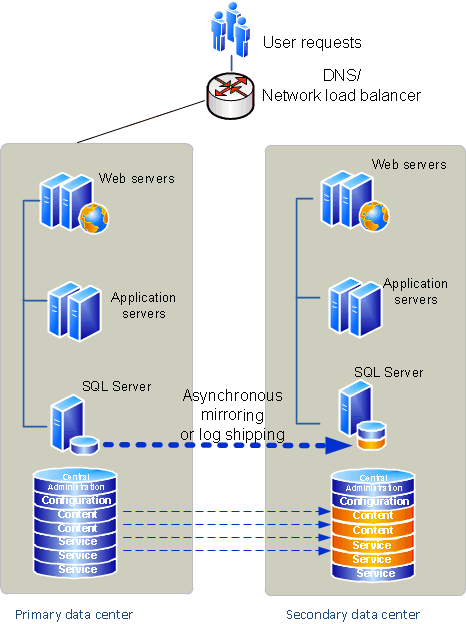
-
Service application redundancy across data centers
To provide availability across data centers for service applications, we recommend that for the services that can be run cross-farm, you run a separate services farm that can be accessed from both the primary and the secondary data centers.
For services that cannot be run cross-farm, and to provide availability for the services farm itself, the strategy for providing redundancy across data centers for a service application varies. The strategy employed depends on whether:
There is business value in running the service application in the disaster recovery farm when it is not in use.
The databases associated with the service application can be log-shipped or asynchronously mirrored.
The service application can run against read-only databases.
The following sections describe the disaster recovery strategies that we recommend for each service application. The service applications are grouped by strategy.
-
Databases that can be log-shipped or asynchronously mirrored
After a service application has been initially deployed on a secondary farm, the databases that support the following service applications can be asynchronously mirrored or log-shipped across farms:
Application Registry service application
Databases: Application Registry service
Business Data Connectivity service application
Databases: Business Data Connectivity
Usage and Health Data Collection service application
Databases: Logging
 Note:
Note:
It is possible to log-ship or mirror the Logging database. However, we recommend that you do not run the Usage and Health Data Collection service on the disaster recovery farm, and that you do not mirror nor log-ship the Logging database.
-
Service applications and databases that cannot be log-shipped or asynchronously mirrored
The following service applications must be deployed on both the primary and failover farms, and cannot be log-shipped or asynchronously mirrored. For most of these service applications, we recommend that you deploy them and then verify that the failover farm has the same configuration settings as the primary farm. If configuration changes that affect the service are made on the primary farm, you must update the failover farm.
Microsoft SharePoint Foundation Subscription Settings service application
Database: Subscription Settings
 Note:
Note:
Log-shipping the Subscription Settings database is not supported.
-
System requirements for disaster recovery
In an ideal scenario, the failover components and systems match the primary components and systems in all ways: platform, hardware, and number of servers. At a minimum, the failover environment must be able to handle the traffic that you expect during a failover. Keep in mind that only a subset of users may be served by the failover site. The systems must match in at least the following:
Operating system version and all updates
SQL Server versions and all updates
SharePoint 2010 Products versions and all updates
Although this article primarily discusses the availability of SharePoint 2010 Products, the system uptime will also be affected by the other components in the system. In particular, make sure that you do the following:
Ensure that infrastructure dependencies such as power, cooling, network, directory, and SMTP are fully redundant.
Choose a switching mechanism, whether DNS or hardware load balancing, that meets your needs.
-
Virtualization planning (SharePoint Foundation 2010)
This section contains articles that are designed to help you plan and implement a server virtualization solution for Microsoft SharePoint Foundation 2010 server farms.
In this section:
Virtualization support and licensing (SharePoint Foundation 2010)
Hyper-V virtualization requirements (SharePoint Foundation 2010)
Plan for virtualization (SharePoint Foundation 2010)
-
Virtualization support and licensing (SharePoint Foundation 2010)
This article provides support and licensing information for using server virtualization technologies to deploy SharePoint 2010 Products in a virtual environment.
-
SharePoint 2010 Products support for virtualization
All elements of Microsoft SharePoint Foundation 2010 are fully supported when deployed in a Windows Server 2008 Hyper-V technology environment. In addition, any related or required supporting technologies are also supported.
 Note:
Note:
Support for SharePoint Foundation 2010 virtualization includes third-party virtualization technologies that are hosted or hardware-based, and certified by Microsoft. For more information about certification and participating vendors, see the Server Virtualization Validation Program (SVVP) (http://go.microsoft.com/fwlink/?LinkId=125649).
-
Server virtualization using Hyper-V technology
Beginning withWindows Server 2008, server virtualization using Hyper-V has been an integral part of the operating system. Hyper-V is available with all editions of the operating system, as well as with Microsoft Hyper-V Server 2008.
We recommend using Windows Server 2008 R2 or Microsoft Hyper-V Server 2008 R2 as virtualization servers for your SharePoint 2010 Products deployment. These releases provide:
Added capabilities, such as increased virtual processor support and increased memory support for virtual machines.
Performance improvements, such as improved virtual hard drive performance and network adapter performance.
For more information, see What’s New in Hyper-V in Windows Server 2008 R2 (http://go.microsoft.com/fwlink/?LinkID=155234).
-
Operating system environment (OSE) licensing
Before you start planning for virtualization you need to determine the licensing requirements for your virtualization environment. Two types of operating system environments (OSEs) exist:
One physical operating system environment
One or more virtual operating system environment(s)
A virtual operating system environment is configured to run on a virtual (or otherwise emulated) hardware system. Use of technologies that create virtual OSEs does not change the licensing requirements for the operating system and any applications running in the OSE.
The Windows Server operation system licensing model for physical multicore processor systems is based on the number of physical processors installed on the hardware. This model extends to virtual processors configured for a virtual machine running on a virtualization server. For licensing purposes, a virtual processor is considered to have the same number of threads and cores as each physical processor on the underlying physical hardware system.
For more information about licensing requirements:
Licensing Microsoft Server Products in Virtual Environments (http://go.microsoft.com/fwlink/?LinkId=187741)
This white paper gives an overview of Microsoft licensing models for the server operating system and server applications under virtual environments.
Windows Server Virtualization Calculators (http://go.microsoft.com/fwlink/?LinkId=187742)
The Windows Server Virtualization Calculators provide two ways to estimate the number and cost of Windows Server Standard Edition, Enterprise Edition, and Datacenter Edition licenses needed for your virtualization scenarios to help you determine the most cost-effective edition of Windows Server.
 Note:
Note:
Although Microsoft Hyper-V Server 2008 R2 does not require a license for the virtualization server, licensing requirements must be met for the virtual OSEs.
-
SharePoint 2010 Products licensing
Every element of a SharePoint farm that is installed on a virtual machine must comply with the licensing requirements for SharePoint Foundation 2010 as well as related and supporting technologies.
-
Hyper-V virtualization requirements (SharePoint Foundation 2010)
This article provides hardware and software requirements for using hardware-based virtualization. Although Windows Server 2008 Hyper-V technology is the focal point of this document, the basic hardware requirements for enabling hardware-based virtualization also apply to third-party virtualization technologies that are certified by Microsoft.
-
Hardware
The requirements for hardware-based virtualization are as follows:
Hardware-assisted virtualization, which is available in processors that include a virtualization option—specifically processors with Intel Virtualization Technology (Intel VT) or AMD Virtualization (AMD-V) technology.
Hardware-enforced Data Execution Prevention (DEP) is available and enabled.
You can use one of the following tools to determine if the processor on an existing server supports Hyper-V:
AMD Hyper-V Compatibility Check Utility (.zip file) (http://go.microsoft.com/fwlink/?LinkId=150561)
Intel Processor Identification Utility (Windows Version) (http://go.microsoft.com/fwlink/?LinkId=150562)
-
Software
One of the following Microsoft products is required for Hyper-V:
Windows Server 2008 (all editions of Windows Server 2008, except for Windows Server 2008 for Itanium-Based Systems, Windows Web Server 2008, and Windows Server 2008 Foundation)
Microsoft Hyper-V Server 2008
Windows Server 2008 R2 (all editions of Windows Server 2008 R2, except for Windows Server 2008 R2 for Itanium-Based Systems, Windows Web Server 2008 R2, and Windows Server 2008 R2 Foundation)
Hyper-V Server R2
We recommend Windows Server 2008 R2 for virtualization servers because of the many improvements introduced for Hyper-V, such as:
Live migration to move a running virtual machine from one cluster node to another
Significant gains in performance and scalability
Enhanced processor support
Enhanced virtual machine storage
Enhanced networking support
For more information, see What’s New in Hyper-V in Windows Server 2008 R2 (http://go.microsoft.com/fwlink/?LinkID=155234).
Virtualization support and licensing (SharePoint Foundation 2010)
-
Plan for virtualization (SharePoint Foundation 2010)
This article describes the planning process to follow in order to successfully deploy Microsoft SharePoint Foundation 2010 in a virtual environment. Each step in the planning process includes links to the appropriate documentation. It is assumed that you have determined the SharePoint Foundation 2010 solution that you want to deploy in a virtual environment. On the surface, deploying a SharePoint Foundation 2010 farm on virtual machines is the same as deploying a farm on physical servers. However, deploying in a virtual environment involves a different level of planning that takes into account the characteristics of Windows Server 2008 Hyper-V technology as well as how virtual machines, the virtual network adapters, and virtual hard disks are implemented on a virtualization server.
Before you start developing your virtualization plan, we recommend that you read the Hyper-V Planning and Deployment Guide (http://go.microsoft.com/fwlink/?LinkId=187964).
Detailed information about the following subjects is out-of-scope for this article, but is provided in other articles:
Capacity management
Security requirements
Health and performance monitoring
Backup and recovery
A virtual environment consists of two interrelated layers, one physical and one virtual. A configuration change in either layer effects servers in the other layer. This interrelationship becomes evident when you plan for, deploy, and use SharePoint Foundation 2010 in a virtual environment.
-
Create a plan for deploying SharePoint Foundation 2010 in a virtual environment
You should approach planning for a virtual farm the same way as you would plan for a physical farm. Most, if not all, of the issues and requirements for deploying SharePoint Foundation 2010 on physical servers apply equally to virtual machines. Any decisions that you make, such as minimum processor or memory requirements, have a direct bearing on number of virtualization hosts required, as well as their ability to adequately support the virtual machines that you identify for the farm.
After you finish planning a physical farm, you have all the information you need to design virtualization architecture. Ideally, this architecture is as close as possible to the final virtualization solution that you intend to put into production. Realistically, the architecture is likely to change as you move through the deployment phase of the system lifecycle. In fact, you may determine that some farm server roles are not good candidates for virtualization.
The key planning steps, tasks, and references are summarized in following the procedure.
 To create a virtualization plan
|
1. Determine virtualization scope
Determining the scope of farm virtualization is a key contributing factor to successfully implementing, managing, and evaluating your virtualization project. When determining scope, you have to decide whether you will virtualize some or the entire supporting virtual machine infrastructure.
Use the following list of tasks to determine the scope of virtualization.
Task 1: Identify all the farms that are required to implement your solution. Take into consideration the fact that most solutions have several farm components. For example, an Internet-facing Web portal typically has a publishing farm, an authoring farm, and a testing or quality assurance farm.
Task 2: For each farm, determine the number of servers that are required as well as the role that each server will have in the farm.
Task 3: Identify which farms you want to deploy in in a virtual environment.
Refining the scope of a solution also refines the scope of a deployment, which makes it easier to implement and manage. For more information, see Site and solution planning (SharePoint Foundation 2010). In many cases, solutions share common elements; however, each solution may have its own requirements. For more information, see Fundamental site planning (SharePoint Foundation 2010). The article shows one of the popular solutions.
 Note: Note:
Expect to refine the scope of your solution as you move through the phases of deploying your farm in a production environment.
2. Identify servers to virtualize
Identify servers that are good candidates for virtualization. From a technical and Microsoft support perspective, all SharePoint servers can be virtualized. The decision to virtualize a particular farm server should be based on:
Corporate compliance policies (for example, legal and technical)
Benefits derived from server consolidation, such as reduced power consumption and physical space requirements. For more information, see Server virtualization (http://go.microsoft.com/fwlink/?LinkId=187965).
Capacity requirements (see next planning step)
3. Identify capacity requirements for each farm server
Determine the resource requirements for each farm server as if it was a physical server. Take into account specialized server roles, such as hosting Enterprise Search components. You need to specify the amount of resources needed for each of the following server components:
Memory
Number of processors and minimum clock speed
Number and size of hard disks
Number of network adapters and their required throughput speed
4. Determine if virtual machine can meet physical requirements.
You have to determine whether each virtual machine that you identified in Step 3 can meet the capacity requirements of a corresponding physical server. At a minimum, complete the following tasks:
Task 1: Assess the memory requirement in the context of available virtualization host capacity.
Task 2: Assess the processor requirement. Hyper-V has a hard limit of four virtual processors per virtual machine. If a physical farm server requires eight processors, determine whether this requirement can be met by scaling out the number of virtual machines in a farm.
Task 3: Assess the virtual machine storage requirement in the context of local physical storage or SAN.
5. Determine virtualization host requirements
Determine the minimum host requirements (memory, number of cores, number and size of local hard drives, number of network adapters)Also consider and plan for the following:
Scalability: Determine if you can add more CPUs, more memory, more hard disks, and more network adapters to the host computer.
 Important: Important:
Depending on the manufacturer and computer model, you may not be able to increase capacity. You need to have this information before you use or purchase a server.
Extra host capacity: Determine whether or not the host has the capacity to scale up existing virtual machines, or to add additional virtual machines. This is very important if you plan to use Hyper-V failover clustering, quick migration, or live migration.
 Important: Important:
Plan for peak load and determine how short term spikes in load will be handled.
6. Design virtualization architecture
A well-designed architecture is required for a successful solution. For SharePoint Foundation 2010, a basic three-tier topology provides the foundation for all the solutions. The following elements form a good design that is based on the recommended foundation topology:
Good overall performance
Ease of maintenance and upgrade
Flexibility
Scalability
High availability
A virtualization architecture model consists of the virtualization hosts and the virtual machines that make up the farm topology. This model enables you to visualize the virtual environment that you plan to deploy.
 Note: Note:
Be prepared to refine the architecture as you move through the planning process. The following steps may dictate changes to the architecture.
7. Identify storage requirements
Determine how much local physical storage or SAN storage is required for Hyper-V-related storage such as configuration files, Virtual Hard Disks (VHDs), and snapshots.
8. Identify backup and recovery requirements
In addition to the farm servers, you have to plan backup and recovery for all or part of a farm. For more information, see Backup and recovery (SharePoint Foundation 2010) (http://technet.microsoft.com/library/48dbef54-1f1b-424f-a918-d2c428c3216e(Office.14).aspx).
9. Determine high availability requirements and design a solution
Identify approaches for achieving high availability for Web servers, application servers, and databases. Typical strategies include the following:
Redundant hardware and servers
Hot-swappable components
Failover clustering for virtual and physical servers. For more information, see Hyper-V: Using Hyper-V and Failover Clustering (http://go.microsoft.com/fwlink/?LinkId=187967).
Clustering or mirroring for database servers. For more information, see Plan for availability (SharePoint Foundation 2010).
10. Identify health and capacity indicators for monitoring the virtual environment.
Combine the key indicators that you derived in the previous steps with the planning you did for SharePoint Foundation 2010. For more information, see Server farm and environment planning (SharePoint Foundation 2010) . You have to determine all the health and capacity indicators in order to collect measurements from the following objects in the virtual environment:
Virtual machines with SharePoint Foundation 2010 installed
Virtual machines that are not part of the farm, such as a firewall server
Virtualization hosts
Network components
After you start to collect data from the virtual environment, you can create a baseline, which can be used to assess and tune the virtual environment during deployment and after the farm goes into production.
11. Create a deployment plan for the deployment phase of the system lifecycle.
For more information, see the SharePoint 2010 Products Deployment model, available in the Technical diagrams (SharePoint Foundation 2010) article.
12. Create a maintenance plan
Create a maintenance plan that enables you to implement password changes and apply software updates, service packs, and hotfixes. This plan should include the virtual machines and the virtualization hosts.
|
-
Performance and capacity test results and recommendations (SharePoint Foundation 2010)
This section contains a series of white papers describing the performance and capacity impact of specific feature sets included in Microsoft SharePoint Foundation 2010. These white papers include information about the performance and capacity characteristics of the feature and how it was tested by Microsoft, including:
Test farm characteristics
Test results
Recommendations
Troubleshooting performance and scalability
The following table describes the available white paper. You can download the white paper as a Microsoft Word document (.doc) (http://www.microsoft.com/downloads/details.aspx?FamilyID=e8a1fb0d-957d-4f96-8e0a-f5c74df0796e).
|
Title
|
Description
|
|
SharePoint Foundation 2010 Search Capacity Planning
|
Provides guidance on how to plan for search in SharePoint Foundation 2010.
|
Capacity management and sizing for SharePoint Server 2010 (http://technet.microsoft.com/library/031b0634-bf99-4c23-8ebf-9d58b6a8e6ce(Office.14).aspx)
-
Planning worksheets for SharePoint Foundation 2010
In this article:
Planning worksheets by task
Planning worksheets by title
This article provides links to worksheets that you can use to record information that you gather and decisions that you make as you plan your deployment of Microsoft SharePoint Foundation 2010. Use these worksheets in conjunction with — not as a substitute for — Planning and architecture for SharePoint Foundation 2010.
-
Planning worksheets by task
-
Planning worksheets by title


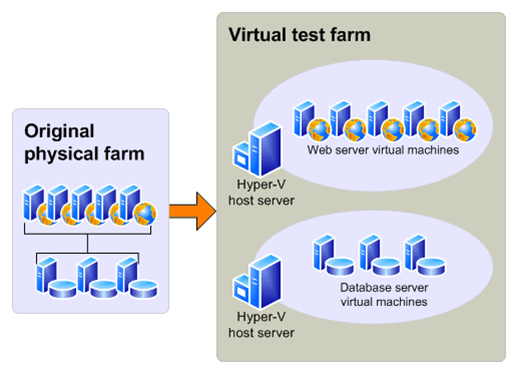
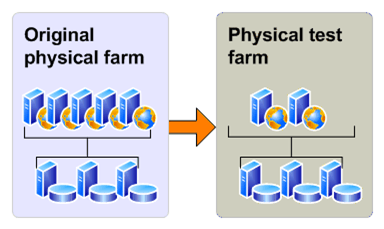


 Note:
Note: