Escape Business Solutions
———————– Page 2———————–
a guide to claims-based identity and access control
———————– Page 3———————–
———————– Page 4———————–
a guide to
Claims-Based Identity
and Access Control
second edition
Authentication and Authorization
for Services and the Web
patterns & practices
Microsoft Corporation
———————– Page 5———————–
This document is provided “as-is.” Information and views expressed
in this document, including URLs and other Internet website
references, may change without notice. You bear the risk of using it.
Some examples depicted herein are provided for illustration only
and are fictitious. No real association or connection is intended or
should be inferred.
©2011 Microsoft. All rights reserved.
Microsoft, Active Directory, MSDN, SharePoint, SQL Server, Visual
Studio, Windows, Windows Azure, Windows Live, Windows
PowerShell, and Windows Server are trademarks of the Microsoft
group of companies. All other trademarks are the property of their
respective owners.
———————– Page 6———————–
Contents
foreword
Kim Cameron xvii
foreword
Stuart Kwan xix
foreword
Steve Peschka xxi
preface
Who This Book Is For xxiii
Why This Book Is Pertinent Now xxiv
A Note about Terminology xxiv
How This Book Is Structured xxv
About the Technologies xxviii
What You Need to Use the Code xxix
Application Server xxx
ADFS xxx
Active Directory xxx
Client Computer xxx
Who’s Who xxxi
acknowledgements xxxiii
———————– Page 7———————–
1 An Introduction to Claims 1
What Do Claims Provide? 1
Not Every System Needs Claims 2
Claims Simplify Authentication Logic 3
A Familiar Example 3
What Makes a Good Claim? 5
Understanding Issuers 5
ADFS as an Issuer 5
External Issuers 7
User Anonymity 9
Implementing Claims-Based Identity 9
Step 1: Add Logic to Your Applications to Support Claims 9
Step 2: Acquire or Build an Issuer 10
Step 3: Configure Your Application to Trust the Issuer 10
Step 4: Configure the Issuer to Know about the 11
Application
A Summary of Benefits 12
Moving On 12
Questions 13
2 Claims-Based Architectures 15
A Closer Look at Claims-Based Architectures 16
Browser-Based Applications 17
Understanding the Sequence of Steps 19
Optimizing Performance 23
Smart Clients 23
SharePoint Applications and SharePoint BCS 25
Federating Identity across Realms 26
The Benefits of Cross-Realm Identity 26
How Federated Identity Works 28
Federated Identity with ACS 29
Understanding the Sequence of Steps 31
Combining ACS and ADFS 32
Identity Transformation 32
Home Realm Discovery 32
Design Considerations for Claims-Based Applications 35
What Makes a Good Claim? 35
How Can You Uniquely Distinguish One User from Another? 36
———————– Page 8———————–
How Can You Get a List of All Possible Users
and All Possible Claims? 36
Where Should Claims Be Issued? 37
What Technologies Do Claims and Tokens Use? 38
Questions 41
3 Claims-based Single Sign-on for the
Web and Windows Azure 43
The Premise 43
Goals and Requirements 45
Overview of the Solution 46
Inside the Implementation 49
a-Expense before Claims 49
a-Expense with Claims 52
a-Order before Claims 59
a-Order with Claims 59
Signing out of an Application 60
Setup and Physical Deployment 61
Using a Mock Issuer 61
Isolating Active Directory 62
Handling Single Sign-out in the Mock Issuer 63
Converting to a Production Issuer 63
Enabling Internet Access 64
Variation—Moving to Windows Azure 64
Questions 68
More Information 69
4 Federated Identity for Web
Applications 71
The Premise 71
Goals and Requirements 72
Overview of the Solution 72
Benefits and Limitations 77
Inside the Implementation 77
Setup and Physical Deployment 77
Using Mock Issuers for Development and Testing 78
Establishing Trust Relationships 78
Questions 79
More Information 80
———————– Page 9———————–
5 Federated Identity with Windows
Azure Access Control Service 81
The Premise 82
Goals and Requirements 82
Overview of the Solution 83
Example of a Customer with its Own Identity Provider 84
Example of a Customer Using a Social Identity 86
Trust Relationships with Social Identity Providers 88
Description of Mapping Rules in a Federation Provider 89
Alternative Solutions 91
Inside the Implementation 93
Setup and Physical Deployment 94
Establishing a Trust Relationship with ACS 94
Reporting Errors from ACS 95
Initializing ACS 95
Working with Social Identity Providers 96
Managing Users with Social Identities 96
Working with Windows Live IDs 97
Working with Facebook 98
Questions 99
More Information 100
6 Federated Identity with
Multiple Partners 101
The Premise 101
Goals and Requirements 102
Overview of the Solution 103
Step 1: Present Credentials to the Identity Provider 104
Step 2: Transmit the Identity Provider’s Security Token
to the Federation Provider 104
Step 3: Map the Claims 105
Step 4: Transmit the Mapped Claims
and Perform the Requested Action 105
Using Claims in Fabrikam Shipping 107
Inside the Implementation 109
———————– Page 10———————–
Setup and Physical Deployment 117
Establishing the Trust Relationship 117
Organization Section 118
Issuer Section 118
Certificate Section 118
User-Configurable Claims Transformation Rules 119
Questions 119
7 Federated Identity with Multiple
Partners and Windows Azure Access
Control Service 123
The Premise 124
Goals and Requirements 125
Overview of the Solution 127
Step 1: Present Credentials to the Identity Provider 128
Step 2: Transmit the Identity Provider’s Security Token
to the Federation Provider 129
Step 3: Map the Claims 129
Step 4: Transmit the Mapped Claims
and Perform the Requested Action 130
Step 1: Present Credentials to the Identity Provider 131
Step 2: Transmit the Social Identity Provider’s
Security Token to ACS 131
Step 3: Map the Claims 132
Step 4: Transmit the Mapped Claims 132
and Perform the Requested Action
Enrolling a New Partner Organization 132
Managing Multiple Partners with a Single Identity 133
Managing Users at a Partner Organization 134
Inside the Implementation 135
Getting a List of Identity Providers from ACS 135
Adding a New Identity Provider to ACS 137
Managing Claims-Mapping Rules in ACS 137
Displaying a List of Partner Organizations 138
Authenticating a User of Fabrikam Shipping 139
Authorizing Access to Fabrikam Shipping Data 140
———————– Page 11———————–
Setup and Physical Deployment 141
Fabrikam Shipping Websites 141
Sample Claims Issuers 142
Initializing ACS 142
Questions 143
More Information 144
8 Claims Enabling Web Services 145
The Premise 145
Goals and Requirements 146
Overview of the Solution 146
Inside the Implementation 148
Implementing the Web Service 148
Implementing the Active Client 150
Implementing the Authorization Strategy 153
Debugging the Application 154
Setup and Physical Deployment 155
Configuring ADFS 2.0 for Web Services 155
Questions 156
9 Securing REST Services 159
The Premise 159
Goals and Requirements 160
Overview of the Solution 160
Inside the Implementation 162
The ACS Configuration 162
Implementing the Web Service 163
Implementing the Active Client 167
Setup and Physical Deployment 172
Configuring ADFS 2.0 for Web Services 172
Configuring ACS 172
Questions 173
More Information 174
———————– Page 12———————–
10 Accessing Rest Services from
a Windows Phone Device 175
The Premise 176
Goals and Requirements 176
Overview of the Solution 177
Passive Federation 177
Active Federation 179
Comparing the Solutions 181
Inside the Implementation 183
Active SAML token handling 183
Web browser control 185
Asynchronous Behavior 187
Setup and Physical Deployment 191
Questions 191
More Information 193
11 Claims-Based Single Sign-On for
Microsoft SharePoint 2010 195
The Premise 196
Goals and Requirements 196
Overview of the Solution 197
Authentication Mechanism 197
End-to-End Walkthroughs 199
Visiting Two Site Collections
in a SharePoint Web Application 199
Visiting Two SharePoint Web Applications 200
Authorization in SharePoint 201
The People Picker 202
Single Sign-Out 204
Inside the Implementation 205
Relying Party Configuration in ADFS 205
SharePoint STS Configuration 206
Create a New SharePoint Trusted Root Authority 206
Create the Claims Mappings in SharePoint 207
Create a New SharePoint Trusted Identity Token Issuer 207
SharePoint Web Application Configuration 209
People Picker Customizations 210
———————– Page 13———————–
Single Sign-Out Control 212
Displaying Claims in a Web Part 214
User Profile Synchronization 214
Setup and Physical Deployment 215
FedAuth Tokens 215
ADFS Default Authentication Method 216
Server Deployment 216
Questions 217
More Information 218
12 federated identity for sharepoint
applications 219
The Premise 219
Goals and Requirements 220
Overview of the Solution 220
Inside the Implementation 224
Token Expiration and Sliding Sessions 224
SAML Token Expiration in SharePoint 225
Sliding Sessions in SharePoint 228
Closing the Browser 232
Authorization Rules 232
Home Realm Discovery 232
Questions 234
More Information 236
appendices
a using fedutil 237
Using FedUtil to Make an Application Claims-Aware 237
b message sequences 239
The Browser-Based Scenario 240
The Active Client Scenario 252
The Browser-Based Scenario with Access Control Service (ACS) 258
Single Sign-Out 273
———————– Page 14———————–
c industry standards 285
Security Assertion Markup Language (SAML) 285
Security Association Management Protocol (SAMP)
and Internet Security Association
and Key Management Protocol (ISAKMP) 285
WS-Federation 285
WS-Federation: Passive Requestor Profile 286
WS-Security 286
WS-SecureConversation 286
WS-Trust 286
XML Encryption 286
d certificates 287
Certificates for Browser-Based Applications 287
On the Issuer (Browser Scenario) 287
Certificate for TLS/SSL (Issuer, Browser Scenario) 287
Certificate for Token Signing (Issuer, Browser Scenario) 287
Optional Certificate for Token Encryption
(Issuer, Browser Scenario) 288
On the Web Application Server 288
Certificate for TLS/SSL (Web Server, Browser Scenario) 288
Token Signature Verification (Web Server, Browser
Scenario) 289
Token Signature Chain of Trust Verification (Web Server,
Browser Scenario) 289
Optional Token Decryption (Web Server, Browser Scenario) 289
Cookie Encryption/Decryption (Web Server, Browser Scenario) 290
Certificates for Active Clients 290
On the Issuer (Active Scenario) 290
Certificate for Transport Security (TLS/SSL)
(Issuer, Active Scenario) 290
Certificate for Message Security (Issuer, Active Scenario) 291
Certificate for Token Signing (Issuer, Active Scenario) 291
Certificate for Token Encryption (Issuer, Active Scenario) 291
On the Web Service Host 292
Certificate for Transport Security (TLS/SSL) (Web Service Host,
Active Scenario) 292
Certificate for Message Security
(Web Service Host, Active Scenario) 292
———————– Page 15———————–
Token Signature Verification (Web Service Host, Active Scenario) 292
Token Decryption (Web Service Host, Active Scenario) 293
Token Signature Chain Trust Verification (Web Service Host,
Active Scenario) 293
On the Active Client Host 293
Certificate for Message Security (Active Client Host) 293
e windows azure appfabric access
control service (acs) 295
What Does ACS DO? 296
Message Sequences for ACS 297
ACS Authenticating Users of a Website 298
ACS Authenticating Services, Smart Clients, and Mobile Devices 299
Combining ACS and ADFS for Users of a Website 300
Combining ACS and ADFS for Services, Smart Clients,
and SharePoint BCS 301
Creating, Configuring, and Using an ACS Issuer 302
Step 1: Access the ACS Web Portal 302
Step 2: Create a Namespace for the Issuer Service Instance 302
Step 3: Add the Required Identity Providers to the Namespace 303
Step 4: Configure One or More Relying Party Applications 303
Step 5: Create Claims Transformations and Pass-through Rules 305
Step 6: Obtain the URIs for the Service Namespace 306
Step 7: Configure Relying Party Applications to Use ACS 306
Custom Home Realm Discovery Pages 306
Configuration with the Management Service API 307
Managing Errors 308
Integration of ACS and a Local ADFS Issuer 308
Security Considerations with ACS 310
Tips for Using ACS 311
ACS and STSs Generated in Visual Studio 2010 311
Error When Uploading a Federation Metadata Document 311
Avoiding Use of the Default ACS Home Realm Discovery Page 312
More Information 312
———————– Page 16———————–
f sharepoint 2010 authentication
architecture and considerations 313
Benefits of a Claims-Based Architecture 313
Windows Identity Foundation
Implementation of the Claims-Based Architecture 315
SharePoint 2010 User Identity 316
The SharePoint 2010 Security Token Service 317
The SharePoint 2010 Services Application Framework 318
Considerations When Using Claims with SharePoint 319
Choosing an Authentication Mode 319
Supported Standards 319
Using Multiple Authentication Mechanisms 320
SharePoint Groups with Claims Authentication 320
SharePoint Profiles and Audiences with Claims Authentication 321
Rich Client, Office, and Reporting Applications
with Claims Authentication 321
Other Trade-offs and Limitations for Claims Authentication 322
Configuring SharePoint to Use Claims 324
Tips for Configuring Claims in SharePoint 325
More Information 326
glossary 327
answers to questions 337
index 365
———————– Page 17———————–
———————– Page 18———————–
Foreword
Claims-based identity seeks to control the digital experience and al-
locate digital resources based on claims made by one party about an-
other. A party can be a person, organization, government, website,
web service, or even a device. The very simplest example of a claim is
something that a party says about itself.
As the authors of this book point out, there is nothing new about
the use of claims. As far back as the early days of mainframe comput-
ing, the operating system asked users for passwords and then passed
each new application a “claim” about who was using it. But this world
was based to some extent on wishful thinking because applications
didn’t question what they were told.
As systems became interconnected and more complicated, we
needed ways to identify parties across multiple computers. One way
to do this was for the parties that used applications on one computer
to authenticate to the applications (and/or operating systems) that
ran on the other computers. This mechanism is still widely used—for
example, when logging on to a great number of Web sites.
However, this approach becomes unmanageable when you have
many co-operating systems (as is the case, for example, in the enter-
prise). Therefore, specialized services were invented that would regis-
ter and authenticate users, and subsequently provide claims about
them to interested applications. Some well-known examples are
NTLM, Kerberos, Public Key Infrastructure (PKI), and the Security
Assertion Markup Language (SAML).
If systems that use claims have been around for so long, how can
claims-based computing be new or important? The answer is a variant
of the old adage, “All tables have legs, but not all legs have tables.” The
claims-based model embraces and subsumes the capabilities of all the
systems that have existed to date, but it also allows many new things
to be accomplished. This book gives a great sense of the resultant
opportunities.
xvii
———————– Page 19———————–
xviiixviii
For one thing, identity no longer depends on the use of unique
identifiers. NTLM, Kerberos, and public key certificates conveyed,
above all else, an identification number or name. This unique number
could be used as a directory key to look up other attributes and to
track activities. But once we start thinking in terms of claims-based
computing, identifiers were not mandatory. We don’t need to say that
a person is associated with the number X, and then look in a database
to see if number X is married. We just say the person is married. An
identifier is reduced to one potential claim (a thing said by some party)
among many.
This opens up the possibility of many more directly usable and
substantive claims, such as a family name, a person’s citizenship, the
right to do something, or the fact that someone is in a certain age
group or is a great customer. One can make this kind of claim without
revealing a party’s unique identity. This has immense implications for
privacy, which becomes an increasingly important concern as digital
identity is applied to our personal lives.
Further, while the earlier systems were all hermetic worlds, we
can now look at them as examples of the same thing and transform a
claim made in one world to a claim made in another. We can use
“claims transformers” to convert claims from one system to another,
to interpret meanings, apply policies, and to provide elasticity. This is
what makes claims essential for connecting our organizations and
enterprises into a cloud. Because they are standardized, we can use
them across platforms and look at the distributed fabric as a real cir-
cuit board on which we can assemble our services and components.
Claims offer a single conceptual model, programming interface,
and end-user paradigm, whereas before claims we had a cacophony of
disjoint approaches. In my experience, the people who use these new
approaches to build products universally agree that they solve many
pressing problems that were impossibly difficult before. Yet these
people also offer a word of advice. Though embracing what has ex-
isted, the claims-based paradigm is fundamentally a new one; the
biggest challenge is to understand this and take advantage of it.
That’s why this book is so useful. It deals with the fundamental
issues, but it is practical and concise. The time spent reading it will be
repaid many times over as you become an expert in one of the trans-
formative technologies of our time.
Kim Cameron
Distinguished Engineer—Microsoft Identity Division
———————– Page 20———————–
Foreword
In the spring of 2008, months before the Windows® Identity Founda-
tion made its first public appearance, I was on the phone with the
chief software architect of a Fortune 500 company when I experi-
enced one of those vivid, clarifying moments that come during the
course of a software project. We were chatting about how difficult it
was to manage an environment with hundreds, or even thousands of
developers, all building different kinds of applications for different
audiences. In such an environment, the burden of consistent applica-
tion security usually falls on the shoulders of one designated security
architect.
A big part of that architect’s job is to guide developers on how to
handle authentication. Developers have many technologies to choose
from. Microsoft® Windows Integrated Authentication, SAML, LDAP,
and X.509 are just a few. The security architect is responsible for writ-
ing detailed implementation guidance on when and how to use all of
them. I imagined a document with hundreds of pages of technology
overviews, decision flowcharts, and code appendices that demon-
strate the correct use of technology X for scenario Y. “If you are build-
ing a web application, for employees, on the intranet, on Windows,
use Windows Integrated Authentication and LDAP, send your queries
to the enterprise directory….”
I could already tell that this document, despite the architect’s best
efforts, was destined to sit unread on the corner of every developer’s
desk. It was all just too hard; although every developer knows security
is important, no one has the time to read all that. Nevertheless, every
organization needed an architect to write these guidelines. It was the
only meaningful thing they could do to manage this complexity.
It was at that moment that I realized the true purpose of the
forthcoming Windows Identity Foundation. It was to render the tech-
nology decision trivial. Architects would no longer need to create com-
plex guidelines for authentication. This was an epiphany of sorts.
xix
———————– Page 21———————–
xxxx
Windows Identity Foundation would allow authentication logic
to be factored out of the application logic, and as a result most devel-
opers would never have to deal with the underlying complexity. Fac-
toring out authentication logic would insulate applications from
changing requirements. Making an application available to users at
multiple organizations or even moving it to the cloud would just mean
reconfiguring the identity infrastructure, not rewriting the application
code. This refactoring of identity logic is the basis of the claims-based
identity model.
Eugenio Pace from the Microsoft patterns & practices group has
brought together some of the foremost minds on this topic so that
their collective experience can be yours. He has focused on practical
scenarios that will help you get started writing your own claims-aware
applications. The guide works progressively, with the simplest and
most common scenarios explained first. It also contains a clear over-
view of the main concepts. Working source code for all of the exam-
ples can be found online (http://claimsid.codeplex.com).
I have truly enjoyed having Eugenio be part of our extended engi-
neering team during this project. His enthusiasm, creativity, and per-
severance have made this book possible. Eugenio is one of the handful
of people I have met who revel in the challenge of identity and secu-
rity and who care deeply that it be done right.
Our goal is for this book to earn its way to the corner of your desk
and lie there dog-eared and much referenced, so that we can be your
identity experts and you can get on with the job that is most impor-
tant to you: building applications that matter. We wish you much
success.
Stuart Kwan
Group Program Manager, Identity and Access Platform
———————– Page 22———————–
Foreword
As you prepare to dive into this guide and gain a deeper understanding
®
of the integration between claims authentication and Microsoft
SharePoint® 2010, you may find the following admission both
exhilarating and frightening at the same time: two years ago I knew
virtually nothing about claims authentication. Today, I sit here writing
a foreword to an extensive guide on the topic. Whether that’s
because a few people think I know a thing or two about claims, or just
that no one else could spare the time to do it, well, I’ll leave that for
you to decide.
Fortunately, this guide will give you a big advantage over what I
had to work with, and by the time you’re finished reading it you’ll
understand the symbiotic relationship between claims and SharePoint
2010; the good news is that it won’t take you two years to do so.
I’ll be the first to admit that claims authentication, in different
flavors, has been around for a number of years. Like many technolo-
gies that turn into core platform components though, it often takes a
big bet by a popular product or company to get a technology onto the
map. I think SharePoint 2010 has helped create acceptance for claims
authentication. Changes of this magnitude are often hard to appreci-
ate at the time, but I think we’ll look back at this release some day and
recognize that, for many of us, this was the time when we really began
to appreciate what claims authentication offers.
From Windows claims, or authentication as we’ve always known
it, to the distributed authentication model of SAML claims, there are
more choices than ever before. Now we can use federated authentica-
tion much more easily with products such as Active Directory®
Federation Services (ADFS) 2.0, or even connect our SharePoint farms
to authentication providers in the cloud, such as the Windows
Azure™ AppFabric Access Control Service. We aren’t authenticating
only Windows users anymore; we can have users authenticate against
our Active Directory from virtually any application—SiteMinder,
Yahoo, Google, Windows Live, Novell eDirectory. Now we can even
xxi
———————– Page 23———————–
xxiixxii
write our own identity provider using Microsoft Visual Studio®
and the Windows Identity Foundation framework. We can use those
claims in SharePoint; we can add our own custom claims to them, we
can inject our own code into the out-of-the-box people picker, and
much more.
I believe this guide provides you with the foundation to help you
take advantage of all of these opportunities and more. Many people
from around the company either directly or indirectly helped to
contribute to its success. Here’s hoping you can build on it and turn it
into your own success.
Steve Peschka
Principal Architect
Microsoft SharePoint Online—Dedicated
———————– Page 24———————–
Preface
As an application designer or developer, imagine a world in which you
don’t have to worry about authentication. Imagine instead that all
requests to your application already include the information you need
to make access control decisions and to personalize the application
for the user.
In this world, your applications can trust another system compo-
nent to securely provide user information, such as the user’s name
or email address, a manager’s email address, or even a purchasing
authorization limit. The user’s information always arrives in the same
simple format, regardless of the authentication mechanism, whether
it’s Microsoft® Windows® integrated authentication, forms-based
authentication in a web browser, an X.509 client certificate, or some-
thing more exotic. Even if someone in charge of your company’s
security policy changes how users authenticate, you still get the infor-
mation, and it’s always in the same format.
This is the utopia of claims-based identity that A Guide to Claims-
Based Identity and Access Control describes. As you’ll see, claims provide
an innovative approach for building applications that authenticate and
authorize users.
Who This Book Is For
This book gives you enough information to evaluate claims-based
identity as a possible option when you’re planning a new application
or making changes to an existing one. It is intended for any architect,
developer, or information technology (IT) professional who designs,
builds, or operates web applications and services that require identity
information about their users. Although applications that use claims-
based identity exist on many platforms, this book is written for people
who work with Windows-based systems. You should be familiar with
xxiii
———————– Page 25———————–
xxiv
the Microsoft .NET Framework, ASP.NET, Windows Communication
Foundation (WCF), Microsoft Active Directory® directory service,
and Microsoft Visual C#® development system.
Why This Book Is Pertinent Now
Although claims-based identity has been possible for quite a while,
there are now tools available that make it much easier for developers
of Windows-based applications to implement it. These tools include
the Windows Identity Foundation (WIF) and Microsoft Active Direc-
tory Federation Services (ADFS) 2.0. This book shows you when and
how to use these tools in the context of some commonly occurring
scenarios.
A Note about Terminology
This book explains claims-based identity without using a lot of new
terminology. However, if you read the various standards and much of
the existing literature, you’ll see terms such as relying party, STS, sub-
ject, identity provider, and so on. Here is a short list that equates some
of the most common expressions used in the literature with the more
familiar terms used in this book. For additional clarification about
terminology, see the glossary at the end of the book.
relying party (rp) = application
service provider (sp) = application
A relying party or a service provider is an application that uses claims.
The term relying party arose because the application relies on an is-
suer to provide information about identity. The term service provider
is commonly used with the Security Assertion Markup Language
(SAML). Because this book is intended for people who design and
build applications, it uses application, or claims-aware application, when
it is discussing the functionality of the application, and relying party or
RP, when it is talking about the role of the application in relation to
identity providers and federation providers. It does not use service
provider or SP.
subject = user
principal = user
A subject or a principal is a user. The term subject has been around for
years in security literature, and it does make sense when you think
about it—the user is the subject of access control, personalization,
and so on. A subject can be a non-human entity, such as printer or
———————– Page 26———————–
preface xxv
another device, but this book doesn’t discuss such scenarios. In addi-
tion, the .NET Framework uses the term principal rather than subject.
This book talks about users rather than subjects or principals .
security token service (sts) = issuer
Technically, a security token service is the interface within an issuer
that accepts requests and creates and issues security tokens contain-
ing claims.
identity provider (IdP) = issuer
An identity provider is an issuer, or a token issuer if you prefer. Identity
providers validate various user credentials, such as user names, pass-
words, and certificates; and they issue tokens.
resource security token service (R-STS)
= issuer
A resource security token service accepts one token and issues an-
other. Rather than having information about identity, it has informa-
tion about the resource. For example, an R-STS can translate tokens
issued by an identity provider into application-specific claims.
active client = smart or rich client
passive client = browser
Much of the literature refers to active versus passive clients. An active
client can use a sophisticated library such as Windows Communica-
tion Foundation (WCF) to implement the protocols that request and
pass around security tokens (WS-Trust is the protocol used in active
scenarios). In order to support many different browsers, the passive
scenarios use a much simpler protocol to request and pass around
tokens that rely on simple HTTP primitives such as HTTP GET (with
redirects) and POST. (This simpler protocol is defined in the WS-
Federation specification, section 13.)
In this book, an active client is a rich client or a smart client.
A passive client is a web browser.
How This Book Is Structured
You can think of the structure of this book as a subway that has main
lines and branches. Following the Preface, there are two chapters that
contain general information. These are followed by scenarios that
show how to apply this knowledge with increasingly more sophisti-
cated requirements.
———————– Page 27———————–
xxvi
Here is the map of our subway.
Preface
An Introduction Claims-Based
to Claims Architectures
Claims-Based Single
Sign-On for the Web
Claims-Based
Single Sign-On
Single Sign-On in for SharePoint
Windows Azure
Federated Identity with Windows
Azure Access Control Service Federated
Federated Identity for Identity for
Web Applications SharePoint
Applications
Federated Identity
with Multiple Partners
Federated Identity
with Multiple Partners
and ACS
Claims Enabling Securing REST
Web Services Services
Accessing REST Services
from Windows Phone
figure 1
Map of the book
———————– Page 28———————–
preface xxvii
An Introduction to Claims explains what a claim is and provides
general rules on what makes good claims and how to incorporate
them into your application. It’s probably a good idea that you read this
chapter before you move on to the scenarios.
Claims-Based Architectures shows you how to use claims with
browser-based applications and smart client applications. In particular,
the chapter focuses on how to implement single sign-on for your us-
ers, whether they are on an intranet or an extranet. This chapter is
optional. You don’t need to read it before you proceed to the sce-
narios.
Claims-Based Single Sign-On for the Web and Windows Azure is
the starting point of the path that explores the implementation of
single sign-on and federated identity. This chapter shows you how to
implement single sign-on and single sign-out within a corporate in-
tranet. Although this may be something that you can also implement
with Integrated Windows Authentication, it is the first stop on the
way to implementing more complex scenarios. It includes a section for
Windows Azure® technology platform that shows you how to move
the claims-based application to the cloud.
Federated Identity for Web Applications shows how you can give
your business partners access to your applications while maintaining
the integrity of your corporate directory and theirs. In other words,
your partners’ employees can use their own corporate credentials to
gain access to your applications.
Federated Identity with Windows Azure Access Control Service is
the start of a parallel path that explores Windows Azure AppFabric
Access Control Service (ACS) in the context of single sign-on and
federated identity. This chapter extends the scenarios described in the
previous chapter to enable users to authenticate using social identity
providers such as Google and Windows Live® network of Internet
services.
Federated Identity with Multiple Partners is a variation of the fed-
erated identity scenario that shows you how to federate with partners
who have no issuer of their own as well as those who do. It demon-
strates how to use the ASP.NET MVC framework to create a claims-
aware application.
Federated Identity with Multiple Partners and Windows Azure
Access Control Service extends the scenarios described in the previ-
ous chapter to include ACS to give users additional choices for au-
thentication that include social identity providers such as Google and
Windows Live.
———————– Page 29———————–
xxviii
Claims Enabling Web Services is the first of a set of chapters that
explore authentication for active clients rather than web browsers.
This chapter shows you how to use the claims-based approach with
web services, whereby a partner uses a smart client that communi-
cates with identity providers and token issuers using SOAP-based
services.
Securing REST Services shows how to use the claims-based approach
with web services, whereby a partner uses a smart client that com-
municates with identity providers and token issuers using REST-based
services.
Accessing REST Services from a Windows Phone Device shows
how you can use claims-based techniques with Windows Phone™
wireless devices. It discusses the additional considerations that you
must take into account when using claims-based authentication with
mobile devices.
Claims-Based Single Sign-On for Microsoft SharePoint 2010 be-
gins a path that explores how you can use claims-based identity tech-
niques with Microsoft SharePoint 2010. This chapter shows how
SharePoint web applications can use claims-based authentication with
an external token issuer such as ADFS to enable access from both
internal locations and externally over the web.
Federated Identity for SharePoint Applications extends the previ-
ous chapter to show how you can use federated identity techniques
to enable users to authenticate using more than one identity provider
and token issuer.
About the Technologies
In this guide, you will find discussion on several technologies with
which you may not be immediately familiar. The following is a brief
description of each one, together with links to where you can find
more information.
Windows Identity Foundation (WIF). WIF contains a set of
components that enable developers using the Microsoft .NET Frame-
work to externalize identity logic from their application, improving
developer productivity, enhancing application security, and enabling
interoperability. Developers can apply the same tools and program-
ming model to build on-premises software as well as cloud services
without requiring custom implementations. WIF uses a single simpli-
fied identity model based on claims, together with interoperability
based on industry-standard protocols. For more information see
“Windows Identity Foundation Simplifies User Access for Develop-
ers,” at http://msdn.microsoft.com/en-us/security/aa570351.aspx.
———————– Page 30———————–
preface xxix
Active Directory Federation Service (ADFS). ADFS is a server
role in Windows Server® that provides simplified access and single
sign-on for on-premises and cloud-based applications in the enter-
prise, across organizations, and on the web. It acts as an identity pro-
vider and token issuer to enable user access with native single sign-on
across organizational boundaries and in the cloud, and to easily con-
nect applications by utilizing industry-standard protocols. For more
information, see “Active Directory Federation Services 2.0,” at http://
http://www.microsoft.com/windowsserver2008/en/us/ad-fs-2-overview.
aspx.
Windows Azure. Windows Azure is a cloud services platform
that serves as the development, service hosting and service manage-
ment environment. It is a flexible platform that supports multiple
languages and provides developers with on-demand compute and
storage services to host, scale, and manage web applications over the
Internet through Microsoft datacenters. For more information, see
“Windows Azure,” at http://www.microsoft.com/windowsazure/
windowsazure/default.aspx.
Windows Azure AppFabric Access Control Service (ACS). ACS
is an easy way to provide identity and access control to web applica-
tions and services while integrating with standards-based identity
providers. These identity providers can include enterprise directories
such as Active Directory, and web identities such as Windows Live ID,
Google, Yahoo! and Facebook. ACS enables authorization decisions to
be moved out of the application and into a set of declarative rules that
can transform incoming security claims into claims that applications
understand, and can also be used to manage users’ permissions. For
more information, see “Windows Azure Access Control,” at http://
http://www.microsoft.com/windowsazure/appfabric/overview/default.aspx.
What You Need to Use the Code
You can either run the scenarios on your own system or you can cre-
ate a realistic lab environment. Running the scenarios on your own
system is very simple and has only a few requirements, which are
listed below.
• Microsoft Windows Vista® SP1, Windows 7, Windows Server
2008 (32-bit or 64-bit), or Windows Server 2008 R2 (32-bit or
64-bit)
• Microsoft Internet Information Services (IIS) 7.0 or 7.5
• Microsoft .NET Framework 4.0
• Microsoft Visual Studio® 2010 (excluding Express editions)
• Windows Azure Tools for Microsoft Visual Studio
• Windows Identity Foundation
———————– Page 31———————–
xxx
NOTE: If you want to install the Windows Azure Tools on Windows
Server 2008 R2 you must first install the .NET Framework version
3.5.1. This is also required for the HTTP Activation features. The
.NET Framework version 3.5.1 can be installed from Windows
Update.
Running the scenarios in a realistic lab environment, with an in-
stance of Active Directory Federation Services (ADFS) and Active
Directory, requires an application server, ADFS, Active Directory, and
a client system. Here are their system requirements.
Application Server
The application server requires the following:
• Windows Server 2008 or Windows Server 2008 R2
• Microsoft Internet Information Services (IIS) 7.0 or 7.5
• Microsoft Visual Studio 2010 (excluding Express editions)
• .NET Framework 4.0
• Windows Identity Foundation
ADFS
The ADFS server requires the following:
• Windows Server 2008 or Windows Server 2008 R2
• Microsoft Internet Information Services (IIS) 7.0 or 7.5
• .NET Framework 4.0
• Microsoft SQL Server® 2005 or 2008 Express Edition
Active Directory
The Active Directory system requires Windows Server 2008 or Win-
dows Server 2008 R2 with Active Directory installed.
Client Computer
The client computer requires Windows Vista or Windows 7 for active
scenarios. Passive scenarios may use any web browser that supports
HTTP redirection as the client.
———————– Page 32———————–
preface xxxi
Who’s Who
As we’ve said, this book uses a number of scenarios that trace the
evolution of several corporate applications. A panel of experts com-
ments on the development efforts. The panel includes a security
specialist, a software architect, a software developer, and an IT profes-
sional. The scenarios can be considered from each of these points of
view. Here are our experts.
Bharath is a security specialist. He checks that solutions for
authentication and authorization reliably safeguard a company’s
data. He is a cautious person, with good reason.
Providing authentication for a single application
is easy. Securing all applications across our
organization is a different thing.
Jana is a software architect. She plans the overall structure of an
application. Her perspective is both practical and strategic. In other
words, she considers not only what technical approaches are needed
today, but also what direction a company needs to consider for the
future.
It’s not easy, balancing the needs of users, the IT
organization, the developers, and the technical
platforms we rely on.
Markus is a senior software developer. He is analytical, detail-
oriented, and methodical. He’s focused on the task at hand,
which is building a great claims-based application. He knows
that he’s the person who’s ultimately responsible for the code.
I don’t care what you use for authentication,
I’ll make it work.
Poe is an IT professional who’s an expert in deploying and running in
a corporate data center. He’s also an Active Directory guru. Poe has
a keen interest in practical solutions; after all, he’s the one who gets
paged at 3:00 AM when there’s a problem.
Each application handles authentication differ-
ently. Can I get a bit of consistency please?!?
If you have a particular area of interest, look for notes provided by the
specialists whose interests align with yours.
———————– Page 33———————–
———————– Page 34———————–
Acknowledgments
This book marks a milestone in a journey I started in the winter of
2007. At that time, I was offered the opportunity to enter a com-
pletely new domain: the world of software delivered as a service.
Offerings such as Windows Azure™ technology platform were far
from being realized, and “the cloud” was still to be defined and fully
understood. My work focused mainly on uncovering the specific chal-
lenges that companies would face with this new way of delivering
software.
It was immediately obvious that managing identity and access
control was a major obstacle for developers. Identity and access con-
trol were fundamental. They were prerequisites for everything else. If
you didn’t get authentication and authorization right, you would be
building your application on a foundation of sand.
Thus began my journey into the world of claims-based identity. I
was very lucky to initiate this journey with none other than a claims
Jedi, Vittorio Bertocci. He turned me into a convert.
Initially, I was puzzled that so few people were deploying what
seemed, at first glance, to be simple principles. Then I understood
why. In my discussions with colleagues and customers, I frequently
found myself having to think twice about many of the concepts and
about the mechanics needed to put them into practice. In fact, even
after longer exposure to the subject, I found myself having to care-
fully retrace the interactions among implementation components.
The principles may have been simple, but translating them into run-
ning code was a different matter. Translating them into the right run-
ning code was even harder.
Around this time, Microsoft announced Windows Identity Foun-
dation (WIF), Active Directory® Federation Services (ADFS) 2.0, and
Windows Azure AppFabric Access Control Service (ACS). Once I
understood how to apply those technologies, and how they dramati-
cally simplified claims-based development, I realized that the moment
had come to create a guide like the one you are now reading.
xxxiii
———————– Page 35———————–
xxxiv
Even after I had spent a significant amount of time on the subject,
I realized that providing prescriptive guidance required greater profi-
ciency than my own, and I was lucky to be able to recruit for my quest
some very bright and experienced experts. I have thoroughly enjoyed
working with them on this project and would be honored to work
with this fine team again. I was also fortunate to have skilled software
developers, software testers, technical writers, and others as project
contributors.
I want to start by thanking the following subject matter experts
and key contributors to this guide: Dominick Baier, Vittorio Bertocci,
Keith Brown, and Matias Woloski. These guys were outstanding. I
admire their rigor, their drive for excellence, and their commitment to
practical solutions.
Running code is a very powerful device for explaining how tech-
nology works. Designing sample applications that are both techni-
cally and pedagogically sound is no simple task. I want to thank the
project’s development and test teams for providing that balance:
Federico Boerr, Carlos Farre, Diego Marcet, Anant Manuj Mittal, Er-
win van der Valk, and Matias Woloski.
This guide is meant to be authoritative and prescriptive in the
topics it covers. However, we also wanted it to be simple to under-
stand, approachable, and entertaining—a guide you would find inter-
esting and you would enjoy reading. We invested in two areas to
achieve these goals: an approachable writing style and an appealing
visual design.
A team of technical writers and editors were responsible for the
text. They performed the miracle of translating and organizing our
jargon- and acronym-plagued drafts, notes, and conversations into
clear, readable text. I want to direct many thanks to RoAnn Corbisier,
Colin Campbell, Roberta Leibovitz, and Tina Burden for doing such a
fine job on that.
The innovative visual design concept used for this guide was
developed by Roberta Leibovitz and Colin Campbell (Modeled
Computation LLC) who worked with a team of talented designers
and illustrators. The book design was created by John Hubbard (Eson).
The cartoon faces and chapter divisions were drawn by the award-
winning Seattle-based cartoonist Ellen Forney. The technical illustra-
tions were adapted from my Tablet PC mock-ups by Veronica Ruiz.
I want to thank the creative team for giving this guide such a great
look.
I also want to thank all the customers, partners, and community
members who have patiently reviewed our early content and drafts.
You have truly helped us shape this guide. Among those, I want to
highlight the exceptional contributions of Zulfiqar Ahmed, Michele
Leroux Bustamante (IDesign), Pablo Mariano Cibraro (Tellago Inc),
———————– Page 36———————–
acknowledgments xxxv
Hernan DeLahitte (DigitFactory), Pedro Felix, Tim Fischer (Microsoft
Germany), Mario Fontana, David Hill, Doug Hiller, Jason Hogg,
Ezequiel Jadib, Brad Jonas, Seshadri Mani, Marcelo Mas, Vijayavani
Nori, Krish Shenoy, Travis Spencer (www.travisspencer.com), Mario
Szpuszta (Sr. Architect Advisor, Microsoft Austria), Chris Tavares,
Peter M. Thompson, and Todd West.
Finally, I want to thank Stuart Kwan and Conrad Bayer from the
Identity Division at Microsoft for their support throughout. Even
though their teams were extremely busy shipping WIF and ADFS,
they always found time to help us.
Eugenio Pace
Senior Program Manager – patterns & practices
Microsoft Corporation
Acknowledgements to Contributors to this
Second Edition
All our guides are the result of great work from many people. I’m
happy to see that so many of the original contributors and advisors of
our first guide also worked on this one. The interest in this particular
area has increased notably since the first edition was published. Proof
of that is the continued investment by Microsoft in tools, services,
and products.
As our scope increased to cover SharePoint and Windows Azure
Access Control Service, we also added new community members
and industry experts who have significantly helped throughout the
development of this new edition.
We’d like to acknowledge the following individuals who have
exceptionally contributed to it: Zulfiquar Ahmed, Dominic Betts,
Federico Boerr, Robert Bogue, Jonathan Cisneros, Shy Cohen, David
Crawford, Pedro Felix, David Hill, Alex Homer, Laura Hunter, Chris
Keyser, Jason Lee, Alik Levin, Masashi Narumoto, Nicolas Paez, Brian
Puhl, Paul Schaeflein, Ken St. Cyr, Venky Veeraraghavan, Rathi
Velusamy, Bill Wilder, Daz Wilkin, Jim Zimmerman, Scott Densmore,
Steve Peschka, and Christian Nielsen
We also want to thank everyone who participated in our Code-
Plex community site.
Eugenio Pace
Sr. Program Manager Lead – patterns & practices
Microsoft Corporation, May 2011
———————– Page 37———————–
———————– Page 38———————–
1 An Introduction to Claims
This chapter discusses some concepts, such as claims and federated Claims-based identity isn’t
identity, that may sound new to you. However, many of these ideas new. It’s been in use for
have been around for a long time. The mechanics involved in a claims- almost a decade.
based approach have a flavor similar to Kerberos, which is one of the
most broadly accepted authentication protocols in use today and is
also the protocol used by Microsoft® Active Directory® directory
service. Federation protocols such as WS-Federation and the Security
Assertion Markup Language (SAML) have been with us for many years
as interoperable protocols that are implemented on all major technol-
ogy platforms.
What Do Claims Provide?
To see the power of claims, you might need to change your view of
authentication. It’s easy to let a particular authentication mechanism
constrain your thinking. If you use Integrated Windows Authentica-
tion (Kerberos or NTLM), you probably think of identity in terms of
Microsoft Windows® user accounts and groups. If you use the ASP.
NET membership and roles provider, you probably think in terms of
user names, passwords, and roles. If you try to determine what the
different authentication mechanisms have in common, you can ab-
stract the individual elements of identity and access control into two
parts: a single, general notion of claims, and the concept of an issuer
or an authority.
A claim is a statement that one subject makes about itself or another
subject. The statement can be about a name, identity, key, group,
privilege, or capability, for example. Claims are issued by a provider,
and they are given one or more values and then packaged in security
tokens that are issued by an issuer, commonly known as a security
token service (STS). For a full list of definitions of terms associated
with claims-based identity, see “Claims-Based Identity Term
1
———————– Page 39———————–
22 chapter one
Definitions” at http://msdn.microsoft.com/en-us/library/
ee534975.aspx.
Thinking in terms of claims and issuers is a powerful abstraction
that supports new ways of securing your applications. Because claims
involve an explicit trust relationship with an issuer, your application
believes a claim about the current user only if it trusts the entity that
issued the claim. Trust is explicit in the claims-based approach, not
implicit as in other authentication and authorization approaches with
which you may be familiar.
The following table shows the relationships between security
tokens, claims, and issuers.
You can use claims to Security token Claims Issuer
implement role-based Windows token. This User name and groups. Windows Active Directory
access control token is represented domain.
(RBAC). Roles are as a security identifier
claims, but claims can (SID). This is a unique
contain more value of variable
information than just length that is used to
role membership. identify a security
Also, you can send principal or security
claims inside a signed group in Windows
(and possibly operating systems.
encrypted) security
token to assure the User name token. User name. Application.
receiver that they Certificate. Examples can include a Certification authorities,
come from a trusted certificate thumbprint, a including the root authority
issuer. subject, or a distinguished and all authorities in the
name. chain to the root.
The claims-based approach to identity makes it easy for users to
sign in using Kerberos where it makes sense, but at the same time, it’s
just as easy for them to use one or more (perhaps more Internet-
Claims provide a powerful friendly) authentication techniques, without you having to recode,
abstraction for identity. recompile, or even reconfigure your applications. You can support any
authentication technique, some of the most popular being Kerberos,
forms authentication, X.509 certificates, and smart cards, as well as
information cards and others.
Not Every System Needs Claims
Sometimes claims aren’t needed. This is an important disclaimer. Com-
panies with a host of internal applications can use Integrated Win-
dows Authentication to achieve many of the benefits provided by
claims. Active Directory does a great job of storing user identities, and
because Kerberos is a part of Windows, your applications don’t have
to include much authentication logic. As long as every application you
build can use Integrated Windows Authentication, you may have al-
ready reached your identity utopia.
———————– Page 40———————–
an introduction to claims 3 3
However, there are many reasons why you might need something
other than Windows authentication. You might have web-facing ap-
plications that are used by people who don’t have accounts in your
Windows domain. Another reason might be that your company has
merged with another company and you’re having trouble authenticat-
ing across two Windows forests that don’t (and may never) have a
trust relationship. Perhaps you want to share identities with another
company that has non-.NET Framework applications or you need to
share identities between applications running on different platforms
(for example, the Macintosh). These are just a few situations in which
claims-based identity can be the right choice for you.
Claims Simplify Authentication Logic
Most applications include a certain amount of logic that supports
identity-related features. Applications that can’t rely on Integrated
Windows Authentication tend to have more of this than applications
that do. For example, web-facing applications that store user names
and passwords must handle password reset, lockout, and other issues.
Enterprise-facing applications that use Integrated Windows Authen-
tication can rely on the domain controller.
But even with Integrated Windows Authentication, there are still
challenges. Kerberos tickets only give you a user’s account and a list
of groups. What if your application needs to send email to the user?
What if you need the email address of the user’s manager? This starts
to get complicated quickly, even within a single domain. To go beyond
the limitations of Kerberos, you need to program Active Directory.
This is not a simple task, especially if you want to build efficient Light-
weight Directory Access Protocol (LDAP) queries that don’t slow
down your directory server.
Claims-based identity allows you to factor out the authentication Claims help you to factor
logic from individual applications. Instead of the application determin- authentication logic out of
ing who the user is, it receives claims that identify the user. your applications.
A Familiar Example
Claims-based identity is all around us. A very familiar analogy is the
authentication protocol you follow each time you visit an airport. You
can’t simply walk up to the gate and present your passport or driver’s
license. Instead, you must first check in at the ticket counter. Here,
you present whatever credential makes sense. If you’re going overseas,
you show your passport. For domestic flights, you present your driver’s
license. After verifying that your picture ID matches your face (au-
thentication), the agent looks up your flight and verifies that you’ve
paid for a ticket (authorization). Assuming all is in order, you receive a
boarding pass that you take to the gate.
———————– Page 41———————–
44 chapter one
A boarding pass is very informative. Gate agents know your name
and frequent flyer number (authentication and personalization), your
flight number and seating priority (authorization), and perhaps even
more. The gate agents have everything that they need to do their jobs
efficiently.
There is also special information on the boarding pass. It is en-
coded in the bar code and/or the magnetic strip on the back. This in-
formation (such as a boarding serial number) proves that the pass was
issued by the airline and is not a forgery.
In essence, a boarding pass is a signed set of claims made by the
airline about you. It states that you are allowed to board a particular
flight at a particular time and sit in a particular seat. Of course, agents
don’t need to think very deeply about this. They simply validate your
boarding pass, read the claims on it, and let you board the plane.
It’s also important to note that there may be more than one way
of obtaining the signed set of claims that is your boarding pass. You
might go to the ticket counter at the airport, or you might use the
airline’s web site and print your boarding pass at home. The gate
agents boarding the flight don’t care how the boarding pass was cre-
ated; they don’t care which issuer you used, as long as it is trusted by
the airline. They only care that it is an authentic set of claims that give
you permission to get on the plane.
In software, this bundle of claims is called a security token. Each
security token is signed by the issuer who created it. A claims-based
application considers users to be authenticated if they present a valid,
signed security token from a trusted issuer. Figure 1 shows the basic
pattern for using claims.
Issuer
.
e
t .
a n
c e
i k
t
n o
e t
h e
t u
u s
s
A I
. .
1 2
3. Send token.
Application
figure 1
Issuers, security tokens, and applications
———————– Page 42———————–
an introduction to claims 5 5
For an application developer, the advantage of this system is clear:
your application doesn’t need to worry about what sort of credentials
the user presents. Someone who determines your company’s security
policy can make those rules, and buy or build the issuer. Your applica-
tion simply receives the equivalent of a boarding pass. No matter what
authentication protocol was used, Kerberos, SSL, forms authentica-
tion, or something more exotic, the application gets a signed set of
claims that has the information it needs about the user. This informa-
tion is in a simple format that the application can use immediately.
What Makes a Good Claim? When you decide what
Think about claims the same way you think about attributes in a cen- kinds of claims to issue, ask
tral repository such as Active Directory, over which you have little yourself how hard is it to
convince the IT department
control. Security tokens can contain claims such as the user’s name, to extend the Active
email address, manager’s email address, groups, roles, and so on. De- Directory schema. They
pending on your organization, it may be easy or difficult to centralize have good reasons for
lots of information about users and issue claims to share that informa- staying with what they
tion with applications. already have. If they’re
reluctant now, claims aren’t
It rarely makes sense to centralize data that is specific to only one going to change that. Keep
application. In fact, applications that use claims can benefit from stor- this in mind when you
ing a separate table that contains user information. This table is where choose which attributes to
you can keep application-specific user data that no other application use as claims.
cares about. This is data for which your application is authoritative. In
other words, it is the single source for that data, and someone must
be responsible for keeping it up to date.
Another use for a table like this is to cache non-authoritative data
that you get from claims. For example, you might cache an email claim
for each user so that you can send out notification email without the
user having to be logged in. You should treat any cached claims as
read-only and refresh them the next time the user visits your applica-
tion and presents fresh claims. Include a date column that you update
each time you refresh the record. That way, you know how stale the
cached claims have become when it comes time to use them.
Claims are like salt.
Understanding Issuers Just a little bit flavors
Today, it’s possible to acquire an issuer that provides user information, the broth. The next
packaged as claims. chapter has more
information on what
makes a good claim.
ADFS as an Issuer
If you have Windows Server® 2008 R2 Enterprise Edition, you are
automatically licensed to run the Microsoft issuer, Active Directory
Federation Services (ADFS) 2.0. ADFS provides the logic to authenti- A good issuer can make it
cate users in several ways, and you can customize each instance of easier to implement authori-
your ADFS issuer to authenticate users with Kerberos, forms authen- zation and personalization
tication, or certificates. Alternatively, you can ask your ADFS issuer to in your applications.
———————– Page 43———————–
66 chapter one
accept a security token from an issuer in another realm as proof of
authentication. This is known as identity federation and it’s how you
achieve single sign-on across realms.
In identity terms, a realm is the set of applications, URLs, domains,
or sites for which a token is valid. Typically a realm is defined using
an Internet domain such as microsoft.com, or a path within that
domain, such as microsoft.com/practices/guides. A realm is some-
times described as a security domain because it encompasses all
applications within a specified security boundary.
You can also receive tokens
that were generated outside Figure 2 shows all the tasks that the issuer performs.
of your own realm, and
accept them if you trust the
issuer. This is known as figure 2 Active Directory
ADFS functions
federated identity. Feder-
ated identity enables
single-sign on, allowing users Active Directory
to sign on to applications in 2. Gather information. Lightweight Directory
different realms without Issuer (ADFS) Services
needing to enter realm-
specific credentials. Users
sign on once to access Relational database
.
e
multiple applications in t n.
a
c e
i k
different realms. t
n o XML Custom stores
e t XML
XML
h e
t u
u s
s
A I
. .
1 3
4. Send token. Claims-based
application
After the user is authenticated, the issuer creates claims about
that user and issues a security token. ADFS has a rules engine that
makes it easy to extract LDAP attributes from the user’s record in
Active Directory and its cousin, Active Directory Lightweight Direc-
tory Services (AD LDS). ADFS also allows you to add rules that include
arbitrary SQL statements so that you can extract user data from your
own custom database.
You can extend ADFS to add other stores. This is useful because,
in many companies, a user’s identity is often fragmented. ADFS hides
this fragmentation. Your claims-based applications won’t break if you
decide to move data around between stores.
———————– Page 44———————–
an introduction to claims 7 7
External Issuers
ADFS requires users to have an account in Active Directory or in one
of the stores that ADFS trusts. However, users may have no access to
an Active Directory-based issuer, but have accounts with other well-
known issuers. These issuers typically include social networks and
email providers. It may be appropriate for your application to accept
security tokens created by one of these issuers. This token can also be
accepted by an internal issuer such as ADFS so that the external is-
suer acts as another ADFS store.
To simplify this approach, you can use a service such as Windows
Azure™ Access Control Service (ACS). ACS accepts tokens issued by
many of the well-known issuers such as Windows Live® network of
Internet services, Google, Facebook, and more. It is the responsibility
of the issuer to authenticate the user and issue claims. ACS can then
perform translation and transformation on the claims using configu-
rable rules, and issue a security token that your application can accept.
Figure 3 shows an overview of the tasks that ACS performs, with
options to authenticate users in conjunction with a local issuer such
as ADFS, and directly without requiring a local issuer.
ACS can be config-
ured to trust a range
of social networking
identity providers
that are capable of
authenticating users
and issuing claims, as
well as trusting
enterprise and
custom identity
providers.
———————– Page 45———————–
88 chapter one
figure 3
ACS functions Windows Live Facebook
Google [ others ]
Redirect
user to a Send
trusted claims
user
Trust
Issuer (ADFS) Issuer (ACS)
Gather Information
e e
t n t n
a e a e
c c
i k i k
t o t o
n t n t
e e e e
h u h u
t t
u s u s
s s
A I A I
S
e n
n e
d k
o
t t
o
k d
e n
n e
S
Claims-based
Application
For more information about obtaining and configuring an ACS
account, see Appendix E, “Windows Azure Access Control Service.”
Claims-based applications expect to receive claims about the user,
but they don’t care about which identity store those claims come
Claims-based applications are from. These applications are loosely coupled to identity. This is one of
loosely coupled to identity. the biggest benefits of claims-based identity.
———————– Page 46———————–
an introduction to claims 9 9
User Anonymity
One option that claims-based applications give you is user anonymity.
Remember that your application no longer directly authenticates the
users; instead, it relies on an issuer to do that and to make claims
about them. If user anonymity is a feature you want, simply don’t ask
for any claim that personally identifies the user. For example, maybe
all you really need is a set of roles to authorize the user’s actions, but
you don’t need to know the user’s name. You can do that with claims-
based identity by only asking for role claims. Some issuers (such as
ADFS and Windows Live ID) support the idea of private user identi-
fiers, which allow you to get a unique, anonymous identifier for a user To maintain user
without any personal information (such as a name or email address). anonymity, it is
important that the
Keep user anonymity in mind when you consider the power of claims- issuer does not
based identity. collude with the
application by
providing additional
Implementing Claims-Based Identity information.
There are some general set-up steps that every claims-based system
requires. Understanding these steps will help you when you read
about the claims-based architectures.
STEP 1: Add Log IC to Your App LICAt Ions
to s upport CLAIms
When you build a claims-based application, it needs to know how to
validate the incoming security token and how to parse the claims that
are inside. Many types of applications can make use of claims for tasks
such as authorizing users and managing access to resources or func-
tionality. For example, Microsoft SharePoint® applications can sup-
port the use of claims to implement authorization rules. Later chapters
of this guide discuss the use of claims with SharePoint applications.
The Windows Identity Foundation (WIF) provides a common
programming model for claims that can be used by both Windows
Communication Foundation (WCF) and ASP.NET applications. If you
already know how to use methods such as IsInRole and properties
such as Identity.Name, you’ll be happy to know that WIF simply adds
one more property: Identity.Claims. It identifies the claims that were
issued, who issued them, and what they contain.
There’s certainly more to learn about the WIF programming
model, but for now just remember to reference the WIF assembly
(Microsoft.IdentityModel.dll) from your ASP.NET applications and
WCF services in order to use the WIF programming paradigm.
———————– Page 47———————–
1010 chapter one
STEP 2: ACqu IrE or Bu ILd A n IssuEr
For most teams, the easiest and most secure option will be to use
ADFS 2.0 or ACS as the issuer of tokens. Unless you have a great deal
of security experience on your team, you should look to the experts
to supply an issuer. If all users can be authenticated in ADFS 2.0
through the stores it trusts, this is a good option for most situations.
For solutions that require authentication using external stores or so-
cial network identity providers, ACS or a combination of ADFS and
ACS, is a good choice. If you need to customize the issuer and the
extensibility points in ADFS 2.0 or ACS aren’t sufficient, you can li-
cense third-party software or use WIF to build your own issuer. Note,
however, that implementing a production-grade issuer requires spe-
cialized skills that are beyond the scope of this book.
While you’re developing applications, you can use a stub issuer that
just returns the claims you need. The Windows Identity Foundation
SDK includes a local issuer that can be used for prototyping and
development. You can obtain the SDK from http://www.microsoft.
com/downloads/en/details.aspx?FamilyID=c148b2df-c7af-46bb-
9162-2c9422208504. Alternatively, you can create a custom STS in
Microsoft Visual Studio® and connect that to your application. For
more information, see “Establishing Trust from an ASP.NET Relying
Party Application to an STS using FedUtil” at http://msdn.micro-
soft.com/en-us/library/ee517285.aspx.
STEP 3: Conf Igur E Your App LICAt Ion to t rust
th E Issu Er
After you build a claims-based application and have an issuer to sup-
port it, the next step is to set up a trust relationship. An application
trusts its issuer to identify and authenticate users and make claims
about their identities. When you configure an application to rely on a
specific issuer, you are establishing a trust (or trust relationship) with
that issuer.
Trust is unidirectional. There are several important things to know about an issuer when
The application trusts you establish trust with it:
the issuer, and not the • What claims does the issuer offer?
other way around.
• What key should the application use to validate signatures on
the issued tokens?
• What URL must users access in order to request a token from
the issuer?
———————– Page 48———————–
an introduction to claims 11 11
Claims can be anything you can imagine, but practically speaking,
there are some very common claims offered by most issuers. They
tend to be simple, commonly available pieces of information, such as
first name, last name, email name, groups and/or roles, and so on. Each
issuer can be configured to offer different claims, so the application
(technically, this means the architects and developers who design and
build the application) needs to know what claims are being offered so
it can either select from that list or ask whoever manages the issuer to
expand its offering.
All of the questions in the previous list can easily be answered by
asking the issuer for federation metadata . This is an XML document in
a format defined by the WS-Federation standard that the issuer pro-
vides to the application. It includes a serialized copy of the issuer’s
certificate that provides your application with the correct public key
to verify incoming tokens. It also includes a list of claims the issuer
offers, the URL where users can go to get a token, and other more
technical details, such as the token formats that it knows about (al-
though in most cases you’ll be using the default SAML format under-
stood by the vast majority of issuers and claims-based applications).
WIF includes a wizard that automatically configures your application’s
identity settings based on this metadata. You just need to give the
wizard the URL for the issuer you’ve selected, and it downloads the
metadata and properly configures your application.
SharePoint applications are a typical example of the type of ap-
plication that can be configured to trust claims issued by an enterprise
or a federated claims issuer, including issuers such as ADFS and ACS.
In particular, SharePoint applications that use BCS to access remote
services can benefit from using federated claims issuers.
STEP 4: Conf Igur E th E Issu Er to Know AB out
th E App LICAt Ion
The issuer needs to know a few things about an application before it
can issue it any tokens:
• What Uniform Resource Identifier (URI) identifies this applica-
tion?
• Of the claims that the issuer offers, which ones does this
application require and which are optional?
• Should the issuer encrypt the tokens? If so, what key should it
use? Issuers only provide claims
• What URL does the application expose in order to receive to authorized applications.
tokens?
———————– Page 49———————–
1212 chapter one
Each application is different, and not all applications need the
same claims. One application might need to know the user’s groups or
roles, while another application might only need a first and last name.
So when a client requests a token, part of that request includes an
identifier for the application the user is trying to access. This identi-
fier is a URI and, in general, it’s simplest to just use the URL of the
application, for example, http://www.fabrikam.com/purchasing/.
If you’re building a claims-based web application that has a rea-
sonable degree of security, you’ll require the use of secure sockets
layer (SSL) (HTTPS) for both the issuer and the application. This will
protect the information in the token from eavesdroppers. Applica-
There are, of course,
many reasons why an tions with stronger security requirements can also request encrypted
application shouldn’t tokens, in which case the application typically has its own certificate
get any more (and private key). The issuer needs a copy of that certificate (without
information about a the private key) in order to encrypt the token issued for that applica-
user than it needs.
tion.
Just two of them are
compliance with Once again, federation metadata makes this exchange of informa-
privacy laws and the tion easy. WIF includes a tool named FedUtil.exe that generates a
design practice of federation metadata document for your application so that you don’t
loose coupling. have to manually configure the issuer with all of these settings.
A Summary of Benefits
To remind you of what you’ve learned, here’s a summary of the ben-
efits that claims can provide to you. Claims decouple authentication
from authorization so that the application doesn’t need to include the
logic for a specific mode of authentication. They also decouple roles
from authorization logic and allow you to use more granular permis-
sions than roles might provide. You can securely grant access to users
who might have previously been inaccessible because they were in
different domains, not part of any corporate domain, or using differ-
ent platforms or technologies.
Finally, you can improve the efficiency of your IT tasks by elimi-
nating duplicate accounts that might span applications or domains
and by preventing critical information from becoming stale.
Moving On
Now that you have a general idea of what claims are and how to build
a claims-based system, you can move on to the particulars. If you are
interested in more details about claims-based architectures for
browser-based and smart client-based applications, see the Chapter 2,
“Claims-Based Architectures.” If you want to start digging into the
———————– Page 50———————–
an introduction to claims 13 13
specifics of how to use claims, start reading the scenarios. Each of the
scenarios shows a different situation and demonstrates how to use
claims to solve the problem. New concepts are explained within the
framework of the scenario to give you a practical understanding of
what they mean. You don’t need to read the scenarios sequentially,
but each chapter presumes that you understand all the material that
was explained in earlier chapters.
Questions
1. Under what circumstances should your application or
service accept a token that contains claims about the user
or requesting service?
a. The claims include an email address.
b. The token was sent over an HTTPS channel.
c. Your application or service trusts the token issuer.
d. The token is encrypted.
2. What can an application or service do with a valid token
from a trusted issuer?
a. Find out the user’s password.
b. Log in to the website of the user’s identity provider.
c. Send emails to the user.
d. Use the claims it contains to authorize the user for
access to appropriate resources.
3. What is the meaning of the term identity federation?
a. It is the name of a company that issues claims about
Internet users.
b. It is a mechanism for authenticating users so that they
can access different applications without signing on
every time.
c. It is a mechanism for passing users’ credentials to
another application.
d. It is a mechanism for finding out which sites a user
has visited.
———————– Page 51———————–
1414 chapter one
4. When would you choose to use Windows Azure AppFabric
Access Control Service (ACS) as an issuer for an application
or service?
a. When the application must allow users to sign on
using a range of well-known social identity credentials.
b. When the application is hosted on the Windows
Azure platform.
c. When the application must support single sign-on
(SSO).
d. When the application does not have access to an alter-
native identity provider or token issuer.
5. What are the benefits of using claims to manage authoriza-
tion in applications and services?
a. It avoids the need to write code specific to any one
type of authentication mechanism.
b. It decouples authentication logic from authorization
logic, making changes to authentication mechanisms
much easier.
c. It allows the use of more fine-grained permissions
based on specific claims compared to the granularity
achieved just using roles.
d. It allows secure access for users that are in a different
domain or realm from the application or service.
———————– Page 52———————–
2 Claims-Based Architectures
The web is full of interactive applications that users can visit by simply
clicking a hyperlink. Once they do, they expect to see the page they
want, possibly with a brief stop along the way to log on. Users also
expect websites to manage their logon sessions, although most of
them wouldn’t phrase it that way. They would just say that they don’t
want to retype their password over and over again as they use any of
their company’s web applications. For claims to flourish on the web,
it’s critical that they support this simple user experience, which is
known as single sign-on.
If you’ve been a part of a Microsoft® Windows® domain, you’re For claims-based
already familiar with the benefits of single sign-on. You type your applications, single
sign-on for the web
password once at the beginning of the day, and that grants you access is sometimes called
to a host of resources on the network. Indeed, if you’re ever asked to passive federation .
type your password again, you’re going to be surprised and annoyed.
You’ve come to expect the transparency provided by Integrated Win-
dows Authentication.
Ironically, the popularity of Kerberos has led to its downfall as a
flexible, cross-realm solution. Because the domain controller holds the
keys to all of the resources in an organization, it’s closely guarded by
firewalls. If you’re away from work, you’re expected to use a VPN to
access the corporate network. Also, Kerberos is inflexible in terms of
the information it provides. It would be nice to extend the Kerberos
ticket to include arbitrary claims such as the user’s email address, but
this isn’t a capability that exists right now.
Claims were designed to provide the flexibility that other proto-
cols may not. The possibilities are limited only by your imagination and
the policies of your IT department. The standard protocols that ex-
change claims are specifically designed to cross boundaries such as
security realms, firewalls, and different platforms. These protocols
were designed by many who wanted to make it easier to securely
communicate with each other.
15
———————– Page 53———————–
1616 chapter two
Claims decouple your applications from the details of identity.
With claims, it’s no longer the application’s responsibility to authenti-
cate users. All your application needs is a security token from the is-
suer that it trusts. Your application won’t break if the IT department
decides to upgrade security and require users to submit a smart card
instead of submitting a user name and password. In addition, it won’t
need to be recoded, recompiled, or reconfigured.
There’s no doubt that domain controllers will continue to guard
organizational resources. Also, the business challenges, such as how to
resolve issues of trust and how to negotiate legal contracts between
companies who want to use federated identity techniques, remain.
Claims work in conjunction with Claims-based identity isn’t going to change any of that. However, by
your existing security systems to layering claims on top of your existing systems, you can remove some
broaden their reach and reduce of the technical hurdles that may have been impeding your access to
technical obstacles. a broad, flexible single sign-on solution.
A Closer Look at Claims-Based Architectures
There are several architectural approaches you can use to create
claims-based applications. For example, web applications and SOAP
web services each use slightly different techniques, but you’ll quickly
recognize that the overall shapes of the handshakes are very similar
because the goal is always the same: to communicate claims from the
issuer to the application in a secure fashion. This chapter shows you
how to evaluate the architectures from a variety of perspectives, such
as the user experience, the performance implications and optimiza-
tion opportunities, and how the claims are passed from the issuer to
the application. The chapter also offers some advice on how to design
your claims and how to know your users.
The goal of many of these architectures is to enable federation
with either a browser or a smart client. Federation with a smart client
is based on WS-Trust and WS-Federation Active Requestor Profile.
These protocols describe the flow of communication between smart
clients (such as Windows-based applications) and services (such as
WCF services) to request a token from an issuer and then pass that
token to the service for authorization.
Federation with a browser is based on WS-Federation Passive
Requestor Profile, which describes the same communication flow
between the browser and web applications. It relies on browser redi-
rects, HTTP GET, and POST to request and pass around tokens.
———————– Page 54———————–
claims-based architectures 17 17
Browser-Based Applications
The Windows Identity Foundation (WIF) is a set of .NET Framework
classes that allow you to build claims-aware applications. Among
other things, it provides the logic you need to process WS-Federation
requests. The WS-Federation protocol builds on other standard pro-
tocols such as WS-Trust and WS-Security. One of its features is to
allow you to request a security token in browser-based applications.
WIF makes claims seem much like forms authentication. If users
need to sign in, WIF redirects them to the issuer’s logon page. Here,
the user is authenticated and is then redirected back to the applica-
tion. Figure 1 shows the first set of steps that allow someone to use
single sign-on with a browser application.
Issuer
Login Page
.
n
i
n 2.
R
g e
i d
i
r
S e
. c
t
3 r
e
q
u
e
s
t
.
1. Send initial request.
Application
figure 1
Single sign-on with a browser, part 1
If you’re familiar with ASP.NET forms authentication, you might
assume that the issuer in the preceding figure is using forms authenti-
cation if it exposes a page named Login.aspx. But this page may simply
be an empty page that is configured in Internet Information Services
(IIS) to require Integrated Windows Authentication or a client cer-
tificate or smart card. An issuer should be configured to use the most
natural and secure method of authentication for the users that sign in
there. Sometimes a simple user name and password form is enough,
but obviously this requires some interaction and slows down the user.
Integrated Windows Authentication is easier and more secure for
employees in the same domain as the issuer.
———————– Page 55———————–
1818 chapter two
When the user is redirected to the issuer’s log-on page, several
query string arguments defined in the WS-Federation standard are
passed that act as instructions to the issuer. Here are two of the key
arguments with example values:
wa=wsignin1.0
The wa argument stands for “action,” and indicates one of
two things—whether you’re logging on (wsignin1.0) or
logging off (wsignout1.0).
wtrealm=http://www.fabrikam.com/purchasing/
The wtrealm argument stands for “target realm” and
contains a Uniform Resource Indicator (URI) that identifies
the application. The issuer uses the URI to identify the
application the user is logging on to. The URI also allows the
issuer to perform other tasks, such as associating the claims
for the application and replying to addresses.
After the issuer authenticates the user, it gathers whatever claims
the application needs (using the wtrealm parameter to identify the
The issuer is told which target application), packages them into a security token, and signs
application is in use so that the token with its private key. If the application wants its tokens
it issues only the claims that encrypted, the issuer encrypts the token with the public key in the
the application needs. application’s certificate.
Now the issuer asks the browser to go back to the application.
The browser sends the token to the application so it can process the
claims. Once this is done, the user can begin using the application.
To accomplish this, the issuer returns an HTML page to the
browser, including a <form> element with the form-encoded token
inside. The form’s action attribute is set to submit the token to what-
ever URL was configured for the application. The user doesn’t nor-
mally see this form because the issuer also emits a bit of JavaScript
that auto-posts it. If scripts are disabled, the user will need to click a
button to post the response to the server. Figure 2 shows this process.
If this sounds familiar,
it’s because forms
authentication uses
a similar redirection
technique with
the ReturnURL
parameter.
———————– Page 56———————–
claims-based architectures 19 19
Issuer
Login Page
.
n
n e
r >
u m k
t r o 5
t .
e o S
R f h u
. t b
4 < i m
i
t
w
.
6. Post <form>,
application
recieves token.
Application
7. WIF validates token and issues a cookie.
8. WIF presents the claims to the application.
9. Application processes claims and continues.
figure 2
Single sign-on with a browser, part 2
Now consider this process from the user’s experience. If the is-
suer uses Integrated Windows Authentication, the user clicks the link
to the application, waits for a moment while the browser is first redi-
rected to the issuer and then back to the application, and then the
user is logged on without any additional input. If the issuer requires
input from the user, such as a user name and password or a smart card,
users must pause briefly to log on, and then they can use the applica-
tion. From the user’s point of view, the logon process with claims is
the same as what he or she is used to, which is critical.
Understanding the Sequence of Steps
The steps illustrated in the preceding illustrations can also be depicted
as a sequence of steps that occur over time. Figure 3 shows this se-
quence when authenticating against Active Directory Federation
Services (ADFS) and Active Directory.
———————– Page 57———————–
2020 chapter two
a-Expense : Active Directory :
John : Browser ADFS : Issuer
Application Directory
Browse application
1
User is not authenticated.
Query for user
Browse to issuer (with Kerberos ticket). attributes such
as email, name,
2 3 and cost center.
SAML token signed.
4 5
POST signed
SAML token.
Receive the home WIF validates
6 page and a cookie token.
This is coordinated by the
WSFederationAuthenticationModule
(FAM).
Send another page and a cookie.
7 WIF populates
Receive another page. ClaimsPrincipal.
This is coordinated by the
SessionAuthenticationModule
(SAM).
figure 3
An audience restriction deter – Browser-based message sequence
mines the URIs the application
will accept. When applying for If a user is not authenticated, the browser requests a token from
a token, the user or application the issuer, which in this case is Active Directory Federation Services
will usually specify the URIs for (ADFS). ADFS queries Active Directory for the necessary attributes
which the token should be valid and returns a signed token to the browser.
(the AppliesTo value, typically After the POST arrives at the application, WIF takes over.
the URL of the application). The application has configured a WIF HTTP module, named WS
The issuer includes this as the FederationAuthenticationModule (FAM), to intercept this POST to
audience restriction in the token the application and handle the processing of the token. The FAM
it issues. listens for the AuthenticateRequest event. The event handler
———————– Page 58———————–
claims-based architectures 21 21
performs several validation steps, including figure 4
checking the token’s audience restriction and the Sequence of steps for initial request
expiration date. Audience restriction is defined by
Event :
the AudienceURI element.
SessionSecurityTokenReceived
The FAM also uses the issuer’s public key to Arguments :
make sure that the token was signed by the raw security token Validate the token
trusted issuer and was not modified in transit. with the
corresponding
Then it parses the claims in the token and uses the security token
HttpContext.User.Identity property (or equiva- handler, such as
lently the Page.User property) to present an SAML 1.1, SAML 2.0,
encrypted or custom.
IClaimsPrincipal object to the application. It also
issues a cookie to begin a logon session, just like
what would happen if you were using forms Create the
authentication instead of claims. This means that ClaimsPrincipal object
with the claims inside.
the authentication process isn’t repeated until the
user signs off or otherwise destroys the cookie, or
until the session expires (sessions are typically Use the
designed to last for a single workday). ClaimsAuthenticationMananger
Figure 4 shows the steps that WIF takes for class to enrich the
ClaimsPrincipal
the initial request, when the application receives a object.
token from the issuer.
One of the steps that the FAM performs is
Event :
to create the session token. On the wire, this SessionSecurityTokenValidated
translates into a sequence of cookies named Arguments :
FedAuth[n]. These cookies are the result of ClaimsPrincipal
compressing, encrypting, and encoding the Claims
Create the
Principal object, along with any other attributes. SessionsSecurityToken:
The cookies are chunked to avoid overstepping Encode(Chunk(Encrypt
any size limitations. (ClaimsPrincipal+lifetime+
[original token]))).
Figure 5 shows what the network traffic
looks like for the initial request.
Set the HTTPContext.User
property to the
ClaimsPrincipal object.
Convert the session
token into a set
of chunked cookies.
Redirect to the
original return URL,
if it exists.
figure 5
Sequence of cookies
———————– Page 59———————–
2222 chapter two
figure 6 On subsequent requests to the application, the
Steps for subsequent Check that the SessionAuthenticationModule intercepts the cookies
requests
cookie is present. and uses them to reconstruct the ClaimsPrincipal
If it is, object. Figure 6 shows the steps that WIF takes for any
recreate the
SessionSecurityToken subsequent requests.
by decoding, Figure 7 shows what the network traffic looks like
decrypting, and
decompressing for subsequent requests.
the cookie.
Event :
SessionSecurityTokenReceived
Arguments :
session token
Check the
SessionSecurityToken
expiration date.
Create the
ClaimsPrincipal object
with the claims inside.
Set the
HTTPContext.User
property to the
ClaimsPrincipal object.
figure 7
Network traffic for subsequent responses
All of the steps, both for the initial and subsequent
requests, should run over the Secure Sockets Layer
(SSL) to ensure that an eavesdropper can’t steal either
the token or the logon session cookie and replay them
to the application in order to impersonate a legitimate
user.
———————– Page 60———————–
claims-based architectures 23 23
Optimizing Performance
Are there opportunities for performance optimizations here? The Applications and issuers use
answer is a definite “Yes.” You can use the logon session cookie to cookies to achieve Internet-
cache some state on the client to reduce round-trips to the issuer. The friendly single-sign on.
issuer also issues its own cookie so that users remain logged on at the Single sign-on is also
issuer and can access many applications. Think about how this possible using ACS when a
works—when a user visits a second application and that application local issuer such as ADFS
redirects back to the same issuer, the issuer sees its cookie and knows is not available. However,
the user has recently been authenticated, so it can immediately issue ACS is primarily aimed at
a token without having to authenticate again. This is how to use federated identity scenarios
claims to achieve Internet-friendly single sign-on with a browser- where the user is authenti-
based application. cated in a different realm
from the application. ACS
Smart Clients is discussed in more detail
When you use a web service, you don’t use a browser. Instead, you use in the section “Federated
an arbitrary client application that includes logic for handling claims- Identity with ACS” later
based identity protocols. There are two protocols that are important in this chapter.
in this situation: WS-Trust, which describes how to get a security to-
ken from an issuer, and WS-Security, which describes how to pass that
security token to a claims-based web service.
Recall the procedure for using a SOAP-based web service. You use
the Microsoft Visual Studio® development system or a command-line
tool to download a Web Service Definition Language (WSDL) docu-
ment that supplies the details of the service’s address, binding, and
contract. The tool then generates a proxy and updates your applica-
tion’s configuration file with the information discovered in the WSDL
document. When you do this with a claims-based service, its WSDL
document and its associated WS-Policy document supply all the nec-
essary details about the issuer that the service trusts. This means that
the proxy knows that it needs to obtain a security token from that
issuer before making requests to the service. Because this information
is stored in the configuration file of the client application, at run time
the proxy can get that token before talking to the service. This opti-
mizes the handshake a bit compared to the browser scenario, because
the browser had to visit the application first before being redirected
to the issuer. Figure 8 shows the sequence of steps for smart clients
when the issuer is ADFS authenticating users against Active Directory.
———————– Page 61———————–
2424 chapter two
Rick : Orders : ADFS : Issuer Active Directory:
Application Web Service Directory
Use the username to
request a security
token. Validate credentials
and query for user
attributes such as
1 email, name, and
cost center.
Return the signed
SAML token.
These interactions can be
orchestrated by the WCF
Call operation 1 on WSFederation binding.
the web service When the client proxy
with the SAML wants to call the service, it
first tries to obtain a token.
token.
Send the SOAP
2
response. WIF
validates
token.
If the client makes a second
call to the web service, it
obtains a new token from
the issuer, unless it cached
the token obtained at the
first call.
figure 8
Smart client-based message sequence
The steps for a smart client are similar to those for browser-based
applications. The smart client makes a round-trip to the issuer, using
WS-Trust to request a security token. In step 1, The Orders web ser-
vice is configured with the WSFederationHttpBinding. This binding
specifies a web service policy that obligates the client to attach a
SAML token to the security header to successfully invoke the web
service. This means that the client will first have to call the issuer with
a set of credentials such as a user name and password to get a SAML
token back. In step 2, the client can call the web service with the to-
ken attached to the security header.
———————– Page 62———————–
claims-based architectures 25 25
Figure 9 shows a trace of the messages that occur in the smart
client scenario.
figure 9
Smart client network traffic
The WS-Trust request (technically named a Request for Security
Token, or RST for short) includes a field named AppliesTo, which
allows the smart client to indicate a URI for the web service it’s
ultimately trying to access. This is similar to the wtrealm query string
argument used in the case of a web browser. Once the issuer authen-
ticates the user, it knows which application wants access and it can
decide which claims to issue. Then the issuer sends back the response
(RSTR), which includes a signed security token that is encrypted with
the public key of the web service. The token includes a proof key. This
is a symmetric key randomly generated by the issuer and included as
part of the RSTR so that the client also gets a copy.
Now it’s up to the client to send the token to the web service in
the <Security> header of the SOAP envelope. The client must sign the
SOAP headers (one of which is a time stamp) with the proof key to
show that it knows the key. This extra cryptographic evidence further
assures the web service that the caller was, indeed, the one who was
issued the token in the first place.
At this point, it’s typical to start a session using the WS-Secure
Conversation protocol. The client will probably cache the RSTR for
up to a day in case it needs to reconnect to the same service later on.
SharePoint Applications
and SharePoint BCS
A common requirement for single sign-on and federated identity is in
Microsoft SharePoint® applications, including those that use the Busi-
ness Connectivity Services (BCS) to work with data exposed by re-
mote services. Microsoft SharePoint Server 2010 implements a claims-
based identity model that supports authentication across users of
Windows-based and non-Windows -based systems, multiple authen-
tication types, a wide set of principal types, and delegation of user
identity between applications.
SharePoint 2010 can accept claims provided as SAML tokens,
and can use them to make identity-related decisions. These decisions
may consist of simple actions such as personalization based on the
———————– Page 63———————–
2626 chapter two
user name, or more complex actions such as authorizing access to
features and functions within the application.
SharePoint also includes a claims provider that can issue claims
and package these claims into security tokens. It can augment tokens
by adding additional claims, and expose the claims in the SharePoint
people picker tool. The ability to augment existing tokens makes it
easier to build SharePoint applications that use BCS to access remote
services for which authentication is required.
Chapter 10, “Accessing REST Services from a Windows Phone
Device” and Chapter 11, “Claims-Based Single Sign-On for Microsoft
SharePoint 2010″ provide more information about using claims and
issuers in SharePoint 2010. A guide to using claims in SharePoint is
available at “Getting Started with Security and Claims-Based Identity
Model” on the MSDN® website ( http://msdn.microsoft.com/en-us/
library/ee536164.aspx).
Federating Identity across Realms
So far you’ve learned enough about claims-based identity to under-
stand how to design and build a claims-based application where the
issuer directly authenticates the users.
But you can take this one step further. You can expand your is-
suer’s capabilities to accept a security token from another issuer, in-
stead of requiring the user to authenticate directly. Your issuer now
not only issues security tokens, but also accepts tokens from other
issuers that it trusts. This enables you to federate identity with other
realms (these are separate security domains), which is truly a powerful
feature. Much of the federation process is actually accomplished by
your IT staff, because it depends on how issuers are configured. But
it’s important to be aware of these possibilities because, ultimately,
they lead to more features for your application, even though you
might not have to change your application in any way. Also, some of
these possibilities may have implications for your application’s design.
The Benefits of Cross-Realm Identity
Maintaining an identity database for users can be a daunting task.
Even something as simple as a database that holds user names and
passwords can be painful to manage. Users forget their passwords on
a regular basis, and the security stance taken by your company may
not allow you to simply email forgotten passwords to them the way
many low-security websites do. If maintaining a database for users
inside your enterprise is difficult, imagine doing this for hundreds or
thousands of remote users.
———————– Page 64———————–
claims-based architectures 27 27
Managing a role database for remote users is just as difficult.
Imagine Alice, who works for a partner company and uses your pur-
chasing application. On the day that your IT staff provisioned her
account, she worked in the purchasing department, so the IT staff
assigned her the role of Purchaser, which granted her permission to
use the application. But because she works for a different company,
how is your company going to find out when she transfers to the Sales
department? What if she quits? In both cases, you’d want to know
about her change of status, but it’s unlikely that anyone in the HR
department at her company is going to notify you.
It’s unavoidable that any data you store about a remote user even- Alice’s identity is
an asset of Alice’s
tually becomes stale. How can you safely expose an application for a organization, so her
partner business to use? company should
One of the most powerful features of claims-based identity is manage it. Also,
that you can decentralize it. Instead of having your issuer authenticate storing information
remote users directly, you can set up a trust relationship with an is- about remote users
can be considered
suer that belongs to the other company. This means that your issuer a liability for your
trusts their issuer to authenticate users in their realm. Their employees company.
are happy because they don’t need special credentials to use your
application. They use the same single sign-on mechanism they’ve al-
ways used in their company. Your application still works because it
continues to get the same boarding pass it needs. The claims you get
in your boarding pass for these remote users might include less power-
ful roles because they aren’t employees of your company, but your
issuer will be responsible for determining the proper assignments. Fi- Claims can be used to
nally, your application doesn’t need to change when a new organiza- decentralize identity,
tion becomes a partner. The fan-out of issuers to applications is a real eliminating stale data
benefit of using claims—you reconfigure one issuer and many down- about remote users.
stream applications become accessible to many new users.
Another benefit is that claims allow you to logically store data
about users. Data can be kept in the store that is authoritative rather
than in a store that is simply convenient to use or easily accessible.
Identity federation removes hurdles that may have stopped you
from opening the doors to new users. Once your company decides
which realms should be allowed access to your claims-based applica-
tion, your IT staff can set up the proper trust relationships. Then you
can, for example, invite employees from a company that uses Java, to
access your application without having to issue passwords for each of
them. They only need a Java-based issuer, and those have been avail-
able for years. Another possibility is to federate identity with Win-
dows Live® network of Internet services, which supports claims-based
identity. This means that anyone with a Windows Live ID can use your
application.
———————– Page 65———————–
2828 chapter two
How Federated Identity Works
You’ve already seen how federated identity works within a single
realm. Indeed, Figure 2 is a small example of identity federation be-
tween your application and a local issuer in your realm. That relation-
ship doesn’t change when your issuer interacts with an issuer it trusts
in a different realm. The only change is that your issuer is now config-
ured to accept a security token issued by a partner company instead
of directly authenticating users from that company. Your issuer trusts
another issuer to authenticate users so it doesn’t have to. This is simi-
lar to how your application trusts its issuer.
Figure 10 shows the steps for federating identity across realms.
Their Trust My
Issuer Issuer
Application
3 4
. . 5.
S I
e s S
n s e
d u n
e d
t t
. o o t
n k k o
e e e k
k n n e
o . . n
t .
e
u
s
. s
e I
t .
a 2
c
i
t
n
e
h
t
u
A
.
1
figure 10
Federating identity across realms
Federating identity across realms is exactly the same as you’ve
seen in the earlier authentication techniques discussed in this chapter,
with the addition of an initial handshake in the partner’s realm. Users
first authenticate with an issuer in their own realm. They present the
tokens they receive from their exchanges to your issuer, which accepts
it in lieu of authenticating them directly. Your issuer can now issue a
token for your application to use. This token is what the user sends to
your application. (Of course, users know nothing about this proto-
col—it’s actually the browser or smart client that does this on their
behalf). Remember, your application will only accept tokens signed by
the one issuer that it trusts. Remote users won’t get access if they try
to send a token from their local issuer to your application.
———————– Page 66———————–
claims-based architectures 29 29
At this point, you may be thinking, “Why should my company
trust some other company to authenticate people that use my appli-
cation? That doesn’t seem safe!” Think about how this works without
claims-based identity. Executives from both companies meet and sign
legal contracts. Then the IT staff from the partner company contacts
your IT staff and specifies which of their users need accounts provi-
sioned and which roles they will need. The legal contracts help ensure
that nobody abuses the trust that’s been established. This process has
been working for years and is an accepted practice.
Another question is why should you bother provisioning accounts
for those remote users when you know that data will get stale over
time? All that claims-based identity does is help you automate the
trust, so that you get fresh information each time a user visits your
application. If Alice quits, the IT staff at her company has great per-
sonal incentive to disable her account quickly. They don’t want a po-
tentially disgruntled employee to have access to company resources.
That means that Alice won’t be able to authenticate with their issuer
anymore, which means she won’t be able to use your application, ei-
ther. Notice that nobody needed to call you up to tell you about Alice.
By decentralizing identity management, you get better information
(authoritative information, you could say) about remote users in a
timely fashion.
Claims can be used to automate existing trusts between businesses.
One possible drawback of federating identity with many other
companies is that your issuer becomes a single point of failure for all
of your federation relationships. Issuers should be as tightly guarded
as domain controllers. Adding features is never without risk, but the
rewards can lead to lower costs, better security, simpler applications,
and happier users.
Federated Identity with ACS
Many users already have accounts with identity providers that authen-
ticate users for one or more applications and websites. Social net-
works such as Facebook, and email and service providers such as
Windows Live ID and Google, often use a single sign-on model that
supports authentication for several applications. Users increasingly
expect to be able to use the credentials for these identity providers
when accessing other applications.
ACS is an issuer that can make use of many of these identity pro-
viders by redirecting the user to the appropriate location to enter
credentials, and then using the claims returned from that identity
provider to issue a token to the applications. ACS can also be used to
supplement a local issuer by retrieving claims from a social networking
or email provider and passing these to the local issuer for it to issue
———————– Page 67———————–
3030 chapter two
the required token. ACS effectively allows a broad range of identity
providers to be used for user authentication, both in conjunction with
a local issuer and when no local issuer is available.
Figure 11 shows the overall sequence of steps for a user authen-
ticating with an identity provider through ACS after a request for
authentication has been received by ACS. ACS redirects the user to
the appropriate identity provider. After successful authentication,
ACS and ADFS map claims for the user and then return a token to the
relying party (the claims-based application). Steps 5 and 6, where the
intervention of a local issuer takes place, will only occur if the applica-
It is important for users to tion is configured to use a local issuer such as ADFS that redirects the
understand that, when they user to ACS.
use their social identity
provider credentials to log in Social Identity Providers :
ACS : ADFS :
through ACS, they are − Google − Transition protocols − Map Claims
consenting to some informa- − Windows LiveID
− Facebook − Map claims
tion (such as their name and − etc.
email address) being sent to
n n n
the application. However, e e e e
n k k k n
t o o o
e t e
a k t t d k
c o n o
giving this consent does not i t d n e t
t n r S n
n e e u . r
e u S t 5 u
provide the application with h s e t
t s . R e
u I 3 . R
access to their social network A 2. 4 6.
.
1
account—it just confirms
their identity to the
application.
Claims Based Application
token
7. Send
figure 11
Federated identity with ACS as the issuer,
optionally including an ADFS local issuer
For more details about ACS and the message sequences with
and without a local issuer, see Appendix B, “Message Sequences,”
and Appendix E, “Windows Azure Access Control Service.”
A major consideration when using ACS is whether you should
trust the identity providers that it supports. You configure ACS to use
only the identity providers you specifically want to trust, and only
these will be available to users when they log into your application.
For example, depending on your requirements, you may decide to ac-
cept authentication only through Windows Live ID and Google, and
not allow users to log in with a Facebook account. Each identity
provider is an authority for users that successfully authenticate, and
———————– Page 68———————–
claims-based architectures 31 31
each provides proof of this by returning claims such as the user name,
user identifier, and email address.
ACS generates a list of the configured identity providers from
which users can select the one they want to use. You can create cus-
tom pages that show the available identity providers within your own
application if required, and configure rules within ACS that transform
and map the claims returned from the identity provider. After the user
logs in at their chosen identity provider, ACS returns a token that the
application or a local issuer such as ADFS can use to provide authori-
zation information to the application as required.
Each identity
Understanding the Sequence of Steps provider will return
Figure 12 shows the sequence of steps for ACS in more detail a different set of
when there is no local issuer. claims. For example,
Windows Live ID
returns a user
Br App ACS Google Live ID identifier, whereas
Google returns
the user name and
email address.
Not Auth
Get Token
HRD page
Select IP
Redirect
AuthN
Redirect + Token
Transform
figure 12
ACS federated identity message sequence
The user accesses the application and fails authentication. The
browser is redirected to ACS, which generates and returns the list of
accepted identity providers (which may include custom issuers or
another ADFS instance as well as social identity providers and email
services). The user selects the required identity provider, and ACS
redirects the user to that identity provider’s login page. After the
identity provider authenticates the user, it returns a token to ACS that
declares the user to be valid. ACS then maps the claims and generates
a token that declares this user to be valid, and redirects the user to the
———————– Page 69———————–
3232 chapter two
application. The application uses the token to authorize the user for
the appropriate tasks.
This means that the authority for the user’s identity differs at
each stage of the process. For example, if the user chooses to authen-
ticate with Google, then the Google token issuer is the authority in
declaring the user to be valid with them, and it returns proof in the
form of a name and email address. When redirected to ACS, the
browser presents the Google token and ACS becomes the authority
on issuing claims about the user based on the valid token from Google
(called a copy claim). ACS can perform transformation and mapping,
such as to include the claim that this user works in a specific company
and has a specific role in the application.
Combining ACS and ADFS
If, instead of authenticating with ACS, the user was originally redi-
rected by the application to a local issuer such as ADFS, which in-
cludes ACS amongst its trusted issuers, the local issuer receives the
token from ACS and becomes the authority in declaring the user valid
based on the claims returned from ACS. The local issuer can also per-
form transformation and mapping, such as to include the claim that
this user works in a specific company and has a specific role in the
application. A scenario that illustrates when this is useful is described
in detail in Chapter 5, “Federated Identity with Windows Azure Ac-
cess Control Service.”
Identity Transformation
The issuer’s job is to take some generic incoming identity (perhaps
from a Kerberos ticket, an X.509 certificate, or a set of user creden-
tials) and transform it into a security token that your application can
use. That security token is like the boarding pass, in that it contains all
of the user’s identity details that your application needs to do its job,
I think of an issuer and nothing more. Perhaps instead of the user’s Windows groups,
as an “identity your boarding pass contains roles that you can use right away.
transformer.” It On the other end of the protocol are users who can use their
converts incoming single sign-on credentials to access many applications because the is-
identities into suer in their realm knows how to authenticate them. Their local issuer
something that’s
intelligible to the provides claims to applications in their local realm as well as to issuers
application. in other realms so that they can use many applications, both local and
remote, without having to remember special credentials for each one.
Consider the application’s local issuer in the last illustration, “Fed-
erating identity across realms.” It receives a security token from a user
in some other realm. Its first job is to reject the request if the incom-
ing token wasn’t issued by one of the select issuers that it trusts. But
once that check is out of the way, its job now becomes one of claims
———————– Page 70———————–
claims-based architectures 33 33
transformation. It must transform the claims made by the remote is- ADFS uses a rules
suer into claims that make sense for your application. For a practical engine to support
example, see Chapter 4, “Federated Identity for Web Applications.” claims transformation.
Transformation is carried out with rules such as, “If you see a
claim of this type, with this value, issue this claim instead.” For exam-
ple, your application may have a role called Managers that grants
special access to manager-specific features. That claim may map di-
rectly to a Managers group in your realm, so that local users who are
in the Managers group always get the Managers role in your applica-
tion. In the partner’s realm, they may have a group called Supervisors
that needs to access the manager-specific features in your application.
The transformation from Supervisors to Managers can happen in their
issuer; if it does not, it must happen in yours. This transformation
simply requires another rule in the issuer. The point is that issuers such
as ADFS and ACS are specifically designed to support this type of
transformation because it’s rare that two companies will use exactly In ACS, the transfor-
the same vocabulary. mation and mapping
rules are configured
Home Realm Discovery using the web-based
Now that you’ve seen the possibility of cross-realm federation, think administration portal
about how it works with browser-based applications. Here are the or by making OData-
formatted calls to
steps: the management API.
1. Alice (in a remote realm) clicks a link to your application.
2. You redirect Alice to your local issuer, just like before.
3. Your issuer redirects Alice’s browser to the issuer in her
realm.
4. Alice’s local issuer authenticates and issues a token, sending
Alice’s browser back to your issuer with that token.
5. Your issuer validates the token, transforms the claims, and
issues a token for your application to use.
6. Your issuer sends Alice’s browser back to your application,
with the token that contains the claims your application
needs.
The mystery here is in step 3. How does the issuer know that
Alice is from a remote realm? What prevents the issuer from thinking
she’s a local user and trying to authenticate her directly, which will
only fail and frustrate the user? Even if the issuer knew that Alice was
from a remote realm, how would it know which realm it was? After
all, it’s likely that you’ll have more than one partner.
This problem is known as home realm discovery. Your issuer has
to determine if Alice is from the local realm or if she’s from some
partner organization. If she’s local, the issuer can authenticate her
———————– Page 71———————–
3434 chapter two
directly. If she’s remote, the issuer needs to know a URL to redirect
her to so that she can be authenticated by her home realm’s issuer.
There are two ways to solve this problem. The simplest one is to
have the user help out. In step 2, when Alice’s browser is redirected to
your local issuer, the authentication sequence pauses and the browser
displays a web page asking her what company she works for. (Note
that it doesn’t help Alice to lie about this, because her credentials are
only good for one of the companies on the list—her company.) Alice
clicks the link for her company and the process continues, since the
issuer now knows what to do. To avoid asking Alice this question in
Take a look at the future, your issuer sets a cookie in her browser so that next time
Chapter 3, “Claims- it will know who her issuer is without having to ask.
Based Single Sign-On If the issuer is ACS, it will automatically generate and display a
for the Web,” to see
an example of this page containing the list of accepted identity providers. Alice must
technique. select one of these, and her choice indicates her home realm. If ACS
is using a trusted instance of an ADFS security token service (STS) as
an identity provider, the home realm discovery page can contain a
textbox as well as (or instead of) the list of configured identity provid-
ers where a user can enter a corresponding email address. The user is
then authenticated by the ADFS STS.
The second way to solve this problem is to add a hint to the
query string that’s in the link that Alice clicks in step 1. That query
string will contain a parameter named whr ( hr stands for home realm).
The issuer looks for this hint and automatically maps it to the
URL of the user’s home realm. This means that the issuer doesn’t have
to ask Alice who her issuer is because the application relays that infor-
mation to the issuer. The issuer uses a cookie, just as before, to ensure
that Alice is never bothered with this question.
My IT people make sure that
the links to remote
applications always include
this information. It makes
the application much
friendlier for the user and
protects the privacy of my
company by not revealing
all of its partners. Take a look at Chapter 4,
“Federated Identity for
Web Applications,” to
see an example of this
technique.
———————– Page 72———————–
claims-based architectures 35 35
Design Considerations for Claims-Based
Applications
Admittedly, it’s difficult to offer general prescriptive guidance for
designing claims because they are so dependent on the particular ap-
plication. This section poses a series of questions and offers some
approaches to consider as you look at your options.
What Makes a Good Claim?
Like many of the most important design decisions, this question
doesn’t always have a clear answer. What’s important is that you un-
derstand the tensions at play and the tradeoffs you’re facing. Here are
some concrete examples that might help you start thinking about
some general criteria for what makes a good claim.
First, consider a user’s email address. That’s a prime candidate for
a claim in almost any system, because it’s generally very tightly coupled
to the user’s identity, and it’s something that everyone needs if you
decide to federate identity across realms. An email name can help you
personalize your system for the user in a very meaningful way.
What about a user’s choice of a skin or theme for your website?
Certainly, this is “personalization” data, but it’s also data that’s par-
ticular to a single application, and it’s hard to argue that this is part of
a user’s identity. Your application should manage this locally.
What about a user’s permission to access data in your application?
While it may make sense in some systems to model permissions as
claims, it’s easy to end up with an overwhelming number of these
claims as you model finer and finer levels of authorization. A better
approach is to define a boundary that separates the authorization
data you’ll get from claims from the data you’ll handle through other
means. For example, in cross-realm federation scenarios, it can be
beneficial to allow other realms to be authoritative for some high-
level roles. Your application can then map those roles onto fine-
grained permissions with tools such as Windows Authorization
Manager (AzMan). But unless you’ve got an issuer that’s specifically
designed for managing fine-grained permissions, it’s probably best to
keep your claims at a much higher level.
Before making any attribute into a claim, ask yourself the follow-
ing questions:
• Is this data a core part of how I model user identity?
• Is the issuer an authority on this information?
• Will this data be used by more than one application?
• Do I want an issuer to manage this data or should my
application manage it directly?
———————– Page 73———————–
3636 chapter two
How Can You Uniquely Distinguish One
User from Another?
Because people aren’t born with unique identifiers (indeed, most
people treasure their privacy), differentiating one person from an-
other has always been, and will likely always be a tricky problem.
Claims don’t make this any easier. Fortunately, not all applications
need to know exactly who the user is. Simply being able to identify
one returning user from another is enough to implement a shopping
cart, for example. Many applications don’t even need to go this far.
But other applications have per-user state that they need to track, so
they require a unique identifier for each user.
Traditional applications typically rely on a user’s sign-in name to
distinguish one user from the next. So what happens when you start
building claims-based applications and you give up control over au-
thentication? You’ll need to pick one (or a combination of multiple)
claims to uniquely identify your user, and you’ll need to rely on your
issuer to give you the same values for each of those claims every time
that user visits your application. It might make sense to ask the issuer
to give you a claim that represents a unique identifier for the user. This
can be tricky in a cross-realm federation scenario, where more than
one issuer is involved. In these more complicated scenarios, it helps to
remember that each issuer has a URI that identifies it and that can be
used to scope any identifier that it issues for a user. An example of
such a URI is http://issuer.fabrikam.com/unique-user-id-assigned-
from-fabrikams-realm.
Email addresses have convenient properties of uniqueness and
scope already built in, so you might choose to use an email claim as a
unique identifier for the user. If you do, you’ll need to plan ahead if
you want users to be able to change the email address associated with
their data. You’ll also need a way to associate a new email address with
that data.
How Can You Get a List of All Possible
Users and All Possible Claims?
One thing that’s important to keep in mind when you build a claims-
based application is that you’re never going to know about all the
users that could use your application. You’ve given up that control in
exchange for less responsibility, worry, and hassle over programming
against any one particular user store. Users just appear at your door-
step, presenting the token they got from the issuer that you trust.
That token gives you information about who the user is and what he
or she can do. In addition, if you’ve designed your authorization code
properly, you don’t need to change your code to support new users;
even if those users come from other realms, as they do in federation
scenarios.
———————– Page 74———————–
claims-based architectures 37 37
So how can you build a list of users that allows administrators to
choose which users have permission to access your application and
which don’t? The simple answer is to find another way. This is a per-
fect example of where an issuer should be involved with authorization
decisions. The issuer shouldn’t issue tokens to users who aren’t privi-
leged enough to use your application. It should be configured to do
this without you having to do anything at all in your application.
When designing a claims-based application, always keep in mind
that a certain amount of responsibility for identity has been lifted
from your shoulders as an application developer. If an identity-related
task seems difficult or impossible to build into your application logic,
consider whether it’s possible for your issuer to handle that task for
you.
Where Should Claims Be Issued?
The question of where claims should be issued is moot when you have
a simple system with only one issuer. But when you have more com-
plex systems where multiple issuers are chained into a path of trust Always get claims from
that leads from the application back to the issuer in the user’s home authoritative sources.
realm, this question becomes very relevant.
The short answer to the question of where claims should be is-
sued is “by the issuer that knows best.”
Take, for example, a claim such as a person’s email name. The
email name of a user isn’t going to change based on which application
he or she uses. It makes sense for this type of claim to be issued close
to the user’s home realm. Indeed, it’s most likely that the first issuer in
the chain, which is the identity provider, would be authoritative for
the user’s email name. This means that downstream issuers and ap-
plications can benefit from that central claim. If the email name is ever
updated, it only needs to be updated at that central location.
Now think about an “action” claim, which is specific to an applica-
tion. An application for expense reporting might want to allow or
disallow actions such as submitExpenseReport and approve
ExpenseReport. Another type of application, such as one that tracks
bugs, would have very different actions, such as reportBug and
assignBug. In some systems, you might find that it works best to have
the individual applications handle these actions internally, based on
higher-level claims such as roles or groups. But if you do decide to
factor these actions out into claims, it would be best to have an issuer
close to the application be authoritative for them. Having local au-
thority over these sorts of claims means you can more quickly imple-
ment policy changes without having to contact a central authority.
What about a group claim or a role claim? In traditional RBAC
(Role-Based Access Control) systems, a user is assigned to one or
more groups, the groups are mapped to roles, and roles are mapped to
———————– Page 75———————–
3838 chapter two
actions. There are many reasons why this is a good design: the map-
ping from roles to actions for an application can be done by someone
who is familiar with it and who understands the actions defined for
that application. For example, the mapping from user to groups can
be done by a central administrator who knows the semantics of each
group. Also, while groups can be managed in a central store, roles and
actions can be more decentralized and handled by the various depart-
ments and product groups that define them. This allows for a much
more agile system where identity and authorization data can be cen-
tralized or decentralized as needed.
Issuers are typically placed at boundaries in organizations. Take,
for example, a company with several departments. Each department
might have its own issuer, while the company has a central issuer that
acts as a gateway for claims that enter or leave it. If a user at this
Issuers are typically found at company accesses an application in another, similarly structured com-
organizational boundaries. pany, the request will end up being processed by four issuers:
• The departmental issuer, which authenticates the user and
supplies an email name and some initial group claims
• The company’s central issuer, which adds more groups and some
roles based on those groups
• The application’s central issuer, which maps roles from the user’s
company to roles that the application’s company understands
(this issuer may also add additional role-claims based on the
ones already present)
• The application’s departmental issuer, which maps roles onto
actions
You can see that as the request crosses each of these boundaries,
the issuers there enrich and filter the user’s security context by issuing
claims that make sense for the target context, based on its require-
ments and the privacy policies. Is the email name passed all the way
through to the application? That depends on whether the user’s com-
pany trusts the application’s company with that information, and
whether the application’s company thinks the application needs to
know that information.
What Technologies Do Claims
and Tokens Use?
Security tokens that are passed over the Internet typically take one of
two forms:
• Security Assertion Markup Language (SAML) tokens are XML-
encoded structures that are embedded inside other structures
such as HTTP form posts and SOAP messages.
———————– Page 76———————–
claims-based architectures 39 39
• Simple Web Token (SWT) tokens that are stored in the HTTP
headers of a request or response.
The tokens are encrypted and can be stored on the client as cookies.
Security Assertion Markup Language (SAML) defines a language
for exchanging security information expressed in the form of asser-
tions about subjects. A subject may be a person or a resource (such as
a computer) that has an identity in a security domain. A typical ex-
ample of a subject is a person identified by an email address within a
specific DNS domain. The assertions in the token can include informa-
tion about authentication status, specific details of the subject (such
as a name), and the roles valid for the subject that allow authorization
decisions to be made by the relying party.
The protocol used to transmit SAML tokens is often referred to
as SAML-P. It is an open standard that is ratified by Oasis, and it is
supported by ADFS 2.0. However, at the time of this writing it
was not natively supported by Windows Identity Foundation (WIF).
To use SAMP-P with WIF requires you to create or obtain a custom
authentication module that uses the WIF extensibility mechanism.
Simple Web Token (SWT) is a compact name-value pair security
token designed to be easily included in an HTTP header.
The transfer of tokens between identity provider, issuer, client,
and the relying party (the application) may happen through HTTP
web requests and responses, or through web service requests and
responses, depending on the nature of the client. Web browsers rely
mainly on HTTP web requests and responses. Smart clients and other
services (such as SharePoint BCS) use web service requests and re-
sponses.
Web service requests make use of a suite of security standards
that fall under the heading of the WS* Extensions. The WS* stan-
dards include the following extensions:
• WS-Security. This specification defines a protocol for end-to-
end message content security that supports a wide range of
security token formats, trust domains, signature formats, and
encryption technologies. It provides a framework that, in
conjunction with other extensions, provides the ability to send
security tokens as part of a message, to verify message integrity,
and to maintain message confidentiality. The WS-Security
mechanisms can be used for single tasks such as passing a
security token, or in combination to enable signing and encrypt-
ing a message and providing a security token.
• WS-Trust. This specification builds on the WS-Security proto-
col to define additional extensions that allow the exchange of
security tokens for credentials in different trust domains. It
includes definitions of mechanisms for issuing, renewing, and
———————– Page 77———————–
4040 chapter two
validating security tokens; for establishing the presence of trust
relationships between domains, and for brokering these trust
relationships.
• WS-SecureConversation. This specification builds on WS-
Security to define extensions that support the creation and
sharing of a security context for exchanging multiple messages,
and for deriving and managing more efficient session keys for
use within the conversation. This can increase considerably the
overall performance and security of the message exchanges.
• WS-Federation. This specification builds on the WS-Security
and WS-Trust protocols to provide a way for a relying party to
make the appropriate access control decisions based on the
credibility of identity and attribute data that is vouched for by
another realm. The standard defines mechanisms to allow
different security realms to federate so that authorized access
to resources managed in one realm can be provided to subjects
whose identities are managed in other realms.
• WS-Federation: Passive Requestor Profile. This specification
WS* is a suite of standards describes how the cross trust realm identity, authentication, and
where each builds on other authorization federation mechanisms defined in WS-Federation
standards to provide additional can be utilized used by passive requesters such as web browsers
capabilities or to meet specific to provide identity services. Passive requesters of this profile are
scenario requirements. limited to the HTTP protocol.
Security Association Management Protocol (SAMP) and Internet
Security Association and Key Management Protocol (ISAKMP) define
standards for establishing security associations that define the header,
authentication, payload encapsulation, and application layer services
for exchanging key generation and authentication data that is inde-
pendent of the key generation technique, encryption algorithm, and
authentication mechanism in use. All of these are necessary to estab-
lish and maintain secure communications when using IP Security
Service or any other security protocol in an Internet environment.
For more information about these standards and protocols,
see Appendix C of this guide.
———————– Page 78———————–
claims-based architectures 41 41
Questions
1. Which of the following protocols or types of claims token
are typically used for single sign-on across applications in
different domains and geographical locations?
a. Simple web Token (SWT)
b. Kerberos ticket
c. Security Assertion Markup Language (SAML) token
d. Windows Identity
2. In a browser-based application, which of the following
is the typical order for browser requests during
authentication?
a. Identity provider, token issuer, relying party
b. Token issuer, identity provider, token issuer, relying
party
c. Relying party, token issuer, identity provider, token
issuer, relying party
d. Relying party, identity provider, token issuer, relying
party
3. In a service request from a non-browser-based application,
which of the following is the typical order of requests
during authentication?
a. Identity provider, token issuer, relying party
b. Token issuer, identity provider, token issuer, relying
party
c. Relying party, token issuer, identity provider, token
issuer, relying party
d. Relying party, identity provider, token issuer, relying
party
4. What are the main benefits of federated identity?
a. It avoids the requirement to maintain a list of valid
users, manage passwords and security, and store and
maintain lists of roles for users in the application.
b. It delegates user and role management to the trusted
organization responsible for the user, instead of it
being the responsibility of your application.
———————– Page 79———————–
4242 chapter two
c. It allows users to log onto applications using the same
credentials, and choose an identity provider that is
appropriate for the user and the application to validate
these credentials.
d. It means that your applications do not need to include
authorization code.
5. How can home realm discovery be achieved?
a. The token issuer can display a list of realms based on
the configured identity providers and allow the user
to select his home realm.
b. The token issuer can ask for the user’s email address
and use the domain to establish the home realm.
c. The application can use the IP address to establish the
home realm based on the user’s country/region of
residence.
d. The application can send a hint to the token issuer in
the form of a special request parameter that indicates
the user’s home realm.
———————– Page 80———————–
3 Claims-Based Single Sign-On for
the Web and Windows Azure
This chapter walks you through an example of single sign-on for in-
tranet and extranet web users who all belong to a single security
realm. You’ll see examples of two existing applications that become
claims-aware. One of the applications uses forms authentication, and For single sign-on, the issuer
one uses Windows authentication. Once the applications use claims- also creates a session with the
based authentication, you’ll see how it’s possible to interact with the user that works with different
applications either from the company’s internal network or from the applications.
public Internet.
This basic scenario doesn’t show how to establish trust relation-
ships across enterprises. (That is discussed in Chapter 4, “Federated
Identity for Web Applications.”) It focuses on how to implement
single sign-on and single sign-off within a security domain as a prepa-
ration for sharing resources with other security domains, and how to
migrate applications to Windows Azure™. In short, this scenario
contains the commonly used elements that will appear in all claims-
aware applications.
The Premise
Adatum is a medium-sized company that uses Microsoft Active Direc-
tory® directory service to authenticate the employees in its corporate
network. Adatum’s sales force uses a-Order, Adatum’s order process-
ing system, to enter, process, and manage customer orders. Adatum
employees also use aExpense, an expense tracking and reimbursement
system for business-related expenses.
Both applications are built with ASP.NET 4.0 and are deployed in
Adatum’s data center. Figure 1 shows a whiteboard diagram of the
structure of a-Order and a-Expense.
43
———————– Page 81———————–
4444 chapter three
Active Directory
Users
Roles a−Expense Kerberos
a−Order
ASP.NET
ASP.NET
User Name & Password
Profiles
Browser
ASP.NET
John at
a−Vacations Adatam Corporation
a−Facilities
Java
figure 1
Adatum infrastructure before claims
The two applications handle authentication differently. The a-
Order application uses Windows authentication. It recognizes the
credentials used when employees logged on to the corporate net-
work. The application doesn’t need to prompt them for user names
and passwords. For authorization, a-Order uses roles that are derived
from groups stored in Active Directory. In this way, a-Order is inte-
grated into the Adatum infrastructure.
Keeping the user The user experience for a-Expense is a bit more complicated. The
database for forms- a-Expense application uses its own authentication, authorization, and
based authentication user profile information. This data is stored in custom tables in an
up to date is painful application database. Users enter a user name and password in a web
since this mainte-
nance isn’t integrated form whenever they start the application. The a-Expense application’s
into Adatum’s process authentication approach reflects its history. The application began as
for managing a Human Resources project that was developed outside of Adatum’s
employee accounts. IT department. Over time, other departments adopted it. Now it’s a
part of Adatum’s corporate IT solution.
The a-Expense access control rules use application-specific roles.
Access control is intermixed with the application’s business logic.
Some of the user profile information that a-Expense uses also
exists in Active Directory, but because a-Expense isn’t integrated with
the corporate enterprise directory, it can’t access it. For example,
———————– Page 82———————–
claims-based single sign-on for the web and windows azure 45 45
Active Directory contains each employee’s cost center, which is also
one of the pieces of information maintained in the a-Expense user
profile database. Changing a user’s cost center in a-Expense is messy
and error prone. All employees have to manually update their profiles
when their cost centers change.
Goals and Requirements
Adatum has a number of goals in moving to a claims-based identity Your choice of an identity
solution. One goal is to add the single sign-on capability to its net- solution should be based on
work. This allows employees to log on once and then be able to access clear goals and requirements.
all authorized systems, including a-Expense. With single sign-on, users
will not have to enter a user name and password when they use a-
Expense.
A second goal is to enable Adatum employees to access corporate
applications from the Internet. Members of the sales force often
travel to customer sites and need to be able to use a-Expense and
aOrder without the overhead of establishing a virtual private network
(VPN) session.
A third goal is to plan for the future. Adatum wants a flexible
solution that it can adapt as the company grows and changes. Right
now, a priority is to implement an architecture that allows them to
host some applications in a cloud environment such as Windows
Azure. Moving operations out of their data center will reduce their
Dealing with change
capital expenditures and make it simpler to manage the applications. is one of the
Adatum is also considering giving their customers access to some ap- challenges of IT
plications, such as a-Order. Adatum knows that claims-based identity operations.
and access control are the foundations needed to enable these plans.
While meeting these goals, Adatum wants to make sure its solu-
tion reuses its existing investment in its enterprise directory. The
company wants to make sure user identities remain under central ad-
ministrative control and don’t span multiple stores. Nonetheless,
Adatum wants its business units to have the flexibility to control ac-
cess to the data they manage. For example, not everyone at Adatum
is authorized to use the a-Expense application. Currently, access to
the program is controlled by application-specific roles stored in a
departmentally administered database. Adatum’s identity solution
must preserve this flexibility.
Finally, Adatum also wants its identity solution to work with
multiple platforms and vendors. And, like all companies, Adatum
wants to ensure that any Internet access to corporate applications is
secure.
With these considerations in mind, Adatum’s technical staff has
made the decision to modify both the aExpense and the a-Order
applications to support claims-based single sign-on.
———————– Page 83———————–
4646 chapter three
Overview of the Solution
Claims can take advantage of The first step was to analyze which pieces of identity information
existing directory information. were common throughout the company and which were specific to
particular applications. The idea was to make maximum use of the
existing investment in directory information. Upon review, Adatum
discovered that their Active Directory store already contained the
necessary information. In particular, the enterprise directory main-
tained user names and passwords, given names and surnames, e-mail
addresses, employee cost centers, office locations, and telephone
numbers.
Since this information was already in Active Directory, the claims-
based identity solution would not require changing the Active Direc-
tory schema to suit any specific application.
They determined that the main change would be to introduce an
issuer of claims for the organization. Adatum’s applications will trust
this issuer to authenticate users.
Nobody likes changing Adatum envisions that, over time, all of its applications will even-
their Active Directory tually trust the issuer. Since information about employees is a corpo-
schema. Adding rate asset, the eventual goal is for no application to maintain a custom
app-specific rules or
claims from a non– employee database. Adatum recognizes that some applications have
Active Directory specialized user profile information that will not (and should not) be
data store to a claims moved to the enterprise directory. Adatum wants to avoid adding
issuer is easier. application-specific attributes to its Active Directory store, and it
wants to keep management as decentralized as possible.
For the initial rollout, the company decided to focus on a-Expense
and a-Order. The a-Order application only needs configuration
changes that allow it to use Active Directory groups and users as
claims. Although there is no immediate difference in the application’s
structure or functionality, this change will set the stage for eventually
allowing external partners to access a-Order.
The a-Expense application will continue to use its own applica-
tion-specific roles database, but the rest of the user attributes will
come from claims that the issuer provides. This solution will provide
single sign-on for aExpense users, streamline the management of user
identities, and allow the application to be accessible remotely from
the Internet.
You might ask why Adatum chose claims-based identity rather than
Staging is helpful. Windows authentication for a-Expense. Like claims, Windows
You can change authentication provides single sign-on, and it is a simpler solution
authentication first
than issuing claims and configuring the application to process claims.
without affecting
authorization.
———————– Page 84———————–
claims-based single sign-on for the web and windows azure 47 47
There’s no disagreement here: Windows authentication is
extremely well suited for intranet single sign-on and should be used
when that is the only requirement.
Adatum’s goals are broader than just single sign-on, however.
Adatum wants its employees to have remote access to a-Expense and
a-Order without requiring a VPN connection. Also, Adatum wants to
move aExpense to Windows Azure and eventually allow customers to
view their pending orders in the aOrder application over the Inter-
net. The claims-based approach is best suited to these scenarios.
Figure 2 shows the proposal, as it was presented on Adatum’s
whiteboards by the technical staff. The diagram shows how internal
users will be authenticated.
Active
Issuer Directory
1
Users
0 Kerberos
Roles a−Expense
a−Order
ASP.NET
User Name &
ASP.NET
Password
Profiles
Browser
John at
Adatam Corporation
figure 2
Moving to claims-based identity
This claims-based architecture allows Adatum employees to work
from home just by publishing the application and the issuer through
the firewall and proxies. Figure 3 shows the way Adatum employees
can use the corporate intranet from home.
———————– Page 85———————–
4848 chapter three
Firewall and Proxy
Internet
ACTIVE
DIRECTORY
user Name &
Issuer Password
Users
0 Kerberos
1 2
Roles a−Expense
a−Order
Browser
3
ASP.NET
User Name & ASP.NET
Password
Profiles
John at
Home
− Name Browser
− Cost Center
ASP.NET John at
a−Vacations Adatam Corporation
a−Facilities
Java
figure 3
The Active Directory Claims-based identity over the Internet
Federation Services
(ADFS) proxy role Once the issuer establishes the remote user’s identity by prompt-
provides intermediary ing for a user name and password, the same claims are sent to the
services between an
Internet client and an application, just as if the employee is inside the corporate firewall.
ADFS server that is This solution makes Adatum’s authentication strategy much more
behind a firewall. flexible. For example, Adatum could ask for additional authentication
requirements, such as smart cards, PINs, or even biometric data, when
someone connects from the Internet. Because authentication is now
the responsibility of the issuer, and the applications always receive the
same set of claims, the applications don’t need to be rewritten. The
ability to change the way you authenticate users without having to
change your applications is a real benefit of using claims.
You can also look at this proposed architecture from the point of
view of the HTTP message stream. For more information, see the mes-
sage sequence diagrams in Chapter 2, “Claims-Based Architectures.”
———————– Page 86———————–
claims-based single sign-on for the web and windows azure 49 49
Inside the Implementation
Now is a good time to walk through the process of converting a-
Expense into a claims-aware application in more detail. As you go
through this section, you may want to download the Microsoft Visual
Studio® solution 1SingleSignOn from http://claimsid.codeplex.com.
This solution contains implementations of a-Expense and a-Order,
with and without claims. If you are not interested in the mechanics,
you should skip to the next section.
a-Expense before Claims By default, the
Before claims, the a-Expense application used forms authentication downloadable
to establish user identity. It’s worth taking a moment to review the implementations run
standalone on your
process of forms authentication so that the differences with the workstation, but you
claims-aware version are easier to see. In simple terms, forms authen- can also configure
tication consists of a credentials database and an HTTP redirect to a them for a multi-
logon page. tiered deployment.
Figure 4 shows the a-Expense application with forms authentica-
tion. Many web applica-
tions store user
profile information in
Receive page Redirect to original page. cookies rather than
request. in the session state
because cookies scale
better on the server
side. Scale wasn’t a
concern here because
a-Expense is a
departmental
Validate Read Users and application.
passwords
Already No credentials and
authenticated? Redirect to logon page. store user profile
in session state. Write
Session state
Yes
Retrieve user
profile data from Read
Session state
session state and
show page.
figure 4
a-Expense with forms authentication
———————– Page 87———————–
5050 chapter three
The logon page serves two purposes in a-Expense. It authenti-
cates the user by asking for credentials that are then checked against
the password database, and it also copies application-specific user
profile information into the ASP.NET’s session state object for later
use. Examples of profile information are the user’s full name, cost
center, and assigned roles. The a-Expense application keeps its user
profile information in the same database as user passwords, which is
typical for applications that use forms authentication.
a-Expense intentionally uses custom code for authentication,
authorization, and profiles instead of using Membership, Roles,
and Profile providers. This is typical of legacy applications that
might have been written before ASP.NET 2.0.
In ASP.NET, adding forms authentication to a web application
requires three steps: an annotation in the application’s Web.config file
to enable forms authentication, a logon page that asks for credentials,
and a handler method that validates those credentials against applica-
tion data. Here is how those pieces work.
The Web.config file for a-Expense enables forms authentication
with the following XML declarations:
<authentication mode=”Forms”>
<forms loginUrl=”~/login.aspx”
requireSSL=”true” … />
</authentication>
<authorization>
<deny users=”?” />
</authorization>
The authentication element tells the ASP.NET runtime (or Micro-
soft Internet Information Services (IIS) 7.0 when running both in ASP.
NET integrated mode and classic mode) to automatically redirect
any unauthenticated page request to the specified login URL. An
authorization element that denies access to unauthenticated users
(denoted by the special symbol “?”) is also required to make this
redirection work.
Next, you’ll find that a-Expense has a Login.aspx page that uses
the built-in ASP.NET Login control, as shown here.
<asp:Login ID=”Login1″ runat=”server”
OnAuthenticate=”Login1OnAuthenticate” … >
</asp:Login>
Finally, if you look at the application, you’ll notice that the han-
dler of the Login.aspx page’s OnAuthenticate event looks like the
following.
———————– Page 88———————–
claims-based single sign-on for the web and windows azure 51 51
public partial class Login : Page
{
protected void Login1OnAuthenticate(object sender,
AuthenticateEventArgs e)
{
var repository = new UserRepository();
if (!repository.ValidateUser(this.Login1.UserName,
this.Login1.Password))
{
e.Authenticated = false;
return;
}
var user = repository.GetUser(this.Login1.UserName);
if (user != null)
{
this.Session[“LoggedUser”] = user;
e.Authenticated = true;
}
}
}
This logic is typical for logon pages. You can see in the code that
the user name and password are checked first. Once credentials are
validated, the user profile information is retrieved and stored in the
session state under the LoggedUser key. Notice that the details of
interacting with the database have been put inside of the application’s
UserRepository class.
Setting the Authenticated property of the AuthenticateEvent
Args object to true signals successful authentication. ASP.NET then
redirects the request back to the original page.
At this point, normal page processing resumes with the execution
of the page’s OnLoad method. In the a-Expense application, this
method retrieves the user’s profile information that was saved in the
session state object and initializes the page’s controls. For example,
the logic might look like the following.
protected void OnLoad(EventArgs e)
{
var user = (User)Session[“LoggedUser”];
var repository = new ExpenseRepository();
var expenses = repository.GetExpenses(user.Id);
this.MyExpensesGridView.DataSource = expenses;
this.DataBind();
base.OnLoad(e);
}
———————– Page 89———————–
5252 chapter three
The session object contains the information needed to make ac-
cess control decisions. You can look in the code and see how a-Ex-
pense uses an application-defined property called AuthorizedRoles
to make these decisions.
a-Expense with Claims
The developers only had to make a few changes to a-Expense to
replace forms authentication with claims. The process of validating
credentials was delegated to a claims issuer simply by removing the
logon page and configuring the ASP.NET pipeline to include the Win-
dows Identity Foundation (WIF) WSFederationAuthentication
Module. This module detects unauthenticated users and redirects
them to the issuer to get tokens with claims. Without a logon page,
You only need a few changes the application still needs to write profile and authorization data into
to make the application the session state object, and it does this in the Session_Start method.
claims-aware. Those two changes did the job.
Figure 5 shows how authentication works now that a-Expense is
claims-aware.
Receive page Redirect to original page, with claims.
request.
Redirect to
claims issuer Redirect to claims issuer.
Already No (WS Federation
authenticated? Authentication
Issuer
Module).
Read
Profiles
Run Session_Start
Does in Global.asax.
No Read
session Initialize the Claims
exist? session state with
data from claims. Write
Session state
Yes
Making a-Expense Retrieve user
profile data from Read
use claims was easy session state and Session state
with WIF’s FedUtil. show page.
exe utility. See
Appendix A. figure 5
a-Expense with claims processing
———————– Page 90———————–
claims-based single sign-on for the web and windows azure 53 53
The Web.config file of the claims-aware version of a-Expense
contains a reference to WIF-provided modules. This Web.config file
is automatically modified when you run the FedUtil wizard either
through the command line (FedUtil.exe) or through the Add STS
Reference command by right-clicking the web project in Visual Stu-
dio.
If you look at the modified Web.config file, you’ll see that there
are changes to the authorization and authentication sections as well
as new configuration sections. The configuration sections include the
information needed to connect to the issuer. They include, for ex- We’re just giving the
ample, the Uniform Resource Indicator (URI) of the issuer and infor- highlights here. You’ll
also want to check
mation about signing certificates. out the WIF and
The first thing you’ll notice in the Web.config file is that the au- ADFS product
thentication mode is set to None, while the requirement for authen- documentation.
ticated users has been left in place.
<authentication mode=”None” />
<authorization>
<deny users=”?” />
</authorization>
The forms authentication module that a-Expense previously used has
been deactivated by setting the authentication mode attribute to
None. Instead, the WSFederationAuthenticationModule
(FAM) and SessionAuthenticationModule (SAM) are now in
charge of the authentication process.
The application’s Login.aspx page is no longer needed and can be This may seem a little
removed from the application. weird. What’s going
on is that authentica-
Next, you will notice that the Web.config file contains two new tion has been moved
modules, as shown here. to a different part of
the HTTP pipeline.
<httpModules>
<add name=”WSFederationAuthenticationModule”
type=”Microsoft.IdentityModel.Web.
WSFederationAuthenticationModule, …” />
<add name=”SessionAuthenticationModule”
type=”Microsoft.IdentityModel.Web.
SessionAuthenticationModule, …” />
</httpModules>
When the modules are loaded, they’re inserted into the ASP.NET
processing pipeline in order to redirect the unauthenticated requests
to the issuer, handle the reply posted by the issuer, and transform the
———————– Page 91———————–
5454 chapter three
user token sent by the issuer into a ClaimsPrincipal object. The mod-
ules also set the value of the HttpContext.User property to the
ClaimsPrincipal object so that the application has access to it.
The WSFederationAuthenticationModule redirects the user to
the issuer’s logon page. It also parses and validates the security token
that is posted back. This module writes an encrypted cookie to avoid
repeating the logon process. The SessionAuthenticationModule
detects the logon cookie, decrypts it, and repopulates the Claims
Principal object.
The Web.config file contains a new section for the Microsoft.
The ClaimsPrincipal IdentityModel that initializes the WIF environment.
object implements <configSections>
the IPrincipal
<section name=”microsoft.identityModel”
interface that you
already know. This type=”Microsoft.IdentityModel.Configuration.
makes it easy to MicrosoftIdentityModelSection,
convert existing Microsoft.IdentityModel, …” />
applications. </configSections>
The identity model section contains several kinds of information
needed by WIF, including the address of the issuer and the certificates
(the serviceCertificate and trustedIssuers elements) that are needed
to communicate with the issuer.
<microsoft.identityModel>
<service>
<audienceUris>
<add value=
“https://{adatum hostname}/a-Expense.ClaimsAware/”
/>
</audienceUris>
…
The value of “adatum hostname” changes depending on where
you deploy the sample code. In the development environment,
it is ” localhost.”
Security tokens contain an audience URI. This indicates that the
issuer has issued a token for a specific “audience” (application). Ap-
plications, in turn, will check that the incoming token was actually
issued for them. The audienceUris element lists the possible URIs.
Restricting the audience URIs prevents malicious clients from reusing
a token from a different application with an application that they are
not authorized to access.
———————– Page 92———————–
claims-based single sign-on for the web and windows azure 55 55
<federatedAuthentication>
<wsFederation passiveRedirectEnabled=”true”
issuer=”https://{adatum hostname}/{issuer endpoint} ”
realm=”https://{adatum hostname}/a-Expense.ClaimsAware/”
requireHttps=”true” />
<cookieHandler requireSsl=”true”
path=”/a-Expense.ClaimsAware/” />
</federatedAuthentication>
The federatedAuthentication section identifies the issuer and
the protocol required for communicating with it.
<serviceCertificate> Using HTTPS
mitigates man-in-the-
<certificateReference x509FindType=”FindByThumbprint”
middle and replay
findValue=”5a074d678466f59dbd063d1a98b1791474723365″ /> attacks. This is
</serviceCertificate> optional during
development, but
The service certificate section gives the location of the certificate be sure to use HTTPS
used to decrypt the token, in case it was encrypted. Encrypting the in production
token is optional, and it’s a decision of the issuer to do it or not. You environments.
don’t need to encrypt the token if you’re using HTTPS, but encryp-
tion is generally recommended as a security best practice.
<issuerNameRegistry
type=”Microsoft.IdentityModel.Tokens.ConfigurationBasedIssuer
NameRegistry,
Microsoft.IdentityModel, … >
<trustedIssuers>
<add thumbprint=” f260042d59e14817984c6183fbc6bfc71baf5462″
name=”adatum” />
</trustedIssuers>
</issuerNameRegistry>
A thumbprint is the result of hashing an X.509 certificate signa-
ture. SHA-1 is a common algorithm for doing that. Thumbprints
uniquely identify a certificate and the issuer. The issuerNameRegistry
element contains the list of thumbprints of the issuers it trusts. Issuers
are identified by the thumbprint of their signing X.509 certificate. If
the thumbprint does not match the certificate embedded in the in-
coming token signature, WIF will throw an exception. If the thumb-
print matches, the name attribute will be mapped to the Claim.Issuer
property.
In the code example, the name attribute adatum is required for
the scenario because the a-Expense application stores the federated
user name in the roles database. A federated user name has the for-
mat: adatum\username.
———————– Page 93———————–
5656 chapter three
The following procedure shows you how to find the thumbprint
of a specific certificate.
T O FIND A THUMBPRINT
1. On the taskbar, click Start, and then type mmc in the search
box.
2. Click mmc. A window appears that contains the Microsoft
Management Console (MMC) application.
3. On the File menu, click Add/Remove Snap-in.
4. In the Add or Remove Snap-ins dialog box, click Certifi-
cates, and then click Add.
5. In the Certificates snap-in dialog box, select Computer
account, and then click Next.
6. In the Select Computer dialog box, select Local computer,
click Finish, and then click OK.
7. In the left pane, a tree view of all the certificates on your
computer appears. If necessary, expand the tree. Expand
the Personal folder. Expand the Certificates folder.
8. Click the certificate whose thumbprint you want.
9. In the Certificate Information dialog box, click the Details
tab, and then scroll down until you see the thumbprint.
This may seem like a
lot of configuration, In Windows 7, you’ll need to double-click to open the dialog, which
but the FedUtil has the title Certificate, not Certificate Information.
wizard handles it
for you. The changes in the Web.config file are enough to delegate
authentication to the issuer.
There’s still one detail to take care of. Remember from the previ-
ous section that the logon handler (which has now been removed
from the application) was also responsible for storing the user profile
data in the session state object. This bit of logic is relocated to the
Session_Start method found in the Global.asax file. The Session_
Start method is automatically invoked by ASP.NET at the beginning
of a new session, after authentication occurs. The user’s identity is
now stored as claims that are accessed from the thread’s Current
Principal property. Here is what the Session_Start method looks
like.
———————– Page 94———————–
claims-based single sign-on for the web and windows azure 57 57
protected void Session_Start(object sender, EventArgs e)
{
if (this.Context.User.Identity.IsAuthenticated)
{
string issuer =
ClaimHelper.GetCurrentUserClaim(
System.IdentityModel.Claims.ClaimTypes.Name).
OriginalIssuer;
string givenName =
ClaimHelper.GetCurrentUserClaim(
WSIdentityConstants.ClaimTypes.GivenName).Value;
string surname =
ClaimHelper.GetCurrentUserClaim(
WSIdentityConstants.ClaimTypes.Surname).Value;
string costCenter =
ClaimHelper.GetCurrentUserClaim(
Adatum.ClaimTypes.CostCenter).Value;
var repository = new UserRepository();
string federatedUsername =
GetFederatedUserName(issuer, this.User.Identity.Name);
var user = repository.GetUser(federatedUsername);
user.CostCenter = costCenter;
user.FullName = givenName + ” ” + surname;
this.Context.Session[“LoggedUser”] = user;
}
Putting globally
}
significant data such
Note that the application does not go to the application data as names and cost
centers into claims
store to authenticate the user because authentication has already
while keeping
been performed by the issuer. The WIF modules automatically read app-specific
the security token sent by the issuer and set the user information in attributes in a local
the thread’s current principal object. The user’s name and some other store is a typical
attributes are now claims that are available in the current security practice.
context.
The user profile database is still used by a-Expense to store the
application-specific roles that apply to the current user. In fact, a-
Expense’s access control is unchanged whether or not claims are used.
The preceding code example invokes methods of a helper class
named ClaimHelper. One of its methods, the GetCurrentUserClaim
method, queries for claims that apply in the current context. You need
to perform several steps to execute this query:
———————– Page 95———————–
5858 chapter three
1. Retrieve context information about the current user by
getting the static CurrentPrincipal property of the System.
Threading.Thread class. This object has the run-time type
IPrincipal.
2. Use a run-time type conversion to convert the current
principal object from IPrincipal to the type IClaims
Principal. Because a-Expense is now a claims-aware applica-
tion, the run-time conversion is guaranteed to succeed.
3. Use the Identities property of the IClaimsPrinci-
pal interface to retrieve a collection of identities that apply
to the claims principal object from the previous step. The
object that is returned is an instance of the ClaimsIdentity
Collection class. Note that a claims principal may have more
than one identity, although this feature is not used in the
a-Expense application.
4. Retrieve the first identity in the collection. To do
this, use the collection’s indexer property with 0 as the
index. The object that is returned from this lookup is the
current user’s claims-based identity. The object has type
IClaimsIdentity.
5. Retrieve a claims collection object from the claims
identity object with the Claims property of the IClaims
Identity interface. The object that is returned is an instance
of the ClaimsCollection class. It represents the set of
claims that apply to the claims identity object from the
previous step.
6. At this point, if you iterate through the claims collection,
you can select a claim whose claim type matches the one
you are looking for. The following expression is an example
of how to do this.
claims.Single(c => c.ClaimType == claimType)
Look at the imple- Note that the Single method assumes that there is one
mentation of the claim that matches the requested claim type. It will throw
ClaimHelper class in an exception if there is more than one claim that matches
the sample code for the desired claim type or if no match is found. The Single
an example of how to method returns an instance of the Claim class.
retrieve claims about
the current user. 7. Finally, you extract the claim’s value with the Claim class’s
Value property. Claims values are strings.
———————– Page 96———————–
claims-based single sign-on for the web and windows azure 59 59
a-Order before Claims
Unlike a-Expense, the a-Order application uses Windows authentica-
tion. This has a number of benefits, including simplicity.
Enabling Windows authentication is as easy as setting an attri-
bute value in XML, as shown here.
<authentication mode=”Windows” />
The a-Order application’s approach to access control is consider-
ably simpler than what you saw in aExpense. Instead of combining
authentication logic and business rules, a-Order simply annotates
pages with roles in the Web.config file.
<authorization>
<allow roles=”Employee, Order Approver” />
<deny users=”*” />
</authorization>
The user interface of the a-Order application varies, depending
on the user’s current role.
base.OnInit(e);
this.OrdersGrid.Visible =
!this.User.IsInRole(Adatum.Roles.OrderApprover);
this.OrdersGridForApprovers.Visible =
this.User.IsInRole(Adatum.Roles.OrderApprover);
a-Order with Claims
Adding claims to a-Order is really just a configuration step. The Converting Windows
application code needs no change. authentication to
If you download the project from http://claimsid.codeplex.com, claims only requires a
you can compare the Web.config files before and after conversion configuration change.
to claims. It was just a matter of right-clicking the project in Visual
Studio and then clicking Add STS Reference. The process is very
similar to what you saw in the previous sections for the a-Expense
application.
The claims types required are still the users and roles that were
previously provided by Windows authentication.
Don’t forget that more than
one value of a given claim
type may be present. For
example, a single identity
can have several role claims.
———————– Page 97———————–
6060 chapter three
Signing out of an Application
The FederatedPassiveSignInStatus control is provided by WIF. The
following snippet from the Site.Master file shows how the single sign-
on scenario uses it to sign out of an application.
<idfx:FederatedPassiveSignInStatus
ID=”FederatedPassiveSignInStatus”
runat=”server”
OnSignedOut=”OnFederatedPassiveSignInStatusSignedOut”
SignOutText=”Logout”
FederatedPassiveSignOut=”true”
SignOutAction=”FederatedPassiveSignOut” />
The idfx prefix identifies the control as belonging to the Micro
soft.IdentityModel.Web.Controls namespace. The control causes a
browser redirect to the ADFS issuer, which logs out the user and de-
stroys any cookies related to the session.
In this single sign-on scenario, signing out from one application
signs the user out from all the applications they are currently signed
into in the single sign-on domain.
For details about how the simulated issuer in this sample supports
single sign-out, see the section “Handling Single Sign-out in the
Mock Issuer” later in this chapter.
The a-Expense application uses an ASP.NET session object to
maintain some user state, and it’s important that this session data is
cleared when a user signs out from the single sign-out domain. The
a-Expense application manages this by redirecting to a special Clean-
Up.aspx page when the application handles the WSFederation
AuthenticationModule_SignedOut event in the global.asax.cs file.
The CleanUp.aspx page checks that the user has signed out and then
abandons the session. The following code example shows the Page_
Load event handler for this page.
protected void Page_Load(object sender, EventArgs e)
{
if (this.User.Identity.IsAuthenticated)
{
this.Response.Redirect(“~/Default.aspx”, false);
}
else
{
———————– Page 98———————–
claims-based single sign-on for the web and windows azure 61 61
this.Session.Abandon();
var signOutImage = new byte[]
{
71, 73, …
…
};
this.Response.Cache.SetCacheability
(HttpCacheability.NoCache);
this.Response.ClearContent();
this.Response.ContentType = “image/gif”;
this.Response.BinaryWrite(signOutImage);
} The Cleanup.aspx
page must be listed as
} unauthenticated in
The byte array represents a GIF image of the green check mark the Web.config file.
that the SignedOut.aspx page in the simulated issuer displays after the
single sign-out is complete.
An alternative approach would be to modify the claims issuer to
send the URL of the clean-up page in the wreply parameter when it
sends a wsignoutcleanup1.0 message to the relying party. However
this would mean that the issuer, not the relying party, is responsible
for initiating the session clean-up process in the relying party.
Setup and Physical Deployment
The process for deploying a claims-aware web application follows
many of the same steps you already know for non-claims-aware ap-
plications. The differences have to do with the special considerations
of the issuer. Some of these considerations include providing a suit-
able test environment during development, migrating to a production
issuer, and making sure the issuer and the web application are prop-
erly configured for Internet access.
Using a Mock Issuer
The downloadable versions of a-Expense and a-Order are set up by Mock issuers simplify the
default to run on a standalone development workstation. This is development process.
similar to the way you might develop your own applications. It’s gen-
erally easier to start with a single development machine.
To make this work, the developers of a-Expense and a-Order
wrote a small stub implementation of an issuer. You can find this code
in the downloadable Visual Studio solution. Look for the project with
the URL https://localhost/Adatum.SimulatedIssuer.1.
———————– Page 99———————–
6262 chapter three
When you first run the a-Expense and a-Order applications, you’ll
find that they communicate with the stand-in issuer. The issuer issues
predetermined claims.
It’s not very difficult to write such a component, and you can re-
use the sample that we can provide.
Isolating Active Directory
The a-Order application uses Windows authentication. Since devel-
opers do not control the identities in their company’s enterprise direc-
tory, it is sometimes useful to swap out Active Directory with a stub
Using a simple, during the development of your application.
developer-created The a-Order application (before claims) shows an example of this.
claims issuer is a good To use this technique, you need to make a small change to the Web.
practice during config file to disable Windows authentication and then add a hook in
development and unit
testing. Your network the session authentication pipeline to insert the user identities of your
administrator can choosing. Disable Windows authentication with the following change
help you change to the Web.config file.
the application
configuration to <authentication mode=”None” />
use production
infrastructure The Global.asax file should include code that sets the identity
components when with a programmer-supplied identity. The following is an example.
it’s time for accep-
tance testing and <script runat=”server”>
deployment.
void Application_AuthenticateRequest(object sender, EventArgs e)
{
this.Context.User = MaryMay;
}
private static IPrincipal MaryMay
{
get
{
IIdentity identity = new GenericIdentity(“mary”);
string[] roles = { “Employee”, “Order Approver” };
return new GenericPrincipal(identity, roles);
}
}
</script>
Remove this code before you deploy your application.
———————– Page 100———————–
claims-based single sign-on for the web and windows azure 63 63
Handling Single Sign-out
in the Mock Issuer
The relying party applications (a-Order and a-Expense) use the
FederatedPassiveSignInStatus control to allow the user to log in and
log out. When the user clicks the log out link in one of the applica-
tions, the following sequence of events takes place:
1. The user is logged out from the current application. The
WSFederationAuthenticationModule (FAM) deletes any
claims that the user has that relate to the current applica-
tion.
To find out more
2. The FAM sends a wsignout1.0 WS-Federation command about the message
flow when a user
to the issuer.
initiates the single
3. The mock issuer performs any necessary sign-out sign-out process, take
operations from other identity providers, for example, by a look at Appendix B.
signing the user out from Active Directory.
4. The mock issuer sends a wsignoutcleanup1.0
message to all the relying party applications that the user
has signed into. The mock issuer maintains this list for each
user in a cookie.
Note: The mock issuer sends the wsignoutcleanup1.0
message to the relying party applications by embedding
a specially constructed image tag in the sign out page
that includes the wsignoutcleanup1.0 message in the
querystring.
5. When the FAM in a relying party application intercepts the
wsignoutcleanup1.0 message, it deletes any claims that the
user has that relate to that application.
Converting to a Production Issuer
When you are ready to deploy to a production environment, you’ll Remove the mock issuers
need to migrate from your simulated issuer that runs on your develop- when you deploy the
ment workstation to a component such as ADFS 2.0. application.
Making this change requires two steps. First, you need to modify
the web application’s Web.config file using FedUtil so that it points
to the production issuer. Next, you need to configure the issuer so
that it recognizes requests from your web application and provides
the appropriate claims.
Appendix A of this guide walks you through the process of using
FedUtil and shows you how to change the Web.config files.
You can refer to documentation provided by your production
issuer for instructions on how to add a relying party and how to add
———————– Page 101———————–
6464 chapter three
claims rules. Instructions for the samples included in this guide can be
found at http://claimsid.codeplex.com.
Enabling Internet Access
One of the benefits of outsourcing authentication to an issuer is that
existing applications can be accessed from the external Internet very
easily. The protocols for claims-based identity are Internet-friendly.
All you need to do is make the application and the issuer externally
addressable. You don’t need a VPN.
If you decide to deploy outside of the corporate firewall, be aware
that you will need certificates from a certificate authority for the
hosts that run your web application and issuer. You also need to make
sure that you configure your URLs with fully qualified host names or
static IP addresses. The ADFS 2.0 proxy role provides specific support
for publishing endpoints on the Internet.
Variation—Moving to Windows Azure
The last stage of Adatum’s plan is to move a-Expense to Windows
Azure. Windows Azure uses Microsoft data centers to provide devel-
opers with an on-demand compute service and storage to host, scale,
and manage web applications on the Internet. This variation shows
the power and flexibility of a claims-based approach. The a-Expense
code doesn’t change at all. You only need to edit its Web.config file.
As you go through this section, you may want to download the
It’s easy to move a claims-aware Visual Studio® solution from http://claimsid.codeplex.com.
application to Windows Azure. Figure 6 shows what Adatum’s solution looks like.
Trust
2
Send token
and access Active
a−Expense Directory
a−Expense
Issuer Kerberos
Get token
1
Browser
Windows Azure
John at Adatum
figure 6
Adatum
a-Expense on Windows Azure
———————– Page 102———————–
claims-based single sign-on for the web and windows azure 65 65
From the perspective of Adatum’s users, the location of the a-
Expense application is irrelevant except that the application’s URL
might change once it is on Windows Azure, but even that can be
handled by mapping CNAMEs to a Windows Azure URL. Otherwise,
its behavior is the same as if it were located on one of Adatum’s serv-
ers. This means that the sequence of events is exactly the same as
before, when a-Expense became claims-aware. The first time a user
accesses the application, he will not be authenticated, so the WIF
module redirects him to the configured issuer that, in this case, is the
Adatum issuer.
The issuer authenticates the user and then issues a token that
includes the claims that a-Expense requires, such as the user’s name
and cost center. The issuer then redirects the user back to the applica-
tion, where a session is established. Note that, even though it is lo-
cated on the Internet, aExpense requires the same claims as when it
was located on the Adatum intranet.
Obviously, for any user to use an application on Windows Azure,
it must be reachable from his computer. This scenario assumes that
Adatum’s network, including its DNS server, firewalls, and proxies, are
configured to allow its employees to have access to the Internet.
Notice however, that the issuer doesn’t need to be available to
external resources. The a-Expense application never communicates
with it directly. Instead, it uses browser redirections and follows the
protocol for passive clients. For more information about this protocol,
see chapter 2, “Claims-Based Architectures” and Appendix B.
Hosting a-Expense on Windows Azure
The following procedures describe how to configure the certificates
that you will upload to Windows Azure and the changes you must
make to the Web.config file. These procedures assume that you al-
ready have a Windows Azure token. If you don’t, see http://www.
microsoft.com/windowsazure/getstarted/ to learn how to do this.
T O CONFIGURE THE CERTIFICATES
1. In Visual Studio, open the Windows Azure project, such as
a-expense.cloud. Right-click the a-Expense.ClaimsAware
role, and then click Properties.
2. If you need a certificate’s thumbprint, click Certificates.
Along with other information, you will see the thumbprint.
3. Click Endpoints, and then select HTTPS:. Set the Name
field to HttpsIn. Set the Port field to the port number that
you want to use. The default is 443. Select the certificate
name from the SSL certificate name drop-down box. The
———————– Page 103———————–
6666 chapter three
default is localhost. The name should be the same as the
name that is listed on the Certificates tab.
Note that the certificate that is uploaded is only used for SSL and
not for token encryption. A certificate from Adatum is only necessary
if you need to encrypt tokens.
Both Windows Azure and WIF can decrypt tokens. You must upload
the certificate in the Windows Azure portal and configure the web
role to deploy to the certificate store each time there is a new
instance. The WIF <serviceCertificate> section should point to
that deployed certificate.
The following procedure shows you how to publish the a-Expense
application to Windows Azure.
T O PUBLISH A-Ex PENSE TO W INDOWS Az URE
1. In Microsoft Visual Studio 2010, open the a-expense.cloud
solution.
2. Upload the localhost.pfx certificate to the Windows Azure
project. The certificate is located at [samples-installation-
directory]\Setup\DependencyChecker\certs\localhost.pfx.
The password is “xyz.”
3. Modify the a-Expense.ClaimsAware application’s Web.
config file by replacing the <microsoft.identityModel>
section with the following XML code. You must replace the
{service-url} element with the service URL that you
selected when you created the Windows Azure project.
<microsoft.identityModel>
<service>
<audienceUris>
<add value=”https://{service-url}.cloudapp.net/” />
</audienceUris>
<federatedAuthentication>
<wsFederation passiveRedirectEnabled=”true”
issuer=
“https://{adatum hostname}/{issuer endpoint}”
realm=”https://{service-url}.cloudapp.net/”
requireHttps=”true” />
———————– Page 104———————–
claims-based single sign-on for the web and windows azure 67 67
<cookieHandler requireSsl=”true” />
</federatedAuthentication>
<issuerNameRegistry
type=
“Microsoft.IdentityModel.Tokens.
ConfigurationBasedIssuerNameRegistry,
Microsoft.IdentityModel, Version=3.5.0.0,
Culture=neutral,
PublicKeyToken=31bf3856ad364e35″>
<trustedIssuers>
‘
<!–Adatum s identity provider –>
<add thumbprint=
“f260042d59e14817984c6183fbc6bfc71baf5462”
name=”adatum” />
</trustedIssuers>
</issuerNameRegistry>
<certificateValidation
certificateValidationMode=”None” />
</service>
</microsoft.identityModel>
4. Right-click the a-expense.cloud project, and then click
Publish. This generates a ServiceConfiguration file and the
actual package for Windows Azure.
5. Deploy the ServiceConfiguration file and package to the
Windows Azure project.
Once the a-Expense application is deployed to Windows Azure,
you can log on to http://windows.azure.com to test it.
If you were to run this application on more than one role instance in
Windows Azure (or in an on-premise web farm), the default cookie
encryption mechanism (which uses DPAPI) is not appropriate, since
each machine has a distinct key.
In this case, you would need to replace the default Session
SecurityHandler object and configure it with a different cookie
transformation such as RsaEncryptionCookieTransform or a
custom one. The “web farm” sample included in the WIF SDK
illustrates this in detail.
———————– Page 105———————–
6868 chapter three
Questions
1. Before Adatum updated the a-Expense and a-Order applica-
tions, why was it not possible to use single sign-on?
a. The applications used different sets of roles to
manage authorization.
b. a-Order used Windows authentication and a-Expense
used ASP.NET forms authentication.
c. In the a-Expense application, the access rules were
intermixed with the application’s business logic.
d. You cannot implement single sign-on when user
profile data is stored in multiple locations.
2. How does the use of claims facilitate remote web-based
access to the Adatum applications?
a. Using Active Directory for authentication makes it
difficult to avoid having to use VPN to access the
applications.
b. Using claims means that you no longer need to use
Active Directory.
c. Protocols such as WS-Federation transport claims in
tokens as part of standard HTTP messages.
d. Using claims means that you can use ASP.NET forms-
based authentication for all your applications.
3. In a claims enabled ASP.NET web application, you typically
find that the authentication mode is set to None in the
Web.config file. Why is this?
a. The WSFederationAuthenticationModule is now
responsible for authenticating the user.
b. The user must have already been authenticated by an
external system before they visit the application.
c. Authentication is handled in the On_Authenticate
event in the global.asax file.
d. The WSFederationAuthenticationModule is now
responsible for managing the authentication process.
———————– Page 106———————–
claims-based single sign-on for the web and windows azure 69 69
4. Claims issuers always sign the tokens they send to a relying
party. However, although it is considered best practice, they
might not always encrypt the tokens. Why is this?
a. Relying parties must be sure that the claims come
from a trusted issuer.
b. Tokens may be transferred using SSL.
c. The claims issuer may not be able to encrypt the token
because it does not have access to the encryption key.
d. It’s up to the relying party to state whether or not it
accepts encrypted tokens.
5. The FederatedPassiveSignInStatus control automatically
signs a user out of all the applications she signed into in the
single sign-on domain.
a. True.
b. False. You must add code to the application to per-
form the sign-out process.
c. It depends on the capabilities of the claims issuer. The
issuer is responsible for sending sign-out messages to
all relying parties.
d. If your relying party uses HTTP sessions, you must add
code to explicitly abandon the session.
More Information
Appendix A of this guide walks through the use of FedUtil and also
shows you how to edit the Web.config files and where to locate your
certificates.
MSDN® contains a number of helpful articles, including MSDN
Magazine’s “A Better Approach For Building Claims-Based WCF Ser-
vices” (http://msdn.microsoft.com/en-us/magazine/dd278426.aspx).
To learn more about Windows Azure, see the Windows Azure
Platform at http://www.microsoft.com/windowsazure/.
———————– Page 107———————–
———————– Page 108———————–
4 Federated Identity for
Web Applications
Many companies want to share resources with their partners, but how
can they do this when each business is a separate security realm with
independent directory services, security, and authentication? One
answer is federated identity. Federated identity helps overcome
some of the problems that arise when two or more separate security
realms use a single application. It allows employees to use their local
corporate credentials to log on to external networks that have trust
relationships with their company. For an overview, see the section Federated identity links
“Federating Identity across Realms” in Chapter 2, “Claims-Based independent security realms.
Architectures.”
In this chapter, you’ll learn how Adatum lets one of its customers,
Litware, use the a-Order application that was introduced in Chapter
3, “Claims-Based Single Sign-On for the Web.”
The Premise
Now that Adatum has instituted single sign-on (SSO) for its employ-
ees, it’s ready to take the next step. Customers also want to use the
a-Order program to track an order’s progress from beginning to end.
They expect the program to behave as if it were an application within
their own corporate domain. For example, Litware is a longstanding
client of Adatum’s. Their sales manager, Rick, wants to be able to log Adatum does not
on with his Litware credentials and use the a-Order program to deter- want to maintain
mine the status of all his orders with Adatum. In other words, he accounts for another
wants the same single sign-on capability that Adatum’s employees company’s users of its
have. However, he doesn’t want separate credentials from Adatum web application, since
maintaining accounts
just to use a-Order. for third-party users
can be expensive.
Federated identity
reduces the cost of
account maintenance.
71
———————– Page 109———————–
7272 chapter four
Goals and Requirements
The goal of this scenario is to show how federated identity can make
the partnership between Adatum and Litware more efficient. With
federated identity, one security domain accepts an identity that
comes from another domain. This lets people in one domain access
resources located in the other domain without presenting additional
credentials. The Adatum issuer will trust Litware to authoritatively
issue claims about its employees.
In addition to the goals, this scenario has a few other require-
ments. One is that Adatum must control access to the order status
pages and the information that is displayed, based on the partner that
is requesting access to the program. In other words, Litware should
only be able to browse through its own orders and not another com-
pany’s. Furthermore, Litware allows employees like Rick, who are in
the Sales department, to track orders.
Another requirement is that, because Litware is only one of Ada-
tum’s many partners that will access the program, Adatum must be
able to find out which issuer has the user’s credentials. This is called
home realm discovery. For more information, see Chapter 2, “Claims-
Based Architectures.”
One assumption for this chapter is that Litware has already de-
ployed an issuer that uses WS-Federation, just as the Adatum issuer
does.
Security Assertion
Markup Language WS-Federation is a specification that defines how companies can
(SAML) is another share identities across security boundaries that have their own au-
protocol you might thentication and authorization systems. (For more information about
consider for a scenario
like this. ADFS 2.0 WS-Federation, see chapter 2, “Claims-Based Architectures.”) This
supports SAMLP. can only happen when legal agreements between Litware and Adatum
that protect both sides are already in place. A second assumption is
that Litware should be able to decide which of its employees can ac-
cess the a-Order application.
Overview of the Solution
Once the solution is in place, when Rick logs on to the Litware net-
work, he will access a-Order just as he would a Litware application.
The application can be modified From his perspective, that’s all there is to it. He doesn’t need a special
to accept claims from a partner password or user names. It’s business as usual. Figure 1 shows the
organization. architecture that makes Rick’s experience so painless.
———————– Page 110———————–
feder ated identity for web applications 73 73
Trust
Issuer IP
( )
Issuer FP
( )
Get the Adatum
token
2
Active Directory
3 Get the
s
Litware o
Map the r
e
Trust 1 token b
Claims r
e
K
Browser
4
a−Order
Get the orders
Rick at Litware
Adatum Litware
figure 1
Federated identity between Adatum and Litware
As you can see, there have been two changes to the infrastructure
since Adatum instituted single sign-on. A trust relationship now exists
between the Adatum and Litware security domains, and the Adatum
issuer has been configured with an additional capability: it can now
act as a federation provider (FP). A federation provider grants access
to a resource, such as the a-Order application, rather than verifying an
identity. When processing a client request, the a-Order application
relies on the Adatum issuer. The Adatum issuer, in turn, relies on the
Litware issuer that, in this scenario, acts as an identity provider (IdP).
Of course, the diagram represents just one implementation choice;
separating Adatum’s identity provider and federation provider would
also be possible. Keep in mind that each step also uses HTTP redirec-
tion through the client browser but, for simplicity, this is not shown
in the diagram.
In the sample solution, there are two Adatum issuers: one is the
Adatum identity provider and one is the Adatum federation provider.
This makes it easier to understand how the sample works. In the real
world, a single issuer would perform both of these roles.
The following steps grant access to a user in another security
domain:
1. Rick is using a computer on Litware’s network. He is already
authenticated with Active Directory® directory service. He
opens a browser and navigates to the a-Order application.
The application is configured to trust Adatum’s issuer (the
———————– Page 111———————–
7474 chapter four
federation provider). The application has no knowledge of
where the request comes from. It redirects Rick’s request to
the federation provider.
2. The federation provider presents the user with a page listing
different identity providers that it trusts. At this point, the
federation provider doesn’t know where Rick comes from.
3. Rick selects Litware from the list and then Adatum’s
federation provider redirects him to the Litware issuer to
verify that Rick is who he says he is.
In the sample code, 4. Litware’s identity provider verifies Rick’s credentials and
home realm discovery
is explicit, but this returns a security token to Rick’s browser. The browser
approach has caveats. sends the token back to the federation provider. The claims
For one, it discloses all in this token are configured for the Adatum federation
of Adatum’s partners, provider and contain information about Rick that is relevant
and some companies to Adatum. For example, the claims establish his name and
may not want to
do this. that he belongs to the sales organization. The process of
verifying the user’s credentials may include additional steps
Notice that Adatum’s such as presenting a logon page and querying Active
federation provider Directory or, potentially, other attribute repositories.
is a “relying party”
to Litware’s identity 5. The Adatum federation provider validates and reads the
provider. security token issued by Litware and creates a new token
that can be used by the a-Order application. Claims issued
by Litware are transformed into claims that are understood
by Adatum’s a-Order application. (The mapping rules that
translate Litware claims into Adatum claims were created
when Adatum configured its issuer to accept Litware’s
issuer as an identity provider.)
6. As a consequence of the claim mappings, Adatum’s issuer
removes some claims and adds others that are needed for
the a-Order application to accept Rick as a user. The
Adatum issuer uses browser redirection to send the new
token to the application. Windows® Identity Foundation
(WIF) validates the security token and extracts the claims.
It creates a ClaimsPrincipal and assigns it to HttpContext.
User. The a-Order application can then access the claims for
You can see these authorization decisions. For example, in this scenario, orders
steps in more detail in are filtered by organization— the organization name is
Appendix B. It shows provided as a claim.
a detailed message
sequence diagram for
using a browser as the
client.
———————– Page 112———————–
feder ated identity for web applications 75 75
The Adatum federation provider issuer mediates between the
application and the external issuer. You can think of this as a logical
role that the Adatum issuer takes on. The federation provider has two
responsibilities. First, it maintains a trust relationship with Litware’s
issuer, which means that the federation provider accepts and under-
stands Litware tokens and their claims.
Second, the federation provider needs to translate Litware claims
into claims that a-Order can understand. The a-Order application only
accepts claims from Adatum’s federation provider (this is its trusted
issuer). In this scenario, a-Order expects claims of type Role in order
to authorize operations on its website. The problem is that Litware Check out the setup
claims don’t come from Adatum and they don’t have roles. In the and deployment
scenario, Litware claims establish the employee’s name and organiza- section of the chapter
tional group. Rick’s organization, for example, is Sales. To solve this to see how to
problem, the federation provider uses mapping rules that turn a Lit- establish a trust
relationship between
ware claim into an Adatum claim.
issuers in separate
The following table summarizes what happens to input claims trust domains.
from Litware after the Adatum federation provider transforms them
into Adatum output claims.
Input Conditions Output claims
Claim issuer: Litware Claim issuer: Adatum
Claim type: Group, Claim type: Role; Claim value: Order Tracker
Claim value: Sales
Claim issuer: Litware Claims issuer: Adatum
Claim type: Company; Claim value: Litware
Claim issuer: Litware Claims issuer: Adatum
Claim type: name Claim type: name; Claim Value: Copied from input
Active Directory Federation Services (ADFS) 2.0 includes a claims
rule language that lets you define the behavior of the issuer when it
creates new tokens. What all of these rules generally mean is that if a
set of conditions is true, you can issue some claims.
These are the three rules that the Adatum FP uses:
• => issue(Type = “http://schemas.adatum.com/claims/2009/08/
organization”, Value = “Litware”);
• c:[Type == “http://schemas.xmlsoap.org/claims/Group”, Value ==
“Sales”] => issue(Type = “http://schemas.microsoft.com/
ws/2008/06/identity/claims/role”, Issuer = c.Issuer, OriginalIssuer
= c.OriginalIssuer, Value = “Order Tracker”, ValueType = c.
ValueType);
• c:[Type == “http://schemas.xmlsoap.org/ws/2005/05/identity/
claims/name”]=> issue(claim = c);
———————– Page 113———————–
7676 chapter four
In all the rules, the part before the “=>” is the condition that must
be true before the rule applies. The part after the “=>” indicates the
action to take. This is usually the creation of an additional claim.
The first rule says that the federation provider will create a claim
of type Organization with the value Litware. That is, for this issuer
(Litware) it will create that claim. The second rule specifies that if
there’s a claim of type Group with value Sales, the federation pro-
vider will create a claim of type Role with the value Order Tracker.
The third rule copies a claim of type name.
An important part of the solution is home realm discovery. The
a-Order application needs to know which issuer to direct users to for
There are no
authentication. If Rick opens his browser and types http://www.
partner-specific
details in the a-Order adatum.com/ordertracking, how does a-Order know that Rick can
application. Partner be authenticated by Litware’s issuer? The fact is that it doesn’t. The
details are kept in a-Order application relies on the federation provider to make that
the FP. decision. The a-Order application always redirects users to the fed-
eration provider.
This approach has two potential issues: it discloses information
publicly about Litware’s relationship with Adatum, and it imposes an
extra step on users who might be confused as to which selection is
appropriate.
You can resolve these issues by giving the application a hint about
the user’s home realm. For example, Litware could send a parameter
in a query string that specifies the sender’s security domain. The ap-
plication can use this hint to determine the federation provider’s be-
havior. For more information, see “Home Realm Discovery” in Chapter
2, “Claims-Based Architectures.”
It also increases the
risk of a phishing
attack.
An issuer can accept the
whr parameter
as a way to specify
someone’s home realm.
———————– Page 114———————–
feder ated identity for web applications 77 77
Benefits and Limitations
Federated identity is an example of how claims support a flexible in-
frastructure. Adatum can easily add customers by setting up the trust
relationship in the federation provider and creating the correct claims
mappings. Thanks to WIF, dealing with claims in a-Order is straight-
forward and, because Adatum is using ADFS 2.0, creating the claim
mapping rules is also fairly simple. Notice that the a-Order application
itself didn’t change. Also, creating a federation required incremental
additions to an infrastructure that was first put in place to implement
single sign-on.
Another benefit is that the claims that Litware issues are about Federated identity
requires a lot less
things that make sense within the context of the organization: Lit- maintenance and
ware’s employees and their groups. All the identity differences be- troubleshooting. User
tween Litware and Adatum are corrected on the receiving end by accounts don’t have
Adatum’s federation provider. Litware doesn’t need to issue Adatum- to be copied and
maintained across
specific claims. Although this is technically possible, it can rapidly
security realms.
become difficult and costly to manage as a company adds new rela-
tionships and applications.
Inside the Implementation
The Microsoft® Visual Studio® development system solution named
2-Federation found at http://claimsid.codeplex.com is an example of
how to use federation. The structure of the application is very similar
to what you saw in Chapter 3, “Claims-Based Single Sign-On for the
Web.” Adding federated identity did not require recompilation or
changes to the Web.config file. Instead, the issuer was configured to Adding federated identity
act as a federation provider and a trust relationship was established to an existing claims-aware
with an issuer that acts as an identity provider. This process is de- application requires only
scribed in the next section. Also, the mock issuers were extended to a configuration change.
handle the federation provider role.
Setup and Physical Deployment
The Visual Studio solution named 2-Federation on CodePlex is ini-
tially configured to run on a stand-alone development machine. The
solution includes projects that implement mock issuers for both
Litware and Adatum.
———————– Page 115———————–
7878 chapter four
Using Mock Issuers for Development
and Testing
Mock issuers are helpful for development, demonstration, and testing
because they allow the end-to-end application to run on a single host.
The WIF SDK includes a Visual Studio template that makes it easy
to create a simple issuer class that derives from the SecurityToken
Service base class. You then provide definitions for the GetScope and
GetOutputClaims methods, as shown in the downloadable code
sample that accompanies this scenario.
When the developers at Adatum want to deploy their application,
they will modify the configuration so that it uses servers provided by
Procedures for Adatum and Litware. To do this, you need to establish a trust relation-
establishing trust can ship between the Litware and Adatum issuers and modify the a-Order.
be automated by
using metadata. For OrderTracking application’s Web.config file for the Adatum issuer.
example, in ADFS 2.0,
you can use the
FederationMetadata. Establishing Trust Relationships
xml file if you prefer
a more automated In the production environment, Adatum and Litware use production-
approach. The mock grade security token issuers such as ADFS 2.0. For the scenario to
issuers provided in work, you must establish a trust relationship between Adatum’s and
the sample code do Litware’s issuers. Generally, there are seven steps in this process:
not provide this
metadata. 1. Export a public key certificate for token signing from the
Litware issuer and copy Litware’s token signing certificate
to the file system of the Adatum’s issuer host.
2. Configure Adatum’s issuer to recognize Litware as a trusted
identity provider.
3. Configure Litware’s issuer to accept requests from
the Adatum issuer.
4. Configure the a-Order Tracking application as a
relying party within the Adatum issuer.
5. Edit claims rules in Litware that are specific to the
Adatum issuer.
6. Edit claims transformation rules in the Adatum
issuer that are specific to the Litware issuer.
7. Edit claims rules in the Adatum issuer that are
specific to the a-Order Tracking application.
You can refer to documentation provided by your production
issuer for instructions on how to perform these steps. Instructions for
the samples included in this guide can be found at http://claimsid.
codeplex.com.
———————– Page 116———————–
feder ated identity for web applications 79 79
Questions
1. Federated identity is best described as:
a. Two or more applications that share the same set of
users.
b. Two or more organizations that share the same set of
users.
c. Two or more organizations that share an identity
provider.
d. One organization trusting users from one or more
other organizations to access its applications.
2. In a federated security environment, claims mapping is
necessary because:
a. Claims issued by one organization are not necessarily
the claims recognized by another organization.
b. Claims issued by one organization can never be trusted
by another organization.
c. Claims must always be mapped to the roles used in
authorization.
d. Claims must be transferred to a new ClaimsPrincipal
object.
3. The roles of a federation provider can include:
a. Mapping claims from an identity provider to claims
that the relying party understands.
b. Authenticating users.
c. Redirecting users to their identity provider.
d. Verifying that the claims were issued by the expected
identity provider.
4. Must an identity provider issue claims that are specific to a
relying party?
a. Yes
b. No
c. It depends.
———————– Page 117———————–
8080 chapter four
5. Which of the following best summarizes the trust relation-
ships between the various parties described in the federated
identity scenario in this chapter?
a. The relying party trusts the identity provider, which in
turn trusts the federation provider.
b. The identity provider trusts the federation provider,
which in turn trusts the relying party.
c. The relying party trusts the federation provider, which
in turn trusts the identity provider.
d. The federation provider trusts both the identity
provider and the relying party.
More Information
For more information about federation and home realm discovery, see
“Developer’s Introduction to Active Directory Federation Services” at
http://msdn.microsoft.com/en-us/magazine/cc163520.aspx. Also see
“One does not simply walk into Mordor, or Home Realm Discovery for
the Internet” at http://blogs.msdn.com/vbertocci/archive/2009/04
/08/one-does-not-simply-walk-into-mordor-or-home-realm-discov-
ery-for-the-internet.aspx.
For a tool that will help you generate WS-Federation metadata
documents, see Christian Weyer’s blog at http://blogs.thinktecture.
com/cweyer/archive/2009/05/22/415362.aspx.
For more information about the ADFS 2.0 claim rule language, see
“Claim Rule Language” at http://technet.microsoft.com/en-us/library/
dd807118%28WS.10%29.aspx.
For a simple tool that you can use as a test security token service
(STS) that can issue tokens via WS-Federation, see the SelfSTS tool
at http://archive.msdn.microsoft.com/SelfSTS.
———————– Page 118———————–
5 Federated Identity with
Windows Azure Access
Control Service
In Chapter 4, “Federated Identity for Web Applications,” you saw how
Adatum used claims to enable users at Litware to access the a-Order
application. The scenario described how Adatum could federate with
partner organizations that have their own claims-based identity infra-
structures. Adatum supported the partner organizations by establish-
ing trust relationships between the Adatum federation provider (FP)
and the partner’s identity provider (IdP).
Adatum would now like to allow individual users who are not part
of a partner’s security domain to access the a-Order application. Ada-
tum does not want to manage the user accounts for these individuals:
instead, these individuals should be able to use an existing identity
® ® ®
from social identity providers such as Microsoft Windows Live , In this chapter, the term
Google, Yahoo!, or Facebook. How can Adatum enable users to reuse “social identity” refers to
an existing social identity, such as Facebook ID, when they access the an identity managed by
a-Order application? In addition to establishing trust relationships a well-known, established
with the social identity providers, Adatum must find solutions to online identity provider.
these problems:
• different identity providers may use different protocols and
token formats to exchange identity data.
• different identity providers may use different claim types.
• the Adatum federation provider must be able to redirect users
to the correct identity provider.
• the a-order application must be able to implement authoriza-
tion rules based on the claims that the social identity providers
issue.
• Adatum must be able to enroll new users with social identities
who want to use the a-order application.
The Windows Azure™ AppFabric Access Control Service (ACS)
is a cloud-based federation provider that provides services to facili-
tate this scenario. ACS can transition between the protocols used by
81
———————– Page 119———————–
82 chapter five
different identity providers to transfer claims, perform mappings be-
tween different claim types based on configurable rules, and help lo-
cate the correct identity provider for a user when they want to access
an application. For more information, see Chapter 2, “Claims-Based
Architectures.”
ACS currently supports the following identity providers: Windows
Live, Google, Yahoo!, and Facebook. In addition, it can work with
ADFS 2.0 identity providers or a custom security token service (STS)
compatible with WS-Federation or WS-Trust. ACS also supports
OpenID, but you must configure this programmatically rather than
through the portal.
In this chapter, you’ll learn how Adatum enables individual cus-
tomers with a range of different social identity types to access the
a-Order application alongside Adatum employees and employees of
an existing enterprise partner. This chapter extends the scenario de-
scribed in Chapter 4, “Federated Identity for Web Applications,” and
shows Adatum building on its previous investments in a claims-based
identity infrastructure.
Consumer users will The Premise
benefit from using their
existing social identities Now that Adatum has enabled federated access to the a-Order ap-
because they won’t need plication for users at some of Adatum’s partners such as Litware,
to remember a new set of Adatum would like to extend access to the a-Order application to
credentials just for users at smaller businesses with no identity infrastructure of their
accessing the a-Order own and to individual consumer users. Fortunately, it is likely that
application. Adatum will
benefit because they won’t these users will already have some kind of social identity such as a
have the overhead of Google ID or a Windows Live ID. Smaller businesses want their users
managing these identi- to be able to track their orders, just as Rick at Litware is already able
ties—securely storing to do. Consumer users want to be able to log on with their social
credentials, managing identity credentials and use the a-Order program to determine
lost passwords, enforcing
password policies, and the status of all their orders with Adatum. They don’t want to be
so on. issued additional credentials from Adatum just to use the a-Order
application.
Goals and Requirements
The goal of this scenario is to show how federated identity can make
the partnership between Adatum and consumer users and users at
smaller businesses with no security infrastructure of their own work
more efficiently. With federated identity, one security realm can ac-
cept identities that come from another security realm. This lets people
in one domain access resources located in the other domain without
———————– Page 120———————–
feder ated identity with windows azure access control service 83
presenting additional credentials. The Adatum issuer will trust the
common social identity providers (Windows Live ID, Facebook,
Google, Yahoo!) to authenticate users on behalf of the a-Order
application.
Adatum trusts the social identity providers indirectly. The federation
provider at Adatum trusts the Adatum ACS instance and that in turn
trusts the social identity providers. If the federation provider at
Adatum trusted all the social identity providers directly, then it
would have to deal with the specifics of each one: the different
protocols and token formats. ACS handles all of this complexity for
Adatum and that makes it really easy for Adatum to support a
variety of social identity providers.
In addition to the goals, this scenario has a number of other re-
quirements. One requirement is that Adatum must control access to
the order status pages and the information that the application dis-
plays based on the identity of the partner or consumer user who is
requesting access to the a-Order application. In other words, users at
Litware should only be able to browse through Litware’s orders and
not another company’s orders. In this chapter, we introduce Mary, the
owner of a small company named “Mary Inc.” She, of course, should
only be able to browse through her orders and no one else’s.
Another requirement is that, because Adatum has several partner
organizations and many consumer users, Adatum must be able to find
out which identity provider it should use to authenticate a user’s
credentials. As mentioned in previous chapters, this process is called
home realm discovery. For more information, see Chapter 2, “Claims-
Based Architectures.”
One assumption for this chapter is that Adatum has its own iden-
tity infrastructure in place.
Overview of the Solution Although using ACS
simplifies the implementa-
With the goals and requirements in place, it’s time to look at the solu- tion of the Adatum issuer,
tion. As you saw in Chapter 4, “Federated Identity for Web Applica- it does introduce some
tions,” the solution includes the establishment of a claim-based archi- running costs. ACS is a
tecture with an issuer that acts as an identity provider on the subscription service, and
Adatum will have to pay
customer’s side and an issuer that acts as the federation provider on based on its usage of ACS
Adatum’s side. Recall that a federation provider acts as a gateway (ACS charges are calculated
between a resource and all of the issuers that provide claims about the based on the number of
resource’s users. Access Control transactions
In addition, this solution now includes an ACS instance, which plus the quantity of data
transferred in and out of
handles the protocol transition and token transformation for issuers the Windows Azure
that might not be WS-Federation based. This includes many of the datacenters).
social identity providers mentioned earlier in this chapter.
———————– Page 121———————–
84 chapter five
Figure 1 shows the Adatum solution for both Litware that has its
own identity provider, and Mary who is using a social identity—
Google, in this example.
n Trust
o
i
t Windows Live ID
i
s
n
a
r
T Facebook Social identity
l
o
c issuers (IdPs)
o
t Google
o
r
P
Claims
Transformation
3
t
Claims rus ACS
T
Transformation
2 1
3
4
5
Issuer FP Trust
( )
Mary
6
a−Order
web application 2 Trust
RP
( )
John
4
Issuer ldP
( )
1
Rick
Adatum
figure 1
Accessing the a-Order application from Litware
Litware and by using a social identity
The following two sections provide a high-level walkthrough of
the interactions between the relying party (RP), the federation pro-
vider, and the identity provider for customers with and without their
own identity provider. For a detailed description of the sequence of
messages that the parties exchange, see Appendix B.
Example of a Customer
with its Own Identity Provider
To recap from Chapter 4, “Federated Identity for Web Applications,”
here’s an example of how the system works for a user, Rick, at the
partner Litware, which has its own identity provider. The steps cor-
respond to the shaded numbers in the preceding illustration.
STEP 1: Auth EntICAt E rICK
1. Rick is using a computer on Litware’s network. Litware’s
Active Directory® service has already authenticated him. He
opens a browser and navigates to the a-Order application.
Rick is not an authenticated user in a-Order at this time.
Adatum has configured a-Order to trust Adatum’s issuer
(the federation provider). The application has no knowledge
———————– Page 122———————–
feder ated identity with windows azure access control service 85
of where the request comes from. It redirects Rick’s request
to the Adatum federation provider.
2. The Adatum federation provider presents the user with a
page listing different identity providers that it trusts (the
“Home realm Discovery” page). At this point, the federation
provider doesn’t know where Rick comes from.
3. Rick selects Litware from the list and then Adatum’s
federation provider redirects him to the Litware issuer that
can verify that Rick is who he says he is.
4. Litware’s identity provider verifies Rick’s credentials and
returns a security token to Rick’s browser. Litware’s identity
provider has configured the claims in this token for the
Adatum federation provider and they contain information
about Rick that is relevant to Adatum. For example, the
claims establish his name and that he belongs to the sales
organization in Litware.
STEP 2: t rA nsmIt L ItwA rE’s sEC urItY t o KEn
to th E AdAtum fEdErAt Ion provIdEr
1. Ricks’ browser now posts the issued token back to the
Adatum federation provider. The Adatum federation
provider validates the token issued by Litware and creates a
new token that the a-Order application can use.
STEP 3: t rA nsformIng thE t o KEn
1. The federation provider transforms the claims issued by
Litware into claims that Adatum’s a-Order application
understands. (The mapping rules that translate Litware
claims into Adatum claims were determined when Adatum
configured its issuer to accept Litware’s issuer as an identity
provider.)
2. The claim mappings in Adatum’s issuer remove some claims
and add others that the a-Order application needs in order
to accept Rick as a user, and possibly control access to
certain resources.
STEP 4: t rA nsmIt th E t rA nsformEd t o KEn
A nd pErform thE rEqu Est Ed ACt Ion
1. The Adatum issuer uses browser redirection to send the
new token to the application. In the a-Order application,
———————– Page 123———————–
86 chapter five
Windows Identity Foundation (WIF) validates the security
token and extracts the claims. It creates a ClaimsPrincipal
object and assigns it to HttpContext.User property. The
a-Order application can then access the claims for authori-
zation decisions. For example, in this scenario, the applica-
tion filters orders by organization, which is one of the pieces
of information provided as a claim.
Example of a Customer
Using a Social Identity
Here’s an example of how the system works for a consumer user such
In the sample, the as Mary who is using a social identity. The steps correspond to the
simulated issuer
allows you to select un-shaded numbers in the preceding illustration.
between Adatum,
partner organizations, STEP 1: prEs Ent CrEdEntIALs to th E Id EntItY provIdEr
and social identity
providers. 1. Mary is using a computer at home. She opens a browser and
navigates to the a-Order application at Adatum. Adatum has
configured the a-Order application to trust Adatum’s issuer
(the federation provider). Mary is currently un-authenticat-
ed, so the application redirects Mary’s request to the
Adatum federation provider.
2. The Adatum federation provider presents Mary with a page
listing different identity providers that it trusts. At this
point, the federation provider doesn’t know which security
realm Mary belongs to, so it must ask Mary which identity
provider she wants to authenticate with.
3. Mary selects the option to authenticate using her social
identity and then Adatum’s federation provider redirects her
to the ACS issuer to verify that Mary is who she says she is.
Adatum’s federation provider uses the whr parameter in the
request to indicate to ACS which social identity provider to
use—in this example it is Google.
In this sample, the Adatum simulated issuer allows users to enter the
email address associated with their social identity provider. The
simulated issuer parses this email address to determine the value of
the whr parameter. Another option would be to let the user choose
from a list of social identity providers. You should check what
options are available with the issuer that you use; you may be able to
query your issuer for the list of identity providers that it currently
supports.
4. ACS automatically redirects Mary to the Google issuer.
———————– Page 124———————–
feder ated identity with windows azure access control service 87
Mary never sees an ACS page; when ACS receives the request from
the Adatum issuer, ACS uses the value of the whr parameter to
redirect Mary directly to her social identity provider. However, if the
whr parameter is missing, or does not have a valid value, then ACS
will display a page that allows the user to select the social identity
provider that she wants to use.
5. Google verifies Mary’s credentials and returns a security
token to Mary’s browser. The Google identity provider has
added claims to this token for ACS: the claims include basic
information about Mary. For example, the claims establish Mary must give her
consent before
her name and her email address.
Google will pass the
claims on to ACS.
STEP 2: t rA nsmIt th E Id EntItY provIdEr’s
sEC urItY t o KEn to ACs
1. The Google identity provider uses HTTP redirection to
redirect the browser to ACS with the security token it has
issued.
2. ACS receives this token and verifies that it was issued by
the identity provider.
STEP 3: t rA nsform thE C LAIms
1. If necessary, ACS converts the token issued by the identity
provider to the security assertion markup language (SAML)
2.0 format and copies the claims issued by Google into the
new token.
2. ACS returns the new token to Mary’s browser.
STEP 4: t rA nsmIt th E Id EntItY provIdEr’s sEC urItY
t o KEn to thE f EdErAt Ion provIdEr
1. Mary’s browser posts the issued token back to the Adatum
federation provider.
2. The Adatum federation provider receives this token and
validates it by checking that ACS issued the token.
STEP 5: mA p thE C LAIms
1. Adatum’s federation provider applies token mapping rules
to the ACS security token. These rules transform the claims
into claims that the a-Order application can understand.
2. The Adatum federation provider returns the new claims to
Mary’s browser.
———————– Page 125———————–
88 chapter five
STEP 6: t rA nsmIt th E mA ppEd CLAIms A nd pErform
th E rEqu Est Ed ACt Ion
1. Mary’s browser posts the token issued by the Adatum
federation provider to the a-Order application. This token
contains the claims created by the mapping process.
2. The application validates the security token by checking
that the Adatum federation provider issued it.
3. The application reads the claims and creates a session for
Mary. It can use Mary’s identity information from the token
to determine which orders Mary can see in the application.
Because this is a web application, all interactions happen through
the browser. (See the section “Browser-Based Scenario with ACS” in
Appendix B for a detailed description of the protocol for a browser-
based client.)
The principles behind these interactions are exactly the same as
those described in Chapter 4, “Federated Identity for Web Applica-
tions.”
Adatum’s issuer, acting as a federation provider, mediates between
the application and the external issuers. The federation provider has
two responsibilities. First, it maintains a trust relationship with partner
issuers, which means that the federation provider accepts and under-
Different social stands Litware tokens and their claims, ACS tokens and their claims,
identity providers and tokens and their claims from any other configured partner. Sec-
return different claims ond, the federation provider needs to translate claims from partners
to ACS: for example,
the Windows Live ID and ACS into claims that a-Order can understand. The a-Order ap-
identity provider only plication only accepts claims from Adatum’s federation provider (this
returns a guid-like is its trusted issuer). In this scenario, a-Order expects claims of type
nameidentifier claim, Role and Organization in order to authorize operations on its web
the Google identity site. The problem is that ACS claims don’t come from Adatum and
provider returns name
and email claims in they don’t have these claim types. In the scenario, the claims from
addition to the ACS only establish that a social identity provider has authenticated
nameidentifier claim. the user. To solve this problem, the Adatum federation provider uses
mapping rules that add a Role claim to the claims from ACS.
Trust Relationships with
Social Identity Providers
The nature of a trust relationship between Adatum and a business
partner such as Litware, is subtly different from a trust relationship
between Adatum and a social identity provider such as Google or
———————– Page 126———————–
feder ated identity with windows azure access control service 89
Windows Live. In the case of a trust relationship between Adatum and
a business partner such as Litware, the trust operates at two levels;
there is a business trust relationship characterized by business con-
tracts and agreements, and a technical trust relationship characterized
by the configuration of the Adatum federation provider to trust to-
kens issued by the Litware identity provider. In the case of a trust re-
lationship between Adatum and a social identity provider such as
Windows Live, the trust is only a technical trust; there is no business
relationship between Adatum and Windows Live. In this scenario,
Adatum establishes a business trust relationship with the owner of
the social identity when the owner enrolls to use the a-Order applica-
tion and registers his or her social identity with Adatum. A further
difference between the two scenarios is in the claims issued by the
identity providers. Adatum can trust the business partner to issue rich,
accurate claims data about its employees such as cost centers, roles,
and telephone numbers, in addition to identity claims such as name
and email. The claims issued by a social identity provider are minimal,
and may sometimes be just an identifier. Because there is no business
trust relationship with the social identity provider, the only thing that
Adatum knows for sure is that each individual with a social identity
has a unique, unchanging identifier that Adatum can use to recognize
that it’s the same person returning to the a-Order application.
An individual’s unique identifier is unique to that instance of ACS: if
Adatum creates a new ACS instance, each individual will have a new
unique identifier. This is important to be aware of if you’re using the
unique identifier to map to other user data stored elsewhere.
Description of Mapping Rules
in a Federation Provider
The claims that ACS returns from the social identity provider to the
Adatum federation provider do not include the role or organization
claims that the a-Order application uses to authorize access to order
data. In some cases, the only claim from the social identity provider is
the nameidentifier that is a guid-like string. The mapping in rules in
the Adatum federation provider must add the role and organization
claims to the token. In the sample, the mapping rules simply add the
OrderTracker role, and “Mary Inc.” as an organization.
The following table summarizes the mapping rules that the Ada-
tum federation provider applies when it receives a token from ACS
when the user has authenticated with Google.
———————– Page 127———————–
90 chapter five
Input claim Output claim Notes
nameidentifier A unique id allocated by Google.
emailaddress The users registered email address
with Google. The user has agreed
to share this address.
name name The users name. This is the only
claim passed through to the
application. The issuer property
of the claim is set to adatum, and
the originalissuer is set to acs\
Google.
identityprovider Google
Role The simulated issuer adds this
claim with a value of “Order
Tracker.”
Organization The simulated issuer adds this
claim with a value of “MaryInc.”
The following table summarizes the mapping rules that the simu-
lated issuer applies when it receives a token from ACS when the user
has authenticated with Windows Live ID.
Input claim Output claim Notes
nameidentifier A unique id allocated by
Windows Live ID.
identityprovider uri:WindowsLiveID
name The simulated issuer copies the
value of the nameidentifier claim
to the name claim. The issuer
property of the claim is set to
adatum, and the originalissuer is
set to acs\LiveID.
Role The simulated issuer adds this
claim with a value of “Order
Tracker.”
Organization The simulated issuer adds this
claim with a value of “MaryInc.”
———————– Page 128———————–
feder ated identity with windows azure access control service 91
The following table summarizes the mapping rules that the simu-
lated issuer applies when it receives a token from ACS when the user
has been authenticated by a Facebook application.
Input claim Output claim Notes
nameidentifier A unique id allocated by the
Facebook application.
identityprovider Facebook-194130697287302. The
number here uniquely identifies
your Facebook application.
name name The users name. This is the only These mappings are, of
claim passed through to the course, an example and for
application. The issuer property demonstration purposes
of the claim is set to adatum, and only. Notice that as they
the originalissuer is set to acs\ stand, anyone authenti-
Facebook. cated by Google or
Windows Live ID has
Role The simulated issuer adds this
access to the “Mary Inc.”
claim with a value of “Order
orders in the a-Order
Tracker.”
application. A real
Organization The simulated issuer adds this federation provider
claim with a value of “MaryInc.” would probably check
that the combination of
In the scenario described in this chapter, because of the small identityprovider and
numbers of users involved, Adatum expects to manage the enrolment nameidentifier claims is
as a manual process. For a description of how this might be automated, from a registered, valid
see Chapter 7, “Federated Identity with Multiple Partners and Win- user and look up in a local
database their name, role,
dows Azure Access Control Service.”
and organization.
Alternative Solutions
Of course, the solution we’ve just described illustrates just one imple-
mentation choice; another possibility would be to separate Adatum’s
identity provider and federation provider and let ACS manage the
federation and the claims transformation. Figure 2 shows the trust
relationships that Adatum would need to configure for this solution.
———————– Page 129———————–
92 chapter five
n Trust
o
i
t Windows Live ID
i
s
n
a
r
T Facebook Social identity
l
o
c issuers (IdPs)
o
t Google
o
r
P
Claims
Transformation
t
rus ACS
T
Trust
Trust
Issuer IdP
( ) Mary
a−Order
web application
RP
( )
John
Issuer ldP
( )
Rick
Adatum
figure 2
Litware
Using ACS to manage the federation
Adatum has already with Adatum’s partners
invested in its own
identity infrastructure In this alternative solution, ACS would trust the Adatum and
and has an existing Litware identity providers and there is no longer a trust relationship
federation provider between the Litware and Adatum issuers. Adatum should also evalu-
running in their own
ate the costs of this solution because there will be additional ACS
datacenter. As a rather
risk-averse organiza- transactions as it handles sign-ins from users at partners with their
tion, Adatum prefers own identity providers. These costs need to be compared with the
to continue to use cost of running and managing this service on-premises.
their tried and tested
solution rather A second alternative solution does away with ACS leaving all the
than migrate the responsibilities for protocol transition and claims transformation to
functionality to ACS. the issuer at Adatum. Figure 3 shows the trust relationships that
Adatum would need to configure for this solution.
———————– Page 130———————–
feder ated identity with windows azure access control service 93
Windows Live ID
Trust Facebook Social identity
Google issuers (IdPs)
n
o
i
t
i
s
n
a
r
T
l
o
c
o Claims
t
o
r
P Transformation
Mary
Issuer FP
( ) Trust
This alternative removes
a−Order
web application Trust a dependency on ACS:
RP
( ) an external, third-party
John
service. It still relies on
Issuer ldP the social identity providers
( )
for their authentication
Rick services.
Adatum
figure 3
Litware
Using the Adatum issuer
for all federation tasks
Although this alternative solution means that Adatum does not
need to pay any of the subscription charges associated with using
ACS, Adatum is concerned about the additional complexity of its is-
suer, which would now need to handle all of the protocol transition
and claims transformation tasks. Furthermore, implementing this
scenario would probably take some time (weeks or months), while
Adatum could probably configure the solution with ACS in a matter
of hours. The question becomes one of business efficiency: would
Adatum get a better return by investing in creating and maintaining
infrastructure services, or by focusing on their core business services?
Inside the Implementation
The Visual Studio solution named 6-FederationWithAcs found at
http://claimsid.codeplex.com is an example of how to use federation
with ACS. The structure of the application is very similar to what you
saw in chapter 4, “Federated Identity for Web Applications.” There
are no changes to the a-Order application: it continues to trust the
Adatum simulated issuer that provides it with the claims required to
authorize access to the application’s data.
———————– Page 131———————–
94 chapter five
The example solution extends the Adatum simulated issuer to
handle federation with ACS, and uses an ACS instance that is config-
ured to trust the social identity providers. The next section describes
these changes.
Setup and Physical Deployment
You can run the Visual Studio solution named 6-FederationWithAcs
found at http://claimsid.codeplex.com on a stand-alone development
machine. As with the solutions described in the previous chapters, this
solution uses mock issuers for both Adatum and Litware. There are no
changes to the Litware mock issuer, but the Adatum mock issuer now
has a trust relationship with ACS in addition to the existing trust re-
lationship with Litware, and offers the user a choice of authenticating
You can select the with the Adatum identity provider, the Litware identity provider, or
certificate that ACS ACS.
uses to sign the token You can see the entry for ACS (https://federationwithacs-dev.
it issues to the accesscontrol.windows.net/) in the issuerNameRegistry section of
Adatum federation the Web.config file in the Adatum.SimulatedIssuer.6 project. This
provider in the
Windows Azure entry includes the thumbprint used to verify the token that the Ada-
AppFabric portal. tum federation provider receives from ACS. This is the address of the
ACS instance created for the sample.
When the developers at Adatum want to deploy their application,
they will modify the configuration so that it uses the Adatum federa-
tion provider. They will also modify the configuration of the Adatum
federation provider by adding a trust relationship with the production
ACS instance.
Establishing a Trust Relationship
with ACS
Establishing a trust relationship with ACS is very similar to establish-
ing a trust relationship with any other issuer. Generally, there are six
steps in this process:
1. Configure Adatum’s issuer to recognize your ACS instance
as a trusted identity provider.
You may be able to configure the Adatum issuer automatically
by providing a link to the FederationMetadata.xml file for the
ACS namespace. However, this FederationMetadata.xml will not
include details of all the claims that your ACS namespace offers,
it only includes the nameidentifier and identityprovider
claims. You will need to configure details of other claim types
offered by ACS manually in the Adatum issuer.
———————– Page 132———————–
feder ated identity with windows azure access control service 95
2. Configure the social identity providers that you want to
support in ACS.
3. Configure your ACS instance to accept requests from the
Adatum issuer (the Adatum issuer is a relying party as far as
ACS is concerned.)
4. Edit the claims rules in ACS to pass the claims from the
social identity provider through to the Adatum issuer.
5. If necessary, edit the claims transformation rules in the
Adatum issuer that are specific to the social identity provid-
ers.
6. If necessary, edit the claims rules in the Adatum issuer that
are specific to the a-Order application.
You can refer to documentation provided by your production is-
suer for instructions on how to perform these steps. You can find
detailed instructions for the ACS configuration in Appendix E of this
guide.
Reporting Errors from ACS
You can specify a URL that points to an error page for each relying
party that you define in ACS. In the sample, this page is called
ErrorPage.aspx and you can find it in the Adatum.FederationProvider.6
project. If ACS detects an error during processing, it can post
JavaScript Object Notation (JSON) encoded error information to this
page. The code-behind for this page illustrates a simple approach for
displaying this error information; in practice, you may want to log
these errors and take different actions depending on the specific error
It’s important to mark
that occurs.
ErrorPage.aspx as
un-authenticated in
An easy way to generate an error in the sample so that you can see
the web.config file
how the error processing works is to try to authenticate using a to avoid the risk of
Google ID, but to decline to give consent for ACS to access your recursive redirects.
data by clicking on No thanks after you have logged into Google.
Initializing ACS
The sample application includes a set of pre-configured partners for
Fabrikam Shipping, both with and without their own identity provid-
ers. These partners require identity providers, relying parties, and
claims-mapping rules in ACS in order to function. The ACS.Setup.6
project in the solution is a basic console application that you can run
to add the necessary configuration data for the pre-configured part-
ners to your ACS instance. It uses the ACS Management API and the
wrapper classes in the ACS.ServiceManagementWrapper project.
———————– Page 133———————–
96 chapter five
You will still need to perform some manual configuration steps; the
ACS Management API does not enable you to create a new service
namespace. You must perform this operation in the ACS manage-
ment portal.
For more information on working with ACS, see Appendix E.
Working with Social Identity Providers
The solution described in this chapter enables Adatum to support
users with identities from trusted partners such as Litware, and with
identities from social identity providers such as Google or Windows
Live ID. Implementing this scenario in the real world would require
solutions to two additional problems.
First, there is the question of managing how we define the set of
identities (authenticated by one of the social identity providers) that
are members of the same organization. For example, which set of us-
ers with Windows Live IDs and Google IDs are associated with the
organization Mary Inc? With a partner such as Litware with its own
identity provider, Adatum trusts Litware to decide which users at
Litware should be able to view the order data that belongs to Litware.
Second, there are differences between the claims returned from
the social identity providers. In particular, Windows Live ID only re-
turns the nameidentifier claim. This is a guid-like string that Windows
Live guarantees to remain unchanged for any particular Windows Live
ID within the current ACS namespace. All we can tell from this claim
is that this instance of ACS and Windows Live have authenticated the
same person, provided we get the same nameidentifier value returned.
There are no claims that give us the user’s email address or name.
The following potential solutions make these assumptions about
Adatum.
• Adatum does not want to make any changes to the a-Order
application to accommodate the requirements of a particular
partner.
• Adatum wants to do all of its claims processing in the Adatum
federation provider. Adatum is using ACS just for protocol
transition, passing through any claims from the social identity
providers directly to the Adatum federation provider.
Managing Users with Social Identities
Taking Litware as an example, let’s recap how the relationship with a
partner organization works.
• Adatum configures the Adatum federation provider to trust the
Litware identity provider. This is a one-time, manual configura-
tion step in this scenario.
———————– Page 134———————–
feder ated identity with windows azure access control service 97
• Adatum adds a set of claims-mapping rules to the Adatum
federation provider, to convert claims from Litware into claims
that the Adatum a-Order application understands. In this
scenario, the relevant claims that the a-Order application
expects to see are name, Role and Organization.
• Litware can authorize any of its employees to access the
Adatum a-Order application by ensuring that Litware’s identity
provider gives the user the correct claim. In other words, Litware
controls who has access to Litware’s data in the Adatum a-
Order application.
The situation for a smaller partner organization without its own The Adatum federation
identity provider is a little different. Let’s take MaryInc, which wants provider should generate
to use Windows Live IDs and Google IDs as an example. the Organization claim
• Unlike a partner with its own identity provider, there is no need rather than pass in through
from Litware. This
to set up a new trust relationship because Adatum already trusts mitigates the risk that a
ACS. From the perspective of the Adatum federation provider, malicious administrator
ACS is where the MaryInc employee claims will originate. at Litware could configure
• The Adatum federation provider cannot identify the partner the Litware identity
provider to issue a
organization of the authenticated user from the claims it claim using another
receives from ACS. Therefore, Adatum must configure a set of organization’s identity.
mapping rules in the federation provider that map a user’s
unique claim from ACS (such as the nameidentifier claim) to
appropriate values for the name, Role and Organization claims
that the a-Order application expects to see.
• If MaryInc wants to allow multiple employees to access MaryInc
data in the a-Order application, then Adatum must manually
configure additional mapping rules in its federation provider.
This last point highlights the significant difference between the
partner with its own identity provider and the partner without. The
partner with its own identity provider can manage who has access to
its data in the a-Order application; the partner without its own iden-
tity provider must rely on Adatum to make changes in the Adatum
federation provider if it wants to change who has access to its data.
Working with Windows Live IDs
Unlike the other social identity providers supported by ACS that all
return name and emailaddress claims, Windows Live ID only returns
a nameidentifier claim. This means that the Adatum federation pro-
vider must use some additional logic to determine appropriate values
for the name, Role and Organization claims that the a-Order applica-
tion expects to see.
This means that when someone with a Windows Live ID enrolls
to use the Adatum a-Order application, Adatum must capture values
———————– Page 135———————–
98 chapter five
for the nameidentifier, name, Role and Organization claims to use in
the mapping rules in the federation provider (as well as any other data
that Adatum requires). The only way to discover the nameidentifier
value is to capture the claim that Windows Live returns after the user
signs in, so part of the enrollment process at Adatum must include the
user authenticating with Windows Live.
It is possible to access data in the user’s Windows Live ID profile,
such as the user’s name and email address, programmatically by
using windows Live messenger Connect. This would eliminate
the requirement that the user manually enter information such as his
name and email address when he enrolled to use the a-Order
application. However, the benefits to the users may not outweigh the
costs of implementing this solution. Furthermore, not all users will
understand the implications of temporarily giving consent to Adatum
to access to their Windows Live ID profile data.
With ADFS you can create custom claims transformation mod-
ules that, for example, allow you to implement a mapping rule based
on data retrieved from a relational database. With this in mind, the
enrollment process for new users of the Adatum a-Order application
could populate a database table with the values required for a user’s
set of claims.
Working with Facebook
The sample application enables you to use Facebook as one of the
supported social identity providers. Adding support for Facebook did
not require any changes to the a-Order web application. However,
there are differences in the way the Adatum federation provider sup-
ports Facebook as compared to the other social identity providers,
and differences in the ACS configuration.
Configuring Facebook as an identity provider in ACS requires
some additional data; an Application ID that identifies your Facebook
application, an Application secret to authenticate with your Facebook
application, and a list of claims that ACS will request from Facebook.
The additional configuration values enable you to configure multiple
Facebook applications as identity providers for your relying party.
The implication for the Adatum federation provider is that it must
Each set of Facebook application be able to identify the Facebook application to use for authentication
credentials is treated as a in the whr parameter that it passes to ACS. The following code sample
separate identity provider from the FederationIssuers class in the Adatum federation provider
in ACS. shows how the Facebook application ID is included in the whr value.
———————– Page 136———————–
feder ated identity with windows azure access control service 99
// Facebook
homeRealmIdentifier = “facebook.com”;
issuerLocation = Federation. AcsIssuerEndpoint;
whr = “Facebook-194130697287302”;
this.issuers.Add(homeRealmIdentifier,
new IssuerInfo(homeRealmIdentifier, issuerLocation, whr));
Questions
1. Which of the following issues must you address if you want
to allow users of your application to authenticate with a
®
social identity provider such as Google or Windows Live
network of Internet services?
a. Social identity providers may use protocols other than
WS-Federation to exchange claims tokens.
b. You must register your application with the social
identity provider.
c. Different social identity providers issue different claim
types.
d. You must provide a mechanism to enroll users using
social identities with your application.
2. What are the advantages of allowing users to authenticate
to use your application with a social identity?
a. The user doesn’t need to remember yet another
username and password.
b. It reduces the features that you must implement in
your application.
c. Social identity providers all use the same protocol to
transfer tokens and claims.
d. It puts the user in control of their password manage-
ment. For example, a user can recover a forgotten
password without calling your helpdesk.
3. What are the potential disadvantages of using ACS as your
federation provider?
a. It adds to the complexity of your relying party
application.
———————– Page 137———————–
100 chapter five
b. It adds an extra step to the authentication process,
which negatively impacts the user experience.
c. It is a metered service, so you must pay for each token
that it issues.
d. Your application now relies on an external service that
is outside of its control.
4. How can your federation provider determine which identity
provider to use (perform home realm discovery) when an
unauthenticated user accesses the application?
a. Present the user with a list of identity providers to
choose from.
b. Analyze the IP address of the originating request.
c. Prompt the user for an email address, and then parse it
to determine the user’s security domain.
d. Examine the ClaimsPrincipal object for the user’s
current session.
5. In the scenario described in this chapter, the Adatum
federation provider trusts ACS, which in turn trusts the
social identity providers such as Windows Live and Google.
Why does the Adatum federation provider not trust the
social identity providers directly?
a. It’s not possible to configure the Adatum federation
provider to trust the social identity providers because
the social identity providers do not make the certifi-
cates required for a trust relationship available.
b. ACS automatically performs the protocol transition.
c. ACS is necessary to perform the claims mapping.
d. Without ACS, it’s not possible to allow Adatum
employees to access the application over the web.
More Information
Appendix E of this guide provides a detailed description of ACS and
its features.
You can find the MSDN® documentation for ACS 2.0 at http://
msdn.microsoft.com/en-us/library/gg429786.aspx.
———————– Page 138———————–
6 Federated Identity with
Multiple Partners
In this chapter, you’ll learn about the special considerations that apply
to applications that establish many trust relationships. Here you will
also see how use the ASP.NET Model View Controller (MVC) frame-
work to build a claims-aware application.
Although the basic building blocks of federated identity—issuers, Special considerations apply
trust, security tokens and claims—are the same as what you saw in the when there are many trust
previous chapter, there are some identity and authorization require- relationships.
ments that are particular to the case of multiple trust relationships.
In some web applications, such as the one shown in this chapter,
users and customers represent distinct concepts. A customer of an
application can be an organization, and each customer can have many
individual users, such as employees. If the application is meant to scale
to large numbers of customers, the enrollment process for new cus-
tomers must be as streamlined as possible. It may even be automated.
As with the other chapters, it is easiest to explain these concepts in
the context of a scenario.
The Premise
Fabrikam is a company that provides shipping services. As part of its
offering, it has a web application named Fabrikam Shipping that al-
lows its customers to perform such tasks as creating shipping orders
and tracking them. Fabrikam Shipping is an ASP.NET MVC application
that runs in Fabrikam’s data center. Fabrikam’s customers want their
employees to use a browser to access the shipping application.
Fabrikam has made its new shipping application claims-based.
Like many design choices, this one was customer-driven. In this case,
Fabrikam signed a deal with a major customer, Adatum. Adatum’s
corporate IT strategy (as discussed in chapter 3, “Claims-Based Single
Sign-On for the Web”) calls for the eventual elimination of identity
silos. Adatum wants its users to access Fabrikam Shipping without
101
———————– Page 139———————–
102102 chapter six
presenting separate user names and passwords. Fabrikam also signed
agreements with Litware that had similar requirements. However,
Fabrikam also wants to support smaller customers, such as Contoso,
that do not have the infrastructure in place to support federated
identity.
Goals and Requirements
Larger customers such as Adatum and Litware have some particular
concerns. These include the following:
• Usability. They would prefer if their employees didn’t need to
learn new passwords and user names for Fabrikam Shipping.
These employees shouldn’t need any credentials other than the
ones they already have, and they shouldn’t have to enter creden-
tials a second time when they access Fabrikam Shipping from
within their security domain.
• Support. It is easier for Adatum and Litware to manage issues
such as forgotten passwords than to have employees interact
with Fabrikam.
• Liability. There are reasons why Adatum and Litware have the
authentication and authorization policies that they do. They
want to control who has access to resources, no matter where
those resources are deployed, and Fabrikam Shipping is no
exception. If an employee leaves the company, he or she should
no longer have access to the application.
Fabrikam has its own goals, which are the following:
• To delegate the responsibility for maintaining user identities
to its customers, when possible. This avoids a number of
problems, such as having to synchronize data between Fabrikam
and its customers. The contact information for a package’s
sender is an example of this kind of information. Its accuracy
should be the customer’s responsibility because it could quickly
become costly for Fabrikam to keep this information up to date.
• To bill customers by cost center if one is supplied. Cost
centers should be provided by the customers. This is also
another example of information that is the customer’s responsi-
bility.
• To sell its services to a large number of customers. This means
that the process of enrolling a new company must be stream-
lined. Fabrikam would also prefer that its customers self-manage
the application whenever possible.
———————– Page 140———————–
feder ated identity with multiple partners 103 103
• To provide the infrastructure for federation if a customer
cannot. Fabrikam wants to minimize the impact on the applica-
tion code that might arise from having more than one authenti-
cation mechanism for customers.
Overview of the Solution
With the goals and requirements in place, it’s time to look at the solu-
tion. As you saw in Chapter 4, “Federated Identity for Web Applica-
tions,” the solution includes the establishment of a claims-based archi-
tecture with an issuer that acts as an identity provider (IdP) on the
customers’ side. In addition, the solution includes an issuer that acts
as the federation provider (FP) on Fabrikam’s side. Recall that a fed-
eration provider acts as a gateway between a resource and all of the
issuers that provide claims about the resource’s users.
Figure 1 shows Fabrikam’s solution for customers that have their
own identity provider.
Issuer IP
( )
Trust
Active
Directory
4
K tum
e
1 Get Token ments/Ada
r /Ship
b Fabrikam
e
r
o Shipping
s
Browser Trust
John
2 Get a Fabrikam
Shipping token
Issuer FP
Adatum ( )
e
r Map the
a 3
Trust w
t Claims
i
L
/
s
t
n 4
e
m
p
i
h
S Fabrikam
/
Issuer
Active
Directory Get
Token 2
K
e 1
r
b Get a Fabrikam
e
r
o Shipping token
s
Browser
Rick
Litware
figure 1
Fabrikam Shipping for customers with an identity provider
———————– Page 141———————–
104104 chapter six
Here’s an example of how the system works. The steps corre-
spond to the numbers in the preceding illustration.
STEP 1: prEs Ent CrEdEntIALs to th E Id EntItY provIdEr
1. When John from Adatum attempts to use fabrikam ship-
ping for the first time (that is, when he first navigates to
https://{fabrikam host}/f-shipping/adatum), there’s no
session established yet. In other words, from Fabrikam’s
point of view, John is unauthenticated. The URL provides
the Fabrikam Shipping application with a hint about the
In this scenario, customer that is requesting access (the hint is “adatum” at
discovering the home the end of the URL).
realm is automated.
There’s no need for 2. The application redirects John’s browser to Fabrikam’s issuer
the user to provide it, (the federation provider). That is because Fabrikam’s
as was shown in
federation provider is the application’s trusted issuer. As
Chapter 4, “Feder-
ated Identity for Web part of the redirection URL, the application includes the
Applications.” whr parameter that provides a hint to the federation
provider about the customer’s home realm. The value of the
whr parameter is http://adatum/trust.
3. Fabrikam’s federation provider uses the whr parameter to
look up the customer’s identity provider and redirect John’s
browser back to the Adatum issuer.
4. Assuming that John uses a computer that is already a part of
the domain and in the corporate network, he will already
have valid network credentials that can be presented to
Adatum’s identity provider.
5. Adatum’s identity provider uses John’s credentials to authen-
ticate him and then issue a security token with a set of
Adatum’s claims. These claims are the employee name, the
employee address, the cost center, and the department.
STEP 2: t rA nsmIt th E Id EntItY provIdEr’s sEC urItY
t o KEn to thE fEdErAt Ion provIdEr
1. The identity provider uses HTTP redirection to redirect
the security token it has issued to Fabrikam’s federation
provider.
2. Fabrikam’s federation provider receives this token and
validates it.
———————– Page 142———————–
feder ated identity with multiple partners 105 105
STEP 3: mA p thE C LAIms
1. Fabrikam’s federation provider applies token mapping rules
to the identity provider’s security token. The claims are
transformed into something that Fabrikam Shipping under-
stands.
2. The federation provider uses HTTP redirection to submit
the claims to John’s browser.
STEP 4: t rA nsmIt th E mA ppEd CLAIms A nd pErform
th E rEqu Est Ed ACt Ion
1. The browser sends the federation provider’s security token,
which contains the transformed claims, to the Fabrikam
Shipping application.
2. The application validates the security token.
3. The application reads the claims and creates a session for
John.
Because this is a web application, all interactions happen through
the browser. (See Appendix B for a detailed description of the proto-
col for a browser-based client.)
The principles behind these interactions are exactly the same as Automated home realm
those described in Chapter 4, “Federated Identity for Web Applica- discovery is important
tions.” One notable exception is Fabrikam’s automation of the home when there are many
realm discovery process. In this case, there’s no user intervention trust relationships.
necessary. The home realm is entirely derived from information passed
first in the URL and then in the whr parameter.
Litware follows the same steps as Adatum. The only differences
are the URLs used (http://{fabrikam host}/f-shipping/litware and the
Litware identity provider’s address) and the claims mapping rules,
because the claims issued by Litware are different from those issued
by Adatum. Notice that Fabrikam Shipping trusts the Fabrikam fed-
eration provider, not the individual issuers of Litware or Adatum. This
level of indirection isolates Fabrikam Shipping from individual differ-
ences between Litware and Adatum.
Fabrikam also provides identity services on behalf of customers
such as Contoso that do not have issuers of their own. Figure 2 shows
how Fabrikam implemented this.
———————– Page 143———————–
106106 chapter six
o
s
to
n Fabrikam
o
C
/
s
t
n
me Shipping
p
i
h
S
/
4
Trust
abrikam
F
a
Get ken Issuer FP
to ( )
ing
2 Shipp
t
s
u
Browser r
T 3 Map the
Claims
1 Send a user name
Bill at and password to Issuer IP
( )
Contoso get a token
figure 2 Fabrikam
Fabrikam Shipping for customers
without an identity provider
Contoso is a small business with no identity infrastructure of its
own. It doesn’t have an issuer that Fabrikam can trust to authenticate
Smaller organizations may Contoso’s users. It also doesn’t care if its employees need a separate
not have their own issuers. set of credentials to access the application.
Fabrikam has deployed its own identity provider to support
smaller customers such as Contoso. Notice, however, that even
though Fabrikam owns this issuer, it’s treated as if it were an external
identity provider, just as those that belong to Adatum and Litware. In
a sense, Fabrikam “federates with itself.”
Because the identity provider is treated as an external issuer, the
process is the same as that used by Adatum and Litware. The only
differences are the URLs and the claim mappings.
By deploying an identity provider for customers such as Contoso,
Fabrikam accepts the costs associated with maintaining accounts for
remote users (for example, handling password resets). The benefit is
that Fabrikam only has to do this for customers that don’t have their
own federation infrastructure. Over time, Fabrikam expects to have
fewer customers that need this support.
———————– Page 144———————–
feder ated identity with multiple partners 107 107
It would also be possible for Fabrikam to support third-party
identity providers such as LiveID or OpenID as a way to reduce the
cost of maintaining passwords for external users.
Using Claims in Fabrikam Shipping
Fabrikam Shipping uses claims for two purposes. It uses role claims to
control access and it also uses claims to retrieve user profile informa- Fabrikam uses claims for
tion. access control and for user
Access control to Fabrikam Shipping is based on one of three profiles.
roles:
• Shipment Creator. Anyone in this role can create new orders.
• Shipment Manager. Anyone in this role can create and modify
existing shipment orders.
• Administrator. Anyone in this role can configure the system.
For example, they can set shipping preferences or change the
application’s appearance and behavior (“look and feel”).
The sender’s address and the sender’s cost center for billing are
the pieces of profile information that Fabrikam Shipping expects as
claims. The cost center allows Fabrikam to provide more detailed in-
voices. For example, two employees from Adatum who belong to two
different departments would get two different bills.
Fabrikam configures claims mappings for every new customer
that uses Fabrikam Shipping. This is necessary because the application
logic within Fabrikam Shipping only understands one set of role
claims, which includes Shipment Creator, Shipment Manager, and
Administrator. By providing these mappings, Fabrikam decouples the
application from the many different claim types that customers pro-
vide.
The following table shows the claims mappings for each customer.
Claims that represent cost centers, user names, and sender addresses
are simply copied. They are omitted from the table for brevity.
———————– Page 145———————–
108108 chapter six
Partner Input conditions Output claims
Adatum Claim issuer: Adatum Claim issuer: Fabrikam
Claim type: Group, Claim type: Role,
Claim value: Customer Service Claim value: Shipment Creator
Claim issuer: Adatum Claim issuer: Fabrikam
Claim type: Group, Claim type: Role,
Claim value: Order Fulfillments Claim value: Shipment Creator
Claim issuer: Fabrikam
Claim type: Role,
Claim value: Shipment Manager
Claim issuer: Adatum Claim issuer: Fabrikam
Claim type: Group, Claim type: Role,
Claim value: Admins Claim value: Administrator
Claim issuer: Adatum Claim issuer: Fabrikam
Claim type: Organization,
Claim value: Adatum
Litware Claim issuer: Litware Claim issuer: Fabrikam
Claim type: Group, Claim type: Role,
Claim value: Sales Claim value: Shipment Creator
Claim issuer: Litware Claim issuer: Fabrikam
Claim type: Organization, Claim value:
Litware
Contoso Claim issuer: Fabrikam identity provider Claim issuer: Fabrikam
Claim type: e-mail, Claim type: Role,
Claim value: bill@contoso.com Claim value: Shipment Creator
Claim issuer: Fabrikam
Claim type: Role,
Claim value: Shipment Manager
Claim issuer: Fabrikam
Claim type: Role,
Claim value: Administrator
Claim issuer: Fabrikam
Claim type: Organization,
Claim value: Contoso
As in Chapter 4, “Federated Identity for Web Applications,” Adatum
could issue Fabrikam-specific claims, but it would not be a best practice
to clutter Adatum’s issuer with Fabrikam-specific concepts such as
Fabrikam roles. Fabrikam allows Adatum to issue any claims it wants,
and then it configures its federation provider to map these Adatum
claims to Fabrikam claims.
———————– Page 146———————–
feder ated identity with multiple partners 109 109
Inside the Implementation
Now is a good time to walk through some of the details of the solu-
tion. As you go through this section, you may want to download the
Microsoft® Visual Studio® development system solution 3Federa-
tionWithMultiplePartners from http://claimsid.codeplex.com. If you
are not interested in the mechanics, you should skip to the next sec-
tion.
The Fabrikam Shipping application uses the ASP.NET MVC frame-
work in conjunction with the Windows® Identify Foundation (WIF).
The application’s Web.config file contains the configuration informa-
tion, as shown in the following XML code. The <system.webServer>
section of the Web.config file references WIF-provided modules and Fabrikam Shipping is an
the ASP.NET MVC HTTP handler class. The WIF information is the ASP.NET MVC application
same as it was in the previous scenarios. The MVC HTTP handler is in that uses claims.
the <handlers> section.
<system.webServer>
…
<modules runAllManagedModulesForAllRequests=”true”>
…
<add name=”WSFederationAuthenticationModule”
preCondition=” integratedMode ”
type=”Microsoft.IdentityModel.Web.
WSFederationAuthenticationModule, …” />
<add name=”SessionAuthenticationModule”
preCondition=” integratedMode”
type=”Microsoft.IdentityModel.Web.
SessionAuthenticationModule, …” />
</modules>
<handlers>
…
Fabrikam chose ASP.NET
<add name=”MvcHttpHandler” MVC because it wanted
preCondition=”integratedMode” improved testability and a
verb=”*” modular architecture. They
path=”*.mvc” considered these qualities
type=”System.Web.Mvc.MvcHttpHandler, …”/> important for an applica-
tion with many customers
… and complex federation
</handlers> relationships.
</system.webServer>
———————– Page 147———————–
110110 chapter six
Fabrikam Shipping is an example of the finer-grained control that’s
available with the WIF API. Although Fabrikam Shipping demon-
strates how to use MVC with WIF, it’s not the only possible ap-
proach. Also, WIF-supplied tools, such as FedUtil.exe, are not
currently fully integrated with MVC applications. For now, you can
edit sections of the configuration files after applying the FedUtil
program to an MVC application. This is what the developers at
Fabrikam did with Fabrikam Shipping.
Fabrikam Shipping needs to customize the redirection of HTTP
requests to issuers in order to take advantage of the ASP.NET MVC
architecture. It does this by turning off automatic redirection from
within WIF’s federated authentication module. This is shown in the
following XML code:
<federatedAuthentication>
If you set passive
RedirectEnabled to <wsFederation passiveRedirectEnabled=”false ”
false, WIF will no issuer=”https://{fabrikam host}/{issuer endpoint}/”
longer be responsible realm=”https://{fabrikam host}/f-Shipping/FederationResult”
for the redirections to
requireHttps=”true”
your issuers. You will
/>
have complete control
of these interactions. <cookieHandler requireSsl=”true” path=”/f-Shipping/” />
</federatedAuthentication>
By setting the passiveRedirectEnabled attribute to false, you
instruct WIF’s federated authentication module not to perform its
built-in redirection of unauthenticated sessions to the issuer. For ex-
ample, Fabrikam Shipping uses the WIF API to perform this redirec-
tion under programmatic control.
ASP.NET MVC applications include the concept of route mappings
and controllers that implement handlers. A route mapping enables you
to define URL mapping rules that automatically dispatch incoming
URLs to application-provided action methods that process them.
(Outgoing URLs are also processed.)
The following code shows how Fabrikam Shipping establishes a
routing table for incoming requests such as “http://{fabrikam host}/f-
shipping/adatum”. The last part of the URL is the name of the organi-
zation (that is, the customer). This code is located in Fabrikam Ship-
ping’s Global.asax file.
public class MvcApplication : System.Web.HttpApplication
{
// …
public static void RegisterRoutes(RouteCollection routes)
{
// …
routes.MapRoute(
———————– Page 148———————–
feder ated identity with multiple partners 111 111
“OrganizationDefault”,
“{organization}/”,
new { controller = “Shipment”, action = “Index” });
}
// …
}
The RegisterRoutes method allows the application to tell the
ASP.NET MVC framework how URIs should be mapped and handled
in code. This is known as a routing rule.
When an incoming request such as “http://{fabrikam host}/
f-Shipping/adatum” is received, the MVC framework evaluates the There’s a lot of good
routing rules to determine the appropriate controller object that information about
should handle the request. The incoming URL is tested against each APS.NET.MVC
route rule. The first matching rule is then used to process the request. concepts at http://
In the case of the “f-Shipping/adatum” URL, an instance of the ap- http://www.asp.net.
plication’s ShipmentController class will be used as the controller,
and its Index method will be the action method.
[AuthenticateAndAuthorize(Roles = “Shipment Creator”)]
public class ShipmentController : BaseController
{
public ActionResult Index()
{
// …
}
}
The ShipmentController class has been decorated with a custom
attribute named AuthenticateAndAuthorize. This attribute is imple-
mented by the Fabrikam Shipping application. Here is the declaration
of the attribute class.
[AttributeUsage(AttributeTargets.Class | AttributeTargets.Method)]
public sealed class AuthenticateAndAuthorizeAttribute :
FilterAttribute, IAuthorizationFilter
{
// …
public void OnAuthorization(AuthorizationContext filterContext)
{
if (!filterContext.HttpContext.Request.IsSecureConnection)
{
throw /* … */
}
if (!filterContext.HttpContext.User.Identity.IsAuthenticated)
———————– Page 149———————–
112112 chapter six
{
AuthenticateUser(filterContext);
}
else
{
this.AuthorizeUser(filterContext);
}
// …
}
The AuthenticateAndAuthorizeAttribute class derives from the
FilterAttribute class and implements the IAuthorizationFilter inter-
face. Both these types are provided by ASP.NET MVC. The MVC
framework recognizes these attribute types when they are applied to
controller classes and it calls the OnAuthorization method before
each controller method is invoked. The OnAuthorization method
detects whether or not authentication has been performed already,
and if it hasn’t, it invokes the AuthenticateUser helper method to
contact the application’s federation provider by HTTP redirection.
The following code shows how this happens.
private static void AuthenticateUser(AuthorizationContext context)
{
var organizationName =
(string)context.RouteData.Values[“organization”];
if (!string.IsNullOrEmpty(organizationName))
{
if (!IsValidTenant(organizationName)) { throw /* … */ }
var returnUrl = GetReturnUrl(context.RequestContext);
var fam =
FederatedAuthentication.WSFederationAuthenticationModule;
var signIn =
new SignInRequestMessage(new Uri(fam.Issuer), fam.Realm)
{
Context = returnUrl.ToString(),
HomeRealm =RetrieveHomeRealmForTenant(organizationName)
};
context.Result =
new RedirectResult(signIn.WriteQueryString());
}
}
———————– Page 150———————–
feder ated identity with multiple partners 113 113
The AuthenticateUser method takes the customer’s name from
the route table. (The code refers to a customer as an organization.) In
this example, “adatum” is the customer. Next, the method checks to
see if the customer has been enrolled in the Fabrikam Shipping ap-
plication. If not, it raises an exception.
Then, the AuthenticateUser method looks up the information it
needs to create a federated sign-in request. This includes the URI of
the issuer (that is, Fabrikam’s federation provider), the application’s
realm (the address where the issuer will eventually return the security
token), the URL that the user is trying to access, and the home realm
designation of the customer. The method uses this information to To keep your app
create an instance of WIF’s SignInRequestMessage class. An instance secure and avoid
attacks such as SQL
of this class represents a new request to an issuer to authenticate the injection, you should
current user. verify all values from
In the underlying WS-Federation protocol, these pieces of infor- an incoming URL.
mation correspond to the parameters of the request message that will
be directed to Fabrikam’s federation provider. The following table
shows this correspondence.
Parameter Name Contents
wrealm Realm This identifies the Fabrikam Shipping application to
the federation provider. This parameter comes from
the Web.config file and is the address to which a
token should be sent.
wctx Context This parameter is set to the address of the original
URL requested by the user. This parameter is not
used by the issuer, but all issuers in the chain
preserve it for the Fabrikam Shipping application,
allowing it to send the user to his or her original
destination.
whr Home realm This parameter tells Fabrikam’s federation provider
that it should use Adatum’s issuer as the identity
provider for this request.
The GetReturnUrl method is a locally defined helper method
that gives the URL that the user is trying to access. An example is
http://{fabrikam host}/f-shipping/adatum/shipment/new.
After using the WIF API to construct the sign-on request mes-
sage, the method configures the result for redirection.
At this point, ASP.NET will redirect the user’s browser to the
federation provider. In response, the federation provider will use the
steps described in the Chapter 3, “Claims-Based Single Sign-On for
the Web,” and Chapter 4, “Federated Identity for Web Applications,”
to authenticate the user. This will include additional HTTP redirection
to the identity provider specified as the home realm. Unlike the previ-
ous examples in this guide, the federation provider in this example
———————– Page 151———————–
114114 chapter six
uses the whr parameter sent by the application to infer the address of
the customer’s identity provider. After the federation provider re-
ceives a security token from the identity provider and transforms it
into a token with the claim types expected by Fabrikam Shipping, it
will POST it to the wrealm address that was originally specified. This
is a special URL configured with the SignInRequestMessage class in
the AuthenticateAndAuthorizeAttribute filter. In the example, the
URL will be f-shipping/FederationResult.
The MVC routing table is configured to dispatch the POST mes-
sage to the FederationResult action handler defined in the Home
Controller class of the Fabrikam Shipping application. This method is
shown in the following code.
[ValidateInput(false)]
[AcceptVerbs(HttpVerbs.Post)]
public ActionResult FederationResult(string wresult)
{
var fam =
FederatedAuthentication.WSFederationAuthenticationModule;
if (fam.CanReadSignInResponse(
System.Web.HttpContext.Current.Request, true))
{
string returnUrl = this.GetReturnUrlFromCtx();
return new RedirectResult(returnUrl);
}
// …
}
Notice that this controller does not have the AuthenticateAnd
Authorize attribute applied. However, the token POSTed to this ad-
dress is still processed by the WIF Federation Authentication Module
because of the explicit redirection of the return URL.
The FederationResult action handler uses the helper method
GetReturnUrlFromCtx to read the wctx parameter that contains the
original URL requested by the user. This is simply a property lookup
operation: this.HttpContext.Request.Form[“wctx”]. Finally, it issues
a redirect request to this URL.
The ValidateInput custom attribute is required for this scenario
because the body of the POST contains a security token serialized
as XML. If this custom attribute were not present, ASP.NET MVC
would consider the content of the body unsafe and therefore raise an
exception.
———————– Page 152———————–
feder ated identity with multiple partners 115 115
The application then processes the request a second time, but in
this pass, there is an authenticated user. The OnAuthorization
method described earlier will again be invoked, except this time it will
pass control to the AuthorizeUser helper method instead of the
AuthenticateUser method as it did in the first pass. The definition of
the AuthorizeUser method is shown in the following code.
private void AuthorizeUser(AuthorizationContext context)
{
var organizationRequested =
(string)context.RouteData.Values[“organization”];
var userOrganiation =
ClaimHelper.GetCurrentUserClaim(
Fabrikam.ClaimTypes.Organization).Value;
if (!organizationRequested.Equals(userOrganiation,
StringComparison.OrdinalIgnoreCase))
{
context.Result = new HttpUnauthorizedResult();
return;
}
var authorizedRoles = this.Roles.Split(new[] { “,” },
StringSplitOptions.RemoveEmptyEntries);
bool hasValidRole = false;
foreach (var role in authorizedRoles)
{
if (context.HttpContext.User.IsInRole(role.Trim()))
{
hasValidRole = true;
break;
}
}
if (!hasValidRole)
{
context.Result = new HttpUnauthorizedResult();
return;
}
}
The AuthorizeUser method checks the claims that are present
for the current user. It makes sure that the customer identification in
the security token matches the requested customer as given by the
URL. It then checks that the current user has one of the roles required
to run this application.
———————– Page 153———————–
116116 chapter six
Because this is a claims-aware application, you know that the user
object will be of type IClaimsPrincipal even though its static type
is IPrincipal. However, no run-time type conversion is needed in this
case. The reason is that the code only checks for role claims, and
these operations are available to instances that implement the
IPrincipal interface.
If you want to extract any other claims from the principal, you
will need to cast the User property to IClaimsPrincipal first. This
is shown in the following code.
var claimsprincipal =
context.HttpContext.User as IClaimsPrincipal;
If the user has a claim that corresponds to one of the permitted
roles (defined in the AuthenticateAndAuthorizeAttribute class), the
AuthorizeUser method will return without setting a result in the
context. This allows the original action request method to run.
In the scenario, the original action method is the Index method
of the ShipmentController class. The method’s definition is given by
the following code example.
[AuthenticateAndAuthorize(Roles = “Shipment Creator”)]
public class ShipmentController : BaseController
{
public ActionResult Index()
{
var repository = new ShipmentRepository();
IEnumerable<Shipment> shipments;
var organization =
ClaimHelper.GetCurrentUserClaim(
Fabrikam.ClaimTypes.Organization).Value;
if (this.User.IsInRole(Fabrikam.Roles.ShipmentManager))
{
shipments =
repository.GetShipmentsByOrganization(organization);
}
else
{
var userName = this.User.Identity.Name;
shipments =
repository.GetShipmentsByOrganizationAndUserName(
organization, userName);
———————– Page 154———————–
feder ated identity with multiple partners 117 117
}
var model =
new ShipmentListViewModel { Shipments = shipments };
return View(model);
}
// …
}
The Index action handler retrieves the data that is needed to
satisfy the request from the application’s data store. Its behavior de-
pends on the user’s role, which it extracts from the current claims
context. It passes control to the controller’s View method for render-
ing the information from the repository into HTML.
Setup and Physical Deployment
Applications such as Fabrikam Shipping that use federated identity
with multiple partners sometimes rely on automated provisioning and Automated provisioning
may allow for customer-configurable claims mapping. The Fabrikam may be needed when there
Shipping example does not implement automated provisioning, but it are many partners.
includes a prototype of a web interface as a demonstration of the
concepts.
Establishing the Trust Relationship
If you were to implement automated provisioning, you could provide
a web form that allows an administrator from a customer’s site to
specify a URI of an XML document that contains federation meta-
data for ADFS 2.0. Alternatively, the administrator could provide the
necessary data elements individually.
If your application’s federation provider is an ADFS 2.0 server, you
can use Windows PowerShell® scripts to automate the configuration
steps. For example, the ADFSRelyingParty command allows you to
programmatically configure ADFS to issue security tokens to particu-
lar applications and federation providers. Look on MSDN® for the
ADFS 2.0 commands that you can use in your PowerShell scripts.
Processing a federation request might initiate a workflow process
that includes manual steps such as verifying that a contract has
been signed. Both manual and automated steps are possible, and
of course, you would first need to authenticate the request for
provisioning.
———————– Page 155———————–
118118 chapter six
If you automate provisioning with a federation metadata XML
file, this file would be provided by a customer’s issuer. In the following
example, you’ll see the federation metadata file that is provided by
Adatum. The file contains all the information that Fabrikam Shipping
would need to configure and deploy its federation provider to com-
municate with Adatum’s issuer. Here are the important sections of the
file.
Organization Section
The organization section contains the organization name.
<Organization>
<OrganizationDisplayName xml:lang=””>
Adatum
</OrganizationDisplayName>
<OrganizationName xml:lang=””>Adatum</OrganizationName>
<OrganizationURL xml:lang=””>
http://{adatum host}/Adatum.Portal/
</OrganizationURL>
</Organization>
Issuer Section
The issuer section contains the issuer’s URI.
<fed:SecurityTokenServiceEndpoint>
<EndpointReference
xmlns=”http://www.w3.org/2005/08/addressing”>
<Address>
https://{adatum host}/{issuer endpoint}/
</Address>
…
</EndpointReference>
</fed:SecurityTokenServiceEndpoint>
Certificate Section
The certificate section contains the certificate (encoded in base64)
that is used by the issuer to sign the tokens.
<RoleDescriptor …>
<KeyDescriptor use=”signing”>
<KeyInfo xmlns=”http://www.w3.org/2000/09/xmldsig#”>
<X509Data>
<X509Certificate>
———————– Page 156———————–
feder ated identity with multiple partners 119 119
MIIB5TCCAV … Ukyey2pjD/R4LO2B3AO
</X509Certificate>
</X509Data>
</KeyInfo>
</KeyDescriptor>
</RoleDescriptor>
After Adatum registers as a customer of Fabrikam Shipping, the
customer’s systems administrators must also configure their issuer to
respond to requests from Fabrikam’s federation provider. For ADFS
2.0, this process is identical to what you saw in Chapter 4, “Federated
Identity for Web Applications,” when the Litware issuer began to
provide claims for the a-Order application.
User-Configurable Claims
Transformation Rules
It’s possible for applications to let customers configure the claims
mapping rules that will be used by the application’s federation pro-
vider. You would do this to make it as easy as possible for an applica-
tion’s customers to use their existing issuers without asking them to An application with many
produce new claim types. If a customer already has roles or groups, partners may require
perhaps from Microsoft Active Directory, that are ready to use, it is user-configurable claims
convenient to reuse them. However, these roles would need to be transformation rules.
mapped to roles that are understood by the application.
If the federation provider is an ADFS 2.0 server, you can use
Windows PowerShell scripts to set up the role mapping rules. The
claims mapping rules would be different for each customer.
Questions
1. In the scenario described in this chapter, who should take
what action when an employee leaves one of the partner
organizations such as Litware?
a. Fabrikam Shipping must remove the user from its user
database.
b. Litware must remove the user from its user database.
c. Fabrikam must amend the claims-mapping rules in its
federation provider.
d. Litware must ensure that its identity provider no
longer issues any of the claims that get mapped to
Fabrikam Shipping claims.
———————– Page 157———————–
120120 chapter six
2. In the scenario described in this chapter, how does Fabrikam
Shipping perform home realm discovery?
a. Fabrikam Shipping presents unauthenticated users
with a list of federation partners to choose from.
b. Fabrikam Shipping prompts unauthenticated users for
their email addresses. It parses this address to deter-
mine which organization the user belongs to.
c. Fabrikam Shipping does not need to perform home
realm discovery because users will have already
authenticated with their organizations’ identity
providers.
d. Each partner organization has its own landing page in
Fabrikam Shipping. Visiting that page will automati-
cally redirect unauthenticated users to that organiza-
tion’s identity provider.
3. Fabrikam Shipping provides an identity provider for its
smaller customers who do not have their own identity
provider. What are the disadvantages of this?
a. Fabrikam must bear the costs of providing this service.
b. Users at smaller customers will need to remember
another username and password.
c. Smaller customers must rely on Fabrikam to manage
their user’s access to Fabrikam Shipping.
d. Fabrikam Shipping must set up a trust relationship
with all of its smaller customers.
4. How does Fabrikam Shipping ensure that only users at a
particular partner can view that partner’s shipping data?
a. The Fabrikam Shipping application examines the email
address of the user to determine the organization they
belong to.
b. Fabrikam Shipping uses separate databases for each
partner. Each database uses different credentials to
control access.
———————– Page 158———————–
feder ated identity with multiple partners 121 121
c. Fabrikam shipping uses the role claim from the
partner’s identity provider to determine whether the
user should be able to access the data.
d. Fabrikam shipping uses the organization claim from
its federation provider to determine whether the user
should be able to access the data.
5. The developers at Fabrikam set the wsFederation passive
RedirectEnabled attribute to false. Why?
a. This scenario uses active redirection, not passive
redirection.
b. They wanted more control over the redirection
process.
c. Fabrikam Shipping is an MVC application.
d. They needed to be able to redirect to external identity
providers.
———————– Page 159———————–
———————– Page 160———————–
7 Federated Identity with
Multiple Partners and
Windows Azure Access
Control Service
In Chapter 6, “Federated Identity with Multiple Partners,” you saw
how Fabrikam used claims to enable access to the Fabrikam shipping
application for multiple partners. The scenario described how Fabri-
kam supported users at large partner organizations with their own
claims-based identity infrastructure, and users from smaller organiza-
tions with no claims-based infrastructure of their own. Fabrikam
provided support for the larger partner organizations by establishing
trust relationships between the Fabrikam federation provider (FP) and
the partner’s identity provider (IdP). To support the smaller organiza-
tions, it was necessary for Fabrikam to implement its own identity
provider and manage the collection of enrolled employees from
smaller partners. This scenario also demonstrated how Fabrikam had
taken steps to automate the enrollment process for new partners.
Users at smaller partners had to create new accounts at Fabrikam,
adding to the list of credentials they have to remember. Many indi-
viduals would prefer to reuse an existing identity rather than create a
new one just to use the Fabrikam Shipping application. How can
Fabrikam enable users to reuse existing identities such as Facebook
IDs, Google IDs, or Windows Live® IDs? In addition to establishing
trust relationships with the social identity providers, Fabrikam must
find solutions to these problems:
• other identity providers may use different protocols to
exchange claims data.
• other identity providers may use different claim types.
• fabrikam shipping must be able to use the claims data it
receives to implement authorization rules.
• the federation provider must be able to redirect users to
the correct identity provider.
• fabrikam must be able to enroll new users who want to use
the fabrikam shipping application.
123
———————– Page 161———————–
124124 chapter seven
In Chapter 5, “Federated Identity with Windows Azure Access
Control Services,” you saw how Adatum extended access to the a-
Order application to include users who wanted to use their social
identity to authenticate with the a-Order application. In this chapter,
you’ll see how Fabrikam replaced its on-premises federation provider
with Windows Azure™ AppFabric Access Control services (ACS), to
You can use ACS to manage enable users at smaller organizations without their own identity infra-
multiple trust relationships. structure to access Fabrikam Shipping.
Unlike the scenario described in Chapter 5, “Federated Identity
with Windows Azure Access Control Services,” users from smaller
partners who use social identity providers will be able to enroll them-
selves with the Fabrikam Shipping application. They will access the
Fabrikam Shipping application alongside employees of existing enter-
prise partners. This chapter extends the scenario described in Chapter
6, “Federated Identity with Multiple Partners.”
The Premise
Fabrikam is a company that provides shipping services. As part of its
offering, it has a web application named Fabrikam Shipping that al-
lows its customers to perform such tasks as creating shipping orders
and tracking them. Fabrikam Shipping is an ASP.NET MVC application
that runs in the Fabrikam data center.
Fabrikam has already claims-enabled the Fabrikam Shipping web
application, allowing employees from Adatum and Litware to access
the application without having to present separate usernames and
passwords. Users at Contoso, a smaller partner, can also access Fabri-
kam Shipping, but they must log in using credentials that the Fabrikam
identity provider, Active Directory® Federation Services (ADFS) 2.0,
authenticates. Users at Contoso have complained about the fact that
Managing the they must remember a set of credentials specifically for accessing the
accounts for users at Fabrikam Shipping application. All of Contoso’s employees have either
organizations such as Windows® Live IDs or Google accounts, and they would prefer to use
Contoso adds to the these credentials to gain access to the application. Users at other
complexity of the Fabrikam customers have echoed this request, mentioning Facebook
Fabrikam ADFS
implementation. IDs and Yahoo! IDs as additional credential types they would like to
be able to use.
———————– Page 162———————–
feder ated identity with multiple partners and windows azure acs 125 125
Goals and Requirements
The primary goal of this scenario is to show how Fabrikam can use
ACS as a federation provider to enable both employees of large part-
ners such as Adatum and Litware, and smaller partners whose employ-
ees use identities from with social identity providers, to access the
Fabrikam Shipping application.
To recap from Chapter 6, “Federated Identity with Multiple Part-
ners,” larger customers such as Adatum and Litware have some par-
ticular concerns. These include the following:
• Usability. They would prefer if their employees didn’t need to
learn new passwords and user names for Fabrikam Shipping.
These employees shouldn’t need any credentials other than the
ones they already have, and they shouldn’t have to enter creden-
tials a second time when they access Fabrikam Shipping from
within their security domain. The solution described in Chapter
6, “Federated Identity with Multiple Partners,” addresses this
concern and introducing ACS as a federation provider must not
change the user experience for the employees of these custom-
ers.
• Support. It is easier for Adatum and Litware to manage issues
such as forgotten passwords than to have their employees
interact with Fabrikam. The solution described in Chapter 6,
“Federated Identity with Multiple Partners,” addresses this
concern and introducing ACS as a federation provider must not
change the user experience for the security administrators of
these customers.
• Liability. There are reasons why Adatum and Litware have the
authentication and authorization policies that they have. They
want to control who has access to their resources, no matter
where those resources are deployed, and Fabrikam Shipping is
no exception. If an employee leaves the company, he or she
should no longer have access to the application. Again, the
solution described in Chapter 6, “Federated Identity with
Multiple Partners,” addresses this concern.
• Confidentiality. Partners of Fabrikam, such as Adatum, do not
want other partners, such as Litware, to know that they are
using the Fabrikam Shipping service. When a user accesses the
Fabrikam Shipping site, they should not have to choose from a
list of available authentication partners; rather, the site should
automatically redirect them to the correct identity provider
without revealing a list of partners.
———————– Page 163———————–
126126 chapter seven
Fabrikam has its own goals, which are the following:
• To delegate the responsibility for maintaining user identities
to its customers, when possible. This avoids a number of
problems, such as having to synchronize data between Fabrikam
and its customers. The contact information for a package’s
sender is an example of this kind of data. Its accuracy should be
the customer’s responsibility because it could quickly become
costly for Fabrikam to keep this information up to date. The
solution described in Chapter 6, “Federated Identity with
Multiple Partners,” addresses this concern.
• To bill customers by cost center if one is supplied. Customers
should provide the cost center information. This is another
example of information that is the customer’s responsibility. The
solution described in Chapter 6, “Federated Identity with
Multiple Partners,” addresses this concern.
• To sell its services to a large number of customers. This means
that the process of enrolling a new company must be stream-
lined. Fabrikam would also prefer that its customers self-manage
the application whenever possible. The automated enrollment
process must be able to support both large organizations with
their own identity infrastructure, and smaller organizations
whose employees use a social identity provider. Furthermore,
Fabrikam would like to support the widest possible range of
social identity providers.
• To provide the infrastructure for federation if a customer
cannot. Fabrikam wants to minimize the impact on the applica-
tion code that might arise from having more than one authenti-
cation mechanism for customers. However, Fabrikam would
prefer not to have to maintain an on-premises identity provider
for smaller customers. Instead, it would like users at smaller
customers to use existing social identities.
Smaller customers and individual users have some particular concerns.
These include the following:
• Usability. Individual users would prefer to use existing identities
such as Windows Live IDs or Google account credentials to
access the Fabrikam Shipping website instead of having to
create a new user ID and password just to access this site.
———————– Page 164———————–
feder ated identity with multiple partners and windows azure acs 127 127
• Support. If individual users forget their passwords, they would
like to be able to use the password recovery tools provided by
their social identity provider rather than interacting with
Fabrikam.
• Privacy. Individual users do not want their social identity
provider to reveal to Fabrikam private information maintained
by the social identity provider that is not relevant to the Fabri-
kam shipping application.
Overview of the Solution Fabrikam must be
careful to explain to
With the goals and requirements in place, it’s time to look at the solu- individual users the
tion. As you saw in Chapter 6, “Federated Identity with Multiple implications of
allowing their social
Partners,” the solution includes the establishment of a claims-based identity provider to
architecture with issuers that act as an identity providers on the cus- release details to ACS
tomers’ side. In addition, the solution includes an issuer that acts as and be clear about
the federation provider on the Fabrikam side. Recall that a federation exactly what
information Fabrikam
provider acts as a gateway between a resource and all of the issuers
Shipping and ACS
that provide claims about the resource’s users. In this chapter, Fabri- will be able to access.
kam replaces the on-premises federation provider with ACS in order
to support authenticating users with social identities. This change also
means that Fabrikam no longer has to host and manage a federation
provider in its own datacenter.
Although this solution brings the benefits of easy support for users
who want to use their social identities, and a simplification of the
implementation of the on-premises Fabrikam issuer, there are some
trade-offs that Fabrikam evaluated.
This solution relies on access to ACS for all access to Fabrikam
Shipping. Fabrikam is satisfied by the SLAs in place with the ACS
subscription.
Using ADFS on-premises meant that Fabrikam could support
federation with organizations using the SAMLP protocol. ACS does
not currently support this protocol, but Fabrikam anticipates that all
of its federation partners will support the WS-Federation protocol.
Figure 1 shows the Fabrikam Shipping solution using ACS.
———————– Page 165———————–
128128 chapter seven
Trust
Open ID
Facebook Issuers (IdPs)
Windows LiveID
Transform
& Map Claims
3 1
2
3 ACS (FP)
Trust
Mary
4
Fabrikam
Shipping RP 2
( ) Trust
4
Issuer idPs
( )
1
John
Fabrikam
In the solution
described in Chapter
6, “Federated Identity figure 1 Adatum
with Multiple Fabrikam Shipping using ACS
Partners,” Fabrikam
used an on-premises Here’s an example of how the system works for a user at an orga-
federation provider
(FP). Now Fabrikam is nization such as Adatum with its own identity provider. This process
using ACS in the is similar, but not identical to the process described in Chapter 6,
cloud instead. “Federated Identity with Multiple Partners.” The steps correspond to
the shaded numbers in the preceding illustration.
STEP 1: prEs Ent CrEdEntIALs to th E Id EntItY provIdEr
1. When John from Adatum attempts to use fabrikam ship-
ping for the first time (that is, when he first navigates to
https://{fabrikam host}/f-shipping/adatum), there’s no
session established yet. In other words, from Fabrikam’s
point of view, John is unauthenticated. The URL provides
the Fabrikam Shipping application with a hint about the
customer that is requesting access (the hint is “adatum”
at the end of the URL).
2. The application redirects John’s browser to the Fabrikam
ACS instance in the cloud (the federation provider). That’s
because the Fabrikam ACS instance is the application’s
trusted issuer. As part of the redirection URL, the applica-
tion includes the whr parameter that provides a hint to ACS
about the customer’s home realm. The value of the whr
parameter is https://localhost/Adatum.SimulatedIssuer.7/.
———————– Page 166———————–
feder ated identity with multiple partners and windows azure acs 129 129
It’s important to use the entityID value from the identity
provider’s FederationMetadata.xml file as the whr value if you
want ACS to automatically redirect the user to the partner’s
identity provider. entityID is an attribute in the issuer’s
federation metadata: ACS uses this attribute value to uniquely
identify identity providers that it trusts.
3. ACS uses the whr parameter to look up the customer’s
identity provider and redirect John’s browser to the Adatum
issuer.
This scenario
4. Assuming that John uses a computer that is already part of automates home
the domain and on the corporate network, he will already realm discovery.
have valid network credentials that his browser can present There’s no need for
to the Adatum identity provider. the user to provide
his home realm
5. The Adatum identity provider uses John’s credentials to details, as was the
authenticate him and then issue a security token with a set case in Chapter
of Adatum claims. These claims are the employee name, the 4, “Federated
Identity for Web
employee address, the cost center, the role, and the group. Applications.”
Although the identity provider may also issue an organization
claim, Fabrikam will always generate the organization claim
value in ACS. This prevents a malicious administrator at a
partner organization from impersonating a user from another
partner.
STEP 2: t rA nsmIt th E Id EntItY provIdEr’s sEC urItY
t o KEn to thE fEdErAt Ion provIdEr
1. The Adatum identity provider uses HTTP redirection
to redirect the browser to the Fabrikam ACS instance,
delivering the security token issued by the Adatum
identity provider to the Fabrikam ACS instance.
2. The Fabrikam ACS instance receives this token and
validates it.
STEP 3: mA p thE C LAIms
1. The Fabrikam ACS instance applies claim-mapping rules to
the claims in the identity provider’s security token. ACS
transforms the claims into claims that Fabrikam Shipping
expects and understands.
2. ACS returns a new token with the claims to John’s browser
and uses HTTP redirection to return John’s browser the
Fabrikam Shipping application.
———————– Page 167———————–
130130 chapter seven
The redirection should be to a secure HTTP address (HTTPS) to
prevent the possibility of session hijacking.
STEP 4: t rA nsmIt th E mA ppEd CLAIms A nd pErform thE
rEqu Est Ed ACt Ion
1. The browser sends the security token from ACS, which
contains the transformed claims, to the Fabrikam Shipping
application.
2. The application validates the security token.
3. The application reads the claims and creates a session for
John.
Because this is a web application, all interactions happen through
the browser. (See Appendix B for a detailed description of the proto-
col for a browser-based client.)
Litware follows the same steps as Adatum. The only differences
are the URLs used (https://{fabrikam host}/f-shipping/litware and the
Litware identity provider’s address) and the claims-mapping rules,
because the claims issued by the Litware identity provider are differ-
ent from those issued by the Adatum identity provider. Notice that
the Fabrikam Shipping web application trusts the Fabrikam ACS in-
stance, not the individual issuers at Litware or Adatum; this level of
indirection isolates Fabrikam Shipping from individual differences
between Litware and Adatum.
In the scenario described in Chapter 6, “Federated Identity with
Multiple Partners,” Fabrikam managed and hosted an identity pro-
vider for smaller customers such as Contoso to enable users from
these customers to authenticate before accessing the Fabrikam Ship-
ping application. Users at organizations such as Contoso would now
prefer to reuse an existing social identity rather than maintaining a
separate set of credentials just for use with Fabrikam Shipping.
Here’s an example of how the system works for a user at an orga-
nization such as Contoso where the users authenticate with an online
social identity provider. The steps correspond to the un-shaded num-
bers in the preceding illustration. ACS treats the online social identity
providers in almost the same way it treats the Adatum and Litware
identity providers. However, it will use a different set of claims-map-
ping rules for the social identity providers and, if necessary, perform
protocol transition as well. Fabrikam didn’t need to change the Fabri-
kam Shipping application in order to support users with social identi-
ties; the application continues to trust ACS and ACS continues to
deliver the same types of claims to Fabrikam Shipping.
———————– Page 168———————–
feder ated identity with multiple partners and windows azure acs 131 131
STEP 1: prEs Ent CrEdEntIALs to th E Id EntItY provIdEr
1. When Mary from Contoso attempts to use fabrikam
shipping for the first time (that is, when she first navigates
to https://{fabrikam host}/f-shipping/Contoso), there’s no
session established yet. In other words, from Fabrikam’s
point of view, Mary is unauthenticated. The URL provides
the Fabrikam Shipping application with a hint about the
customer that is requesting access (the hint is “Contoso” at
the end of the URL).
2. The application redirects Mary’s browser to the Fabrikam
ACS instance in the cloud (the federation provider). That’s
because the Fabrikam ACS instance is the application’s
trusted issuer. As part of the redirection URL, the applica-
tion includes the whr parameter that provides a hint to the
federation provider about the customer’s home realm. The
value of the whr parameter is uri:WindowsLiveID.
In the current implementation, this means that all the employees
at a small partner must use the same social identity provider. In
this example, all Contoso employees must have a Windows Live
ID to be able to access Fabrikam Shipping. You could extend the
sample to enable users at partners such as Contoso to each use
different social identity providers.
3. ACS uses the whr parameter to look up the customer’s
preferred social identity provider and redirect Mary’s
browser to the social identity issuer; in this example,
Windows Live.
4. The social identity provider, Windows Live in this example,
uses Mary’s credentials to authenticate her and then returns
a security token with a basic set of claims to Mary’s brows-
er. In the case of Windows Live ID, the only claim returned
is nameidentifier.
STEP 2: t rA nsmIt th E soCIAL Id EntItY provIdEr’s
sEC urItY t o KEn to ACs
1. The social identity provider uses HTTP redirection to
redirect Mary’s browser with the security token it has issued
to the Fabrikam ACS instance.
2. The Fabrikam ACS instance receives this token and
validates it.
———————– Page 169———————–
132132 chapter seven
STEP 3: mA p thE C LAIms
1. The Fabrikam ACS instance applies token mapping rules to
the social identity provider’s security token. It transforms
the claims into claims that Fabrikam Shipping understands.
In this example, it adds new claims: name, organization,
role, and costcenter.
2. If necessary, ACS transitions the protocol that the social
identity provider uses to the WS-Federation protocol.
3. ACS returns a new token with the claims to Mary’s browser.
The types of claims
that ACS sends to
STEP 4: t rA nsmIt th E mA ppEd CLAIms A nd pErform
Fabrikam Shipping
from a user with a th E rEqu Est Ed ACt Ion
social identity are the 1. ACS uses HTTP redirection to redirect Mary’s browser with
same claims types as
it sends for users at the security token from ACS, which contains the claims, to
Adatum and Litware. the Fabrikam Shipping application.
2. The application validates the security token.
3. The application reads the claims and creates a session for
Mary.
Enrolling a New Partner Organization
One of Fabrikam’s goals was to enable partner organizations to enroll
themselves with the Fabrikam Shipping application, and enable
Partners, both with and without them to manage their own users. Both larger partners with their
their own identity providers, can own identity providers and smaller partners whose employees use
enroll themselves with Fabrikam identities from social identity providers should be able to perform
Shipping. these operations.
The enrollment process must perform three key configuration steps:
• Update the Fabrikam Shipping list of registered partners. The
registration data for each partner should include its name, the
URL of a logo image, and an identifier for the partner’s home
realm.
• For partners using their own identity provider, create a trust
relationship so that the Fabrikam ACS instance trusts the
partner’s identity provider.
• Create suitable claims-mapping rules in the Fabrikam ACS
instance that transform the claims from the partner’s identity
provider to the claims that Fabrikam Shipping expects to see.
Fabrikam uses the partner name and logo that it stores in its list
of registered partners to customize the UI of Fabrikam Shipping when
an employee from the partner visits the site. The partner’s home realm
———————– Page 170———————–
feder ated identity with multiple partners and windows azure acs 133 133
is important because when Fabrikam Shipping redirects a user to ACS
for authentication, it includes the home realm as a value for the whr
parameter in the request’s querystring. To enable ACS to automati-
cally redirect the user to the correct identity provider, the partner’s
home realm value should be the value of the entityID in the partner
identity provider’s FederationMetadata.xml.
Partners without their own identity provider use one of the pre-
configured social identity providers in ACS; enrolling a new partner in
this scenario does not require Fabrikam to configure a new identity
provider in ACS. For partners with their own identity provider, the
enrollment process must configure a new identity provider in ACS. We can use ACS to
handle the differ-
Partners with their own identity provider must configure their ences in the tokens
identity provider; a configuration example might be defining a and protocols that
relying party realm. The details of this will be specific to the type the various social
of identity provider that the partner uses. identity providers
use.
Different identity providers return different claims. For example,
Windows Live only returns a nameidentifier claim, while a custom
provider might include name, organization, costcenter, and role
claims. Regardless of the claims that the identity provider issues, the
rules that the enrollment process creates in ACS must be sufficient to
return costcenter, name, organization, and role claims, all of which
the Fabrikam Shipping application requires. ACS can issue these claims
to Fabrikam Shipping either by transforming a claim from the identity
provider, by passing a claim from the identity provider through un-
changed, or by creating a new claim.
Managing Multiple Partners
with a Single Identity
A user, such as Paul, may work for two or more partners of Fabrikam
Shipping. If those partners have their own identity providers, then
Paul will have two separate identities, such as paul@contoso.com and
paul@adventureworks.com, for example. However, if the partner or-
ganizations do not have their own identity providers, then it’s likely
that Paul will want to use the same social identity (paul@gmail.com)
with both partners. This raises a problem if Paul has different roles
in the two partner organizations; in Contoso, he may be in the
Shipment Manager role, and in AdventureWorks he may be in the
Administrator role. If ACS assigns roles based on Paul’s identity,
he will end up with both roles assigned to him, which means he will
be in the Administrator role in Contoso.
To handle this scenario, Fabrikam first considered using a differ-
ent service namespace for each partner in ACS. To access Contoso
data at Fabrikam Shipping, Paul would need a token from the
Contoso namespace, to access AdventureWorks data he would need
———————– Page 171———————–
134134 chapter seven
a token from the AdventureWorks namespace. To automate the en-
rollment process for new partners, Fabrikam would need to be able to
create new service namespaces in ACS programmatically. Unfortu-
nately, the ACS Management API does not currently support this
operation.
The solution adopted by Fabrikam was to create a different rely-
ing party (RP) in ACS for each partner. In ACS, each relying party can
have its own set of claims-mapping rules, so the rule group in the
Contoso relying party in ACS can assign the Shipment Manager role
to Paul, while the rule group in the AdventureWorks relying party in
Enabling partners to ACS can assign him the Administrator role. If Paul signs in to Fabri-
manage their own kam Shipping using a token from the Contoso relying party and he
users reduces the then tries to access AdventureWorks data he will need to re-authen-
amount of work ticate in order to obtain a token from the AdventureWorks relying
Fabrikam has to do to party in ACS.
manage the Fabrikam
Shipping application. A single service namespace in ACS can have multiple relying parties.
The wtrealm parameter passed to ACS identifies the relying party
to use, and each relying party has its own set of claims-mapping
rules that include a rule to add an organization claim. Fabrikam
Shipping uses the organization claim to authorize access to data.
Managing Users at a Partner
Organization
For a partner organization with its own identity provider, the partner
can manage which employees have access to its data at Fabrikam Ship-
ping using the partner’s identity provider. By controlling which claims
its identity provider issues for individual employees, the partner can
determine what level of access the employee has in the Fabrikam
Shipping application. This approach depends on the claims-mapping
rules that the enrollment process created in ACS. For example, map-
ping the Order Tracker role in Adatum to the ShipmentManager role
in Fabrikam Shipping would give anyone at Adatum with the Order
Tracker role the ability to manage Adatum shipments at Fabrikam.
In the case of a partner without its own identity provider, such as
Contoso where employees authenticate with a social identity pro-
vider, the claims-mapping rules in ACS must include the mapping of
individuals to roles within Fabrikam. To manage these mappings for
these organizations, one user should be a designated administrator
who can edit their organization’s claims-mapping rules. The adminis-
trator would use an administration page hosted on the Fabrikam Ship-
ping enrollment web site to manage the list of users with access to
Contoso data in Fabrikam Shipping and edit the rules that control
———————– Page 172———————–
feder ated identity with multiple partners and windows azure acs 135 135
access levels. This page will use the ACS Management API to make the
necessary configuration changes in ACS.
The sample does not implement this feature: each partner without its
own identity provider has only a single user. The enrollment process
configures this user. The sample implementation also assumes that if
a partner did have more than one user, then all the users must use
the same social identity provider.
Inside the Implementation
Now is a good time to walk through some of the details of the solu-
tion. As you go through this section, you may want to download the
Microsoft Visual Studio® solution, 7FederationWithMultiplePartner-
sAndAcs from http://claimsid.codeplex.com. If you are not interested
in the mechanics, you should skip to the next section.
The scenario described in this chapter is very similar to the sce-
nario described in Chapter 6, “Federated Identity with Multiple Part-
ners.” The key difference is that ACS, rather than an issuer at Fabrikam,
now provides the federation services. The changes to the Fabrikam Modifying Fabrikam
Shipping application all relate to the way Fabrikam Shipping interacts Shipping to use ACS instead
with ACS; in particular, how the application enrolls new partners and of the Fabrikam federation
handles the log on process. The logic of the application and the au- provider was mostly a
thorization rules it applies using the claims from the identity providers configuration task.
is unchanged.
Getting a List of Identity Providers
from ACS
When a partner wants to enroll with the Fabrikam Shipping applica-
tion, part of the sign-up process requires the partner to select the
identity provider they want to use. The choice they have is either to
use their own identity provider (at this stage in the enrollment process
Fabrikam Shipping and ACS know nothing about the partner or its
identity provider), or to use one of the pre-configured social identity
providers: Google, Yahoo!, or Windows Live. It’s possible that the list
of available social identity providers might change, so it makes sense
for Fabrikam to build the list programmatically by querying the Fabri-
kam ACS instance. However, there’s no way to ask ACS for only the
list of social identity providers and exclude any custom identity pro-
viders from other partners. The following code sample shows how
Fabrikam implemented an extension method, IsSocial, to check
whether an identity provider is a social identity provider.
———————– Page 173———————–
136136 chapter seven
public static class SocialIdentityProviders
{
public static readonly SocialIdentityProvider
Google = new SocialIdentityProvider {
DisplayName = “Google”,
HomeRealm = “Google”,
Id = “10008641” };
public static readonly SocialIdentityProvider
WindowsLiveId = new SocialIdentityProvider {
DisplayName = “Windows Live ID”,
HomeRealm = “uri:WindowsLiveID”,
Id = “10007989” };
public static readonly SocialIdentityProvider
Yahoo = new SocialIdentityProvider {
DisplayName = “Yahoo!”,
HomeRealm = “Yahoo!”,
Id = “10008653” };
public static Ienumerable<SocialIdentityProvider> GetAll()
{
return new SocialIdentityProvider[3] {
Google, Yahoo, WindowsLiveId };
}
public static string GetHomeRealm(string socialIpId)
{
var providers = new[] { Google, Yahoo, WindowsLiveId };
return providers.Single(p => p.Id == socialIpId).HomeRealm;
}
public static bool IsSocial(this IdentityProvider ip)
{
if (ip.Issuer.Name.Contains(Google.HomeRealm) ||
A separate web ip.Issuer.Name.Contains(Yahoo.HomeRealm) ||
application ip.Issuer.Name.Contains(WindowsLiveId.HomeRealm))
called f-Shipping. {
Enrollment.7
return true;
handles the
enrollment tasks. }
return false;
}
}
The solution includes an ACS.ServiceManagementWrapper proj-
ect that wraps the REST calls that perform management operations
in ACS. The enrollment process builds a list of available social identity
providers by calling the RetrieveIdentityProviders method in this
wrapper class.
———————– Page 174———————–
feder ated identity with multiple partners and windows azure acs 137 137
The ACS.ServiceManagementWrapper project uses password
authentication over HTTPS with the calls that it makes to the
ACS management API. As an alternative, you could sign the
request with a symmetric key or an X.509 certificate.
Adding a New Identity Provider to ACS
When a partner with its own identity provider enrolls with Fabrikam
Shipping, part of the enrollment process requires Fabrikam to add
details of the partner’s issuer to the list of identity providers in ACS.
The enrollment process automates this by using the ACS Management
API. The wrapper class in the ACS.ServiceManagementWrapper proj-
ect includes two methods, AddIdentityProvider and AddIdentity
ProviderManually for configuring a new identity provider in ACS.
During the enrollment process, if the user provides a FederationMeta-
data.xml file that contains all of the necessary information to config-
ure the trust, the EnrollmentController class uses the AddIdentity
Provider method. If the user provides details of the identity provider
manually, it uses the AddIdentityProviderManually method. The
enrollment process then adds a relying party and mapping rules to the
identity provider, again using methods in the ServiceManagement
Wrapper wrapper class.
Managing Claims-Mapping Rules in ACS
The automated enrollment process for both larger organizations that
have their own identity provider, and smaller partners who rely on a
social identity provider requires Fabrikam to add claims-mapping rules
to ACS programmatically. The wrapper class in the ACS.ServiceMan-
agementWrapper project includes an AddSimpleRuleToRuleGroup
method that the enrollment process uses when it adds a new claims-
mapping rule. The application also uses the AddPassthroughRule
ToRuleGroup when it needs to add a rule that passes a claim through
from the identity provider to the relying party without changing it,
and the AddSimpleRuleToRuleGroupWithoutSpecifyInputClaim
method when it needs to create a new claim that’s not derived from
any of the claims issued by the identity provider.
It’s important that the mapping rules don’t simply pass through the
organization claim, but instead create a new organization claim
derived from the identity of the identity provider. This is to prevent
the risk of a malicious administrator at the partner spoofing the
identity of another organization. When registering a new organiza-
tion, the code should verify that the organization name is not already
is use, so that a new registration cannot override an existing organi-
zation name or add itself to an existing organization. The Fabrikam
———————– Page 175———————–
138138 chapter seven
Shipping application uses the organization claim in its authoriza-
tion and data access management logic (for example, when creating
and listing shipments).
For partners without their own identity provider, the enrollment
process must also create a new relying party in ACS. The wrapper
class in the ACS.ServiceManagementWrapper project includes an
AddRelyingParty method to perform this operation.
The EnrollmentController class in the f-Shipping.Enrollment.7
project demonstrates how the Fabrikam Shipping application handles
the automated enrollment process.
Each partner without Because Fabrikam uses multiple relying parties in ACS to handle
an identity provider the case where a user with a social identity is associated with multiple
still needs a relying partners, the sample solution disables checking audience URIs in the
party so that
Fabrikam Shipping Web.config file:
can recognize when XML
the same user is
associated with two <microsoft.identityModel>
or more different <service>
partner organizations. <audienceUris mode=”Never”>
</audienceUris>
…
</service>
</microsoft.identityModel>
Normally, you should not set the audienceUris mode to “Never”
because this introduces a security vulnerability: the correct approach
is to add the audience URIs at run time as Fabrikam Shipping enrolls
new partners. You would also need to share the list of Uris between
the f-Shipping.Enrollment.7 web application and the f-Shipping.7 web
application. Furthermore, to avoid the possibility of one tenant imper-
sonating another, you would use a separate symmetric key for each
tenant. However, as described previously, in this solution ACS adds an
organization claim to the token that it issues that the REST service
can check.
Displaying a List of Partner
Organizations
For the purposes of this sample, the home page at Fabrikam Shipping
displays a list of registered partner organizations. In a real application,
you may not want to make this information public because some
partners may not want other partners to know about their business
relationship with Fabrikam Shipping, so each partner would have their
own landing page.
———————– Page 176———————–
feder ated identity with multiple partners and windows azure acs 139 139
In ACS 2.0 (the current version at the time of this writing), it’s not
possible to keep this information private because ACS publishes a
public feed of all the identity providers associated with each relying
party.
For this example, the Fabrikam Shipping application generates the
list of partners from a local store instead of querying ACS. Because
Fabrikam Shipping maintains this data locally, there is no need to
query ACS or use the login page that ACS can generate for you.
Authenticating a User of Fabrikam
Shipping You can find the
The Fabrikam Shipping application uses the AuthenticateAnd address of the feed
that contains a list of
AuthorizeAttribute attribute class to intercept requests and then ask all the identity provid-
the WSFederationAndAuthenticationModule class to handle the ers in the ACS portal
authentication and to retrieve the user’s claims from ACS. The in the “Application
AuthenticateUser method builds the redirect URL that passes the integration” section
WS-Federation parameters to the ACS instance that Fabrikam Ship- under “Login Page
Integration.”
ping uses. The following table describes the parameters that the
application passes to ACS.
Parameter Example value Notes
wa wsignin1.0 The WS-Federation command.
wtrealm https:// The realm value that ACS uses to
localhost/f-Shipping.7/ identify the relying party.
FederationResult
wctx https:// The return URL to which ACS should
localhost/f-Shipping.7/ post the token with claims.
Contoso
The Fabrikam Shipping application does not send a whr parameter
identifying the home realm because Fabrikam configures each tenant
in ACS as a relying party with only a single identity provider enabled.
The following code example shows the AuthenticateUser
method in the AuthenticateAndAuthorizeAttribute class.
private static void AuthenticateUser(AuthorizationContext context)
{
var organizationName =
(string)context.RouteData.Values[“organization”];
if (!string.IsNullOrEmpty(organizationName))
{
…
———————– Page 177———————–
140140 chapter seven
var returnUrl = GetReturnUrl(context.RequestContext);
// User is not authenticated and is entering for the first time.
Var fam =
FederatedAuthentication.WSFederationAuthenticationModule;
var signIn = new SignInRequestMessage
(new Uri(fam.Issuer), fam.Realm)
{
Context = returnUrl.ToString(),
Realm = string.Format
(“https://localhost/f-shipping.7/{0}”,organizationName)
};
context.Result =
new RedirectResult(signIn.WriteQueryString());
}
else
{
throw new ArgumentException(“Tenant name missing.”);
}
}
Authorizing Access to Fabrikam
Shipping Data
The Fabrikam Shipping application uses the same AuthenticateAnd
Authorize attribute to handle authorization. For example, Fabrikam
Shipping only allows members of the Shipment Manager role to
cancel orders. The following code example from the Shipment
Controller class shows how this is declared:
[AuthenticateAndAuthorize(Roles = “Shipment Manager”)]
[AcceptVerbs(HttpVerbs.Post)]
public ActionResult Cancel(string id)
{
…
}
The AuthorizeUser method in the AuthenticateAndAuthorize
Attribute class determines whether a user has the appropriate
Organization and Role claims:
private void AuthorizeUser(AuthorizationContext context)
{
var organizationRequested =
(string)context.RouteData.Values[“organization”];
———————– Page 178———————–
feder ated identity with multiple partners and windows azure acs 141 141
…
var userOrganization = ClaimHelper
.GetCurrentUserClaim(Fabrikam.ClaimTypes.Organization).Value;
if (!organizationRequested.Equals(
userOrganization, StringComparison.OrdinalIgnoreCase))
{
context.Result = new HttpUnauthorizedResult();
return;
}
var authorizedRoles =
this.Roles.Split(new[] { “,” },
StringSplitOptions.RemoveEmptyEntries);
bool hasValidRole = false;
foreach (var role in authorizedRoles)
{
if (context.HttpContext.User.IsInRole(role.Trim()))
{
hasValidRole = true;
break;
}
}
if (!hasValidRole)
{
context.Result = new HttpUnauthorizedResult();
return;
}
In a multi-tenant application
}
such as Fabrikam Shipping,
For a discussion of some alternative approaches to authorization the authorization rule that
that Fabrikam Shipping could have taken, see Appendix G, “Authoriza- checks the Organization
tion Strategies.” claim ensures that a tenant
only has access to its own
data.
Setup and Physical Deployment
The following sections describe the setup and physical deployment
for the Fabrikam Shipping websites, the simulated claims issuers, and
the initialization of the ACS instance.
Fabrikam Shipping Websites
Fabrikam has two separate websites: one for Fabrikam Shipping and
one to manage the enrollment process for new partners. This enables
Fabrikam to configure the two sites for the different expected usage
———————– Page 179———————–
142142 chapter seven
patterns: Fabrikam expects the usage of the shipping site to be sig-
nificantly higher than the usage of the enrollment site.
In the sample application, Fabrikam Shipping maintains a list
of registered partner organizations using the Organization and
OrganizationRepository classes. The following code sample shows
the Organization class:
C#
public class Organization
{
public string LogoPath { get; set; }
Using two separate sites public string Name { get; set; }
also circumvents a problem public string DisplayName { get; set; }
that can occur during the public string HomeRealm { get; set; }
enrollment process for a }
partner that uses a social
identity provider. During Both the f-Shipping.Enrollment.7 and the f-Shipping.7 web ap-
the enrollment process, a plications need access to this repository, which the sample imple-
user must sign into their
social identity provider so ments by using a simple file called organizations.txt stored in a folder
that Fabrikam can capture called SharedData.
the claim values that prove
that user’s identity. The The implementation of the enrollment functionality in this sample
enrollment process then shows only a basic outline of how you would implement this func-
creates the new claims- tionality in a real application.
mapping rules in ACS for
the partner. Unless the user
running the enrollment Sample Claims Issuers
process signs out and then The sample comes with two, pre-configured, claims issuers that act as
signs in again (not a great identity providers for Adatum and Litware. These simulated issuers
user experience), they will
not get the full set of claims illustrate the role that a real issuer, such as ADFS 2.0, would play in
that they require to access this scenario. If you want to experiment and extend the sample by
the Fabrikam Shipping enrolling additional partners with their own identity providers, you
application. will need additional issuers. You can either create your own new STS
using the WIF “WCF Security Token Service” template in Visual Stu-
dio and using either the Adatum.SimulatedIssuer.7 or Litware.Simu-
latedIssuer.7 projects as a model to work from, or you could use one
of the simple issuers for Northwind or AdventureWorks in the Assets
folder for this sample.
These simple issuers use the SelfSTS sample application that you
can read about here: http://archive.msdn.microsoft.com/selfsts.
Initializing ACS
The sample application includes a set of pre-configured partners for
Fabrikam Shipping, both with and without their own identity provid-
ers. These partners require identity providers, relying parties, and
———————– Page 180———————–
feder ated identity with multiple partners and windows azure acs 143 143
claims-mapping rules in ACS in order to function. The ACS.Setup
project in the solution is a simple console application that you can run
to add the necessary configuration data for the pre-configured part-
ners to your ACS instance. It uses the ACS Management API and the
wrapper classes in the ACS.ServiceManagementWrapper project.
You will still need to perform some manual configuration steps; the
ACS Management API does not enable you to create a new service
namespace. You must perform this operation in the ACS manage-
ment portal.
Questions
1. Why does Fabrikam want to use ACS in the scenario
described in this chapter?
a. Because it will simplify Fabrikam’s own internal
infrastructure requirements.
b. Because it’s the only way Fabrikam can support users
who want to use a social identity provider for authen-
tication.
c. Because it enables users with social identities to
access the Fabrikam Shipping application more easily.
d. Because ACS can authenticate users with social
identities.
2. In the scenario described in this chapter, why is it necessary
for Fabrikam to configure ACS to trust issuers at partners
such Adatum and Litware?
a. Because Fabrikam does not have its own on-premises
federation provider.
b. Because Fabrikam uses ACS for all the claims-mapping
rules that convert claims to a format that Fabrikam
Shipping understands.
c. Because partners such as Adatum have some users
who use social identities as their primary method of
authentication.
d. Because a relying party such as Fabrikam Shipping can
only use a single federation provider.
———————– Page 181———————–
144144 chapter seven
3. How does Fabrikam Shipping manage home realm discovery
in the scenario described in this chapter?
a. Fabrikam Shipping presents unauthenticated users
with a list of federation partners to choose from.
b. Fabrikam Shipping prompts unauthenticated users
for their email addresses. It parses each address to
determine which organization the user belongs to.
c. ACS manages home realm discovery; Fabrikam
Shipping does not.
d. Each partner organization has its own landing
page in Fabrikam Shipping. Visiting that page will
automatically redirect unauthenticated users to
that organization’s identity provider.
4. Enrolling a new partner without its own identity provider
requires which of the following steps?
a. Updating the list of registered partners stored by
Fabrikam Shipping. This list includes the home realm
of the partner.
b. Adding a new identity provider to ACS.
c. Adding a new relying party to ACS.
d. Adding a new set of claims-mapping rules to ACS.
5. Why does Fabrikam use a separate web application to
handle the enrollment process?
a. Because the expected usage patterns of the enroll-
ment functionality are very different from the
expected usage patterns of the main Fabrikam
Shipping web site.
b. Because using the enrollment functionality does not
require a user to authenticate.
c. Because the site that handles enrolling new partners
must also act as a federation provider.
d. Because the site that updates ACS with new relying
parties and claims-mapping rules must have a different
identity from sites that only read data from ACS.
More Information
Appendix E of this guide provides a detailed description of ACS
and its features.
———————– Page 182———————–
8 Claims Enabling Web Services
In Chapter 4, “Federated Identity for Web Applications,” you saw
Adatum make the a-Order application available to its partner Litware.
Rick, a salesman from Litware, used his local credentials to log onto
the a-Order website, which was hosted on Adatum’s domain.
To do this, Rick needed only a browser to access the a-Order
website. But what would happen if the request came from an applica-
tion other than a web browser? What if the information supplied by
aOrder was going to be integrated into one of Litware’s in-house ap-
plications?
Federated identity with an active (or “smart”) client application
works differently than federated identity with a web browser. In a
browser-based scenario, the web application requests security tokens
by redirecting the user’s browser to an issuer that produces them.
(This process is shown in the earlier scenarios.) With redirection, the
browser can handle most of the authentication for you. In the active
scenario, the client application actively contacts all issuers in a trust
chain (these issuers are typically an identity provider (IdP) and a fed- Active clients do not need
eration provider (FP)) to get and transform the required tokens. HTTP redirection.
In this chapter, you’ll see an example of a smart client that uses
federated identity. Fortunately, support for Microsoft® Windows®
Communication Foundation (WCF) is a standard feature of the Win-
dows Identity Foundation (WIF). Using WCF and WIF reduces the
amount of code needed to implement both claims-aware web ser-
vices and claims-aware smart clients.
The Premise
Litware wants to write an application that can read the status of its
orders directly from Adatum. To satisfy this request, Adatum agrees
to provide a web service called a-Order.OrderTracking.Services that
can be called by Litware over the Internet.
145
———————– Page 183———————–
146146 chapter eight
Adatum and Litware have already done the work necessary to
establish federated identity, and they both have issuers capable of
interacting with active clients. The necessary communications infra-
structure, including firewalls and proxies, is in place. To review these
elements, see Chapter 4, “Federated Identity for Web Applications.”
Now, Adatum only needs to expose a claims-aware web service
on the Internet. Litware will invoke Adatum’s web service from
within its client application. Because the client application runs in
Litware’s security realm, it can use Windows authentication to estab-
lish the identity of the user and then use this identity to obtain a to-
If Active Directory® ken it can pass along to Adatum’s federation provider.
Federation Services
(ADFS) 2.0 is used,
support for federated Goals and Requirements
identity with active
clients is a standard Both Litware and Adatum see benefits to a collaboration based on
feature. claims-aware web services. Litware wants programmatic access to
Adatum’s a-Order application. Adatum does not want to be respon-
sible for authenticating any people or resources that belong to an-
Active clients use claims to get other security realm. For example, Adatum doesn’t want to keep and
access to remote services. maintain a database of Litware users.
Both Adatum and Litware want to reuse the existing infrastruc-
ture as much as possible. For example, Adatum wants to enforce
permissions for its web service with the same rules it has for the
browser-based web application. In other words, the browser-based
application and the web service will both use roles for access control.
Overview of the Solution
Figure 1 gives an overview of the proposed system.
Trust
R Issuer
e 2
qu
es IdP
t
3 an A ( )
d
at
u
Map the t m
ok
Issuer FP en
Claims ( ) 1
Trust
Request a Litware
4 token
Get Orders
WPF
a−Order
Order tracking Smart Rick
WCF web service Client
Adatum
Litware
figure 1
Federated identity with a smart client
———————– Page 184———————–
claims enabling web services 147 147
The diagram shows an overview of the interactions and relation-
ships among the different components. It is similar to the diagrams
you saw in the previous chapters, except that no HTTP redirection is
involved.
Litware’s client application is based on Windows Presentation
Foundation (WPF) and is deployed on Litware employees’ desktops.
Rick, the salesman at Litware, uses this application to track orders
with Litware.
Adatum exposes a SOAP web service on the Internet. This web
service is implemented with WCF and uses standard WCF bindings
that allow it to receive Security Assertion Markup Language (SAML)
tokens for authentication and authorization. In order to access this
service, the client must present a security token from Adatum.
The sequence shown in the diagram proceeds as follows:
1. Litware’s WPF application uses Rick’s credentials to request
a security token from Litware’s issuer. Litware’s issuer
authenticates Rick and, if the authentication is a success,
returns a Group claim with the value Sales because Rick
is in the sales organization.
2. The WPF application then forwards the security token
to Adatum’s issuer, which has been configured to trust
Litware’s issuer.
3. Adatum’s issuer, acting as a federation provider, transforms
the claim Group:Sales into Role:Order Tracker and adds a
new claim, Organization:Litware. The transformed claims
are the ones required by Adatum’s web service, a-Order.
OrderTracking.Services. These are the same rules that were
defined in the browser-based scenario.
4. Finally, the WPF application sends the web service the
request to return orders. This request includes the security
token obtained in the previous step.
This sequence is a bit different from a browser-based web appli-
cation because the smart client application knows the requirements
of the web service in advance and also knows how to acquire the
claims that satisfy the web service’s requirements. The client applica-
tion goes to the identity provider first, the federation provider second,
and then to the web service. The smart client application actively
drives the authentication process.
———————– Page 185———————–
148148 chapter eight
Inside the Implementation
Now is a good time to walk through some of the details of the solu-
tion. As you go through this section, you may want to download the
Microsoft Visual Studio® solution, 4ActiveClientFederation, from
http://claimsid.codeplex.com. If you are not interested in the mechan-
ics, you should skip to the next section.
You can implement a claims-based smart client application
The a-Order.OrderTracking using the built-in facilities of WCF, or you can code at a lower level
web service uses WCF standard using the WIF API. The a-Order.OrderTracking web service uses WCF
bindings. standard bindings.
Implementing the Web Service
The web service’s Web.config file contains the following WCF service
configuration.
<services>
<service
name=”AOrder.OrderTracking.Services.OrderTrackingService”
behaviorConfiguration=”serviceBehavior”>
<endpoint
address=””
binding=”ws2007FederationHttpBinding”
bindingConfiguration=
“WS2007FederationHttpBinding_IOrderTrackingService”
contract=
“AOrder.OrderTracking.Contracts.IOrderTrackingService”
/>
<endpoint address=”mex” binding=”mexHttpBinding”
contract=”IMetadataExchange” />
</service>
</services>
If your service endpoints support metadata exchange, as a-Order
tracking does, it’s easy for clients to locate services and bind to them
using tools such as Svcutil.exe. However, some manual editing of the
configuration that is auto-generated by the tools will be necessary in
the current example because it involves two issuers: the identity
provider and the federation provider. With only one issuer, the tool
will generate a configuration file that does not need editing.
The Web.config file contains binding information that matches
the binding information for the client. If they don’t match, an excep-
tion will be thrown.
———————– Page 186———————–
claims enabling web services 149 149
The Web.config file also contains some customizations. The fol-
lowing XML code shows the first customization.
<extensions>
<behaviorExtensions>
<add name=”federatedServiceHostConfiguration”
type=”Microsoft.IdentityModel
.Configuration.ConfigureServiceHostBehaviorExtensionElement,
Microsoft.IdentityModel, …” />
</behaviorExtensions>
</extensions>
Adding this behavior extension attaches WIF to the WCF pipe-
line. This allows WIF to verify the security token’s integrity against
the public key. (If you forget to attach WIF, you will see a run-time
exception with a message that says that a service certificate is miss-
ing.)
The service’s Web.config file uses the <Microsoft.identity
Model> element to specify the configuration required for the WIF
component. This is shown in the following code example.
<microsoft.identityModel>
<service>
<issuerNameRegistry
type=
“Microsoft.IdentityModel.Tokens.
ConfigurationBasedIssuerNameRegistry,
Microsoft.IdentityModel, Version=3.5.0.0,
Culture=neutral,
PublicKeyToken=31bf3856ad364e35″>
<trustedIssuers>
<add
thumbprint=”f260042d59e14817984c6183fbc6bfc71baf5462″
name=”adatum” />
</trustedIssuers>
</issuerNameRegistry>
<audienceUris>
<add value=
“http://{adatum host}/a-Order.OrderTracking.Services/
OrderTrackingService.svc”
/>
</audienceUris>
…
———————– Page 187———————–
150150 chapter eight
Because the Adatum issuer will encrypt its security tokens with
the web service’s X.509 certificate, the <service> element of the ser-
vice’s Web.config file also contains information about the web ser-
vice’s private key. This is shown in the following XML code.
<serviceCertificate>
<certificateReference
findValue=”CN=adatum”
storeLocation=”LocalMachine”
storeName=”My”
x509FindType=”FindBySubjectDistinguishedName”/>
</serviceCertificate>
Implementing the Active Client
The client application, which acts as the WCF proxy, is responsible for
orchestrating the interactions. You can see this by examining the
client’s App.config file. The following XML code is in the <system.
serviceModel> section.
<client>
<endpoint
address=
“http://{adatum host}/a-Order.OrderTracking.Services/
OrderTrackingService.svc”
binding=”ws2007FederationHttpBinding”
bindingConfiguration=
“WS2007FederationHttpBinding_IOrderTrackingService”
contract=”OrderTrackingService.IOrderTrackingService”
name=”WS2007FederationHttpBinding_IOrderTrackingService”>
<identity>
<dns value=”adatum” />
</identity>
</endpoint>
</client>
The address attribute gives the Uniform Resource Identifier (URI)
of the order tracking service.
The binding attribute, ws2007FederationHttpBinding, indicates
that WCF should use the WS-Trust protocol when it creates the se-
curity context of invocations of the a-Order order tracking service.
The Domain Name System (DNS) value given in the <identity>
section is verified at run time against the service certificate’s subject
name.
The App.config file specifies three nested bindings in the
<bindings> subsection. The following XML code shows the first of
these bindings.
———————– Page 188———————–
claims enabling web services 151 151
<ws2007FederationHttpBinding>
<binding
name=”WS2007FederationHttpBinding_IOrderTrackingService”>
<security mode=”Message”>
<message>
<issuer
address=”https://{adatum host}/{issuer endpoint}”
binding=”customBinding”
bindingConfiguration=”AdatumIssuerIssuedToken”>
</issuer>
</message>
</security>
</binding>
</ws2007FederationHttpBinding>
The issuer address changes depending on how you deploy the sample.
For an issuer running on the local machine, the address attribute of
the <issuer> element will be:
https://localhost/Adatum.FederationProvider.4/Issuer.svc
For ADFS 2.0, the address will be:
https://{adatum host}/Trust/13/IssuedTokenMixed
SymmetricBasic256
This binding connects the smart client application to the a-Order.
OrderTracking service. Unlike WCF bindings that do not involve
claims, this special claims-aware binding includes a message security
element that specifies the address and binding configuration of the The message security element
Adatum issuer. The address attribute represents the active endpoint identifies the issuer.
of the Adatum issuer.
The nested binding configuration is labeled AdatumIssuerIssued
Token. It is the second binding, as shown here.
<customBinding>
<binding name=”AdatumIssuerIssuedToken”>
<security
authenticationMode=”IssuedTokenOverTransport”
messageSecurityVersion=
“WSSecurity11WSTrust13WSSecureConversation13
WSSecurityPolicy12BasicSecurityProfile10″
>
<issuedTokenParameters>
<issuer
address=
“https://{litware host}/{issuer endpoint}”
———————– Page 189———————–
152152 chapter eight
binding=”ws2007HttpBinding”
bindingConfiguration=”LitwareIssuerUsernameMixed”>
</issuer>
</issuedTokenParameters>
</security>
<httpsTransport />
</binding>
</customBinding>
The issuer address changes depending on how you deploy the sample.
The federation binding For an issuer running on the local machine, the address attribute of
in the Microsoft .NET the <issuer> element will be:
Framework 3.5 provides
no way to turn off a https://localhost/Litware.SimulatedIssuer.4/Issuer.svc
secure conversation.
For ADFS 2.0 the address will be:
(This feature is available
in version 4.0.) Because https://{litware host}/Trust/13/UsernameMixed
ADFS 2.0 endpoints
have secure conversation The AdatumIssuerIssuedToken binding configures the connec-
disabled, this example tion to the Adatum issuer that will act as the federation provider in
needs a custom binding.
this scenario.
The <security> element specifies that the binding uses WS-Trust.
This binding also nests the URI of the Litware issuer, and for this rea-
son, it is sometimes known as a federation binding . The binding speci-
fies that the binding configuration labeled LitwareIssuerUsername
Mixed is used for the Litware issuer that acts as the identity provider.
The following XML code shows this.
<ws2007HttpBinding>
<binding name=”LitwareIssuerUsernameMixed”>
<security mode=”TransportWithMessageCredential”>
<message
clientCredentialType=”UserName”
establishSecurityContext=”false”
/>
</security>
</binding>
</ws2007HttpBinding>
This binding connects the Litware issuer that acts as an identity
provider. This is a standard WCF HTTP binding because it transmits
user credentials to the Litware issuer.
In a production scenario, the configuration should be changed
to clientCredentialType=”Windows” to use Windows
authentication. For simplicity, this sample uses UserName
credentials. You may want to consider using other options in
a production environment.
———————– Page 190———————–
claims enabling web services 153 153
When the active client starts, it must provide credentials. If the
configured credential type is UserName, a UserName property must
be set. This is shown in the following code.
private void ShowOrders()
{
var client =
new OrderTrackingService.OrderTrackingServiceClient();
client.ClientCredentials.UserName.UserName = “LITWARE\\rick”;
client.ClientCredentials.UserName.Password =
“thisPasswordIsNotChecked”;
Using the WIF
WSTrustChannel
var orders = client.GetOrdersFromMyOrganization(); gives you more
control, but it
this.DisplayView(new OrderTrackingView() requires a deeper
{ understanding of
WS-Trust.
DataContext =
new OrderTrackingViewModel(orders)
});
}
This step would not be necessary if the application were deployed
in a production environment because it would probably use Windows
authentication.
WCF federation bindings can handle the negotiations between the
active client and the issuers without additional code. You can achieve
the same results with calls to the WIF WSTrustChannel class.
Implementing the Authorization
Strategy
The Adatum web service implements its authorization strategy in the A claims authorization
SimpleClaimsAuthorizationManager class. The service’s Web.config manager determines which
file contains a reference to this class in the <claimsAuthorization methods can be called by
Manager> element. the current user.
<claimsAuthorizationManager
type=”AOrder.OrderTracking.Services.
SimpleClaimsAuthorizationManager,
AOrder.OrderTracking.Services” />
Adding this service extension causes WCF to invoke the Check
Access method of the specified class for authorization. This occurs
before the service operation is called.
The implementation of the SimpleClaimsAuthorization
Manager class is shown in the following code.
———————– Page 191———————–
154154 chapter eight
public class SimpleClaimsAuthorizationManager :
ClaimsAuthorizationManager
{
public override bool CheckAccess(AuthorizationContext context)
{
return context.Principal.IsInRole(Adatum.Roles.OrderTracker);
}
}
WIF provides the base class, ClaimsAuthorizationManager.
Applications derive from this class in order to specify their own ways
of checking whether an authenticated user should be allowed to call
the web service methods.
The CheckAccess method in the a-Order order tracking service
ensures that the caller of any of the service’s methods must have a
role claim with the value Adatum.Roles.OrderTracker, which is de-
fined in the Samples.Web.ClaimsUtilities project elsewhere as the
string, “Order Tracker.”
In this scenario, the Litware issuer, acting as an identity provider,
issues a Group claim that identifies the salesman Rick as being in the
Litware sales organization (value=Sales). The Adatum issuer, acting as
a federation provider, transforms the security token it receives from
Litware. One of its transformation rules adds the role, Order Tracker,
to any Litware employee with a group claim value of Sales. The order
tracking service receives the transformed token and grants access to
the service.
Debugging the Application
The configuration files for the client and the web service in this
sample include settings to enable tracing and debugging messages. By
default, they are commented out so that they are not active.
If you uncomment them, make sure you update the <sharedLis-
teners> section so that log files are generated where you can find
them and in a location where the application has write permissions.
Here is the XML code.
<sharedListeners>
<add
initializeData=”c:\temp\WCF-service.svclog”
type=”System.Diagnostics.XmlWriterTraceListener”
name=”xml”>
<filter type=”” />
</add>
<add
initializeData=”c:\temp\wcf-service-msvg.svclog”
———————– Page 192———————–
claims enabling web services 155 155
type=”System.Diagnostics.XmlWriterTraceListener, System,
Version=2.0.0.0, Culture=neutral,
PublicKeyToken=b77a5c561934e089″
name=”ServiceModelMessageLoggingListener”
traceOutputOptions=”Timestamp”>
<filter type=”” />
</add>
</sharedListeners>
Setup and Physical Deployment
By default, the web service uses the local host for all components. In
a production environment, you would want to use separate comput-
ers for the client, the web service, the federation provider, and the
identity provider.
To deploy this application, you must substitute the mock issuer
with a production-grade component such as ADFS 2.0 that supports
active clients. You must also adjust the Web.config and App.config
settings to account for the new server names by changing the issuer
addresses. Remove the mock issuer
Note that neither the client nor the web service needs to be re- during deployment.
compiled to be deployed to a production environment. All of the
necessary changes are in the respective .config files.
Configuring ADFS 2.0 for Web Services
In the case of ADFS 2.0, you enable the endpoints using the Microsoft
Management Console (MMC).
To obtain a token from Litware, the UsernameMixed or Windows
Mixed endpoint could be used. UsernameMixed requires a user name
and password to be sent across the wire, while WindowsMixed
works with the Windows credentials. Both endpoints will return a
SAML token.
The “Mixed” suffix indicates that the endpoint uses transport
security (based on HTTPS) for integrity and confidentiality; client
credentials are included in the header of the SOAP message.
To obtain a token from Adatum, the endpoint used is Issued
TokenMixedSymmetricBasic256. This endpoint accepts a SAML token
as an input and returns a SAML token as an output. It also uses trans-
port and message security.
In addition, Litware and Adatum must establish a trust relation-
ship. Litware must configure Adatum ADFS as a relying party (RP)
and create rules to generate a token based on Lightweight Directory
———————– Page 193———————–
156156 chapter eight
Access Protocol (LDAP) Active Directory attributes. Adatum must
configure Litware ADFS as an identity provider and create rules to
transform the group claims into role claims.
Finally, Adatum must configure the a-Order web service as a rely-
ing party. Adatum must enable token encryption and create rules that
pass role and name claims through.
Questions
1. Which statements describe the difference between the way
federated identity works for an active client as compared to
a passive client:
a. An active client uses HTTP redirects to ask each token
issuer in turn to process a set of claims.
b. A passive client receives HTTP redirects from a web
application that redirect it to each issuer in turn to
obtain a set of claims.
c. An active client generates tokens to send to claims
issuers.
d. A passive client generates tokens to send to claims
issuers.
2. A difference in behavior between an active client and a
passive client is:
a. An active client visits the relying party first; a passive
client visits the identity provider first.
b. An active client does not need to visit a federation
provider because it can perform any necessary claims
transformations by itself.
c. A passive client visits the relying party first; an active
client visits the identity provider first.
d. An active client must visit a federation provider first
to determine the identity provider it should use.
Passive clients rely on home realm discovery to
determine the identity provider to use.
———————– Page 194———————–
claims enabling web services 157 157
3. The active scenario described in this chapter uses which
protocol to handle the exchange of tokens between the
various parties?
a. WS-Trust
b. WS-Transactions
c. WS-Federation
d. ADFS
4. In the scenario described in this chapter, it’s necessary to
edit the client application’s configuration file manually,
because the Svcutil.exe tool only adds a binding for a single
issuer. Why do you need to configure multiple issuers?
a. The metadata from the relying party only includes
details of the Adatum identity provider.
b. The metadata from the relying party only includes
details of the client application’s identity provider.
c. The metadata from the relying party only includes
details of the client application’s federation provider.
d. The metadata from the relying party only includes
details of the Adatum federation provider.
5. The WCF service at Adatum performs authorization checks
on the requests that it receives from client applications.
How does it implement the checks?
a. The WCF service uses the IsInRole method to verify
that the caller is a member of the OrderTracker role.
b. The Adatum federation provider transforms claims
from other identity providers into Role type claims
with a value of OrderTracker.
c. The WCF service queries the Adatum federation
provider to determine whether a user is in the Order
Tracker role.
d. It does not need to implement any authorization
checks. The application automatically grants access
to anyone who has successfully authenticated.
———————– Page 195———————–
———————– Page 196———————–
9 Securing REST Services
In Chapter 8, “Claims Enabling Web Services,” you saw how Adatum
exposed a SOAP-based web service to a client application. The client
used the WS-Trust active federation protocol to obtain a token con-
taining the claims that it needed to access the web service. The sce-
nario that this chapter describes is similar, but differs in that the web
service is REST-based rather than SOAP-based. The client must now
send a Simple Web Token (SWT) containing the claims to the web
service using the OAuth protocol instead of a SAML token using the
WS-Trust protocol. The client will obtain an SWT token from Win-
dows Azure™ AppFabric Access Control services (ACS) v2.
Like Chapter 8, “Claims Enabling Web Services,” this chapter de-
scribes an active scenario. In an active scenario, the client application
actively contacts all issuers in a trust chain; these issuers are typically
an identity provider (IdP) and a federation provider (FP). The client The client application must
application communicates with the identity provider and federation actively call all the issuers
provider to get and transform the tokens that it requires to access the in the trust chain.
relying party (RP) application.
In this chapter, you’ll see an example of a Windows® Presentation
Foundation (WPF) smart client application that uses federated iden-
tity. In Chapter 8, “Claims Enabling Web Services,” the Windows
Communication Foundation (WCF) bindings determined how the
client application called the issuers in the trust chain; in this chapter,
you’ll see how the client must call the identity provider and federation
provider programmatically because WCF does not support the calling
of RESTful web services.
The Premise
Litware wants to write an application that can read the status of its
orders directly from Adatum. To satisfy this request, Adatum agrees
to provide a web service called a-Order.OrderTracking.Services that
159
———————– Page 197———————–
160160 chapter nine
users at Litware can access by using a variety of client applications
over the Internet.
Adatum and Litware have already done the work necessary to
establish federated identity, and they both have issuers capable of
interacting with active clients. The necessary communications infra-
structure, which includes firewalls and proxies, is in place. To review
these elements, see Chapter 4, “Federated Identity for Web Applica-
tions.”
Now, Adatum only needs to expose a claims-aware web service
on the Internet. Litware will invoke Adatum’s web service from
If Active Directory® within its client application. Because the client application runs in
Federation Services Litware’s security realm, it can use Microsoft® Windows® authentica-
(ADFS) 2.0 is used, tion to establish the identity of the user and then use this identity to
you’ll get support for obtain a token it can pass along to Adatum’s federation provider. In
federated identity this scenario Adatum uses ACS as its federation provider.
with active clients as
a standard feature.
Goals and Requirements
Both Litware and Adatum see benefits in a collaboration based on
claims-aware web services. Litware wants programmatic access to
Adatum’s a-Order application. Adatum does not want to be respon-
sible for authenticating any people or resources that belong to an-
Active clients use claims to get other security realm. For example, Adatum doesn’t want to keep and
access to remote services. maintain a database of Litware users.
Both Adatum and Litware want to reuse the existing infrastruc-
ture as much as possible. For example, Adatum wants to enforce
permissions for its web service with the same rules it has for the
browser-based web application. In other words, the browser-based
application and the web service will both use roles for access control.
Adatum has decided to expose the a-Order order tracking data as
a RESTful web service to expand the range of clients that can access
the application. Adatum anticipates that partners will implement cli-
ent applications on mobile platforms; in these environments partners
will prefer a lightweight REST API to a SOAP-based API.
SWT tokens are smaller than SAML
tokens because they do not include any
XML markup. It is also much easier to
manipulate SWT tokens in JavaScript,
making SWT the preferred token
format for rich JavaScript clients.
———————– Page 198———————–
securing rest services 161 161
Overview of the Solution
Figure 1 gives an overview of the proposed solution.
3
Trust
Trust
FP
ACS
2
GetToken
(SWT) IdP
(ADFS 2.0)
4 1 GetToken
(SAML)
a−Order
Call Service + SWT
WPF − Smart Client
WCF Rick
Adatum
Litware
figure 1
Federated identity with a smart client
The diagram presents an overview of the interactions and rela-
tionships among the different components. It is similar to the diagrams
you saw in the previous chapters.
Litware has a single client application based on Windows Presen-
tation Foundation (WPF) deployed on Litware employees’ desktops.
Rick, a Litware employee, uses this application to track orders with
Adatum.
Adatum exposes a RESTful web service on the Internet. This web
service expects to receive Simple Web Token (SWT) tokens that it
will use to implement authorization rules in the a-Order application.
In order to access this service, the client must present an SWT token
from the Adatum ACS instance.
The sequence shown in the diagram proceeds as follows:
1. The Litware WPF application uses Rick’s credentials to
request a security token from the Litware issuer. The
Litware issuer authenticates Rick and, if the authentication
succeeds, it returns a Group claim with the value Sales
because Rick is in the sales organization. The Litware issuer
returns a SAML token to the client application.
———————– Page 199———————–
162162 chapter nine
2. The WPF application then forwards the SAML token to
ACS (the Adatum federation provider), which trusts the
Litware issuer.
3. ACS, acting as a federation provider, transforms the claim
Group:Sales into Role:Sales and adds a new claim,
Organization:Litware. The transformed claims are the ones
required by the Adatum a-Order RESTful web service.
These are the same rules that were defined in the browser-
based scenario. ACS also transitions the incoming SAML
token to an SWT token that it returns to the client WPF
It’s also possible to application. The interaction between the client application
wrap SWT tokens and ACS uses the OAuth protocol.
in the WS-Trust and
WS-Federation 4. Finally, the WPF application sends the web service the
protocols by using request for the order tracking data. This request includes
a BinarySecurity
TokenElement . the SWT token obtained in the previous step. The web
service uses the claims in the token to implement its
authorization rules.
This sequence is a bit different from the scenario described in
Chapter 8, “Claims Enabling Web Services.” In this scenario, the fed-
eration provider is an ACS instance that performs token format tran-
sition from SAML to SWT in addition to mapping the claims from the
identity provider into claims that the relying party expects to see.
Inside the Implementation
Now is a good time to walk through some of the details of the solu-
tion. As you go through this section, you may want to download the
Visual Studio® development system solution called 8ActiveRestCli-
entFederation from http://claimsid.codeplex.com. If you are not in-
terested in the mechanics, you should skip to the next section.
WCF does not provide built-in support for REST on the client or
for SWT on the server so this sample requires more code than you
saw in Chapter 8, “Claims Enabling Web Services.”
The following sections describe some of the key parts of the im-
plementation of the active client, the RESTful web service, and ACS.
The ACS Configuration
In this scenario, in addition to handling the claims mapping rules, ACS
is also responsible for transitioning the incoming token from the Lit-
ware identity provider from the SAML format to the SWT format.
This is partially a configuration task, but the active client application
must be able to receive an SWT token from ACS. For more details, see
the section, “Implementing the Active Client,” later in this chapter.
———————– Page 200———————–
securing rest services 163 163
The configuration step in ACS is to ensure that the token format
for the aOrderService relying party is set to SWT. This makes sure
that ACS issues an SWT token when it receives a token from any of
the identity providers configured for the aOrderService relying party.
Implementing the Web Service
In this scenario, Adatum exposes the order-tracking feature of the a-
Order application as a RESTful web service. The following snippet
from the Web.config file shows how the application defines the HTTP
endpoint for the service.
<services>
In this scenario, the web
<service name=
service does not use
“AOrder.OrderTracking.Services.OrderTrackingService” Windows Identity
behaviorConfiguration=”serviceBehavior”> Foundation (WIF) to
<endpoint handle the incoming
address=”” tokens. However, the
service does use WIF for
binding=”webHttpBinding”
some claims processing;
contract= for example, it uses it
“AOrder.OrderTracking.Contracts.IOrderTrackingService” in the CustomClaims
behaviorConfiguration=”orders” /> AuthorizationManager
class. You will see the
</service>
details in the microsoft.
</services>
identityModel section
<behaviors> in the Web.config file.
<serviceBehaviors>
<behavior name=”serviceBehavior”>
<serviceDebug includeExceptionDetailInFaults=”true” />
<serviceMetadata httpGetEnabled=”true” />
</behavior>
</serviceBehaviors>
<endpointBehaviors>
<behavior name=”orders”>
<webHttp />
</behavior>
</endpointBehaviors>
</behaviors>
The Global.asax file contains code to route requests to the ser-
vice definition. The following code sample from the Global.asax.cs file
shows the routing definition in the service.
protected void Application_Start(object sender, EventArgs e)
{
RouteTable.Routes.Add(new ServiceRoute(“orders”,
new WebServiceHostFactory(), typeof(OrderTrackingService)));
}
———————– Page 201———————–
164164 chapter nine
The Adatum a-Order application must also extract the claims in-
formation from the incoming SWT token. The application uses the
claims to determine the identity of the caller and the roles that the
caller is a member of in order to apply the authorization rules in the
application. The following code sample from the OrderTracking
Service class shows how the GetOrdersFromMyOrganization
method retrieves the current user’s organization claim to use when it
fetches a list of orders from the order repository.
public Order[] GetOrdersFromMyOrganization()
{
string organization = ClaimHelper.GetClaimsFromPrincipal(
HttpContext.Current.User,
Adatum.ClaimTypes.Organization).Value;
var repository = new OrderRepository();
return repository.GetOrdersByCompanyName(organization).
ToArray();
}
This method retrieves a claim value from the IClaimsPrincipal
object. In the scenarios described in previous chapters, WIF has been
responsible for populating the IClaimsPrincipal object with claims
from a SAML token: in the current scenario, we are using SWT tokens
and the OAuth protocol, which are not directly supported by WIF.
The Visual Studio solution, 8ActiveRestClientFederation, includes a
project called DPE.OAuth that implements an extension to WIF to
provide support for SWT tokens and the OAuth protocol.
The following snippet from the Web.config file in the a-Order.
OrderTracking.Services.8 project shows how Adatum installed the
modules for the extension to WIF.
In addition to the extension module, Microsoft.Samples.DPE.
OAuth.ProtectedResource.ProtectedResourceModule, it’s
necessary to install the standard WSFederationAuthentication
Module and SessionAuthenticationModule modules.
…
<configSections>
<section name=”microsoft.identityModel”
type=”Microsoft.IdentityModel.Configuration.MicrosoftIdentity
ModelSection,
Microsoft.IdentityModel, Version=3.5.0.0, Culture=neutral,
PublicKeyToken=31bf3856ad364e35″ />
</configSections>
…
———————– Page 202———————–
securing rest services 165 165
<system.webServer>
<validation validateIntegratedModeConfiguration=”false” />
<modules runAllManagedModulesForAllRequests=”true”>
<add name=”UrlRoutingModule” type=”System.Web.Routing.
UrlRoutingModule,
System.Web, Version=4.0.0.0, Culture=neutral,
PublicKeyToken=b03f5f7f11d50a3a” />
<add name=”ProtectedResourceModule”
type=”Microsoft.Samples.DPE.OAuth.ProtectedResource.
ProtectedResourceModule,
Microsoft.Samples.DPE.OAuth, Version=1.0.0.0,
Culture=neutral” />
<add name=”WSFederationAuthenticationModule”
type=”Microsoft.IdentityModel.Web.
WSFederationAuthenticationModule,
Microsoft.IdentityModel, Version=3.5.0.0, Culture=neutral,
PublicKeyToken=31bf3856ad364e35″
preCondition=”managedHandler” />
<add name=”SessionAuthenticationModule”
type=”Microsoft.IdentityModel.Web.
SessionAuthenticationModule,
Microsoft.IdentityModel, Version=3.5.0.0, Culture=neutral,
PublicKeyToken=31bf3856ad364e35″
preCondition=”managedHandler” />
</modules>
</system.webServer>
You use the microsoft.identityModel section to configure the
extension module to handle SWT tokens and the OAuth protocol.
<microsoft.identityModel>
<service name=”OAuth”>
<audienceUris>
<add value=”https://localhost/a-Order.OrderTracking.
Services.8″ />
</audienceUris>
<claimsAuthorizationManager
type=”AOrder.OrderTracking.Services.
CustomClaimsAuthorizationManager,
AOrder.OrderTracking.Services.8, Culture=neutral” />
<securityTokenHandlers>
<add type=”Microsoft.Samples.DPE.OAuth.Tokens.
SimpleWebTokenHandler,
Microsoft.Samples.DPE.OAuth” />
</securityTokenHandlers>
———————– Page 203———————–
166166 chapter nine
<issuerTokenResolver
type=”Microsoft.Samples.DPE.OAuth.ProtectedResource
.ConfigurationBasedIssuerTokenResolver, Microsoft.Samples.
DPE.OAuth”>
<serviceKeys>
<add serviceName=”https://localhost/a-Order.
OrderTracking.Services.8″
serviceKey=
“lJFL02dwy9n3rCe2YEToblDFHdZmbecmFK1QB88ax7U=” />
</serviceKeys>
</issuerTokenResolver>
<issuerNameRegistry type=”Microsoft.Samples.DPE.OAuth.
ProtectedResource
.SimpleWebTokenTrustedIssuersRegistry, Microsoft.Samples.
DPE.OAuth”>
<trustedIssuers>
<add issuerIdentifier=”https://aorderrest-dev.
accesscontrol.windows.net/”
name=”aOrder” />
</trustedIssuers>
</issuerNameRegistry>
</service>
</microsoft.identityModel>
This section also configures a custom claims authorization man-
ager that Adatum uses to apply custom authorization rules in the
service. The following code example shows how the service imple-
ments the custom claims authorization manager class that checks the
caller’s role membership and the resource the caller is requesting. The
IOrderTrackingService interface defines the mapping from the paths
“/all” and “/frommyorganization” to the service methods Get
AllOrders and GetOrdersFromMyOrganization.
public class CustomClaimsAuthorizationManager :
ClaimsAuthorizationManager
{
public override bool CheckAccess(AuthorizationContext context)
{
Claim actionClaim =
context.Action.Where(x => x.ClaimType == ClaimTypes.Name).
FirstOrDefault();
Claim resourceClaim =
context.Resource.Where(x => x.ClaimType == ClaimTypes.
Name).FirstOrDefault();
———————– Page 204———————–
securing rest services 167 167
IClaimsPrincipal principal = context.Principal;
var resource = new Uri(resourceClaim.Value);
string action = actionClaim.Value;
if (action == “GET” && resource.PathAndQuery.Contains
(“/frommyorganization”))
{
if (!principal.IsInRole(Adatum.Roles.OrderTracker))
{
return false;
You can also use a custom
} ClaimsAuthentication
} Manager class to modify
the set of claims attached
if (action == “GET” && resource.PathAndQuery.Contains to the IClaimsPrincipal
(“/all”)) object in the context.
{
if (!principal.IsInRole(Adatum.Roles.OrderApprover))
{
return false;
}
To find out more about
}
authorization strategies,
take a look at Appendix G,
return true; “Authorization Strategies.”
}
}
Implementing the Active Client
The ACS configuration ensures that the token format for the Adatum
a-Order relying party application is set to SWT. ACS issues an SWT
token when it receives a token from any of the identity providers
configured for the Adatum a-Order relying party (the client obtains
the token from the identity provider and sends it ACS). The client
application uses a custom endpoint behavior to intercept all outgoing
requests; the behavior obtains the token that the relying party re-
quires and attaches it to the request. Figure 2 shows an overview of
———————– Page 205———————–
168168 chapter nine
Adatum ACS
Instance
(FP)
Litware IP
5
4
OrderTrackingServiceClient
1
CustomHeaderMessageInspector Adatum
3 6 a-Order Tracking Services
OrderTrackingViewModel (RESTful Web Service)
2
Litware WPF Client
this process.
figure 2
Attaching an SWT token to the outgoing request
The sequence shown in Figure 2 proceeds as follows.
1. The service client, the OrderTrackingServiceClient class,
attaches a new behavior to the channel endpoint. This
CustomHeaderBehavior behavior class instantiates a
custom message inspector that has access to every outgoing
request on the channel.
2. The client application invokes the GetOrdersForMy
The inspector caches the Organization method that sends a request to the
SWT token to avoid having a-Order order tracking Service.
to revisit the identity
provider and ACS for every 3. The CustomHeaderMessageInspector class intercepts
request to the a-Order the message before it is sent.
application. The sample
caches the token for 30 4. The CustomHeaderMessageInspector class requests
seconds, but you should a SAML token from the Litware identity provider.
adjust this to a suitable
value for your application. 5. The CustomHeaderMessageInspector class sends the
SAML token to ACS and receives an SWT token.
6. The CustomHeaderMessageInspector class attaches
the SWT token to the outgoing message header.
———————– Page 206———————–
securing rest services 169 169
Adatum chose to use WCF in the client to manage the call to the
REST-based service rather than the WebClient or HttpWeb
Request classes because it was a convenient way to attach the
SWT token. For an example that uses the HttpWebRequest
class (because WCF is not available on the Windows® Phone 7
platform), see Chapter 10, “Accessing REST Services from a
Windows Phone Device.”
Although WIF does not provide full support for REST-based web
services, the sample client application uses WIF to handle some of the
token processing. This reduces the amount of code required to imple-
ment this sample client application. One of the reasons for using a
RESTful web service is to support other client environments, and
Chapter 10, “Accessing REST Services from a Windows Phone 7 De-
vice,” shows you how to implement a client application without using
WIF.
The inspector must first obtain a SAML token from the identity
provider. The following code example from the CustomHeader
MessageInspector class shows how the a-Order.OrderTracking.Client
application uses WIF to perform this task. This method takes three
arguments; the service endpoint, the STS endpoint, and the user’s
credentials.
private static SecurityToken GetSamlToken(
string realm, string stsEndpoint, ClientCredentials
clientCredentials)
{
using (var factory = new WSTrustChannelFactory(
new UserNameWSTrustBinding(SecurityMode.
TransportWithMessageCredential),
new EndpointAddress(new Uri(stsEndpoint))))
{
factory.Credentials.UserName.UserName =
clientCredentials.UserName.UserName;
factory.Credentials.UserName.Password =
clientCredentials.UserName.Password;
factory.TrustVersion = TrustVersion.WSTrust13;
WSTrustChannel channel = null;
try
{
var rst = new RequestSecurityToken
{
RequestType = WSTrust13Constants.Request
———————– Page 207———————–
170170 chapter nine
Types.Issue,
AppliesTo = new EndpointAddress(realm),
KeyType = KeyTypes.Bearer,
};
channel = (WSTrustChannel)factory.CreateChannel();
return channel.Issue(rst);
}
finally
{
if (channel != null)
{
channel.Abort();
}
factory.Abort();
}
}
}
The token request specifies a bearer token; ACS expects to receive
a bearer token and not a holder-of-key token. For this reason it’s
important to use Secure Sockets Layer (SSL) to secure the connec-
tions between the client application and the identity provider, and
between the client application and ACS in order to mitigate the
threat of a man-in-the-middle attack.
The inspector can then send the SAML token to ACS. The follow-
ing code example from the CustomHeaderMessageInspector class
shows how the client application sends the SAML token to ACS and
receives the SWT token in return. The application uses the OAuth
protocol to communicate with ACS.
private static NameValueCollection GetOAuthToken(string
xmlSamlToken, string serviceEndpoint, string acsRelyingParty)
{
var values = new NameValueCollection
{
{ “grant_type”, “urn:oasis:names:tc:SAML:2.0:assertion” },
{ “assertion”, xmlSamlToken },
{ “scope”, acsRelyingParty }
};
var client = new WebClient { BaseAddress = serviceEndpoint };
byte[] acsTokenResponse = client.UploadValues(“v2/Oauth2-13”,
———————– Page 208———————–
securing rest services 171 171
“POST”, values);
string acsToken = Encoding.UTF8.GetString(acsTokenResponse);
var tokens = new NameValueCollection();
var json = new JavaScriptSerializer();
var parsed = json.DeserializeObject(acsToken) as
Dictionary<string, object>;
foreach (var item in parsed)
{
tokens.Add(item.Key, item.Value.ToString());
}
return tokens;
}
The inspector attaches the SWT token in the Authorization
header in the HTTP request message that the client application is
sending to the a-Order order tracking service. The following code
example shows how the client application performs this task in the
BeforeSendRequest method.
var oauthAuthorizationHeader =
string.Format(“OAuth {0}”, oauthToken[“access_token”]);
httpRequestMessageProperty.Headers.Add(
HttpRequestHeader.Authorization, oauthAuthorizationHeader);
The SWT token expiry time is accessible in the response from
ACS and the code in the sample checks the expiry time on the SWT
token before attaching it to the outgoing request. With a SAML to-
ken, the expiry time is in the token (not part of the response); if the
issuer encrypts the SAML token, the client application may not have
access to the contents of this token. In this solution, the client appli-
cation simply forwards the SAML token on to ACS.
You can read the expiry time of a SAML token using the following
code:
var rst = new RequestSecurityToken
{
RequestType = WSTrust13Constants.RequestTypes.Issue,
AppliesTo = new EndpointAddress(realm),
KeyType = KeyTypes.Bearer,
};
channel = (WSTrustChannel)factory.CreateChannel();
RequestSecurityTokenResponse response;
var token = channel.Issue(rst, out response);
var expires = response.Lifetime.Expires.Value;
———————– Page 209———————–
172172 chapter nine
Setup and Physical Deployment
By default, the web service uses the local host for all components. In
a production environment, you would want to use separate comput-
ers for the client, the web service, the federation provider, and the
identity provider.
To deploy this application, you must substitute the mock issuer
with a production-grade component such as ADFS 2.0 that supports
active clients. You must also adjust the settings in the client applica-
tion’s App.config file to account for the new server names: the
Remove the mock issuer during addresses for the identity provider and ACS are located in the app
deployment. Settings section.
Note that neither the client nor the web service needs to be re-
compiled to be deployed to a production environment unless you are
changing the ACS service namespace that your solution uses; in this
case, you must update the service namespace name and key in the
CustomServiceHostFactory class in the a-Order order tracking web
service.
Configuring ADFS 2.0 for Web Services
In the case of ADFS 2.0, you enable the endpoints using the Microsoft
Management Console (MMC).
To obtain a token from the Litware issuer, you could use the
UsernameMixed or WindowsMixed endpoint. UsernameMixed
requires a user name and password to be sent across the wire,
while WindowsMixed works with the Windows credentials. Both
endpoints will return a SAML token.
The “Mixed” suffix indicates that the endpoint uses transport
security (based on HTTPS). For integrity and confidentiality, client
credentials are included in the header of the SOAP message.
Configuring ACS
As a minimum, you should configure the aOrderService relying party
in ACS to issue name and organization claims. If you implement any
additional authorization rules, you should ensure that ACS issues
any additional claims that your rules require.
To avoid the risk of a partner spoofing an organization name in
a token, you should configure ACS to generate the organization
claim and not simply pass it through from the identity provider.
———————– Page 210———————–
securing rest services 173 173
Questions
1. In the scenario described in this chapter, which of the
following statements best describes what happens the first
time that the smart client application tries to use the
RESTful a-Order web service?
a. It connects first to the ACS instance, then to the
Litware IP, and then to the a-Order web service.
b. It connects first to the Litware IP, then to the ACS
instance, and then to the a-Order web service.
c. It connects first to the a-Order web service, then
to the ACS instance, and then to the Litware IP.
d. It connects first to the a-Order web service, then
to the Litware IP, and then to the ACS instance.
2. In the scenario described in this chapter, which of the
following tasks does ACS perform?
a. ACS authenticates the user.
b. ACS redirects the client application to the relying
party.
c. ACS transforms incoming claims to claims that the
relying party will understand.
d. ACS transitions the incoming token format from
SAML to SWT.
3. In the scenario described in this chapter, the Web.config
file in the a-Order web service does not contain a
<microsoft.identity> section. Why?
a. Because it configures a custom ServiceAuthorization
Manager class to handle the incoming SWT token in
code.
b. Because it is not authenticating requests.
c. Because it is not authorizing requests.
d. Because it is using a routing table.
———————– Page 211———————–
174174 chapter nine
4. ACS expects to receive bearer tokens. What does this
suggest about the security of a solution that uses ACS?
a. You do not need to use SSL to secure the connection
between the client and the identity provider.
b. You should use SSL to secure the connection between
the client and the identity provider.
c. The client application must use a password to
authenticate with ACS.
d. The use of bearer tokens has no security implications
for your solution.
5. You should use a custom ClaimsAuthorizationManager
class for which of the following tasks.
a. To attach incoming claims to the IClaimsPrincipal
object.
b. To verify that the claims were issued by a trusted
issuer.
c. To query ACS and check that the current request is
authorized.
d. To implement custom rules that can authorize access
to web service methods.
More Information
To learn more about proof tokens and bearer tokens, see the blog
posts at: http://blogs.msdn.com/b/vbertocci/archive/2008/01/02/
on-prooftokens.aspx and http://travisspencer.com/blog/2009/02/
what-is-a-proof-key.html.
For more information about the DPE.OAuth project used in this
solution, see: http://www.fabrikamshipping.com/.
———————– Page 212———————–
10 Accessing REST Services from a
Windows Phone Device
In Chapter 9, “Securing REST Services,” you saw how Adatum exposed
a REST-based web service that used federated authentication and
SWT tokens. The scenario described there also included a rich desk-
top client application that obtained a Simple Web Token (SWT) to-
ken from Windows Azure™ AppFabric Access Control services (ACS)
to present to the web service. The scenario that this chapter describes
uses the same web service, but describes how to implement a client
application on the Windows® Phone platform.
Creating a Windows Phone client raises some additional security
concerns. You can’t assume that the Windows Phone device is pro-
tected with a password; if the device is stolen or used without the
owner’s consent, a malicious user could access all of the applications
and data on the device unless you introduce some additional security
measures. Such security measures could include requiring the user to
enter a password or PIN to access either your application, or a feature
within your application. The problem here is that any of these secu-
rity measures are likely to reduce the usability of the application and
degrade the overall user experience.
This chapter describes two alternative implementations of the
Windows Phone client: a passive federation approach and an active
federation approach. The active federation implementation shows
how the client application uses the OAuth protocol and contacts all
of the issuers in the trust chain in turn to acquire a valid SWT token
to access the a-Order Tracking application. The passive implementa-
tion shows how to use an embedded web browser control to handle
the redirect messages that are used by the WS-Federation protocol
to coordinate the exchange of messages with the issuers.
The active federation implementation described in this chapter
differs from the implementation shown in Chapter 9, “Securing REST
Services.” Because there is no version of WIF available for Windows
175
———————– Page 213———————–
176176 chapter ten
Phone to help with the token processing, the client code in the
The sample client application Windows Phone application is slightly more complex than you’d
demonstrates both active and typically find in a Microsoft® Windows® operating system desktop
passive federation approaches. application.
The Premise
Litware wants a mobile application that can read the status of its or-
ders directly from Adatum. To satisfy this request, Adatum agrees to
provide a web service called a-Order.OrderTracking.Services that us-
ers at Litware can use from a variety of client applications over the
Internet.
Adatum and Litware have already done the work necessary to
establish federated identity; Litware has an issuer that is capable of
interacting with both active and passive clients, and Adatum has con-
figured an ACS service namespace with the necessary relying parties
(RPs) and identity providers (IdPs). The necessary communications
infrastructure, including firewalls and proxies, is in place. To review
these elements, see Chapter 5, “Federated Identity with Windows
Azure Access Control Service.”
Adatum also has a RESTful web service in place that exposes or-
der-tracking data. This web service is claims-aware and expects to
receive claims in an SWT token. For a description of how the web
If ADFS 2.0 is used, service handles SWT tokens, see Chapter 9, “Securing REST Services.”
support for federated
identity with both
active and passive Goals and Requirements
clients is a standard
feature.
Both Litware and Adatum see benefits in enabling mobile access to
the a-Order tracking data, and Litware already has plans to adopt
Windows Phone as its preferred mobile platform. Adatum originally
decided to expose the a-Order tracking data using a RESTful web
service in anticipation of developing client applications on mobile
platforms.
Adatum wants to ensure that the Windows Phone client applica-
tion follows best practices in terms of integration with the platform
and design for optimal battery use. Adatum and Litware are concerned
about addressing the possible security issues that arise from using a
mobile platform—in particular, the risks associated with someone
gaining unauthorized access to a device.
Adatum wants to simplify the process of configuring new identity
providers for the Windows Phone application.
———————– Page 214———————–
accessing rest services from a windows phone device 177 177
Overview of the Solution
The following sections describe two solutions: one that uses an active
federated authentication approach, and one that uses a passive
federated authentication approach. There is also a discussion of the
advantages and disadvantages of each.
Passive Federation
Figure 1 gives an overview of the proposed solution that uses a passive
federation model to obtain an SWT token from ACS.
Litware Issuer (IdP)
ACS (FP) Trust
5
GetToken
(SWT)
4
3 GetToken
(SAML)
Trust
Get identity
provider list
1
a−Order Tracking
RESTful Web Service (RP)
Embedded
8 Browser
Call Service + SWT
2 SWT
7
Adatum 9 6
Application
figure 1 Windows Phone Device
Windows Phone using passive federation
———————– Page 215———————–
178178 chapter ten
The diagram presents an overview of the interactions and rela-
tionships among the different components. It is similar to the diagrams
you saw in previous chapters.
Litware has a Windows Phone client application deployed on
Litware employees’ phones. Rick, a Litware employee, uses this ap-
plication to track orders with Adatum.
Adatum exposes a RESTful web service on the Internet. The a-
Order tracking web service expects to receive SWT tokens that
contain the claims it will use for authorization. In order to access this
Adatum has service, the client must present an SWT token from the Adatum ACS
configured the instance.
a-Order tracking The sequence shown in the diagram proceeds as follows:
web service to trust
the Adatum ACS 1. The Windows Phone application connects to a service
instance. namespace in ACS. It obtains a list of configured identity
providers for the relying party (RP) application (Adatum
a-Order tracking) as a JavaScript Object Notation (JSON)
formatted list. Each entry in this list includes the identity
provider’s name and the address of the sign-in page at the
identity provider. You can find the URL for this list on the
ACS Application Management page.
2. The Windows Phone application displays this list for Rick to
select the identity provider he wants to use to authenticate.
In the sample, there is only one identity provider (Litware),
so Rick has only one choice.
3. When Rick selects an identity provider, the Windows Phone
application uses an embedded web browser control to
navigate to the identity provider’s sign-in page (based on
the information retrieved in step 1).
4. Because the client application initiates the sign-in passively,
after the Litware identity provider authenticates Rick it
automatically redirects the embedded web browser control
back to ACS, passing it the Security Assertion Markup
Language (SAML) token from the Litware identity provider.
5. ACS transforms the tokens based on the rules in the service
namespace, and transitions the incoming SAML token to an
SWT token. ACS returns the SWT token to the embedded
browser.
6. The Windows Phone application retrieves the SWT token
from the embedded web browser control and then caches it
on the Windows Phone device.
———————– Page 216———————–
accessing rest services from a windows phone device 179 179
7. The Windows Phone application then makes a REST call to
the a-Order tracking web service, including the SWT token
in the request header.
8. The a-Order tracking web service extracts the SWT token
from the request. It uses the claims in the token to imple-
ment authorization rules in the a-Order tracking web
service.
9. The service returns the order tracking data to the Windows
Phone application.
This scenario uses the passive WS-Federation protocol; the inter-
action between the identity provider and ACS (the federation pro- The sample application
installs a self-issued
vider) is passive and uses an embedded web browser control on the certificate on the Windows
phone to handle the redirects. The Windows Phone application in- Phone device so that it
vokes the RESTful web service directly, sending the SWT token to the can use SSL when it
web service (the relying party) along with the request for tracking communicates with the
data. Litware identity provider
and the a-Order tracking
The only configuration data that the Windows Phone application application. In a real-world
needs is: scenario, the Litware
• The URL the phone uses to access the list of identity providers identity provider and the
in JSON format from ACS. The Windows Phone application a-Order tracking applica-
uses this URL in step 1 in the sequence shown in Figure 1. tions will be protected by
certificates from a trusted
• The URL the phone uses to access the a-Order tracking RESTful third-party issuer.
web service. This happens in step 7 in the sequence shown in
Figure 1.
This scenario uses Secure Sockets Layer (SSL) to protect all the
interactions from the Windows Phone device including accessing the
Litware identity provider, the ACS instance, and calling the Adatum
web service.
To improve its usability, the Windows Phone application caches
the SWT token so that for subsequent requests it can simply forward
the cached SWT token instead of re-authenticating with the identity
provider, and obtaining a new SWT token from ACS.
Active Federation
Figure 2 shows an alternative solution for the Windows Phone client
application that uses a pure active federation approach.
———————– Page 217———————–
180180 chapter ten
Litware Issuer (IdP)
ACS (FP) Trust
3
1
GetToken
(SAML)
Trust
2
GetToken
(SWT)
a−Order Tracking
RESTful Web Service (RP)
5
Call Service + SWT
4
Adatum 6
Application
figure 2
Windows Phone Device
Windows Phone using active federation
The diagram presents an overview of the interactions and rela-
tionships among the different components in the active federation
solution.
Litware has a Windows Phone client application deployed on
Litware employees’ phones. Rick, a Litware employee, uses this ap-
plication to track orders with Adatum.
Adatum exposes a RESTful web service on the Internet. This web
service expects to receive Simple Web Token (SWT) tokens that it
will use to implement authorization rules in the a-Order application.
In order to access this service, the client application must present an
SWT token from the Adatum ACS instance.
———————– Page 218———————–
accessing rest services from a windows phone device 181 181
The sequence shown in the diagram proceeds as follows:
1. The Windows Phone application connects the Litware
identity provider. It sends Rick’s credentials and receives a
SAML token in response. This SAML token includes the
claims that the Litware identity provider issues for Rick.
2. The Windows Phone application sends the SAML token
from the Litware issuer to ACS.
3. The ACS service instance applies the mapping rules for the
Litware identity provider to the incoming claims and
transitions the incoming SAML token to an SWT token.
ACS returns the new SWT token to the Windows Phone
client application.
4. The Windows Phone application caches the SWT token so
it can use it for future requests. The Windows Phone
application then makes a REST call to the a-Order tracking
web service, including the SWT token in the request header.
5. The a-Order tracking web service extracts the SWT token
from the request. It uses the claims in the token to imple-
ment authorization rules in the a-Order tracking web
service.
6. The service returns the order tracking data to the Windows
Phone application.
In this solution, the Windows Phone application controls the
process of obtaining the SWT token and invoking the web service
directly. The application code includes logic to visit all of the issuers
in the trust chain in the correct order. It uses the WS-Trust protocol
when it communicates with the Litware identity provider to obtain a
SAML token, and the OAuth protocol to communicate with ACS and
the a-Order tracking service.
As in the passive solution, all the interactions from the Windows
Phone device are secured using SSL.
Comparing the Solutions
The passive federation solution that leverages an embedded browser
control offers a simpler approach to obtaining an SWT token because
the embedded web browser control in combination with the WS-
Federation protocol handles most of the logic to visit the issuers and
obtain the SWT token that the application needs to access the a-
Order tracking service. In the active federation solution, the Windows
Phone application must include code to control the interactions with
the issuers explicitly. Furthermore, the active solution must include
———————– Page 219———————–
182182 chapter ten
code to handle the request for a SAML token from the Litware issuer;
this is more complex on the Windows Phone platform than on the
desktop because there is not currently a version of WIF for Windows
Phone. The sample described in Chapter 9, “Securing REST Services,”
shows you how to do this in a Windows Presentation Foundation
(WPF) application.
However, there is some complexity in the passive solution in the
way that the application must interact with an embedded web
browser control to initiate the sign-in with the Litware identity pro-
vider and retrieve the SWT token issued by ACS from the browser
control.
In a WPF application,
you can use Windows For some scenarios, an advantage of the passive federation ap-
Identity Foundation proach is that it enables the Windows Phone application to dynami-
(WIF) to perform cally build the list of identity providers for the user to choose from. If
some of the token you add an additional identity provider to your ACS configuration, the
handling, even though
WIF does not provide Windows Phone client application will detect this the next time it
full support for requests the list of identity providers from ACS. You could use this to
RESTful web services. quickly and easily add support for additional social identity providers
to an already deployed Windows Phone application. In the active
federation solution, the application is responsible for choosing the
identity provider to use, and although you could design the applica-
tion to dynamically build a list of identity providers, this would add
considerably to the complexity of the solution. The active federation
solution is much better suited to scenarios where you have a fixed,
known identity provider for the Windows Phone application to use.
If you compare Figures 1 and 2, you can see that the passive solu-
tion requires more round trips to obtain an SWT token, which will
make this approach slower than the active approach. You should bear
in mind that this applies only to the initial federated authentication.
If the application caches the SWT token, it can reuse it for subse-
quent requests to the a-Order tracking web service.
Another potential disadvantage of the active solution is that it
only works with a WS-Trust compliant Security Token Service (STS).
If the Windows Phone device needs to authenticate with a different
protocol, then you’ll have to implement that protocol on the phone.
You must explicitly add any SWT token caching behavior to the
Windows Phone application for both the active or passive federation
solutions; there is no automatic caching provided in either solution.
However, in the passive federation solution, the embedded web
browser control will automatically cache the SAML token it receives
The lifetime of the from the Litware identity provider; after the initial authentication
SAML token is
with the Litware identity provider, the application will not prompt the
determined by
the token issuer. user will to re-enter their credentials for as long as the cached SAML
token remains valid.
———————– Page 220———————–
accessing rest services from a windows phone device 183 183
Inside the Implementation
Now is a good time to walk through some of the details of the solu-
tion. As you go through this section, you may want to download the
Microsoft Visual Studio® development system solution called 9Win-
dowsPhoneClientFederation from http://claimsid.codeplex.com. The
following sections describe some of the key parts of the implementa-
tion; some of these are specific to either the active or passive federa-
tion solution.
For details about the implementation of the a-Order tracking web
service, see Chapter 9, “Securing REST Services.” ADFS 2 does not
support the OAuth
protocol, so the
Active SAML Token Handling Windows Phone
The active federation solution must handle the request for a SAML application must
use the WS-Trust
token that the Windows Phone application sends to the Litware protocol to obtain
identity provider. There is no version of WIF available for the Win- a SAML token.
dows Phone platform, so the application must create the SAML sign-
in request programmatically. In the sample application, the GetSaml-
TokenRequest method in the HttpWebRequestExtensions class,
illustrates a technique for requesting a SAML token when WIF is not
available to perform this task for you.
See chapter 9, “Securing REST Services,” for an example of an active
client that can use WIF to request a SAML token.
The following code sample from the HttpWebRequestExtensions
class shows how the Windows Phone application creates the SAML
token request to send to the identity provider.
private static string GetSamlTokenRequest
(string samlEndpoint, string realm)
{
var tokenRequest =
string.Format(
CultureInfo.InvariantCulture,
samlSignInRequestFormat,
Guid.NewGuid().ToString(),
samlEndpoint,
DateTime.UtcNow.ToString(
“yyyy’-‘MM’-‘ddTHH’:’mm’:’ss’.’fff’Z'”),
DateTime.UtcNow.AddMinutes(15).ToString(
“yyyy’-‘MM’-‘ddTHH’:’mm’:’ss’.’fff’Z'”),
“LITWARE\\rick”,
“PasswordIsNotChecked”,
“https://aorderphone-dev.accesscontrol.windows.net/”);
———————– Page 221———————–
184184 chapter ten
return tokenRequest;
}
/// Format:
/// {0}: Message Id – Guid
/// {1}: To – https://localhost/Litware.SimulatedIssuer.9/
Issuer.svc
/// {2}: Created – 2011-03-11T01:49:29.395Z
/// {3}: Expires – 2011-03-11T01:54:29.395Z
/// {4}: Username – LITWARE\rick
/// {5}: Password – password
/// {6}: Applies To – https://{project}.accesscontrol.
windows.net/
private const string samlSignInRequestFormat =
@”<s:Envelope xmlns:s=””http://www.w3.org/2003/05/
soap-envelope””
xmlns:a=””http://www.w3.org/2005/08/addressing””
xmlns:u=””http://docs.oasis-
open.org/wss/2004/01/oasis-200401-wss-wssecurity-utility-
1.0.xsd””> … </s:Envelope>”;
The following code example shows how the client posts the
SAML token request to the identity provider and retrieves the SAML
token from the response.
public static IObservable<string> PostSamlTokenRequest
(this HttpWebRequest request, string tokenRequest)
{
request.Method = “POST”;
request.ContentType = “application/soap+xml; charset=utf-8”;
return
Observable
.FromAsyncPattern<Stream>(request.BeginGetRequestStream,
request.EndGetRequestStream)()
.SelectMany(
requestStream =>
{
using (requestStream)
{
var buffer = System.Text.Encoding.UTF8.
GetBytes(tokenRequest);
requestStream.Write(buffer, 0, buffer.Length);
requestStream.Close();
}
———————– Page 222———————–
accessing rest services from a windows phone device 185 185
return
Observable.FromAsyncPattern<WebResponse>(
request.BeginGetResponse,
request.EndGetResponse)();
},
(requestStream, webResponse) =>
{
string res = new StreamReader
(webResponse.GetResponseStream(),
Encoding.UTF8).ReadToEnd();
var startIndex = res.IndexOf(“<Assertion “);
var endIndex = res.IndexOf(“</Assertion>”);
var token = res.Substring(
startIndex, endIndex + “</Assertion>”.
Length – startIndex);
return token;
});
}
Web Browser Control
The passive federation solution uses an embedded web browser con-
trol to handle the passive WS-Federation interactions between the
client application and the issuers. The application wraps the web
browser control in a custom control that you can find in the SL.Phone.
Federation project. The Windows Phone application passes the ad-
dress of the JSON-encoded list of identity providers into this control,
and then retrieves the SAML token from the control when the feder-
ated authentication process is complete. The following code sample
from the MainPage.xaml.cs file shows how the application interacts
with the custom sign-in control.
private void OnGetMyOrdersPassiveButtonClicked
(object sender, RoutedEventArgs e)
{
…
var acsJsonEndpoint = “https://aorderphone-dev.
accesscontrol.windows.net/v2/metadata/IdentityProviders.
js?protocol=wsfederation&
realm=https%3A%2F%2Flocalhost%2Fa-
Order.OrderTracking.Services.9&context=&version=1.0″;
SignInControl.RequestSecurityTokenResponseCompleted +=
new EventHandler<SL.Phone.Federation.Controls
———————– Page 223———————–
186186 chapter ten
.RequestSecurityTokenResponseCompletedEventArgs>(
SignInControl_RequestSecurityTokenResponseCompleted);
SignInControl.GetSecurityToken(new Uri(acsJsonEndpoint));
}
void SignInControl_RequestSecurityTokenResponseCompleted
(object sender,
SL.Phone.Federation.Controls.RequestSecurityTokenResponse
CompletedEventArgs e)
{
this.GetOrdersWithToken(e.RequestSecurityTokenResponse.
TokenString)
.ObserveOnDispatcher()
.Catch((WebException ex) =>
{
…
}
.Subscribe(orders =>
{
…
});
}
The catch block in the SignInControl_RequestSecurityToken
ResponseCompleted method enables the client to trap errors such as
“401 Unauthorized” errors from the REST service.
The custom control that contains the embedded web browser
control must raise the RequestSecurityTokenResponseCompleted
event after the control receives the SWT token from ACS. The con-
trol recognizes when it has received the SWT token because ACS
sends a redirect message to a special URL: https://break_here. The
ACS configuration for the aOrderService RP includes this value for
the “Return URL” setting. The following code sample shows how the
Navigating event in the custom control traps this navigation request,
extracts the SWT token, and raises the RequestSecurityToken
ResponseCompleted event to notify the Windows Phone application
that the SWT token is now available.
private void SignInWebBrowserControl_Navigating(object sender,
NavigatingEventArgs e)
{
if (e.Uri == new Uri(“https://break_here”))
{
e.Cancel = true;
———————– Page 224———————–
accessing rest services from a windows phone device 187 187
var acsReply = this.BrowserSigninControl.SaveToString();
Regex tagRegex = CreateRegexForHtmlTag
(“BinarySecurityToken”);
var acsBinaryToken = tagRegex.Match(acsReply).Groups[1].
Value;
var acsTokenBytes = Convert.FromBase64String(acsBinaryToken);
var acsToken = System.Text.Encoding.UTF8.GetString(
acsTokenBytes, 0, acsTokenBytes.Length);
tagRegex = CreateRegexForHtmlTag(“Expires”);
var expires = DateTime.Parse(tagRegex.Match(acsReply).
Groups[1].Value);
tagRegex = CreateRegexForHtmlTag(“TokenType”);
var tokenType = tagRegex.Match(acsReply).Groups[1].Value;
if (null != RequestSecurityTokenResponseCompleted)
{
var rstr = new RequestSecurityTokenResponse();
rstr.TokenString = acsToken;
rstr.Expiration = expires;
rstr.TokenType = tokenType;
RequestSecurityTokenResponseCompleted(this,
new RequestSecurityTokenResponseCompletedEventArgs
(rstr, null));
}
}
…
}
You must also explicitly enable JavaScript in the embedded web
browser control on the phone; otherwise the automatic redirections
will fail. The following snippet from the AccessControlServiceSignIn.
xaml file shows how to do this.
<phone:WebBrowser x:Name=”BrowserSigninControl”
IsScriptEnabled=”True” Visibility=”Collapsed” />
Asynchronous Behavior
Both the active and passive scenarios make extensive use of the
Reactive Extensions (Rx) for the Windows Phone platform to interact
with issuers and the a-Order tracking web service asynchronously. For
example, the active federation solution uses Rx to orchestrate the
interactions with the issuers and ensure that they are visited in the
———————– Page 225———————–
188188 chapter ten
correct sequence. The GetOrders method in the MainPage.xaml.cs
file shows how the client application adds the SWT token to the
request header that it sends to the a-Order tracking web service,
sends the request, and traps any errors such as “401 Unauthorized”
messages, all asynchronously.
public IObservable<Order[]> GetOrders()
{
var stsEndpoint =
“https://localhost/Litware.SimulatedIssuer.9/Issue.svc”;
var acsEndpoint =
“https://aorderphone-dev.accesscontrol.windows.net/
v2/OAuth2-13″;
var serviceEnpoint =
“https://localhost/a-Order.OrderTracking.Services.9”;
var ordersServiceUri = new Uri
(serviceEnpoint + “/orders/frommyorganization”);
return
HttpClient.RequestTo(ordersServiceUri)
.AddAuthorizationHeader
(stsEndpoint, acsEndpoint, serviceEnpoint)
.SelectMany(request =>
{
return request.Get<Order[]>();
},
(request, orders) =>
{
return orders;
})
.ObserveOnDispatcher()
.Catch((WebException ex) =>
{
var message = GetMessageForException(ex);
MessageBox.Show(message);
return Observable.Return(default(Order[]));
});
}
This example uses the SelectMany method instead of the simple
Select method because the call to the Get method itself returns an
IObservable<Orders[]> instance; using Select would then return
an IObservable<IObservable<Orders[]>> instance. The Select
———————– Page 226———————–
accessing rest services from a windows phone device 189 189
Many method flattens the IObservable<IObservable
<Orders[]>> instance to an IObservable<Orders[]>
instance.
The following list outlines the nested sequence of calls in the
active federated authentication scenario. The process starts when the
application calls the MainPage.GetMyOrdersButton_Click method,
and uses Rx to manage the nested sequence of asynchronous calls.
1. Call the MainPage.GetOrders method asynchronously on
a background thread.
a. Create an HttpWebRequest object to send to the
a-Orders tracking web service.
b. Call the HttpWebRequestExtensions.Add
AuthorizationHeader method to add the SWT token
to the HttpWebRequest object asynchronously.
i. Create a SAML token request.
ii. Call the HttpWebExtensions.PostSamlToken
Request to send the SAML request asynchro-
nously to the Litware identity provider.
a. Send the SAML request to the Litware
identity provider.
b. Extract the SAML token in the response
from the Litware identity provider.
c. Return the SAML token.
iii. Call the HttpWebExtensions.PostSwtToken
Request method to send the SAML token to
ACS asynchronously.
a. Create an SWT token request that contains
the SAML token.
b. Send the SWT token request to ACS.
c. Extract the SWT token in the response
from ACS.
d. Return the SWT token.
iv. Add the SWT token to the HttpWebRequest
object.
v. Return the HttpWebRequest object.
———————– Page 227———————–
190190 chapter ten
c. Invoke the a-Orders tracking web service by calling
the HttpWebRequest.Get method asynchronously.
i. Send the web request to the a-Orders tracking
web service.
ii. Use the BeginGetResponse and EndGet
Response methods to capture the response data.
iii. Deserialize the response data to an Order[]
instance.
iv. Return the Order[] instance.
d Return the results as an Order[] instance.
2. Update the UI with the result of the call to MainPage.
GetOrders.
The following list outlines the nested sequence of calls in the
passive federated authentication scenario. The process starts when
the application calls the MainPage.OnGetMyOrdersPassive
Button_Click method, and uses Rx to manage the nested sequence
of asynchronous calls.
1. Call the AccessControlServiceSignIn.GetSecurityToken
method to obtain an SWT token.
2. Handle the AccessControlServiceSignIn.RequestSecurity
TokenResponseCompleted event.
a. Call the MainPage.GetOrdersWithToken method
asynchronously. The SWT token is available in the
EventArgs parameter.
i. Create an HTTP request to send to the a-Order
tracking web service.
ii. Call the HttpWebRequestExtensions.Add
AuthorizationHeader method asynchronously
to add the SWT token to the request.
iii. Invoke the a-Orders tracking web service by
calling the HttpWebRequest.Get method
asynchronously.
a. Send the web request to the a-Orders
tracking web service.
b. Use the BeginGetResponse and EndGet
Response methods to capture the response
data.
———————– Page 228———————–
accessing rest services from a windows phone device 191 191
c. Deserialize the response data to an Order[]
instance.
d. Return the Order[] instance.
iv. Return the Order[] instance.
b. From the background thread, update the UI with the
Order[] instance data by calling the UpdateOrders
method.
Setup and Physical Deployment
For the sample Windows Phone application to be able to use SSL
when it communicates with the sample Litware issuer and Adatum
a-Order tracking applications on localhost, it’s necessary to install the
localhost root certificate on the Windows Phone device. To do this,
the Litware sample issuer includes a page that has a link to the re-
quired certificate: http://localhost/Litware.simulatedIssuer.9/root-
Cert/default.aspx. If you navigate to this address on the Windows
Phone device, you can install the root certificate that enables SSL. In
a production environment, you should secure your web service and
issuer with a certificate from a trusted third-party certificate provider
rather than a self-issued certificate; if you do this, it won’t be neces-
sary to install a certificate on the Windows Phone device in order to
access your issuer and web service using SSL.
In the passive federation scenario, the Windows Phone applica-
tion uses an embedded web browser control to navigate to the Lit-
ware identity provider so that the user can enter her credentials. It’s
important that the sign-in page at the issuer is “mobile friendly” and
displays clearly on the Windows Phone device. You should verify that
your issuer renders a suitable sign-in page if you are planning to use a
Windows Phone client in a passive federated authentication scenario.
Questions
1. Which of the following are issues in developing a claims-
aware application that access a web service for the Win-
dows Phone 7™ platform?
a. It’s not possible to implement a solution that uses
SAML tokens on the phone.
b. You cannot install custom SSL certificates on the
phone.
———————– Page 229———————–
192192 chapter ten
c. There is no secure storage on the phone.
d. There is no implementation of WIF available for the
phone.
2. Why does the sample application use an embedded web
browser control?
a. To handle the passive federated authentication
process.
b. To handle the active federated authentication process.
c. To access the RESTful web service.
d. To enable the client application to use SSL.
3. Of the two solutions (active and passive) described in the
chapter, which requires the most round trips for the initial
request to the web service?
a. They both require the same number.
b. The passive solution requires fewer than the active
solution.
c. The active solution requires fewer than the passive
solution.
d. It depends on the number of claims configured for the
relying party in ACS.
4. Which of the following are advantages of the passive
solution over the active solution?
a. The passive solution can easily build a dynamic list of
identity providers.
b. It’s simpler to create code to handle SWT tokens in
the passive solution.
c. It’s simpler to create code to handle SAML tokens in
the passive solution.
d. Better performance.
———————– Page 230———————–
accessing rest services from a windows phone device 193 193
5. In the sample solution for this chapter, how does the
Windows Phone 7 client application add the SWT token to
the outgoing request?
a. It uses a Windows Communication Foundation (WCF)
behavior.
b. It uses Rx to orchestrate the acquisition of the SWT
token and add it to the header.
c. It uses the embedded web browser control to add the
header.
d. It uses WIF.
More Information
To learn more about developing for Windows Phone 7, see the
“Windows Phone 7 Developer Guide” at: http://msdn.microsoft.com/
en-us/library/gg490765.aspx.
———————– Page 231———————–
———————– Page 232———————–
11 Claims-Based Single Sign-On
for Microsoft SharePoint
2010
This chapter walks you through an example of integrating two Micro-
soft® SharePoint® services web applications into a single-sign on
(SSO) environment for intranet and extranet web users who all belong
to a single security realm. These users can already access other ASP.
NET web applications in the SSO environment. You’ll see examples of
SharePoint applications that Adatum has made claims-aware so that
Adatum employees can access the SharePoint applications from the
company intranet or from the web.
This basic scenario doesn’t show how to establish a trust relation-
ship between enterprises that would allow users from another com-
pany to access the SharePoint site; that is discussed in Chapter 12,
“Federated Identity for SharePoint Applications.” Instead, this chapter
focuses on how to implement single sign-on and single sign-off
within a security domain as a preparation for sharing resources with
other security domains, and how to configure SharePoint to use
claims-based authentication and authorization. In short, this scenario
contains the commonly used elements that will appear in all claims- Most of what you’ll see
aware SharePoint applications. For further information about inte- described in this chapter
grating ASP.NET web applications into an SSO environment and about SharePoint and claims
making them claims-aware, you should read Chapter 3, “Claims-Based could be achieved without
Single Sign-On for the Web.” needing to claims-enable
SharePoint. However, the
For additional information about SharePoint and claims-based claims-based infrastructure
identity, see Appendix F, “SharePoint 2010 Authentication Architec- that this chapter introduces
ture and Considerations.” forms the basis of more
advanced scenarios, such as
the federated scenario
described in the next
chapter, which can only be
implemented using claims.
195
———————– Page 233———————–
196196 chapter eleven
The Premise
Adatum is a medium sized company that uses Microsoft Active Direc-
tory® to authenticate the employees in its corporate network. Ada-
tum is planning to implement two applications as SharePoint 2010
web applications that employees will access from both the intranet
and the Internet:
1. One application is a portal, named a-Portal, where Adatum
stores the product documentation that’s used by its sales
force when they engage with customers. This SharePoint
web application consists of a single site collection based on
the “Team Site” template.
2. The other is a web application, named a-Techs, where field
staff access scheduling information, tasks, and technical
data. It also includes a blog where field technicians can
capture tips and techniques to share with other team
members (and possibly partners in the future). This Share-
Point web application consists of two site collections; one
based on the “Team Site” template, and one based on the
“Blog” template. This web application also uses SharePoint
user profile data.
Adatum has already established an SSO environment that includes
existing ASP.NET web applications such as the a-Order and a-Expense
applications. As part of this environment, Adatum has configured Ac-
tive Directory Federation Services (ADFS) to act as an identity pro-
vider (IdP).
Goals and Requirements
The goals of this scenario are to show how to configure a SharePoint
environment to use a claims-based identity model to control access,
and how to customize SharePoint to provide a way for a SharePoint
farm administrator to effectively manage access to the claims-enabled
SharePoint applications.
Configuring a SharePoint environment to use claims includes
configuring the trust relationship between SharePoint and ADFS and
configuring which claims ADFS passes to SharePoint.
Users must be able to access the SharePoint web applications
from both the intranet and Internet as part of an SSO realm that in-
cludes other ASP.NET web applications. The environment should also
support single sign-out, so that logging out from any ASP.NET or
SharePoint web application logs the user out from all applications that
are part of the SSO domain.
———————– Page 234———————–
claims-based single sign-on for microsoft sharepoint 2010 197 197
SharePoint site collection administrators should be able to con-
trol access to site collections and sites based on role memberships
defined in AD. For example, only users in the Sales role should have
access to the a-Portal web application and only users in the Team
Leader role should be able to post to the blog in the a-Techs applica-
tion.
Overview of the Solution
Adatum has created two claims-enabled SharePoint web applications: In SharePoint, you
one for salespersons and one for field technical employees. These ap- configure an STS by creating
plications are available on the intranet and Internet. The following a SharePoint trusted identity
diagram shows the main components of the solution suggested by token issuer.
Adatum.
Trust
STS
FedAuth
FedAuth
Cookie
Cookie
ADFS
Internet
Team
Team Site
Site
Blog
a−Portal
a−Techs
SharePoint
Browser
Browser
John at Adatum
a−Order
John at home
figure 1
Claims-enabled SharePoint applications at Adatum
Authentication Mechanism
Adatum has configured both SharePoint web applications to use During development,
ADFS as a Trusted Identity Provider. Adatum has also configured it’s useful to be able
ADFS to use different authentication types depending on where the to see the set of
user is accessing the applications from: intranet users will sign-in au- claims that a user
tomatically using Integrated Windows Authentication, and Internet has. See the section
“Displaying Claims
users will enter their Adatum Windows credentials into a web form.
in a Web Part” for
In this way, all users authenticate with Active Directory through one way to do this.
ADFS.
———————– Page 235———————–
198198 chapter eleven
An alternative approach that Adatum considered was to configure
two authentication types in each web application in SharePoint.
SharePoint 2010 allows you to configure multiple authentication
mechanisms for a single web application; for example, you could con-
figure a SharePoint web application to use both Windows Authentica-
tion and a trusted identity provider. Figure 2 shows the two alterna-
tive routes by which user attributes from Active Directory become
claims belonging to a SharePoint user in this alternative scenario. The
SharePoint security token service (STS) is an instance of a SharePoint
trusted identity token issuer; the custom claims providers are op-
tional components.
Custom IClaimsPrincipal Instance
ADFS SharePoint STS
Claims Provider
+ Claims Mapping + Claims Mapping
Rules Rules (Claims
Augmentation)
Claims Collection
Active Directory
Custom
SharePoint STS Claims Provider
(Claims
Augmentation)
figure 2
Building a user’s claims collection
The difficulty with this approach is that although both authenti-
cation mechanisms result in a set of claims for the IClaimsPrincipal
Instance associated with the user, without additional code they are
unlikely to generate the same types of claims. For example, the claims
from Windows authentication will include groupsid claims, while the
claims from the trusted identity provider will include role claims. An
additional complexity of this approach is that you’ll probably want to
You can use the
customize the page that SharePoint displays, offering users a choice
claims augmentation
offered by the custom of authentication provider.
claims providers to For an example of how a custom claims provider converts SIDs
programmatically add
additional claims to a to group names, see this blog post: http://blogs.technet.com/b/
user’s claims set. speschka/archive/2010/09/12/a-sharepoint-2010-claims-provider-
to-convert-role-sids-to-group-names.aspx.
———————– Page 236———————–
claims-based single sign-on for microsoft sharepoint 2010 199 199
For an example of how to customize the default SharePoint
page that presents a choice of authentication providers to the user,
see this blog post: http://blogs.msdn.com/b/brporter/ar-
chive/2010/05/10/temp.aspx.
For these reasons, Adatum selected the first approach that uses a
single trusted identity provider in SharePoint so that they can use the
claims-mapping rules in ADFS and ensure that a consistent set of
claims reach SharePoint.
End-to-End Walkthroughs
The following sections outline two scenarios for a user who accesses
a claims-enabled SharePoint environment: the first scenario describes
what happens when a user accesses two different site collections in
the same SharePoint web application, the second scenario describes
what happens when a user accesses two SharePoint web applications
hosted in the same domain.
The walkthroughs below describe the experience of Internet us-
ers who must provide their username and password to ADFS in order
to authenticate. ADFS will not prompt intranet users (inside the cor-
porate firewall) for their credentials, but will authenticate them using
Integrated Windows Authentication: intranet users will not see the
sign-in page for ADFS.
Visiting Two Site Collections in a SharePoint
Web Application
In this walkthrough, John visits the Document Library and then the
Team Site in the a-Techs SharePoint web application.
1. John browses to the Team site in the a-Techs SharePoint
web application.
2. John has not yet been authenticated so SharePoint redi-
rects his browser to ADFS. There are several intermediate
steps—the SharePoint authentication endpoint and the
SharePoint sign-in endpoint—before it arrives at ADFS.
3. John enters his Adatum domain credentials; ADFS validates
the credentials, creates a token that contains John’s claims,
and redirects the browser to the SharePoint STS (the “/_
trust/” endpoint in the SharePoint web application refer-
ences the trusted identity token issuer).
4. The SharePoint STS validates the token from ADFS and
issues a FedAuth cookie for the a-Techs SharePoint web
application. This cookie contains a reference to the token
that contains John’s claims; the token itself is stored in the
SharePoint token cache.
———————– Page 237———————–
200200 chapter eleven
5. SharePoint checks that John has adequate permissions to
access to the Team site collection, and redirects his browser
to the site (the “/_layouts/Authenticate.aspx” endpoint in
the SharePoint web application performs the permissions
check).
6. John browses to the Blog site in the a-Techs SharePoint web
Application. He does not require a new token for this site
collection because it is part of the same SharePoint web
application.
In Chapter 12, “Federated Identity for SharePoint Applications,”
you can see a sequence diagram that illustrates this process in
relation to sliding sessions.
Visiting Two SharePoint Web Applications
In this walkthrough, John visits the a-Portal SharePoint web applica-
tion and then visits the a-Techs SharePoint web application.
1. John visits the a-Portal SharePoint web application.
a. John browses to the Team site in the a-Portal Share –
Point web application.
b. John has not yet been authenticated, so SharePoint
redirects his browser to ADFS.
c. John enters his Adatum domain credentials; ADFS
validates the credentials, issues a SAML token that
contains his claims, and redirects the browser to the
SharePoint STS (the “/_trust/” endpoint in the Share-
Point web application). ADFS also creates an SSO
cookie so that it can recognize if it has already
authenticated John.
d. The SharePoint STS validates the token from ADFS
and issues a FedAuth cookie for the a-Portal Share-
Point web application that contains a reference to
John’s claims in the SharePoint token cache.
e. SharePoint checks that John has access to the Team
site collection, and redirects his browser to the site.
2. John visits the a-Techs SharePoint web application.
a. John browses to the Team site in the a-Techs Share –
Point web application.
b. John has not yet been authenticated for this Share –
Point web application so SharePoint redirects his
browser to ADFS.
———————– Page 238———————–
claims-based single sign-on for microsoft sharepoint 2010 201 201
c. ADFS detects the SSO cookie that it issued in step
1-c, and redirects the browser with a new SAML token
to the SharePoint STS.
d. The SharePoint STS validates the token from ADFS
and issues a FedAuth cookie for the a-Techs Share-
Point web application that contains a reference to
John’s claims in the SharePoint token cache.
e. SharePoint checks that John has sufficient permissions
to access to the Team site collection, and redirects his
browser to the site.
In this example, it’s important to ensure that each SharePoint web
application uses its own FedAuth token. If the web applications have
different host names, this will happen automatically. However, if in a
test environment the web applications share the same host name, the
second web application will try to use the existing FedAuth token,
which will not be valid for that web application. Each web applica-
tion must have its own FedAuth token. See the section, “Setup and
Physical Deployment,” in this chapter for more details.
Authorization in SharePoint
This scenario uses standard SharePoint groups to control access to the
sites in the two SharePoint web applications. The following table
summarizes the permissions.
Site SharePoint Group Permission level Role Claim
a-Portal Team SalesSite Members Contribute sales
site
a-Techs Team site TechSite Members Contribute techleaders
a-Techs Team site TechSite Members Contribute techs
a-Techs Blog site TechBlog Members Contribute techleaders
a-Techs Blog site TechBlog Visitors Read techs
In SharePoint, a site administrator can add users to a SharePoint
group to grant those users the permissions associated with the group.
In a claims-based environment, a site administrator can add users to a
SharePoint group based on the users’ claims; for example, a site admin-
istrator could add all authenticated users in the sales role to the
SharePoint Site Members group by using the Site Permissions Tools.
Mapping claims to SharePoint groups simplifies the administration
tasks in SharePoint. There is no need to add individual users to
SharePoint groups.
———————– Page 239———————–
202202 chapter eleven
Adatum has modified the SharePoint People Picker to make it
easier for site administrators to map role and organization claims to
SharePoint groups.
If your identity provider does not provide the claims that you
need to implement your authorization rules, you can use claims aug-
mentation in the SharePoint STS to modify existing claim values or to
add additional claims to an authenticated user.
The People Picker
It is difficult for site administrators at Adatum to use the default
people picker to reliably assign permissions in the a-Portal and a-Techs
web applications. The default behavior of the people picker is to allow
the user to enter part of a user name or group name and then use the
search function to locate the user or group. In a claims-enabled Share-
In a claims-enabled Point web application this does not work as expected because there
application, the application is no repository of users and groups for the people picker to search;
receives a set of claims the only information SharePoint has is the claims data associated with
from a trusted issuer about
the current user. The default people picker implementation works
the person accessing the
application. This contrasts around this by always finding a match and resolving the name even if
with the approach whereby the name is incorrect, which makes it easy for an administrator to
the application queries a make a mistake. For example, let’s say the site administrator would like
directory service to discover to assign a permission to anyone in the techs role. If he makes a typing
information about the user.
mistake and searches for techz in the people picker he will get a
The claims-based approach
is much more flexible: the match and be able to assign a permission to a non-existent role.
claims can come from many To prevent this type of error, Adatum implemented a custom
different issuers and be SPClaimsManager component that can search for role and organiza-
used in a federated identity tion values in a pre-defined list of valid values. Figure 3 shows the
environment. However, in overall architecture of the solution that Adatum adopted. There is a
a claims-based scenario the
application may not have central store of valid role and organization names that both ADFS and
direct access to lists of users the SharePoint people picker use: this way Adatum can configure
in a directory. ADFS to issue role and organization claims that the SharePoint
people picker will recognize.
———————– Page 240———————–
claims-based single sign-on for microsoft sharepoint 2010 203 203
Look up roles and ADFS
organizations.
People Picker
Use predefined roles
and organizations.
SharePoint
Store
SharePoint Site Administrator
searches for valid roles
and organizations.
Adatum
figure 3
Architecture of the Adatum people picker solution
SharePoint and ADFS both run inside the Adatum corporate net-
work. If SharePoint is running in a separate network from ADFS and
the store, then a slightly more complex solution is needed. This might
arise if SharePoint is running in the cloud, or if SharePoint needs to
resolve values used by a partner’s directory services. In this case, the
architecture might include a lookup service as shown in Figure 4; in
SharePoint you can use Business Connectivity Services to make the
call to the lookup service, which introduces a useful layer of indirec-
tion into the architecture.
———————– Page 241———————–
204204 chapter eleven
Query
Claims
Look up roles and Service
organizations.
ADFS
Use predefined roles
and organizations.
People Picker
SharePoint
in the Cloud Store
Adatum
figure 4
SharePoint Site Administrator
searches for valid roles People picker solution architecture
and organizations. including a query claims lookup service
Adatum plans to use role and organization claims to assign per-
missions in SharePoint, and wants to avoid assigning permissions to
individual users. However, some organizations may prefer to use
names or email addresses to assign permissions in some circumstances.
It is still possible to do this in a claims-enabled SharePoint site, but
with the standard people picker component, site administrators will
face the same problem whereby the people picker resolves both valid
and invalid names. To work around this problem you can again create
a custom people picker component that resolves name and email
address claim values against your directory service.
Single Sign-Out
In the long run, it’s more
maintainable to manage For a SharePoint web application to participate in the single sign-out
permissions based on roles process, it must be able to handle the following scenarios. For more
(and organizations) rather information about single sign-out and the WS-Federation protocol
than on individuals in see Chapter 3, “Claims-Based Single Sign-On for the Web and Win-
SharePoint. You can use
dows Azure.”
Active Directory and ADFS
to manage an individual’s 1. The user should be able to initiate the single sign-out from
role and organization
membership, while in within the SharePoint web application. Adatum modified
SharePoint you can the behavior of the standard sign-out process to send the
focus on mapping roles WS-Federation wsignout message to the token issuer. In
and organizations to the Adatum scenario, this token issuer is ADFS.
SharePoint groups.
———————– Page 242———————–
claims-based single sign-on for microsoft sharepoint 2010 205 205
2. SharePoint web applications should handle WS-Federation
wsignoutcleanup messages from the issuer and invalidate
any security tokens for the application. For this to work in
SharePoint you must configure the SharePoint security
token service to use session cookies rather than persistent
cookies.
If the user is signing in using Windows authentication in ADFS, then
revisits the web application after having signed out, he or she will be
signed in automatically and silently. Although the single sign-out has
happened, the user won’t be aware of it.
By default, SharePoint uses persistent cookies to store the session
token, and this means that a user can close the browser and re-open
it and get back to the SharePoint web application as long as the
cookie has not expired. The consequence of changing to session cook- The default name for
ies is that if a user closes the browser, she will always be required to the session cookie is
authenticate again when she next visits the SharePoint web applica- FedAuth.
tion. Adatum prefers this behavior because it provides better security.
Inside the Implementation
The following sections describe the key configuration steps that Ada-
tum performed in order to implement the scenario that this chapter
describes.
Relying Party Configuration in ADFS
Each SharePoint web application is a separate relying party (RP) from
the perspective of ADFS. Adatum has configured each of the relying
parties to use the WS-Federation protocol and to issue the emailad-
dress and role claims for users that it authenticates, passing the values
of these claims through from Active Directory. The following table
shows the mapping rules that Adatum configured for each relying
party in ADFS.
LDAP Attribute Outgoing claim type
E-Mail-Addresses E-Mail Address
Token-Groups – Unqualified Names Role
It’s important that the claims issued to SharePoint by ADFS (or
any other claims issuer) are SAML 1.x compliant. For a description of
the correct name format for claims that will be consumed by Share-
Point, see this blog post: http://social.technet.microsoft.com/wiki/
contents/articles/ad-fs-2-0-the-admin-event-log-shows-error-
111-with-system-argumentexception-id4216.aspx.
———————– Page 243———————–
206206 chapter eleven
ADFS must be able to identify which relying party a request
comes from so that it can issue the correct set of rules. The sample
scenario uses the identifiers shown in the following table:
Relying Party Identifiers
a-Portal SharePoint web application urn:adatum-portal:sharepoint
a-Techs SharePoint web application urn:adatum-techs:sharepoint
As part of the configuration in ADFS, you must specify the URL
of the relying party WS-Federation protocol endpoint: this URL will
be the “/_trust/” path in your SharePoint web application.
SharePoint will send
these identifier values You must enter the required information in ADFS manually (or
in the wtrealm create Windows® PowerShell® command-line interface scripts);
parameter. It’s SharePoint does not expose a FederationMetadata.xml document
important to make that you can use to automate the configuration.
sure that these
identifiers match the
configuration in SharePoint STS Configuration
SharePoint. These
You must configure the SharePoint STS to trust the ADFS issuer, and
examples show the
recommended format map the incoming claims from ADFS to claims that your SharePoint
for these identifiers; applications will use. The following sections describe the steps you
however, there is no must perform to complete this configuration.
specific required
format. Remember to install the SharePoint PowerShell snap-in before
attempting to run any SharePoint PowerShell scripts. You can
do this with the following PowerShell command:
Add-PSSnapin Microsoft.Sharepoint.Powershell
Create a New SharePoint Trusted Root Authority
ADFS signs the tokens that it issues with a token signing certificate.
You must import into SharePoint a certificate that it can use to vali-
date the token from ADFS. You can use the following PowerShell
commands to import a certificate from the adfs.cer file:
$cert = New-Object System.Security.Cryptography.X509Certificates.
X509Certificate2(“C:\adfs.cer “)
New-SPTrustedRootAuthority
-Name “Token Signing Cert”
-Certificate $cert
You can export this certificate from ADFS using the certificates
node in the ADFS 2.0 Management console.
———————– Page 244———————–
claims-based single sign-on for microsoft sharepoint 2010 207 207
If the signing certificate from ADFS has one or more parent certifi-
cates in its certificate chain, you must add these to SharePoint as
well. You can use the same SharePoint command to do this.
Notice that you must import any certificates that SharePoint
uses into SharePoint; SharePoint does not use the trusted root
authorities in the certificate store on the local machine.
Create the Claims Mappings in SharePoint
To map the incoming claims from ADFS to claims that SharePoint
uses, you must create some mapping rules. The following PowerShell
commands show how to create rules to pass through the incoming
emailaddress and role claims.
$map = New-SPClaimTypeMapping
-IncomingClaimType “http://schemas.xmlsoap.org/ws/2005/05/
identity/claims/emailaddress”
-IncomingClaimTypeDisplayName “EmailAddress”
-SameAsIncoming
$map2 = New-SPClaimTypeMapping
-IncomingClaimType “http://schemas.microsoft.com/ws/2008/06/
identity/claims/role” -IncomingClaimTypeDisplayName “Role”
–SameAsIncoming
You can choose to perform your claims mapping either as a part
of the relying party definition in ADFS, or in the SharePoint STS.
However, the rules-mapping language in ADFS is the more flexible of
the two.
For an example of how to add additional claim types, see the
“People Picker Customizations” section later in this chapter.
Create a New SharePoint Trusted Identity Token Issuer
A SharePoint trusted identity token issuer binds together the details
of the identity provider and the mapping rules to associate them with
a specific SharePoint web application. The following PowerShell com-
mands show how to add the configuration settings for the scenario
that this chapter describes. This script uses the $cert, $map, and
$map2 variables from the previous script snippets.
$ap = New-SPTrustedIdentityTokenIssuer
-Name “SAML Provider”
-Description “Uses Adatum ADFS as an identity provider”
-Realm “urn:adatum-portal:sharepoint”
-ImportTrustCertificate $cert
———————– Page 245———————–
208208 chapter eleven
-ClaimsMappings $map,$map2
-SignInUrl “https://DC-adatum/adfs/ls/”
-IdentifierClaim http://schemas.xmlsoap.org/ws/2005/05/identity/
claims/emailaddress
$uri = New-Object System.Uri(“https://adatum-sp:31242/”)
$ap.ProviderRealms.Add($uri, “urn:adatum-techs:sharepoint”)
$ap.Update()
The following table describes the key parameters in the Power-
Don’t forget to call Shell commands.
the Update method
to save the changes Parameter/command Notes
that the Provider -Realm The realm is the value of the relying party identifier in
Realms.Add method ADFS. In this example, the realm parameter identifies
makes. the a-Portal SharePoint web application. The Add
method of the ProviderRealms object adds the
identifier for the a-Techs SharePoint web application.
The URI is the address of the SharePoint web
application.
-ImportTrustCertificate This associates the token-signing certificate from
ADFS with the token issuer.
-ClaimsMappings This associates the claims-mapping rules with the
token issuer.
-SignInUrl This identifies the URL where the user can authenti-
cate with ADFS.
-IdentifierClaim This identifies which claim from the identity provider
uniquely identifies the user.
This example uses the email address as the identifier. You may
want to consider alternative unique identifiers because of the possibil-
ity that email addresses can change.
Figure 5 summarizes how the SharePoint trusted identity token
issuer uses the configuration data to issue a SAML token to the Share-
Point web application.
———————– Page 246———————–
claims-based single sign-on for microsoft sharepoint 2010 209 209
SharePoint Trusted Identity Token Issuer
Token request
Provider Realms
-Look up the relying party Token Issuer
identifier for the web application -Authenticate the
requesting a token. user and issue a
Token Request SAML token. ADFS
uses the identifier
to determine which
rules to run.
SAML Mapping Rules Token Signing Certificate
Token – Apply the mapping rules. – Verify the signature Issue
Issue on the token. SAML
SAML Token
Token
figure 5
The SharePoint trusted identity token issuer
When a SharePoint web application requests a token from a
trusted identity provider, the SharePoint trusted token issuer first
looks up the unique identifier of the web application. It passes this
identifier to the external token issuer in the wtrealm parameter of the
request. When the external token issuer returns a SAML token, the
SharePoint trusted identity token issuer verifies the signature, applies
any mapping rules, and places the new SAML token in the SharePoint
token cache. It also creates a FedAuth cookie that contains a refer-
ence to the SAML token in the cache. Whenever the user access a
page in the SharePoint web application, SharePoint first checks if
a valid SAML token exists for the user, and then uses the claims in the
token to perform any authorization checks.
There is a one-to-one mapping between SharePoint trusted iden-
tity token issuers and trust certificates from the external token issuer.
You cannot configure a new SharePoint trusted identity token issuer
using a token-signing certificate that an existing SharePoint trusted
identity token issuer uses.
SharePoint Web Application
Configuration
Each web application in SharePoint defines which authentication
mechanisms it can use. In the scenario described in this chapter, Ada-
tum has configured both SharePoint web applications to use a SAML-
based trusted identity provider. Both intranet and internet users use
the SAML-based trusted identity provider.
———————– Page 247———————–
210210 chapter eleven
People Picker Customizations
To customize the behavior of the standard people picker to enable
site administrators to reliably select role and organization claims,
Adatum created a custom claim provider to deploy to SharePoint. The
Microsoft Visual Studio® development system solution, SampleClaim-
sProvider, in the 10SharePoint folder from http://claimsid.codeplex.
com includes a custom claim provider that demonstrates how Adatum
extended the behavior of the people picker. For reasons of simplicity,
this sample does not use a store to maintain the list of role and
organization claims that Adatum uses, the lists of valid claims are
maintained in memory. In a production-quality claims provider you
should read the permissible claims values from a store shared with the
You can configure the
authentication methods identity provider. For more information, see the section “The People
that SharePoint will use for Picker” earlier in this chapter.
a web application in the
“SharePoint 2010 Central Use a custom SPClaimProvider class to override the default people
Administration” site. Just picker behavior.
navigate to Manage Web
Applications, select the The SampleClaimsProvider class extends the abstract SPClaim
application you want to Provider class and overrides the methods FillHierarchy, FillResolve,
change, and click on and FillSearch. The SPTrustedClaimsIssuer class, which derives from
Authentication Providers. the SPClaimProvider class, implements the default UI behavior in the
people picker.
The GetPickerEntry method is responsible for building an entry
that will display in the people picker. The following code sample
shows this method.
private PickerEntity GetPickerEntity(string ClaimValue, string
claimType, string GroupName)
{
PickerEntity pe = CreatePickerEntity();
var issuer = SPOriginalIssuers.Format(
SPOriginalIssuerType.TrustedProvider, TrustedProviderName);
pe.Claim = new SPClaim(claimType, ClaimValue,
Microsoft.IdentityModel.Claims.ClaimValueTypes.String,
issuer);
pe.Description = claimType + “/” + ClaimValue;
pe.DisplayText = ClaimValue;
pe.EntityData[PeopleEditorEntityDataKeys.DisplayName] =
ClaimValue;
pe.EntityType = SPClaimEntityTypes.Trusted;
pe.IsResolved = true;
pe.EntityGroupName = GroupName;
return pe;
}
———————– Page 248———————–
claims-based single sign-on for microsoft sharepoint 2010 211 211
This method uses the ClaimValue, claimType, and GroupName
strings to create a claim that the people picker can display. The Trusted
ProviderName variable refers to the name of the SharePoint trusted
identity token issuer that you are using: the SPOriginal
Issuers.Format method returns a string with the full name of the
original valid issuer that you must use when you create a new claim.
Notice that a claim definition includes the claim issuer as well as the
claim type and value. SharePoint will check the source of a claim as
a part of any authorization rules.
If you are creating an identity claim, you must ensure that the
claimType that you pass to the SPClaim constructor matches the
identity claim type of your trusted identity token issuer, and that you
set the EntityType property to SPClaimEntityTypes.User.
The people picker uses the value of the Description property to
display a tooltip in the UI when a user hovers the mouse over a
resolved claim.
If you deploy this solution to SharePoint, then the people picker
will display search results from this custom claim provider in addition
to results from the default, built-in claim provider. This means that if
a site administrator searches for a non-existent role or organization
claim, then the default claim provider will continue to resolve this
non-existent claim value. To prevent this behavior, you can make your
custom claim provider the default claim provider. If the name of the Adatum made the custom
trusted identity token issuer is “SAML Provider” and the name of the claim provider the default
custom claim provider is “ADFSClaimProvider,” then the following claim provider in the
PowerShell script will make the custom claim provider the default. SharePoint web applications.
$ti = Get-SPTrustedIdentityTokenIssuer “SAML Provider”
$ti.ClaimProviderName = “ADFSClaimsProvider”
$ti.Update()
It’s also important to ensure that the claim types that the site
administrator will use in the custom people picker exist in the trusted
identity token issuer. You can use the following PowerShell script to
list the claims that are present in the configuration.
$i = Get-SPTrustedIdentityTokenIssuer “SAML Provider”
$i.ClaimTypes
You can add claim types to an existing trusted identity token is-
suer using the technique shown in the following PowerShell script.
$map = New-SPClaimTypeMapping -IncomingClaimType
“http://schemas.microsoft.com/ws/2008/06/identity/claims/
organization”
-IncomingClaimTypeDisplayName “Organization” -LocalClaimType
———————– Page 249———————–
212212 chapter eleven
“http://schemas.microsoft.com/ws/2008/06/identity/claims/
organization”
$ti = Get-SPTrustedIdentityTokenIssuer “SAML Provider”
$ti.ClaimTypes.Add(
“http://schemas.microsoft.com/ws/2008/06/identity/claims/
organization”)
Add-SPClaimTypeMapping –Identity $map
-TrustedIdentityTokenIssuer $ti
This script maps an incoming claim and defines the new claim
type in the trusted identity token issuer.
Single Sign-Out Control
To implement single sign-out behavior, you must be able to send the
WS-Federation wsignout message to the token issuer when the user
clicks either the “Sign out” or “Sign in with a different user” link on any
page in the a-Portal or a-Techs SharePoint web applications. Adatum
implemented the single sign-out logic in the SessionAuthentication
Module’s SignedIn and SigningOut events. The Visual Studio solu-
tion, SingleSignOutModule in the 10SharePoint folder from http://
claimsid.codeplex.com, includes a custom HTTP module to deploy to
your SharePoint web application that includes this functionality.
The following code sample shows the DoFederatedSignOut
method that the SigningOut event handler invokes to perform the
sign-out.
private void DoFederatedSignOut()
{
string providerName = GetProviderNameFromCookie();
SPTrustedLoginProvider loginProvider = null;
SPSecurity.RunWithElevatedPrivileges(delegate()
{
loginProvider = GetLoginProvider(providerName);
});
if (loginProvider != null)
{
string returnUrl = string.Format(
System.Globalization.CultureInfo.InvariantCulture,
“{0}://{1}/_layouts/SignOut.aspx”,
HttpContext.Current.Request.Url.Scheme,
HttpContext.Current.Request.Url.Host);
HttpCookie signOutExpiredCookie =
new HttpCookie(SignOutCookieName, string.Empty);
signOutExpiredCookie.Expires = new DateTime(1970, 1, 1);
HttpContext.Current.Response.Cookies.
———————– Page 250———————–
claims-based single sign-on for microsoft sharepoint 2010 213 213
Remove(SignOutCookieName);
HttpContext.Current.Response.Cookies.
Add(signOutExpiredCookie);
WSFederationAuthenticationModule.FederatedSignOut(
loginProvider.ProviderUri, new Uri(returnUrl));
}
}
This method performs the sign-out by calling the SharePoint
SPFederationAuthenticationModule.FederatedSignOut method,
passing the address of the claims provider and the address of the
SharePoint web application’s sign-out page as parameters. To discover
This method reads the
the address of the claims provider, it uses an SPTrustedLogin provider name from a
Provider object: however, to get a reference to the SPTrustedLogin custom sign-out cookie
Provider object it needs its name, and it discovers the name by read- rather than from the
ing the custom sign-out cookie. IClaimsIdentity object
This method uses the SPSecurity.RunWithElevatedPrivileges associated with the current
user: this is because if the
method to invoke the GetLoginProvider method with “Full Control” user’s session has expired,
permissions. there will be no IClaims
The following code sample shows how Adatum creates the custom Identity object. Also,
sign-out cookie in the Session_SignedIn event. it’s not safe to read the
provider name from
private const string SignOutCookieName = “SPSignOut”; the FedAuth cookie.
void WSFederationAuthenticationModule_SignedIn(object sender,
EventArgs e)
{
IClaimsIdentity identity =
HttpContext.Current.User.Identity as IClaimsIdentity;
if (identity != null)
{
foreach (Claim claim in identity.Claims)
{
if (claim.ClaimType == SPClaimTypes.IdentityProvider)
{
int index = claim.Value.IndexOf(‘:’);
string loginProviderName = claim.Value.Substring(
index + 1, claim.Value.Length – index – 1);
HttpCookie signOutCookie = new HttpCookie(
SignOutCookieName,
Convert.ToBase64String(
System.Text.Encoding.UTF8.
GetBytes(loginProviderName)));
signOutCookie.Secure = FederatedAuthentication
.SessionAuthenticationModule
.CookieHandler.RequireSsl;
———————– Page 251———————–
214214 chapter eleven
signOutCookie.HttpOnly = FederatedAuthentication
.SessionAuthenticationModule.CookieHandler
.HideFromClientScript;
signOutCookie.Domain = FederatedAuthentication
.SessionAuthenticationModule.CookieHandler
.Domain;
HttpContext.Current.Response.Cookies.Add(signOutCookie);
break;
}
}
}
One of the key reasons
that Adatum selected this }
approach for handling
single sign-out was its The custom sign-out cookie is not encrypted or signed. It is
compatibility with the transported using SSL, and only contains the name of the
sliding-sessions implemen- user’s login provider.
tation that Adatum chose
to use. The sign-out You can find a complete listing of the global.asax file that Adatum
process must be initiated use in the a-Portal web application at the end of this chapter.
when the user is inactive
for more than the defined
period of inactivity and Displaying Claims in a Web Part
when the user’s SAML When you’re developing a claims-enabled SharePoint solution, it’s
token ValidTo time is useful to be able to view the set of claims that a user has when he
reached. For details about
visits a SharePoint web application. The Visual Studio solution called
how Adatum implemented
sliding sessions in the DisplayClaimsWebPart in the 10SharePoint folder from http://claim-
a-Portal web application sid.codeplex.com includes a SharePoint Web Part that displays claims
see Chapter 12, “Federated data for the current user. The Web Part displays the following claims
Identity for SharePoint data:
Applications.” • The claim type.
• The claim issuer (this is typically SharePoint).
• The original claim issuer (this might be a trusted provider
or the SharePoint STS).
• The claim value.
This is a standard Web Part that you can deploy to a SharePoint
web application directly from Visual Studio or through the SharePoint
UI. After the Web Part is deployed to SharePoint you can add it to any
SharePoint web page. It does not require any further configuration.
User Profile Synchronization
A claims-enabled SharePoint environment can synchronize user pro-
file data stored in the SharePoint profile store with profile data that
is stored in directory services and other business systems in the enter-
prise. The important difference in the way that user profiles work in
a claims-enabled web application such as the Adatum a-Techs Share-
———————– Page 252———————–
claims-based single sign-on for microsoft sharepoint 2010 215 215
Point application is how SharePoint identifies the correct user profile
from the claims data associated with an SPUser instance.
To make sure that SharePoint can match up a user profile from the
current SPUser instance, you must ensure that three user properties
are correctly configured.
Property name Property value
Claim User Identifier This is the unique identifier for a user. For Adatum,
this is the value it used for the IdentifierClaim
parameter when it configured the SharePoint trusted
identity token issuer: http://schemas.xmlsoap.org/
ws/2005/05/identity/claims/emailaddress. To test this, you
must have SharePoint
Claim Provider Identifier This identifies the trusted identity token issuer. For
2010 Server
Adatum this value is “SAML Provider.” This value is
set automatically when you configure the user profile (not Foundation)
installed in Farm
synchronization service.
(not Standalone)
Claim Provider Type This specifies the token provider type. For Adatum mode.
this value is “Trusted Claims Provider Authentica-
tion.” This value is set automatically when you
configure the user profile synchronization service.
Setup and Physical Deployment
To run this scenario in a lab environment you may want to change
some of the default configuration options in SharePoint and ADFS.
FedAuth Tokens
Each SharePoint web application must have its own FedAuth cookie
if it is to function correctly in an single sign-on environment. In a
production environment, this is not normally an issue because each
SharePoint web application has a separate host name: for example,
a-portal.adatum.com, and a-techs.adatum.com. However, in a lab en-
vironment you may not want to configure the necessary DNS infra-
structure to support this; if your SharePoint web applications share
the same host name, for example lab-sp.adatum.com:31242 and lab-
sp.adatum.com:40197, then you must make a configuration change to
make sure that each application uses a different name for the FedAuth
cookie. You can change the name of the FedAuth cookie in the micro-
soft.IdentityModel section of the Web.config file. The following
snippet shows how to change the token name to “techsFedAuth”
from its default name of “FedAuth.”
<federatedAuthentication>
…
<cookieHandler mode=”Custom” path=”/” name=”techsFedAuth”>
…
</federatedAuthentication>
———————– Page 253———————–
216216 chapter eleven
ADFS Default Authentication Method
By default, an Active Directory Federation Services (ADFS) server
installation uses Integrated Windows Authentication, and an ADFS
proxy installation uses an ASP.NET form to collect credentials. In a lab
environment, if you do not have an ADFS proxy installation, you may
want to change the default behavior of the ADFS server to use an
ASP.NET form. To change this, edit the Web.config file in the /adfs/ls
folder. The following snippet shows “Forms” at the top of the list,
making it the default. This means that in a simple lab environment you
will always need to sign in explicitly.
<microsoft.identityServer.web>
<localAuthenticationTypes>
<add name=”Forms” page=”FormsSignIn.aspx” />
<add name=”Integrated” page=”auth/integrated/” />
<add name=”TlsClient” page=”auth/sslclient/” />
<add name=”Basic” page=”auth/basic/” />
</localAuthenticationTypes>
…
</microsoft.identityServer.web>
Server Deployment
ADFS enables you to deploy proxy instances that are intended to
handle authentication requests from the web rather than the internal
corporate network which are handled by the main ADFS server in-
stances. This provides an addition layer of security because the main
ADFS server instances can be kept inside the corporate firewall. For
more information about deploying ADFS servers and ADFS server
proxies, see this section on the TechNet website: http://technet.mi-
crosoft.com/en-us/library/gg982491(ws.10).aspx. You will also need
to ensure that your SharePoint web application is exposed to the in-
ternet to allow Adatum employees to access it remotely.
Questions
1. Which of the following roles can the embedded STS
in SharePoint perform?
a. Authenticating users.
b. Issuing FedAuth tokens that contain the claims
associated with a user.
c. Requesting claims from an external STS such as ADFS.
———————– Page 254———————–
claims-based single sign-on for microsoft sharepoint 2010 217 217
d. Requesting claims from Active Directory through
Windows Authentication.
2. Custom claim providers use claims augmentation to perform
which function?
a. Enhancing claims by verifying them against an external
provider.
b. Enhancing claims by adding additional metadata to
them.
c. Adding claims data to the identity information in the
SPUser object if the SharePoint web application is in
“legacy” authentication mode.
d. Adding additional claims to the set of claims from the
identity provider.
3. Which of the following statements about the FedAuth
cookie in SharePoint are correct?
a. The FedAuth cookie contains the user’s claim data.
b. Each SharePoint web application has its own FedAuth
cookie.
c. Each site collection has its own FedAuth cookie.
d. The FedAuth cookie is always a persistent cookie.
4. In the scenario described in this chapter, why did Adatum
choose to customize the people picker?
a. Adatum wanted the people picker to resolve role
and organization claims.
b. Adatum wanted the people picker to resolve name
and emailaddress claims from ADFS.
c. Adatum wanted to use claims augmentation.
d. Adatum wanted to make it easier for site
administrators to set permissions reliably.
5. In order to implement single sign-out behavior in Share-
Point, which of the following changes did Adatum make?
a. Adatum modified the standard signout.aspx page to
send a wsignoutcleanup message to ADFS.
b. Adatum uses the SessionAuthenticationModule
SigningOut event to customize the standard sign-out
process.
———————– Page 255———————–
218218 chapter eleven
c. Adatum added custom code to invalidate the FedAuth
cookie.
d. Adatum configured SharePoint to use a session-based
FedAuth cookie.
More Information
For more information about SharePoint and claims-based identity,
see Appendix F, “SharePoint 2010 Authentication Architecture and
Considerations.”
For a detailed, end-to-end walkthrough that describes how to
configure SharePoint and ADFS, see this blog post: http://blogs.tech-
net.com/b/speschka/archive/2010/07/30/configuring-sharepoint-
2010-and-adfs-v2-end-to-end.aspx.
The following resources are useful if you are planning to create a
custom people picker component for your SharePoint environment:
• People Picker overview (SharePoint Server 2010): http://
technet.microsoft.com/en-us/library/gg602068.aspx
• Custom claims providers for People Picker (SharePoint Server
2010): http://technet.microsoft.com/en-us/library/gg602072.
aspx
• Creating Custom Claims Providers in SharePoint 2010: http://
msdn.microsoft.com/library/gg615945.aspx
• Claims Walkthrough: Writing Claims Providers for SharePoint
2010: http://msdn.microsoft.com/en-us/library/ff699494.aspx
• How to Override the Default Name Resolution and Claims
Provider in SharePoint 2010: http://blogs.technet.com/b/
speschka/archive/2010/04/28/how-to-override-the-default-
name-resolution-and-claims-provider-in-sharepoint-2010.aspx
For further information about using profiles in a claims-enabled
SharePoint environment, see this blog post: http://blogs.msdn.com/b/
brporter/archive/2010/07/19/trusted-identity-providers-amp-user-
profile-synchronization.aspx.
———————– Page 256———————–
12 Federated Identity
for SharePoint
Applications
In previous chapters, you saw ways that federated identity can help
companies share resources with their partners. The scenarios have
included small numbers of partners as well as large numbers of con-
stantly changing partners, sharing web applications and web services,
and supporting multiple client platforms. These scenarios share an
important feature: they all use claims.
In Chapter 11, “Claims-Based Single Sign-On for Microsoft Share-
Point 2010,” you saw how Adatum could expand its single sign-on
domain to include Microsoft® SharePoint® services web applications.
The SharePoint web applications at Adatum used claims-based
authentication, using claims from an external token issuer Microsoft
Active Directory® Federation Services (ADFS). Adatum wants to allow
In this chapter, you’ll learn how Adatum lets employees at one selected partners access to
of its customers, Litware, use the a-Portal SharePoint application its SharePoint a-Portal
that was introduced in Chapter 11, “Claims-Based Single Sign-On for web application.
Microsoft SharePoint 2010.”
The Premise
The a-Portal SharePoint application has given Adatum sales personnel
access to up-to-date and accurate product information during the
sales process, which has resulted in improved customer satisfaction.
However, there have been complaints from customers who make
purchases through of Adatum’s partners that some of the product
information has been out of date. This is because Adatum’s partners
are responsible for keeping the product information that they use up
to date. One of these sales partners is Litware. Rick, the CIO of Lit-
ware, has seen the a-Portal SharePoint application and he is keen for
his sales staff to use a-Portal instead of their own copy of the product
information. Adatum has already claims-enabled the a-Portal Share-
Point application (for further information see Chapter 11, “Claims-
219
———————– Page 257———————–
220220 chapter twelve
Based Single Sign-On for Microsoft SharePoint 2010″) and made it
available to Adatum employees who work remotely on the Internet.
Litware has already deployed ADFS, so most of the required federa-
tion infrastructure is already available.
Goals and Requirements
The primary goal of this scenario is to show how to create a Share-
Point site that uses federated identities, so that users from Litware
can access the Adatum a-Portal SharePoint application without hav-
ing to sign in again to the Adatum security realm. The types of claims
issued by Litware are not the same types as the claims used by a-
Portal at Adatum, so it’s necessary to include some claims transforma-
tion logic to convert the claims issued by Litware. Adatum anticipates
that other sales partners will also want to use the a-Portal application,
so the solution must be able to accommodate multiple identity pro-
viders.
The solution should also ensure that partners are kept isolated.
For example, there may be some product information that only Ada-
tum and not Litware sales personnel should see.
For security, Adatum wants to have SharePoint automatically sign
users out of the a-Portal application after a period of inactivity. In
addition, because users will be accessing the a-Portal application on
computers outside the Adatum corporate network, when a user
closes the browser and then re-opens it, the user must re-authenticate
to gain access to the a-Portal web application.
Overview of the Solution
Adatum has deployed
an ADFS proxy to Figure 1 shows an overview of the solution adopted by Adatum and
support authenticating
users outside of the Litware. It shows a new trust relationship between Adatum’s issuer,
Adatum corporate and Litware’s issuer. In addition to acting as an identity provider (IdP)
network. for Adatum employees, the Adatum ADFS instance now functions as
a federation provider (FP) for partners such as Litware.
———————– Page 258———————–
feder ated identity for sharepoint applications 221 221
Trust
Trust
STS Adatum FP Litware IP
ADFS
ADFS
FedAuth
Cookie 1
2
Team
Site
3
a−Portal
Browser
SharePoint
Rick at Litware
figure 1 Adatum Litware
Federating identity with Litware
When Rick, a user from Litware, browses to the a-Portal Share-
Point web application, SharePoint detects that Rick is not authenti-
cated, and redirects his browser to the Adatum federation provider.
The Adatum federation provider then redirects Rick’s browser to the
Litware issuer.
For details about how to customize the way that SharePoint redi-
rects a user to a token issuer, see the section “The Sign-In Page” in
Chapter 11, “Claims-Based Single Sign-On for Microsoft SharePoint
2010.”
The numbers in the following list correspond to the numbers in
Figure 1.
1. Rick authenticates with the Litware identity provider and
obtains a SAML token with claims issued by Litware.
2. Rick’s browser redirects back to the Adatum issuer. This
federation provider can apply some custom claims mapping
rules to the set of claims from Litware to create a set of
claims suitable for the a-Portal web application. The
federation provider issues this new set of claims as a SAML
token.
———————– Page 259———————–
222222 chapter twelve
3. Rick’s browser redirects back to SharePoint. SharePoint
validates the token, checks any authorization rules that
apply to the page that Rick requested, and if Rick has
permission, displays the page.
Adatum considered two alternative models for federating with
partners. The first, which is the one that Adatum selected, is shown in
Figure 2.
Trust
Trust
Trust
STS Adatum FP Litware IP
ADFS
FedAuth
Cookie
Fabrikam IP
Trust
Team
Site
a−Portal
Constoso IP
SharePoint
figure 2 Adatum Partners
The hub model
In the hub model, SharePoint has a single trust relationship with
the Adatum federation provider. The Adatum federation provider
then trusts the partners’ issuers. The Adatum federation provider can
apply rules to the claims from the different identity providers to cre-
ate claims that the SharePoint web application understands.
Figure 3 shows the alternative model.
———————– Page 260———————–
feder ated identity for sharepoint applications 223 223
Trust
STS Adatum FP Litware IP
Trust
ADFS
FedAuth
Cookie
Trust
Fabrikam IP
Team
Site
a−Portal Trust
Constoso IP
SharePoint
figure 3 Adatum Partners
The direct trust model
In the direct trust model, SharePoint manages a trust relationship
with each issuer directly, and uses custom claims providers to manipu-
late the incoming claims to a common set of claims that the a-Portal
web application understands.
The advantages of the hub model adopted by Adatum are that:
1. It’s easier to manage multiple trust relationships in ADFS An advantage of the
rather than SharePoint. SAMLP protocol over
WS-Federation is that it
2. It’s simpler to manage a single trust relationship in Share- supports initializing the
Point and it avoids the requirement for multiple custom authentication process
claims providers. from the identity provider
3. You can reuse the trust relationships in the federation instead of the relying party,
provider with other relying parties. which avoids the require-
ment for either the relying
4. You can leverage ADFS features such as integration with party (RP) or the federation
auditing tools to track token issuing. provider to perform
5. ADFS supports the Security Assertion Markup Language home-realm discovery.
protocol (SAMLP) in addition to WS-Federation.
———————– Page 261———————–
224224 chapter twelve
The disadvantage of the hub approach is its performance: it re-
quires more hops to acquire a valid SAML token. With this in mind,
Adatum made some changes to the token caching policy in the a-
Portal web application to reduce the frequency at which it’s necessary
to refresh the SAML token. However, Adatum is using session cookies
rather than persistent cookies to store the SAML token references so
that if the user closes his browser, then he will be forced to re-authen-
ticate when he next visits the a-Portal web application.
Adatum implemented sliding sessions for users of the a-Portal
web application: after a token issuer authenticates a user, the user can
Strictly speaking, continue using the a-Portal web application without having to re-au-
the session cookie thenticate if he remains active. If a user becomes inactive in the web
doesn’t contain application for more than a defined period, then he must re-authenti-
the SAML token, it cate with the claims issuer and obtain a new SAML token. With the
contains a reference sliding-sessions solution in place:
to the SAML token
in the SharePoint • Provided a user remains active in the a-Portal web application,
token cache. SharePoint will not interrupt the user and require him to
re-authenticate with the SAML token issuer.
• The a-Portal web application remains secure because users who
It’s important that the sliding- become inactive must re-authenticate when they start using the
session implementation is application again.
compatible with the single
sign-out solution that Chapter
11, “Claims-Based Single Inside the Implementation
Sign-On for Microsoft
SharePoint 2010,” describes. The following sections describe the key configuration steps that Ada-
tum performed in order to implement the scenario that this chapter
describes. The hub model that Adatum selected meant that the
changes in SharePoint were minimal: there is still a single trust rela-
tionship with the Adatum issuer.
The following sections describe the changes Adatum made to the
a-Portal web application in SharePoint to support access from partner
organizations.
Token Expiration and Sliding Sessions
One of the Adatum requirements was that the a-Portal application
automatically sign users out after a defined period of inactivity, but
allow them to continue working with the application without re-au-
The main configura- thenticating so long as they remain active. To achieve this, Adatum
tion changes were
in ADFS: adding the implemented a sliding-session mechanism in SharePoint that can re-
trust relationship with new the SharePoint session token. For performance reasons, Adatum
Litware and adding wanted to be able to extend the lifetime of the session token without
the rules to convert having to revisit ADFS (the federation provider) or the partner’s token
Litware claims to
issuer.
Adatum claims.
———————– Page 262———————–
feder ated identity for sharepoint applications 225 225
A cookie (usually named FedAuth) that can exist either as a persis-
tent or in-memory cookie represents the SharePoint session token.
This cookie contains a reference to the SAML token that SharePoint
stores in its token cache. The SAML token contains the claims issued
to the user by any external identity and federation providers, and by
the internal SharePoint security token service (STS).
Before showing the details of how Adatum implemented sliding
sessions, it will be useful to understand how token expiration works
by default in SharePoint.
SAML Token Expiration in SharePoint
This section describes the standard behavior in SharePoint as it relates
to token expiration.
When Rick from Litware first tries to access the a-Portal web
application, his browser performs all of the following steps in order to
obtain a valid SAML token:
1. Rick requests a page in the a-Portal web application.
2. Rick’s browser redirects to the SharePoint STS.
3. Because Rick is not yet authenticated, the SharePoint STS
redirects Rick’s browser to the Adatum issuer to request a
token.
4. The Adatum issuer redirects Rick’s browser to the Litware
issuer to authenticate and obtain a Litware token.
5. Rick’s browser returns to the Adatum issuer to transform
the Litware token into an Adatum token.
6. Rick’s browser returns to the a-Portal web application to
sign in to SharePoint.
7. Rick’s browser returns to the page that Rick originally
requested in the a-Portal web application to view. When Rick’s SAML token
expires he may, or may
All SAML tokens have a fixed lifetime that the token issuer
not, need to re-enter his
specifies when it issues the token; in the Adatum scenario, it is the credentials at the token
Adatum ADFS that sets this value. Once a token has expired, the user issuer (ADFS): this depends
must request a new SAML token from the token issuer. For Rick at on the configuration of
Litware, this means repeating the steps listed above. Because this the issuer. In ADFS, you
can specify the web single
takes time, Adatum does not want users such as Rick to have to reau- sign-on (SSO) lifetime that
thenticate too frequently. However, using a token with a long lifetime determines the lifetime of
can be a security risk because someone else could use Rick’s com- the ADFS SSO cookie.
puter while he wasn’t there and access the a-Portal web application
with Rick’s cached token.
———————– Page 263———————–
226226 chapter twelve
The following table describes the two configuration options that
directly affect when SharePoint requires a user to get a new SAML
token from the issuer.
Configuration value Notes
SAML token lifetime The token issuer sets this value. In ADFS, you can
configure this separately for each relying party by using
the Set-ADFSRelyingPartyTrust PowerShell command.
Once the SAML token expires, the SharePoint session
expires, and the user must re-authenticate with the
token issuer to obtain a new SAML token.
By default, SharePoint sets the session lifetime to be the
same as the SAML token lifetime.
LogonTokenCache- This SharePoint configuration value controls when
ExpirationWindow SharePoint will consider that the SAML token has
expired and ask the user to re-authenticate with the
issuer and obtain a new token. SharePoint checks
whether the SAML token has expired at the start of
every request.
For example, if ADFS sets the SAML token lifetime to
Make sure that the ten minutes, and the LogonTokenCacheExpirationWin-
value of the Logon dow property in SharePoint is set to two minutes, then
TokenCache the session in SharePoint will be valid for eight minutes.
ExpirationWindow If the user requests a page from SharePoint seven
property is always minutes after signing in, then SharePoint checks whether
less than the SAML the session is set to expire during the time in minutes
token lifetime; represented by LogonTokenCacheExpirationWindow:
otherwise, you’ll see in this case the answer is no because seven plus two is
a loop whenever a less than ten.
user tries to access If the user requests a page from SharePoint nine minutes
your SharePoint web after signing in, then SharePoint checks whether the
application and keeps session is set to expire during the time in minutes
being redirected back represented by LogonTokenCacheExpirationWindow:
to the token issuer. in this case the answer is yes because nine plus two is
greater than ten.
The following script example shows you how to change the life-
time of the SAML token issued by the “SharePoint Adatum Portal”
relying party in ADFS to 10 minutes.
Add-PSSnapin Microsoft.ADFS.PowerShell
Set-AdfsRelyingPartyTrust –TargetName “SharePoint Adatum Portal”
–TokenLifeTime 10
The following script example shows you how to change the
LogonTokenCacheExpirationWindow in SharePoint to two minutes.
$ap = Get-SPSecurityTokenServiceConfig
$ap.LogonTokenCacheExpirationWindow = (New-TimeSpan -minutes 2)
$ap.Update();
IIsreset
———————– Page 264———————–
feder ated identity for sharepoint applications 227 227
These two configuration settings will cause SharePoint to redi-
rect the user to the issuer to sign in again eight minutes after the user
last authenticated with ADFS.
The sequence diagram in Figure 4 shows how SharePoint manages
its session lifetime and the SAML token that it receives from the to-
ken issuer.
SharePoint SharePoint SAML Token
Browser a−Portal Web SharePoint Home Realm WS−Federation Issuer
Application Authenticate.aspx Discovery Endpoint (ADFS)
Get /SitePages/Home.aspx −No session exists
−Redirect to: −No session exists
/_layouts/Authenticate.aspx −Redirect to: −Request a SAML token
1 from the SharePoint STS
/_login/default.aspx −Redirect to:
−Request a SAML token
/_trust/default.aspx
from the identity provider
−Redirect to ADFS
−Save the SAML token in −Post SAML token to the
the SharePoint token cache SharePoint STS at:
T −Redirect to the originally −Create a Session
R /_trust/
requested page −Redirect to:
Get −The user now has a /_layouts/Authenticate.aspx
/Lists/Tasks/AllItems.aspx valid session 2
3 −The session has expired
−Redirect to: −The session has expired −Request a SAML token
Get /SitePages/Home.aspx /_layouts/Authenticate.aspx Redirect to: from the SharePoint STS
/_login/default.aspx −Redirecr to:
4 /_trust/default.aspx −Request a SAML token
from the identity provider
−Redirect to ADFS
−Post SAML token to the
T −Save the SAML token in SharePoint STS at:
R −Redirect to the originally the SharePoint token cache /_trust/
Get requested page −Create a session
/Lists/Tasks/AllItems.aspx −The user now has a −Redirect to:
valid session /_layouts/Authenticate.aspx
figure 4
Standard token expiration in SharePoint
Figure 4 shows a simplified view of the sequence of interactions. In
reality, SharePoint and the WS-Federation protocol use browser
redirects and automatic posts to manage the interactions between
the various components so that all of the requests go through the
browser.
In the sequence diagram, TR represents the time from when ADFS
issues the SAML token to when SharePoint will try to renew the to-
ken. Based on the configuration settings described above, T is set to
R
eight minutes.
———————– Page 265———————–
228228 chapter twelve
The following notes refer to the numbers on the sequence diagram:
1. This is the first time that the user visits the a-Portal web
application; there is no valid session so SharePoint redirects
the user to begin the sign-in process.
2. SharePoint creates a session for the user. The lifetime of the
session is the same as the lifetime of the SAML token issued
by ADFS.
3. SharePoint uses the session lifetime and the LogonToken
CacheExpirationWindow property to determine when the
user must sign in again. At this point, the session is still valid.
While the session is valid, the user can continue to visit
pages in the SharePoint web application.
4. SharePoint uses the session lifetime and the LogonToken
CacheExpirationWindow property to determine when the
user must sign in again. At this point, SharePoint determines
that the session has expired, so it begins the sign-in process
again. If the ADFS SSO cookie has expired, Rick will have
to enter his credentials to obtain a new SAML token.
To force users to re-enter their credentials whenever they are
redirected back to ADFS, you should set the web SSO lifetime in
ADFS to be less than or equal to SAMLtokenlifetime minus the
value of LogonTokenCacheExpirationWindow. In the Adatum
scenario, the web SSO lifetime in ADFS should be set to eight
minutes to force users to re-authenticate when SharePoint redirects
them to ADFS.
Sliding Sessions in SharePoint
Adatum wanted to implement sliding sessions so that SharePoint can
extend the lifetime of the session if the user remains active. Adatum
wanted to be able to define an inactivity period, after which Share-
Point forces the user to re-authenticate with ADFS. In other words, a
user will only need to sign in again if the session is allowed to expire
or if the SAML token expires. In this scenario, the session lifetime will
be less than the SAML token lifetime.
To implement this behavior, Adatum first configured ADFS to is-
sue SAML tokens with a lifetime of eight hours. The following Micro-
soft Windows® PowerShell® command-line interface script shows
how you can configure this setting in ADFS for the SharePoint
Adatum Portal relying party.
———————– Page 266———————–
feder ated identity for sharepoint applications 229 229
Add-PSSnapin Microsoft.ADFS.PowerShell
Set-AdfsRelyingPartyTrust –TargetName “SharePoint Adatum Portal”
–TokenLifeTime 480
By setting the LogonTokenCacheExpirationWindow value to
470 minutes, Adatum can effectively set the session duration to 10
minutes.
$ap = Get-SPSecurityTokenServiceConfig
$ap.LogonTokenCacheExpirationWindow = (New-TimeSpan -minutes 470)
$ap.Update();
IIsreset
Remember:
Adatum then modified the way that SharePoint manages its ses- A reference to the
sions. SharePoint now recreates a new session before the existing SAML token in the
session expires (as long as the user visits the SharePoint web applica- SharePoint token
tion before the existing session expires). A user can continue to recre- cache is stored in the
ate sessions up to the time that the SAML token finally expires; in this session. The session
scenario, the user could continue using the a-Portal web application is represented by the
FedAuth cookie.
for eight hours without having to re-authenticate. If the user doesn’t
visit the web application before the session expires, then on the next
visit he must sign in again. The Microsoft Visual Studio® development
system solution, SlidingSessionModule, found in the 10SharePoint
folder from http://claimsid.codeplex.com includes a custom HTTP
module to deploy to your SharePoint web application that includes
this functionality. The following code sample from the Adatum cus-
tom HTTP module shows the implementation.
public void Init(HttpApplication context)
{
// Sliding session
FederatedAuthentication.SessionAuthenticationModule
.SessionSecurityTokenReceived +=
SessionAuthenticationModule_SessionSecurityTokenReceived;
…
}
private void SessionAuthenticationModule_
SessionSecurityTokenReceived(
object sender,
SessionSecurityTokenReceivedEventArgs e)
{
double sessionLifetimeInMinutes
= (e.SessionToken.ValidTo –
e.SessionToken.ValidFrom).TotalMinutes;
———————– Page 267———————–
230230 chapter twelve
var logonTokenCacheExpirationWindow = TimeSpan.FromSeconds(1);
SPSecurity.RunWithElevatedPrivileges(delegate()
{
logonTokenCacheExpirationWindow =
Microsoft.SharePoint.Administration.Claims
.SPSecurityTokenServiceManager
.Local.LogonTokenCacheExpirationWindow;
});
DateTime now = DateTime.UtcNow;
DateTime validTo = e.SessionToken.ValidTo
– logonTokenCacheExpirationWindow;
DateTime validFrom = e.SessionToken.ValidFrom;
if ((now < validTo) &&
(now > validFrom.AddMinutes(
(validTo – validFrom).TotalMinutes / 2)))
{
SessionAuthenticationModule sam
= FederatedAuthentication.SessionAuthenticationModule;
e.SessionToken = sam.CreateSessionSecurityToken(
e.SessionToken.ClaimsPrincipal,
e.SessionToken.Context, now,
now.AddMinutes(sessionLifetimeInMinutes),
e.SessionToken.IsPersistent);
e.ReissueCookie = true;
}
}
This method first determines the valid from time and valid to time
of the existing session, taking into account the value of the Logon
TokenCacheExpirationWindow property. Then, if the existing ses-
sion is more than halfway through its lifetime, the method uses the
SPSessionAuthenticationModule instance to extend the session. It
does this by creating a new session that has the same lifetime as the
original, but which has a ValidFrom property set to the current time.
The sequence diagram in Figure 5 shows how SharePoint handles
Adatum’s sliding-sessions implementation.
———————– Page 268———————–
feder ated identity for sharepoint applications 231 231
SharePoint SharePoint SAML Token
Browser a−Portal Web SharePoint Home Realm WS−Federation Issuer
Application Authenticate.aspx Discovery Endpoint (ADFS)
Get /SitePages/Home.aspx −No session exists
−Redirect to: −No session exists
/_layouts/Authenticate.aspx −Redirect to: −Request a SAML token
1 from the SharePoint STS
/_login/default.aspx −Redirect to:
/_trust/default.aspx
−Request a SAML token
from the identity provider
−Redirect to ADFS
T Get −Redirect to the originally −Save the SAML token in −Post SAML token to the
F /Lists/Tasks/AllItems.aspx requested page the SharePoint token cache SharePoint STS at:
−The user now has a −Create a session FedAuth /_trust/
valid session cookie.
3 −Redirect to:
/_layouts/Authenticate.aspx
Get /SitePages/Page1.aspx
2
T 4
F
Get /SitePages/Home.aspx −The session has expired −The session has expired
−Redirect to:
/_layouts/Authenticate.aspx Redirect to: ….
5 /_login/default.aspx
figure 5
Sliding sessions in the a-Portal web application
The sequence diagram shows a simplified view of the sequence of
interactions. In reality, SharePoint and the WS-Federation protocol
use browser redirects and automatic posts to manage the interac-
tions between the various components so all of the requests go
through the browser.
In the sequence diagram, TF represents the session lifetime. The
session lifetime also defines the inactivity period, after which a user
must re-authenticate with ADFS.
The following notes refer to the numbers on the sequence diagram:
1. This is the first time that the user visits the a-Portal web
application; there is no valid session so SharePoint redirects
the user to begin the sign-in process.
2. SharePoint creates a session for the user. The effective
lifetime of the session is the difference between the
lifetime of the SAML token issued by ADFS and the value
of the LogonTokenCacheExpirationWindow property.
For Adatum, the lifetime of the session is 10 minutes:
———————– Page 269———————–
232232 chapter twelve
the lifetime of the SAML token is 480 minutes, and the
value of the LogonTokenCacheExpirationWindow
property is 470 minutes.
3. SharePoint checks the age of the session. At this point,
although the session is still valid, it is nearing the end of
its lifetime so SharePoint creates a new session, copying
data from the existing session.
4. SharePoint checks the age of the session. At this point,
it is still near the beginning of its lifetime so SharePoint
continues to use this session.
5. SharePoint checks the age of the session. At this point,
the session has expired so SharePoint initiates the process
of re-authenticating with the identity provider.
Closing the Browser
The default behavior for SharePoint is to use persistent session cook-
ies. This enables a user to close the browser, re-open the browser, and
re-visit a SharePoint web application without signing in again. Adatum
wants users to always re-authenticate if they close the browser and
then re-open it and revisit the a-Portal web application. To enforce
this behavior, Adatum configured SharePoint to use an in-memory
instead of a persistent session cookie. You can use the following Pow-
erShell script to do this.
$sts = Get-SPSecurityTokenServiceConfig
$sts.UseSessionCookies = $true
$sts.Update()
iisreset
Authorization Rules
With multiple partners having access to the a-Portal SharePoint web
application, Adatum wants to have the ability to restrict access to
documents in the SharePoint document library based on the organiza-
tion that the user belongs to. Adatum wants to be able to use the
standard SharePoint groups mechanism for assigning and managing
permissions, so it needs some way to identify the organization a user
belongs to.
Adatum achieves this objective by using claims. Adatum has con-
figured ADFS to add an organization claim to the SAML token it is-
sues based on the federated identity provider that originally authen-
ticated the user. You should not rely on the identity provider to issue
the organization claim because a malicious administrator at a partner
———————– Page 270———————–
feder ated identity for sharepoint applications 233 233
organization could add an organization claim with another partner’s
value and gain access to confidential data.
Chapter 11, “Claims-Based Single Sign-On for Microsoft Share-
Point 2010,” describes how to add the organization claim to the Share-
Point people picker to make it easy for site administrators to set
permissions based on the value of the organization claim.
Home Realm Discovery
If Adatum shares the a-Portal web application with multiple partners,
each of those partners will have its own identity provider, as shown in
Figure 2 earlier in this chapter. With multiple identity providers in
place, there must be some mechanism for selecting the correct iden-
tity provider for a user to use for authentication, and that’s the home-
realm discovery process.
Adatum decided to customize the home-realm discovery page
that ADFS provides. The default page in ADFS (/adfs/ls/HomeRealm-
Discovery.aspx) displays a drop-down list of the claims provider trusts
configured in ADFS (claims provider trusts represent identity provid-
ers in ADFS) for the user to select an identity provider. ADFS then
redirects the user to the sign-in page at the identity provider. It’s easy
to customize this page with partner logos to make it easier for users
to select the correct identity provider. In addition, this page in ADFS
has access to the relying party identifier in the wtrealm parameter so
it can customize the list of identity providers based on the identity of
the SharePoint relying party web application. After a user has selected
an identity provider for the first time, ADFS can remember the choice Claims provider trusts
so that in the future, the user bypasses the home-realm discovery page represent identity providers
and redirects the browser directly to the identity provider’s sign-in in ADFS.
page.
For details about how to customize the ADFS home-realm discovery
page and configure how long ADFS will remember a user’s selection,
see this page on the MSDN® web site: http://msdn.microsoft.
com/en-us/library/bb625464(vs.85).aspx.
Adatum also considered the following options related to the
home-realm discovery page.
• Automatically determine a user’s home realm based on the user’s
IP address. This would remove the requirement for the user to
specify her home realm when she first visits ADFS; however, this
approach is not very reliable, especially with mobile and home
workers and does not provide any additional security because IP
addresses can be spoofed.
———————– Page 271———————–
234234 chapter twelve
• Perform the home-realm discovery in SharePoint instead of
ADFS. Adatum could customize the standard SharePoint login
page (usually located at C:\Program Files\Common Files\
Microsoft Shared\Web Server Extensions\14\template\identity-
model\login\default.aspx) to display the list of identity provid-
ers, and then append a whr parameter identifying the user’s
home realm to the address of the ADFS sign-in page. However,
the SharePoint login page only displays to the user if multiple
authentication types are configured in SharePoint; Adatum only
has a single authentication type configured for the a-Portal web
application so Adatum would need to override the behavior of
the standard login page so that it always displays. By default, all
SharePoint web applications share this login page, so SharePoint
You should be sure to would display the same list of identity providers regardless of
keep your SharePoint the SharePoint web application the user is accessing. You can
environment up to override this behavior and display a separate login page for each
date with the latest
patches from SharePoint web application.
Microsoft.
Questions
1. In the scenario described in this chapter, Adatum prefers to
maintain a single trust relationship between SharePoint and
ADFS, and to maintain the trust relationships with the
multiple partners in ADFS. Which of the following are valid
reasons for adopting this model?
a. It enables Adatum to collect audit data relating to
external sign-ins from ADFS.
b. It allows for the potential reuse of the trust relation-
ships with partners in other Adatum applications.
c. It allows Adatum to implement automatic home realm
discovery.
d. It makes it easier for Adatum to ensure that Share-
Point receives a consistent set of claim types.
2. When must a SharePoint user reauthenticate with the
claims issuer (ADFS in the Adatum scenario)?
a. Whenever the user closes and then reopens the
browser.
———————– Page 272———————–
feder ated identity for sharepoint applications 235 235
b. Whenever the ADFS web SSO cookie expires.
c. Whenever the SharePoint FedAuth cookie that
contains the SAML token expires.
d. Every ten minutes.
3. Which of the following statements are true with regard to
the Adatum sliding session implementation?
a. SharePoint tries to renew the session cookie before it
expires.
b. SharePoint waits for the session cookie to expire and
then creates a new one.
c. When SharePoint renews the session cookie, it always
requests a new SAML token from ADFS.
d. SharePoint relies on sliding sessions in ADFS.
4. Where is the organization claim that SharePoint uses to
authorize access to certain documents in the a-Portal web
application generated?
a. In the SharePoint STS.
b. In the identity provider’s STS; for example in the
Litware issuer.
c. In ADFS.
d. Any of the above.
5. Why does Adatum rely on ADFS to perform home realm
discovery?
a. It’s easier to implement in ADFS than in SharePoint.
b. You can customize the list of identity providers for
each SharePoint web application in ADFS.
c. You cannot perform home realm discovery in Share-
Point.
d. You can configure ADFS to remember a user’s choice
of identity provider.
———————– Page 273———————–
236236 chapter twelve
More Information
For information about Windows Identity Foundation (WIF) and
sliding sessions see this post: http://blogs.msdn.com/b/vbertocci/
archive/2010/06/16/warning-sliding-sessions-are-closer-than-they-
appear.aspx.
For more information about automated home-realm discovery,
see Chapter 6, “Federated Identity with Multiple Partners,” and
Chapter 7, “Federated Identity with Multiple Partners and Windows
Azure Access Control Service.”
———————– Page 274———————–
Appendix A Using Fedutil
This appendix shows you how to use the FedUtil wizard for the sce-
narios in this book. Note that a Security Token Service (STS) is
equivalent to an issuer.
Using FedUtil to Make an Application
Claims-Aware
This procedure shows how to use FedUtil to make an application
claims-aware. In this example, the application is a-Order.
First you’ll need to open the FedUtil tool. There are two ways to
do so. One way is to go to the Windows Identity Foundation (WIF)
SDK directory and run FedUtil.exe. The other is to open the single
sign-on (SSO) solution in Microsoft® Visual Studio® development
system, right-click the a-Order.ClaimsAware project, and then click
Add STS Reference. In either case, the FedUtil wizard opens.
T O MAKE AN APPLICATION CLAIMS-AWARE
1. In the Application configuration location box, enter the
location of the a-Order Web.config file or browse to it. In
the Application URI box, enter the Uniform Resource
Indicator (URI) for aOrder, and then click Next.
2. In the Security Token Service dialog box, select Use an
Existing STS. Alternatively, you can select Create a new
STS project in the current solution to create a custom
STS that you can modify.
3. In the STS federation metadata location box, enter the
URI of the federation metadata or browse to it, and then
click Next.
237
———————– Page 275———————–
238238 appendix a
4. In the Security token encryption dialog box, select No
encryption, and then click Next.
5. In the Offered claims dialog box, click Next.
6. On the Summary page, click Finish.
Along with using FedUtil, you must also make the following
changes:
• In the a-Expense Web.config file, change the name of Trusted
Issuer to Adatum. This is necessary because a-Expense uses a
custom data store for users and roles mapping. Names should
be formatted as Adatum\name. For example, Adatum\mary is
correctly formatted.
• Place the ADFS token signing certificate into the Trusted People
store of the local machine.
———————– Page 276———————–
Appendix B Message Sequences
Appendix B shows in detail the message sequences for the passive
(browser-based) and active (smart) client scenarios. It also includes
information about what the HTTP and, where applicable, Kerberos,
traffic looks like as the browser or client, the application, the issuer,
and Microsoft® Active Directory® directory service communicate
with each other.
239
———————– Page 277———————–
240240 appendix b
The Browser-Based Scenario
Figure 1 shows the message sequence for the browser-based scenario.
Rick : Browser App1: Relying ADFS : Issuer Active Directory :
Party Directory
GET /App1
Annonymous user?
1
HTTP 302
(redirect to issuer)
GET /FederationPassive?wtrealm=App1
Is Windows
2 Redirect to Windows Integrated Authentication
enabled?
sign-on page
GET /FederationPassive/
Integrated?wrealm=App1
3 HTTP 401 WWW-Authenticate:
Negotitiate
Kerberos ticket
request
Kerberos ticket
4 response
GET /FederationPassive/Integrated?wrealm=App1 and
Kerberos ticket (Authorization header)
Look up rules
for App1
ADFS allows
Query for user
you to configure attributes, such as
transformation
the email name
5 rules for each
and cost center.
application.
Create SAML
HTTP 200 <form action-“https://../App1”> token with Active
Directory
POST /App1 attributes as
wresult-<RequestSecurityTokenResponse… claims.
HTTP 302
/Default.aspx and WIF validates the token (the signature,
FAM cookie experation date, target audience,
6 encrypted, chunked, and trusted issuer).
and encoded in
base64 This is coordinated by the
WSFederation Authentication
Module (FAM).
GET /SomePage.aspx
and FedAuth cookie This is coordinated by the
SessionAuthentication
chunks
Module (SAM).
figure 1 7 HTTP 200 WIF decrypts the cookie
Message sequence for the /SomePage.aspx and populates the
browser-based scenario ClaimsPrincipal object.
———————– Page 278———————–
message sequences 241 241
Figure 2 shows the traffic generated by the browser.
figure 2
HTTP traffic
The numbers in the screenshot correspond to the steps in the
message diagram. In this example, the name of the application is a-
Expense.ClaimsAware. For example, step 1 in the screen shot shows
the initial HTTP redirect to the issuer that is shown in the message
diagram. The following table explains the symbols in the “#” column.
Symbol Meaning
Arrow An arrow indicates an HTTP 302 redirect.
Key A key indicates a Kerberos ticket transaction (the 401 code indicates
that authentication is required).
Globe A globe indicates a response to a successful request, which means
that the user can access a website.
STEP 1
The anonymous user browses to a-Expense and the Federation Au-
thentication Module (FAM), WSFederatedAuthenticationModule,
redirects the user to the issuer which, in this example, is located at
https://login.adatumpharma.com/FederationPassive. As part of the
request URL, there are four query string parameters: wa (the action to
execute, which is wsignin1.0), wtrealm (the relying party that this
token applies to, which is a-Expense), wctx (context data such as a
return URL that will be propagated among the different parties), and
wct (a time stamp).
Figure 3 shows the response headers for step 1.
———————– Page 279———————–
242242 appendix b
figure 3
Response headers for step 1
The FAM on a-Expense redirects the anonymous user to the issuer.
Figure 4 shows the parameters that are sent to the issuer with the
query string.
figure 4
Query string parameters
STEP 2
The issuer is Active Directory Federation Services (ADFS) 2.0 config-
ured with Integrated Windows® Authentication only. Figure 5 shows
that ADFS redirects the user to the integrated sign-on page.
ADFS can be configured to allow Integrated Windows Authentica –
tion and/or client certificate authentication and/or forms-based
authentication. In either case, credentials are mapped to an Active
Directory account.
———————– Page 280———————–
message sequences 243 243
figure 5
ADFS redirecting the user to the Integrated Windows Authentication page
STEP 3
The IntegratedSignIn.aspx page is configured to use Integrated Win-
dows Authentication on Microsoft Internet Information Services (IIS).
This means that the page will reply with an HTTP 401 status code and
the “WWW-Authenticate: Negotiate” HTTP header. This is shown in
Figure 6.
figure 6
ADFS returning WWW-Authenticate: Negotiate header
IIS returns the WWW-Authenticate:Negotiate header to let the
browser know that it supports Kerberos or NTLM.
———————– Page 281———————–
244244 appendix b
STEP 4
At this point, the user authenticates with Microsoft Windows creden-
tials, using either Kerberos or NTLM. Figure 7 shows the HTTP traffic
for NTLM, not Kerberos.
If the infrastructure, such as the browser and the service principal
names, are correctly configured, the client can avoid step 4 by
requesting a service ticket from the key distribution center that is
hosted on the domain controller. It can then use this ticket together
with the authenticator in the next HTTP request.
figure 7
NTLM handshake on the ADFS website
The Cookies/Login node for the request headers shows the
NTLM handshake process. This process has nothing to do with claims,
WS-Federation, Security Assertion Markup Language (SAML), or WS-
Trust. The same thing would happen for any site that is configured
———————– Page 282———————–
message sequences 245 245
with Integrated Windows Authentication. Note that this step does
not occur for Kerberos.
STEP 5
Now that the user has been successfully authenticated with Micro-
soft Windows credentials, ADFS can generate a SAML token based
on the Windows identity. ADFS looks up the claims mapping rules
The The RequestSecurityTokenRequestSecurityToken
associated with the application using the wtrealm parameter men- ResponseResponse is defined in the is defined in the
tioned in step 1 and executes them. The result of those rules is a set WS-Trust specification. It’s the WS-Trust specification. It’s the
of claims that will be included in a SAML assertion and sent to the shell that will enclose a token of shell that will enclose a token of
user’s browser. any kind. The most common any kind. The most common
The following XML code shows the token that was generated implementation of the token is implementation of the token is
SAML (version 1.1 or 2.0). SAML (version 1.1 or 2.0).
(some attributes and namespaces were deleted for clarity). The shell contains the lifetime The shell contains the lifetime
<t:RequestSecurityTokenResponse and the endpoint address for and the endpoint address for
this token.this token.
xmlns:t=”http://schemas.xmlsoap.org/ws/2005/02/trust”>
<t:Lifetime>
<wsu:Created>2009-10-22T14:40:07.978Z</wsu:Created>
<wsu:Expires>2009-10-22T00:40:07.978Z</wsu:Expires>
</t:Lifetime>
<wsp:AppliesTo> The token expiration
The token expiration
date (for WS-Fed).
<EndpointReference> date (for WS-Fed).
<Address>
https://www.adatumpharma.com/a-Expense.ClaimsAware/
</Address>
</EndpointReference> The token audience
The token audience
(for WS-Fed).
</wsp:AppliesTo> (for WS-Fed).
<t:RequestedSecurityToken>
<saml:Assertion
The SAML token is repreThe SAML token is –
MinorVersion=”1″
sented by an assertion that contains represented by an assertion
AssertionID=”_9f68…” Issuer=”http://…/Trust”> that contains certain conditions, certain conditions, such as the
<saml:Conditions expiration time and audience such as the expiration time
and audience restrictions.restrictions.
NotBefore=”2009-10-22T14:40:07.978Z”
NotOnOrAfter=”2009-10-22T00:40:07.978Z”>
<saml:AudienceRestrictionCondition> The token audience
The token audience
(for SAML).
<saml:Audience> (for SAML).
https://www.adatumpharma.com/a-Expense.ClaimsAware/
</saml:Audience>
</saml:AudienceRestrictionCondition>
</saml:Conditions>
Because the browser does not Because the browser does not
<saml:AttributeStatement>
hold a key that can prove its hold a key that can prove its
<saml:Subject>
identity, the token generated is identity, the token generated is
<saml:SubjectConfirmation> of type of type bearerbearer. In this scenario, . In this scenario,
<saml:ConfirmationMethod> enabling HTTPS is critical to enabling HTTPS is critical to
urn:oasis:names:tc:SAML:1.0:cm:bearer avoid potential attacks.avoid potential attacks.
———————– Page 283———————–
246246 appendix b
</saml:ConfirmationMethod>
</saml:SubjectConfirmation>
</saml:Subject>
<saml:Attribute
AttributeName=”name”
AttributeNamespace=
“http://…/ws/2005/05/identity/claims”>
<saml:AttributeValue>mary</saml:AttributeValue>
</saml:Attribute>
<saml:Attribute
AttributeName=”CostCenter”
AttributeNamespace=
“http://schemas.adatumpharma.com/2009/08/claims”>
<saml:AttributeValue>394002</saml:AttributeValue>
</saml:Attribute> The claims are represented
The claims are represented
by the SAML attributes,
</saml:AttributeStatement> by the SAML attributes,
where ClaimType equals the
<ds:Signature> where ClaimType equals the
AttributeNamespace and
AttributeNamespace and
<ds:SignedInfo> the AttributeName .
the AttributeName .
… The ClaimValue equals the
The ClaimValue equals the
</ds:SignedInfo> AttributeValue .
AttributeValue .
<ds:SignatureValue>
dCHtoNUbvVyz8…n0XEA6BI=
</ds:SignatureValue>
<KeyInfo> The signature and the public The signature and the public
<X509Data> key (an X.509 certificate that is key (an X.509 certificate that is
<X509Certificate> encoded in base64) that will be encoded in base64) that will be
MIIB6DCC…gUitvS6JhHdg used to verify the signature on the used to verify the signature on the
website. If the verification was website. If the verification was
</X509Certificate>
successful, you have to ensure that successful, you have to ensure that
</X509Data> the certificate is the one you trust the certificate is the one you trust
</KeyInfo> (either by checking its thumbprint (either by checking its thumbprint
</ds:Signature> or its serial number).or its serial number).
</saml:Assertion>
</t:RequestedSecurityToken>
<t:TokenType>
http://docs.oasis-open.org/wss/ The token generated is
The token generated is
oasis-wss-saml-token-profile-1.1#SAMLV1.1 SAML 1.1.
SAM 1.1.
</t:TokenType>
<t:RequestType>
http://schemas.xmlsoap.org/ws/2005/02/trust/Issue
</t:RequestType>
<t:KeyType>
http://schemas.xmlsoap.org/ws/2005/05/identity/NoProofKey
</t:KeyType>
</t:RequestSecurityTokenResponse>
———————– Page 284———————–
message sequences 247 247
STEP 6
Once ADFS generates a token, it needs to send it back to the applica-
tion. A standard HTTP redirect can’t be used because the token may
be 4 KB long, which is larger than most browsers’ size limit for a URL.
Instead, issuers generate a <form> that includes a POST method. The
token is in a hidden field. A script auto-submits the form once the
page loads. The following HTML code shows the issuer’s response.
<html>
<head>
<title>Working…</title>
</head>
<body>
<form
method=”POST”
name=”hiddenform”
action=
“https://www.adatumpharma.com/a-Expense.ClaimsAware/”>
<input type=”hidden” name=”wa” value=”wsignin1.0″ />
<input
type=”hidden”
name=”wresult”
value=”<t:RequestSecurityTokenResponse
xmlns…</t:RequestSecurityTokenResponse>”
/>
<input
type=”hidden”
name=”wctx”
value=”rm=0&id=passive&
ru=%2fa-Expense.ClaimsAware%2fdefault.aspx”
/>
<noscript>
<p>Script is disabled. Click Submit to continue.</p>
<input type=”submit” value=”Submit” />
</noscript>
</form>
<script language=”javascript”>
window.setTimeout(‘document.forms[0].submit()””’, 0);
</script>
</body>
</html>
———————– Page 285———————–
248248 appendix b
When the application receives the POST, the FAM takes control
of the process. It listens for the AuthenticateRequest event. Figure
8 shows the sequence of steps that occur in the handler of the
AuthenticateRequest event.
Event :
SessionSecurityTokenReceived
Arguments :
raw security token
Validate the token
with the
corresponding
security token
handler, such as
SAML 1.1, SAML 2.0,
encrypted or custom
Create the
ClaimsPrincipal object
with the claims inside.
Use the
ClaimsAuthenticationMananger
class to enrich the
ClaimsPrincipal
object.
Event :
SessionSecurityTokenValidated
Arguments :
ClaimsPrincipal
Create the
SessionsSecurityToken:
Encode(Chunk(Encrypt
(ClaimsPrincipal+lifetime+
[Original token])))
Set the HTTPContext.User
property to the
ClaimsPrincipal object.
Convert the session
token into a set
of chunked cookies.
Redirect to the
original return URL,
if it exists.
figure 8
Logic for an initial request to an application
———————– Page 286———————–
message sequences 249 249
Notice that one of the steps that the FAM performs is to create
the session security token. In terms of network traffic, this token is a
set of cookies named FedAuth[n] that is the result of compressing,
encrypting, and encoding the ClaimsPrincipal object. The cookies are
chunked to avoid exceeding any cookie size limitations. Figure 9
shows the HTTP response, where a session token is chunked into
three cookies.
figure 9
HTTP response from the website with a session token chunked into three
cookies
———————– Page 287———————–
250250 appendix b
STEP 7
The session security token (the FedAuth cookies) is sent on subse-
quent requests to the application. In the same way that the FAM
handles the AuthenticationRequest event, the SAM executes the
logic shown in Figure 10.
Check that the
cookie is present.
If it is,
recreate the
SessionSecurityToken
by decoding,
decrypting, and
decompressing
the cookie.
Event :
SessionSecurityTokenReceived
Arguments :
session token
Check the
SessionSecurityToken
expiration date.
Create the
ClaimsPrincipal object
with the claims inside.
Set the
HTTPContext.User
property to the
ClaimsPrincipal object.
figure 10
Logic for subsequent requests to the application
———————– Page 288———————–
message sequences 251 251
The FedAuth cookies are sent on each request. Figure 11 shows
the network traffic.
figure 11
Traffic for a second HTTP request
———————– Page 289———————–
252252 appendix b
The Active Client Scenario
The following section shows the interactions between an active client
and a web service that is configured to trust tokens generated by an
ADFS issuer. Figure 12 shows a detailed message sequence diagram.
Rick : Desktop Orders : ADFS : Issuer Active Directory :
Application Web Service Directory
Send the RequestSecurityToken message and the Use the LDAP to
UserNamePasswordToken in the security header. validate the user
1 name and password
credentials.
These interactions are orchestrated
by the WCF federation bindings. The Look up the claim
client proxy obtains a token the first mapping rules for
the Order
time it contacts the web service.
web service.
Query for user attributes
such as the email name
Send the RequestSecurityTokenResponse and cost center.
message and the signed SAML token.
Create the
SAML token
Send the Orders.GetOrders message and include
and the signed SAML token in the the user
security header attributes as
claims. Sign
the token
WIF validates and encrypt
it.
the token (the
signature, expiration
date, target audience,
and trusted issuer). ADFS allows you to
extract attributes from
2 stores other than Active
Directory. For example, you
WIF allows or denies can use a database, a web
access depending on service, or a file.
the result from the
ClaimsAuthorizationManager object.
Send the
Orders.GetOrders
response. Excecute the operation.
If the user makes another call
figure 12 to the web service, the token is
Active client scenario reused unless you create a new
message-diagram proxy.
———————– Page 290———————–
message sequences 253 253
Figure 13 shows the corresponding HTTP traffic for the active
client message sequence.
figure 13
HTTP traffic
Following are the two steps, explained in detail.
STEP 1
The Orders web service is configured with the wsFederationHttp-
Binding. This binding specifies a web service policy that requires the
client to add a SAML token to the SOAP security header in order to
successfully invoke the web service. This means that the client must
first contact the issuer with a set of credentials (the user name and
password) to get the SAML token. The following message represents
a RequestSecurityToken (RST) sent to the ADFS issuer (ADFS)
hosted at https://login.adatumpharma.com/adfs/services/trust/13/
usernamemixed. (Note that the XML code is abridged for clarity.
Some of the namespaces and elements have been omitted.)
<s:Envelope>
<s:Header>
<a:Action>
http://docs.oasis-open.org/ws-sx/ws-trust/200512/RST/Issue
</a:Action>
<a:To>
https://login.adatumpharma.com/adfs/
services/trust/13/usernamemixed
</a:To>
This is the endpoint of
<o:Security> This is the endpoint of the
the issuer that accepts a
<o:UsernameToken issuer that accepts a
UsernameToken.
UsernameToken.
u:Id=”uuid-bffe89aa-e6fa-404d-9365-d078d73beca5-1″>
<o:Username>
<!– Removed–>
</o:Username>
These are the credentials These are the credentials
<o:Password>
that are sent to the issuer.that are sent to the issuer.
<!– Removed–>
</o:Password>
</o:UsernameToken>
</o:Security>
———————– Page 291———————–
254254 appendix b
</s:Header>
<s:Body>
<trust:RequestSecurityToken
xmlns:trust=
“http://docs.oasis-open.org/ws-sx/ws-trust/200512”>
<wsp:AppliesTo>
<EndpointReference>
The client specifies the
<Address> The client specifies the
intended recipient of the
intended recipient of the token.
https://orders.adatumpharma.com/Orders.svc token. In this case, it is the
In this case, it is the Orders web
</Address> Orders web service.
service.
</EndpointReference>
</wsp:AppliesTo>
<trust:TokenType>
http://docs.oasis-open.org/wss/
The issuer expects a
The issuer expects a
oasis-wss-saml-token-profile-1.1#SAMLV1.1 SAML 1.1 token.
SAML 1.1 token.
</trust:TokenType>
<trust:KeyType>
http://docs.oasis-open.org/ws-sx/
ws-trust/200512/SymmetricKey
</trust:KeyType>
</trust:RequestSecurityToken>
</s:Body>
</s:Envelope>
The issuer uses the credentials to authenticate the user and exe-
cutes the corresponding rules to obtain user attributes from Active
Directory (or any other attributes store it is configured to contact).
<s:Envelope>
<s:Header>
<a:Action>http://docs.oasis-open.org/ws-sx/ws-trust/200512/RSTRC/
IssueFinal</a:Action>
</s:Header>
<s:Body>
<trust:RequestSecurityTokenResponseCollection
xmlns:trust=”http://docs.oasis-open.org/ws-sx/ws-trust/200512″>
The issuer specifies the
<trust:RequestSecurityTokenResponse> The issuer specifies the
lifetime of the token.
lifetime of the token.
<trust:Lifetime>
<wsu:Created>2009-10-22T21:15:19.010Z</wsu:Created>
<wsu:Expires>2009-10-22T22:15:19.010Z</wsu:Expires>
</trust:Lifetime>
<wsp:AppliesTo> The issuer specifies the
The issuer specifies the
<a:EndpointReference> intended recipient of the
intended recipient of the
token. In this case, it is the
<a:Address> token. In this case, it is the
Orders web service.
Orders web service.
https://orders.adatumpharma.com/Orders.svc
———————– Page 292———————–
message sequences 255 255
</a:Address>
</a:EndpointReference>
</wsp:AppliesTo>
<trust:RequestedSecurityToken>
<xenc:EncryptedData>
<xenc:EncryptionMethod
Algorithm=
“http://www.w3.org/2001/04/xmlenc#aes256-cbc” />
<KeyInfo>
<e:EncryptedKey>
<KeyInfo> The token was encrypted using an
The token was encrypted using an
<o:SecurityTokenReference> X.509 certificate (public key).
X.509 certificate (public key).
The web service must have the
<X509Data> The web service must have the
corresponding private key to
<X509IssuerSerial> corresponding private key to
decrypt it. This section acts as
decrypt it. This section acts as
<X509IssuerName>
a hint to help the web service
a hint to help the web service
CN=localhost select the correct key.
select the correct key.
</X509IssuerName>
<X509SerialNumber>
-124594669148411034902102654305925584353
</X509SerialNumber>
</X509IssuerSerial>
</X509Data>
</o:SecurityTokenReference>
</KeyInfo>
<e:CipherData>
<e:CipherValue>
WayfmLM9DA5….u17QC+MWdZVCA2ikXwBc=
</e:CipherValue>
</e:CipherData> This is the encrypted token. The
This is the encrypted token. The
token is a SAML assertion that
</e:EncryptedKey> token is a SAML assertion that
represents claims about the user.
</KeyInfo> represents claims about the user.
It’s signed with the issuer’s private
It’s signed with the issuer’s private
<xenc:CipherData>
signing key (see below for the
signing key (see below for the
<xenc:CipherValue> decrypted SAML assertion).
decrypted SAML assertion).
U6TLBMVR/M4Ia2Su……/oV+qg/VU=
</xenc:CipherValue>
</xenc:CipherData>
</xenc:EncryptedData>
</trust:RequestedSecurityToken>
<trust:RequestedProofToken>
<trust:ComputedKey>
http://docs.oasis-open.org/ws-sx/
ws-trust/200512/CK/PSHA1
</trust:ComputedKey>
</trust:RequestedProofToken>
<trust:TokenType>
———————– Page 293———————–
256256 appendix b
http://docs.oasis-open.org/wss/ The token that is
The token that is
generated is a
oasis-wss-saml-token-profile-1.1#SAMLV1.1 generated is a
SAML 1.1 token.
SAML 1.1 token.
</trust:TokenType>
<trust:KeyType>
http://docs.oasis-open.org/ws-sx/
ws-trust/200512/SymmetricKey
</trust:KeyType>
</trust:RequestSecurityTokenResponse>
</trust:RequestSecurityTokenResponseCollection>
</s:Body>
</s:Envelope>
If you had the private key to decrypt the token (highlighted above
as “<e:CipherValue>U6TLBMVR/M4Ia2Su…”), the following is what
you would see.
<saml:Assertion
MajorVersion=”1″
MinorVersion=”1″
This is the issuer identifier
This is the issuer identifier
AssertionID=”_a5c22af0-b7b2-4dbf-ac10-326845a1c6df”
(it’s a URI). It is different
(it’s a URI). It is different
Issuer=”http://login.adatumpharma.com/Trust” than the actual issuer
than the actual issuer
sign-on URL.
IssueInstant=”2009-10-22T21:15:19.010Z “> sign-on URL.
<saml:Conditions
NotBefore=”2009-10-22T21:15:19.010Z ”
NotOnOrAfter=”2009-10-22T22:15:19.010Z “>
<saml:AudienceRestrictionCondition>
<saml:Audience>
https://orders.adatumpharma.com/Orders.svc
</saml:Audience>
</saml:AudienceRestrictionCondition> The holder-of-key provides
The holder-of-key provides
proof of ownership of
</saml:Conditions> proof of ownership of
a signed SAML token.
<saml:AttributeStatement> a signed SAML token.
SOAP clients often use this
SOAP clients often use this
<saml:Subject>
approach to prove that an
approach to prove that an
<saml:SubjectConfirmation>
incoming request is valid.
incoming request is valid.
<saml:ConfirmationMethod> Note that a browser can’t
Note that a browser can’t
access a key store the way
urn:..:SAML:1.0:cm:holder-of-key access a key store the way
a smart client can.
</saml:ConfirmationMethod> a smart client can.
<KeyInfo>
<trust:BinarySecret>
ztGzs3I…VW+6Th38o=
</trust:BinarySecret>
</KeyInfo>
</saml:SubjectConfirmation>
</saml:Subject>
<saml:Attribute
———————– Page 294———————–
message sequences 257 257
AttributeName=”name”
The claims are represented
The claims are represented
AttributeNamespace=
by the SAML attributes.
by the SAML attributes.
“http://schemas.xmlsoap.org/ws/2005/05/identity/claims”> The ClaimType equals
The ClaimType equals
<saml:AttributeValue>rick</saml:AttributeValue> the AttributeNamespace
the AttributeNamespace
and the AttributeName .
</saml:Attribute> and the AttributeName .
The ClaimValue equals
<saml:Attribute The ClaimValue equals
the AttributeValue .
the AttributeValue .
AttributeName=”role”
AttributeNamespace=
“http://schemas.xmlsoap.org/ws/2005/05/identity/claims”>
<saml:AttributeValueOrderTracker</saml:AttributeValue>
</saml:Attribute>
</saml:AttributeStatement>
<ds:Signature>
This is the signature and
<ds:SignedInfo> … </ds:SignedInfo> This is the signature and
public key (an X.509 certificate
public key (an X.509 certificate
<ds:SignatureValue>
encoded in base64) that will be
encoded in base64) that will be
dCHtoNUbvVyz8…n0XEA6BI= used to verify the signature on
used to verify the signature on
</ds:SignatureValue> the web service. If the verification
the web service. If the verification
is successful, you must ensure that
<KeyInfo> is successful, you must ensure that
the certificate is the one you trust,
<X509Data> the certificate is the one you trust,
by checking either its thumbprint
by checking either its thumbprint
<X509Certificate>
or its serial number.
or its serial number.
MIIB6DCC…gUitvS6JhHdg
</X509Certificate>
</X509Data>
</KeyInfo>
</ds:Signature>
</saml:Assertion>
STEP 2
Once the client obtains a token from the issuer, it can attach the to-
ken to the SOAP security header and call the web service. This is the
SOAP message that is sent to the Orders web service.
Here are the SOAP
Here are the SOAP
<s:Envelope>
action and the URL
action and the URL
<s:Header>
of the web service.
of the web service.
<a:Action>http://tempuri.org/GetOrders</a:Action>
<a:To>https://orders.adatumpharma.com/Orders.svc</a:To>
<o:Security>
<u:Timestamp u:Id=”_0″>
<u:Created>2009-10-22T21:15:19.123Z</u:Created>
<u:Expires>2009-10-22T21:20:19.123Z</u:Expires>
</u:Timestamp>
<xenc:EncryptedData >
This is the token from
This is the token from
… the token we’ve got in step 1 … step 1, but encrypted.
step 1, but encrypted.
———————– Page 295———————–
258258 appendix b
</xenc:EncryptedData>
This is the signature of the
This is the signature of the
<Signature xmlns=”http://www.w3.org/2000/09/xmldsig#”>
message generated using the
message generated using the
… SAML assertion. This is a
SAML assertion. This is a
different signature from the
<SignatureValue> different signature from the
token signature. This signature
oaZFLr+1y/I2kYcAvyQv6WSkPYk= token signature. This signature
is generated for any security
</SignatureValue> is generated for any security
token (not just a SAML token)
token (not just a SAML token)
<KeyInfo>
to protect the message content
to protect the message content
<o:SecurityTokenReference> and source verification.
and source verification.
<o:KeyIdentifier
ValueType=
“http://docs.oasis-open.org/wss/
oasis-wss-saml-token-profile-1.0#
SAMLAssertionID”>
_a5c22af0-b7b2-4dbf-ac10-326845a1c6df
</o:KeyIdentifier>
</o:SecurityTokenReference>
</KeyInfo>
</Signature>
</o:Security>
</s:Header>
<s:Body>
<GetOrders xmlns=”http://tempuri.org/”>
<customerId>1231</customerId>
</GetOrders>
</s:Body>
</s:Envelope>
Windows Identity Foundation (WIF) and Windows Communica-
tion Foundation (WCF) will take care of decrypting and validating the
SAML token. The claims will be added to the ClaimsPrincipal object
and the principal will be added to the WCF security context. The
WCF security context will be used in the authorization manager by
checking the incoming claims against the operation call the client
wants to make.
The Browser-Based Scenario with
Access Control Service (ACS)
Figure 14 shows the message sequence for the browser-based sce-
nario that authenticates with a social identity provider and uses ACS
for protocol transition.
———————– Page 296———————–
message sequences 259 259
Adatum Simulated
a-Order ACS Google
Mary : Browser Issuer
(RP) (FP) (IdP)
(FP)
GET /a-Order.OrderTracking.6/
Anonymous user
1 HTTP 302
(redirect to issuer)
GET /Adatum.FederationProvider.6
Is the
2 HTTP 302 (redirect to HomeRealmDiscover.aspx) user already
authenticated?
GET /Adatum.FederationProvider.6/HomeRealmDiscovery.aspx
3
HTTP 200
POST /Adatum.FederationProvider.6/HomeRealmDiscovery.aspx
4 HTTP 302 (redirect to
Adatum.FederationProvider.6/Federation.aspx)
The diagram skips a
POST Adatum.FederationProvider.6/Federation.aspx number of steps here
where the user gives
5 HTTP 302 (redirect to Determine consent for Google to
federationwithacs-dev.accesscontrol.windows.net) Identity Provider release his email
address.
GET federationwithacs-devaccesscontrol.windows.net
6 HTTP 302 (redirect http://www.google.com/accounts) Verify RP
GET http://www.google.com/accounts/ServiceLogin
7 HTTP 200
POST http://www.google.com/accounts/ServiceLogin (passing Google ID and password)
8 HTTP 302 (redirect to federationwithacs-dev.accesscontrol.windows.net – including token from Google)
GET federationwithacs-dev.accesscontrol.windows.net
Protocol
9 HTTP 200 (Uses JavaScript to trigger POST to Adatum.FederationProvider.6 issuer) Transition
POST /Adatum.FederationProvider.6/Federation.aspx
10 HTTP 200 (Uses JavaScript to trigger POST to Claims
a-Order.OrderTracking.6) Mapping
POST a-Order.OrderTracking.6
WIF veries
11 HTTP 302
the token.
POST a-Order.OrderTracking.6
WIF decrypts the cookie
12 HTTP 200 and populates the claims
principal object. figure 14
Message sequence for the
browser-based scenario with
ACS and authentication with
a social identity provider
———————– Page 297———————–
260260 appendix b
Figure 15 shows the key traffic generated by the browser. For
reasons of clarity, we have removed some messages from the list.
figure 15
HTTP traffic
The numbers in the screenshot correspond to the steps in the
message diagram. In this sample, the name of the application is a-Or-
der.Tracking.6 and it is running on the local machine. The name of the
mock issuer that takes the place of ADFS is Adatum.FederationPro-
vider.6 and it is also running locally, and the name of the ACS instance
is federationwithacs-dev.accesscontrol.windows.net. The sample il-
lustrates a user authenticating with a Google identity.
STEP 1
The anonymous user browses to a-Order.OrderTracking.6, and be-
cause there is no established security session, the WSFederatedAu-
thenticationModule (FAM) redirects the browser to the issuer which,
in this example is located at https://localhost/Adatum.FederationPro-
vider.6/. As part of the request URL, there are four query string param-
eters: wa (the action to execute, which is wsignin1.0), wtrealm (the
relying party that this token applies to, which is a-Order.OrderTrack-
ing), wctx (context data, such as a return URL that will be propagated
among the different parties), and wct (a time stamp).
Figure 16 shows the response headers for step 1.
———————– Page 298———————–
message sequences 261 261
figure 16
Response headers for step 1
Figure 17 shows the parameters that are sent to the issuer with
the query string.
figure 17
Query string parameters
———————– Page 299———————–
262262 appendix b
STEP 2
The issuer is a simulated issuer that takes the place of ADFS for this
sample. Figure 18 shows that the simulated issuer redirects the user to
the home realm discovery page where the user can select the identity
provider she wants to use.
The simulated issuer is built using the WIF SDK.
figure 18
Simulated issuer redirecting the user to the HomeRealmDiscovery page
STEP 3
On the home-realm discovery page, the user can elect to sign in using
the Adatum provider, the Litware provider, or a social identity pro-
vider. In this walkthrough, the user opts to use a social identity pro-
vider and provides an email address. When the user submits the form,
the simulated issuer parses the email address to determine which so-
cial identity provider to use.
STEP 4
The home-realm discovery page redirects the browser to the Federa-
tion.aspx page.
STEP 5
The Federation.aspx page at the simulated issuer returns a cookie to
the browser that stores the original wa, wtrealm, wctx, and wct que-
rystring parameters, as was shown in Figure 17. The simulated issuer
redirects the user to the ACS instance, passing new values for these
parameters. The simulated issuer also sends a whr querystring param-
eter; this is a hint to ACS about which social identity provider it should
use to authenticate the user. Figure 19 shows that the simulated is-
suer redirects the user to ACS.
———————– Page 300———————–
message sequences 263 263
figure 19
The simulated issuer redirects the user to ACS
Figure 20 shows the new values of the querystring parameters
that the simulated issuer sends to ACS. This includes the value
“Google” for the whr parameter. The value of the wctx parameter
refers to the cookie that contains the original values of the wa, wt-
realm, wctx, and wct querystring parameters that came from the rely-
ing party—a-Order.OrderTracking.
figure 20
Querystring parameters sent to ACS from the simulated issuer
STEP 6
ACS verifies that the wtrealm parameter value, https://localhost/
Adatum.FederationProvider.6, is a configured relying party applica-
tion. ACS then examines the whr parameter value to determine which
identity provider to redirect the user to. If there is no valid whr value,
then ACS will display a page listing the available identity providers.
ACS forwards the wtrealm parameter value to Google in the opened.
return_to parameter, so that when Google returns a token to ACS, it
can tell ACS the address of the relying party (for ACS, the relying
party is https://localhost/Adatum.FederationProvider.6.)
———————– Page 301———————–
264264 appendix b
STEP 7
Google displays a login form that prompts the user to provide creden-
tials. This form also indicates to the user that the request came from
ACS.
STEP 8
After Google has authenticated the user and obtained consent to re-
turn the users email address to the relying party (ACS), Google redi-
rects the browser back to ACS.
Figure 21 shows the querystring parameters that Google uses to
pass the claims back to ACS.
figure 21
Querystring parameters sent from Google to ACS
In addition to the claims data, there is also a context parameter
that enables ACS to associate this claim data with the original request
from a-Order.OrderTracking.6. This context parameter includes the
address of the Adatum simulated issuer, which sent the original re-
quest to ACS.
STEP 9
ACS transitions the token from Google to create a new SAML 1.1
token, which contains a copy of the claims that Google issued. ACS
uses the information in the context parameter to identify the relying
party application (Adatum.FederationProvider.6) and the rule group
to apply. In this sample, the rule group copies all of the claims from
Google through to the new SAML token.
The following XML code shows the token that ACS generates
(some attributes and namespaces were deleted for clarity).
———————– Page 302———————–
message sequences 265 265
<t:RequestSecurityTokenResponse
The RequestSecurityToken
The RequestSecurityToken
Context=”6d67cfce-9797-4958-ae3c-1eb489b04801″
Response is defined in the
Response is defined in the
xmlns:t=”http://schemas.xmlsoap.org/ws/2005/02/trust”> WS-Trust specification. It’s
WS-Trust specification. It’s
the envelope that encloses a
<t:Lifetime> the envelope that encloses a
token of any kind. The most
<wsu:Created>2011-02-09T15:05:17.355Z</wsu:Created> token of any kind. The most
common implementation of
common implementation of
<wsu:Expires>2011-02-09T15:15:17.355Z</wsu:Expires>
the token is SAML (version 1.1
the token is SAML (version 1.1
</t:Lifetime> or 2.0). The envelope contains
or 2.0). The envelope contains
the lifetime and the endpoint
the lifetime and the endpoint
address for this token.
<wsp:AppliesTo> address for this token.
<EndpointReference>
The token expiration date
<Address> The token expiration date
and time (for WS-Fed).
https://localhost/Adatum.FederationProvider.6/ and time (for WS-Fed).
</Address>
</EndpointReference>
</wsp:AppliesTo>
The token audience
The token audience
<t:RequestedSecurityToken> (for WS-Fed).
(for WS-Fed).
<saml:Assertion
AssertionID=”_592d…”
Issuer=”https://federationwithacs-dev.accesscontrol.
windows.net/”>
<saml:Conditions
NotBefore=”2011-02-09T15:05:17.355Z”
NotOnOrAfter=”2011-02-09T15:15:17.355Z”>
<saml:AudienceRestrictionCondition>
<saml:Audience>
https://localhost/Adatum.FederationProvider.6/
</saml:Audience>
The token audience
The token audience
</saml:AudienceRestrictionCondition>
(for SAML).
(for SAML).
</saml:Conditions>
<saml:AttributeStatement>
<saml:Subject>
<saml:NameIdentifier>
https://www.google.com/accounts/o8/
id?id=AItOawnvknktThEaScLj34MPreTLfOKqrQazL20
</saml:NameIdentifier>
<saml:SubjectConfirmation>
<saml:ConfirmationMethod>
Because the browser does not Because the browser does not
urn:oasis:names:tc:SAML:1.0:cm:bearer hold a key that can prove its hold a key that can prove its
</saml:ConfirmationMethod> identity, the token generated is identity, the token generated is
</saml:SubjectConfirmation> of type of type bearerbearer. In this scenario, . In this scenario,
enabling HTTPS is critical to enabling HTTPS is critical to
</saml:Subject>
avoid potential attacks.avoid potential attacks.
———————– Page 303———————–
266266 appendix b
<saml:Attribute
AttributeName=”emailaddress”
AttributeNamespace=
“http://schemas.xmlsoap.org/ws/2005/05/identity/claims”>
<saml:AttributeValue>mary@gmail.com
</saml:AttributeValue> The claims are represented
The claims are represented
by the SAML attributes,
</saml:Attribute> by the SAML attributes,
where ClaimType equals the
where ClaimType equals the
AttributeNamespace and
<saml:Attribute AttributeNamespace and
the AttributeName .
the AttributeName .
AttributeName=”name” The ClaimValue equals
The ClaimValue equals
AttributeNamespace=”http://schemas.xmlsoap.org/ the AttributeValue .
the AttributeValue .
ws/2005/05/identity/claims”>
<saml:AttributeValue>Mary</saml:AttributeValue>
</saml:Attribute>
<saml:Attribute
AttributeName=”identityprovider”
AttributeNamespace=”…”>
<saml:AttributeValue>Google</saml:AttributeValue>
</saml:Attribute>
</saml:AttributeStatement>
<ds:Signature xmlns:ds=”http://www.w3.org/2000/09/xmldsig#”>
<ds:SignedInfo>
…
</ds:SignedInfo>
<ds:SignatureValue>
euicdW…UGM7rA==
</ds:SignatureValue>
<KeyInfo xmlns=”http://www.w3.org/2000/09/xmldsig#”>
<X509Data>
<X509Certificate>
MIIDO…jVSbv/3 The signature and the public
The signature and the public
key (an X.509 certificate that
</X509Certificate> key (an X.509 certificate that
is encoded in base64) that will
</X509Data> is encoded in base64) that will
be used to verify the signature
be used to verify the signature
</KeyInfo>
on the website. If the verification
on the website. If the verification
</ds:Signature> was successful, you have to ensure
was successful, you have to ensure
</saml:Assertion> that the certificate is the one you
that the certificate is the one you
trust (by checking either its
</t:RequestedSecurityToken> trust (by checking either its
thumbprint or its serial number).
<t:RequestedAttachedReference> thumbprint or its serial number).
<o:SecurityTokenReference>
<o:KeyIdentifier
ValueType=
“http://docs.oasis-open.org/wss/oasis-wss-saml-token-profile-
———————– Page 304———————–
message sequences 267 267
1.0#SAMLAssertionID”>
_592d8e3a-8f42-4f14-9552-4617959dbd77
</o:KeyIdentifier>
</o:SecurityTokenReference>
</t:RequestedAttachedReference>
<t:RequestedUnattachedReference>
<o:SecurityTokenReference>
<o:KeyIdentifier
ValueType=
“http://docs.oasis-open.org/wss/oasis-wss-saml-token-profile-
1.0#SAMLAssertionID”>
_592d8e3a-8f42-4f14-9552-4617959dbd77
</o:KeyIdentifier>
</o:SecurityTokenReference>
</t:RequestedUnattachedReference>
<t:TokenType>
urn:oasis:names:tc:SAML:1.0:assertion
</t:TokenType>
<t:RequestType>
http://schemas.xmlsoap.org/ws/2005/02/trust/Issue
</t:RequestType>
<t:KeyType>
http://schemas.xmlsoap.org/ws/2005/05/identity/NoProofKey
</t:KeyType>
</t:RequestSecurityTokenResponse>
This step returns a form to the browser with an HTTP 200 status
message. The user does not see this form because a JavaScript timer
automatically submits the form, posting the new token to the Adatum
simulated issuer. It obtains the address of the simulated issuer from
the Return URL setting in the Adatum.SimulatedIssuer relying party
definition in ACS. The token data is contained in the hidden wresult
field. The following HTML code shows the form that ACS returns to
the browser. Some elements have been abbreviated for clarity.
<html>
<head>
<title>Working…</title>
</head>
<body>
<form method=”POST”
name=”hiddenform”
action=”https://localhost/Adatum.FederationProvider.6/
Federation.aspx”>
<input type=”hidden” name=”wa” value=”wsignin1.0″ />
<input type=”hidden” name=”wresult”
———————– Page 305———————–
268268 appendix b
value=”<t:RequestSecurityTokenResponse
Context="…” />
<input type=”hidden” name=
“wctx” value=”6d67cfce-9797-4958-ae3c-1eb489b04801″ />
<noscript>
<p>
Script is disabled. Click Submit to continue.
</p>
<input type=”submit” value=”Submit” />
</noscript>
</form>
<script language=”javascript”>
window.setTimeout(‘document.forms[0].submit()’, 0);
</script>
</body>
</html>
STEP 10
The Adatum simulated issuer applies the claims mapping rules to the
claims that it received from ACS. The following XML code shows the
token that ACS generates (some attributes and namespaces were
deleted for clarity).
<trust:RequestSecurityTokenResponseCollection
xmlns:trust=”http://docs.oasis-open.org/ws-sx/ws-trust/200512″>
<trust:RequestSecurityTokenResponse
Context=”rm=0&id=passive&ru=%2fa-Order.
OrderTracking%2f”>
<trust:Lifetime>
<wsu:Created>2011-02-09T15:05:17.776Z</wsu:Created>
<wsu:Expires>2011-02-09T16:05:17.776Z</wsu:Expires>
</trust:Lifetime>
<wsp:AppliesTo>
The token expiration date
<EndpointReference> The token expiration date and
and time (for WS-Fed).
time (for WS-Fed).
<Address>
https://localhost/a-Order.OrderTracking.6/
</Address>
</EndpointReference>
</wsp:AppliesTo>
<trust:RequestedSecurityToken>
<saml:Assertion
AssertionID=”_3770…”
Issuer=”adatum”
IssueInstant=”2011-02-09T15:05:17.776Z”
xmlns:saml=”urn:oasis:names:tc:SAML:1.0:assertion”>
<saml:Conditions
———————– Page 306———————–
message sequences 269 269
NotBefore=”2011-02-09T15:05:17.776Z”
NotOnOrAfter=”2011-02-09T16:05:17.776Z”>
<saml:AudienceRestrictionCondition>
<saml:Audience>
https://localhost/a-Order.OrderTracking.6/
</saml:Audience> The token audience
The token audience
(for SAML).
</saml:AudienceRestrictionCondition> (for SAML).
</saml:Conditions>
<saml:AttributeStatement>
<saml:Subject>
<saml:SubjectConfirmation>
<saml:ConfirmationMethod>
urn:oasis:names:tc:SAML:1.0:cm:bearer
</saml:ConfirmationMethod>
</saml:SubjectConfirmation>
</saml:Subject> The claims are represented
by the SAML attributes,
<saml:Attribute
where ClaimType equals the
AttributeName=”name” AttributeNamespace and
AttributeNamespace=”…” the AttributeName .
a:OriginalIssuer=”acs\Google”> The ClaimValue equals the
AttributeValue . These claims
<saml:AttributeValue>
also have an OriginalIssuer
Mary
attribute showing where
</saml:AttributeValue> the claim came from.
</saml:Attribute>
<saml:Attribute
AttributeName=”role”
AttributeNamespace=”http://schemas.microsoft.com/
ws/2008/06/identity/claims”>
<saml:AttributeValue>
Order Tracker
</saml:AttributeValue>
</saml:Attribute>
<saml:Attribute
AttributeName=”organization”
AttributeNamespace=”http://schemas.adatum.com/
claims/2009/08″>
<saml:AttributeValue>
Contoso
</saml:AttributeValue>
</saml:Attribute>
</saml:AttributeStatement>
<ds:Signature xmlns:ds=”http://www.w3.org/2000/09/
xmldsig#”>
<ds:SignedInfo>
…
———————– Page 307———————–
270270 appendix b
</ds:SignedInfo>
<ds:SignatureValue>ZxLyG…2uU=</ds:SignatureValue>
<KeyInfo xmlns=”http://www.w3.org/2000/09/xmldsig#”>
<X509Data>
<X509Certificate>MIIB5…2B3AO</X509Certificate>
</X509Data>
</KeyInfo>
</ds:Signature>
</saml:Assertion>
</trust:RequestedSecurityToken>
<trust:RequestedAttachedReference>
<o:SecurityTokenReference
k:TokenType=”http://docs.oasis-open.org/wss/oasis-wss-
saml-token-profile-1.1#SAMLV1.1″ >
<o:KeyIdentifier
ValueType=”http://docs.oasis-open.org/wss/oasis-wss-
saml-token-profile-1.0#SAMLAssertionID”>
_377035cf-c44a-4495-a69c-c4b4951af18b
</o:KeyIdentifier>
</o:SecurityTokenReference>
</trust:RequestedAttachedReference>
<trust:RequestedUnattachedReference>
<o:SecurityTokenReference
k:TokenType=”http://docs.oasis-open.org/wss/oasis-wss-
saml-token-profile-1.1#SAMLV1.1″>
<o:KeyIdentifier
ValueType=”http://docs.oasis-open.org/wss/oasis-wss-
saml-token-profile-1.0#SAMLAssertionID”>
_377035cf-c44a-4495-a69c-c4b4951af18b
</o:KeyIdentifier>
</o:SecurityTokenReference>
</trust:RequestedUnattachedReference>
<trust:TokenType>
urn:oasis:names:tc:SAML:1.0:assertion
</trust:TokenType>
<trust:RequestType>
http://docs.oasis-open.org/ws-sx/ws-trust/200512/Issue
</trust:RequestType>
<trust:KeyType>
http://docs.oasis-open.org/ws-sx/ws-trust/200512/Bearer
</trust:KeyType>
</trust:RequestSecurityTokenResponse>
</trust:RequestSecurityTokenResponseCollection>
———————– Page 308———————–
message sequences 271 271
This step returns a form to the browser with an HTTP 200 status
message. The user does not see this form because a JavaScript timer
automatically submits the form, posting the new token to the a-Order.
OrderTracking.6 application. The token with the new claims is con-
tained in the wresult field. The following HTML code shows the form
that ACS returns to the browser. Some elements have been abbrevi-
ated for clarity.
<html>
<head>
<title>Working…</title>
</head>
<body>
<form method=”POST” name=”hiddenform”
action=”https://localhost/a-Order.OrderTracking.6/”>
<input type=”hidden” name=”wa” value=”wsignin1.0″ />
<input type=”hidden” name=”wresult”
value=”<trust:RequestSecurityTokenResponse
Collection…” />
<input type=”hidden” name=”wctx”
value=”rm=0&id=passive&ru=%2fa-Order.
OrderTracking%2f” />
<noscript>
<p>
Script is disabled. Click Submit to continue.
</p>
<input type=”submit” value=”Submit” />
</noscript>
</form>
<script language=”javascript”>
window.setTimeout(‘document.forms[0].submit()’, 0);
</script>
</body>
</html>
The simulated issuer determines the address to post the token to
(https://localhost/a-Order.OrderTracking.6/) by reading the original
value of the wtrealm parameter that the simulated issuer saved in a
cookie in step 4.
STEP 11
The Federation Authentication Module (FAM) validates the security
token from the simulated issuer, and creates a ClaimsPrincipal object
using the claim values from the token. This is compressed, encrypted,
and encoded to create a session security token which the application
returns to the browser as a set of FedAuth[n] cookies. The cookies
are chunked to avoid exceeding any cookie size limitations.
———————– Page 309———————–
272272 appendix b
Figure 22 shows the response headers, which include the Fed-
Auth cookies.
figure 22
Response headers, including the FedAuth cookies
STEP 12
On subsequent requests to the a-Order.OrderTracking.6 application,
the browser returns the security session data to the application. Fig-
ure 23 shows the FedAuth cookie in the request headers.
figure 23
FedAuth cookies in the request header
The WSFederatedAuthenticationModule (FAM) decodes, de-
crypts, and decompresses the cookie and verifies the security session
data before recreating the ClaimsPrincipal object.
———————– Page 310———————–
message sequences 273 273
Single Sign-Out
Figure 24 shows the single sign-out message sequence for the browser-
based scenario.
Adatum Simulated
a-Expense a-Order
John : Browser Issuer
(RP) (RP)
(IdP)
GET /a-Expense as an
Anonymous user
1 HTTP 302
(redirect to issuer)
GET /Adatum.SimulatedIssuer – wsignin1.0
2
HTTP 200 – display log in page
POST Adatum.SimulatedIssuer
3 Create WS –
Add a-Expense to AdatumClaimsRPStsSiteCookie – HTTP 200 Federation token.
POST WS-Federation token to a-Expense
Create
4 Return FedAuth cookie ClaimsPrincipal
GET /a-Expense
5 HTTP 200 – display data Authorize
Click link to visit a-Order – GET /a-Order as an Anonymous user
6 HTTP 302 (redirect to issuer)
GET Adatum.SimulatedIssuer – wsignin1.0
Already
authenticated,
7 Add a-Order to AdatumClaimsRPStsSiteCookie – HTTP 200 return WS-
Federation token.
POST WS – Federation Token to a-Order
Create
8 Return FedAuth cookie
ClaimsPrincipal
GET a-Order
Authorize
9 HTTP 200 – display data
Click Logout link -POST /a-Order
10 Delete FedAuth cookie – HTTP 302
GET Adatum.SimulatedIssuer – wsignout1.0
11 HTTP 302 – redirect the signout page
GET /Adatum.SimulatedIssuer/SignOut.aspx – wsignout1.0
Sign out from
12 Delete AdatumClaimsRPStsSiteCookie – HTTP 200 any IdPs.
GET /a-Expense – wsignoutcleanup1.0 In steps 13 and 14, the URLs
are invoked from IMG tags
13 Delete FedAuth cookie -HTTP 200 in the page returned from figure 24
GET /a-Order – wsignoutcleanup1.0 the issuer in step 12. Message sequence for single
sign-out in the browser-based
14 HTTP 200 – the FEDAUTH cookie was deleted in step 10 scenario
———————– Page 311———————–
274274 appendix b
Figure 25 shows the key traffic generated by the browser. For
reasons of clarity, we have removed some messages from the list.
figure 25
HTTP traffic
The numbers in the screenshot correspond to the steps in the
message diagram. In this sample, the names of the two relying party
applications are a-Expense.ClaimsAware and a-Order.ClaimsAware
and they are running on the local machine. The name of the mock is-
suer that takes the place of ADFS is Adatum.SimulatedIssuer.1 and it
is also running locally. The sample illustrates a user signing in first
to a-Expense.ClaimsAware, then accessing the a-Order.ClaimsAware
application, and then initiating the single sign-out from a link in the
a-Order.ClaimsAware application.
———————– Page 312———————–
message sequences 275 275
STEP 1
The anonymous user browses to a-Expense.ClaimsAware, and because
there is no established security session, the WSFederatedAuthenti-
cationModule (FAM) redirects the browser to the issuer which, in
this example, is located at https://localhost/Adatum.simulatedIssuer.1/.
figure 26
Redirect to the issuer
As part of the request URL, there are four query string parameters:
wa (the action to execute, which is wsignin1.0), wtrealm (the relying
party that this token applies to, which is a-Expense.ClaimsAware),
wctx (this is context data such as a return URL that will be propa-
gated among the different parties), and wct (a time stamp).
figure 27
WS-Federation data sent to the issuer
STEP 2
The simulated issuer allows the user to select a User to sign in as for
the session; in this example the user chooses to sign in as John.
———————– Page 313———————–
276276 appendix b
STEP 3
The simulated issuer stores the name of the relying party (which it can
use in the log-out process) in a cookie named AdatumClaimsRPStsSite-
Cookie, and details of the user in the .WINAUTH cookie.
figure 28
Cookies containing the user ID and a list of relying parties
The simulated issuer then posts the token back to the a-Expense.
ClaimsAware application using a JavaScript timer, passing the WS-
Federation token in the wresult field.
figure 29
Sending the WS-Federation token to the relying party
———————– Page 314———————–
message sequences 277 277
STEP 4
The relying party verifies the token, instantiates a ClaimsPrincipal
object, and saves the claim data in a cookie named FedAuth. The ap-
plication sends an HTTP 302 to redirect the browser to the a-Expense.
ClaimsAware website.
figure 30
Creating the FedAuth cookie in the a-Expense.ClaimsAware application
STEP 5
The a-Expense.ClaimsAware application uses the claims data stored in
the FedAuth cookie to apply the authorization rules that determine
which records John is permitted to view.
———————– Page 315———————–
278278 appendix b
STEP 6
John clicks on the link to visit the a-Order.ClaimsAware application.
From the perspective of the application, the request is from an
anonymous user, so it redirects the browser to the simulated issuer.
figure 31
Redirecting to the issuer
As part of the request URL, there are four query string parameters:
wa (the action to execute, which is wsignin1.0), wtrealm (the relying
party that this token applies to, which is a-Order.ClaimsAware), wctx
(context data, such as a return URL that will be propagated among the
different parties), and wct (a time stamp).
figure 32
WS-Federation data sent to the issuer
———————– Page 316———————–
message sequences 279 279
STEP 7
The simulated issuer recognizes that John is already authenticated
because the browser sends the .WINAUTH cookie.
figure 33
The browser sends the .WINAUTH cookie to the issuer
The application updates the AdatumClaimRPStsSiteCookie with
details of the new relying party application, and posts a WS-Federa-
tion token back to the relying party.
figure 34
The browser updates the cookie with the new relying party
———————– Page 317———————–
280280 appendix b
figure 35
The issuer posts the WS-Federation token to the relying party
STEP 8
The relying party verifies the token, instantiates a ClaimsPrincipal
object, and saves the claim data in a cookie named FedAuth. The ap-
plication sends an HTTP 302 to redirect the browser to the a-Order.
ClaimsAware website.
figure 36
The a-Order.ClaimsAware site creates a FedAuth cookie
STEP 9
The a-Order.ClaimsAware application uses the claims data stored in
the FedAuth cookie to apply the authorization rules that determine
which records John is permitted to view.
———————– Page 318———————–
message sequences 281 281
STEP 10
John clicks on the Logout link in the a-Order.ClaimsAware applica-
tion. The application deletes the FedAuth cookie and redirects the
browser to the simulated issuer to complete the sign-out process.
figure 37
Deleting the FedAuth cookie and redirecting to the issuer
STEP 11
The simulated issuer redirects the browser to itself, sending a WS-
Federation wsignout1.0 command.
figure 38
Sending the wsignout1.0 command
———————– Page 319———————–
282282 appendix b
STEP 12
The simulated issuer signs out from any identity providers and deletes
the contents of the AdatumClaimsRPStsSiteCookie cookie.
figure 39
Clearing the cookie with the list of relying parties
STEPS 13 AND 14
The simulated issuer uses the list of relying parties from the Adatum-
ClaimsRPStsSiteCookie cookie to construct a list of image URLs:
<img src=’https://localhost/a-expense.ClaimsAware/
?wa=wsignoutcleanup1.0′ />
<img src=’https://localhost/a-Order.ClaimsAware/
?wa=wsignoutcleanup1.0′ />
These URLs pass the WS-Federation wsignoutcleanup1.0 com-
mand to each of the relying party applications, giving them the op-
portunity to complete the sign-out process in the application and
perform any other necessary cleanup.
———————– Page 320———————–
message sequences 283 283
figure 40
Clearing the FedAuth cookie in the a-Expense.ClaimsAware application
figure 41
The FedAuth cookie was cleared for the a-
Order.Claims application in step 10
———————– Page 321———————–
———————– Page 322———————–
Appendix C Industry Standards
This appendix lists the industry standards that are discussed in this
book.
Security Assertion Markup Language (SAML)
For more information about SAML, see the following:
• The OASIS Standard specification, “Assertions and Protocol for
the OASIS Security Assertion Markup Language (SAML) V1.1″
http://www.oasis-open.org/committees/download.php/3406/
oasis-sstc-saml-core-1.1.pdf
(Chapter 1, “An Introduction to Claims,” and Chapter 2, “Claims-
Based Architectures,” cover SAML assertions.)
Security Association Management Protocol
(SAMP) and Internet Security Association and
Key Management Protocol (ISAKMP)
For more information about these protocols, see the following:
• The IETF draft specification, “Internet Security Association
and Key Management Protocol (ISAKMP)”
http://tools.ietf.org/html/rfc2408
WS-Federation
For more information about WS-Federation, see the following:
• The OASIS Standard specification,
http://docs.oasis-open.org/wsfed/federation/v1.2/
• “Understanding WS-Federation” on MSDN®
http://msdn.microsoft.com/en-us/library/bb498017.aspx
285
———————– Page 323———————–
286286 appendix c
WS-Federation: Passive Requestor Profile
For more information about WS-Federation Passive Requestor
Profile, see the following:
• Section 13 of the OASIS Standard specification, “Web Services
Federation Language (WS-Federation) Version 1.2″
http://docs.oasis-open.org/wsfed/federation/v1.2/os/ws-
federation-1.2-spec-os.html#_toc223175002
• “WS-Federation: Passive Requestor Profile” on MSDN
http://msdn.microsoft.com/en-us/library/bb608217.aspx
WS-Security
For more information about WS-Security, see the following:
• The OASIS Standard specification, “Web Services Security:
SOAP Message Security 1.1 (WS-Security 2004)”
http://docs.oasis-open.org/wss/v1.1/wss-v1.1-spec-os-
soApmessagesecurity.pdf
WS-SecureConversation
For more information about WS-SecureConversation, see the following:
• The OASIS Standard specification, “WS-SecureConversation
1.3″
http://docs.oasis-open.org/ws-sx/ws-secureconversation/v1.3/
ws-secureconversation.pdf
WS-Trust
For more information about WS-Trust, see the following:
• The OASIS Standard specification, “WS-Trust 1.3”
http://docs.oasis-open.org/ws-sx/ws-trust/200512/ws-trust-
1.3-os.html
XML Encryption
For more information about XML Encryption (used to generate XML
digital signatures), see the following:
• The W3C Recommendation, “XML Encryption Syntax and
Processing”
http://www.w3.org/tr/2002/ rEC-xmlenc-core-20021210/
———————– Page 324———————–
Appendix D Certificates
This appendix lists the digital certificates that are used in claims-based
applications. To see this in table form, see “Claims Based Identity &
Access Control Guide” on CodePlex (http://claimsid.codeplex.com).
Certificates for Browser-Based Applications
In browser-based scenarios, you will find certificates used on the is-
suer and on the computer that hosts the web application. The client
computer does not store certificates.
On the Issuer (Browser Scenario)
In browser-based scenarios, you will find the following certificates on
the issuer.
Certificate for TLS/SSL (Issuer, Browser Scenario)
The Transport Layer Security protocol/Secure Sockets Layer protocol
(TLS/SSL) uses a certificate to protect the communication with the
issuer—for example, for the credentials transmitted to it. The purpose
is to prevent man-in-the-middle attacks, eavesdropping, and replay
attacks.
Requirements: The subject name in the certificate must match
the Domain Name System (DNS) name of the host that provides the
certificate. Browsers will generally check that the certificate has a
chain of trust to one of the root authorities trusted by the browser.
Recommended certificate store: LocalMachine\My
Example: CN=login.adatumpharma.com
Certificate for Token Signing (Issuer, Browser Scenario)
The issuer’s certificate for token signing is used to generate an XML
digital signature to ensure token integrity and source verification.
287
———————– Page 325———————–
288288 appendix d
Requirements: The worker process account that runs the issuer
needs access to the private key of the certificate.
Recommended certificate store: LocalMachine\My and if Micro-
soft® Active Directory® Federation Services (ADFS) 2.0 is the issuer,
the ADFS 2.0 database will keep a copy.
Example: CN=adatumpharma-tokensign.com
The subject name on the certificate does not need to match a DNS
name. It’s a recommended practice to name the certificate in a way
that describes its purpose.
Optional Certificate for Token Encryption
(Issuer, Browser Scenario)
The certificate for token encryption secures the SAML token. Encrypt-
ing tokens is optional, but it is recommended. You may opt to rely on
TLS/SSL, which will secure the whole channel.
Requirements: Only the public key is required. The private key is
owned by the relying party for decrypting.
Recommended certificate store: LocalMachine\TrustedPeople,
LocalMachine\AddressBook or if ADFS 2.0 is the issuer, the ADFS 2.0
database will keep it.
Example: CN=a-expense.adatumpharma-tokenencrypt.com
Encrypting the token is optional, but it is generally recommended.
Using TLS/SSL is already a measure to ensure the confidentiality of
the token in transit. This is an extra security measure that could be
used in cases where claim values are confidential.
On the Web Application Server
In browser-based scenarios, you will find the following certificates on
the web application server.
Certificate for TLS/SSL (Web Server, Browser Scenario)
TLS/SSL uses a certificate to protect the communication with the
web application server—for example, for the SAML token posted to
it. The purpose is to prevent man-in-the-middle attacks, eavesdrop-
ping, and replay attacks.
Requirements: The subject name in the certificate must match
the DNS name of the host that provides the certificate. Browsers will
generally check that the certificate has a chain of trust to one of the
root authorities trusted by the browser.
Recommended certificate store: LocalMachine\My
Example: CN=a-expense.adatumpharma.com
———————– Page 326———————–
certificates 289 289
Token Signature Verification
(Web Server, Browser Scenario)
The web application server has the thumbprint of the certificate that
is used to verify the SAML token signature. The issuer embeds the
certificate in each digitally signed security token. The web application
server checks that the digital signature’s thumbprint (a hash code)
matches that of the signing certificate. Windows® Identity Founda-
tion (WIF) and ADFS embed the public key in the token by default.
Requirements: The thumbprint of the issuer’s certificate should
be present in the <issuerNameRegistry> section of the application’s
Web.config file.
Recommended certificate store: None
Example: d2316a731b59683e744109278c80e2614503b17e (This
is the thumbprint of the certificate with CN=adatumpharma-token-
sign.com.)
If the certificate (issuer public key) is embedded in the token, the
signature verification is done automatically by WIF. If not, an
IssuerTokenResolver needs to be configured to find the public key.
This is common in interop scenarios; however, WIF and ADFS will
always embed the full public key.
Token Signature Chain of Trust Verification
(Web Server, Browser Scenario)
The web application server has a certificate that is used to verify the
trusted certificate chain for the issuer’s token signing certificate.
Requirements: The public key of the issuer certificate should be
installed in LocalMachine\TrustedPeople certificate store unless the
certificate was issued by a trusted root authority.
Recommended certificate store: LocalMachine\TrustedPeople
only if the certificate was not issued by a trusted root authority.
The chain-of-trust verification is controlled by an attribute of the
<certificateValidation> element of the WIF configuration section
of the application’s Web.config file. WIF has this setting turned on
by default.
Optional Token Decryption
(Web Server, Browser Scenario)
The web application has a certificate that it uses to decrypt the SAML
token that it receives from an issuer (if it was encrypted). The web
application has both public and private keys. The issuer has only the
public key.
———————– Page 327———————–
290290 appendix d
Requirements: The certificate used to decrypt the SAML token
should be configured in the <serviceCertificate> element of the
<microsoft.identityModel> section of the application’s Web.config
file. Also, the App Pool account of the website should have permission
to read the private key of the certificate.
Recommended certificate store: LocalMachine\My
Example: CN=a-expense.adatumpharma-tokenencrypt.com
Cookie Encryption/Decryption
(Web Server, Browser Scenario)
The web application server has a certificate that it uses to ensure the
confidentiality of the session cookie created to cache the token claims
for the whole user session.
Requirements: The default WIF mechanism uses the Data Pro-
tection API (DPAPI) to encrypt the cookie. This requires access to a
private key stored in the profile of the App Pool account. You must
ensure that the account has the profile loaded by setting the Load
User Profile to true in the App Pool configuration.
Recommended certificate store: None
A more web farm-friendly option is to use a different Cookie
Transform to encrypt/decrypt the token (such as RsaEncryption
CookieTransform) that uses X.509 certificates instead of DPAPI.
Certificates for Active Clients
In scenarios with active clients that interact with web services, you
will find certificates used on the issuer, on the machine that hosts the
web service, and on the client machine.
On the Issuer (Active Scenario)
In active client scenarios, you will find the following certificates on
the issuer.
Certificate for Transport Security (TLS/SSL)
(Issuer, Active Scenario)
TLS/SSL uses a certificate to protect the communication with the
issuer—for example, for the credentials transmitted to it. The purpose
is to avoid man-in-the-middle attacks, eavesdropping, and replay at-
tacks.
Requirements: The subject name in the certificate must match
the DNS name of the host that provides the certificate. Browsers will
generally check that the certificate has a chain of trust to one of the
root authorities trusted by the browser.
———————– Page 328———————–
certificates 291 291
Recommended certificate store: LocalMachine\My
Example: CN=login.adatumpharma.com
Certificate for Message Security (Issuer, Active Scenario)
A certificate will be used to protect the communication between the
client and the issuer at the message level.
Requirements: For a custom issuer that you implement, the ser-
vice credentials are configured in the Windows Communication
Foundation (WCF) issuer—for example, through the <service
Certificate> section of the issuer’s Web.config file.
For an ADFS 2.0 issuer, this is configured using the Microsoft
Management Console (MMC).
Recommended certificate store: LocalMachine\My or ADFS
database
Example: CN=login.adatumpharma.com
Certificate for Token Signing (Issuer, Active Scenario)
The issuer’s certificate for token signing is used to generate an XML
digital signature to ensure token integrity and source verification.
Requirements: The worker process account that runs the issuer
needs access to the private key of the certificate.
Recommended certificate store: LocalMachine\My and the
ADFS 2.0 database
Example: CN=adatumpharma-tokensign.com
The subject name on the certificate does not need to match a DNS
name. It’s a recommended practice to name the certificate in a way
that describes its purpose.
Certificate for Token Encryption (Issuer, Active Scenario)
The certificate for token encryption secures the SAML token. This
certificate is required when an active client is used.
Requirements: Only the public key is required on the client. The
relying party owns the private key, which it uses to decrypt the SAML
token.
Recommended certificate store: LocalMachine\TrustedPeople,
LocalMachine\AddressBook or the ADFS 2.0 database
Example: CN=a-expense.adatumpharma-tokenencrypt.com
Encrypting the token is optional, but it is generally recommended.
The use of TLS/SSL is already a measure to ensure the confidentiality
of the token in transit. This is an extra security measure that could
be used in cases where claim values must be kept confidential.
———————– Page 329———————–
292292 appendix d
On the Web Service Host
These are the certificates used on the machine that hosts the web
service.
Certificate for Transport Security (TLS/SSL)
(Web Service Host, Active Scenario)
TLS/SSL uses a certificate to protect the communication with the
web service—for example, for the SAML token sent to it by an issuer.
The purpose is to mitigate and prevent man-in-the-middle attacks,
eavesdropping, and replay attacks.
Requirements: The subject name in the certificate must match
the DNS name of the host that provides the certificate. Active clients
will generally check that the certificate has a chain of trust to one of
the root authorities trusted by that client.
Recommended certificate store: LocalMachine\My
Example: CN=a-expense-svc.adatumpharma.com
Certificate for Message Security
(Web Service Host, Active Scenario)
A certificate will be used to protect the communication between the
client and the web service at the message level.
Requirements: The service credentials are configured in the WCF
web service—for example, through the <serviceCertificate> section
of the web service’s Web.config file.
Recommended certificate store: LocalMachine\My
Example: CN=a-expense-svc.adatumpharma.com
Token Signature Verification
(Web Service Host, Active Scenario)
The web service host has the thumbprint of the certificate that is
used to verify the SAML token signature. The issuer embeds the cer-
tificate in each digitally signed security token. The web service host
checks that the digital signature’s thumbprint (a hash code) matches
that of the signing certificate. WIF and ADFS embed the public key in
the token by default.
Requirements: The thumbprint of the issuer’s certificate should
be present in the <issuerNameRegistry> section of the web service’s
Web.config file.
Recommended certificate store: None
Example: d2316a731b59683e744109278c80e2614503b17e (This
is the thumbprint of the certificate with CN=adatumpharma-token-
sign.com.)
If the certificate (issuer public key) is embedded in the token, the
signature verification is done automatically by WIF. If not, an
———————– Page 330———————–
certificates 293 293
IssuerTokenResolver needs to be configured to find the public key.
This is common in interop scenarios; however, WIF and ADFS will
always embed the full public key.
Token Decryption (Web Service Host, Active Scenario)
The web service host has a certificate that it uses to decrypt the
SAML token that it receives from an issuer. The web application has
both public and private keys. The issuer has only the public key.
Requirements: The certificate used to decrypt the SAML token
should be configured in the <serviceCertificate> element of the
<microsoft.identityModel> section of the web service’s Web.config
file. Also, the App Pool account of the web server should have permis-
sion to read the private key of the certificate.
Recommended certificate store: LocalMachine\My
Example: CN=a-expense-svc.adatumpharma-tokenencrypt.com
Token Signature Chain Trust Verification (Web Service
Host, Active Scenario)
The web service host has a certificate that is used to verify the
trusted certificate chain for the issuer’s token signing certificate.
Requirements: The public key of the issuer certificate should be
installed in LocalMachine\TrustedPeople certificate store unless the
certificate was issued by a trusted root authority.
Recommended certificate store: LocalMachine\TrustedPeople
only if the certificate was not issued by a trusted root authority.
The chain-of-trust verification is controlled by an attribute of the
<certificateValidation> element of the WIF configuration section
of the web service’s Web.config file. WIF has this setting turned on
by default.
On the Active Client Host
These are the certificates that are used on the active client computer.
Certificate for Message Security (Active Client Host)
A certificate will be used to protect the communication between the
client and the web service or issuer at the message level.
Requirements: If negotiateServiceCredentials is enabled, the
client will obtain the public key of the web service or issuer at run
time. If not, the certificate for message security is configured in the
WCF client by setting the ClientCredentials.ServiceCertificate
property at run time or configuring the <serviceCertificate> element
of the active client’s App.config file. The service credentials are con-
figured in the WCF web service—for example, through the <service
———————– Page 331———————–
294294 appendix d
Certificate> section of the web service’s Web.config file.
Recommended certificate store: LocalMachine\TrustedPeople or
LocalMachine\AddressBook
Example: CN=a-expense-svc.adatumpharma.com
———————– Page 332———————–
Appendix E Windows Azure
AppFabric Access
Control Service
This appendix provides background information about ACS and
shows you how to obtain and configure a Windows Azure™ App
Fabric Access Control Service (ACS) account. ACS makes it easy to
authenticate and authorize website, application, and service users and
is compatible with popular programming and runtime environments.
It allows authentication to take place against many popular web and
enterprise identity providers. Users are presented with a configurable
page listing the identity providers that are configured for the applica-
tion, which assists in the home realm discovery (HRD) process by
permitting the user to select the appropriate identity provider.
ACS also integrates with Windows Identity Foundation (WIF)
tools and environments and Microsoft Active Directory® Federation
Services (ADFS) 2.0. It can accept SAML 1.1, SAML 2.0, and Simple
Web Token (SWT) formatted tokens, and will issue a SAML 1.1,
SAML 2.0, or SWT token. ACS supports a range of protocols that
includes OAuth, OpenID, WS-Federation, and WS-Trust. Rules con-
figured within ACS can perform protocol transition and claims trans-
formation as required by the website, application, or service.
ACS is configured through the service interface using an OData-
based management API, or though the web portal that provides a
graphical and interactive administration experience.
This appendix discusses the ways that ACS can be used by show-
ing several scenarios and the corresponding message sequences. It also
contains information about creating an ACS issuer service instance,
configuring applications to use this service instance, creating custom
home realm discovery pages, error handling, integrating with ADFS,
security considerations, and troubleshooting ACS operations.
295
———————– Page 333———————–
296296 appendix e
What Does ACS DO?
ACS can be used to implement federated authentication and authori-
zation by acting as a token issuer that authenticates users by trusting
one or more identity providers. The following list contains definitions
of the important entities and concepts involved in this process:
• Realm or Domain: an area or scope for which a specific identity
provider is authoritative. It is not limited to only an Active
Directory directory service domain or any similar enterprise
mechanism. For example, the Google identity provider service is
authoritative for all users in the Google realm or domain (users
who have an account with Google); but it is not authoritative
for users in the Windows Live® realm or domain (users with an
account on the Windows Live network of Internet services).
• Home Realm Discovery: the process whereby the realm or
domain of a user is identified so that the request for authentica-
tion can be forwarded to the appropriate identity provider. This
may be accomplished by displaying a list of available identity
providers and allowing the user to choose the appropriate one
(one that will be able to authenticate the user). Alternatively, it
may be achieved by asking the user to provide an email address,
and then using the domain of that address to identify the home
realm or domain of that user for authentication purposes.
• Identity Provider: a service or site that accepts credentials from
a user. These credentials prove that the user has a valid account
or identity. ACS redirects users to the appropriate identity
provider that can authenticate that user and issue a token
containing the claims (a specific set of information) about that
user. The claims may include only a user identifier, or may
include other details such as the user name, email address, and
any other information that the user agrees to share. An identity
provider is authoritative when the authentication takes place
for a user within the provider’s realm or domain.
• Security Token Service (STS) or Token Issuer: a service that
issues tokens containing claims. ACS is an STS in that it issues
tokens to relying parties that use ACS to perform authentica-
tion. The STS must trust the identity provider(s) it uses.
• Relying Party: an application, website, or service that uses a
token issuer or STS to authenticate a user. The relying party
trusts the STS to issue the token it needs. There might be
several trust relationships in a chain. For example, an application
trusts STS A, which in turn trusts another STS B. The applica-
tion is a relying party to STS A, and STS A is a relying party to
STS B.
———————– Page 334———————–
windows azure appfabric access control service 297 297
• Trust Relationship: a configuration whereby one party trusts
another party to the extent that it accepts the claims for users
that the other party has authenticated. For example, in the
scope of this appendix, ACS must trust the identity providers it
uses and the relaying party must trust ACS.
• Transformation Rules: operations that are performed on the
claims in a token received from an STS when generating the
token that this entity will issue. ACS includes a rules engine that
can perform a range of operations on the claims in the source
token received from an identity provider or another STS. The
rules can copy, process, filter, or add claims before inserting
them into a token that is issued to the relying party.
• Protocol Transition: the process in an STS of issuing a token for
a relying party when the original token came from another STS
that implements different token negotiation protocols. For
example, ACS may receive a token from an identity provider
using OpenID, but issue the token to the relying party using the
WS_Federation protocol.
In essence, when the user is requesting authentication in a web
browser, ACS receives a request for authentication from a relying
party and presents a home realm discovery page. The user selects an
identity provider, and ACS redirects the user to that identity provider’s
login page. The user logs in and is returned to ACS with a token con-
taining the claims this user has agreed to share in that particular iden-
tity provider.
ACS then applies the appropriate rules to transform the claims,
and creates a new token containing the transformed claims. It then
redirects the user back to the relying party with the ACS token. The
relying party can use the claims in this token to apply authorization
rules appropriate for this user.
The process for service authentication is different because there
is no user interaction. Instead, the service must first obtain a suitable
token from an identity provider, present this token to ACS for trans-
formation, and then present the token that ACS issues to the relying
party. The following sections of this chapter describe the message
sequence in more detail, and explain how you can configure ACS to
perform federated authentication.
Message Sequences for ACS
ACS can be used as a stand-alone claims issuer, but the typical sce-
nario is to combine it with one or more local issuers such as ADFS or
custom issuers. The sequence of messages and redirections varies
———————– Page 335———————–
298298 appendix e
depending on the specific scenario; however, the following are some
of the more common scenarios for ACS.
ACS Authenticating Users of a Website
ACS can be used to authenticate visitors to a website when these
visitors wish to use a social identity provider or another type of iden-
tity provider that ACS supports. Figure 1 shows a simplified view of
the sequence of requests that occur.
Issuer (ACS)
Trust
3 4 7 8
Trust
r D R t R
r
n y n
o i e t a e
s
e
t
o
t
i
n
f i
c u
t
u
k
s
t
o
t
r
n
r f
s a o
v n o n
e c e t
i
e r
d r
H t
u t i
r e m o
y
q n
o k
d d
e
e e i
p m e
n
d
r h v
a n
e
t
e
o
c
d
g
u S r
e l c
n
R a
a p
o
e
e i n
m
S
a t
l s a
m i
n
i
n
g Identity Provider
1 Access site Windows Live
Claims-aware 2 Redirect to ACS Authenticate 5
website Issue token 6 Google
and redirect to
Web Facebook
ACS
browser
9 Send ACS token [ others ]
figure 1
ACS authenticating users of a website
On accessing the application (1), the visitor’s web browser is redi-
rected to ACS, the trusted source of security tokens (2 and 3). ACS
displays the home realm discovery page (4) containing a list of iden-
tity providers configured for the website or web application. The user
selects an identity provider and ACS redirects the visitor’s web
browser to that identity provider’s login page (5).
After entering the required credentials, the visitor’s browser is
eventually redirected back to ACS (6) with the identity provider’s
token in the request (7). ACS performs any necessary transformation
of the claims in the identity provider’s token using rules configured for
the website or application, and then returns a token containing these
claims (8). The visitor’s browser is then redirected to the claims-aware
website that was originally accessed (9).
This scenario is demonstrated in Chapter 7, “Federated Identity
with Multiple Partners and Windows Azure Access Control Service.”
———————– Page 336———————–
windows azure appfabric access control service 299 299
ACS Authenticating Services, Smart
Clients, and Mobile Devices
ACS can be used to authenticate service requests for web services,
smart clients, and mobile devices such as Windows Phone when the
service uses a social identity provider or another type of identity
provider that ACS supports. Figure 2 shows a simplified view of the
sequence of requests that occur.
Issuer (ACS)
Trust
3 4
Trust
r t R
r
n
a e
e e
d n t
u
i k
s
r
v o
f
n
t
o
o
r
r t
m
p
o
e k
y
t
i d e
n
t
c
n
e l c
d a o
i i n
m
d t
s a
i
n
e n
S i
n
Identity Provider g
Windows Live
1 Authenticate
Claims-aware
Google
2 Issue token Send ACS token 5 service
Facebook
[ others ] Smart Client
or Service
figure 2
ACS authenticating services, smart clients, and SharePoint BCS
Because the service cannot use the ACS home realm discovery
web page, it must be pre-configured to use the required identity pro-
vider or may query ACS to discover the trusted STS to use. The service
first authenticates with the appropriate identity provider (1), which
returns a token (2) that the service sends to ACS (3). ACS performs
any necessary transformation of the claims in the identity provider’s
token using rules configured for the service, and then returns a token
containing these claims (4). The service then sends the token received
from ACS to the relying party service or resource (5).
This scenario is demonstrated in Chapter 8, “Claims Enabling Web
Services.”
———————– Page 337———————–
300300 appendix e
Combining ACS and ADFS for Users
of a Website
ACS can be used to authenticate visitors to a website when these
visitors will access an ADFS STS first to establish their identity, but
the ADFS STS trusts ACS so that visitors who wish to use a social
identity provider or another type of identity provider can be authen-
ticated. Figure 3 shows a simplified view of the sequence of requests
that occur.
Trust
Active
Issuer (ADFS) Issuer (ACS)
Directory
4 2 5 9
3 1 1 6 1
1
S s R S t R 0
r e
r
a e p e f e a t y
r
o
u e d
n
n
t
o u
m
n
f
n
l i Trust
t
g
c i
n e
m s r
t
h d i r d f n t a k n
e
s o
fi
n i
i e
e r t o
o
c A
e t e n
n e e o r t
R t i
t o
u a e d
t q d t C k m k c e g i r a
Trust i q i t s
c u e
e
a e b o S n e e e t m a d d n
d
r
m
y
P
i n
n n i
A
i
t
o
s
o
i t r s r c d e y e v c a
o u C s e l c h H r S o l
u
n
n f l S c a o t e r n c
o e
e
e
n
e i n
v p e
u
m
d
r
r
r
S
s i i t a k
f v
u o e
e s a
t c o
i s t m
d n
e i r
i R n o
n
D r f
g
u s
t n
e a
R r
t
Identity Provider
1 Access site
Authenticate 7 Windows Live
2 Redirect to ADFS
Claims-aware Issue token and 8 Google
website redirect to ACS
Web Facebook
browser
13 Send ADFS token
[ others ]
figure 3
ACS and ADFS authenticating users of a website
Upon accessing the application (1), the visitor’s web browser is
redirected to ADFS (2 and 3). ADFS will contain preconfigured rules
that redirect the visitor to ACS (4 and 5), which displays the home
realm discovery page (6) containing a list of identity providers config-
ured for the website or web application. The user selects an identity
provider and ACS redirects the visitor’s web browser to that identity
provider’s login page (7).
After entering the required credentials, the visitor’s browser is
redirected back to ACS with the identity provider’s token in the re-
quest (8 and 9). ACS performs any necessary transformation of the
claims in the identity provider’s token using rules configured for the
website or application, and then redirects the browser to ADFS with
a token containing these claims (10). ADFS receives the token (11),
———————– Page 338———————–
windows azure appfabric access control service 301 301
performs any additional transformations on the claims, and returns a
token (12). The visitor’s browser is then redirected to the claims-aware
website that was originally accessed (13).
Combining ACS and ADFS for Services,
Smart Clients, and SharePoint BCS
ACS can be used to authenticate service requests for web services,
smart clients, and Microsoft SharePoint® Business Connectivity Ser-
vices (BCS) applications when the service uses an ADFS STS as the
token issuer, but the service requires a token provided by ACS. Figure
4 shows a simplified view of the sequence of requests that occur.
Active
Issuer (ADFS) Trust Issuer (ACS)
Directory
3
n 4
e S
k
2
F
1
o
t D
d A n
n e
k
I
m
c
e
s
o
A
o
A
S t
o s
r S
f
u u
n
c n
d r C
t t t e e u A
i h
t
a
n
v t
i e
e i T
m
e o
a
n
R
n
t o
r
r
i k
b
D
f
t n e o u
i
i c g n s
r a t
e t c
c e l
t a
o w i
r i m
y t s
h
Claims-aware
service
5 Send token
Smart Client
or Service
figure 4
ACS authenticating services, smart
clients, and SharePoint BCS
The service is preconfigured to use ADFS and Active Directory as
the identity provider. The service first authenticates through ADFS
(1), which returns a token (2) that the service sends to ACS (3). ACS
trusts ADFS, and performs any necessary transformation of the claims
in the token using rules configured for the service; then it returns a
token containing these claims (4). The service then sends the token
received from ACS to the relying party service or resource (5).
This scenario is demonstrated in Chapter 9, “Securing REST
Services.”
———————– Page 339———————–
302302 appendix e
Creating, Configuring, and Using an ACS Issuer
The complete process for creating and configuring an ACS account to
implement a token issuer requires the following steps:
1. Access the ACS web portal.
2. Create a namespace for the issuer service instance.
3. Add the required identity providers to the namespace.
4. Configure one or more relying party applications.
5. Create claims transformations and pass-through rules.
6. Obtain the URIs for the service namespace.
7. Configure relying party applications to use ACS.
The following sections explain each of these steps in more detail.
STEP 1: ACCEss th E AC s wEB portAL
The initial configuration of ACS must be done using the web portal.
This is a Microsoft Silverlight® browser plug-in application that pro-
vides access to the access control, service bus, and cache features of
the Azure AppFabric for your account. You must log into the portal
using a Windows Live ID associated with your Windows Azure ac-
count. If you do not have a Windows Live ID, you must create and
register one first at http://www.live.com. If you do not have a Win-
dows Azure account, you must create one at http://www.microsoft.
com/windowsazure/account/ before you can use ACS.
ACS is a subscription-based service, and you will be charged for
the use of ACS. The cost depends on the type of subscription you
take out. At the time of writing, the standard consumption charge was
$1.99 per 100,000 transactions.
STEP 2: Cr EAt E A nAm EspACE for th E Issu Er
sE rvICE InstA nCE
After you sign into the ACS web portal, you can begin to configure
your service instance. The first step is to define a namespace for your
service. This is prepended to the ACS URI to provide a unique base
URI for your service instance. You must choose a namespace that is
not already in use anywhere else by ACS (you can check the avail-
ability before you confirm your choice), and choose a country/region
where the service will be hosted.
For example, if you choose the namespace fabrikam, the base URI
for your ACS service instance will be https://fabrikam.accesscontrol.
appfabric.com. Endpoints for applications to use for authentication
will be paths based on this unique URI.
———————– Page 340———————–
windows azure appfabric access control service 303 303
After you have created the namespace, you see the main service
management page for your new service instance. This provides quick
access to the configuration settings for the trust relationships (the
relying party applications, identity providers, and rule groups), the
service settings (certificates, keys, and service identities), administra-
tion, and application integration.
You must use the Certificates and Keys page either to upload an
X.509 certificate with a private key for use by ACS when encrypting
tokens, or specify a 256-bit symmetric key. You can also upload a dif-
ferent certificate for signing the tokens if required. You can use cer-
tificates generated by a local certificate authority such as Active Di-
rectory Certificate Services, a certificate obtained from a commercial
certification authority, or (for testing and proof of concept purposes)
self-signed certificates.
STEP 3: Add th E rEqu IrEd IdEntItY provIdErs to thE
nA m EspACE
Next, you must specify the identity providers that you will trust to
authenticate requests sent to ACS from applications and users. By
default, Windows Live ID is preconfigured as an identity provider. You
can add additional providers such as Google, Yahoo!, Facebook, your
own or other ADFS issuers, and more. For each one, you can specify
the URL of the login page and an image to display for the identity
provider when the user is presented with a list of trusted providers.
For known identity providers (such as Google, Yahoo!, and Face-
book) these settings are preconfigured and you should consider using
the default settings. If you want to trust another identity provider,
such as a Security Token Service (STS) based at an associated site such
as a partner company, you must enter the login page URL, and option-
ally specify an image to display.
By default, ACS uses Windows Live ID as the identity provider to
determine the accounts of ACS administrators. You configure a rule
that identifies administrators through the claims returned by their
identity provider (claim transformation and filtering rules are
described in step 5). You can also use any of the other configured
identity providers to determine which accounts have administrative
rights for this ACS service instance.
STEP 4: Conf Igur E o nE or mor E rELYIng pArtY
App LICAt Ions
You can now configure the ACS service to recognize and respond to
relying parties. Typically these are the applications and web services
that will send authentication requests to this ACS service instance.
For each relying party you specify:
———————– Page 341———————–
304304 appendix e
• A name for the application or service as it will appear in the
authentication portal page where users select an identity
provider.
• The URIs applicable to this application or service. These include
the realm (URI) for which tokens issued by ACS will be valid,
the URI to redirect the request to after authentication and,
optionally, a different URI to redirect the request to if an
authentication error occurs.
It is good practice to always configure the redirection addresses,
even though they are mandated by ACS to be in the same realm as
the token that ACS delivers, in order to mitigate interception attacks
through rerouting the posted token
• The format, encryption policy, and validity lifetime (in seconds)
for the tokens returned from ACS. By default the format is a
SAML 2.0 token, but other formats such as SAML 1.1 and SWT
are available. SAML 1.1 and SAML 2.0 tokens can be encrypted,
but SWT tokens cannot. If you want to return tokens to a web
service that implements the WS-Trust protocol you must select
a policy that encrypts the token.
• The binding between this relying party and the identity provid-
ers you previously configured for the service namespace. Each
relying party can trust a different subset of the identity provid-
ers you have configured for the service namespace.
• The token signing options. By default, tokens are signed using
the certificate for the service namespace, and all relying parties
will use the same certificate. However, if you wish, you can
upload more certificates and allocate them to individual relying
parties.
Each option in the configuration page has a “Learn more” link that
provides more information on that setting. You can, as an alternative,
upload a WS-Federation metadata document that contains the re-
quired settings instead of entering them manually into the portal.
If you only configure a single identity provider for a relying party,
ACS will not display the Home Realm Discovery page that shows a
list of configured identity providers. It will just use the identity
provider you configured.
———————– Page 342———————–
windows azure appfabric access control service 305 305
STEP 5: Cr EAt E C LAIms t rA nsformAt Ions
A nd pAss-through ruLEs
By default, ACS does not include any of the claims it receives from an
identity provider in the token it issues. This ensures that, by default,
claims that might contain sensitive information are not automatically
sent in response to authentication requests. You must create rules
that pass the values in the appropriate claims through to the token
that will be returned to the relying party. These rules can apply a
transformation to the claim values, or simply pass the value received
from the identity provider into the token.
The rules are stored in rule groups. You create a rule group and
give it a name, then create individual rules for this group. The portal
provides a Generate feature that will automatically generate a pass-
through rule for every claim for every configured identity provider. If
you do not require any transformations to take place, (which is typi-
cally the case if the relying party application or service will access ACS
through another STS such as a local ADFS instance), this set of gener-
ated rules will probably suffice as all of the claims mapping and trans-
formations will take place on the local STS issuer.
If you want to perform transformation of claims within ACS, you
must create custom rules. For a custom rule, you specify:
• The rule conditions that match an input claim from an identity
provider. You can specify that the rule will match on the claim
type, the claim value, or both.
• For the claim type, you can specify that it will match any claim
type, one of the standard claim types exposed by this identity
provider, or a specific claim type you enter (as a full XML
namespace value for that claim type).
• For the claim value, you can specify that it will match any value
or a specific value you enter. Claim types and values are case-
sensitive.
• The rule actions when generating the output claim. You can
specify the output claim type, the output claim value, or both.
• For the output claim type you can specify a pass-through action
that generates a claim of the same type as the input claim, select
one of the standard claim types exposed by this identity pro-
vider, or enter a specific claim type (as a full XML namespace
value for that claim type).
• For the output claim value you can choose to pass through the
original value of the claim, or enter a value.
• The rule description (optional) that helps you to identify the
rule when you come to apply it.
———————– Page 343———————–
306306 appendix e
STEP 6: oBtAI n thE urIs for thE sE rvICE nAm EspACE
After you configure your ACS service instance, you use the Applica-
tion Integration page of the portal to obtain the endpoints to which
relying parties will connect to authenticate requests. This page also
lists the endpoints for the management service (the API for configur-
ing ACS without using the web portal), the OAuth WRAP URI, and
the URIs of the WS-Federation and WS-Metadata Exchange docu-
ments.
STEP 7: Conf Igur E rELYIng pArtY App LICAt Ions
to us E AC s
To add an ACS service reference to an application in Microsoft Visual
Studio® development system, you must download and install the
Windows Identity Foundation SDK. This adds a new option to the
Visual Studio menus to allow you to add an STS reference to a project.
It starts a wizard (the FedUtil utility) that asks for the URI of the
WS-Federation document for your ACS service instance, with can be
obtained from the application integration page of the portal in the
previous step. The wizard adds a reference to the Microsoft.Identity
Model assembly to the project and updates the application configura-
tion file.
If the application is a web application, users will be redirected to
ACS when they access the application, and will see the ACS home
realm discovery page that lists the configured identity providers for
the application that are available. After authenticating with their
chosen identity provider, users will be returned to the application,
which can use the claims in the token returned by ACS to modify its
behavior as appropriate for each user.
For information and links to other resources that describe tech-
niques for using claims and tokens to apply authorization in applica-
tions and services, see “Authorization In Claims Aware Applications
– Role Based and Claims Based Access Control” at http://blogs.msdn.
com/b/alikl/archive/2011/01/21/authorization-in-claims-aware-ap-
plications-role-based-and-claims-based-access-control.aspx.
Custom Home Realm Discovery Pages
By default, ACS displays a home realm discovery page when a user is
redirected to ACS for authentication. This page contains links to the
identity providers configured for the relying party application, and is
hosted within ACS. If you have configured an ADFS instance as an
identity provider, you can specify email suffixes that are valid for this
ADFS instance, and ACS will display a text box where users can enter
an email address that has one of the valid suffixes. This enables ACS
to determine the home realm for the authenticated user.
———————– Page 344———————–
windows azure appfabric access control service 307 307
As an alternative to using the default ACS-hosted login page, you
can create a custom page and host it with your application (or else-
where). The custom page uses the Home Realm Discovery Metadata
Feed exposed by ACS to get the list and details of the supported
identity providers. To make this easier, you can download the example
login page (which is the same as the default page) from ACS and
modify it as required.
If you are integrating ACS with ADFS, the home realm discovery
page will contain a text box where users can enter an email address
that is valid within trusted ADFS domains. ACS will use this to deter-
mine the user’s home realm. You can create a custom page that con-
tains only a text box and does not include the list of configured
identity providers if this is appropriate for your scenario.
Configuration with the Management Service
API
Windows Azure AppFabric exposes a REST-based service API in At-
omPub format that uses X.509 client certificates for authentication.
The URI of the management service for your ACS instance is shown
in the application integration page of the web portal after your con-
figure the instance. You can upload any valid X.509 certificate (in .cer
format) to the ACS portal and then use it as a client certificate when
making API requests.
The Windows Azure management API supports all of the opera-
tions available through the web portal with the exception of creating
a namespace. You can use the management API to configure identity
providers, relying parties, rules, and other settings for your namespac-
es. To create new namespaces, you must use the web portal.
Chapter 7, “Federated Identity with Multiple Partners and Win-
dows Azure Access Control Service” and the associated ACS wrapper
used in this sample to configure ACS demonstrate how you can use
the management API to configure identity providers, relying partiers,
and rules.
For more information, see “Access Control Service Samples and
Documentation” at http://acs.codeplex.com/releases/view/57595.
For examples of adding identity providers such as ADFS, OpenID,
and Facebook using the management API, see the following resources:
• “Adding Identity Provider Using Management Service” at http://
blogs.msdn.com/b/alikl/archive/2011/01/08/windows-azure-
appfabric-access-control-service-v2-adding-identity-provider-
using-management-service.aspx.
———————– Page 345———————–
308308 appendix e
• “Programmatically Adding OpenID as an Identity Provider Using
Management Service” at http://blogs.msdn.com/b/alikl/ar-
chive/2011/02/08/windows-azure-appfabric-access-control-
service-acs-v2-programmatically-adding-openid-as-an-identity-
provider-using-management-service.aspx.
• “Programmatically Adding Facebook as an Identity Provider
Using Management Service” at http://blogs.msdn.com/b/alikl/
archive/2011/01/14/windows-azure-appfabric-access-control-
service-acs-v2-programmatically-adding-facebook-as-an-
identity-provider-using-management-service.aspx.
Managing Errors
One of the configuration settings for a relying party that can be pro-
vided is the URI where ACS will send error messages. ACS sends de-
tails of the error as a JavaScript Object Notation (JSON)-encoded
object in the response body when the original request was an OAuth
request; or a SOAP fault message if the original request was a WS-
Trust request. The response includes a TraceId value that is useful in
identifying failed requests if you need to contact the ACS support
team.
For information about handling JSON-encoded responses, see
“How To: Use Error URL” at http://acs.codeplex.com/wikipage?title=
how%20to%3a%20use%20Error%20urL and “Returning Friendly
Error Messages Using Error URL Feature” at http://blogs.msdn.com/b/
alikl/archive/2011/01/15/windows-azure-appfabric-access-control-
service-acs-v2-returning-friendly-error-messages-using-error-url-
feature.aspx.
Errors that arise when processing management API requests
throw an exception of type DataServiceRequestException.
A list of error codes for ACS is available from “ACS Error Codes”
at http://acs.codeplex.com/wikipage?title=ACs%20Error%20Codes&
version=8.
Integration of ACS and a Local ADFS Issuer
You can configure ACS to use an ADFS issuer as a trusted identity
provider. This is useful in scenarios where you want users of a local
application to be able to authenticate against an Active Directory
installation (typically within your own organization) when they access
the local application, and then access other services that require a
SAML or other type of claims token. For example, a locally installed
customer management application may use a partner’s externally
hosted service to obtain credit rating information for customers.
———————– Page 346———————–
windows azure appfabric access control service 309 309
The procedure for configuring this scenario is to use the WS-
Federation document that can be created by ADFS to configure ACS
so that it can use the ADFS service as a trusted identity provider. ACS
can accept encrypted tokens from ADFS identity providers as long as
the appropriate X.509 certificate with a private key is hosted by ACS.
The ADFS identity provider receives the public key it will use to en-
crypt tokens when it imports the WS-Federation metadata from ACS.
Afterwards, when users first access the local application they are
authenticated by the local ADFS STS. When the application must
access the externally hosted service, it queries ACS. ACS then authen-
ticates the user against their local ADFS STS and issues a token that
is valid for the remote service. The customer management application
then passes this token to the remote service when it makes the call to
retrieve rating information (see Figure 5).
1 Configure using
WS-Fed metadata
Active ADFS ACS
Directory
2
Get SAML token
3 Exchange SAML
token for ACS token
Externally hosted
Local application service
4 Send ACS token (Relying Party)
with payload
figure 5
ACS using an ADFS issuer as a trusted identity provider
An alternative (reverse) scenario is to configure ADFS to use ACS
as a trusted issuer. In this scenario, ADFS can authenticate users that
do not have an account in the local Active Directory used by ADFS.
When users log into the application and are authenticated by ADFS,
they can choose an identity provider supported by ACS. ADFS then
accepts the token generated by ACS, optionally maps the claims it
contains, and issues a suitable token (such as a Kerberos ticket) to the
user that is valid in the local domain (see Figure 6).
———————– Page 347———————–
310310 appendix e
1 Configure ADFS
to trust ACS
Active ADFS ACS
2 Get SAML token
Directory
Issue Kerberos
3
ticket or other
appropriate token
Internally hosted
Local application service
Send token obtained (Relying Party)
from ADFS with
4
payload
figure 6
ADFS using ACS as a trusted issuer
Security Considerations with ACS
You must ensure that your applications and services that make use of
ACS for authentication and claims issuance maintain the requisite
levels of security. Although your applications do not have access to
users’ login credentials, ACS does expose claims for the user that your
application must manage securely.
You must ensure that credentials and certificates used by applica-
tions and services, and for access to ACS, are stored and handled in a
secure manner. Always consider using SSL when passing credentials
over networks. Other issues you should consider are those that apply
to all applications, such as protection from spoofing, tampering, repu-
diation, and information disclosure.
For more information and links to related resources that describe
security threats and the relevant techniques available to counter them
see the following resources:
“Windows Azure AppFabric Access Control Service (ACS) v2 –
Threats & Countermeasures” at http://blogs.msdn.com/b/alikl/ar-
chive/2011/02/03/windows-azure-appfabric-access-control-service-
acs-v2-threats-amp-countermeasures.aspx
———————– Page 348———————–
windows azure appfabric access control service 311 311
“Windows Identity Foundation (WIF) Security for ASP.NET Web
Applications – Threats & Countermeasures” at http://blogs.msdn.
com/b/alikl/archive/2010/12/02/windows-identity-foundation-wif-
security-for-asp-net-web-applications-threats-amp-countermea-
sures.aspx
“Microsoft Application Architecture Guide, 2nd Edition” at
http://msdn.microsoft.com/en-us/library/ff650706.aspx
Tips for Using ACS
The following advice may be useful in resolving issues encountered
when using claims authentication with ACS.
ACS and STSs Generated in Visual Studio
2010
Custom STSs created from the Visual Studio 2010 template assume
that the ReplyToAddress is the same as the AppliesToAddress. You
can see this in in the GetScope method of the CustomSecurity
TokenService, which sets scope.ReplyToAddress = scope.Applies
ToAddress. In the case of ACS, the ReplyToAddress and the Applies
ToAddress are different. The STS generates a redirection to the
wrong place and an error occurs when an application accesses ACS to
perform authentication.
To resolve this, replace the line that sets the ReplyToAddress
with the following code.
C#
if (request.ReplyTo != null)
{
scope.ReplyToAddress = request.ReplyTo.ToString();
}
else
{
scope.ReplyToAddress = scope.AppliesToAddress;
}
Error When Uploading a Federation
Metadata Document
When adding a new ADFS token issuer as a trusted identity provider
to ACS, you may receive an error such as “ACS20009: An error oc-
curred reading the WS-Federation metadata document” when up-
———————– Page 349———————–
312312 appendix e
loading the federation metadata file. ACS validates the signature of
the file, and if you have modified the file that was generated by Vi-
sual Studio this error will occur. If you need to modify the metadata
file, you must re-sign it. A useful tool for this can be found at “WIF
Custom STS Metadata File Editor” (http://botsikas.blogspot.
com/2010/06/wif-custom-sts-metadata-file-editor.html).
Avoiding Use of the Default ACS Home
Realm Discovery Page
When using ACS with multiple identity providers, ACS will display a
page with the list of identity providers that are configured the first
time you attempt to sign in. You can avoid this by sending the ap-
propriate whr parameter with the authentication request. The follow-
ing table lists the different values for this parameter for each of the
identity providers.
Identity provider whr parameter value
Windows Live ID urn:WindowsLiveID
Google Google
Yahoo! Yahoo!
Facebook Facebook-<application-ID>
Custom STS The value should match the entityid declared
in the FederationMetadata file of the identity
provider.
More Information
For more information about setting up and using ACS, see the follow-
ing resources:
• “Windows Azure AppFabric” at http://www.microsoft.com/
windowsazure/Appfabric/overview/default.asp
• “Access Control Service Samples and Documentation” at
http://acs.codeplex.com/documentation
• “Windows Azure Team Blog” at http://blogs.msdn.com/
windowsazure/
———————– Page 350———————–
Appendix F SharePoint 2010
Authentication
Architecture and
Considerations
This appendix provides background information about the way that
Microsoft® SharePoint® 2010 implements claims-based authentica-
tion. This is a major change to the authentication architecture com-
pared to previous versions, and makes it easier to take advantage
of federated authentication approaches for SharePoint websites, ap-
plications, and services. It also contains information on some of the
important factors you should consider when creating and deploying
claims-aware SharePoint applications and services.
Versions prior to SharePoint 2010 use the techniques for authen-
tication provided by the Microsoft Windows® operating system and
ASP.NET. Applications can use Windows authentication (with the
credentials validated by Microsoft Active Directory® directory
service), ASP.NET forms authentication (with credentials typically
validated from a database), or a combination of these techniques.
To make claims-based and federated authentication easier, Share-
Point 2010 can use a claims-based model for authentication. This
model still fully supports Windows and forms authentication, but
does so by integrating these approaches with the claims-based
authentication mechanism. This appendix provides background
information that will help you to understand how this model is
implemented within SharePoint 2010.
Benefits of a Claims-Based Architecture
Users often require access to a number of different applications to
perform daily tasks, and increasingly these applications are remotely
located so that users access them over the Internet. ASP.NET forms
authentication typically requires the maintenance of a separate user
database at each location. Users must have accounts registered with
all of the Active Directory domains, or in all of the ASP.NET forms
authentication databases.
313
———————– Page 351———————–
314314 appendix f
The use of tokens and claims can simplify authentication by al-
lowing the use of federated identity—users are authenticated by an
identity provider that the organization and application trusts. This
may be an identity provider within the organization, such as Active
Directory Federation Services (ADFS), or a third party (a business
partner or a social identity provider such as Windows Live® or
Google).
As well as simplifying administration tasks, claims-based authen-
tication also assists users because it makes it possible for users to use
the same account (the same credentials) to access multiple applica-
tions and services in remote locations, hosted by different organiza-
tions. This allows for single sign-on (SSO) in that users can move from
one application to another, or make use of other services, without
needing to log on each time.
The integration of claims-based authentication with the existing
architecture of SharePoint provides the following benefits:
• Support for single sign-on over the Internet in addition to the
existing location-dependent mechanisms such as Active Direc-
tory, LDAP, and databases.
• Automatic and secure delegation of identity between applica-
tions and between machines in a server farm.
• Support for multiple different authentication mechanisms in a
single web application without requiring the use of zones.
• Access to external web services without requiring the user to
provide additional credentials.
• Support for standard authentication methods increasingly being
used on the web.
• Support for accessing non-claims-based services that use only
Windows authentication.
Windows Identity Foundation
SharePoint 2010 uses the Windows Identity Foundation (WIF) for
authentication irrespective of the authentication approach used by
the individual applications and services. This is a fundamental change
in the architecture of SharePoint in comparison to previous versions.
WIF is a standards-based technology for working with authentication
tokens and claims, and for interacting with security token services
(STSs). It provides a unified programming model that supports both
the Passive and Active authentication sequences.
The Passive authentication sequence uses the WS-Federation
protocol for authentication in web browser-based scenarios, such
as ASP.NET applications. It depends on redirection of the browser
between the relying party, token issuers, and identity providers.
———————– Page 352———————–
sharepoint 2010 authentication architecture and consider ations 315 315
The Active authentication sequence uses the WS-Trust protocol
for authentication in web service scenarios, such as Windows
Communication Foundation (WCF) services. The service ” knows”
(typically through configuration) how to obtain the tokens it requires
to access other services.
Implementation of the Claims-Based
Architecture
The claims-based architecture in SharePoint 2010 comprises three
main themes and the associated framework implementations. These
three themes correspond to the three main factors in the flow of
identity through SharePoint applications and services.
• The first theme is the extension of authentication to enable
the use of multiple authentication mechanisms. Authentication
is possible using tokens containing claims, ASP.NET forms
authentication, and Windows authentication. External authenti-
cation is implemented though an STS within SharePoint 2010.
• The second theme is identity normalization, where the identity
verified by the different authentication mechanisms is con-
verted to an IClaimPrincipal instance that the Windows
Identity Foundation authorization mechanism can use to
implement access control.
• The third theme is supporting existing identity infrastructure,
where the identity can be used to access external services and
applications that may or may not be claims-aware. For non-
claims-aware applications and services, WIF can generate an
IPrincipal instance to allow other authentication methods (such
as Windows authentication) to be used even when the original
identity was validated using claims. This is implemented though
the Services Application Framework within SharePoint 2010.
Figure 1 shows a conceptual overview of these three themes, and
the mechanisms that implement them in SharePoint 2010.
———————– Page 353———————–
316316 appendix f
Externalized Identity Support for existing
authentication normalization identity infastructure
Client Application Service Content
Database
SharePoint
STS
Windows
IClaimsPrincipal IPrincipal
ASP.NET
SAML / SSO
Authentication methods Access control Services Application
(WIF and SP-STS) (WIF) Framework (WIF)
figure 1
The three authentication themes in SharePoint 2010
SharePoint 2010 User Identity
Internally, SharePoint 2010 uses the SPUser type to manage and flow
identity through applications and services. The fundamental change
in this version of SharePoint compared to previous versions is the
provision of an external authentication mechanism that supports
identity verification using claims, as well as ASP.NET forms and Win-
dows authentication. The external authentication mechanism con-
verts claims it receives into a SAML token, then maps this token to an
instance of the SPUser type.
The claims may be received in the form of a SAML token from
ADFS, Windows Azure™ AppFabric Access Control Service (ACS),
or another STS; as a Windows NT token; or from the ASP.NET forms
authentication mechanism. An application can be configured to use
more than one authentication mechanism, allowing users to be au-
thenticated by any of the configured mechanisms.
Previous to version 2010, supporting more than one authentication
method for a SharePoint application typically required the use of
zones; each of which is effectively a separate Microsoft Internet
Information Services (IIS) web site and URL pointing to the applica-
tion. Zones are no longer required in SharePoint 2010 because
applications can be configured to use a combination of authentica-
tion methods, although they can still be used if required (for
example, if a different application URL is required for each authen-
tication method).
It is also possible to configure the SharePoint 2010 authentication
mechanism in “Classic” mode for existing applications or services that
are not claims-aware, and which present a Windows NT token that
SharePoint can map to an instance of the SPUser type. If you select
classic mode, you can use Windows authentication in the same
way as in previous versions of SharePoint, and the user accounts
are treated as Active Directory Domain Services (AD DS) accounts.
———————– Page 354———————–
sharepoint 2010 authentication architecture and consider ations 317 317
However, services and service applications will use claims-based iden-
tities for inter-farm communication regardless of the mode that is
selected for web applications and users.
Figure 2 shows an overview of the sign-in methods supported by
the SharePoint 2010 authentication mechanism.
SAML 1.1 +
token (web SSO)
d
e
s SAML
a
b- ASP.NET Forms claims-based
s
m Authentication identity
i token
a
l
C
Windows
NT token SharePoint
SPUser
instance
c
i
s Windows
s
a
l NT token
C
figure 2
Authentication methods in SharePoint 2010
Windows certificate-based authentication is not supported by the
SharePoint 2010 claims-based authentication mechanism.
The SharePoint 2010 Security Token
Service
The conversion of claims received in the different formats is carried
out by an STS within SharePoint 2010. This is a fairly simple STS that
can map incoming claims to the claims required by the relying party
(the target application or service). It can also be configured to trust
external STSs such as ADFS, ACS, and other token issuers.
Applications and services running within SharePoint 2010 access
the local SharePoint STS to discover the claims for each user or pro-
cess that requires authorization. For example, applications can verify
that the current user is a member of one of the required Active Direc-
tory groups. This is done using the WIF authorization mechanisms,
and works in much the same way as (non-SharePoint) applications
that access ADFS or ACS directly to obtain a token containing the
claims.
For example, when a user accesses a SharePoint-hosted ASP.NET
application that requires authentication, the request is redirected to
———————– Page 355———————–
318318 appendix f
an identity provider such as ADFS or ACS. The token received from
the identity provider is then posted to the SharePoint STS (which the
application must be configured to trust). The SharePoint STS authen-
ticates the user and augments (transforms) the claims in the token or
request. It then redirects the request back to the application with the
augmented claims. Inside the application, the claims can be used to
authorize the user for specific actions. Figure 3 shows this process.
6 Authenticate user
SharePoint
STS 7 Augment claims
5 8
R
e
y n
t
t e
i
t k u
n r
n
o
e t
S
d r
i
P
e
d d
t
n i
o
v
e
k
o
S r
e
n
p
Identity Provider
1 Access application
ADFS
SharePoint-hosted 2 Redirect to identity Authenticate 3
web application provider ACS
Return token 4
Web
9 Access granted browser [other]
figure 3
Claims authentication sequence in SharePoint 2010
The SharePoint 2010 Services Application
Framework
One of the typical scenarios for a SharePoint application is to access
both internal (SharePoint hosted) and external services to obtain data
required by the application. Internal services include the Search Ser-
vice, Secure Store Service, Excel Services, and others. External ser-
vices may be any that expose data, either on a corporate network or
from a remote location over the Internet.
Accessing these services will, in most cases, require the applica-
tion to present appropriate credentials to the services. In some cases,
the services will be claims-aware and the application can present a
SAML token containing the required claims. As long as the external
service trusts the SharePoint STS, it can verify the claims.
Some services may not, however, be claims aware. A typical ex-
ample is when accessing a Microsoft SQL Server® database. In these
cases, the SharePoint Services Application Framework can be used to
generate a Windows token that the application can present to the
service. This is done using the Claims to Windows Token Service
(C2WTS), which can create a suitable Windows NT token.
———————– Page 356———————–
sharepoint 2010 authentication architecture and consider ations 319 319
Microsoft Visual Studio® development system provides support and
features to make building and deploying SharePoint 2010 applica –
tions easier. This support is included in all editions of Visual Studio
2010 (Professional, Premium, and Ultimate). It is not available in the
Express versions of Visual Studio.
Considerations When Using Claims
with SharePoint
The following sections provide specific guidance on topics related to
using claims authentication in SharePoint 2010 applications and ser-
vices.
Choosing an Authentication Mode
Claims-based authentication is now the recommended mechanism for
SharePoint, and all new SharePoint applications should use claims-
based authentication; even if the operating environment will include
only Windows accounts. SharePoint 2010 implements Windows au-
thentication in the same way regardless of the mode that is selected,
and there are no additional steps required to implement Windows
authentication with the claims-based authentication mode.
If you are upgrading an application that uses ASP.NET forms-
based authentication, you must use claims-based authentication. Clas-
sic mode authentication cannot support ASP.NET forms-based au-
thentication.
The only scenario where choosing classic mode authentication is
valid is when upgrading to SharePoint 2010 and existing accounts use
only Windows authentication. This allows existing applications to
continue to operate in the same way as in previous versions of Share-
Point.
The default authentication mode for a new SharePoint application is
classic mode. You must specifically select claims-based authentication
mode when creating a new application or website.
Supported Standards
SharePoint 2010 supports the following claims-related standards:
• WS-Federation version 1.1
• WS-Trust version 1.4
• SAML Tokens version 1.1
SharePoint 2010 does not support SAML Protocol (SAMLP).
———————– Page 357———————–
320320 appendix f
Using Multiple Authentication
Mechanisms
When multiple authentication methods are configured for an applica-
tion, SharePoint displays a home realm discovery page that lists the
authentication methods available. The user must select the method to
use. This adds an extra step into the authentication process for the
user. It is possible to create a custom home realm discovery (sign-in)
page if required.
SharePoint 2010 does not discriminate between user accounts
when different authentication methods are used. Users that success-
fully authenticate with SharePoint 2010 using any of the claims-based
authentication methods have access to the same resources and ser-
vices as would be available if that user was authenticated using classic
Windows authentication.
Users who access a SharePoint 2010 application that is configured
to use claims-based authentication and has multiple authentication
methods set up will have the same access to resources and services
when using any of the authentication methods. However, if the user
has two different accounts configured (in other words, has accounts
in two different repositories, such as a social identity provider and
ASP.NET), and the authentication method used validates the user
against one of these accounts, the user will have access to only re-
sources and services configured for the account that was validated.
You can configure multiple SAML authentication providers for a
server farm and application. However, you can configure only a single
instance of an ASP.NET forms-based authentication provider. If you
configure Windows authentication when using claims-based authen-
tication mode, you can use both a Windows integrated method and a
Basic method, but you cannot configure any additional Windows au-
thentication methods.
For a discussion on the merits of using multiple identity providers for
authentication, see Chapter 12 of this guide, “Federated Identity
for SharePoint Applications.”
SharePoint Groups with Claims
Authentication
To simplify administration tasks when setting authorization permis-
sions on resources, it is recommended that you use SharePoint Groups.
Setting permissions for resources based on membership of a specific
group means that it is not necessary to continually update the permis-
sions as new users are added to groups or existing users are removed
from groups.
The SharePoint STS automatically augments the claims in the
tokens it issues to include group membership for users when Win-
———————– Page 358———————–
sharepoint 2010 authentication architecture and consider ations 321 321
dows authentication is used. It also automatically augments the to-
kens to include the roles specified for users when ASP.NET forms-
based authentication is used; with each role translated into a
SharePoint group name (the SharePoint groups are not created auto-
matically).
When using SAML tokens issued by external identity providers
and STSs, you must create a custom claims provider that augments the
tokens to include the relevant roles. For example, you could create a
custom claims provider that augments the SharePoint STS token with
specific roles based on a test of the claims in the token received from
the identity provider. This may be done by checking the incoming
token to see if it was issued by a specific partner’s STS, or that the
email address is within with a specific domain.
SharePoint Profiles and Audiences with
Claims Authentication
SharePoint user profiles are not populated automatically when using
claims-based authentication methods. You must create and populate
these profiles yourself, typically in code. Users that map to existing
accounts when you migrate to claims-based authentication will use
any existing profile information, but other users and new users will
not have profile information. For information about how you can
populate user profiles when using claims-based authentication, see
“Trusted Identity Providers & User Profile Synchronization” at http://
blogs.msdn.com/b/brporter/archive/2010/07/19/trusted-identity-
providers-amp-user-profile-synchronization.aspx.
The same limitation occurs when using SharePoint Audiences.
You cannot use user-based audiences directly unless you create cus-
tom code to support this, but you can use property-based audiences
that make use of claims values. For information, see “Using Audiences
with Claims Auth Sites in SharePoint 2010″ at http://blogs.technet.
com/b/speschka/archive/2010/06/12/using-audiences-with-claims-
auth-sites-in-sharepoint-2010.aspx.
Rich Client, Office, and Reporting
Applications with Claims Authentication
Claims-based authentication methods in SharePoint support almost
all of the capabilities for integration with Office client applications
and services. Office 2007 clients can use forms-based authentication
to access SharePoint 2010 applications that are configured to use
forms-based authentication and Office 2010 clients can use claims to
access SharePoint 2010 applications that are configured to use claims-
based forms-based authentication. However, there are some limita-
tions when using claims-based authentication:
———————– Page 359———————–
322322 appendix f
• Microsoft Office Excel® Services can use only the Classic or the
Windows claims-based authentication methods. When using
other claims-based authentication methods you must use the
Secure Store Service for external data connections and unat-
tended data refresh.
• Microsoft Visio® Services can use the Secure Store Service, but
only for drawings that use an Office Data Connection (ODC)
file to specify the connection. The Unattended Service Account
option can also be used with the same limitation.
• PowerPivot can be used in workbooks with embedded data, but
data refresh from a data source is not possible when using any
of the claims-based authentication methods.
• SQL Server 2008 R2 Reporting Services integration is only
possible when using classic Windows Authentication. It cannot
use the Claims to Windows Token Service (c2WTS), which is a
feature of Windows Identity Foundation.
• PerformancePoint must use the Unattended Service Account
option in conjunction with Secure Store Service when using
claims-based authentication.
• Project Server maintains a separate user database containing
logon information, and so migrating users when using claims-
based authentication is not sufficient.
Other Trade-offs and Limitations for
Claims Authentication
When upgrading existing applications to SharePoint 2010, be aware
of the following factors that may affect your choice of authentication
type:
• Claims-based authentication requires communication over
HTTPS with a token issuer and identity provider. It typically also
requires multiple redirects for clients that are using a web
browser. These are likely to be slower than Windows Authenti-
cation or ASP.NET forms-based authentication lookup. Even
after initial authentication, as users move between applications
taking advantage of single sign-on, the applications and services
must make calls over HTTPS to validate the authentication
tokens.
• Web Parts or custom code that relies on or uses Windows
identities must be modified if you choose claims-based
authentication. Consider choosing classic mode authentication
until all custom code is updated.
• When you upgrade a web application from classic mode to
claims-based authentication, you must use Windows Power-
Shell® command-line interface to convert Windows identities
———————– Page 360———————–
sharepoint 2010 authentication architecture and consider ations 323 323
to claims identities. This can take time, and you must factor in
time for this operation as part of the upgrade process.
• Search alerts are currently not supported with claims-based
authentication.
• You cannot use custom ISAPI extensions or HTTP modules with
the forms-based authentication method because the SharePoint
STS communicates directly with the forms authentication
provider by calling its ValidateUser method.
• Some client-hosted applications may attempt to authenticate
with the server when displaying content linked from SharePoint
application web pages. If you are using claims-based authentica-
tion and the client-hosted application is not claims-aware (as in
the case of Windows Media Player), this content might not be
displayed.
• Managing the session lifetime is not a trivial exercise when using
claims-based authentication. For details of how you can manage
session lifetime, see Chapter 11, “Claims-Based Single Sign-On
for Microsoft SharePoint 2010.”
• The External Content Type Designer in SharePoint Designer
2010 cannot discover claims aware WSDL endpoints. For more
information, see MSDN® Knowledge Base article 982268 at
http://support.microsoft.com/default.aspx?scid=kb;En-
us;982268 .
Applications are not changed to claims-based authentication mode
automatically when you upgrade to SharePoint 2010. If you later
convert an application from classic authentication mode to claims-
based authentication mode, you cannot convert it back to classic
authentication mode.
Claims-based authentication validates users from a variety of realms
and domains, some of which do not provide the wealth of information
about users that is available from Windows authentication against
Active Directory. This has some impact on the usability of SharePoint
in terms of administration and development.
Primarily, the People Picker user experience is different when us-
ing claims-based authentication. It does not provide the same level of
support, such as browsing repositories (lists of accounts are not
stored or available in the people picker). This means that locating ac-
counts involves using the search feature against known attributes.
However, the people picker UI does provide some assistance using
pop-up tool tips. Alternatively, you can create a custom implementa-
tion of the SPClaimProvider class to extend the people picker and
provide an enhanced user experience.
———————– Page 361———————–
324324 appendix f
Administrators must also configure and manage the SharePoint
STS to implement the appropriate trust relationships and the rules for
augmenting claims. This can only be done using PowerShell. In addi-
tion, the order for configuring items and the provision of the correct
claim types is critical.
The SharePoint STS is fairly simple compared to an STS such as
ADFS or ACS, and basically implements only rules for copying claims.
It requires the STSs and identity providers it trusts to implement the
appropriate claims. It also runs in the same domain as SharePoint, and
the FedAuth cookies it exposes are scoped to that domain. It does
provide a token cache.
You may need to configure a SharePoint server farm to use affin-
ity for web applications to ensure that users are directed to the
server on which they were authenticated. If users are authenticated
on more than one server, the token may be rejected in a subsequent
request, and the continual re-authentication requests may resemble a
denial-of-service attack that causes the identity provider or STS to
block authentication requests.
Configuring SharePoint to Use Claims
Many configuration tasks in SharePoint, especially when configuring
a SharePoint server farm, are performed using Windows PowerShell
commands and scripts. Many of the required scripts are provided with
SharePoint or are available for download from the SharePoint resource
sites listed at the end of this appendix.
The main tasks for configuring SharePoint web applications to
use claims are the following:
• Configure an identity provider STS web application using
PowerShell
• Configure a relying party STS web application
• Establish a trust relationship with an identity provider STS using
PowerShell
• Export the trusted identity provider STS certificate using
PowerShell
• Define a unique identifier for claims mapping using PowerShell
• Create a new SharePoint web application and configure it to use
SAML sign-in
The following resources provide step-by-step guides to setting up
claims authentication for a web application in SharePoint:
• “Claims-based authentication Cheat Sheet Part 1” at http://
blogs.msdn.com/b/spidentity/archive/2010/01/04/claims-
based-authentication-cheat-sheet-part-1.aspx.
———————– Page 362———————–
sharepoint 2010 authentication architecture and consider ations 325 325
• “Claims-based authentication Cheat Sheet Part 2” at http://
blogs.msdn.com/b/spidentity/archive/2010/01/23/claims-based-
authentication-cheat-sheet-part-2.aspx.
• “Claims-Based Identity in SharePoint 2010” at http://blogs.
technet.com/b/wbaer/archive/2010/04/14/claims-based-
identity-in-sharepoint-2010.aspx.
• “Configure authentication using a SAML security token (Share-
Point Server 2010)” at http://technet.microsoft.com/en-us/
library/ff607753.aspx.
• “Configure the security token service (SharePoint Server 2010)”
at http://technet.microsoft.com/en-us/library/ee806864.aspx.
Tips for Configuring Claims in SharePoint
The following advice may be useful in resolving issues encountered
when configuring a SharePoint application to use claims authentica-
tion:
• The SharePoint PowerShell snap-in requires developers and
administrators to have special permissions in the SharePoint
database. It is not sufficient just to be an administrator or a
domain administrator. For information on how to configure the
SharePoint database for the PowerShell snap-in, see “The local
farm is not accessible Cmdlets with FeatureDependencyId are
not registered” at http://www.sharepointassist.
com/2010/01/29/the-local-farm-is-not-accessible-cmdlets-with-
featuredependencyid-are-not-registered/.
• When you use ADFS 2.0, the setting for enabling single sign-on
(SSO) is not available in the ADFS management interface. By
default SSO is enabled. You can change the setting by editing
the Web.config file for the ADFS website. The element to
modify is <singlesignon enabled =”true” />. It is located in the
microsoft.identityserver.web section.
• When you create a new web application and configure it to
work over HTTPS, you must edit the website bindings. This
cannot be done in the SharePoint management tools. Instead,
you must select the SSL certificate to use for the website in the
IIS Manager Microsoft Management Console (MMC) snap-in.
• It is possible to create more than one SharePoint application
with the same alias, although this is generally unlikely. However,
the authentication cookie served by the application uses the
alias as the cookie name. The result is that single sign-on
authentication will fail when users access one of the applica-
tions if they have previously accessed another application with
———————– Page 363———————–
326326 appendix f
the same alias because the authentication cookie is not valid for
the second application. To resolve this, create each application
under a different domain name and use DNS to point to the
SharePoint application, or modify the cookieHandler element in
the federatedAuthentication section of Web.config for each
application to specify a different cookie name.
More Information
For more information about SharePoint 2010, see the following
resources:
• “Getting Started with Security and Claims-Based Identity
Model” at http://msdn.microsoft.com/en-us/library/ee536164.
aspx.
• “Using the New SharePoint 2010 Security Model – Part 2” at
http://technet.microsoft.com/en-us/sharepoint/ff678022.
aspx#lesson2.
• “Plan Authentication Methods (SharePoint Server 2010)” at
http://technet.microsoft.com/en-us/library/cc262350.aspx.
• “Claims Tips 1: Learning About Claims-Based Authentication in
SharePoint 2010″ at http://msdn.microsoft.com/en-us/library/
ff953202.aspx.
• “Claims-Based Identity in SharePoint 2010” at http://blogs.
technet.com/b/wbaer/archive/2010/04/14/claims-based-
identity-in-sharepoint-2010.aspx.
• “Replace the Default SharePoint People Picker with a Custom
People Picker” at http://www.sharepointsecurity.com/share-
point/sharepoint-security/replace-the-default-sharepoint-
people-picker-with-a-custom-people-picker/.
• “Understanding People Picker and Custom Claims Providers”
at http://blogs.technet.com/b/tothesharepoint/archive/
2011/02/03/new-understanding-people-picker-and-custom-
claims-providers.aspx.
———————– Page 364———————–
Glossary
access control. The process of making authorization decisions for a
given resource.
access control rule. A statement that is used to transform one set
of claims into another set of claims. An example of an access
control rule might be: any subject that possesses the claim
“Role=Contributor” should also have the claim
“CanAddDocuments=True”. Each access control system will have
its own rule syntax and method for applying rules to input claims.
access control system (ACS). The aspect of a software system
responsible for authorization decisions.
account management. The process of maintaining user identities.
ActAs. A delegation role that allows a third party to perform
operations on behalf of a subject via impersonation.
active client. A claims-based application component that makes
calls directly to the claims provider. Compare with passive client.
Active Directory Federation Services (ADFS). An issuer that is a
component of the Microsoft® Windows® operating system. It
issues and transforms claims, enables federations, and manages
user access.
active federation. A technique for accessing a claims provider that
does not involve the redirection feature of the HTTP protocol.
With active federation, both endpoints of a message exchange
are claims-aware. Compare with passive federation.
assertion. Within a closed-domain model of security, a statement
about a user that is inherently trusted. Assertions, with inherent
trust, may be contrasted with claims, which are only trusted if a
trust relationship exists with the issuer of the claim.
authentication. The process of verifying an identity.
authority. The trusted possessor of a private key.
327
———————– Page 365———————–
328328 glossary
authorization. See authorization decision.
authorization decision. The determination of whether a subject
with a given identity can gain access to a given resource.
back-end server. A computing resource that is not exposed to the
Internet or that does not interact directly with the user.
blind credential. A trusted fact about a user that does not reveal
the identity of the user but is relevant for making an
authorization decision. For example, an assertion that the user is
over the age of 21 may be used to grant access.
bootstrap token. A security token that is passed to a claims provider
as part of a request for identity delegation. This is part of the
ActAs delegation scenario.
certificate. A digitally signed statement of identity.
certificate authority. An entity that issues X.509 certificates.
claim. A statement, such as a name, identity, key, group, permission,
or capability made by one subject about itself or another subject.
Claims are given one or more values and then packaged in
security tokens that are distributed by the issuer.
claims model. The vocabulary of claims chosen for a given
application. The claims provider and claims-based application
must agree on this vocabulary of claims. When developing a
claims-based application, you should code to the claims model
instead of calling directly into platform-specific security APIs.
claims processing. A software feature that enables a system to act
as a claims provider, claims requester, or claims-based application.
For example, a security token service provides claims processing
as part of its feature set.
claims producer. A claims provider.
claims provider. A software component or service that generates
security tokens upon request. Also known as the issuer of a claim.
claims requester. The client of a security token service. An identity
selector is a kind of claims requester.
claims transformer. A claims provider that accepts security tokens
as input; for example, as a way to implement federated identity or
access control.
claims type. A string, typically a URI, that identifies the kind of
claim. All claims have a claims type and a value. Example claims
types include FirstName, Role, and the private personal
identifier (PPID). The claims type provides context for the claim
value.
———————– Page 366———————–
329 329
claims value. The value of the statement in the claim being made.
For example, if the claims type is FirstName, a value might be
Matt.
claims-based application. A software application that uses claims as
the basis of identity and access control. This is in contrast to
applications that directly invoke platform-specific security APIs.
claims-based identity. A set of claims from a trusted issuer that
denotes user characteristics such as the user’s legal name or email
address. In an application that uses the Windows Identity
Foundation (WIF), claims-based identity is represented by
run-time objects that implement the IClaimsIdentity interface.
claims-based identity model. A way to write applications so that
the establishment of user identity is external to the application
itself. The environment provides all required user information in
a secure manner.
client. An application component that invokes web services or
issues HTTP requests on behalf of a local user.
cloud. A dynamically scalable environment such as Windows
Azure™ for hosting Internet applications.
cloud application. A software system that is designed to run in the
cloud.
cloud provider. An application hosting service.
cloud service. A web service that is exposed by a cloud application.
credentials. Data elements used to establish identity or permission,
often consisting of a user name and password.
credential provisioning. The process of establishing user identities,
such as user names and initial passwords, for an application.
cryptography. The practice of obfuscating data, typically via the use
of mathematical algorithms that make reading data dependent on
knowledge of a key.
digital signature. The output of a cryptographic algorithm that
provides evidence that the message’s originator is authentic and
that the message content has not been modified in transit.
domain. Area of control. Domains are often hierarchically
structured.
domain controller. A centralized issuer of security tokens for an
enterprise directory.
DPAPI. The Data Protection API (DPAPI) is a password-based data
protection service that uses the Triple-DES cryptographic
algorithm to provide operating system-level data protection
services to user and system processes via a pair of function calls.
———————– Page 367———————–
330330 glossary
enterprise directory. A centralized database of user accounts for a
domain. For example, the Microsoft Active Directory® Domain
Service allows organizations to maintain an enterprise directory.
enterprise identity backbone. The chosen mechanism for providing
identity and access control within an organization; for example,
by running Active Directory Federation Services (ADFS).
federated identity. A mechanism for authenticating a system’s users
based on trust relationships that distribute the responsibility for
authentication to a claims provider that is outside of the current
security realm.
federatedAuthentication attribute. An XML attribute used in a
Web.config file to indicate that the application being configured
is a claims-based application.
federation provider. A type of identity provider that provides single
sign-on functionality between an organization and other identity
providers (issuers) and relying parties (applications).
federation provider security token service (FP-STS). A software
component or service that is used by a federation provider to
accept tokens from a federation partner and then generate claims
and security tokens on the contents of the incoming security
token into a format consumable by the relying party (application).
A security token service that receives security tokens from a
trusted federation partner or identity provider (IdP-STS). In turn,
the relying party (RP-STS) issues new security tokens to be
consumed by a local relying party application.
FedUtil. The utility provided by Windows Identity Foundation for
the purpose of establishing federation.
forest. A collection of domains governed by a central authority.
Active Directory Federation Services (ADFS) can be used to
combine two Active Directory forests in a single domain of trust.
forward chaining logic. An algorithm used by access control
systems that determines permissions based on the application of
transitive rules such as group membership or roles. For example,
using forward chaining logic, an access control system can deduce
that user X has permission Z whenever user X has role Y and role
Y implies permission Z.
home realm discovery. The process of determining a user’s issuer.
identity. In this book, this refers to claims-based identity. There are
other meanings of the word “identity,” so we will further qualify
the term when we intend to convey an alternate meaning.
identity delegation. Enabling a third party to act on one’s behalf.
———————– Page 368———————–
331 331
identity model. The organizing principles used to establish the
identity of an application’s user. See claims-based identity model.
identity provider (IdP). An organization issuing claims in security
tokens. For example, a credit card provider organization might
issue a claim in a security token that enables payment if the
application requires that information to complete an authorized
transaction.
identity security token service (I-STS). An identity provider.
information card. A visual representation of an identity with
associated metadata that may be selected by a user in response to
an authentication request.
input claims. The claims given to a claims transformer such as an
access control system.
issuer. The claims provider for a security token; that is, the entity
that possesses the private key used to sign a given security token.
In the IClaimsIdentity interface, the Issuer property returns the
claims provider of the associated security token. The term may be
used more generally to mean the issuing authority of a Kerberos
ticket or X.509 certificate, but this second use is always made
clear in the text.
issuer name registry. A list of URIs of trusted issuers. You can
implement a class derived from the abstract class
IssuerNameRegistry (this is part of the Windows Identity
Foundation) in order to pick an issuer-naming scheme and also
implement custom issuer validation logic.
issuing authority. Claims provider; the issuer of a security token.
(The term has other meanings that will always be made clear with
further qualification in the text.)
Kerberos. The protocol used by Active Directory domain controllers
to allow authentication in a networked environment.
Kerberos ticket. An authenticating token used by systems that
implement the Kerberos protocol, such as domain controllers.
key. A data element, typically a number or a string, that is used by a
cryptographic algorithm when encrypting plain text or decrypting
cipher text.
key distribution center (KDC). In the Kerberos protocol, a key
distribution center is the issuer of security tickets.
Lightweight Directory Access Protocol (LDAP). A TCP/IP protocol
for querying directory services in order to find other email users
on the Internet or corporate intranet.
———————– Page 369———————–
332332 glossary
Local Security Authority (LSA). A component of the Windows
operating system that applications can use to authenticate and
log users on to the local system.
Local Security Authority Subsystem Service (LSASS). A
component of the Windows operating system that enforces
security policy.
managed information card. An information card provided by an
external identity provider. By using managed cards, identity
information is stored with an identity provider, which is not the
case with self-issued cards.
management APIs. Programmable interface for configuration or
maintenance of a data set. Compare with portal.
moniker. An alias used consistently by a user in multiple sessions of
an application. A user with a moniker often remains anonymous.
multiple forests. A domain model that is not hierarchically
structured.
multi-tenant architecture. A cloud-based application designed for
running in multiple data centers, usually for the purpose of
geographical distribution or fault tolerance.
on-premises computing. Software systems that run on hardware
and network infrastructure owned and managed by the same
enterprise that owns the system being run.
output claims. The claims produced by a claims transformer such as
an output control system.
passive client. A web browser that interacts with a claims-based
application running on an HTTP server.
passive federation. A technique for accessing a claims provider that
involves the redirection feature of the HTTP protocol. Compare
with active federation.
perimeter network. A network that acts as a buffer between an
internal corporate network and the Internet.
permission. The positive outcome of an authorization decision.
Permissions are sometimes encoded as claims.
personalization. A variant of access control that causes the
application’s logic to change in the presence of particular claims.
Security trimming is a kind of personalization.
policy. A statement of addresses, bindings, and contracts structured
in accordance with the WS-Policy specification. It includes a list
of claim types that the claims-based application needs in order to
execute.
———————– Page 370———————–
333 333
portal. Web interface that allows viewing and/or modifying data
stored in a back-end server.
principal. A run-time object that represents a subject. Claims-based
applications that use the Windows Identity Foundation expose
principals using the IClaimsPrincipal interface.
private key. In public key cryptography, the key that is not
published. Possession of the correct private key is considered to
be sufficient proof of identity.
privilege. A permission to do something such as access an
application or a resource.
proof key. A cryptographic token that prevents security tokens
from being used by anyone other than the original subject.
public key. In public key cryptography, the key that is published.
Possession of a user’s public key allows the recipient of a message
sent by the user to validate the message’s digital signature against
the contents of the message. It also allows a sender to encrypt a
message so that only the possessor of the private key can decrypt
the message.
public key cryptography. A class of cryptographic algorithms that
use one key to encrypt data and another key to decrypt this data.
public key infrastructure (PKI). Conventions for applying public
key cryptography.
realm. A security realm.
relying party (RP). An application that relies on security tokens and
claims issued by an identity provider.
relying party security token service (RP-STS). See federation
provider security token service .
resource. A capability of a software system or an element of data
contained by that system; an entity such as a file, application, or
service that is accessed via a computer network.
resource security token service (R-STS). A claims transformer.
REST protocols. Data formats and message patterns for
representational state transfer (REST), which abstracts a
distributed architecture into resources named by URIs connected
by interfaces that do not maintain connection state.
role. An element of identity that may justify the granting of
permission. For example, a claim that “role is administrator” might
imply access to all resources. The concept of role is often used by
access control systems based on the role-based access control
(RBAC) model as a convenient way of grouping users with similar
access needs.
———————– Page 371———————–
334334 glossary
role-based access control (RBAC). An established authorization
model based on users, roles, and permissions.
SAML 2.0. A data format used for encoding security tokens that
contain claims. Also, a protocol that uses claims in SAML format.
See Security Assertion Markup Language (SAML).
scope. In Microsoft Access Control Services, a container of access
control rules for a given application.
Security Assertion Markup Language (SAML). A data format used
for encoding security tokens that contain claims. Also, a particular
protocol that uses claims in SAML format.
security attribute. A fact that is known about a user because it
resides in the enterprise directory (thus, it is implicitly trusted).
Note that with claims-based identity, claims are used instead of
security attributes.
security context. A Microsoft .NET Framework concept that
corresponds to the IPrincipal interface. Every .NET Framework
application runs in a particular security context.
security infrastructure. A general term for the hardware and
software combination that implements authentication,
authorization, and privacy.
security policy. Rules that determine whether a claims provider will
issue security tokens.
security token. An on-the-wire representation of claims that has
been cryptographically signed by the issuer of the claims,
providing strong proof to any relying party of the integrity of the
claims and the identity of the issuer.
security token service (STS). A claims provider implemented as a
web service that issues security tokens. Active Directory
Federation Services (ADFS) is an example of a security token
service. Also known as an issuer. A web service that issues claims
and packages them in encrypted security tokens (see WS-Security
and WS-Trust).
security trimming. (informal) The process of altering an
application’s behavior based on a subject’s available permissions.
service. A web service that adheres to the SOAP standard.
service provider. A service provider is an application. The term is
commonly used with the Security Assertion Markup Language
(SAML).
session key. A private cryptographic key shared by both ends of a
communications channel for the duration of the communications
———————– Page 372———————–
335 335
session. The session key is negotiated at the beginning of the
communication session.
SOAP. A web standard (protocol) that governs the format of
messages used by web services.
social identity provider (social IdP). A term used in this book to
refer to identity services offered by well-known web service
®
providers such as Windows Live , Facebook, Google, and Yahoo!
software as a service (SaaS). A software licensing method in which
users license software on demand for limited periods of time
rather than purchasing a license for perpetual use. The software
vendor often provides the execution environment as, for example,
a cloud-based application running as a web service.
subject. A person. In some cases, business organizations or software
components are considered to be subjects. Subjects are
represented as principals in a software system. All claims
implicitly speak of a particular subject. The Windows Identity
Foundation type, IClaimsPrincipal, represents the subject of a
claim.
System.IdentityModel.dll. A component of the .NET Framework
3.0 that includes some claims-based features, such as the Claim
and ClaimSet classes.
token. A data element or message.
trust. The acceptance of another party as being authoritative over
some domain or realm.
trust relationship. The condition of having established trust.
trusted issuer. A claims provider for which trust has been
established via the WS-Trust protocol.
user credentials. A set of identifying information belonging to a
user. An example is a user name and password.
web identity. Authenticated identifying characteristics of the
sender of an HTTP request. Often, this is an authenticated email
address.
web single sign-on (web SSO). A process that enables partnering
organizations to exchange user authentication and authorization
data. By using web SSO, users in partner organizations can
transition between secure web domains without having to
present credentials at each domain boundary.
Windows Communication Foundation (WCF). A component of
the Windows operating system that enables web services.
Windows identity. User information maintained by Active
Directory.
———————– Page 373———————–
336336 glossary
Windows Identity Foundation (WIF). A .NET Framework library
that enables applications to use claims-based identity and access
control.
WS-Federation. A standard that defines mechanisms that are used
to enable identity, attribute, authentication, and authorization
federation across different trust realms. This standard includes an
interoperable use of HTTP redirection in order to request
security tokens.
WS-Federation Authentication Module (FAM). A component of
the Windows Identity Foundation that performs claims
processing.
WS-Federation Passive Requestor Profile. Describes how the
cross-trust realm identity, authentication, and authorization
federation mechanisms defined in WS-Federation can be used by
passive requesters such as web browsers to provide identity
services. Passive requesters of this profile are limited to the HTTP
protocol.
WS-Policy. A web standard that specifies how web services may
advertise their capabilities and requirements to potential clients.
WS-Security. A standard that consists of a set of protocols
designed to help secure web service communication using SOAP.
WS-Trust. A standard that takes advantage of WS-Security to
provide web services with methods to build and verify trust
relationships.
x.509. A standard format for certificates.
x.509 certificate. A digitally signed statement that includes the
issuing authority’s public key.
———————– Page 374———————–
Answers to Questions
Chapter 1, An Introduction to Claims
1. Under what circumstances should your application or
service accept a token that contains claims about the user
or requesting service?
a. The claims include an email address.
b. The token was sent over an HTTPS channel.
c. Your application or service trusts the token issuer.
d. The token is encrypted.
Answer: Only (c) is strictly correct. While it is good practice to
use encrypted tokens and send them over a secure channel, an
application should only accept a token if it is configured to trust
the issuer. The presence of an email address alone does not
signify that the token is valid.
2. What can an application or service do with a valid token
from a trusted issuer?
a. Find out the user’s password.
b. Log in to the website of the user’s identity provider.
c. Send emails to the user.
d. Use the claims it contains to authorize the user for
access to appropriate resources.
Answer: Only (d) is true in all cases. The claims do not include
the user’s password or other credentials. They only include the
information the user and the identity provider choose to expose.
This may or may not include an email address, depending on the
identity provider.
337
———————– Page 375———————–
338338 asnwers to questions
3. What is the meaning of the term identity federation?
a. It is the name of a company that issues claims about
Internet users.
b. It is a mechanism for authenticating users so that they
can access different applications without signing on
every time.
c. It is a mechanism for passing users’ credentials to
another application.
d. It is a mechanism for finding out which sites a user has
visited.
Answer: Only (b) is correct. Each application must query the
original issuer to determine if the token a user obtained when
they originally authenticated is valid. The token does not include
the users’ credentials or other information about users’ browsing
history or activity.
4. When would you choose to use Windows Azure™ Ap-
pFabric Access Control Service (ACS) as an issuer for an
application or service?
a. When the application must allow users to sign on
using a range of well-known social identity credentials.
b. When the application is hosted on the Windows
Azure platform.
c. When the application must support single sign-on
(SSO).
d. When the application does not have access to an alter-
native identity provider or token issuer.
Answer: Only (a) and (d) are correct. Applications running on
Windows Azure can use ACS if they must support federated
identity, but it is not mandatory. SSO can be implemented using
a range of mechanisms other than ACS, such as a Microsoft
Active Directory ® domain server and Active Directory Federa-
tion Services.
5. What are the benefits of using claims to manage authoriza-
tion in applications and services?
a. It avoids the need to write code specific to any one
type of authentication mechanism.
———————– Page 376———————–
339 339
b. It decouples authentication logic from authorization
logic, making changes to authentication mechanisms
much easier.
c. It allows the use of more fine-grained permissions
based on specific claims compared to the granularity
achieved just using roles.
d. It allows secure access for users that are in a different
domain or realm from the application or service.
Answer: All of the answers are correct, which shows just how
powerful claims can be!
Chapter 2, Claims Based Architectures
1. Which of the following protocols or types of claims token
are typically used for single sign-on across applications in
different domains and geographical locations?
a. Simple web Token (SWT)
b. Kerberos ticket
c. Security Assertion Markup Language (SAML) token
d. Windows Identity
Answer: Only (a) and (c) are typically used across domains and
applications outside a corporate network. Kerberos tickets
cannot contain claims, and they are confined within a domain or
Active Directory forest. Windows Identities may contain role
information, but cannot carry claims between applications.
2. In a browser-based application, which of the following is
the typical order for browser requests during authentica-
tion?
a. Identity provider, token issuer, relying party
b. Token issuer, identity provider, token issuer, relying
party
c. Relying party, token issuer, identity provider, token
issuer, relying party
d. Relying party, identity provider, token issuer, relying
party
Answer: Only (c) is correct. The claims-aware application (the
relying party) redirects the browser to the token issuer, which
———————– Page 377———————–
340340 asnwers to questions
either redirects the browser to the appropriate identity provider
for the user to enter credentials (ACS) or obtains a token on the
user’s behalf using their correct credentials (ADFS). It then
redirects the browser back to the claims-aware application.
3. In a service request from a non-browser-based application,
which of the following is the typical order of requests
during authentication?
a. Identity provider, token issuer, relying party
b. Token issuer, identity provider, token issuer, relying
party
c. Relying party, token issuer, identity provider, token
issuer, relying party
d. Relying party, identity provider, token issuer, relying
party
Answer: When authenticating using ADFS and Active Direc-
tory (or a similar technology), only (b) is correct. ADFS obtains
a token on the application’s behalf using credentials provided in
the request. When authenticating using ACS, (a) and (b) are
correct.
4. What are the main benefits of federated identity?
a. It avoids the requirement to maintain a list of valid
users, manage passwords and security, and store and
maintain lists of roles for users in the application.
b. It delegates user and role management to the trusted
organization responsible for the user, instead of it
being the responsibility of your application.
c. It allows users to log onto applications using the same
credentials, and choose an identity provider that is
appropriate for the user and the application to validate
these credentials.
d. It means that your applications do not need to include
authorization code.
Answer: Only (a), (b), and (c) are correct. Even if you com-
pletely delegate the validation of users to an external federated
system, you must still use the claims (such as role membership)
in your applications to limit access to resources to only the
appropriate users.
———————– Page 378———————–
341 341
5. How can home realm discovery be achieved?
a. The token issuer can display a list of realms based on
the configured identity providers and allow the user to
select his home realm.
b. The token issuer can ask for the user’s email address
and use the domain to establish the home realm.
c. The application can use the IP address to establish the
home realm based on the user’s country/region of
residence.
d. The application can send a hint to the token issuer in
the form of a special request parameter that indicates
the user’s home realm.
Answer: Only (a), (b), and (d) are correct. Home realms are
not directly related to geographical location (although this may
have some influence). The home realm is the domain that is
authoritative for the user’s identity. It is the identity provider
that the user must be redirected to when logging in.
Chapter 3, Claims-Based Single Sign-On
for the Web and Windows Azure
1. Before Adatum updated the a-Expense and a-Order applica-
tions, why was it not possible to use single sign-on?
a. The applications used different sets of roles to
manage authorization.
b. a-Order used Windows authentication and a-Expense
used ASP.NET forms authentication.
c. In the a-Expense application, the access rules were
intermixed with the application’s business logic.
d. You cannot implement single sign-on when user
profile data is stored in multiple locations.
Answer: Only (b) is correct. The key factor blocking the
implementation of single sign-on is that the applications use
different authentication mechanisms. Once users authenticate
with a claims issuer, you can configure the applications to trust
the issuer. The applications can use the claims from the issuer to
implement any authorization rules they need.
———————– Page 379———————–
342342 asnwers to questions
2. How does the use of claims facilitate remote web-based
access to the Adatum applications?
a. Using Active Directory for authentication makes it
difficult to avoid having to use VPN to access the
applications.
b. Using claims means that you no longer need to use
Active Directory.
c. Protocols such as WS-Federation transport claims in
tokens as part of standard HTTP messages.
d. Using claims means that you can use ASP.NET forms-
based authentication for all your applications.
Answer: Only (a) and (c) are correct. Protocols that use claims
such as WS-Federation make it easy to provide web-based
access to your applications. ADFS makes it easy to continue to
use Active Directory in a claims-based environment, while using
just Active Directory on its own with the Kerberos protocol is
not well suited to providing web-based access.
3. In a claims enabled ASP.NET web application, you typically
find that the authentication mode is set to None in the
Web.config file. Why is this?
a. The WSFederationAuthenticationModule is now
responsible for authenticating the user.
b. The user must have already been authenticated by an
external system before they visit the application.
c. Authentication is handled in the On_Authenticate
event in the global.asax file.
d. The WSFederationAuthenticationModule is now
responsible for managing the authentication process.
Answer: Only (d) is correct. The WSFederationAuthentica-
tionModule is responsible for managing the authentication
process. It intercepts requests in the HTTP pipeline before they
reach the application and coordinates with an external claims
issuer to authenticate the user.
4. Claims issuers always sign the tokens they send to a relying
party. However, although it is considered best practice, they
might not always encrypt the tokens. Why is this?
———————– Page 380———————–
343 343
a. Relying parties must be sure that the claims come
from a trusted issuer.
b. Tokens may be transferred using SSL.
c. The claims issuer may not be able to encrypt the token
because it does not have access to the encryption key.
d. It’s up to the relying party to state whether or not it
accepts encrypted tokens.
Answer: Only (a) and (b) are correct. A key feature of claims-
based authentication is that relying parties can trust the claims
that they receive from an issuer. A signature proves that the
claim came from a particular issuer. Using SSL helps to secure
the tokens that the issuer transmits to the relying party if the
issuer does not encrypt them.
5. The FederatedPassiveSignInStatus control automatically
signs a user out of all the applications she signed into in the
single sign-on domain.
a. True.
b. False. You must add code to the application to per-
form the sign-out process.
c. It depends on the capabilities of the claims issuer. The
issuer is responsible for sending sign-out messages to
all relying parties.
d. If your relying party uses HTTP sessions, you must add
code to explicitly abandon the session.
Answer: Only (c) and (d) are correct. It is the responsibility of
the claims issuer to notify all relying parties that the user is
signing out. Additionally, you must add any necessary code to
abandon any HTTP sessions.
Chapter 4, Federated Identity for Web
Applications
1. Federated identity is best described as:
a. Two or more applications that share the same set of
users.
b. Two or more organizations that share the same set
of users.
———————– Page 381———————–
344344 asnwers to questions
c. Two or more organizations that share an identity
provider.
d. One organization trusting users from one or more
other organizations to access its applications.
Answer: Only (d) is correct. Federation is about trusting the
users from another organization. Instead of creating special
accounts for external users, you trust another organization to
authenticate users on your behalf before you give them access
to your applications.
2. In a federated security environment, claims mapping is
necessary because:
a. Claims issued by one organization are not necessarily
the claims recognized by another organization.
b. Claims issued by one organization can never be trusted
by another organization.
c. Claims must always be mapped to the roles used in
authorization.
d. Claims must be transferred to a new ClaimsPrincipal
object.
Answer: Only (a) is correct. The claims used by one organiza-
tion may not be the same as the claims used by another. For
example, one organization may use a claim called role while
another organization uses a claim called group for a similar
purpose. Mapping enables you to map the claims used by one
organization to the claims used in another. Although role claims
are often used for authorization, the authorization scheme could
depend on other claims such as organization or cost center.
3. The roles of a federation provider can include:
a. Mapping claims from an identity provider to claims
that the relying party understands.
b. Authenticating users.
c. Redirecting users to their identity provider.
d. Verifying that the claims were issued by the expected
identity provider.
Answer: Only (a), (c) and (d) are correct. A federation provider
can map claims, redirect users to the correct identity provider,
———————– Page 382———————–
345 345
and verify that the claims were issued by the correct identity
provider.
4. Must an identity provider issue claims that are specific to
a relying party?
a. Yes
b. No
c. It depends.
Answer: Only (b) is correct. It is the job of the federation
provider to map the claims issued by the identity provider to
claims recognized by the relying party. Therefore, the identity
provider’s issuer should not issue claims specific to the relying
party. Using a federation provider helps to decouple the identity
provider from the relying party.
5. Which of the following best summarizes the trust relation-
ships between the various parties described in the federated
identity scenario in this chapter?
a. The relying party trusts the identity provider, which in
turn trusts the federation provider.
b. The identity provider trusts the federation provider,
which in turn trusts the relying party.
c. The relying party trusts the federation provider, which
in turn trusts the identity provider.
d. The federation provider trusts both the identity
provider and the relying party.
Answer: Only (c) is correct. The trust relationships described
in this chapter have the relying party trusting the federation
provider that trusts the identity provider.
Chapter 5, Federated Identity with
Windows Azure Access Control Service
1. Which of the following issues must you address if you want
to allow users of your application to authenticate with a
®
social identity provider such as Google or Windows Live
network of Internet services?
a. Social identity providers may use protocols other than
WS-Federation to exchange claims tokens.
———————– Page 383———————–
346346 asnwers to questions
b. You must register your application with the social
identity provider.
c. Different social identity providers issue different claim
types.
d. You must provide a mechanism to enroll users using
social identities with your application.
Answer: Only (a), (c) and (d) are correct. Your solution must
be able to transition protocols; the solution described in this
chapter uses ACS to perform this task. The scenario described
in this chapter also uses ACS to map the different claim types
issued by the social identity providers to claim types that
Adatum understands. You must provide a mechanism to enroll
users with social identities.
2. What are the advantages of allowing users to authenticate
to use your application with a social identity?
a. The user doesn’t need to remember yet another
username and password.
b. It reduces the features that you must implement in
your application.
c. Social identity providers all use the same protocol
to transfer tokens and claims.
d. It puts the user in control of their password manage-
ment. For example, a user can recover a forgotten
password without calling your helpdesk.
Answer: Only (a), (b), and (d) are correct. Reusing a social
identity does mean that the user doesn’t need to remember a
new set of credentials. Also, the authentication and user account
management is now handled by the social identity provider.
3. What are the potential disadvantages of using ACS as your
federation provider?
a. It adds to the complexity of your relying party
application.
b. It adds an extra step to the authentication process,
which negatively impacts the user experience.
c. It is a metered service, so you must pay for each token
that it issues.
———————– Page 384———————–
347 347
d. Your application now relies on an external service that
is outside of its control.
Answer: Only (c) and (d) are correct. Although ACS is a
metered service, you should compare its running costs to the
costs of implementing and running your own federation provider.
ACS is a third-party application outside of your control; again,
you should evaluate the SLA associated with ACS against the
service-level agreement (SLA) your IT department offers for
on-premises services.
4. How can your federation provider determine which identity
provider to use (perform home realm discovery) when an
unauthenticated user accesses the application?
a. Present the user with a list of identity providers to
choose from.
b. Analyze the IP address of the originating request.
c. Prompt the user for an email address, and then parse
it to determine the user’s security domain.
d. Examine the ClaimsPrincipal object for the user’s
current session.
Answer: Only (a) and (c) are correct. The scenario described in
this chapter lets the user select from a list of identity providers.
It’s also possible to analyze the user’s email address; for example,
if the email address were paul@gmail.com, the federation
provider would determine that the user has a Google identity.
5. In the scenario described in this chapter, the Adatum
federation provider trusts ACS, which in turn trusts the
social identity providers such as Windows Live and Google.
Why does the Adatum federation provider not trust the
social identity providers directly?
a. It’s not possible to configure the Adatum federation
provider to trust the social identity providers because
the social identity providers do not make the certifi-
cates required for a trust relationship available.
b. ACS automatically performs the protocol transition.
c. ACS is necessary to perform the claims mapping.
d. Without ACS, it’s not possible to allow Adatum
employees to access the application over the web.
———————– Page 385———————–
348348 asnwers to questions
Answer: Only (b) is correct. Using ACS simplifies the Adatum
federation provider, especially because ACS performs any
protocol transitioning automatically. It is possible to configure
the Adatum federation provider to trust the social identity
providers directly and perform the claims mapping; however,
this is likely to be complex to implement.
Chapter 6, Federated Identity
with Multiple Partners
1. In the scenario described in this chapter, who should take
what action when an employee leaves one of the partner
organizations such as Litware?
a. Fabrikam Shipping must remove the user from its user
database.
b. Litware must remove the user from its user database.
c. Fabrikam must amend the claims-mapping rules in its
federation provider.
d. Litware must ensure that its identity provider no
longer issues any of the claims that get mapped to
Fabrikam Shipping claims.
Answer: Only (b) is correct. If the employee leaves Litware, the
simplest and safest action is to remove the employee from its
user database. This means that the ex-employee can no longer
authenticate with Litware or be issued any claims.
2. In the scenario described in this chapter, how does Fabrikam
Shipping perform home realm discovery?
a. Fabrikam Shipping presents unauthenticated users
with a list of federation partners to choose from.
b. Fabrikam Shipping prompts unauthenticated users
for their email addresses. It parses this address to
determine which organization the user belongs to.
c. Fabrikam Shipping does not need to perform home
realm discovery because users will have already
authenticated with their organizations’ identity
providers.
d. Each partner organization has its own landing page
in Fabrikam Shipping. Visiting that page will automati-
———————– Page 386———————–
349 349
cally redirect unauthenticated users to that organiza-
tion’s identity provider.
Answer: Only (d) is correct. Each organization has its own
landing page in Fabrikam Shipping. For example, Adatum
employees should navigate to https://{fabrikam
host}/f-shipping/adatum.
3. Fabrikam Shipping provides an identity provider for its
smaller customers who do not have their own identity
provider. What are the disadvantages of this?
a. Fabrikam must bear the costs of providing this service.
b. Users at smaller customers will need to remember
another username and password.
c. Smaller customers must rely on Fabrikam to manage
their user’s access to Fabrikam Shipping.
d. Fabrikam Shipping must set up a trust relationship
with all of its smaller customers.
Answer: Only (a), (b) and (c) are correct. Unless Fabrikam
Shipping charges for the service, they must bear the costs.
It does mean that users will have to remember a new set
of credentials. All of the user management takes place at
Fabrikam, unless Fabrikam implements a web interface for
smaller customers to manage their users.
4. How does Fabrikam Shipping ensure that only users at a
particular partner can view that partner’s shipping data?
a. The Fabrikam Shipping application examines the email
address of the user to determine the organization
they belong to.
b. Fabrikam Shipping uses separate databases for each
partner. Each database uses different credentials to
control access.
c. Fabrikam shipping uses the role claim from the
partner’s identity provider to determine whether the
user should be able to access the data.
d. Fabrikam shipping uses the organization claim from
its federation provider to determine whether the user
should be able to access the data.
———————– Page 387———————–
350350 asnwers to questions
Answer: Only (d) is correct. It’s the organization claim that
Fabrikam Shipping uses to control access.
5. The developers at Fabrikam set the wsFederation passive
RedirectEnabled attribute to false. Why?
a. This scenario uses active redirection, not passive
redirection.
b. They wanted more control over the redirection
process.
c. Fabrikam Shipping is an MVC application.
d. They needed to be able to redirect to external identity
providers.
Answer: Only (b) is correct. For this scenario, they needed
more control over the passive redirection process.
Chapter 7, Federated Identity with
Multiple Partners and Windows Azure
Access Control Service
1. Why does Fabrikam want to use ACS in the scenario
described in this chapter?
a. Because it will simplify Fabrikam’s own internal
infrastructure requirements.
b. Because it’s the only way Fabrikam can support
users who want to use a social identity provider
for authentication.
c. Because it enables users with social identities to
access the Fabrikam Shipping application more easily.
d. Because ACS can authenticate users with social
identities.
Answer: Only (a) and (c) are correct. Using ACS means that
Fabrikam Shipping no longer requires its own federation
provider. Also, ACS handles all of the necessary protocol
transition for the tokens that the social identity providers issue.
ACS does not perform the authentication; this task is handled
by the social identity provider.
———————– Page 388———————–
351 351
2. In the scenario described in this chapter, why is it necessary
for Fabrikam to configure ACS to trust issuers at partners
such Adatum and Litware?
a. Because Fabrikam does not have its own on-premises
federation provider.
b. Because Fabrikam uses ACS for all the claims-mapping
rules that convert claims to a format that Fabrikam
Shipping understands.
c. Because partners such as Adatum have some users
who use social identities as their primary method of
authentication.
d. Because a relying party such as Fabrikam Shipping
can only use a single federation provider.
Answer: Only (a) and (b) are correct. In this scenario,
Fabrikam decided to use ACS as its federation provider,
so ACS holds all of its claims-mapping rules.
3. How does Fabrikam Shipping manage home realm discovery
in the scenario described in this chapter?
a. Fabrikam Shipping presents unauthenticated users
with a list of federation partners to choose from.
b. Fabrikam Shipping prompts unauthenticated users
for their email addresses. It parses each address to
determine which organization the user belongs to.
c. ACS manages home realm discovery; Fabrikam
Shipping does not.
d. Each partner organization has its own landing page
in Fabrikam Shipping. Visiting that page will automati-
cally redirect unauthenticated users to that organiza-
tion’s identity provider.
Answer: Only (d) is correct. Although the sample application
does have a page that displays a list of partners, this is just to
simplify the use of the sample. In practice, each partner would
use its own landing page that would redirect the use to ACS,
passing the correct value in the whr parameter.
4. Enrolling a new partner without its own identity provider
requires which of the following steps?
———————– Page 389———————–
352352 asnwers to questions
a. Updating the list of registered partners stored by
Fabrikam Shipping. This list includes the home realm
of the partner.
b. Adding a new identity provider to ACS.
c. Adding a new relying party to ACS.
d. Adding a new set of claims-mapping rules to ACS.
Answer: Only (a), (c) and (d) are correct. A partner without
its own identity provider will use one of the pre-configured
social identity providers in ACS.
5. Why does Fabrikam use a separate web application to
handle the enrollment process?
a. Because the expected usage patterns of the enroll-
ment functionality are very different from the expect-
ed usage patterns of the main Fabrikam Shipping web
site.
b. Because using the enrollment functionality does not
require a user to authenticate.
c. Because the site that handles enrolling new partners
must also act as a federation provider.
d. Because the site that updates ACS with new relying
parties and claims-mapping rules must have a different
identity from sites that only read data from ACS.
Answer: Only (a) is correct. The number of new enrolments
may be only one or two a day, while Fabrikam expects thousands
of visits to the Shipping application. Using separate web sites
enables Fabrikam to tune the two sites differently.
Chapter 8, Claims Enabling Web Services
1. Which statements describe the difference between the way
federated identity works for an active client as compared to
a passive client:
a. An active client uses HTTP redirects to ask each token
issuer in turn to process a set of claims.
b. A passive client receives HTTP redirects from a web
application that redirect it to each issuer in turn to
obtain a set of claims.
———————– Page 390———————–
353 353
c. An active client generates tokens to send to claims
issuers.
d. A passive client generates tokens to send to claims
issuers.
Answer: Only (b) is correct. The relying party, federation
provider, and identity provider communicate with each other
through the client browser by using HTTP redirects that send
the browser with any tokens to the next step in the process.
2. A difference in behavior between an active client and a
passive client is:
a. An active client visits the relying party first; a passive
client visits the identity provider first.
b. An active client does not need to visit a federation
provider because it can perform any necessary claims
transformations by itself.
c. A passive client visits the relying party first; an active
client visits the identity provider first.
d. An active client must visit a federation provider first
to determine the identity provider it should use.
Passive clients rely on home realm discovery to
determine the identity provider to use.
Answer: Only (c) is correct. A passive client visits the relying
party first; the relying party redirects the client to an issuer.
Active clients know how to obtain the necessary claims so they
can visit the identity provider first.
3. The active scenario described in this chapter uses which
protocol to handle the exchange of tokens between the
various parties?
a. WS-Trust
b. WS-Transactions
c. WS-Federation
d. ADFS
Answer: Only (c) is correct. WS-Trust is the protocol that WIF
and Windows Communication Foundation (WCF) use for active
clients.
———————– Page 391———————–
354354 asnwers to questions
4. In the scenario described in this chapter, it’s necessary to
edit the client application’s configuration file manually,
because the Svcutil.exe tool only adds a binding for a single
issuer. Why do you need to configure multiple issuers?
a. The metadata from the relying party only includes
details of the Adatum identity provider.
b. The metadata from the relying party only includes
details of the client application’s identity provider.
c. The metadata from the relying party only includes
details of the client application’s federation provider.
d. The metadata from the relying party only includes
details of the Adatum federation provider.
Answer: Only (c) is correct. The metadata from the relying
party only includes details of the Adatum federation provider
and the client application also needs the metadata from its
identity provider.
5. The WCF service at Adatum performs authorization checks
on the requests that it receives from client applications.
How does it implement the checks?
a. The WCF service uses the IsInRole method to verify
that the caller is a member of the OrderTracker role.
b. The Adatum federation provider transforms claims
from other identity providers into Role type claims
with a value of OrderTracker.
c. The WCF service queries the Adatum federation
provider to determine whether a user is in the
OrderTracker role.
d. It does not need to implement any authorization
checks. The application automatically grants access
to anyone who has successfully authenticated.
Answer: Only (a) and (b) are correct. The WCF service checks
the role membership of the caller. The role value is created from
the claims received from the federation provider.
———————– Page 392———————–
355 355
Chapter 9, Securing REST Services
1. In the scenario described in this chapter, which of the
following statements best describes what happens the first
time that the smart client application tries to use the
RESTful a-Order web service?
a. It connects first to the ACS instance, then to the
Litware IP, and then to the a-Order web service.
b. It connects first to the Litware IP, then to the ACS
instance, and then to the a-Order web service.
c. It connects first to the a-Order web service, then
to the ACS instance, and then to the Litware IP.
d. It connects first to the a-Order web service, then
to the Litware IP, and then to the ACS instance.
Answer: Only (b) is correct. The Active client first obtains
a SAML token from the Litware IP, it then sends the SAML
token to ACS where it is transitioned to an SWT token, it
then attaches the SWT token to the request that it sends to
the web service.
2. In the scenario described in this chapter, which of the
following tasks does ACS perform?
a. ACS authenticates the user.
b. ACS redirects the client application to the relying
party.
c. ACS transforms incoming claims to claims that the
relying party will understand.
d. ACS transitions the incoming token format from
SAML to SWT.
Answer: Only (c) and (d) are correct. The only tasks that ACS
performs in this scenario are claims transformation and claims
transitioning.
3. In the scenario described in this chapter, the Web.config
file in the a-Order web service does not contain a
<microsoft.identity> section. Why?
a. Because it configures a custom ServiceAuthorization
Manager class to handle the incoming SWT token in
code.
———————– Page 393———————–
356356 asnwers to questions
b. Because it is not authenticating requests.
c. Because it is not authorizing requests.
d. Because it is using a routing table.
Answer: Only (a) is correct. The incoming tokens are handled
by the custom SWTAuthorizationManager class that is
instantia ted in the CustomServiceHostFactory class.
4. ACS expects to receive bearer tokens. What does this
suggest about the security of a solution that uses ACS?
a. You do not need to use SSL to secure the connection
between the client and the identity provider.
b. You should use SSL to secure the connection between
the client and the identity provider.
c. The client application must use a password to authen-
ticate with ACS.
d. The use of bearer tokens has no security implications
for your solution.
Answer: Only (b) is correct. A solution that uses bearer tokens
is susceptible to man-in-the-middle attacks; using SSL mitigates
this risk.
5. You should use a custom ClaimsAuthorizationManager
class for which of the following tasks.
a. To attach incoming claims to the IClaimsPrincipal
object.
b. To verify that the claims were issued by a trusted
issuer.
c. To query ACS and check that the current request is
authorized.
d. To implement custom rules that can authorize access
to web service methods.
Answer: Only (d) is correct. The CheckAccess method in a
custom ClaimsAuthorizationManager class has access to the
IClaimsPrincipal object and URL associated with the current
request. It can use this information to implement authorization
rules.
———————– Page 394———————–
357 357
Chapter 10, Accessing REST Services
from a Windows Phone 7 Device
1. Which of the following are issues in developing a
claims-aware application that access a web service for
the Windows Phone® 7 platform?
a. It’s not possible to implement a solution that uses
SAML tokens on the phone.
b. You cannot install custom SSL certificates on the
phone.
c. There is no secure storage on the phone.
d. There is no implementation of WIF available for the
phone.
Answer: Only (c) and (d) are correct. Because there is no
secure storage on the phone, you cannot securely store any
credentials on the phone; either the user enters his credentials
whenever he uses the application, or you accept the risk of the
phone being used by an unauthorized person who will be able to
use any cached credentials. There is no version of WIF available
for the phone, so you must manually implement any token
handling that your application requires.
2. Why does the sample application use an embedded web
browser control?
a. To handle the passive federated authentication
process.
b. To handle the active federated authentication process.
c. To access the RESTful web service.
d. To enable the client application to use SSL.
Answer: Only (a) is correct. The embedded web browser control
handles the passive federated authentication process, enabling
redirects between ACS and the Litware IP.
3. Of the two solutions (active and passive) described in the
chapter, which requires the most round trips for the initial
request to the web service?
a. They both require the same number.
b. The passive solution requires fewer than the active
solution.
———————– Page 395———————–
358358 asnwers to questions
c. The active solution requires fewer than the passive
solution.
d. It depends on the number of claims configured for the
relying party in ACS.
Answer: Only (c) is correct. For the initial request to the web
service, the active solution requires fewer round trips: the active
solution first calls the Litware identity provider, then ACS, and
finally the web service; the passive solution first calls ACS, the
Litware identity provider, then goes back to ACS, and finally
calls the web service.
4. Which of the following are advantages of the passive
solution over the active solution?
a. The passive solution can easily build a dynamic list of
identity providers.
b. It’s simpler to create code to handle SWT tokens in
the passive solution.
c. It’s simpler to create code to handle SAML tokens in
the passive solution.
d. Better performance.
Answer: Only (a) and (c) are correct. The passive solution can
retrieve a list of configured identity providers from ACS to
display to the user. In the passive solution, the embedded web
browser manages the SAML token as part of the automatic
redirects between the identity provider and the federation
provider.
5. In the sample solution for this chapter, how does the
Windows Phone 7 client application add the SWT token to
the outgoing request?
a. It uses a Windows Communication Foundation (WCF)
behavior.
b. It uses Rx to orchestrate the acquisition of the SWT
token and add it to the header.
c. It uses the embedded web browser control to add the
header.
d. It uses WIF.
———————– Page 396———————–
359 359
Answer: Only (b) is correct. The sample solution makes
extensive use of Rx to orchestrate asynchronous operations.
Both the active and passive solutions use Rx to add the
authorization header at the right time.
Chapter 11, Claims-Based Single Sign-On
for Microsoft SharePoint 2010
1. Which of the following roles can the embedded STS in
SharePoint perform?
a. Authenticating users.
b. Issuing FedAuth tokens that contain the claims
associated with a user.
c. Requesting claims from an external STS such as ADFS.
d. Requesting claims from Active Directory through
Windows Authentication.
Answer: Only (b), (c) and (d) are correct. The embedded
STS does not perform any authentication itself, but it can
request that external token issuers such as ADFS or Windows
Authentication issue tokens. The claims are then added to
the user’s FedAuth token.
2. Custom claim providers use claims augmentation to perform
which function?
a. Enhancing claims by verifying them against an external
provider.
b. Enhancing claims by adding additional metadata to
them.
c. Adding claims data to the identity information in the
SPUser object if the SharePoint web application is in
“legacy” authentication mode.
d. Adding additional claims to the set of claims from
the identity provider.
Answer: Only (d) is correct. Claims augmentation is the
function of a custom claims provider that adds to the set of
claims from an identity provider.
———————– Page 397———————–
360360 asnwers to questions
3. Which of the following statements about the FedAuth
cookie in SharePoint are correct?
a. The FedAuth cookie contains the user’s claim data.
b. Each SharePoint web application has its own FedAuth
cookie.
c. Each site collection has its own FedAuth cookie.
d. The FedAuth cookie is always a persistent cookie.
Answer: Only (a) and (b) are correct. Each SharePoint web
application has its own FedAuth token because you can
configure each SharePoint web application to have a different
token provider. By default, the FedAuth cookie is persistent,
but you can configure it to be a session cookie.
4. In the scenario described in this chapter, why did Adatum
choose to customize the people picker?
a. Adatum wanted the people picker to resolve role and
organization claims.
b. Adatum wanted the people picker to resolve name
and emailaddress claims from ADFS.
c. Adatum wanted to use claims augmentation.
d. Adatum wanted to make it easier for site administra-
tors to set permissions reliably.
Answer: Only (a) and (d) are correct. Adatum wanted the
people picker to correctly resolve role and organization claims
so that site administrators could assign permissions based on
these values.
5. In order to implement single sign-out behavior in Share-
Point, which of the following changes did Adatum make?
a. Adatum modified the standard signout.aspx page to
send a wsignoutcleanup message to ADFS.
b. Adatum uses the SessionAuthenticationModule
SigningOut event to customize the standard sign-out
process.
———————– Page 398———————–
361 361
c. Adatum added custom code to invalidate the FedAuth
cookie.
d. Adatum configured SharePoint to use a session-based
FedAuth cookie.
Answer: Only (b) and (d) are correct. The relying party must
send a wsignout message to its identity provider; the identity
provider sends wsignoutcleanup messages to all of the
currently logged-in relying parties. If the FedAuth cookie is
session-based, SharePoint will automatically invalidate it.
Chapter 12, Federated Identity
for SharePoint Applications
1. In the scenario described in this chapter, Adatum prefers to
maintain a single trust relationship between SharePoint and
ADFS, and to maintain the trust relationships with the
multiple partners in ADFS. Which of the following are valid
reasons for adopting this model?
a. It enables Adatum to collect audit data relating to
external sign-ins from ADFS.
b. It allows for the potential reuse of the trust relation-
ships with partners in other Adatum applications.
c. It allows Adatum to implement automatic home realm
discovery.
d. It makes it easier for Adatum to ensure that Share-
Point receives a consistent set of claim types.
Answer: Only (a), (c) and (d) are correct. There is nothing in
the model chosen by Adatum that specifically enables home
realm discovery, though it may be easier to implement by
customizing the pages in ADFS. It is easier for Adatum to
manage the authentication and claims issuing in ADFS.
2. When must a SharePoint user reauthenticate with the
claims issuer (ADFS in the Adatum scenario)?
a. Whenever the user closes and then reopens the
browser.
b. Whenever the ADFS web SSO cookie expires.
———————– Page 399———————–
362362 asnwers to questions
c. Whenever the SharePoint FedAuth cookie that
contains the SAML token expires.
d. Every ten minutes.
Answer: Only (a) and (c) are correct. Whether or not a user
must re-authenticate after closing and re-opening the browser
depends on whether the SAML token is stored in a persistent
cookie; the Adatum single sign-out implementation requires
session cookies to be enabled. The ADFS web SSO cookie
determines when a user must reauthenticate with ADFS, not
with SharePoint. The time period between authentications will
depend on the lifetime of the SAML token as specified by
ADFS and whether sliding sessions are in use.
3. Which of the following statements are true with regard to
the Adatum sliding session implementation?
a. SharePoint tries to renew the session cookie before it
expires.
b. SharePoint waits for the session cookie to expire and
then creates a new one.
c. When SharePoint renews the session cookie, it always
requests a new SAML token from ADFS.
d. SharePoint relies on sliding sessions in ADFS.
Answer: Only (a) and (c) are correct. SharePoint tries to renew
the session cookie before it expires. If the cookie expires, then
SharePoint will request a new SAML token from ADFS.
4. Where is the organization claim that SharePoint uses to
authorize access to certain documents in the a-Portal web
application generated?
a. In the SharePoint STS.
b. In the identity provider’s STS; for example in the
Litware issuer.
c. In ADFS.
d. Any of the above.
Answer: Only (c) is correct. The solution relies on ADFS to
generate the organization claim. It’s important not to rely on
the partner’s identity provider because a malicious administrator
could spoof another partner’s identity.
———————– Page 400———————–
363 363
5. Why does Adatum rely on ADFS to perform home realm
discovery?
a. It’s easier to implement in ADFS than in SharePoint.
b. You can customize the list of identity providers for
each SharePoint web application in ADFS.
c. You cannot perform home realm discovery in Share-
Point.
d. You can configure ADFS to remember a user’s choice
of identity provider.
Answer: Only (a), (b), and (d) are correct. (a), (b), and (d)
are all reasons for Adatum to implement home realm discovery
in ADFS. It is possible to implement it SharePoint.
———————– Page 401———————–
———————– Page 402———————–
Index
A see also federated identity for Windows
1SingleSignOn, 49 Azure ACS; federated identity with
2-Federation, 77 multiple partners and Windows Azure
3FederationWithMultiplePartners, 109 ACS; SharePoint 2010 authentication;
4ActiveClientFederation, 148 Windows Azure Appfabric ACS
6-FederationWithAcs, 93-94 acknowledgments, xxxiii-xxxv
7FederationWithMultiplePartnersAndAcs, 135 active client
8ActiveRestClientFederation, 162, 164 certificates, 293-294
9WindowsPhoneClientFederation, 183 claims enabling web services, 150-153
10SharePoint, 210, 212, 214, 229 defined, xxv
<bindings> subsection, 150 -151 REST services, 167-171
<Microsoft.identityModel> element, 149 scenario, 252-258
<service> element, 150 scenario message-diagram, 252
<sharedListeners> section, 154-155 Active Directory, xxx, 62, 80
<system.serviceModel> section, 150 changing schemas, 46
Access Control Service (ACS), 81-83 choosing claims, 5
and ADFS for Services, Smart Clients, and Active Directory Federation Services (ADFS) see
SharePoint BCS, 301 ADFS 2.0
and ADFS for users of a website, 300-301 active federation, 179-181
ADFS issuer as a trusted identity provider, active SAML token handling, 183-185
309 AdatumIssuerIssuedToken binding, 151-152
ADFS issuer as a trusted issuer, 310 Adatum people picker solution, 203
authenticating services, smart clients, and Adatum scenario, 43-69
mobile devices, 299 ASP.NET 4.0, 43-45
authenticating users of a website, 298 claims-enabled SharePoint applications, 197
claims, 7 infrastructure before claims, 44
diagram of functions, 8 ADFS 2.0, xxix
federated identity message sequence, 31 as claims issuer, 5-6
home realm discovery page, 312 claims rule language, 74-75
REST services, 162-163 default authentication method, 216
and STSs generated in Visual Studio 2010, 311 server requirements, xxx
what does it do?, 296-297 trusted identity provider, 309
365
———————– Page 403———————–
366
trusted issuer, 310 B
for web services, 155-156, 172 BCS, 25-26, 299
adfs.cer file, 206 Bharath see security specialist role (Bharath)
a-Expense, 44-67 <bindings> subsection, 150 -151
application, 44-46 browser-based applications, 17-23
before claims, 49-52 browser-based message sequence, 20
with claims, 52-58 WSFederationAuthenticationModule (FAM),
with forms authentication, 49 20-21
hosting on Windows Azure, 64-67 browser-based scenario, 240-251
anonymity, 9-12 browser closing, 232
answer key, 337-363 Business Connectivity Services (BCS) see BCS
a-Order, 43-49, 59 business trust relationship, 89
a-Order.OrderTracking Web service, 148
appendixes see certificates; FedUtil.exe tool; C
industry standards; message sequences; Cameron, Kim, xvii-xviii
SharePoint 2010 authentication; Windows Certificate for Message Security (Active Client
Azure Appfabric ACS Host), 293-294
applications Certificate for Message Security (Web Service
browser-based applications, 17-23 Host, Active Scenario), 292
initial request to, 248 Certificate for TLS/SSL (Web Server, Browser
making claims-aware, 237-238 Scenario), 288
server requirements, xxx Certificate for Token Encryption (Issuer, Active
SharePoint web applications, 200-201 Scenario), 291
signing out of, 60-61 Certificate for Token Signing (Issuer, Active
site collections in a SharePoint web Scenario), 287-288, 291
application, 199-200 Certificate for Transport Security (TLS/SSL) (Web
see also claims-based applications Service Host, Active Scenario), 292
architecture see claims-based architectures certificates, 287-294
architecture of the Adatum people picker solution, on the active client host, 293-294
203 for browser-based applications, 287
ASP.NET 4.0, 43-45 Certificate for Message Security (Active
ASP.NET MVC, 101, 109-112, 114 Client Host), 293-294
see also federated identity with multiple Certificate for Message Security (Issuer,
partners Active Scenario), 291
audience, xxiii-xxiv Certificate for Message Security (Web
AuthenticateAndAuthorizeAttribute class, 112, Service Host, Active Scenario), 292
139-141 Certificate for TLS/SSL (Web Server, Browser
AuthenticateUser method, 112-113, 115, 139 Scenario), 288
authentication Certificate for Token Encryption (Issuer,
extension, 315-316 Active Scenario), 291
logic, 3-5 Certificate for Token Signing (Issuer, Active
mechanism, 197-199 Scenario), 291
methods in SharePoint, 316-317 Certificate for Token Signing (Issuer, Active
mode, 319 Scenario), 287-288
authoritative data, 5 Certificate for Transport Security (TLS/SSL)
authorization rules, 232-233 (Issuer, Active Scenario), 290-291
AuthorizeUser method, 115-116, 140 Certificate for Transport Security (TLS/SSL)
automated provisioning, 117-118 (Web Service Host, Active Scenario), 292
Azure see Windows Azure
———————– Page 404———————–
367
Cookie Encryption/Decryption (Web Server, uses for, 2-5
Browser Scenario), 290 vs. Kerberos, 1-2
importing from adfs.cer file, 206 where they should be issued, 37-38
on the issuer (active scenario), 290-291 claims-based applications, 4-5
Optional Certificate for Token Encryption design considerations, 35-40
(Issuer, Browser Scenario), 288 diagram, 8
Optional Token Decryption (Web Server, good claims, 35
Browser Scenario), 289-290 setting up, 61
TLS/SSL (Issuer, Browser Scenario), 287 claims-based architectures, 15-42
Token Decryption (Web Service Host, Active benefits, 313-314
Scenario), 293 implementation, 315-319
Token Signature Chain of Trust Verification performance optimizations, 23
(Web Server, Browser Scenario), 289 smart clients, 23-25
Token Signature Chain Trust Verification claims-based identity
(Web Service Host, Active Scenario), 293 familiar example, 3-5
Token Signature Verification (Web Server, over the Internet, 48
Browser Scenario), 289 powerful feature of, 27
Token Signature Verification (Web Service vs. Windows authentication, 46-47
Host, Active Scenario), 292-293 claims-based single sign-on for Microsoft
on the web application server, 288-290 SharePoint 2010, 195-218
on the web service host, 292-293 ADFS default authentication method, 216
certificate section, 118-119 authentication mechanism, 197-199
ClaimHelper class, 57-58 claims mappings in SharePoint, 207
Claim Provider Identifier, 215 displaying claims in a web part, 214
Claim Provider Type, 215 end-to-end walkthroughs, 199
claims, 1-14 FedAuth tokens, 215
Access Control Service (ACS), 7 goals and requirements, 196-197
authentication limitations, 322-324 overview, 197-205
authentication logic, 3-5 people picker, 202-204
authentication profiles and audiences, 321 people picker customizations, 210-212
benefits, 12 relying party (RP) configuration in ADFS,
building a collection, 198 205-206
claims rule language, 74 server deployment, 216
displaying in a web part, 214 SharePoint authorization, 201-202
external issuers, 7-8 SharePoint STS configuration, 206-209
getting lists of, 36-37 SharePoint trusted identity token issuer,
good, 5 207-209
implementing identity, 9-12 SharePoint trusted root authority, 206-207
mappings, 107-108 SharePoint web application configuration,
mappings in SharePoint, 207 209
relationships to security tokens and issuers, 2 single sign-out, 204-205
SharePoint, 25-26 single sign-out control, 212-214
table, 2 user profile synchronization, 214-215
technologies used by, 38-40 visiting two SharePoint web applications,
transformation, 32-33 200-201
use configuration, 324-325 visiting two site collections in a SharePoint
use considerations, 319-324 web application, 199-200
user anonymity, 9-12 claims-based single sign-on for the Web, 43-69
user distinguishing, 36 inside the implementation, 49-59
———————– Page 405———————–
368
overview, 46-48 F
setup and physical deployment, 61 Fabrikam scenario see federated identity with
Windows Azure, 64-67 multiple partners; federated identity with
claims-enabled SharePoint applications at Adatum, multiple partners and Windows Azure ACS
197 Fabrikam Shipping
claims enabling web services, 145-157 for customers with an identity provider,
active client, 150-153 103-105
ADFS 2.0 for web services, 155-156 using ACS, 128
authorization strategy, 153-154 Facebook
debugging the application, 154-155 authentication, 91
goals and requirements, 146 federated identity for Windows Azure ACS,
inside the implementation, 148-155 98-99
overview, 146-147 FedAuth tokens, 215, 225
setup and physical deployment, 155-156 federatedAuthentication attribute, 55
web service, 148-150 federated identity, 1, 5-6, 28-32
ClaimsPrincipal object, 21-22, 54, 248-250 across realms, 26-32
claims rule language, 74 with ACS as the issuer, 30
Claims to Windows Token Service (C2WTS), between Adatum and Litware diagram, 73
318-319 with a smart client, 146-147, 161
Claim User Identifier, 215 message sequence, 31
CleanUp.aspx page, 60-61 federated identity for SharePoint applications,
client computer requirements, xxx 219-236
code requirements, xxix-xxx authorization rules, 232-233
configurable claims transformation rules, 119 closing the browser, 232
Contoso, 105-106, 133-134 goals and requirements, 220
Cookie Encryption/Decryption (Web Server, home realm discovery, 233-234
Browser Scenario), 290 inside the implementation, 224-234
cookies, 21-23, 49, 205, 224, 249-251 overview, 220-224
see also FedAuth tokens SAML token expiration in SharePoint,
credentials, 30 225-228
cross-realm identity, 26-28 sliding sessions, 231
custom claims authorization manager class, token expiration and sliding sessions, 224
166-167 federated identity for Web applications, 71-80
CustomHeaderMessageInspector class, 169 -171 benefits and limitations, 77
goals and requirements, 72
D mapping input to claims, 75
decentralization, 26-27 mock issuers, 78
default ACS home realm discovery page, 312 overview, 72
direct trust model, 223 setup and physical deployment, 77
DisplayClaimsWebPart, 214 single sign-on (SSO), 71
DoFederatedSignOut method, 212-213 trust relationships, 78
domains, 72, 296 federated identity for Windows Azure ACS, xxvii,
81-100
E alternative solutions, 91-99
8ActiveRestClientFederation, 162, 164 customer using a social identity, 86-88
errors, 308 customer with its own identity provider,
federation metadata document, 311-312 84-86
experts, xxxi Facebook, 98-99
———————– Page 406———————–
369
goals and requirements, 82-83 FederatedPassiveSignInStatus control, 60, 63
initializing ACS, 95-96 federation binding, 152
inside the implementation, 93-94 federation metadata, 11-12, 118
mapping rules in a federation provider, 89-91 document uploading, 311-312
overview, 83-84 federation provider (FP), 73-75
reporting errors from ACS, 95 FederationResult handler, 114
setup and physical deployment, 94 FedUtil.exe tool, 12, 110, 237-238
social identity providers, 96-99 forward, xvii-xxii
trust relationships with social identity 4ActiveClientFederation, 148
providers, 88-89
trust relationship with ACS, 94-96 G
users with social identities, 96-97 GetOrders method, 188
Windows Live IDs, 97-98 GetPickerEntry method, 210 -211
federated identity with multiple partners, 101-121 Global.asax file, 56, 62, 110, 163
certificate section, 118-119 glossary, 327-336
claims in Fabrikam shipping, 107-108 Google authentication, 89-90
goals and requirements, 102-103
inside the implementation, 109-117 H
issuer section, 118 home realm discovery, 72, 74, 76, 83
mapping input to claims, 108 Access Control Service (ACS), 296, 312
organization section, 118 custom pages, 306-307
overview, 103-107 federated identity for SharePoint
setup and physical deployment, 117-119 applications, 233-234
trust relationship, 117-119 federated identity with multiple partners, 105
user-configurable claims transformation rules, senior software developer role (Markus), 129
119 and Web services, 33-34
federated identity with multiple partners and HTTP traffic, 241, 253, 260, 274
Windows Azure ACS, 123-144 HttpWebRequestExtensions class, 183-184
ACS initialization, 142-143 hub model, 222-224
adding a new identity provider to, 137
authenticating a user of Fabrikam Shipping,
I
139-140
identity
authorizing access to Fabrikam Shipping data,
federating across realms, 28
140-141
federating with Litware, 221
claims-mapping rules in ACS, 137-138
federation, 5-6
enrolling a new partner organization, 132-133
infrastructure, 315-316
Fabrikam Shipping using ACS, 127-128
normalization, 315-316
Fabrikam Shipping websites, 141-142
transformation, 32-33
goals and requirements, 125-127
see also claims-based identity
inside the implementation, 135-141
Identity.Claims property, 9
listing identity providers from ACS, 135-137
listing partner organizations, 138-139 identity provider (IdP), xxv, 73, 296
Index method, 111, 116 -117
multiple partners with a single identity,
industry standards, 285-286
133-134
Internet Security Association and Key
overview, 125-135
sample claims issuers, 142 Management Protocol (ISAKMP), 285
setup and physical deployment, 141-143 Security Assertion Markup Language (SAML),
285
users at a partner organization, 134-135
———————– Page 407———————–
370
Security Association Management Markus see senior software developer role
Protocol(SAMP), 285 (Markus)
WS-Federation, 285 message sequences, 239-283
WS-Federation Passive Requestor Profile, 286 for ACS, 297-301
WS-SecureConversation, 286 active client scenario, 252-258
WS-Security, 286 browser-based, 20
WS-Trust, 286 browser-based scenario, 240-251
XML Encryption, 286 browser-based scenario with ACS, 258-272
Internet single sign-out, 273-283
accessing, 64 smart-client based, 23-25
claims-based identity, 48 metadata, 11, 78
Internet Security Association and Key <Microsoft.identityModel> element, 149
Management Protocol (ISAKMP), 285 microsoft.identityModel section, 165-166
IsSocial method, 135-136 Microsoft SharePoint Business Connectivity
issuers, 2, 4, 32 Services (BCS) see BCS
see also mock issuers Microsoft Windows Identity Foundation (WIF),
issuer section, 118 17-23
IT professional role (Poe), xxxi mock issuers, 61-63
LogonTokenCacheExpirationWindow federated identity for Web applications, 78
property, 226 Model View Controller (MVC) framework, 101,
Organization claim, 97 109-112, 114
multiple partners see federated identity with
J multiple partners
Jana see software architect role (Jana)
JavaScript, 187 N
JSON-encoded responses, 308 nameidentifier claim, 88, 96-97
Navigating event, 186-187
K 9WindowsPhoneClientFederation, 183
Kerberos NTLM handshake, 244
downfall of, 15
limitations, 3 O
vs. claims-based approach, 1-2 OnAuthenticate event, 50 -51
Kwan, Stuart, xix-xx 1SingleSignOn, 49
OnLoad method, 51
L on the issuer (active scenario), 290-291
layout of this book, xxv-xxix Optional Certificate for Token Encryption (Issuer,
Litware, 221 Browser Scenario), 288
LitwareIssuerUsernameMixed binding, 152 Optional Token Decryption (Web Server, Browser
LogonTokenCacheExpirationWindow property, Scenario), 289-290
226, 229-232 OrderTrackingService class, 164
Organization claim, 97, 137-138, 141-142, 232-233
M organization section, 118
management service API, 307-308
mappings P
of claims, 107-108 Pace, Eugenio, xxxiii-xxxv
of this book, xxvi Page_Load event handler, 60 -61
partner organizations, 138-139
passive client, xxv
———————– Page 408———————–
371
passive federation, 15 REST services from a Windows phone device,
REST services from a Windows phone device, 175-193
177-179 active federation, 179-181
passiveRedirectEnabled attribute, 110 active SAML token handling, 183-185
people picker, 202-204 asynchronous behavior, 187-191
customizations, 210-212 comparing the solutions, 181-182
Peschka, Steve, xxi-xxii goals and requirements, 176
phone devices see REST services from a Windows overview, 177-182
phone device passive federation, 177-179
Poe see IT professional role (Poe) Web browser control, 185-187
PowerShell command parameters, 208 RetrieveIdentityProviders method, 136-137
preface, xxiii-xxxi ReturnURL parameter, 18
principal, xxiv-xxv rich client, office, and reporting applications with
privacy, 30, 34, 36, 127 claims authentication, 321-322
production issuer, 63-64 Role-Based Access Control (RBAC) see RBAC
profiles roles, xxxi
and audiences with claims authentication, 321 see also IT professional role (Poe); security
synchronization, 214-215 specialist role (Bharath); senior software
proof keys, 25 developer role (Markus); software
protocol transitions, 297 architect role (Jana)
route mappings, 110
R
RBAC, 2, 37-38 S
Reactive Extensions (Rx), 187-188 SAML see Security Assertion Markup Language
realms, 6, 26-32, 296 (SAML)
RegisterRoutes method, 110 -111 scenarios see active client; certificates; message
relying party (RP), 74, 296 sequences; roles
configuration in ADFS, 205-206 security
defined, xxiv between domains, 72
Fabrikam scenario, 134 Windows Azure Appfabric ACS, 310-311
identifiers, 206 Security Assertion Markup Language (SAML), xxiv,
mapping table, 205 39, 72
production issuer, 63-64 industry standards, 285
remote users, 26-27 token expiration in SharePoint, 225-228
RequestSecurityTokenResponse, 245 token request, 184-185
RequestSecurityToken (RST), 253 tokens, 38-39, 147, 171
requirements, xxix-xxx Security Association Management
resource security token service (R-STS), xxv Protocol(SAMP), 285
REST services, 158-174 security specialist role (Bharath)
ACS configuration, 162-163 cross-realm identity, 27
active client, 167-171 federated identity, 6
ADFS for web services, 172 overview, xxxi
federated identity with a smart client, 161 RBAC, 2
goals and requirements, 160 security tokens, 4
inside the implementation, 162-171 table, 2
overview, 161-162 security token service (STS), xxv, 296
setup and physical deployment, 172 generated in Visual Studio 2010, 311
SWT token, 168 SelfSTS tool, 80, 142
web service, 163-167
———————– Page 409———————–
372
senior software developer role (Markus) SharePoint Business Connectivity Services (BCS)
ASP.NET MVC, 111 see BCS
home realm discovery, 129 ShipmentController class, 111
overview, xxxi sign-on, 43-69
ReturnURL parameter, 18 SimpleClaimsAuthorizationManager class,
server deployment, 216 153-154
<service> element, 150 Simple Web Token (SWT), 39
service providers (SP), xxiv single sign-on (SSO), 43
Session_SignedIn event, 213-214 with a browser, 17, 19
Session_Start method, 56-57 federated identity for Web applications, 71
7FederationWithMultiplePartnersAndAcs, 135 see also claims-based single sign-on for
<sharedListeners> section, 154-155 Microsoft SharePoint 2010; claims-based
SharePoint single sign-on for the Web
claims, 25-26 single sign-out, 204-205
claims-enabled applications at Adatum, 197 control, 212-214
configuration values, 226 SingleSignOutModule, 212
permissions table, 201 site collections in SharePoint web applications,
security token service, 317-318 199-201
services application framework, 318-319 6-FederationWithAcs, 93-94
sliding sessions in, 228-232 SlidingSessionModule, 229
standard token expiration, 227 sliding sessions
STS configuration, 206-209 in the a-Portal web application, 224, 231
supported standards, 319 in SharePoint, 228-232
token expiration, 225-228 smart client, 146-147, 161-162
trusted identity token issuer, 207-209 with federated identity, 146-147, 161-162
trusted root authority, 206-207 smart client-based message sequence, 24
user identity, 316-317 social identity, 81, 83-84
web application configuration, 209 customer using a social identity, 86-88
see also claims-based single sign-on for social identity providers, 96-99
Microsoft SharePoint 2010; federated trust relationships with social identity
identity for SharePoint applications providers, 88-89 users with social
SharePoint 2010 authentication, 313-326 identities, 96-97
choosing a mode, 319 software architect role (Jana)
claims-based architecture benefits, 313-314 ASP.NET MVC, 109
claims-based architecture implementation, identity transformation, 32
315-319 overview, xxxi
Claims to Windows Token Service (C2WTS), software requirements, xxix-xxx
318-319 SPClaimsManager component, 202
claim use configuration, 324-325 SPUser instance, 215
claim use considerations, 319-324 SPUser type, 316
configuration tips, 325-326 SSO see single sign-on (SSO)
groups with claims authentication, 320-321 standards, 319
limitations, 321-324 standard token expiration in SharePoint, 227
methods in, 316-317 structure of this book, xxv-xxix
multiple authentication mechanisms, 320 STS see security token service (STS)
profiles and audiences with claims stub issuers, 10
authentication, 321 subject defined, xxiv-xxv
sequence, 318 SWT tokens, 168, 171
supported standards, 319 <system.serviceModel> section, 150
———————– Page 410———————–
373
T see also claims enabling web services
technical trust relationship, 89 websites
10SharePoint, 210, 212, 214, 229 ACS and ADFS, 300-301
terminology, xxiv-xxv user authentication, 298
3FederationWithMultiplePartners, 109 who’s who, xxxi
thumbprints, 55-56 whr parameters, 76, 87, 98-99, 128-129, 312
TLS/SSL (Issuer, Browser Scenario), 288 Windows authentication vs. claims-based identity,
Token Decryption (Web Service Host, Active 46-47
Scenario), 293 Windows Azure, xxix, 64-67
tokens Windows Azure Appfabric ACS, xxix, 81-82,
expiration in SharePoint, 225-228 295-312
issuers, 296 creating, configuring, and using an ACS issuer,
request, 184-185 302-306
sliding sessions, 224 custom home realm discovery pages, 306-307
trusted identity token issuer, 207-209 error management, 308
Token Signature Chain Trust Verification (Web integrating ACS and a local ADFS issuer,
Service Host, Active Scenario), 293 308-310
Token Signature Verification (Web Server, Browser management service API, 307-308
Scenario), 289 message sequences for ACS, 297-301
Token Signature Verification (Web Service Host, security considerations, 310-311
Active Scenario), 292-293 tips for using, 311-312
transformation what does ACS do?, 296-297
claims, 32-33 Windows Identity Foundation (WIF), xix-xx, xxviii,
configurable claims transformation rules, 119 9, 17-23, 314-315
rules, 297 Windows Live IDs
trusted identity token issuer, 207-209 authentication, 90
trust relationship, 2, 10, 88-89, 297 federated identity for Windows Azure ACS,
2-Federation, 77 97-98
Windows Live Messenger Connect, 98
U Windows Phone
unique identification, 36 active federation, 180
UserName property, 153 passive federation, 177
users, 36-37 Windows phone devices see REST services from a
anonymity, 9-12 Windows phone device
configurable claims transformation rules, 119 WS* Extensions, 39-40
profile synchronization, 214-215 WSFederatedAuthenticationModule (FAM), 241,
website authentication, 298 260, 272, 275
WS-Federation, 11, 40, 72, 113
W data sent to the issuer, 275
industry standards, 285
wa argument, 18
protocol, 113, 223
Web see claims-based single sign-on for the Web
Web applications see federated identity for Web WSFederationAuthenticationModule (FAM),
applications 53-54
Web browser control, 185-187 browser-based message sequence, 20-21
WS-Federation Passive Requestor Profile, 16, 40
Web.config file, 163
web services industry standards, 286
WS-SecureConversation, 40
ADFS 2.0, 155-156, 172
REST services, 163-167 industry standards, 286
———————– Page 411———————–
374
WS-Security, 39
industry standards, 286
WS-Trust, 39
industry standards, 286
WSTrustChannel, 153
wtrealm argument, 18, 25
x
XML Encryption, 286

.png)

.png)
.png)


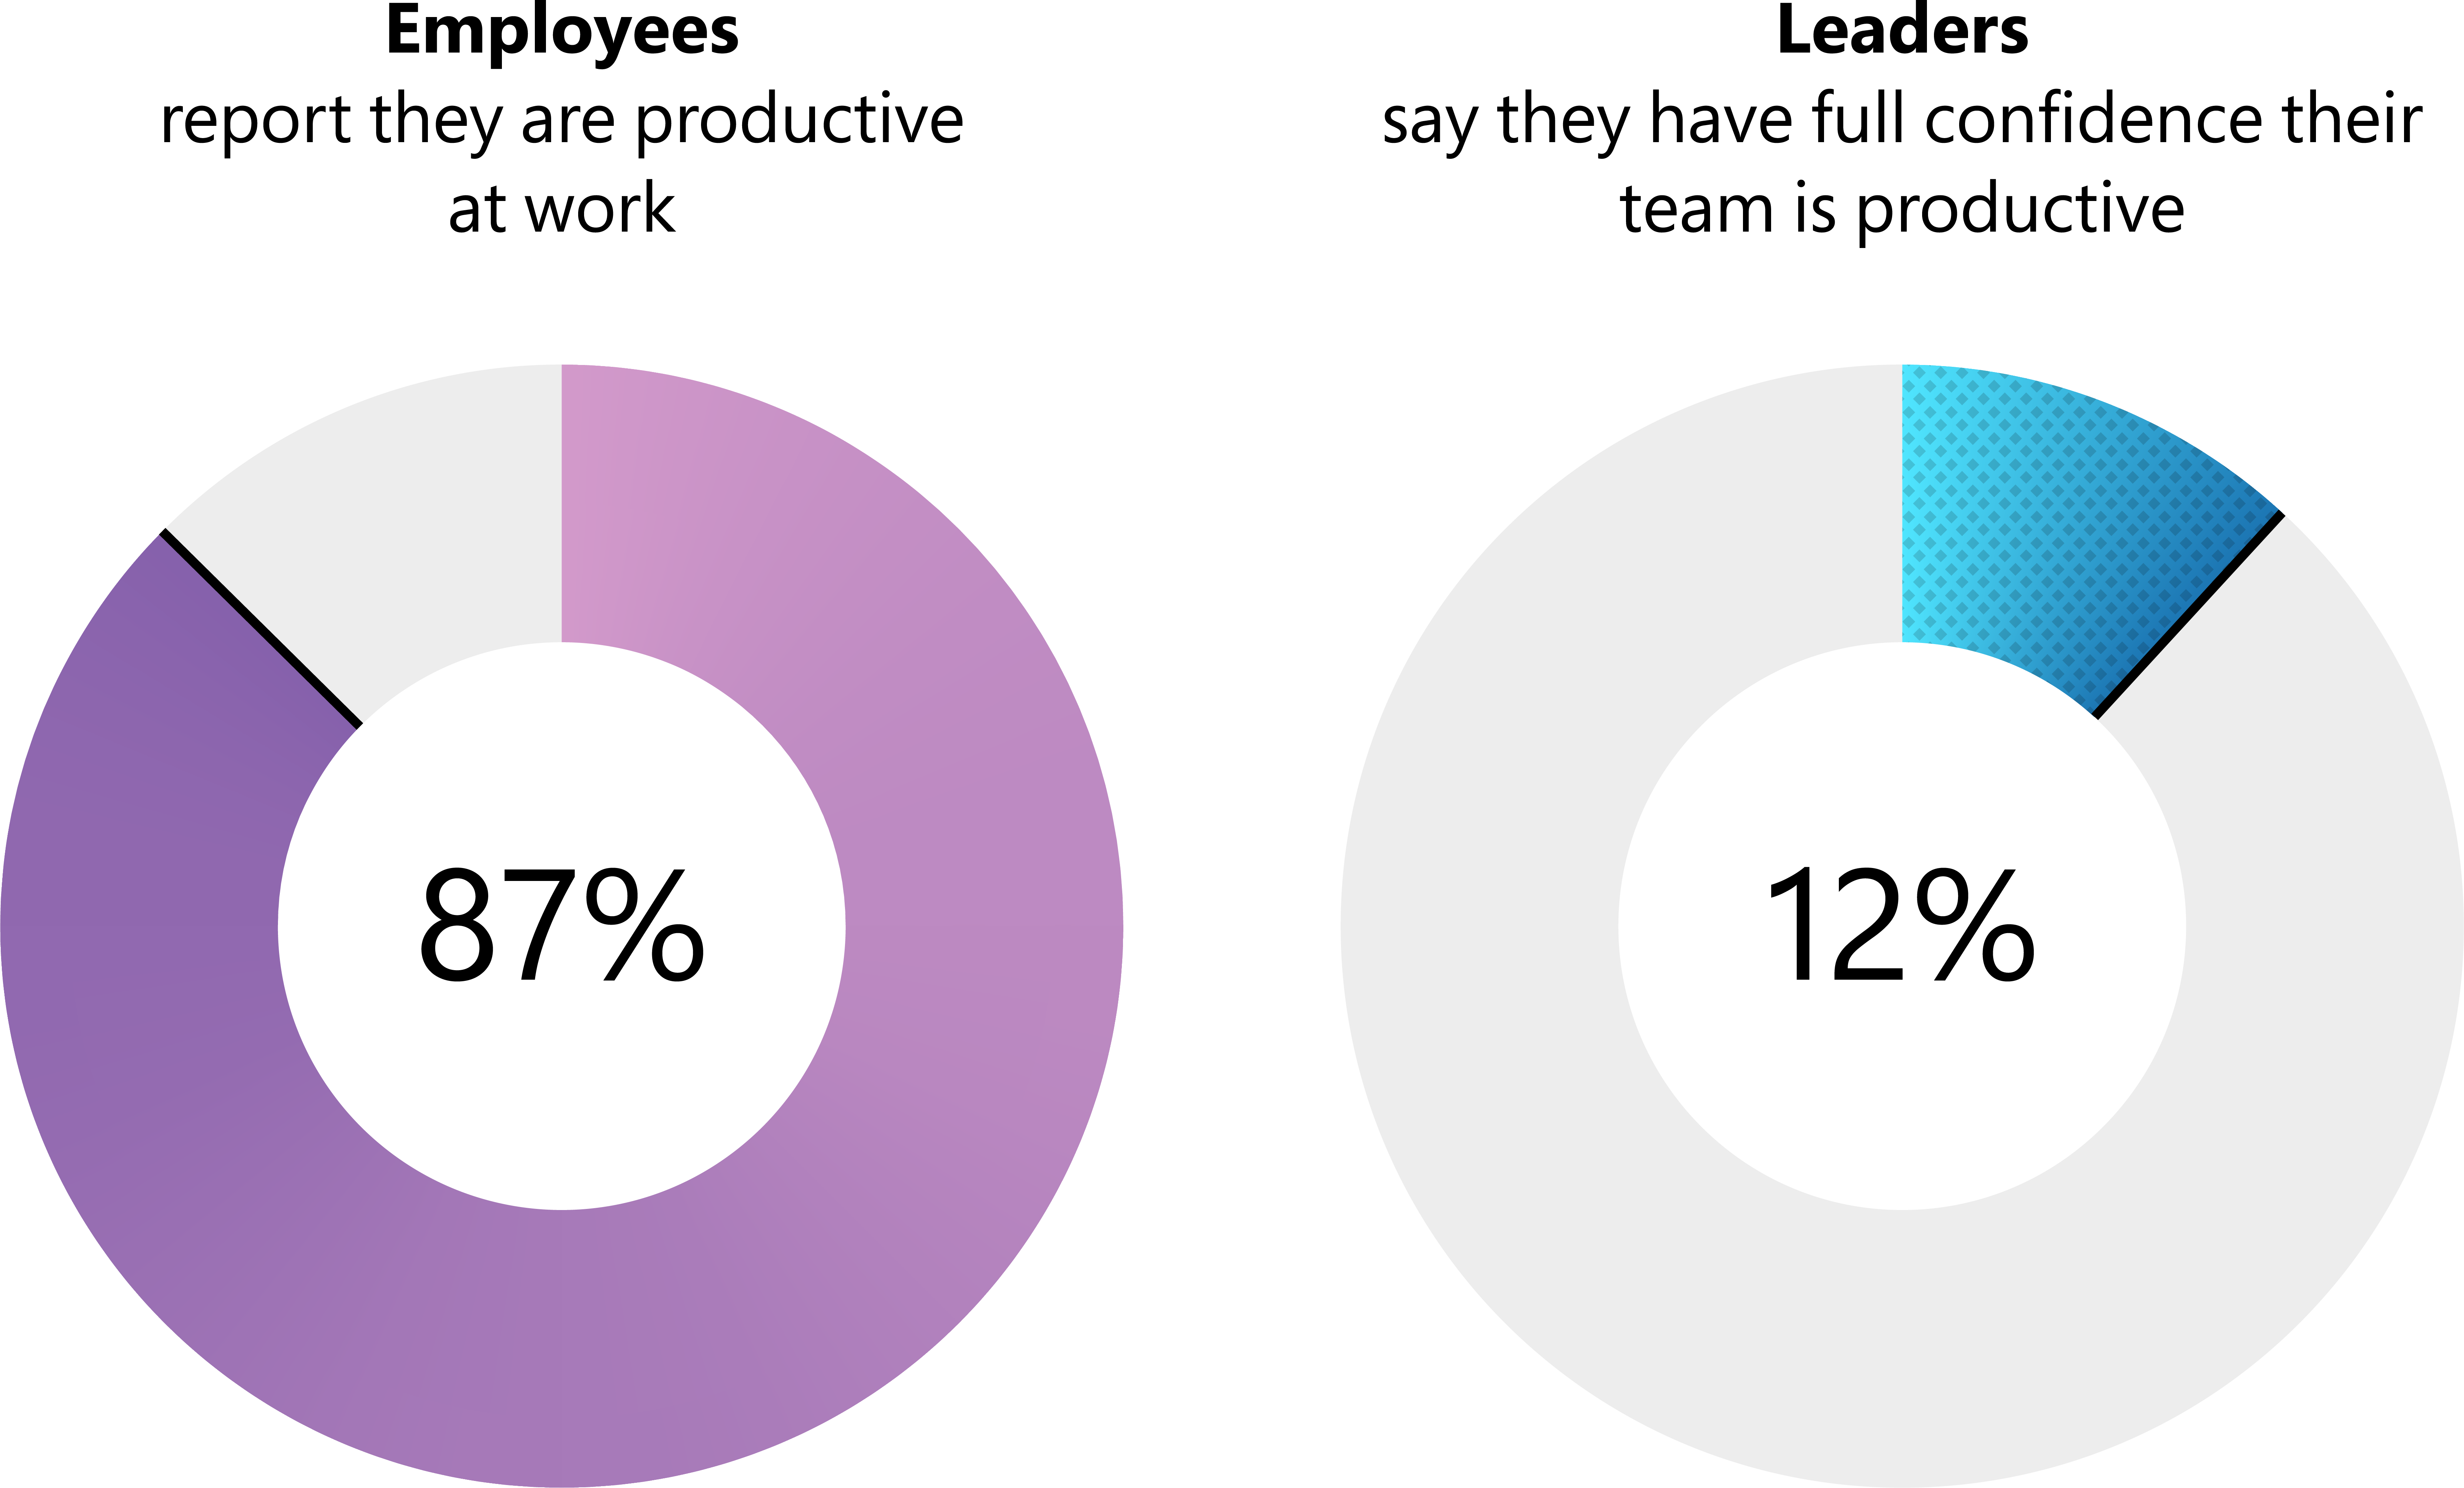

 +U. Under Explore all settings select
 +U. Under Explore all settings, select
 +U. Under Explore all settings, select
 +U. Under Explore all settings, select
 +U. Under Explore all settings, select
 +U
+U +U. Under Explore all settings, select


 in the notification area of the taskbar when using desktop view; and then moving the slider up or down to increase or decrease the speaker volume. Or, from the Start screen, swipe in from the right edge of the screen and click Settings. Click the volume control icon and move the slider up or down to increase or decrease the speaker volume.
 , muting is turned off. If the button looks like this:
  , tap or click it to turn off muting.
 +U. Under Explore all settings, select
 +U after you log on to Windows.