Microsoft ADO .NET Step by Step
by Rebecca M. Riordan ISBN: 0735612366
Microsoft Press © 2002 (512 pages)
Learn to use the ADO.NET model to expand on data-bound Windows and
Web Forms, as well as how XML and ADO.NET intermingle.
Table of Contents
Microsoft ADO.NET Step by Step
Introduction
Part I – Getting Started with ADO.NET
Chapter 1 – Getting Started with ADO.NET
Part II – Data Providers
Chapter 2 – Creating Connections
Chapter 3 – Data Commands and the DataReader
Chapter 4 – The DataAdapter
Chapter 5 – Transaction Processing in ADO.NET
Part III – Manipulating Data
Chapter 6 – The DataSet
Chapter 7 – The DataTable
Chapter 8 – The DataView
Part IV – Using the ADO.NET Objects
Chapter 9 – Editing and Updating Data
Chapter 10 – ADO.NET Data-Binding in Windows Forms
Chapter 11 – Using ADO.NET in Windows Forms
Chapter 12 – Data-Binding in Web Forms
Chapter 13 – Using ADO.NET in Web Forms
Part V – ADO.NET and XML
Chapter 14 – Using the XML Designer
Chapter 15 – Reading and Writing XML
Chapter 16 – Using ADO in the .NET Framework
Index
List of Tables
List of Sidebars
Microsoft ADO.NET Step by Step
PUBLISHED BY
Microsoft Press
A Division of Microsoft Corporation
One Microsoft Way
Redmond, Washington 98052-6399
Copyright © 2002 by Rebecca M. Riordan
All rights reserved. No part of the contents of this book may be reproduced or transmitted
in any form
or by any means without the written permission of the publisher.
Microsoft ADO.Net – Step by Step 1
Library of Congress Cataloging-in-Publication Data
Riordan, Rebecca.
Microsoft ADO.NET Step by Step / Rebecca M. Riordan.
p. cm.
Includes index.
ISBN 0-7356-1236-6
1. Database design. 2. Object oriented programming (Computer
science) 3. ActiveX. I.
Title.
QA76.9.D26 R56 2002
005.75’85—dc21 2001054641
Printed and bound in the United States of America.
1 2 3 4 5 6 7 8 9 QWE 7 6 5 4 3 2
Distributed in Canada by Penguin Books Canada Limited.
A CIP catalogue record for this book is available from the British Library.
Microsoft Press books are available through booksellers and distributors worldwide. For
further information about international editions, contact your local Microsoft Corporation
office or contact Microsoft Press International directly at fax (425) 936-7329. Visit our
Web site at http://www.microsoft.com/mspress. Send comments to mspinput@microsoft.com.
ActiveX, IntelliSense, Internet Explorer, Microsoft, Microsoft Press, the .NET logo, Visual
Basic, Visual C#, and Visual Studio are either registered trademarks or trademarks of
Microsoft Corporation in the United States and/or other countries. Other product and
company names mentioned herein may be the trademarks of their respective owners.
The example companies, organizations, products, domain names, e-mail addresses,
logos, people, places, and events depicted herein are fictitious. No association with any
real company, organization, product, domain name, e-mail address, logo, person, place,
or event is intended or should be inferred.
Acquisitions Editor: Danielle Bird
Project Editor: Rebecca McKay
Body Part No. X08-05018
To my very dear friend, Stephen Jeffries
About the Author
Rebecca M. Riordan
With almost 20 years’ experience in software design, Rebecca M. Riordan has earned
an international reputation as an analyst, systems architect, and designer of database
and work -support systems.
She works as an independent consultant, providing systems design and consulting
expertise to an international client base. In 1998, she was awarded MVP status by
Microsoft in recognition of her work in Internet newsgroups. Microsoft ADO.NET Step by
Step is her third book for Microsoft Press.
Rebecca currently resides in New Mexico. She can be reached at
rebeccar@attglobal.net.
Introduction
Overview
ADO.NET is the data access component of Microsoft’s new .NET Framework. Microsoft
bills ADO.NET as “an evolutionary improvement” over previous versions of ADO, a claim
that has been hotly debated since its announcement. It is certainly true that the
ADO.NET object model bears very little relationship to earlier versions of ADO.
Microsoft ADO.Net – Step by Step 2
In fact, whether you decide to love it or hate it, one fact about the .NET Framework
seems undeniable: it levels the playing ground. Whether you’ve been at this computer
game longer than you care to talk about or you’re still sorting out your heaps and stacks,
learning the .NET Framework will require a major investment. We’re all beginners now.
So welcome to Microsoft ADO.NET Step by Step. Through the exercises in this book, I
will introduce you to the ADO.NET object model, and you’ll learn how to use that model
in developing data-bound Windows Forms and Web Forms. In later topics, we’ll look at
how ADO.NET interacts with XML and how to access older versions of ADO from the
.NET environment.
Since we’re all beginners, an exhaustive treatment would be, well, exhausting, so this
book is necessarily limited in scope. My goal is to provide you with an understanding of
the ADO.NET objects—what they are and how they work together. So fair warning: this
book will not make you an expert in ADO.NET. (How I wish it were that simple!)
What this book will give you is a road map, a fundamental understanding of the
environment, from which you will be able to build expertise. You’ll know what you need to
do to start building data applications. The rest will come with time and experience. This
book is a place to start.
Although I’ve pointed out language differences where they might be confusing, in order
to keep the book within manageable proportions I’ve assumed that you are already
familiar with Visual Basic .NET or Visual C# .NET. If you’re completely new to the .NET
environment, you might want to start with Microsoft Visual Basic .NET Step by Step by
Michael Halvorson (Microsoft Press, 2002) or Microsoft Visual C# .NET Step by Step by
John Sharp and Jon Jagger (Microsoft Press, 2002), depending on your language of
choice.
The exercises that include programming are provided in both Microsoft Visual Basic and
Microsoft C#. The two versions are identical (except for the difference between the
languages), so simply choose the exercise in the language of your choice and skip the
other version.
Conventions and Features in This Book
You’ll save time by understanding, before you start the lessons, how this book displays
instructions, keys to press, and so on. In addition, the book provides helpful features that
you might want to use.
§ Numbered lists of steps (1, 2, and so on) indicate hands-on exercises. A
rounded bullet indicates an exercise that has only one step.
§ Text that you are to type appears in bold.
§ Terms are displayed in italic the first time they are defined.
§ A plus sign (+) between two key names means that you must press those
keys at the same time. For example, “Press Alt+Tab” means that you hold down
the Alt key while you press Tab.
§ Notes labeled “tip” provide additional information or alternative methods for a
step.
§ Notes labeled “important” alert you to essential information that you should
check before continuing with the lesson.
§ Notes labeled “ADO” point out similarities and differences between ADO and
ADO.NET.
§ Notes labeled “Roadmap” refer to places where topics are discussed in depth.
§ You can learn special techniques, background information, or features related
to the information being discussed by reading the shaded sidebars that appear
throughout the lessons. These sidebars often highlight difficult terminology or
suggest future areas for exploration.
§ You can get a quick reminder of how to perform the tasks you learned by
reading the Quick Reference at the end of a lesson.
Microsoft ADO.Net – Step by Step 3
Using the ADO.NET Step by Step CD-ROM
The Microsoft ADO.NET Step by Step CD-ROM inside the back cover contains practice
files that you’ll use as you complete the exercises in the book. By using the files, you
won’t need to waste time creating databases and entering sample data. Instead, you can
concentrate on how to use ADO.NET. With the files and the step-by-step instructions in
the lessons, you’ll also learn by doing, which is an easy and effective way to acquire and
remember new skills.
System Requirements
In order to complete the exercises in this book, you will need the following software:
§ Microsoft Windows 2000 or Microsoft Windows XP
§ Microsoft Visual Studio .NET
§ Microsoft SQL Server Desktop Engine (included with Visual Studio .NET)
or Microsoft SQL Server 2000
This book and practice files were tested primarily using Windows 2000 and Visual Studio
.NET Professional; however, other editions of Visual Studio .NET, such as Visual Basic
.NET Standard and Visual C# .NET Standard, should also work.
Since Windows XP Home Edition does not include Internet Information Services (IIS),
you won’t be able to create local ASP.NET Web applications (discussed in chapters 12
and 13) using Windows XP Home Edition. Windows 2000 and Windows XP Professional
do include IIS.
Installing the Practice Files
Follow these steps to install the practice files on your computer so that you can use them
with the exercises in this book.
1. Insert the CD in your CD-ROM drive.
A Start menu should appear automatically. If this menu does not appear,
double-click StartCD.exe at the root of the CD.
2. Click the Getting Started option.
3. Follow the instructions in the Getting Started document to install the
practice files and setup SQL Server 2000 or the Microsoft SQL Server
Desktop Engine (MSDE).
Using the Practice Files
The practice files contain the projects and completed solutions for the ADO.NET Step by
Step book. Folders marked ‘Finish’ contain working solutions. Folders marked ‘Start’
contain the files needed to perform the exercises in the book.
Uninstalling the Practice Files
Follow these steps to remove the practice files from your computer.
1. Insert the CD in your CD-ROM drive.
A Start menu should appear automatically. If this menu does not appear,
double-click StartCD.exe at the root of the CD.
2. Click the Uninstall Practice Files option.
3. Follow the steps in the Uninstall Practice Files document to remove
the practice files.
Need Help with the Practice Files?
Every effort has been made to ensure the accuracy of the book and the contents of this
CD-ROM. As corrections or changes are collected for this book, they will be placed on a
Web page and any errata will also be integrated into the Microsoft online Help tool
known as the Knowledge Base. To view the list of known corrections for this book, visit
the following page:
http://support.microsoft.com/support/misc/kblookup.asp?id=Q314759
Microsoft ADO.Net – Step by Step 4
To search the Knowledge Base and review your support options for the book or CDROM,
visit the Microsoft Press Support site:
http://www.microsoft.com/mspress/support/
If you have comments, questions, or ideas regarding the book or this CD-ROM, or
questions that are not answered by searching the Knowledge Base, please send them to
Microsoft Press via e-mail to:
mspinput@microsoft.com
or by postal mail to:
Microsoft Press
Attn: Microsoft ADO.NET Step by Step Editor
One Microsoft Way
Redmond, WA 98052-6399
Please note that product support is not offered through the above addresses.
Part I: Getting Started with ADO.NET
Chapter List
Chapter 1: Getting Started with ADO.NET
Chapter 1: Getting Started with ADO.NET
Overview
In this chapter, you’ll learn how to:
§ Identify the primary objects that make up Microsoft ADO.NET are and how
they interact
§ Create Connection and DataAdapter objects by using the DataAdapter
Configuration Wizard
§ Automatically generate a DataSet
§ Bind control properties to a DataSet
§ Load data into a DataSet at run time
Like other components of the .NET Framework, ADO.NET consists of a set of objects
that interact to provide the required functionality. Unfortunately, this can make learning to
use the object model frustrating—you feel like you need to learn all of it before you can
understand any of it.
The solution to this problem is to start by building a conceptual framework. In other
words, before you try to learn the details of how any particular object functions, you need
to have a general understanding of what each object does and how the objects interact.
That’s what we’ll do in this chapter. We’ll start by looking at the main ADO.NET objects
and how they work together to get data from a physical data store, to the user, and back
again. Then, just to whet your appetite, we’ll work through building a set of objects and
binding them to a simple data form.
On the Fundamental Interconnectedness of All Things
In later chapters in this section, we’ll examine each object in the ADO.NET object model
in turn. At least in theory. In reality, because the objects are so closely interlinked, it’s
impossible to look at any single object in isolation.
Microsoft ADO.Net – Step by Step 5
Roadmap A roadmap note like this will point you to the discussion of a
property or method that hasn’t yet been introduced.
Where it’s necessary to use a method or property that we haven’t yet examined, I’ll use
roadmap notes, like the one in the margin next to this paragraph, to point you to the
chapter where they are discussed.
The ADO.NET Object Model
The figure below shows a simplified view of the primary objects in the ADO.NET object
model. Of course, the reality of the class library is more complicated, but we’ll deal with
the intricacies later. For now, it’s enough to understand what the primary objects are and
how they typically interact.
The ADO.NET classes are divided into two components: the Data Providers (sometimes
called Managed Providers), which handle communication with a physical data store, and
the DataSet, which represents the actual data. Either component can communicate with
data consumers such as WebForms and WinForms.
Data Providers
The Data Provider components are specific to a data source. The .NET Framework
includes two Data Providers: a generic provider that can communicate with any OLE DB
data source, and a SQL Server provider that has been optimized for Microsoft SQL
Server versions 7.0 and later. Data Providers for other databases such as Oracle and
DB2 are expected to become available, or you can write your own. (You may be relieved
to know that we won’t be covering the creation of Data Providers in this book.)
The two Data Providers included in the .NET Framework contain the same objects,
although their names and some of their properties and methods are different. To
illustrate, the SQL Server provider objects begin with SQL (for example,
SQLConnection), while the OLE DB objects begin with OleDB (for example,
OleDbConnection).
The Connection object represents the physical connection to a data source. Its
properties determine the data provider (in the case of the OLE DB Data Provider), the
data source and database to which it will connect, and the string to be used during
connecting. Its methods are fairly simple: You can open and close the connection,
change the database, and manage transactions.
The Command object represents a SQL statement or stored procedure to be executed at
the data source. Command objects can be created and executed independently against
a Connection object, and they are used by DataAdapter objects to handle
communications from a DataSet back to a data source. Command objects can support
SQL statements and stored procedures that return single values, one or more sets of
rows, or no values at all.
Microsoft ADO.Net – Step by Step 6
A DataReader is a fast, low-overhead object for obtaining a forward-only, read-only
stream of data from a data source. They cannot be created directly in code; they are
created only by calling the ExecuteReader method of a Command.
The DataAdapter is functionally the most complex object in a Data Provider. It provides
the bridge between a Connection and a DataSet. The DataAdapter contains four
Command objects: the SelectCommand, UpdateCommand, InsertCommand, and
DeleteCommand. The DataAdapter uses the SelectCommand to fill a DataSet and uses
the remaining three commands to transmit changes back to the data source, as required.
Microsoft ActiveX
Data Objects
(ADO)
In functional terms, the Connection and Command
objects are roughly equivalent to their ADO
counterparts (the major difference being the lack of
support for server-side cursors), while the
DataReader functions like a firehose cursor. The
DataAdapter and DataSet have no real equivalent in
ADO.
DataSets
The DataSet is a memory-resident representation of data. Its structure is shown in the
figure below. The DataSet can be considered a somewhat simplified relational database,
consisting of tables and their relations. It’s important to understand, however, that the
DataSet is always disconnected from the data source—it doesn’t “know” where the data
it contains came from, and in fact, it can contain data from multiple sources.
The DataSet is composed of two primary objects: the DataTableCollection and the
DataRelationCollection. The DataTableCollection contains zero or more DataTable
objects, which are in turn made up of three collections: Columns, Rows, and Constraints.
The DataRelationCollection contains zero or more DataRelations.
The DataTable’s Columns collection defines the columns that compose the DataTable.
In addition to ColumnName and DataType properties, a DataColumn’s properties allow
you to define such things as whether or not it allows nulls (AllowDBNull), its maximum
length (MaxLength), and even an expression that is used to calculate its value
(Expression).
The DataTable’s Rows collection, which may be empty, contains the actual data as
defined by the Columns collection. For each Row, the DataTable maintains its original,
current, and proposed values. As we’ll see, this ability greatly simplifies certain kinds of
programming tasks.
Microsoft ADO.Net – Step by Step 7
ADO The ADO.NET DataTable provides essentially the same
functionality as the ADO Recordset object, although it obviously
plays a very different role in the object model.
The DataTable’s Constraints collection contains zero or more Constraints. Just as in a
relational database, Constraints are used to maintain the integrity of the data. ADO.NET
supports two types of constraints: ForeignKeyConstraints, which maintain relational
integrity (that is, they ensure that a child row cannot be orphaned), and
UniqueConstraints, which maintain data integrity (that is, they ensure that duplicate rows
cannot be added to the table). In addition, the PrimaryKey property of the DataTable
ensures entity integrity (that is, it enforces the uniqueness of each row).
Finally, the DataSet’s DataRelationCollection contains zero or more DataRelations.
DataRelations provide a simple programmatic interface for navigating from a master row
in one table to the related rows in another. For example, given an Order, a DataRelation
allows you to easily extract the related OrderDetails rows. (Note, however, that the
DataRelation itself doesn’t enforce relational integrity. A Constraint is used for that.)
Binding Data to a Simple Windows Form
The process of connecting data to a form is called data binding. Data binding can be
performed in code, but the Microsoft Visual Studio .NET designers make the process
very simple. In this chapter, we’ll use the designers and the wizards to quickly create a
simple data bound Windows form.
Important If you have not yet installed this book’s practice files, work
through “Installing and Using the Practice Files” in the
Introduction, and then return to this chapter.
Adding a Connection and DataAdapter to a Form
Roadmap We’ll examine the Connection object in Chapter 2 and the
DataAdapter in Chapter 4.
The first step in binding data is to create the Data Provider objects. Visual Studio
provides a DataAdapter Configuration Wizard to make this process simple. Once the
DataAdapter has been added, you can check that its configuration is correct by using the
DataAdapter Preview window within Visual Studio.
Add a Connection to a Windows Form
1. Open the EmployeesForm project from the Visual Studio Start Page.
2. Double-click Employees.vb (or Employees.cs if you’re using C#) in the
Solution Explorer to open the form.
Visual Studio displays the form in the form designer.
3. Drag a SQLDataAdapter onto the form from the Data tab of the
Toolbox.
Visual Studio displays the first page of the DataAdapter Configuration Wizard.
Microsoft ADO.Net – Step by Step 8
4. Click Next.
The DataAdapter Configuration Wizard displays a page asking you to choose
a connection.
5. Click New Connection.
The Data Link Properties dialog box opens.
Microsoft ADO.Net – Step by Step 9
6. Specify the name of your server, the appropriate logon information,
select the Northwind database, and then click Test Connection.
The DataAdapter Configuration Wizard displays a message indicating that the
connection was successful.
Tip If you’re unsure how to complete step 6, check with your system
administrator.
7. Click OK to close the message, click OK to close the Data Link
Properties dialog box, and then click Next to display the next page of
the DataAdapter Configuration Wizard.
The DataAdapter Configuration Wizard displays a page requesting that you
choose a query type.
Microsoft ADO.Net – Step by Step 10
8. Verify that the Use SQL statements option is selected, and then click
Next.
The DataAdapter Configuration Wizard displays a page requesting the SQL
statement(s) to be used.
9. Click Query Builder.
The DataAdapter Configuration Wizard opens the Query Builder and displays
the Add Table dialog box.
Microsoft ADO.Net – Step by Step 11
10. Select the Employees table, click Add, and then click Close.
The Add Table dialog box closes, and the Employees table is added to the
Query Builder.
11. Add the following fields to the query by selecting the check box next to
the field name in the top pane: EmployeeID, LastName, FirstName,
Title, TitleOfCourtesy, HireDate, Notes.
The Query Builder creates the SQL command.
Microsoft ADO.Net – Step by Step 12
12. Click OK to close the Query Builder, and then click Next.
The DataAdapter Configuration Wizard displays a page showing the results of
adding the Connection and DataAdapter objects to the form.
13. Click Finish to close the DataAdapter Configuration Wizard.
The DataAdapter Configuration Wizard creates and configures a
SQLDataAdapter and a SQLConnection, and then adds them to the
Component Designer.
Creating DataSets
Roadmap We’ll examine the DataSet in Chapter 6.
Microsoft ADO.Net – Step by Step 13
The Connection and DataAdapter objects handle the physical communication with the
data store, but you must also create a memory -resident representation of the actual data
that will be bound to the form. You can bind a control to almost any structure that
contains data, including arrays and collections, but you’ll typically use a DataSet.
As with the Data Provider objects, Visual Studio provides a mechanism for automating
this process. In fact, it can be done with a simple menu choice, although because Visual
Studio exposes the code it creates, you can further modify the basic DataSet
functionality that Visual Studio provides.
Create a DataSet
1. On the Data menu, choose Generate Dataset.
The Generate Dataset dialog box opens.
2. In the New text box, type dsEmployees.
Microsoft ADO.Net – Step by Step 14
3. Click OK.
Visual Studio creates the DataSet class and adds an instance of it to the
bottom pane of the forms designer.
Simple Binding Controls to a DataSet
The .NET Framework supports two kinds of binding: simple and complex. Simple binding
occurs when a single data element, such as a date, is bound to a control. Complex
binding occurs when a control is bound to multiple data values, for example, binding a
list box to a DataSet that contains a list of Order Numbers.
Roadmap We’ll examine simple and complex data binding in more
detail in Chapters 10 and 11.
Almost any property of a control can support simple binding, but only a subset of
Windows and WebForms controls (such as DataGrids and ListBoxes) can support
complex binding.
Bind the Text Property of a Control to a DataSet
1. Click the txtTitle text box in the forms designer to select it.
2. Click the plus sign next to DataBindings to expand the DataBindings
properties.
3. Click the drop-down arrow for the Text property.
Visual Studio displays a list of available data sources.
4. In the list of available data sources for the Text property, click the plus
sign next to the DsEmployees1 data source, and then click the plus
sign next to the Employees DataTable.
Microsoft ADO.Net – Step by Step 15
5. Click the TitleOfCourtesy column to select it.
6. Repeat steps 1 through 5 to bind the Text property of the remaining
controls to the columns of the Employees DataTable, as shown in the
following table.
Control DataTable
Column
lblEmployeeID EmployeeID
txtGivenName FirstName
txtSurname LastName
txtHireDate HireDate
txtPosition Title
txtNotes Notes
Loading Data into the DataSet
We now have all the components in place for manipulating the data from our data
source, but we have one task remaining: We must actually load the data into the
DataSet.
If you’re used to working with data bound forms in environments such as Microsoft
Access, it may come as a surprise that you need to do this manually. Remember,
however, that the ADO.NET architecture has been designed to operate without a
permanent connection to the database. In a disconnected environment, it’s appropriate,
Microsoft ADO.Net – Step by Step 16
and indeed necessary, that the management of the connection be under programmatic
control.
Roadmap The DataAdapter’s Fill method is discussed in Chapter 4.
The DataAdapter’s Fill method is used to load data into the DataSet. The DataAdapter
provides several versions of the Fill method. The simplest version takes the name of a
DataSet as a parameter, and that’s the one we’ll use in the exercise below.
Load Data into the DataSet
Visual Basic .NET
1. Press F7 to view the code for the form.
2. Expand the region labeled “Windows Form Designer generated code”
and navigate to the New Sub.
3. Add the following line of code just before the end of the procedure:
SqlDataAdapter1.Fill(DsEmployees1)
Roadmap The DataAdapter’s Fill method is discussed in Chapter 4.
This line calls the DataAdapter’s Fill method, passing the name of the
DataSet to be filled.
4. Press F5 to build and run the program.
Visual Studio displays the form with the first row displayed.
5. Admire your data bound form for a few minutes (see, that wasn’t so
hard!), and then close the form.
Visual C# .NET
1. Press F7 to view the code for the form.
2. Add the following line of code to the end of the Employees procedure:
sqlDataAdapter1.Fill(dsEmployees1);
Roadmap The DataAdapter’s Fill method is discussed in Chapter 4.
This line calls the DataAdapter’s Fill method, passing the name of the
DataSet to be filled.
3. Press F5 to build and run the program.
Visual Studio displays the form with the first row displayed.
Microsoft ADO.Net – Step by Step 17
4. Admire your data bound form for a few minutes (see, that wasn’t so
hard!), and then close the form.
Chapter 1 Quick Reference
To Do this
Add a Connection and DataAdapter to a
form by using the DataAdapter
Configuration Wizard
Drag a DataAdapter object onto the
form and follow the wizard
instructions
Use Visual Studio to automatically
generate a typed DataSet
Select Create DataSet from the
Data menu, complete the Generate
Dataset dialog box as required, and
then click OK
Simple bind properties of a control to a
data source
In the Properties window
DataBindings section, select the
data source, DataTable, and
column
Load data into a DataSet Use the Fill method of the
DataAdapter. For example:
myDataAdapter.Fill(myDataS
et)
Part II: Data Providers
Chapter 2: Creating Connections
Chapter 3: Data Commands and the DataReader
Chapter 4: The DataAdapter
Chapter 5: Transaction Processing in ADO.NET
Chapter 2: Creating Connections
Overview
In this chapter, you’ll learn how to:
§ Add an instance of a Server Explorer Connection to a form
§ Create a Connection using code
§ Use Connection properties
§ Use an intermediary variable to reference multiple types of Connections
§ Bind Connection properties to form controls
§ Open and close Connections
Microsoft ADO.Net – Step by Step 18
§ Respond to a Connection.StateChange event
In the previous chapter, we took a brief tour through the ADO.NET object model. In this
chapter, we’ll begin to examine the objects in detail, starting with the lowest level object,
the Connection.
Understanding Connections
Connections are responsible for handling the physical communication between a data
store and a .NET application. Because the Connection object is part of a Data Provider,
each Data Provider implements its own version. The two Data Providers supported by
the .NET Framework implement the OleDbConnection in the System.Data.OleDB
namespace and the SqlConnection in the System.Data.SqlClient namespace,
respectively.
Note It’s important to understand that if you’re using a Connection
object implemented by another Data Provider, the details of the
implementation may vary from those described here.
The OleDbConnection, not surprisingly, uses OLE DB and can be used with any OLE DB
provider, including Microsoft SQL Server. The SqlConnection goes directly to SQL
Server without going through the OLE DB provider and so is more efficient.
Microsoft
ActiveX
Data
Objects
(ADO)
Since ADO.NET merges the ADO object model with OLE
DB, it is rarely necessary to go directly to OLE DB for
performance reasons. You might still need to use OLE DB
directly if you need specific functionality that isn’t exposed
by ADO.NET, but again, these situations are likely to be
rarer than when using ADO.
Creating Connections
In the previous chapter, we created a Connection object by using the DataAdapter
Configuration Wizard. The Data Form Wizard, accessed by clicking Add Windows Form
on the Project menu, also creates a Connection automatically. In this chapter, we’ll look
at several other methods for creating Connections in Microsoft Visual Studio .NET.
Design Time Connections
Visual Studio’s Server Explorer provides the ability, at design time, to view and maintain
connections to a number of different system services, including event logs, message
queues, and, most important for our purposes, data connections.
Important If you have not yet installed this book’s practice files, work
through ‘Installing and Using the Practice Files’ in the
Introduction and then return to this chapter.
Add a Design Time Connection to the Server Explorer
1. Open the Connection project from the Visual Studio start page or from
the Project menu.
2. Double-click ConnectionProperties.vb (or ConnectionProperties.cs, if
you’re using C#) in the Solution Explorer to open the form.
Visual Studio displays the form in the form designer.
Microsoft ADO.Net – Step by Step 19
3. Open the Server Explorer.
4. Click the Connect to Database button.
Visual Studio displays the Data Link Properties dialog box.
Tip You can also display the Data Link Properties dialog box by choosing
Connect to Database on the Tools menu.
5. Click the Provider tab and then select Microsoft Jet 4.0 OLE DB
Provider.
Microsoft ADO.Net – Step by Step 20
6. Click Next.
Visual Studio displays the Connection tab of the dialog box.
7. Click the ellipsis button after Select or enter a database name,
navigate to the folder containing the sample files, and then select the
nwind sample database.
8. Click Open.
Visual Studio creates a Connection string for the database.
Microsoft ADO.Net – Step by Step 21
9. Click OK.
Visual Studio adds the Connection to the Server Explorer.
10. Right -click the Connection in the Server Explorer, click Rename from
the context menu, and then rename the Connection Access nwind.
Microsoft ADO.Net – Step by Step 22
Database References
In addition to Database Connections in the Server Explorer, Visual Studio also
supports Database References. Database References are set as part of a Database
Project, which is a special type of project used to store SQL scripts, Data Commands,
and Data Connections.
Database References are created in the Solution Explorer (rather than the Server
Explorer) and, unlike Database Connections defined in the Server Explorer, they are
stored along with the project.
Data connections defined through the Server Explorer become part of your Visual
Studio environment—they will persist as you open and close projects. Database
references, on the other hand, exist as part of a specific project and are only available
as part of the project.
Design time connections aren’t automatically included in any project, but you can drag a
design time connection from the Server Explorer to a form, and Visual Studio will create
a pre-configured Connection object for you.
Microsoft ADO.Net – Step by Step 23
Add an Instance of a Design Time Connection to a Form
§ Select the Access nwind Connection in the Server Explorer and drag it
onto the Connection Properties form.
Visual Studio adds a pre-configured OleDbConnection to the Component
Designer.
Creating a Connection at Run Time
Using Visual Studio to create form-level Connections is by far the easiest method, but if
you need a Connection that isn’t attached to a form, you can create one at run time in
code.
Note You wouldn’t ordinarily create a form-level Connection object in
code because the Visual Studio designers are easier and just as
effective.
The Connection object provides two overloaded versions of its constructor, giving you
the option of passing in the ConnectionString, as shown in Table 2-1.
Table 2-1: Connection Constructors
Method Description
New() Creates a
Connection
with the
ConnectionSt
ring property
set to an
empty string
New(ConnectionString) Creates a
Connection
with the
ConnectionSt
ring property
specified
The ConnectionString is used by the Connection object to connect to the data source.
We’ll explore it in detail in the next section of this chapter.
Create a Connection in Code
Visual Basic .NET
1. Display the code for the ConnectionProperties form by pressing F7.
2. Add the following lines after the Inherits statement:
3. Friend WithEvents SqlDbConnection1 As New _
Microsoft ADO.Net – Step by Step 24
System.Data.SqlClient.SqlConnection()
This code creates the new Connection object using the default values.
Visual C# .NET
1. Display the code for the ConnectionProperties form by pressing F7.
2. Add the following lines after the opening bracket of the class
declaration:
3. internal System.Data.SqlClient.SqlConnection
SqlDbConnection1;
This code creates the new Connection object. (For the time being, ignore the
warning that the variable is never assigned to.)
Using Connection Properties
The significant properties of the OleDbConnection and SqlDbConnection objects are
shown in Table 2-2 and Table 2-3, respectively.
Table 2-2: OleDbConnection Properties
Property Meaning Default
ConnectionString The string
used to
connect to
the data
source when
the Open
method is
executed
Empty
ConnectionTimeout The
maximum
time the
Connection
object will
continue
attempting to
make the
connection
before
throwing an
exception
15
second
s
Database The name of
the database
to be opened
once a
connection is
opened
Empty
DataSource The location
and file
containing
the database
Empty
Provider The name of
the OLE DB
Data
Provider
Empty
ServerVersion The version
of the server,
Empty
Microsoft ADO.Net – Step by Step 25
Table 2-2: OleDbConnection Properties
Property Meaning Default
as provided
by the OLE
DB Data
Provider
State A
ConnectionS
tate value
indicating the
current state
of the
Connection
Closed
Table 2-3: SqlConnection Properties
ConnectionString The string
used to
connect to
the data
source when
the Open
method is
executed
Empty
ConnectionTimeout The
maximum
time the
Connection
object will
continue
attempting to
make the
connection
before
throwing an
exception
15
secon
ds
Database The name of
the database
to be opened
once a
connection is
opened
Empty
DataSource The location
and file
containing
the database
Empty
PacketSize The size of
network
packets used
to
communicate
with SQL
Server
8192
bytes
ServerVersion The version
of SQL
Server being
Empty
Microsoft ADO.Net – Step by Step 26
used
State A
ConnectionS
tate value
indicating the
current state
of the
Connection
Closed
WorkStationID A string
identifying
the database
client, or, if
that is not
specified, the
name of the
workstation
Empty
As you can see, the two versions of the Connection object expose a slightly different set
of properties: The SqlDbConnection doesn’t have a Provider property, and the
OleDbConnection doesn’t expose PacketSize or WorkStationID. To make matters worse,
not all OLE DB Data Providers support all of the OleDbConnection properties, and if
you’re working with a custom Data Provider, all bets are off.
What this means in real terms is that we still can’t quite write code that is completely data
source-independent unless we’re prepared to give up the optimization of specific Data
Providers. However, as we’ll see, the problem isn’t as bad as it might at first seem, since
the .NET Framework provides a number of ways to accommodate run-time configuration.
Rather more tedious to deal with are the different names of the objects, but using an
intermediate variable can minimize the impact, as we’ll see later in this chapter.
The ConnectionString Property
The ConnectionString is the most important property of any Connection object. In fact,
the remaining properties are read-only and set by the Connection based on the value
provided for the ConnectionString.
All ConnectionStrings have the same format. They consist of a set of keywords and
values, with the pairs separated by semicolons, and the whole thing is delimited by either
single or double quotes:
“keyword = value;keyword = value;keyword = value”
Keyword names are case-insensitive, but the values may not be, depending on the data
source. The use of single or double quotes follows the normal rules for strings. For
example, if the database name is Becca’s Data, then the ConnectionString must be
delimited by double quotes: “Database=Becca’s Data”. ‘Database = Becca’s Data’ would
cause an error.
If you use the same keyword multiple times, the last instance will be used. For example,
given the ConnectionString “database=Becca’s Data; database=Northwind”, the initial
database will be set to Northwind. The use of multiple instances is perfectly legal; no
syntax error will be generated.
ADO Unlike ADO, the ConnectionString returned by the .NET
Framework is the same as the user-set string, with the exception
that the user name and password are returned only if Persist
Security Info is set to true (it is false by default).
Microsoft ADO.Net – Step by Step 27
Unfortunately, the format of the ConnectionString is the easy part. It’s determining the
contents that can be difficult because it will always be unique to the Data Provider. You
can always cheat (a little) by creating a design time connection using the Data Link
Properties dialog box, and then copying the values.
The ConnectionString can only be set when the Connection is closed. When it is set, the
Connection object will check the syntax of the string and then set the remaining
properties (which, you’ll remember, are read-only). The ConnectionString is fully
validated when the Connection is opened. If the Connection detects an invalid or
unsupported property, it will generate an exception (either an OleDbException or a
SqlDbException, depending on the object being used).
Setting a ConnectionString Property
In this exercise, we’ll set the ConnectionString for the SqlDbConnection that we created
in the previous exercise. The ConnectionString that your system requires will be different
from the one in my installation. (I have SQL Server installed locally, and my machine
name is BUNNY, for example.)
Fortunately, the DataAdapter Configuration Wizard in Chapter 1 created a design time
Connection for you. If you select that connection in the Server Explorer, you can see the
values in the Properties window. In fact, you can copy and paste the entire
ConnectionString from the Properties window if you want. (If you didn’t do the exercise in
Chapter 1, you can create a design time connection by using the technique described in
the Add a Design Time Connection exercise in this chapter.)
Set a ConnectionString Property
Visual Basic .NET
1. Expand the region labeled “Windows Form Designer generated code”
and navigate to the New Sub.
2. Add the following line to the procedure after the InitializeComponent
call, filling in the ConnectionString values required for your
implementation:
3. Me.SqlDbConnection1.ConnectionString = “<<add your
ConnectionString here>>”
Visual C# .NET
1. Scroll down to the ConnectionProperties Sub.
2. Add the following lines to the procedure after the InitializeComponent
call, filling in the ConnectionString values required for your
implementation:
3. this.SqlDbConnection1 = new
4. System.Data.SqlClient.SqlConnection();
5. this.SqlDbConnection1.ConnectionString =
“<<add your ConnectionString here>>”;
Using Other Connection Properties
With the Connection objects in place, we can now add the code to display the
Connection properties on the sample form. But first, we need to use a little bit of objectoriented
sleight of hand in order to accommodate the two different types of objects.
One method would be to write conditional code. In Visual Basic, this would look like:
If Me.rbOleChecked then
Me.txtConnectionString.Text = Me.OleDbConnection1.ConnectionString
Me.txtDatabase.Text = Me.OleDbConnection1.Database.String
Microsoft ADO.Net – Step by Step 28
Me.txtTimeOut.Text = Me.OleDbConnection1.ConnectionTimeout
Else
Me.txtConnectionString.Text = Me.SqlDbConnection1.ConnectionString
Me.txtDatabase.Text = Me.SqlDbConnection1.Database.String
Me.txtTimeOut.Text = Me.SqlDbConnection1.ConnectionTimeout
End If
Another option would be to use compiler constants to conditionally compile code. Again,
in Visual Basic:
#Const SqlVersion
#If SqlVersion Then
Me.txtConnectionString.Text = Me.OleDbConnection1.ConnectionString
Me.txtDatabase.Text = Me.OleDbConnection1.Database.String
Me.txtTimeOut.Text = Me.OleDbConnection1.ConnectionTimeout
#Else
Me.txtConnectionString.Text = Me.SqlDbConnection1.ConnectionString
Me.txtDatabase.Text = Me.SqlDbConnection1.Database.String
Me.txtTimeOut.Text = Me.SqlDbConnection1.ConnectionTimeout
#End If
But either option requires a lot of typing, in a lot of places, and can become a
maintenance nightmare. If you only need to access the ConnectionString, Database, and
TimeOut properties (and these are the most common), there’s an easier way.
Connection objects, no matter the Data Provider to which they belong, must implement
the IDbConnection interface, so by declaring a variable as an IDbConnection, we can
use it as an intermediary to access a few of the shared properties.
Create an Intermediary Variable
Visual Basic .NET
1. Declare the variable by adding the following line of code at the
beginning of the class module, under the Connection declarations
we added previously:
Dim myConnection As System.Data.IDbConnection
2. Add procedures to set the value of the myConnection variable when
the user changes their choice in the Connection Type group box. Do
that by using the CheckedChanged event of the two Radio Buttons.
Select the rbOleDB control in the Class Name box of the editor and the
CheckedChanged event in the Method Name box.
Visual Studio adds the CheckedChanged event handler template to the class.
3. Add the following assignment statement to the procedure:
myConnection = Me.OleDbConnection1
4. Repeat steps 2 and 3 for the rbSql radio button, substituting the
SqlDbConnection object:
5. myConnection = Me.SqlDbConnection1
Microsoft ADO.Net – Step by Step 29
Visual C# .NET
1. Declare the variable by adding the following line of code at the
beginning of the class module, under the Connection declaration we
added previously:
private System.Data.IDbConnection myConnection;
2. Add procedures to set the value of the myConnection variable when
the user changes their choice in the Connection Type group box. Do
that by using the CheckedChanged event of the two radio buttons.
Add the following event handlers to the code window below the Dispose
procedure:
private void rbOleDB_CheckChanged(object sender, EventArgs e)
{
myConnection = this.oleDbConnection1;
}
private void rbSQL_CheckChanged (object sender, EventArgs e)
{
myConnection = this.SqlDbConnection1;
}
3. Connect the event handlers to the actual radio button events. Add the
following code to the end of the ConnectionProperties sub:
4. this.rbOleDB.CheckedChanged += new
5. EventHandler(this.rbOleDB_CheckChanged);
6. this.rbSQL.CheckedChanged += new
EventHandler(this.rbSQL_CheckChanged);
Binding Connection Properties to Form Controls
Now that we have the intermediary variable in place, we can add the code to display the
Connection (or rather, the IDbConnection properties) in the control:
Bind Connection Properties to Form Controls
Visual Basic .NET
1. Add the following procedure to the class module:
2. Private Sub RefreshValues()
3. Me.txtConnectionString.Text =
Me.myConnection.ConnectionString
4. Me.txtDatabase.Text = Me.myConnection.Database
5. Me.txtTimeOut.Text = Me.myConnection.ConnectionTimeout
6. End Sub
7. Add a call to the RefreshValues procedure to the end of each of the
CheckedChanged event handlers.
8. Save and run the program by pressing F5. Choose each of the
Connections in turn to confirm that their properties are displayed in
the text boxes.
Microsoft ADO.Net – Step by Step 30
9. Close the application.
Visual C# .NET
1. Add the following procedure to the class module below the
CheckChanged event handlers:
2. private void RefreshValues()
3. {
4. this.txtConectionString.Text =
this.myConnection.ConnectionString;
5. this.txtDatabase.Text = this.myConnection.Database;
6. this.txtTimeOut.Text =
this.myConnection.ConnectionTimeout.ToString();
}
7. Add a call to the RefreshValues procedure to the end of each of the
CheckedChanged event handlers.
8. Save and run the program by pressing F5. Choose each of the
Connections in turn to confirm that their properties are displayed in
the text boxes.
9. Close the application.
Using Dynamic Properties
Another way to handle ConnectionString configurations is to use .NET Framework
dynamic properties. When an application is deployed, dynamic properties are stored in
an external configuration file, allowing them to be easily changed.
Microsoft ADO.Net – Step by Step 31
Connection Methods
Both the SqlConnection and OleDbConnection objects expose the same set of methods,
as shown in Table 2-4.
Table 2-4: Connection Methods
Method Description
BeginTransaction Begins a
database
transaction
ChangeDatabase Changes
the current
database on
an open
Connection
Close Closes the
connection
to the data
source
CreateCommand Creates and
returns a
Data
Command
associated
with the
Connection
Open Establishes
a
connection
to the data
source
Roadmap We’ll examine transaction processing in Chapter 5.
The Connection methods that you will use most often are Open and Close, which do
exactly what you would expect them to—they open and close the connection. The
BeginTransaction method begins transaction processing for a Connection, as we’ll see in
Chapter 5.
Roadmap We’ll examine Data Commands in Chapter 3.
The CreateCommand method can be used to create an ADO.NET Data Command
object. We’ll examine this method in Chapter 3.
Opening and Closing Connections
The Open and Close methods are invoked automatically by the two objects that use a
Connection, the DataAdapter and Data Command. You can also invoke them explicitly in
code, if required.
Roadmap We’ll examine the DataAdapter in Chapter 4.
If the Open method is invoked on a Connection by the DataAdapter or a Data Command,
these objects will leave the Connection in the state in which they found it. If the
Connection was open when a DataAdapter.Fill method is invoked, for example, it will
remain open when the Fill operation is complete. On the other hand, if the Connection is
closed when the Fill method is invoked, the DataAdapter will close it upon completion.
If you invoke the Open method explicitly, the data source connection will remain open
until it is explicitly closed. It will not be closed automatically, even if the Connection
object goes out of scope.
Microsoft ADO.Net – Step by Step 32
Important You must always explicitly invoke a Close method when you
have finished using a Connection object, and for scalability
and performance purposes, you should call Close as soon as
possible after you’ve completed the operations on the
Connection.
Connection Pooling
Although it’s easiest to think of Open and Close methods as discrete operations, in fact
the .NET Framework pools connections to improve performance. The specifics of the
connection pooling are determined by the Data Provider.
The OLE DB Data Provider automatically uses OLE DB connection pooling. You have
no programmatic control over the process. The SQL Server Data Provider uses implicit
pooling by default, based on an exact match in the connection string, but the OLE DB
Data Provider supports some additional keywords in the ConnectionString to control
pooling. See online help for more details.
Open and Close a Connection
Visual Basic .NET
1. Select the btnTest control in the Class Name combo box of the editor
and the Click event in the Method Name combo box.
Visual Studio adds the click event handler template.
2. Add the following lines to the procedure to open the connection,
display its status in a message box, and then close the connection:
3. myConnection.Open()
4. MessageBox.Show(Me.myConnection.State.ToString)
myConnection.Close()
5. Press F5 to save and run the application.
6. Change the Connection Type, and then click the Test button.
The application displays the Connection state.
7. Close the application.
Visual C# .NET
1. Add the following procedure to the code window to open the
connection, display its status in a message box, and then close the
connection:
Microsoft ADO.Net – Step by Step 33
2. private void btnTest_Click(object sender, System.EventArgs e)
3. {
4. this.myConnection.Open();
5. MessageBox.Show(this.myConnection.State.ToString());
6. this.myConnection.Close();
}
7. Add the following code, which connects the event handler to the
btnTest.Click event, to the end of the ConnectionProperties sub:
this.btnTest.Click += new EventHandler(this.btnTest_Click);
8. Press F5 to save and run the application.
9. Change the Connection Type and then click the Test button.
The application displays the Connection state.
10. Close the application.
Handling Connection Events
Both the OLE DB and the SQL Server Connection objects provide two events:
StateChange and InfoMessage.
StateChange Events
Not surprisingly, the StateChange event fires whenever the state of the Connection
object changes. The event passes a StateChangeEventArgs to its handler, which, in
turn, has two properties: OriginalState and CurrentState. The possible values for
OriginalState and CurrentState are shown in Table 2-5.
Table 2-5: Connection States
State Meaning
Broken The
Connecti
on is
open, but
not
functiona
l. It may
be
closed
and reopened
Closed The
Connecti
Microsoft ADO.Net – Step by Step 34
Table 2-5: Connection States
State Meaning
on is
closed
Connecting The
Connecti
on is in
the
process
of
connecti
ng, but
has not
yet been
opened
Executing The
Connecti
on is
executin
g a
comman
d
Fetching The
Connecti
on is
retrieving
data
Open The
Connecti
on is
open
Respond to a StateChange Event
Visual Basic .NET
1. Select OleDbConnection1 in the Class Name combobox of the editor
and the StateChange event in the Method Name combobox.
Visual Studio adds the event declaration to the class.
2. Add the following code to display the previous and current Connection
states:
3. Dim theMessage As String
4. theMessage = “The Connection is changing from ” & _
5. e.OriginalState.ToString & _
6. ” to ” & e.CurrentState.ToString
MessageBox.Show(theMessage)
7. Repeat steps 1 and 2 for SqlDbConnection1.
8. Save and run the program.
9. Click the Test button.
The application displays MessageBoxes as the Connection is opened and
closed.
Microsoft ADO.Net – Step by Step 35
Visual C# .NET
1. Add the following procedure code to display the previous and current
Connection states for each of the two Connection objects:
2. private void oleDbConnection1_StateChange (object sender,
3. StateChangeEventArgs e)
4. {
5. string theMessage;
6. theMessage = “The Connection State is changing from ” +
7. e.OriginalState.ToString() +
8. ” to ” + e.CurrentState.ToString();
9. MessageBox.Show(theMessage);
10. }
11. private void SqlDbConnection1_StateChange (object sender,
12. StateChangeEventArgs e)
13. {
14. string theMessage;
15. theMessage = “The Connection State is changing from ” +
16. e.OriginalState.ToString() +
17. ” to ” + e.CurrentState.ToString();
18. MessageBox.Show(theMessage);
}
19. Add the code to connect the event handlers to the
ConnectionProperties sub:
20. this.oleDbConnection1.StateChange += new
21.
System.Data.StateChangeEventHandler(this.oleDbConnection1
_StateChange);
22. this.SqlDbConnection1.StateChange += new
System.Data.StateChangeEventHandler(this.SqlDbConnection1_StateCha
nge);
23. Save and run the program.
24. Change the Connection Type and then click the Test button.
The application displays two MessageBoxes as the Connection is opened and
closed.
InfoMessage Events
The InfoMessage event is triggered when the data source returns warnings. The
information passed to the event handler depends on the Data Provider.
Chapter 2 Quick Reference
To Do this
Create a Server Explorer Connection Click the Connect to Database
button in the Server Explorer,
or choose Connect to
Database on the Tools menu
Add an instance of a Server Explorer
Connection to a form
Drag the Connection from the
Server Explorer to the form
Create a Connection using code Use the New constructor. For
example:
Dim myConn as New
OleDbConnection()
Use an intermediary variable to reference Declare the variable as an
Microsoft ADO.Net – Step by Step 36
To Do this
multiple types of IDbConnection. For example:
Dim myConn As
System.Data.IDbConnect
ion Connections
Open a Connection Use the Open method. For
example: myConn.Open
Close a Connection Use the Close method. For
example: myConn.Close
Chapter 3: Data Commands and the DataReader
Overview
In this chapter, you’ll learn how to:
§ Add a Data Command to a form
§ Create a Data Command at run time
§ Set Command properties at run time
§ Configure the Parameters collection in Microsoft Visual Studio .NET
§ Add and configure Parameters at run time
§ Set Parameter values
§ Execute a Command
§ Create a DataReader to return Command results
The Connection object that we examined in Chapter 2 represents the physical
connection to a data source; the conduit for exchanging information between an
application and the data source. The mechanism for this exchange is the Data
Command.
Understanding Data Commands and DataReaders
Essentially, an ADO.NET data command is simply a SQL command or a reference to a
stored procedure that is executed against a Connection object. In addition to retrieving
and updating data, the Data Command can be used to execute certain types of queries
on the data source that do not return a result set and to execute data definition (DDL)
commands that change the structure of the data source.
When a Data Command does return a result set, a DataReader is used to retrieve the
data. The DataReader object returns a read-only, forward-only stream of data from a
Data Command. Because only a single row of data is in memory at a time (unlike a
DataSet, which, as we’ll see in Chapter 6, stores the entire result set), a DataReader
requires very little overhead. The Read method of the DataReader is used to retrieve a
row, and the GetType methods (where Type is a system data type, such as GetString to
return a data string) return each column within the current row.
As part of the Data Provider, Data Commands and DataReaders are specific to a data
source. Each of the .NET Framework Data Providers implements a Command and a
DataReader object: OleDbCommand and OleDbDataReader in the System.Data.OleDb
namespace; and SqlCommand and SqlDataReader in the System.Data.SqlClient
namespace.
Creating Data Commands
Like most of the objects that can exist at the form level, Data Commands can either be
created and configured at design time in Visual Studio or at run time in code.
DataReaders can be created only at run time, using the ExecuteReader method of the
Data Command, as we’ll see later in this chapter.
Microsoft ADO.Net – Step by Step 37
Creating Data Commands in Visual Studio
A Command object is created in Visual Studio just like any other control—simply drag
the control off of the Data tab of the Toolbox and drop it on the form. Since the Data
Command has no user interface, like most of the objects we’ve covered, Visual Studio
will add the control to the Component Designer.
Add a Data Command to a Form at Design Time
In this exercise we’ll create and name a Data Command. We’ll configure its properties in
later lessons.
1. Open the DataCommands project from the Visual Studio start page or
from the Project menu.
2. Double-click DataCommands.vb (or DataCommands.cs, if you’re using
C#) in the Solution Explorer to open the form.
Visual Studio displays the form in the form designer.
3. Drag a SqlCommand control from the Data tab of the Toolbox to the
form.
Visual Studio adds the command to the form.
4. In the Properties window, change the name of the Command to
cmdGetEmployees.
Creating Data Commands at Run Time
Roadmap We’ll discuss the version of the Command constructor that
supports transactions in Chapter 5.
Microsoft ADO.Net – Step by Step 38
The Data Command supports four versions of its constructor, as shown in Table 3-1. The
New() version sets all the properties to their default values, while the other versions allow
you to set properties of the Command object during creation. Whichever version you
choose, of course, you can set or change property values after the Command is created.
Table 3-1: Command Constructors
Property Description
New() Creates a
new, default
instance of
the Data
Command
New(Command) Creates a
new Data
Command
with the
CommandT
ext set to
the string
specified in
Command
New(Command, Connection) Creates a
new Data
Command
with the
CommandT
ext set to
the string
specified in
Command
and the
Connection
property set
to the
SqlConnecti
on specified
in
Connection
New(Command, Connection, Transaction) Creates a
new Data
Command
with the
CommandT
ext set to
the string
specified in
Command,
the
Connection
property set
to the
Connection
specified in
Connection,
and the
Transaction
property set
to the
Microsoft ADO.Net – Step by Step 39
Table 3-1: Command Constructors
Property Description
Transaction
specified in
Transaction
Create a Command Object at Run Time
Once again, we will create the Command object in this exercise and set its properties
later in the chapter.
Visual Basic .NET
1. Press F7 to display the code editor window.
2. Add the following line after the Inherits statement:
Friend WithEvents cmdGetCustomers As
System.Data.SqlClient.SqlCommand
This line declares the command variable. (One variable, cmdGetOrders, has
already been declared in the exercise project.)
3. Expand the region labeled ‘Windows Form Designer generated code’.
4. Add the following line to end of the New Sub:
Me.cmdGetCustomers = New System.Data.SqlClient.SqlCommand()
This command instantiates the Command object using the default constructor.
(cmdGetOrders has already been instantiated.)
Visual C# .NET
1. Press F7 to display the code editor window.
2. Add the following line after the opening bracket of the class
declaration:
internal System.Data.SqlClient.SqlCommand cmdGetCustomers;
This line declares the command variable.
3. Scroll down to the frmDataCmds Sub.
4. Add the following line to the procedure after the InitializeComponent
call:
this.cmdGetCustomers = new System.Data.SqlClient.SqlCommand();
This command instantiates the Command object using the default constructor.
(cmdGetOrders has already been declared and instantiated.)
Command Properties
The properties exposed by the Data Command object are shown in Table 3-2. These
properties will only be checked for syntax errors when they are set. Final validation
occurs only when the Command is executed by a data source.
Table 3-2: Data Command Properties
Property Description
CommandText The SQL
statement or
stored
procedure to
execute
CommandTimeout The time (in
seconds) to
Microsoft ADO.Net – Step by Step 40
Table 3-2: Data Command Properties
Property Description
wait for a
response
from the
data source
CommandType Indicates
how the
CommandT
ext property
is to be
interpreted,
defaults to
Text
Connection The
Connection
object on
which the
Data
Command is
to be
executed
Parameters The
Parameters
Collection
Transaction The
Transaction
in which the
command
will execute
UpdatedRowSource Determines
how results
are applied
to a
DataRow
when the
Command is
used by the
Update
method of a
DataAdapter
The CommandText property, which is a string, contains either the actual text of the
command to be executed against the connection or the name of a stored procedure in
the data source.
The CommandTimeout property determines the time that the Command will wait for a
response from the server before it generates an error. Note that this is the wait time
before the Command begins receiving results, not the time it takes the command to
execute. The data source might take ten or fifteen minutes to return all the rows of a
huge table, but provided the first row is received within the specified CommandTimeout
period, no error will be generated.
The CommandType property tells the command object how to interpret the contents of
the CommandText property. The possible values are shown in Table 3-3. TableDirect is
only supported by the OleDbCommand, not the SqlCommand, and is equivalent to
SELECT * FROM <tablename>, where the <tablename> is specified in the
CommandText property.
Microsoft ADO.Net – Step by Step 41
Table 3-3: CommandType Values
Property Description
StoredProcedure The name of
a stored
procedure
TableDirect A table
name
Text A SQL text
command
The Connection property contains a reference to the Connection object on which the
Command will be executed. The Connection object must belong to the same namespace
as the Command object, that is, a SqlCommand must contain a reference to a
SqlConnection and an OleDbCommand must contain a reference to an
OleDbConnection.
The Command object’s Parameters property contains a collection of Parameters for the
SQL command or stored procedure specified in CommandText. We’ll examine this
collection in detail later in this exercise.
Roadmap We’ll examine the Transaction property in Chapter 5.
The Transaction property contains a reference to a Transaction object and serves to
enroll the Command in that transaction. We’ll examine this property in detail in Chapter
5.
Roadmap We’ll examine the DataAdapter in Chapter 4 and the
DataRow in Chapter 7.
The UpdatedRowSource property determines how results are applied to a DataRow
when the Command is executed by the Update method of the DataAdapter. The possible
values for the UpdatedRowSource property are shown in Table 3-4.
Table 3-4: UpdatedRowSource Values
Property Description
Both Both the
output
parameters
and the first
row returned
by the
Command
will be
mapped to
the changed
row
FirstReturnedRecord The first row
returned by
the
Command
will be
mapped to
the changed
row
None Any
returned
parameters
or rows are
Microsoft ADO.Net – Step by Step 42
Table 3-4: UpdatedRowSource Values
Property Description
discarded
OutputParameters Output
parameters
of the
Command
will be
mapped to
the changed
row
If the Data Command is generated automatically by Visual Studio, the default value of
the UpdatedRowSource property is None. If the Command is generated at run time or
created by the user at design time, the default value is Both.
Setting Command Properties at Design Time
As might be expected, the properties of a Command control created in Visual Studio are
set using the Properties window. In specifying the CommandText property, you can
either type the value directly or use the Query Builder to generate the required SQL
statement. You must specify the Connection property before you can set the
CommandText property.
Set Command Properties in Visual Studio
1. In the form designer, select cmdGetEmployees in the Component
Designer.
2. In the Properties window, select the Connection property, expand the
Existing node in the drop-down list, and then click cnNorthwind.
3. Select the CommandText property, and then click the ellipsis button.
Visual Studio displays the Query Builder’s Add Table dialog box.
Microsoft ADO.Net – Step by Step 43
4. Click the Views tab in the Add Table dialog box, and then click
EmployeeList.
5. Click Add, and then click Close.
Visual Studio adds EmployeeList to the Query Builder.
6. Select the check box next to (All Columns) in the Diagram pane of the
Query Builder to select all columns.
Visual Studio updates the SQL text in the SQL pane.
Microsoft ADO.Net – Step by Step 44
7. Click OK.
Visual Studio generates the SQL command and sets the CommandText
property in the Properties window.
Setting Command Properties at Run Time
The majority of the properties of the Command object are set by using simple
assignment statements. The exception is the Parameters collection, which because it is
a collection, uses the Add method.
Set Command Properties at Run Time
Visual Basic .NET
1. In the Code window, add the following lines below the variable
instantiations of the New Sub:
2. Me.cmdGetCustomers.CommandText = “SELECT * FROM
CustomerList”
3. Me.cmdGetCustomers.CommandType = CommandType.Text
Me.cmdGetCustomers.Connection = Me.cnNorthwind
4. The first line specifies the command to be executed on the
Connection—it simply returns all rows from the CustomerList view.
The second line specifies that the CommandText property is to be
treated as a SQL command, and the third line sets the Connection
on which the command is to be executed.
Visual C# .NET
1. In the Code window, add the following lines below the variable
instantiation:
2. this.cmdGetCustomers.CommandText = “SELECT * FROM
CustomerList”;
3. this.cmdGetCustomers.CommandType = CommandType.Text;
this.cmdGetCustomers.Connection = this.cnNorthwind;
4. The first line specifies the command to be executed on the
Connection—it simply returns all rows from the CustomerList view.
The second line specifies that the CommandText property is to be
treated as a SQL command, and the third line sets the Connection
on which the command is to be executed.
Microsoft ADO.Net – Step by Step 45
Using the Parameters Collection
There are three steps to using parameters in queries and stored procedures—you must
specify the parameters in the query or stored procedure, you must specify the
parameters in the Parameters collection, and finally you must set the parameter values.
If you’re using a stored procedure, the syntax for specifying parameters will be
determined by the data source when the stored procedure is created. If you are using
parameters in a SQL command specified in the CommandText property of the Command
object, the syntax requirement is determined by the .NET Data Provider.
Unfortunately, the two Data Providers supplied in the .NET Framework use different
syntax. OleDbCommand objects use a question mark (?) as a placeholder for a
parameter:
SELECT * FROM Customers WHERE CustomerID = ?
SqlDbCommand objects use named parameters, prefixed with the @ character:
SELECT * FROM Customers WHERE CustomerID = @custID
Having created the stored procedure or SQL command, you must then add each of the
parameters to the Parameters collection of the Command object. Again, if you are using
Visual Studio, it will configure the collection for you, but if you are creating or reconfiguring
the Command object at run time, you must use the Add method of the
Parameters collection to create a Parameter object for each parameter in the query or
stored procedure.
The Parameters collection provides a number of methods for configuring the collection at
run time. The most useful of these are shown in Table 3-5. Note that because the
OleDbCommand doesn’t support named parameters, the parameters will be substituted
in the order they are found in the Parameters collection. Because of this, it is important
that you configure the items in the collection correctly. (This can be a very difficult bug to
track, and yes, that is the voice of experience.)
Table 3-5: Parameters Collection Methods
Property Description
Add(Value) Adds a new
parameter
at the end of
the
collection
with the
specified
Value
Add(Parameter) Adds a
Parameter
to the end of
the
collection
Add(Name, Value) Adds a
Parameter
with the
name
specified in
the Name
string and
the specified
Value to the
end of the
collection
Microsoft ADO.Net – Step by Step 46
Table 3-5: Parameters Collection Methods
Property Description
Add(Name, Type) Adds a
Parameter
of the
specified
Type with
the name
specified in
the Name
string to the
end of the
collection
Add(Name, Type, Size) Adds a
Parameter
of the
specified
Type and
Size with
the name
specified in
the Name
string to the
end of the
collection
Add(Name, Type, Size, SourceColumn) Adds a
Parameter
of the
specified
Type and
Size with
the name
specified in
the Name
string to the
end of the
collection,
and maps it
to the
DataTable
column
specified in
the
SourceColu
mn string
Clear Removes all
Parameters
from the
collection
Insert(Index, Value) Inserts a
new
Parameter
with the
Value
specified at
the position
specified by
Microsoft ADO.Net – Step by Step 47
Table 3-5: Parameters Collection Methods
Property Description
the zerobased
Index
into the
collection
Remove(Value) Removes
the
parameter
with the
specified
Value from
the
collection
RemoveAt(Index) Removes
the
parameter
at the
position
specified by
the zerobased
Index
into the
collection
RemoveAt(Name) Removes
the
parameter
with the
name
specified by
the Name
string from
the
collection
Configure the Parameters Collection in Visual Studio
1. In the form designer, drag a SqlCommand object onto the form.
Visual Studio adds a new command to the Component Designer.
2. In the Properties window, change the new Command’s name to
cmdOrderCount.
3. In the Properties window, expand the Existing node in the Connection
property’s drop-down list, and then click cnNorthwind.
4. Select the CommandText property, and then click the ellipsis button.
Visual Studio opens the Query Builder and the Add Table dialog box.
5. Click the Views tab in the Add Table dialog box, and then click
OrderTotals.
6. Click Add, and then click Close.
Visual Studio adds OrderTotals to the Query Builder.
7. Change the SQL statement in the SQL pane to read as follows:
8. SELECT Count(*) AS OrderCount
9. FROM OrderTotals
WHERE (EmployeeID = @empID) AND (CustomerID = @custID)
Microsoft ADO.Net – Step by Step 48
10. Verify that the Regenerate parameters collection for this command
check box is selected, and then click OK.
Visual Studio displays a warning message.
11. Click Yes.
Visual Studio generates the CommandText property and the Parameters
collection.
12. In the Properties window, select the Parameters property, and then
click the ellipsis button.
Visual Studio displays the SqlParameter Collection Editor. Because the Query
Builder generated the parameters for us, there is nothing to do here.
However, you could add, change, or remove parameters as necessary.
13. Click OK.
Microsoft ADO.Net – Step by Step 49
Add and Configure Parameters at Run Time
Visual Basic .NET
1. Press F7 to display the code editor.
2. Add the following lines to the end of the New Sub:
3. Me.cmdGetOrders.Parameters.Add(“@custID”,
SqlDbType.VarChar)
Me.cmdGetOrders.Parameters.Add(“@empID”, SqlDbType.Int)
Visual C# .NET
1. Press F7 to display the code editor.
2. Add the following lines after the property instantiations:
3. this.cmdGetOrders.Parameters.Add(“@custID”,
SqlDbType.VarChar);
4. this.cmdGetOrders.Parameters.Add(“@empID”, SqlDbType.Int);
Set Parameter Values
After you have established the Parameters collection and before you execute the
command, you must set the values for each of the Parameters. This can be done only at
run time with a simple assignment statement.
Visual Basic .NET
1. In the Code Editor window, select btnOrderCount in the Object Name
list, and Click in the Method Name box.
Visual Studio adds the click event handler for the button.
2. Add the following code to the event handler:
3. Dim cnt As Integer
4. Dim strMsg As String
5.
6. Me.cmdOrderCount.Parameters(“@empID”).Value = _
7. Me.lbEmployees.SelectedItem(“EmployeeID”)
8. Me.cmdOrderCount.Parameters(“@custID”).Value = _
Me.lbClients.SelectedItem(“CustomerID”)
The code first declares a couple of variables that will be used in the next
exercise, and then sets the value of each of the parameters in the
cmdOrderCount.Parameters collection to the value of the Employees and
Clients list boxes, respectively.
Visual C# .NET
1. Add the following event handler to the code below the existing
btnGetOrders_Click procedure:
2. private void btnOrderCount_Click(object sender,
3. System.EventArgs e)
4. {
5. int cnt;
6. string strMsg;
7. System.Data.DataRowView drv;
8.
9. drv = (System.Data.DataRowView)
10. this.lbEmployees.SelectedItem;
11. this.cmdOrderCount.Parameters[“@empID”].Value =
12. drv[“EmployeeID”];
13. drv = (System.Data.DataRowView)
Microsoft ADO.Net – Step by Step 50
14. this.lbClients.SelectedItem;
15. this.cmdOrderCount.Parameters[“@custID”].Value =
16. drv[“CustomerID”];
17. }
The code first declares a couple of variables that will be used in the next
exercise, and then sets the value of each of the parameters in the
cmdOrderCount.Parameters collection to the value of the Employees and
Clients list boxes, respectively.
18. Connect the event handler to the click event by adding the following
line to the end of the frmDataCmds sub:
19. this.btnOrderCount.Click += new
EventHandler(this.btnOrderCount_Click);
Command Methods
The methods exposed by the Command object are shown in Table 3-6. Of these, the
most important are the four Execute methods: ExecuteNonQuery, ExecuteReader,
ExecuteScalar, and ExecuteXmlReader.
ExecuteNonQuery is used when the SQL command or stored procedure to be executed
returns no rows. An Update query, for example, would use the ExecuteNonQuery
method.
ExecuteScalar is used for SQL commands and stored procedures that return a single
value. The most common example of this sort of command is one that returns a count of
rows:
SELECT Count(*) from OrderTotals
Table 3-6: Command Methods
Method Description
Cancel Cancels
execution of a
Data
Command
CreateParameter Creates a new
parameter
ExecuteNonQuery Executes a
command
against the
Connection
and returns the
number of
rows affected
ExecuteReader Sends the
CommandText
to the
Connection
and builds a
DataReader
ExecuteScalar Executes the
query and
returns the first
column of the
first row of the
result set
ExecuteXmlReader Sends the
Microsoft ADO.Net – Step by Step 51
Table 3-6: Command Methods
Method Description
CommandText
to the
Connection
and builds an
XMLReader
Prepare Creates a
prepared
(compiled)
version of the
command on
the data
source
ResetCommandTimeout Resets the
CommandTim
eout property
to its default
value
The ExecuteReader method is used for SQL Commands and stored procedures that
return multiple rows. The method creates a DataReader object. We’ll discuss
DataReaders in detail in the next section.
The ExecuteReader method may be executed with no parameters, or you can supply a
CommandBehavior value that allows you to control precisely how the Command will
perform. The values for CommandBehavior are shown in Table 3-7.
Table 3-7: CommandBehavior Values
Property Description
CloseConnection Closes the
associated
Connection
when the
DataReader
is closed
KeyInfo Indicates
that the
query
returns
column and
primary key
information
SchemaOnly Returns the
database
schema
only, without
affecting
any rows in
the data
source
SequentialAccess The results
of each
column of
each row
will be
Microsoft ADO.Net – Step by Step 52
Table 3-7: CommandBehavior Values
Property Description
accessed
sequentially
SingleResult Returns only
a single
value
SingleRow Returns only
a single row
Most of the CommandBehavior values are self-explanatory. Both KeyInfo and
SchemaOnly are useful if you cannot determine the structure of the command’s result
set prior to run time.
The SequentialAccess behavior allows the application to read large binary column
values using the GetBytes or GetChars methods of the DataReader, while the
SingleResult and SingleRow behaviors can be optimized by the Data Provider.
Execute a Command
Visual Basic .NET
§ Add the following code to the btnOrderCount_Click event handler that
we began in the last exercise:
§ Me.cnNorthwind.Open()
§ cnt = Me.cmdOrderCount.ExecuteScalar
§ Me.cnNorthwind.Close()
§
§ strMsg = “There are ” & cnt.ToString & ” Orders for this ”
§ strMsg &= “Employee/Customer combination.”
§ MessageBox.Show(strMsg)
The first three lines of code open the cnNorthwind Connection, call the ExecuteScalar
method to return a single value from the cmdOrderCount Command, and then close
the Connection. The last three lines simply display the results in a message box.
Visual C# .NET
§ Add the following code to the btnOrderCount_Click event handler that
we began in the last exercise:
§ this.cnNorthwind.Open();
§ cnt = (Int) this.cmdOrderCount.ExecuteScalar();
§ this.cnNorthwind.Close();
§
§ strMsg = “There are ” + cnt.ToString() + ” Orders for this “;
§ strMsg += “Employee/Customer combination.”;
MessageBox.Show(strMsg);
The first three lines of code open the cnNorthwind Connection, call the ExecuteScalar
method to return a single value from the cmdOrderCount Command, and then close
the Connection. The last three lines simply display the results in a message box.
DataReaders
The DataReader’s properties are shown in Table 3-8. The Item property supports two
versions: Item(Name), which takes a string specifying the name of the column as a
parameter, and Item(Index), which takes an Int32 as an index into the columns
collection. (As with all collections in the .NET Framework, the collection index is zerobased.)
Table 3-8: DataReader Properties
Property Description
Microsoft ADO.Net – Step by Step 53
Table 3-8: DataReader Properties
Property Description
Depth The depth of
nesting for
the current
row in
hierarchical
result sets.
SQL Server
always
returns zero.
FieldCount The number
of columns
in the
current row.
IsClosed Indicates
whether the
DataReader
is closed.
Item The value of
a column.
RecordsAffected The number
of rows
changed,
inserted, or
deleted.
The methods exposed by the DataReader are shown in Table 3-9. The Close method, as
we’ve seen, closes the DataReader and, if the CloseConnection behavior has been
specified, closes the Connection as well. The GetDataTypeName, GetFieldType,
GetName, GetOrdinal and IsDbNull methods allow you to determine, at run time, the
properties of a specified column.
Note that IsDbNull is the only way to check for a null value, since the .NET Framework
doesn’t have an intrinsic Null data type.
Table 3-9: DataReader Methods
Method Description
Close Closes the
DataReader
GetType Gets the
value of the
specified
column as
the specified
type
GetDataTypeName Gets the
name of the
data source
type
GetFieldType Returns the
system type
of the
specified
Microsoft ADO.Net – Step by Step 54
Table 3-9: DataReader Methods
Method Description
column
GetName Gets the
name of the
specified
column
GetOrdinal Gets the
ordinal
position of
the column
specified
GetSchemaTable Returns a
DataTable
that
describes
the structure
of the
DataReader
GetValue Gets the
value of the
specified
column as
its native
type
GetValues Gets all the
columns in
the current
row
IsDbNull Indicates
whether the
column
contains a
nonexistent
value
NextResult Advances
the
DataReader
to the next
result
Read Advances
the
DataReader
to the next
row
The Read method retrieves the next row of the result set. When the DataReader is first
opened, it is positioned at the beginning of file, before the first row, not at the first row.
You must call Read before the first row of the result set will be returned.
The NextResult method is used when a SQL command or stored procedure returns
multiple result sets. It positions the DataReader at the beginning of the next result set.
Again, the DataReader will be positioned before the first row, and you must call Read
before accessing any results.
Microsoft ADO.Net – Step by Step 55
The GetValues method returns all of the columns in the current row as an object array,
while the GetValue method returns a single value as one of the .NET Framework types.
However, if you know the data type of the value to be returned in advance, it is more
efficient to use one of the GetType methods shown in Table 3-10.
Note The SqlDataReader object supports additional GetType methods
for values of System.Data.SqlType. They are detailed in online
help.
Table 3-10: GetType Methods
Method Name Method
Name
Method
Name
GetBoolean GetFloat GetInt16
GetByte GetGuid GetInt32
GetBytes GetDateTime GetInt64
GetChar GetDecimal GetString
GetChars GetDouble GetTimeSpan
Create a DataReader to Return Command Results
Visual Basic .NET
1. In the code editor window, select btnFillLists in the Object Name list,
and Click in the Method Name box.
Visual Studio adds the click event handler to the code.
2. Add the following variable declarations to the event handler:
3. Dim dr As System.Data.DataRow
4. Dim rdrEmployees As System.Data.SqlClient.SqlDataReader
Dim rdrCustomers As System.Data.SqlClient.SqlDataReader
5. Add the following code to fill the EmployeeList table:
6. Me.cnNorthwind.Open()
7. rdrEmployees = Me.cmdGetEmployees.ExecuteReader()
8.
9. With rdrEmployees
10. While .Read
11. dr = Me.dsMaster1.EmployeeList.NewRow
12. dr(0) = .GetInt32(0)
13. dr(1) = .GetString(1)
14. dr(2) = .GetString(2)
15. Me.dsMaster1.EmployeeList.Rows.Add(dr)
16. End While
17. End With
18. rdrEmployees.Close()
19. Me.cnNorthwind.Close()
Roadmap We’ll examine the DataSet in Chapter 6.
20. The code first opens the Connection, and then creates the
DataReader with the ExecuteReader method. The While .Read loop
first creates a new DataRow, retrieves each column from the
DataRow and assigns its value to a column, and then adds the new
row to the EmployeeList table. Finally, the DataReader and the
Connection are closed.
21. Add the final code to the procedure:
Microsoft ADO.Net – Step by Step 56
22. Me.cnNorthwind.Open()
23. rdrCustomers = Me.cmdGetCustomers.ExecuteReader()
24. With rdrCustomers
25. While .Read
26. dr = Me.dsMaster1.CustomerList.NewRow
27. dr(0) = .GetString(0)
28. dr(1) = .GetString(1)
29. Me.dsMaster1.CustomerList.Rows.Add(dr)
30. End While
31. End With
32. rdrCustomers.Close()
Me.cnNorthwind.Close()
This code is almost identical to the previous section, except that it uses the
cmdGetCustomers command to fill the CustomerList table. Note that the
Connection is closed and re-opened between calls to the ExecuteReader
method. This is necessary because the Connection will return a status of
Busy until either it or the DataReader are explicitly closed.
33. Press F5 to run the application.
34. Click Fill Lists.
35. Select different combinations of Employee and Customer, and then
click Order Count, and, if you like, click Get Orders.
Microsoft ADO.Net – Step by Step 57
The Get Orders button click event handler, which is provided for you, also
calls the ExecuteReader method, but this time against the cmdGetOrders
object.
Visual C# .NET
1. Create the following event handler in the code editor window:
2. private void btnFillLists_Click(object sender, System.EventArgs e)
3. {
4. System.Data.DataRow dr;
5. System.Data.SqlClient.SqlDataReader rdrEmployees;
6. System.Data.SqlClient.SqlDataReader rdrCustomers;
}
7. Add the following code to fill the EmployeeList table:
8. this.cnNorthwind.Open();
9. rdrEmployees = this.cmdGetEmployees.ExecuteReader();
10.
11. while (rdrEmployees.Read())
12. {
13. dr = this.dsMaster1.EmployeeList.NewRow();
14. dr[0] = rdrEmployees.GetInt32(0);
15. dr[1] = rdrEmployees.GetString(1);
16. dr[2] = rdrEmployees.GetString(2);
17. this.dsMaster1.EmployeeList.Rows.Add(dr);
18. }
19.
20. rdrEmployees.Close();
this.cnNorthwind.Close();
Roadmap We’ll examine the DataSet in Chapter 6.
The code first opens the Connection, and then creates the DataReader with
the ExecuteReader method. The while (rdrEmployees.Read()) loop first
creates a new DataRow, retrieves each column from the DataRow and
assigns its value to a column, and then adds the new row to the EmployeeList
table. Finally, the DataReader and the Connection are closed.
21. Add the final code to the procedure:
22. this.cnNorthwind.Open();
Microsoft ADO.Net – Step by Step 58
23. rdrCustomers = this.cmdGetCustomers.ExecuteReader();
24.
25. while (rdrCustomers.Read())
26. {
27. dr = this.dsMaster1.CustomerList.NewRow();
28. dr[0] = rdrCustomers.GetString(0);
29. dr[1] = rdrCustomers.GetString(1);
30. this.dsMaster1.CustomerList.Rows.Add(dr);
31. }
32.
33. rdrCustomers.Close();
34. this.cnNorthwind.Close();
This code is almost identical to the previous section, except that it uses the
cmdGetCustomers command to fill the CustomerList table. Note that the
Connection is closed and re-opened between calls to the ExecuteReader
method. This is necessary because the Connection will return a status of
Busy until either it or the DataReader are explicitly closed.
35. Link the event handler to the event by adding the following line to
the frmDataCmds sub:
36. this.btnFillLists.Click += New
EventHandler(this.btnFillLists_Click);
37. Press F5 to run the application.
38. Click Fill Lists.
Microsoft ADO.Net – Step by Step 59
39. Select different combinations of Employee and Customer, and then
click Order Count, and, if you like, click Get Orders.
The Get Orders button click event handler, which is provided for you, also
calls the ExecuteReader method, but this time against the cmdGetOrders
object.
Chapter 3 Quick Reference
To Do this
Add a Data Command to a form Drag an OleDbCommand or
SqlCommand from the Data tab of
the Toolbox to the form.
Create a Data Command at run time Use one of the New constructors.
For example: Dim myCmd as New
System.Data.SqlClient.SqlComma
nd()
Configure the Parameters collection in
Visual Studio
Click the ellipsis button in the
Parameters property of the
Property window.
Add and configure Parameters at run
time
Use one of the Add methods of the
Parameters collection. For
example:
Microsoft ADO.Net – Step by Step 60
To Do this
mySqlCmd.Parameters.Add
(“@myParam”, SqlDbType.Type)
Execute a Command that doesn’t return
a result
Use the ExecuteNonQuery
method. For example: intResults =
myCmd.ExecuteNonQuery()
Execute a Command that returns a
single value
Use the ExecuteScalar method.
For example: myResult =
myCmd.ExecuteScalar()
Create a DataReader to return
Command results
Use the ExecuteReader method.
For example: myReader =
myCmd.ExecuteReader()
Chapter 4: The DataAdapter
Overview
In this chapter, you’ll learn how to:
§ Create a DataAdapter
§ Preview the results of a DataAdapter
§ Set a DataAdapter’s properties
§ Use the Table Mappings dialog box
§ Use the DataAdapter’s methods
§ Respond to DataAdapter events
In this chapter, we’ll examine the DataAdapter, which sits between the Connection object
we looked at in the previous chapter and the DataSet, which we’ll examine in Chapter 5.
Understanding the DataAdapter
Like the Connection and Command objects, the DataAdapter is part of the Data
Provider, and there is a version of the DataAdapter specific to each Data Provider. In the
release version of the .NET Framework, this means the OleDbDataAdapter in the
System.Data.OleDb namespace and the SqlDataAdapter in the System.Data.SqlClient
namespace. Both of these objects inherit from the System.Data.DbDataAdapter, which in
turn inherits from the System.Data.DataAdapter.
DataAdapters act as the ‘glue’ between a data source and the DataSet object. In very
abstract terms, the DataAdapter receives the data from the Connection object and
passes it to the DataSet. It then passes changes back from the DataSet to the
Connection to update the data in the data source. (Remember that the data source can
be any kind of data, not just a database.)
Tip Typically, there is a one-to-one relationship between a DataAdapter
and a DataTable within a DataSet, but a SelectCommand that
returns multiple result sets may link to multiple tables in the
DataSet.
To perform updates on the data source, DataAdapters contain references to four Data
Commands, one for each possible action: SelectCommand, UpdateCommand,
InsertCommand, and DeleteCommand.
Note With the exception of some minor differences in the Fill method,
which we’ll look at later, the SqlDataAdapter and
OleDbDataAdapter have identical properties, methods, and
events. For the sake of simplicity, we’ll only use the
SqlDataAdapter in this chapter, but all of the code samples will
Microsoft ADO.Net – Step by Step 61
work equally well with OleDb if you change the class names of the
objects.
Creating DataAdapters
Microsoft Visual Studio .NET provides several different methods for creating
DataAdapters interactively. We saw one in Chapter 1, when we used the Data Adapter
Configuration Wizard, and we’ll explore a couple more in this section. Of course, if you
need to, you can create a DataAdapter manually in code, and we’ll look at that in this
section, as well.
Using the Server Explorer
If you have created a design time connection to a data source in the Server Explorer,
you can automatically create a DataAdapter by dragging the appropriate table, query, or
stored procedure onto your form. If you don’t already have a connection on the form,
Visual Studio will create a preconfigured connection as well.
Create a DataAdapter from the Server Explorer
1. Open the DataAdapters project from the Visual Studio start page or by
using the Open menu.
2. In the Solution Explorer, double-click DataAdapters.vb (or
DataAdapters.cs, if you’re using C#) to open the form.
Visual Studio displays the form in the form designer.
3. In the Server Explorer, expand the SQL Northwind connection (the
name of the Connection will depend on your system configuration),
and then expand its Tables collection.
Microsoft ADO.Net – Step by Step 62
4. Drag the Categories table onto the form.
Visual Studio adds an instance of the SqlDataAdapter and becaus e it didn’t
already exist, an instance of the SqlConnection to the component designer.
5. Select the SqlDataAdapter1 on the form, and then in the Properties
window, change its name to daCategories.
Using the Toolbox
As we saw in Chapter 1, if you drag a DataAdapter from the Toolbox (either an
SqlDataAdapter or an OleDbDataAdapter), Visual Studio will start the Data Adapter
Configuration Wizard. If you want to configure the DataAdapter manually, you can simply
Microsoft ADO.Net – Step by Step 63
cancel the wizard and set the DataAdapter’s properties using code or the Properties
window.
Create a DataAdapter Using the Toolbox
In this exercise, we’ll only create the DataAdapter. We’ll set its properties later in the
chapter.
1. In the Toolbox, drag a SqlDataAdapter from the Data tab onto the
form.
Visual Studio starts the Data Adapter Configuration Wizard.
2. Click Cancel.
Visual Studio creates an instance of the SqlDataAdapter in the component
designer.
3. In the Properties window, change the name of the DataAdapter to
daProducts.
Creating DataAdapters at Run Time
When we created ADO.NET objects in code in previous chapters, we first declared them
and then initialized them. The process is essentially the same to create a DataAdapter,
but it has a little twist—because a DataAdapter references four command objects, you
must also declare and instantiate each of the commands, and then set the DataAdapter
to reference them.
Create a DataAdapter in Code
Visual Basic .NET
1. Press F7 to display the code for the DataAdapters form.
2. Type the following statements after the Inherits statement:
3. Friend WithEvents cmdSelectSuppliers As New _
4. System.Data.SqlClient.SqlCommand()
5. Friend WithEvents cmdInsertSuppliers As New _
6. System.Data.SqlClient.SqlCommand()
7. Friend WithEvents cmdUpdateSuppliers As New _
8. System.Data.SqlClient.SqlCommand()
9. Friend WithEvents cmdDeleteSuppliers As New _
10. System.Data.SqlClient.SqlCommand()
11. Friend WithEvents daSuppliers As New _
System.Data.SqlClient.SqlDataAdapter()
These lines declare the four command objects and the DataAdapter, and
initialize each object with its default constructor.
12. Open the region labeled “Windows Form Designer generated code”
and add the following lines to the New Sub after the call to
InitializeComponent:
13. Me.daSuppliers.DeleteCommand = Me.cmdDeleteSuppliers
14. Me.daSuppliers.InsertCommand = Me.cmdInsertSuppliers
15. Me.daSuppliers.SelectCommand = Me.cmdSelectSuppliers
Me.daSuppliers.UpdateCommand = Me.cmdUpdateSuppliers
These lines assign the four Command objects to the daSuppliers
DataAdapter.
Microsoft ADO.Net – Step by Step 64
Visual C# .NET
1. Press F7 to display the code for the DataAdapters form.
2. Type the following statements at the beginning of the class definition:
3. private System.Data.SqlClient.SqlCommand cmdSelectSuppliers;
4. private System.Data.SqlClient.SqlCommand cmdInsertSuppliers;
5. private System.Data.SqlClient.SqlCommand
cmdUpdateSuppliers;
6. private System.Data.SqlClient.SqlCommand cmdDeleteSuppliers;
7. private System.Data.SqlClient.SqlDataAdapter daSuppliers;
These lines declare the four Command objects and the DataAdapter.
8. Scroll down to the DataAdapters function and add the following lines
after the call to InitializeComponent:
9. this.cmdDeleteSuppliers = new
10. System.Data.SqlClient.SqlCommand();
11. this.cmdInsertSuppliers = new
12. System.Data.SqlClient.SqlCommand();
13. this.cmdSelectSuppliers = new
14. System.Data.SqlClient.SqlCommand();
15. this.cmdUpdateSuppliers = new
16. System.Data.SqlClient.SqlCommand();
17. this.daSuppliers = new
System.Data.SqlClient.SqlDataAdapter();
These lines instantiate each object using the default constructor.
18. Add the following lines to assign the four command objects to the
daSuppliers DataAdapter:
19. this.daSuppliers.DeleteCommand = this.cmdDeleteSuppliers;
20. this.daSuppliers.InsertCommand = this.cmdInsertSuppliers;
21. this.daSuppliers.SelectCommand = this.cmdSelectSuppliers;
this.daSuppliers.UpdateCommand = this.cmdUpdateSuppliers;
Previewing Results
Visual Studio provides a quick and easy method to check the configuration of a formlevel
DataAdapter: the DataAdapter Preview dialog box.
Preview the Results of a DataAdapter
1. Make sure that daCategories is selected in the component designer.
2. Select Preview Data in the bottom portion of the Properties window.
Visual Studio opens the DataAdapter Preview window.
Microsoft ADO.Net – Step by Step 65
3. Click Fill Dataset.
Visual Studio displays the rows returned by the DataAdapter.
4. Click Close.
Visual Studio closes the DataAdapter Preview window.
DataAdapter Properties
The properties exposed by the DataAdapter are shown in Table 4-1. The
SqlDataAdapter and OleDbDataAdapter objects expose the same set of properties.
Table 4-1: DataAdapter Properties
Property Description
AcceptChangesDuringFill Determines
whether
AcceptChange
s is called on a
Microsoft ADO.Net – Step by Step 66
Table 4-1: DataAdapter Properties
Property Description
DataRow after
it is added to
the DataTable
DeleteCommand The Data
Command
used to delete
rows in the
data source
InsertCommand The Data
Command
used to insert
rows in the
data source
MissingMappingAction Determines the
action that will
be taken when
incoming data
cannot be
matched to an
existing table or
column
MissingSchemaAction Determines the
action that will
be taken when
incoming data
does not match
the schema of
an existing
DataSet
SelectCommand The Data
Command
used to retrieve
rows from the
data source
TableMappings A collection of
DataTableMap
ping objects
that determine
the relationship
between the
columns in a
DataSet and
the data source
UpdateCommand The Data
Command
used to update
rows in the
data source
Note Roadmap
We’ll examine AcceptChanges in Chapter 9.
The AcceptChangesDuringFill property determines whether the AcceptChanges method
is called for each row that is added to a DataSet. The default value is true.
Microsoft ADO.Net – Step by Step 67
The MissingMappingAction property determines how the system reacts when a
SelectCommand returns columns or tables that are not found in the DataSet. The
possible values are shown in Table 4-2. The default value is Passthrough.
Table 4-2: MissingMappingAction Values
Value Description
Error Throws a
SystemExcep
tion
Ignore Ignores any
columns or
tables not
found in the
DataSet
Passthrough The column
or table that is
not found is
added to the
DataSet,
using its
name in the
data source
Similarly, the MissingSchemaAction property determines how the system will respond if
a column is missing in the DataSet. The MissingSchemaAction property will be called
only if the MissingMappingAction is set to Passthrough. The possible values are shown
in Table 4-3. The default value is Add.
Table 4-3: MissingSchemaAction Values
Value Description
Add Adds the
necessary
columns to
the DataSet
AddWithKey Adds both the
necessary
columns and
tables and
PrimaryKey
constraints
Error Throws a
SystemExcep
tion
Ignore Ignores the
extra columns
In addition, the DataAdapter has two sets of properties that we’ll examine in detail: the
set of Command objects that tell it how to update the data source to reflect changes
made to the DataSet and a TableMappings property that maintains the relationship
between columns in a DataSet and columns in the data source.
DataAdapter Commands
As we’ve seen, each DataAdapter contains references to four Command objects, each of
which has a CommandText property that contains the actual SQL command to be
executed.
Microsoft ADO.Net – Step by Step 68
If you create a DataAdapter by using the Data Adapter Configuration Wizard or by
dragging a table, view, or stored procedure from the Server Explorer, Visual Studio will
attempt to automatically generate the CommandText property for each command. You
can also edit the SQL command in the Properties window, although you must first
associate the command with a Connection object.
Note Every DataAdapter command must be associated with a
Connection. In most cases, you will use a single Connection for all
of the commands, but this isn’t a requirement. You can associate a
different Connection with each command, if necessary.
You must specify the CommandText property for the SelectCommand object, but the
.NET Framework can generate the commands for update, insert, and delete if they are
not specified.
Internally, Visual Studio uses the CommandBuilder object to generate commands. You
can instantiate a CommandBuilder object in code and use it to generate commands as
required. However, you must be aware of the CommandBuilder’s limitations. It cannot
handle parameterized stored procedures, for example.
Set CommandText in the Properties Window
1. Select the daProducts object in the form designer, and then in the
Properties window, expand the Select Command properties.
2. Select the SelectCommand’s Connection property, expand the
Existing node in the list, and then choose SqlConnection1.
Microsoft ADO.Net – Step by Step 69
3. Select the CommandText property, and then click the ellipsis
button.Visual Studio opens the Query Builder and opens the Add
Table dialog box.
4. Select the Products table, click Add, and then click Close.
Visual Studio closes the Add Table dialog box and adds the table to the
Query Builder.
5. Add the CategoryID, ProductID, and ProductName columns to the
query by selecting each column’s check box.
6. Click OK.
Microsoft ADO.Net – Step by Step 70
Visual Studio generates the CommandText property.
Set CommandText in Code
Visual Basic .NET
§ In the code editor, add the following lines of code to the bottom of the
New Sub:
§ Me.cmdSelectSuppliers.CommandText = “SELECT * FROM
Suppliers”
Me.cmdSelectSuppliers.Connection = Me.SqlConnection1
Visual C# .NET
§ In the code editor, add the following lines to the bottom of the
DataAdapters Sub:
§ this.cmdSelectSuppliers.CommandText = “SELECT * FROM
Suppliers”;
this.cmdSelectSuppliers.Connection = this.sqlConnection1;
The TableMappings Collection
A DataSet has no knowledge of where the data it contains comes from, and a
Connection has no knowledge of what happens to the data it retrieves. The DataAdapter
maintains the connection between the two. It does this by using the TableMappings
collection.
The structure of the TableMappings collection is shown in the following figure. At the
highest level, the TableMappings collection contains one or more DataTableMapping
objects. Typically, there is only one DataTableMapping object because most
DataAdapters return only a single record set. However, if a DataAdapter manages
multiple record sets, as might be the case with a stored procedure that returns multiple
result sets, there will be a DataTableMapping object for each record set.
The DataTableMapping object is another collection, which contains one or more
DataColumnMapping objects. The DataColumnMapping object consists of two
properties: the SourceColumn, which is the case-sensitive name of the column within the
data source, and the DataSetColumn, which is the case-insensitive name of the column
within the DataSet. There is a DataColumnMapping object for each column managed by
the DataAdapter.
Microsoft ADO.Net – Step by Step 71
By default, the .NET Framework will create a TableMappings collection (and all of the
objects it contains) with the DataSetColumn name set to the SourceColumn name. There
are times, however, when this isn’t what you want. For example, you might want to
change the mappings for reasons of convenience or because you’re working with a preexisting
DataSet with difference column names.
Change a DataSet Column Name Using the Table Mappings Dialog Box
1. Select the daCategories DataAdapter in the form designer.
2. In the Properties window, expand the Mapping properties.
3. Select the TableMappings property and click the ellipsis button.
Visual Studio displays the Table Mappings dialog box.
Microsoft ADO.Net – Step by Step 72
4. Change the name of the Dataset column from CategoryName to
Name.
5. Click OK.
Visual Studio updates the collection.
DataAdapter Methods
The DataAdapter supports two important methods: Fill, which loads data from the data
source into the DataSet, and Update, which transfers data the other direction—loading it
from the DataSet into the data source. We’ll examine both in this set of exercises.
Generating DataSets and Binding Data
Roadmap We’ll examine DataSets in Chapter 6.
Before we can examine the Fill and Update methods, we must create and link the
DataSets to be used to store the data. We haven’t examined DataSets yet (we’ll do that
in Chapter 6), so just follow the steps outlined and try not to worry about them.
Generate and Bind DataSets
1. Select the daCategories DataAdapter in the form designer.
2. On the Data menu, choose Generate Dataset.
Microsoft ADO.Net – Step by Step 73
Visual Studio displays the Generate Dataset dialog box.
3. In the New text box, change the name of the new DataSet to
dsCategories.
4. Click OK.
Visual Studio creates the dsCategories DataSet and adds an instance of it to
the form designer.
5. Repeat steps 1 through 4 for the daProducts DataAdapter. Name the
new DataSet dsProducts.
Microsoft ADO.Net – Step by Step 74
6. Select the dgCategories object in the drop-down list box of the
Properties window.
7. In the Properties window, expand the DataBindings section.
8. Select dsCategories1 in the DataSource list.
Microsoft ADO.Net – Step by Step 75
9. Select Categories in the DataMember list.
Microsoft ADO.Net – Step by Step 76
10. Repeat steps 6 through 9 for the dgProducts control, binding it to the
dsProducts1 DataSource and Table DataMember.
The Fill Method
The Fill method loads data from a data source into one or more tables of a DataSet by
using the command specified in the DataAdapter’s SelectCommand. The
DbDataAdapter object, from which both the OleDbDataAdapter and the SqlDataAdapter
are inherited, supports several variations of the Fill method, as shown in Table 4-4.
Table 4-4: DbDataAdapter Fill Methods
Method Description
Fill(DataSet) Creates a
DataTable
named Table
and populates it
with the rows
returned from
the data source
Fill(DataTable) Fills the
specified
DataTable with
the rows
returned from
the data source
Fill(DataSet, tableName) Fills the
DataTable
named in the
tableName
Microsoft ADO.Net – Step by Step 77
Table 4-4: DbDataAdapter Fill Methods
Method Description
string, within
the DataSet
specified, with
the rows
returned from
the data source
Fill(DataTable, DataReader) Fills the
DataTable
using the
specified
DataReader
(Because
DataReader is
declared as an
IDataReader,
either an
OleDbDataRea
der or a
SQLDataReade
r can be used)
Fill(DataTable, command, CommandBehavior) Fills the
DataTable
using the SQL
string passed in
command and
the specified
CommandBeha
vior
Fill(DataSet, startRecord,maxRecords, tableName) Fills the
DataTable
specified in the
tableName
string,
beginning at the
zero-based
startRecord and
continuing for
maxRecords or
until the end of
the result set
Fill(DataSet, tableName, DataReader, startRecord,
maxRecords)
Fills the
DataTable
specified in the
tableName
string,
beginning at the
zero-based
startRecord and
continuing for
maxRecords or
until the end of
the result set,
using the
specified
Microsoft ADO.Net – Step by Step 78
Table 4-4: DbDataAdapter Fill Methods
Method Description
DataReader
(Since
DataReader is
declared as an
IDataReader,
either an
OleDbDataRea
der or a
SQLDataReade
r can be used)
Fill(DataSet, startRecord, maxRecords, tableName,
command, CommandBehavior)
Fills the
DataTable
specified in the
tableName
string,
beginning at the
zero-based
startRecord and
continuing for
maxRecords or
until the end of
the result set,
using the SQL
text contained
in command
and the
specified
CommandBeha
vior
In addition, the OleDbDataAdapter supports the two additional versions of the Fill
method shown in Table 4-5, which are used to load data from Microsoft ActiveX Data
Objects (ADO).
Table 4-5: OleDbDataAdapter Fill Methods
Method Description
Fill(DataTable, adoObject) Fills the
specified
DataTable
with rows
from the
ADO
Recordset
or Record
object
specified in
adoObject
Fill(DataSet, adoObject, tableName) Fills the
specified
DataTable
with rows
from the
ADO
Recordset
or Record
Microsoft ADO.Net – Step by Step 79
Table 4-5: OleDbDataAdapter Fill Methods
Method Description
object
specified in
adoObject,
using the
DataTable
specified in
the
tableName
string to
determine
the
TableMappi
ngs
The SqlDataAdapter supports only the methods provided by the DbDataAdapter.
DataAdapters included in other Data Providers can, of course, support additional
versions of the Fill method.
Important The Microsoft SQL Server decimal data type allows a
maximum of 38 significant digits, while the .NET Framework
decimal type only allows a maximum of 28. If a row in a SQL
table contains a decimal field with more than 28 significant
digits, the row will not be added to the DataSet and a
FillError will be raised.
Use the Fill Method
Visual Basic .NET
1. Press F7 to display the code editor for the DataAdapters form.
2. Select btnFill in the ClassName list, and then select Click in the
MethodName list.
Visual Studio displays the Click event handler template.
3. Add the following lines of code to clear each dataset to the sub:
4. Me.dsCategories1.Clear()
Me.dsProducts1.Clear()
5. Add the following code to fill each DataSet from the DataAdapters:
6. Me.daCategories.Fill(Me.dsCategories1.Categories)
7. Me.daProducts.Fill(Me.dsProducts1.Table)
8. Press F5 to run the program.
Microsoft ADO.Net – Step by Step 80
9. Click Fill.
10. Verify that each of the data grids has been filled correctly, and then
close the application.
Visual C# .NET
1. Double-click the Fill button.
Visual Studio adds a Click event handler to the code window.
2. Add the following code to the event handler:
3. private void btnFill_Click(object sender, System.EventArgs e)
4. {
5. this.dsCategories1.Clear();
6. this.dsProducts1.Clear();
}
These lines clear the contents of each DataSet.
7. Add the following code to fill each DataSet from the DataAdapters:
8. this.daCategories.Fill(this.dsCategories1.Categories);
this.daProducts.Fill(this.dsProducts1._Table);
9. Press F5 to run the program.
Microsoft ADO.Net – Step by Step 81
10. Click Fill.
11. Verify that each of the data grids has been filled correctly, and then
close the application.
The Update Method
Remember that the DataSet doesn’t retain any knowledge about the source of the data it
contains, and that the changes you make to DataSet rows aren’t automatically
propagated back to the data source. You must use the DataAdapter’s Update method to
do this. The Update method calls the DataAdapter’s InsertCommand, DeleteCommand,
or UpdateCommand, as appropriate, for each row in a DataSet that has changed.
The System.Data.Common.DbDataAdapter, which you will recall is the DataAdapter
class from which relational database Data Providers inherit their DataAdapters, supports
a number of versions of the Update method, as shown in Table 4-6. Neither the
SqlDataAdapter nor the OleDbDataAdapter add any additional versions.
Table 4-6: DbDataAdapter Update Methods
Method Description
Update(DataSet) Updates the
data source
from a
DataTable
named Table in
the specified
Microsoft ADO.Net – Step by Step 82
Table 4-6: DbDataAdapter Update Methods
Method Description
DataSet
Update(dataRows) Updates the
data source
from the
specified array
of dataRows
Update(DataTable) Updates the
data source
from the
specified
DataTable
Update(dataRows, DataTableMapping) Updates the
data source
from the
specified array
of dataRows,
using the
specified
DataTableMap
ping
Update(DataSet, sourceTable) Updates the
data source
from the
DataTable
specified in
sourceTable in
the specified
DataSet
Update a Data Source Using the Update Method
Visual Basic .NET
1. In the code editor, select the btnUpdate control in the ControlName
list, and then select the Click event in the MethodName list.
Visual Studio displays the Click event handler template.
2. Add the following code to call the Update method:
Me.daCategories.Update(Me.dsCategories1.Categories)
3. Press F5 to run the application.
4. Click Fill.
The application fills the data grids.
Tip You can drag the data grid’s column headings to widen them.
5. Click the CategoryName of the first row, and then change its value
from Beverages to Old Beverages.
Microsoft ADO.Net – Step by Step 83
6. Click Update.
The application updates the data source.
7. Click Fill to ensure that the change has been propagated to the data
source.
8. Close the application.
Visual C# .NET
1. Add the following event handler in the code editor, below the
btnFill_Click handler we added in the previous exercise:
2. private void btnUpdate_Click (object sender, System.EventArgs
e)
3. {
4. this.daCategories.Update(this.dsCategories1.Categories);
}
5. Add the following code to connect the event handler in the class
definition:
6. this.btnUpdate.Click += new
EventHandler(this.btnUpdate_Click);
7. Press F5 to run the application.
8. Click Fill.
The application fills the data grids.
Tip You can drag the data grid’s column headings to widen them.
9. Click the CategoryName of the first row, and then change its value
from Beverages to Old Beverages.
Microsoft ADO.Net – Step by Step 84
10. Click Update.
The application updates the data source.
11. Click Fill to ensure that the change has been propagated to the data
source.
12. Close the application.
Handling DataAdapter Events
Other than the events caused by errors, the DataAdapter supports only two events:
OnRowUpdating and OnRowUpdated. These two events occur on either side of the
actual dataset update, providing fine control of the process.
OnRowUpdating Event
The OnRowUpdating event is raised after the Update method has set the parameter
values of the command to be executed but before the command is executed. The event
handler for this event receives an argument whose properties provide essential
information about the command that is about to be executed.
The class of the event arguments is defined by the Data Provider, so it will be either
OleDbRowUpdatingEventArgs or SqlRowUpdatingEventArgs if one of the .NET
Framework Data Providers is used. The properties of RowUpdatingEventArgs are shown
in Table 4-7.
Table 4-7: RowUpdatingEventArgs Properties
Properties Description
Command The Data
Command to
be executed
Errors The errors
generated by
the .NET Data
Provider
Row The
DataReader to
be updated
StatementType The type of
Command to
be executed.
The possible
values are
Microsoft ADO.Net – Step by Step 85
Table 4-7: RowUpdatingEventArgs Properties
Properties Description
Select, Insert,
Delete, and
Update
Status The
UpdateStatus
of the
Command
TableMapping The
DataTableMap
ping used by
the update
The Command property contains a reference to the actual Command object that will be
used to update the data source. Using this reference, you can, for example, examine the
Command’s CommandText property to determine the SQL that will be executed and
change it if necessary.
The StatementType property of the event argument defines the action that is to be
performed. The property is an enumeration that can evaluate to Select, Insert, Update, or
Delete. The StatementType property is read-only, so you cannot use it to change the
type of action to be performed.
The Row property contains a read-only reference to the DataRow to be propagated to
the data source, while the TableMapping property contains a reference to the
DataTableMapping that is being used for the update.
When the event handler is first called, the Status property, which is an UpdateStatus
enumeration, defines the status of the event. If it is ErrorsOccurred, the Errors property
will contain a collection of Errors.
You can set the Status property within the event handler to determine what action the
system is to take. In addition to ErrorsOccured, which causes an exception to be thrown,
the possible exit status values are Continue, SkipAllRemainingRows, and
SkipCurrentRow. Continue, which is the default value, does exactly what you would
expect—it instructs the system to continue processing. SkipAllRemainingRows actually
discards the update to the current row, as well as any remaining unprocessed rows,
while SkipCurrentRow only cancels processing for the current row.
Respond to an OnRowUpdating Event
Visual Basic .NET
1. In the code editor, select daCategories in the ControlName list and
then select RowUpdating in the MethodName list.
Visual Studio displays the RowUpdating event handler template.
2. Add the following text to the Messages control to indicate that the
event has been triggered:
Me.txtMessages.Text &= vbCrLf & “Beginning Update…”
3. Press F5 to run the application, and then click Fill to fill the data grids.
4. Change the CategoryName for Category 1, which we changed to Old
Beverages in the previous exercise, back to Beverages.
Microsoft ADO.Net – Step by Step 86
5. Click Update.
The application updates the text in the Messages control.
6. Close the application.
Visual C# .NET
1. Add the following event handler in the code editor:
2. private void daCategories_RowUpdate(object sender,
3. System.Data.SqlClient.SqlRowUpdatedEventArgs e)
4. {
5. string strMsg;
6.
7. strMsg = “Beginning update…”;
8. this.txtMessages.Text += strMsg;
}
The code adds text to the Messages control to indicate that the event has
been triggered.
9. Add the following code to connect the event handler in the class
description:
10. this.daCategories.RowUpdating += new
11. System.Data.SqlClient.SqlRowUpdatingEventHandler
(this.daCategories_RowUpdating);
Microsoft ADO.Net – Step by Step 87
12. Press F5 to run the application, and then click Fill to fill the data
grids.
13. Change the CategoryName for Category 1, which we changed to
Old Beverages in the previous exercise, back to Beverages.
14. Click Update.
The application updates the text in the Messages control.
15. Close the application.
Examine the RowUpdatingEventArgs Properties
Visual Basic .NET
1. Add the following lines to the daCategories_RowUpdating event
handler that you created in the previous exercise:
2. Me.txtMessages.Text &= vbCrLf & (“Executing a command of
type ” _
& e.StatementType.ToString)
3. Press F5 to run the application, and then click Fill.
4. Change the CategoryName of Category 1 to New Beverages, and
then click Update.
The application updates the text in the Messages control.
Microsoft ADO.Net – Step by Step 88
5. Close the application.
Visual C# .NET
1. Change the da_Categories_RowUpdated event handler that you
created in the previous exercise to read:
2. string strMsg;
3.
4. strMsg = “\nUpdate Completed.”;
5. strMsg += “, ” + e.RecordsAffected.ToString();
6. strMsg += ” records(s) updated.”;
7. this.txtMessages.Text += strMsg;
8.
9. Press F5 to run the application, and then click Fill.
10. Change the CategoryName of Category 1 to New Beverages, and
then click Update.
The application updates the text in the Messages control.
11. Close the application.
Microsoft ADO.Net – Step by Step 89
OnRowUpdated Event
The OnRowUpdated event is raised after the Update method executes the appropriate
command against the data source. The event handler for this event is either passed an
SqlRowUpdatedEventArgs or an OleDbRowUpdatedEventArgs argument, depending on
the Data Provider.
Either way, the event argument contains all of the same properties as the
RowUpdatingEvent argument, plus an additional property, a read-only RecordsEffected
argument that indicates the number of rows that were changed, inserted, or deleted by
the SQL command that was executed.
Respond to an OnRowUpdated Event
Visual Basic .NET
1. Select daCategories in the ControlName list and then select
RowUpdated in the MethodName list.
Visual Studio displays the RowUpdated event handler template.
2. Add the following text to the Messages control to indicate that the
event has been triggered:
Me.txtMessages.Text &= vbCrLf & “Update completed”
3. Press F5 to run the application, and then click Fill to fill the data grids.
4. Change the CategoryName for Category 1, which we changed to New
Beverages in the previous exercise, back to Beverages.
5. Click Update.
The application updates the text in the Messages control.
Microsoft ADO.Net – Step by Step 90
6. Close the application.
Visual C# .NET
1. Add the following code to add the RowUpdated event template to the
code editor:
2. private void daCategories_RowUpdate(object sender,
3. System.Data.SqlClient.SqlRowUpdatedEventArgs e)
4. {
5. string strMsg;
6.
7. strMsg = “\nUpdate Completed.”;
8. this.txtMessages.Text += strMsg;
}
9. Add the following code to connect the event handler in the class
description:
10. this.daCategories.RowUpdated +=
11. new System.Data.SqlClient.SqlRowUpdatedEventHandler
(this.daCategories_RowUpdated);
12. Press F5 to run the application, and then click Fill to fill the data
grids.
13. Change the CategoryName for Category 1, which we changed to
New Beverages in the previous exercise, back to Beverages.
Microsoft ADO.Net – Step by Step 91
14. Click Update.
The application updates the text in the Messages control.
15. Close the application.
Examine the RowUpdatedEventArgs Properties
Visual Basic .NET
1. Add the following lines to the daCategories_RowUpdated event
handler that you created in the previous exercise:
2. Me.txtMessages.Text &= “, ” & e.RecordsAffected.ToString & ”
record(s) updated.”
3. Press F5 to run the application, and then click Fill.
4. Change the CategoryName of Category 1 to Beverages 2, and then
click Update.
The application updates the text in the Messages control.
Microsoft ADO.Net – Step by Step 92
5. Close the application.
Visual C# .NET
1. Change the daCategories_RowUpdated event handler that you
created in the previous exercise to read:
2. string strMsg;
3.
4. strMsg = “\nUpdate Completed.”;
5. strMsg += “, ” + e.RecordsAffected.ToString();
6. strMsg += ” records(s) updated.”;
7. this.txtMessages.Text += strMsg;
8. Press F5 to run the application, and then click Fill.
9. Change the CategoryName of Category 1 to Beverages 2, and then
click Update.
The application updates the text in the Messages control.
10. Close the application.
Microsoft ADO.Net – Step by Step 93
Chapter 4 Quick Reference
To Do this
Create a DataAdapter in the Server Explorer Drag a table
into the form
designer.
Create a DataAdapter using the Toolbox Drag an
OleDbDataAda
pter or an
SqlDataAdapte
r onto the form
designer.
Cancel the
Data Adapter
Configuration
Wizard if you
wish to
configure the
DataAdapter
manually.
Create a DataAdapter in code Declare the
DataAdapter
variable and
the four
Command
object
variables, and
then instantiate
them and
assign the
Command
objects to the
DataAdapter.
Preview the results of a DataAdapter Select the
DataAdapter in
the form
designer, and
then click
Preview
Dataset in the
Properties
window.
Chapter 5: Transaction Processing in ADO.NET
Overview
In this chapter, you’ll learn how to:
§ Create a transaction
§ Create a nested transaction
§Commit a transaction
§ Rollback a transaction
Microsoft ADO.Net – Step by Step 94
In the last few chapters, we’ve seen how ADO.NET data provider objects interact in the
process of editing and updating. In this chapter, we’ll complete our examination of data
providers in ADO.NET with an exploration of transaction processing.
Understanding Transactions
A transaction is a series of actions that must be treated as a single unit of work—either
they must all succeed, or they must all fail. The classic example of a transaction is the
transfer of funds from one bank account to another. To transfer the funds, an amount,
say $100, is withdrawn from one account and deposited in the other. If the withdrawal
were to succeed while the deposit failed, money would be lost into cyberspace. If the
withdrawal were to fail and the deposit succeed, money would be invented. Clearly, if
either action fails, they must both fail.
ADO.NET supports transactions through the Transaction object, which is created against
an open connection. Commands that are executed against the connection while the
transaction is pending must be enrolled in the transaction by assigning a reference to the
Transaction object to their Transaction property. Commands cannot be executed against
the Connection outside the transaction while it is pending.
If the transaction is committed, all of the commands that form a part of that transaction
will be permanently written to the data source. If the transaction is rolled back, all of the
commands will be discarded at the data source.
Creating Transactions
The Transaction object is implemented as part of the data provider. There is a version for
each of the intrinsic data providers: OleDbTransaction in the System.Data.OleDb
namespace and SqlTransaction in the System.Data.SqlClient namespace.
The SqlTransaction object is implemented using Microsoft SQL Server transactions—
creating a SqlTransaction maps directly to the BeginTransaction statement. The
OleDbTransaction is implemented within OLE DB. No matter which data provider you
use, you shouldn’t explicitly issue BeginTransaction commands on the database.
Creating New Transactions
Transactions are created by calling the BeginTransaction method of the Connection
object, which returns a reference to a Transaction object. BeginTransaction is
overloaded, allowing an IsolationLevel to optionally be specified, as shown in Table 5-1.
The Connection must be valid and open when BeginTransaction is called.
Table 5-1: Connection BeginTransaction Methods
Method Description
BeginTransaction() Begins a
transaction
BeginTransaction Begins a
transaction
at the
specified
IsolationLev
el
(IsolationLevel)
Because SQL Server supports named transactions, the SqlClient data provider exposes
two additional versions of BeginTransaction, as shown in Table 5-2.
Table 5-2: Additional SQL BeginTransaction Methods
Method Description
BeginTransaction (TransactionName) Begins a
Microsoft ADO.Net – Step by Step 95
Table 5-2: Additional SQL BeginTransaction Methods
Method Description
transaction
with the name
specified in
the
TransactionN
ame string
BeginTransaction (IsolationLevel, TransactionName) Begins a
transaction at
the specified
IsolationLevel
with the name
specified in
the
TransactionN
ame string
ADO Unlike ADO, the ADO.NET Commit and Rollback methods are
exposed on the Transaction object, not the Command object.
The optional IsolationLevel parameter to the BeginTransaction method specifies the
connection’s locking behavior. The possible values for IsolationLevel are shown in Table
5-3.
Table 5-3: Isolation Levels
Value Meaning
Chaos Pending
changes
from
more
highly
ranked
transacti
ons
cannot
be
overwritt
en
ReadCommitted Shared
locks are
held
while the
data is
being
read, but
data can
be
changed
before
the end
of the
transacti
on
ReadUncommitted No
shared
locks are
issued
Microsoft ADO.Net – Step by Step 96
Table 5-3: Isolation Levels
Value Meaning
and no
exclusive
locks are
honored
RepeatableRead Exclusive
locks are
placed
on all
data
used in
the query
Serializable A range
lock is
placed
on the
DataSet
Unspecified An
existing
isolation
level
cannot
be
determin
ed
Create a New Transaction
Visual Basic .NET
1. Open the Transactions project from the Microsoft Visual Studio .NET
Start Page or by using the File menu.
2. Double-click Transactions.vb to display the form in the form designer.
3. Double-click Create.
Visual Studio opens the code editor window and adds the Click event handler.
4. Add the following code to the procedure:
5. Dim strMsg As String
6. Dim trnNew As System.Data.OleDb.OleDbTransaction
Microsoft ADO.Net – Step by Step 97
7.
8. Me.cnAccessNwind.Open()
9. trnNew = Me.cnAccessNwind.BeginTr ansaction()
10. strMsg = “Isolation Level: ”
11. strMsg &= trnNew.IsolationLevel.ToString
12. MessageBox.Show(strMsg)
Me.cnAccessNwind.Close()
The code creates a new Transaction using the default method, and then
displays its IsolationLevel in a message box.
13. Press F5 to run the application.
14. Click Load Data.
The application fills the DataSet and displays the Customers and Orders lists.
15. Click Create.
The application displays the transaction’s IsolationLevel in a message box.
Microsoft ADO.Net – Step by Step 98
16. Click OK in the message box, and then close the application.
Visual C# .NET
1. Open the Transactions project from the Visual Studio Start Page or by
using the File menu.
2. Double-click Transactions.cs to display the form in the form designer.
3. Double-click Create.
Visual Studio opens the code editor window and adds the Click event handler.
4. Add the following code to the procedure:
5. string strMsg;
6. System.Data.OleDb.OleDbTransaction trnNew;
7.
8. this.cnAccessNwind.Open();
9. trnNew = this.cnAccessNwind.BeginTransaction();
10. strMsg = “Isolation Level: “;
11. strMsg += trnNew.IsolationLevel.ToString();
12. MessageBox.Show(strMsg);
this.cnAccessNwind.Close();
The code creates a new Transaction using the default method, and then
displays its IsolationLevel in a message box.
13. Press F5 to run the application.
Microsoft ADO.Net – Step by Step 99
14. Click Load Data.
The application fills the DataSet and displays the Customers and Orders lists.
15. Click Create.
The application displays the transaction’s IsolationLevel in a message box.
16. Click OK in the message box, and then close the application.
Microsoft ADO.Net – Step by Step 100
Creating Nested Transactions
Although it isn’t possible to have two transactions on a single Connection, the
OleDbTransaction object supports nested transactions. (They aren’t supported on SQL
Server.)
ADO Multiple transactions on a single Connection, which were
supported in ADO, are no longer supported in ADO.NET.
The syntax for creating a nested transaction is the same as that for creating a first-level
transaction, as shown in Table 5-4. The difference is that nested transactions are
created by calling the BeginTransaction method on the Transaction object itself, not on
the Connection.
All nested transactions must be committed or rolled back before the trans-action
containing them is committed; however, if the parent (containing) transaction is rolled
back, the nested transactions will also be rolled back, even if they have previously been
committed.
Table 5-4: Transaction BeginTransaction Methods
Method Description
BeginTransaction() Begins a
transaction
BeginTransaction (IsolationLevel) Begins a
transaction
at the
specified
IsolationLev
el
Create a Nested Transaction
Visual Basic .NET
1. Select btnNested in the code editor’s ControlName list, and then
select Click in the MethodName list.
Visual Studio adds the Click event handler to the code.
2. Add the following code to the procedure:
3. Dim strMsg As String
4. Dim trnMaster As System.Data.OleDb.OleDbTransaction
5. Dim trnChild As System.Data.OleDb.OleDbTransaction
6.
7. Me.cnAccessNwind.Open()
8.
9. trnMaster = Me.cnAccessNwind.BeginTransaction
10.
11. trnChild = trnMaster.Begin
12. strMsg = “Child Isolation Level: ”
13. strMsg &= trnChild.IsolationLevel.ToString
14. MessageBox.Show(strMsg)
15.
Me.cnAccessNwind.Close()
The code first creates a transaction, trnMaster, on the Connection object. It
then creates a second, nested transaction, trnChild, on the trnMaster
transaction, and displays its IsolationLevel in a message box.
Microsoft ADO.Net – Step by Step 101
16. Press F5 to run the application.
17. Click Load Data.
18. Click Create Nested.
The application displays the child transaction’s IsolationLevel in a message
box.
19. Click OK in the message box, and then close the application.
Visual C# .NET
1. Add the following procedure to the code:
2. private void btnNested_Click(object sender, System.EventArgs e)
3. {
4. string strMsg;
5. System.Data.OleDb.OleDbTransaction trnMaster;
6. System.Data.OleDb.OleDbTransaction trnChild;
7.
8. this.cnAccessNwind.Open();
9.
10. trnMaster =
this.cnAccessNwind.BeginTransaction();
11.
12. trnChild = trnMaster.Begin();
13. strMsg = “Child Isolation Level: “;
14. strMsg += trnChild.IsolationLevel.ToString();
15. MessageBox.Show(strMsg);
16.
17. this.cnAccessNwind.Close();
}
The code first creates a transaction, trnMaster, on the Connection object. It
then creates a second, nested transaction, trnChild, on the trnMaster
transaction, and displays its IsolationLevel in a message box.
18. Add the code to bind the click handler to the top of the
frmTransactions() sub:
19. this.btnNested.Click += new
EventHandler(this.btnNested_Click);
20. Press F5 to run the application.
21. Click Load Data.
22. Click Create Nested.
The application displays the child transaction’s IsolationLevel in a message
box.
Microsoft ADO.Net – Step by Step 102
23. Click OK in the message box, and then close the application.
Using Transactions
There are three steps to using transactions after they are created. First they are
assigned to the commands that will participate in them, then the commands are
executed, and finally the transaction is closed by either committing it or rolling it back.
Assigning Transactions to a Command
Once a transaction has been begun on a connection, all commands executed against
that connection must participate in that transaction. Unfortunately, this doesn’t happen
automatically—you must set the Transaction property of the command to reference the
transaction.
However, once the transaction is committed or rolled back, the transaction reference in
any commands that participated in the transaction will be reset to Nothing, so it isn’t
necessary to do this step manually.
Committing and Rolling Back Transactions
The final step in transaction processing is to commit or roll back the changes that were
made by the commands participating in the transaction. If the transaction is committed,
all of the changes will be accepted in the data source. If it is rolled back, all of the
changes will be discarded, and the data source will be returned to the state it was in
before the transaction began.
Transactions are committed using the transaction’s Commit method and rolled back
using the transaction’s Rollback method, neither of which takes any parameters. The
actions are typically wrapped in a Try…Catch block.
Commit a Transaction
Visual Basic .NET
1. Select btnCommit in the ControlName list, and then select Click in the
MethodName list.
Visual Studio adds the Click event handler to the code.
2. Add the following lines to the procedure:
3. Dim trnNew As System.Data.OleDb.OleDbTransaction
4.
5. AddRows(“AAAA1”)
Microsoft ADO.Net – Step by Step 103
6.
7. Me.cnAccessNwind.Open()
8. trnNew = Me.cnAccessNwind.BeginTransaction()
9. Me.daCustomers.InsertCommand.Transaction = trnNew
10. Me.daOrders.InsertCommand.Transaction = trnNew
11. Try
12.
Me.daCustomers.Update(Me.dsCustomerOrders1.CustomerList)
13. Me.daOrders.Update(Me.dsCustomerOrders1.Orders)
14. trnNew.Commit()
15. MessageBox.Show(“Transaction Committed”)
16. Catch err As System.Data.OleDb.OleDbException
17. trnNew.Rollback()
18. MessageBox.Show(err.Message.ToString)
19. Finally
20. Me.cnAccessNwind.Close()
End Try
The AddRows procedure, which is provided in Chapter 1, adds a Customer
row and an Order for that Customer.
Within a Try…Catch block, the code commits the two Update commands if
they succeed, and then displays a message confirming that the transaction
has completed without errors.
21. Press F5 to run the application.
22. Click Load Data.
The application fills the DataSet, and then displays the Customers and Orders
lists.
23. Click Commit.
The application displays a message box confirming the updates.
24. Click OK in the message box, and then click Load Data to confirm
that the rows have been added.
Microsoft ADO.Net – Step by Step 104
25. Close the application.
Visual C# .NET
1. Add the following procedure to the code:
2. private void btnCommit_Click(object sender, System.EventArgs
e)
3. {
4. System.Data.OleDb.OleDbTransaction trnNew;
5.
6. AddRows(“AAAA1”);
7.
8. this.cnAccessNwind.Open();
9. trnNew = this.cnAccessNwind.BeginTransaction();
10. this.daCustomers.InsertCommand.Transaction =
trnNew;
11. this.daOrders.InsertCommand.Transaction =
trnNew;
12. try
13. {
this.daCustomers.Update(this.dsCustomerOrders1.CustomerLis
t);
14.
this.daOrders.Update(this.dsCustomerOrders1.Orders);
15. trnNew.Commit();
16. MessageBox.Show(“Transaction Committed”);
17. }
18. catch (System.Data.OleDb.OleDbException err)
19. {
20. trnNew.Rollback();
21. MessageBox.Show(err.Message.ToString());
22. }
23. finally
24. {
25. this.cnAccessNwind.Close();
26. }
}
The AddRows procedure, which is provided in Chapter 1, adds a Customer
row and an Order for that Customer.
Within a Try…Catch block, the code commits the two Update commands if
they succeed, and then displays a message confirming that the transaction
has completed without errors.
27. Add the code to bind the click handler to the top of the
frmTransactions() sub:
Microsoft ADO.Net – Step by Step 105
this.btnCommit.Click += new EventHandler(this.btnCommit_Click);
28. Press F5 to run the application.
29. Click Load Data.
The application fills the DataSet, and then displays the Customers and Orders
lists.
30. Click Commit.
The application displays a message box confirming the updates.
31. Click OK in the message box, and then click Load Data to confirm
that the rows have been added.
32. Close the application.
Rollback a Transaction
Visual Basic .NET
1. Select btnRollback in the ControlName list, and then select Click in
the MethodName list.
Visual Studio adds the Click event handler to the code.
2. Add the following lines to the procedure:
3. Dim trnNew As System.Data.OleDb.OleDbTransaction
4.
5. AddRows(“AAAA2”)
6.
7. Me.cnAccessNwind.Open()
Microsoft ADO.Net – Step by Step 106
8. trnNew = Me.cnAccessNwind.BeginTransaction()
9. Me.daCustomers.InsertCommand.Transaction = trnNew
10. Me.daOrders.InsertCommand.Transaction = trnNew
11. Try
12. Me.daOrders.Update(Me.dsCustomerOrders1.Orders)
13.
Me.daCustomers.Update(Me.dsCustomerOrders1.CustomerList)
14. trnNew.Commit()
15. MessageBox.Show(“Transaction Committed”)
16. Catch err As System.Data.OleDb.OleDbException
17. trnNew.Rollback()
18. MessageBox.Show(err.Message.ToString)
19. Finally
20. Me.cnAccessNwind.Close()
End Try
This procedure is almost identical to the Commit procedure in the previous
exercise. However, because the order of the Updates is reversed so that the
Order is added before the Customer, the first Update will fail and a message
box will display the error.
21. Press F5 to run the application.
22. Click Load Data.
The application fills the DataSet, and then displays the Customers and Orders
lists.
23. Click Rollback.The application displays a message box explaining
the error.
Microsoft ADO.Net – Step by Step 107
24. Click OK to close the message box, and then click Load Data to
confirm that the rows have not been added.
25. Close the application.
Visual C# .NET
1. Add the following procedure to the code:
2. private void btnRollback_Click(object sender, System.EventArgs
e)
3. {
4. System.Data.OleDb.OleDbTransaction trnNew;
5.
6. AddRows(“AAAA2”);
7.
8. this.cnAccessNwind.Open();
9. trnNew = this.cnAccessNwind.BeginTransaction();
10. this.daCustomers.InsertCommand.Transaction =
trnNew;
11. this.daOrders.InsertCommand.Transaction =
trnNew;
12. try
13. {
14.
this.daOrders.Update(this.dsCustomerOrders1.Orders);
15.
this.daCustomers.Update(this.dsCustomerOrders1.CustomerLis
t);
16. trnNew.Commit();
17. MessageBox.Show(“Transaction Committed”);
18. }
19. catch (System.Data.OleDb.OleDbException err)
20. {
21. trnNew.Rollback();
22. MessageBox.Show(err.Message.ToString());
23. }
24. finally
25. {
26. this.cnAccessNwind.Close();
27. }
}
This procedure is almost identical to the Commit procedure in the previous
exercise. However, because the order of the Updates is reversed so that the
Order is added before the Customer, the first Update will fail and a message
box will display the error.
Microsoft ADO.Net – Step by Step 108
28. Add the code to bind the click handler to the top of the
frmDataSets() sub:
this.btnRollback.Click += new EventHandler(this.btnRollback_Click);
29. Press F5 to run the application.
30. Click Load Data.
The application fills the DataSet, and then displays the Customers and Orders
lists.
31. Click Rollback.
The application displays a message box explaining the error.
32. Click OK to close the message box, and then click Load Data to
confirm that the rows have not been added.
33. Close the application.
Microsoft ADO.Net – Step by Step 109
Chapter 5 Quick Reference
To Do this
Create a transaction Call the BeginTransaction
method of the Connection
object:
myTrans =
myConn.BeginTransaction
Create a nested transaction Call the BeginTransaction
method of the Transaction
object:
nestedTrans =
myTrans.BeginTransactio
n()
Commit a transaction Call the Commit method of the
Transaction:
myTrans.Commit()
Rollback a transaction Call the Rollback method of the
Transaction:
myTrans.Rollback()
Part III: Manipulating Data
Chapter 6: The DataSet
Chapter 7: The DataTable
Chapter 8: The DataView
Chapter 6: The DataSet
Overview
In this chapter, you’ll learn how to:
§ Create Typed and Untyped DataSets
§ Add DataTables to DataSets
§Add DataRelations to DataSets
§ Clone and copy DataSets
Beginning with this chapter, we’ll move away from the ADO.NET Data Providers to
examine the objects that support the manipulation of data in your applications. We’ll start
with the DataSet, the memory-resident structure that represents relational data.
Note In this chapter, we’ll begin an application that we’ll continue to
work with in subsequent chapters.
Understanding DataSets
The structure of the DataSet is shown in the following figure.
Microsoft ADO.Net – Step by Step 110
ADO.NET supports two distinct kinds of DataSets: Typed and Untyped. Architecturally,
an Untyped DataSet is a direct instantiation of the System.Data.DataSet object, while a
Typed DataSet is a distinct class that inherits from System.Data.DataSet.
In functional terms, a Typed DataSet exposes its tables, and the columns within them, as
object properties. This makes manipulating the DataSet far simpler syntactically because
you can reference tables and columns directly by their names.
For example, given a Typed DataSet called dsOrders that contains a DataTable called
OrderHeaders, you can reference the value of the OrderID column in the first row as:
Me.dsOrders.OrderHeaders(0).OrderID
If you were working with an Untyped DataSet with the same structure, however, you
would need to reference the OrderHeaders DataTable and OrderID Column through the
Tables and Item collections, respectively:
Me.dsOrders.Tables(“OrderHeader”).Rows(0).Item(“OrderID”)
If you’re working in Microsoft Visual Studio, the Visual Studio code editor supports a
Typed DataSet’s tables and columns through IntelliSense, which makes the reference
even easier.
The Typed DataSet provides another important benefit: it allows compile-time type
checking of data values, which is referred to as strong typing. For example, assuming
that OrderTotal is numeric, the compiler would generate an error in the following line:
Me.dsOrders.OrderHeader.Rows(0).OrderTotal = “Hello, world”
But if you were working with an Untyped DataSet, the following line would compile
without error:
Me.dsOrders.Tables(“OrderHeader”).Rows(0).Item(“OrderTotal”) = “Hello, world”
Despite the advantages of the Typed DataSet, there are times when you’ll need an
Untyped DataSet. For example, your application may receive a DataSet from a middletier
component or a Web service, and you won’t know the structure of the DataSet until
run time. Or you may need to reconfigure a DataSet’s schema at run time, in which case
regenerating a Typed DataSet would be an unnecessary overhead.
Creating DataSets
As always, Visual Studio provides several different methods for creating DataSets, both
interactively and programmatically.
Microsoft ADO.Net – Step by Step 111
Creating Typed DataSets
Roadmap We’ll explore the XML SchemaDesigner in Chapter 13.
In previous chapters, we created Typed DataSets from DataAdapters by using the
Generate Dataset command. In this chapter, we’ll use the Component Designer. You
can also create them programmatically and by using the XML Schema Designer. We’ll
examine both of those techniques in detail in Part V. We will, however, use the Schema
Designer in this chapter to confirm our changes.
Create a Typed DataSet Using the Component Designer
1. Open the DataSets project from the Start page or the Project menu.
2. Double-click DataSets.vb (or DataSets.cs, if you’re using C#) in the
Solution Explorer.
Visual Studio opens the form in the form designer.
3. Select the daCustomers DataAdapter in the Component Designer.
4. Choose Generate Dataset from the Data menu.
The Generate Dataset dialog box opens.
Microsoft ADO.Net – Step by Step 112
5. In the New text box, change the name of the new DataSet to
dsMaster.
6. Click OK.
Visual Studio creates a Typed DataSet and adds an instance of it to the
Component Designer.
The DataSet object’s Tables collection, being a collection, can contain multiple
DataTables, and the Visual Studio Generate Dataset dialog box allows you to add the
result sets returned by a DataAdapter to an existing DataSet.
Because all of the result sets returned by the defined DataAdapters are displayed in the
Generate Dataset dialog box, you can add them all in a single operation by selecting the
check boxes next to their names.
Add a DataTable to an Existing Typed DataSet
1. Select daOrders in the Component Designer.
Microsoft ADO.Net – Step by Step 113
2. Choose Generate dataset from the Data Menu.
Visual Studio displays the Generate dataset dialog.
3. Verify that the default option to add the DataTable to the existing
dsMaster DataSet is selected, and then click OK.
Visual Studio adds the DataTable to dsMaster.
4. Select dsMaster in the Component Designer, and then click View
Schema at the bottom of the Properties window.
Visual Studio opens the XML Schema Designer.
5. Verify that the DataSet contains both DataTables, and then close the
XML Schema Designer.
Creating Untyped DataSets
You can create Untyped DataSets both interactively in Visual Studio and
programmatically at run time. Within Visual Studio, you can create both Typed and
Untyped DataSets by dragging the DataSet control from the Toolbox.
Create an Untyped DataSet Using Visual Studio
1. Drag a DataSet control from the Data tab of the Toolbox onto the form.
Visual Studio displays the Add Dataset dialog.
Microsoft ADO.Net – Step by Step 114
2. Select the Untyped dataset option, and then click OK.
Visual Studio adds the DataSet to the Component Designer.
3. In the Properties window, change both the DataSetName property and
the Name property to dsUntyped.
The DataSet object supports three versions of the usual New constructor to create an
Untyped DataSet in code, as shown in Table 6-1. Only the first two are typically used in
application programs.
Table 6-1: DataSet Constructors
Method Description
New() Creates an
Untyped
DataSet
with the
default
name
NewDataSet
New(dsName) Creates an
Untyped
DataSet
with the
name
passed in
the dsName
string
New(SerializationInfo, StreamingContext) Used
Microsoft ADO.Net – Step by Step 115
Table 6-1: DataSet Constructors
Method Description
internally by
the .NET
Framework
Create an Untyped DataSet at Run Time
Visual Basic .NET
1. Press F7 to open the code editor.
2. Expand the region labeled Windows Form Designer generated code,
and then scroll to the bottom of the class-level declarations.
3. Add the following declaration to the end of the section:
Dim dsEmployees As New System.Data.DataSet(“dsEmployees”)
Visual C# .NET
1. Press F7 to open the code editor.
2. Add the following declaration to the beginning of the class declaration:
private System.Data.DataSet dsEmployees;
3. Add the following instantiation to the frmDataSets sub, after the call to
InitializeComponent:
dsEmployees = new System.Data.DataSet(“dsEmployees”);
DataSet Properties
The properties exposed by the DataSet object are shown in Table 6-2.
Table 6-2: DataSet Properties
Property Value
CaseSensitive Determines
whether
compariso
ns are
casesensitive
DataSetName The name
used to
reference
the
DataSet in
code
DefaultViewManager Defines the
default
filtering
and sorting
order of the
DataSet
EnforceConstraints Determines
whether
constraint
rules are
followed
during
changes
Microsoft ADO.Net – Step by Step 116
Table 6-2: DataSet Properties
Property Value
ExtendedProperties Custom
user
information
HasErrors Indicates
whether
any of the
DataRows
in the
DataSet
contain
errors
Locale The locale
information
to be used
when
comparing
strings
Namespace The
namespac
e used
when
reading or
writing an
XML
document
Prefix An XML
prefix used
as an alias
for the
namespac
e
Relations A collection
of
DataRelati
on objects
that define
the
relationship
of the
DataTables
within the
DataSet
Tables The
collection
of
DataTables
contained
in the
DataSet
Roadmap We’ll examine the DataSet’s XML-related methods in Chapter
14.
Microsoft ADO.Net – Step by Step 117
The majority of properties supported by the DataSet are related to its interaction with
XML. We’ll examine these properties in Chapter 14. Of the non-XML properties, the two
most important are the Tables and Relations collections, which contain and define the
data maintained within the DataSet.
The DataSet Tables Collection
Roadmap We’ll examine the properties and methods of DataTables in
detail in Chapter 5.
For Typed DataSets, the contents of the DataSet’s Tables collection are defined by the
DataSet schema. For Untyped DataSets, you can create the tables and their columns
either programmatically or through the Visual Studio designers.
Add a DataTable to an Untyped DataSet Using Visual Studio
1. Select the dsUntyped DataSet in the form designer.
2. In the Properties window, select the Tables property, and then click
the ellipsis button.
The Tables Collection Editor opens.
3. Click Add.
Visual Studio adds a new table called Table1 to the DataSet.
4. Change both the Name and TableName properties to dtMaster.
Microsoft ADO.Net – Step by Step 118
5. Select the Columns property, and then click the ellipsis button.
The Columns Collection Editor opens.
6. Click Add.
Visual Studio adds a column named Column1 to the DataTable.
7. Set the column’s properties to the values shown in the following table.
Property Value
AllowDbNull False
AutoIncrement True
Caption MasterID
ColumnName MasterID
DataType System.Int32
Name MasterID
Microsoft ADO.Net – Step by Step 119
8.
9. Click Add again, and then set the new column’s properties to the
values shown in the following table.
Property Value
Caption MasterValue
ColumnName MasterValue
Name MasterValue
10.
11. Click Close.
The Columns Collection Editor closes.
12. In the Tables Collection Editor, click Add to add a second table to the
DataSet.
13. Change both the Name and TableName properties to dtChild.
Microsoft ADO.Net – Step by Step 120
14. Click the Columns property, and then click the ellipsis button.
The Columns Collection Editor opens.
15. Click Add.
Visual Studio adds a column named Column1 to the DataTable.
16. Set the column’s properties to the values shown in the following table.
Property Value
AllowDbNull False
AutoIncrement True
Caption ChildID
ColumnName ChildID
DataType System.Int32
Name ChildID
17.
Microsoft ADO.Net – Step by Step 121
18. Click Add again, and then set the column’s properties to the values
shown in the following table.
Property Value
AllowDbNull False
Caption MasterLink
ColumnName MasterLink
DataType System.Int32
Name MasterLink
19.
20. Click Add again, and then set the new column’s properties to the
values shown in the following table.
Property Value
Caption ChildValue
ColumnName ChildValue
Name ChildValue
Microsoft ADO.Net – Step by Step 122
21.
22. Click Close.
The Columns Collection Editor closes.
23. Click Close on the Tables Collection Editor.
Add a DataTable to an Untyped DataSet at Run Time
Visual Basic .NET
1. In the code editor window, select btnTable in the ControlName list,
and then select Click in the MethodName list.
Visual Studio adds the Click event handler template to the code.
2. Add the following code to create the Employees table and its columns:
3. Dim strMessage as String
4.
5. ‘Create the table
6. Dim dtEmployees As System.Data.DataTable
7. dtEmployees = Me.dsEmployees.Tables.Add(“Employees”)
8.
9. ‘Add the columns
10. dtEmployees.Columns.Add(“EmployeeID”, _
11. Type.GetType(“System.Int32”))
12. dtEmployees.Columns.Add(“FirstName”, _
13. Type.GetType(“System.String”))
14. dtEmployees.Columns.Add(“LastName”, _
15. Type.GetType(“System.String”))
16.
17. ‘Fill the DataSet
18. Me.daEmployees.Fill(Me.dsEmployees.Tables(“Emplo
yees”))
19. strMessage = “The first employee is ”
20. strMessage &= _
Microsoft ADO.Net – Step by Step 123
21.
Me.dsEmployees.Tables(“Employees”).Rows(0).Item(“LastNam
e”)
MessageBox.Show(strMessage)
22. Press F5 to run the application.
23. Click CreateTable.
The application displays a message box containing the last name of the first
employee.
24. Click OK to close the message box, and then close the application.
Visual C# .NET
1. In the form designer, double-click the Create Table button.
Visual Studio adds the Click event handler to the code.
2. Add the following code to create the Employees table and its columns:
3. string strMessage;
4.
5. // Create the table
6. System.Data.DataTable dtEmployees;
7. dtEmployees = this.dsEmployees.Ta bles.Add(“Employees”);
8.
9. //Add the columns
Microsoft ADO.Net – Step by Step 124
10. dtEmployees.Columns.Add(“EmployeeID”,
Type.GetType(“System.Int32”));
11. dtEmployees.Columns.Add(“FirstName”,
Type.GetType(“System.String”));
12. dtEmployees.Columns.Add(“LastName”,
Type.GetType(“System.String”));
13.
14. //Fill the dataset
15. this.daEmployees.Fill(this.dsEmployees.Tables[“Emplo
yees”]);
16.
17. strMessage = “The first employee is “;
18. strMessage +=
this.dsEmployees.Tables[“Employees”].Rows[0][“LastName”];
MessageBox.Show(strMessage);
19. Press F5 to run the application.
20. Click CreateTable.
The application displays a message box containing the last name of the first
employee.
21. Click OK to close the message box, and then close the application.
Microsoft ADO.Net – Step by Step 125
DataSet Relations
While the DataSet’s Tables collection defines the structure of the data stored in a
DataSet, the Relations collection defines the relationships between the DataTables. The
Relations collection contains zero or more DataRelation objects, each one representing
the relationship between two tables.
As we’ll see in the next chapter, the DataRelation object allows you to easily move
between parent and child rows—given a parent, you can find all the related children, or
given a child, you can find its parent row. DataRelation objects also provide a
mechanism for enforcing relational integrity through their ChildKeyConstraint and
ParentKeyConstraint properties.
Important Even if constraints are established in the DataRelation
object, they will be enforced only if the DataSet’s
EnforceConstraints property is True.
Add a DataRelation to an Untyped DataSet Using Visual Studio
1. Select the dsUntyped DataSet in the Component Designer.
2. In the Properties window, select the Relations property, and then click
the ellipsis button.
The Relations Collection Editor opens.
3. Click Add.
The Relation dialog box opens.
Microsoft ADO.Net – Step by Step 126
4. Change the name of the relation to MasterChild, the Key Column to
MasterID, and the Foreign Key Column to MasterLink.
5. Click OK.
Visual Studio adds the DataRelation to the DataSet.
6. Click Close.
Roadmap We’ll discuss the XML Schema Designer in Chapter 13.
The Visual Studio Relations Collection Editor is available for only Untyped DataSets. For
Typed DataSets, you can use the XML Schema Designer, which we’ll examine in
Chapter 13, or you can add DataRelations pro-grammatically. You can, of course, also
add DataRelations to Untyped DataSets at run time.
Add a DataRelation to a Dataset at Run Time
Visual Basic .NET
1. In the code editor, select btnRelation in the ControlName list, and then
select Click in the MethodName list.
Visual Studio adds the Click event handler template to the code.
Microsoft ADO.Net – Step by Step 127
2. Add the following code to create the DataRelation:
3. Dim strMessage As String
4.
5. ‘Add a new relation
6. Me.dsMaster1.Relations.Add(“CustomerOrders”, _
7. Me.dsMaster1.CustomerList.CustomerIDColumn, _
8. Me.dsMaster1.OrderTotals.CustomerIDColumn)
9.
10. strMessage = “The name of the DataRelation is ”
11. strMessage &=
Me.dsMaster1.Relations(0).RelationName.ToString
12. MessageBox.Show(strMessage)
13. Press F5 to run the application.
14. Click Create Relation.
The application adds the DataRelation, and then displays a message box
containing the name of the DataRelation.
15. Click OK to close the message box, and then close the application.
Visual C# .NET
1. In the form designer, double-click the Clone DataSet button.
Visual Studio adds the Click event handler to the code.
2. Add the following code to create the DataRelation:
Microsoft ADO.Net – Step by Step 128
3. string strMessage;
4.
5. //Add a new relation
6. this.dsMaster1.Relations.Add(“CustomerOrders”,
7. this.dsMaster1.CustomerList.CustomerIDColumn,
8. this.dsMaster1.OrderTotals.CustomerIDColumn);
9.
10. strMessage = “The name of the DataRelation is “;
11. strMessage+=
this.dsMaster1.Relations[0].RelationName.ToString();
MessageBox.Show(strMessage);
12. Press F5 to run the application.
13. Click Create Relation.
The application adds the DataRelation, and then displays a message box
containing the name of the DataRelation.
14. Click OK to close the message box, and then close the application.
DataSet Methods
The primary methods supported by the DataSet object are listed in Table6-3. Like the
DataSet’s properties, the majority of its methods are related to its interaction with XML
and will be examined in Part V.
Roadmap We’ll examine the relationship between ADO.NET and XML
in Part V.
Table 6-3: Primary DataSet Methods
Method Description
AcceptChanges Commits all
pending
changes to
the DataSet
Clear Empties all
the tables in
the DataSet
Clone Copies the
structure of
Microsoft ADO.Net – Step by Step 129
Table 6-3: Primary DataSet Methods
Method Description
a DataSet
Copy Copies the
structure
and
contents of
a DataSet
GetChanges Returns a
DataSet
containing
only the
changed
rows in each
of its tables
GetXml Returns an
XML
representati
on of the
DataSet
GetXmlSchema Returns an
XSD
representati
on of the
DataSet’s
schema
HasChanges Returns a
Boolean
value
indicating
whether the
DataSet has
pending
changes
InferXmlSchema Infers a
schema
from an
XML
TextReader
or file
Merge Combines
two
DataSets
ReadXml Reads an
XML
schema and
data into the
DataSet
ReadXmlSchema Reads an
XML
schema into
the DataSet
Microsoft ADO.Net – Step by Step 130
Table 6-3: Primary DataSet Methods
Method Description
RejectChanges Rolls back
all changes
pending in
the DataSet
Reset Returns the
DataSet to
its original
state
WriteXml Writes an
XML
schema and
data from
the DataSet
WriteXmlSchema Writes the
DataSet
structure as
an XML
schema
Roadmap We’ll examine the HasChanges, GetChanges,
AcceptChanges and RejectChanges methods in Chapter 9.
HasChanges, GetChanges, AcceptChanges, RejectChanges, and Merge are used when
updating the DataSet’s Tables collection, and we’ll examine those in the Chapter 9.
That leaves only three methods: Clear, which we’ve used extensively already; Clone,
which creates an empty copy of the DataSet; and Copy, which creates a complete copy
of the DataSet and its data.
Cloning a DataSet
The Clone method creates an exact duplicate of a DataSet, including its Tables,
Relations, and constraints.
Clone a DataSet
Visual Basic .NET
1. In the code editor, select btnClone in the ControlName list, and then
select Click in the MethodName list.
Visual Studio adds the Click event handler template.
2. Add the following code to clone the record set:
3. Dim strMessage As String
4. Dim dsClone As System.Data.DataSet
5.
6. dsClone = Me.dsMaster1.Clone()
7. strMessage = “The cloned dataset has ”
8. strMessage &= dsClone.Tables.Count.ToString
9. strMessage &= ” Tables.”
10. MessageBox.Show(strMessage)
11. Press F5 to run the application.
12. Click Clone DataSet.
The application displays a message box containing the number of tables in
the new DataSet.
Microsoft ADO.Net – Step by Step 131
13. Close the application.
Visual C# .NET
1. In the form designer, double-click the Create Relation button.
Visual Studio adds the Click event handler to the code.
2. Add the following code to clone the record set:
3. string strMessage;
4. System.Data.DataSet dsClone;
5.
6. dsClone = this.dsMaster1.Clone();
7.
8. strMessage = “The cloned dataset has “;
9. strMessage += dsClone.Tables.Count.ToString();
10. strMessage += ” tables.”;
MessageBox.Show(strMessage);
11. Press F5 to run the application.
12. Click Clone DataSet.
The application displays a message box containing the number of tables in
the new DataSet.
13. Close the application.
Microsoft ADO.Net – Step by Step 132
Copying a DataSet
Unlike the Clone method, which duplicates only the structure of a DataSet, the Copy
method copies both its structure and its data.
Copy a DataSet
Visual Basic .NET
1. In the code editor, select btnCopy in the ControlName list, and then
select Click in the MethodName list.
Visual Studio adds the Click event handler template.
2. Add the following code to copy the DataSet:
3. Dim strMessage As String
4. Dim dsCopy As System.Data.DataSet
5.
6. ‘Fill the original dataset
7. Me.daCustomers.Fill(Me.dsMaster1.CustomerList)
8.
9. dsCopy = Me.dsMaster1.Copy
10. strMessage = “The copied dataset has ”
11. strMessage &= _
dsCopy.Tables(“CustomerList”).Rows.Count.ToString
strMessage &= ” rows in the CustomerList.”
12. Press F5 to run the application.
13. Click Copy DataSet.
Visual Studio displays a message box containing the number of rows in the
CustomerList table.
14. Click OK to close the message box, and then close the application.
Visual C# .NET
1. In the form designer, double-click the Copy DataSet button.
Visual Studio adds the Click event handler to the code.
2. Add the following code to copy the DataSet:
3. string strMessage;
4. System.Data.DataSet dsCopy;
5.
6. //Fill the original dataset
Microsoft ADO.Net – Step by Step 133
7. this.daCustomers.Fill(this.dsMaster1.CustomerList);
8.
9. dsCopy = this.dsMaster1.Copy();
10. strMessage = “The copied dataset has “;
11. strMessage +=
dsCopy.Tables[“CustomerList”].Rows.Count.ToString();
12. strMessage += ” rows in the CustomerList.”;
MessageBox.Show(strMessage);
13. Press F5 to run the application.
14. Click Copy DataSet.
Visual Studio displays a message box containing the number of rows in the
CustomerList table.
15. Click OK to close the message box, and then close the application.
Chapter 6 Quick Reference
To Do this
Create a
Typed
DataSet
using the
Component
Designer
Select a DataAdapter, and then choose Generate Dataset
From the Data menu.
Create an
Untyped
DataSet
using Visual
Studio
Drag a DataSet control from the Data tab of the Toolbox onto
the form.
Create an
Untyped
DataSet at
run time
Use the New method of the DataSet object:
myDs = New System.Data.DataSet()
Add a
DataTable to
an Untyped
DataSet
In the Property window for the DataSet, click the Tables
property, and then click the ellipsis button.
Microsoft ADO.Net – Step by Step 134
To Do this
using Visual
Studio
Add a
DataTable to
an Untyped
DataSet at
run time
Use the Add method of the DataTable’s Columns collection:
myTable.Columns.Add(“Name”,Type.GetType(“type”)
Add a
DataRelatio
n to an
Untyped
DataSet
using Visual
Studio
In the Properties window, click the Relations property, and then
click the ellipsis button.
Add a
DataRelatio
n to a
DataSet at
run time
Use the Add method of the DataSet’s Relations collection:
myDS.Relations.Add(“Name”, ParentCol, ChildCol)
Clone a
DataSet
Use the Clone method: newDS =myDS.Clone()
Copy a
DataSet
Use the Copy method: newDS = myDS.Copy()
Chapter 7: The DataTable
Overview
In this chapter, you’ll learn how to:
§ Create an independent DataTable at run time
§ Add a DataTable to an existing DataSet
§ Add a PrimaryKey constraint by using the FillSchema method
§ Create a calculated column in a DataTable
§ Add a new row to the Rows collection
§ Display the RowState of a DataRow
§ Add a ForeignKey constraint to a DataTable
§ Add a UniqueConstraint to a DataTable
§ Display a subset of rows within a DataTable
§ Retrieve data related to the current DataRow
We’ve been working with DataTables in the previous several chapters, but in this
chapter, we’ll take a detailed look at their structure, properties, and methods.
Understanding DataTables
Remember that we defined DataSets as an in-memory representation of relational data.
DataTables contain the actual data. They can exist as part of the DataSet’s Tables
collection or can be created independently.
As we’ll see, although the DataTable has properties of its own, it functions primarily as a
container for three collections: the Columns collection, which defines the structure of the
Microsoft ADO.Net – Step by Step 135
table; the Rows collection, which contains the data itself; and the Constraints collection,
which works in conjunction with the DataTable’s PrimaryKey property to enforce integrity
rules on the data.
Creating DataTables
In previous chapters, we used a number of techniques to create DataTables as part of a
DataSet—we used the Fill method of the DataAdapter, the Add method of the DataSet,
and the Table Collection Editor that’s part of Microsoft Visual Studio .NET. Tables can
also be created for Typed DataSets by using the XML Schema Designer in Visual
Studio, as we’ll see in Part V.
In this chapter, we’ll concentrate on creating DataTables at run time, using the DataSet’s
Add method and the DataTable’s New constructor.
Roadmap Run-time DataTables can also be created by using the
DataSet’s ReadXML, ReadXMLSchema, and
InferXmlSchema methods. We’ll examine those in Chapter
14.
Creating Independent DataTables
Although DataTa bles are most often used as part of a DataSet, they can be created
independently. You might want to create an independent DataTable to provide data for a
bound control, for example, or simply so that it can be configured before being added to
the DataSet.
The three forms of the DataTable’s New constructor are shown in Table 7-1. Of these,
only the first two are typically used in application programs.
Table 7-1: DataTable Constructors
Method Description
New() Creates a
new
DataTable
New(TableName) Creates a
new
DataTable
with the
name
specified in
the
TableName
string
New(SerializableInfo, StreamingContext) Used
internally by
the .NET
Framework
Create an Independent DataTable Object at Run Time
Visual Basic .NET
1. Open the DataTables project on the Start Page or from the Project
menu.
2. Double-click DataTables.vb in the Server Explorer.
Visual Studio opens the form designer.
Microsoft ADO.Net – Step by Step 136
3. On the form, double-click Add Table.
Visual Studio adds the Click event handler template to the code.
4. Add the following code to create a DataTable, and then set its name
to Employees:
5. Dim strMessage As String
6.
7. ‘Create the table
8. Dim dtEmployees As New System.Data.DataTable(“Employees”)
9.
10. strMessage = “The table name is ”
11. strMessage &= dtEmployees.TableName.ToString
MessageBox.Show(strMessage)
This code uses the New(tableName) version of the constructor to create a
DataTable named dtEmployees, and then displays the table name in a
message box.
12. Press F5 to run the application.
13. Click Add Table.
The application displays a message box containing the name of the table.
Microsoft ADO.Net – Step by Step 137
14. Close the application.
Visual C# .NET
1. Open the DataTables project on the Start Page or from the Project
menu.
2. Double-click DataTables.cs in the Server Explorer.
Visual Studio opens the form designer.
3. In the form designer, double-click Add Table.
Visual Studio adds the Click event handler template to the code.
4. Add the following code to create a DataTable, and then set its name
to Employees:
5. string strMessage;
6.
7. //Create the table
8. System.Data.DataTable dtEmployees;
9. dtEmployees = new System.Data.DataTable(“Employees”);
10.
Microsoft ADO.Net – Step by Step 138
11. strMessage = “The table name is “;
12. strMessage += dtEmployees.TableName.ToString();
13.
MessageBox.Show(strMessage);
This code uses the New(tableName) version of the constructor to create a
DataTable named dtEmployees, and then displays the table name in a
message box.
14. Press F5 to run the application.
15. Click Add Table.
The application displays a message box containing the name of the table.
16. Close the application.
Creating DataSet Tables
Table 7-2 shows the four methods that can be used to add a table to the DataSet’s
Tables collection. These methods are called on the Tables collection, not the DataSet
itself, for example, myDataSet.Tables.Add(), not myDataSet.Add().
Table 7-2: DataSet Add Table Methods
Method Description
Tables.Add() Creates a
new
DataTable
within the
Microsoft ADO.Net – Step by Step 139
Table 7-2: DataSet Add Table Methods
Method Description
DataSet
with the
name
TableN,
where N is a
sequential
number
Tables.Add (TableName) Creates a
new
DataTable
with the
name
specified in
the
TableName
string
Tables.Add (DataTable) Adds the
specified
DataTable
to the
DataSet
Tables.AddRange (TableArray) Adds the
DataTables
included in
the
TableArray
array to the
DataSet
The first version of the Add method creates a DataTable with the name TableN, where N
is a sequential number. Note that this behavior is different from creating an independent
DataTable without passing a table name to the constructor. In the latter case, the
TableName property will be an empty string.
We used the second version of the Add method, Add(TableName), in the previous
chapter. This version creates the new table and sets its TableName property to the string
supplied as a parameter.
You can add an independent DataTable that you’ve created at run time, or add a
DataTable that exists in another DataSet, by using the Add(DataTable) version, while the
AddRange method allows you to add an array of DataTables (again, either DataTables
that you’ve created at run time or DataTables belonging to another DataSet).
Create a DataTable Using the Tables.Add Method
Visual Basic .NET
1. In the code editor, select btnDataSet in the ControlName list, and then
select Click in the MethodName list.
Visual Studio adds the Click event handler template to the code.
2. Add the following code to add a DataTable with a default name to the
DataSet:
3. Dim strMessage As String
4.
5. ‘Create the table
6. Me.dsEmployees.Tables.Add()
7.
Microsoft ADO.Net – Step by Step 140
8. strMessage = “The table name is ”
9. strMessage &= Me.dsEmployees.Tables(0).TableName.ToString
MessageBox.Show(strMessage)
The code uses the version of the Add method that creates a new table with
the default name of TableN.
10. Press F5 to run the application.
11. Click DataSet Table.
The application displays a message box containing the name of the table.
12. Close the application.
Visual C# .NET
1. In the form designer, double-click the Dataset Table button.
Visual Studio adds the Click event handler to the code window.
2. Add the following code to add a DataTable with a default name to the
DataSet:
3. string strMessage;
4.
5. //Create the table
6. this.dsEmployees.Tables.Add();
7.
8. strMessage = “The table name is “;
9. strMessage +=
this.dsEmployees.Tables[0].TableName.ToString();
MessageBox.Show(strMessage);
The code uses the version of the Add method that creates a new table with
the default name of TableN.
10. Press F5 to run the application.
11. Click DataSet Table.
The application displays a message box containing the name of the table.
Microsoft ADO.Net – Step by Step 141
12. Close the application.
DataTable Properties
The primary properties of the DataTable are shown in Table 7-3. The most important of
these are the three collections that control the data—Columns, Rows, and Constraints.
We’ll look at each of these in detail later in this chapter.
Table 7-3: DataTable Properties
Property Description
CaseSensitive Determines
how string
comparison
s will be
performed.
ChildRelations A collection
of
DataRelatio
n objects
that have
this
DataTable
as the
Parent
table.
Columns The
collection of
DataColumn
objects
within the
DataTable.
Constraints The
collection of
constraints
maintained
by the
DataTable.
DataSet The DataSet
of which this
Microsoft ADO.Net – Step by Step 142
Table 7-3: DataTable Properties
Property Description
DataTable is
a member.
DisplayExpression An
expression
used to
represent
the table
name in the
user
interface
(UI).
HasErrors Indicates
whether
there are
errors in any
of the rows
belonging to
the
DataTable.
ParentRelations A collection
of
DataRelatio
n objects
that have
this
DataTable
as the Child
table.
PrimaryKey An array of
columns
that function
as the
primary key
of the table.
Rows The
collection of
rows
belonging to
the table.
TableName The name of
the
DataTable
in the
DataSet.
This is the
name by
which the
DataTable is
referenced
in code.
If the DataTable belongs to a DataSet, the CaseSensitive property will default to the
value of the corresponding DataSet.CaseSensitive property. Otherwise, the default value
will be False.
Microsoft ADO.Net – Step by Step 143
The ChildRelations and ParentRelations collections contain references to the
DataRelations that reference the table as a child or parent, respectively. For most
independent DataTables, these collections will be Null, but it is theoretically possible to
add a relation to the ChildRelations and ParentRelations collections if, for example, the
DataTable is related to itself.
The DisplayExpression property is similar to the Caption property of a column in that it
determines how the name of the table will be displayed to the user at run time, but unlike
the Caption property, DisplayExpression uses an expression to determine the value at
run time. One of the uses of the DataExpression property is to calculate the way the
table is displayed based on the contents of the table.
Using DataTable Properties
Most DataTable properties are set just like the properties of any other object—by a
simple assignment, or if the property is a collection, by calling the collection’s Add
method. Additionally, the structure of a DataTable based on a table in a data source can
be established using the FillSchema method of the DataAdapter. In Chapter 6, we used
FillSchema to load the entire structure of a DataTable. It can also be used to load
DataTable constraints such as the primary key.
Add a PrimaryKey Constraint Using the DataAdapter’s FillSchema Method
Visual Basic .NET
1. In the code editor, select btnSchema in the ControlName list, and then
select Click in the MethodName list.
Visual Studio adds the Click event handler template.
2. Add the following code to create the table and its PrimaryKey
constraint by using FillSchema:
3. Dim strMessage As String
4.
5. Me.dsEmployees.Tables.Add(“Employees”)
6. Me.daEmployees.FillSchema(Me.dsEmployees.Tables(“Employe
es”), _
7. SchemaType.Source)
8.
9. With Me.dsEmployees.Tables(“Employees”)
10. strMessage = “Primary Key: ”
11. strMessage &=
.PrimaryKey(0).ColumnName.ToString
12. strMessage &= vbCrLf & “Constraint Count: ”
13. strMessage &=
.Constraints(0).ConstraintName.ToString
14. MessageBox.Show(strMessage)
End With
15. Press F5 to run the application.
16. Click FillSchema.
The application displays a message box showing the column of the primary
key and the number of constraints.
Microsoft ADO.Net – Step by Step 144
17. Close the application.
Visual C# .NET
1. In the form designer, double-click the FillSchema button.
2. Visual Studio adds the Click event handler to the code window.
3. Add the following code to create the table and its PrimaryKey
constraint by using FillSchema:
4. string strMessage;
5. System.Data.DataTable dt;
6.
7. dt = this.dsEmployees.Tables.Add(“Employees”);
8.
9. this.daEmployees.FillSchema(dt,
10. SchemaType.Source);
11.
12. strMessage = “Primary Key: “;
13. strMessage += dt.PrimaryKey[0].ColumnName.ToString();
14. strMessage += “\nConstraint Count: “;
15. strMessage += dt.Constraints[0].ConstraintName.ToString();
16. MessageBox.Show(strMessage);
17. Press F5 to run the application.
18. Click FillSchema.
The application displays a message box showing the column of the primary
key and the number of constraints.
Microsoft ADO.Net – Step by Step 145
19. Close the application.
The Columns Collection
The DataTable’s Columns collection contains zero or more DataColumn objects that
define the structure of the table. If the DataTable is created by a DataAdapter’s Fill or
FillSchema method, the Columns collection will be generated automatically.
If you’re creating a DataColumn in code, you can use one of the New constructors
shown in Table 7-4.
Table 7-4: DataColumn Constructors
Method Description
New() Creates a
new
DataColumn
with no
ColumnNam
e or Caption
New(columnName) Creates a
new
DataColumn
with the
name
specified in
the
columnNam
e string
New(columnName, dataType) Creates a
new
DataColumn
with the
name
specified in
the
columnNam
e string and
the data type
specified by
the dataType
parameter
New(columnName, DataType, Expression) Creates a
new
Microsoft ADO.Net – Step by Step 146
Table 7-4: DataColumn Constructors
Method Description
DataColumn
with the
name
specified in
the
columnNam
e string and
the specified
DataType
and
Expression
New(columnName, DataType, Expression,
ColumnMapping)
Creates a
new
DataColumn
with the
name
specified in
the
columnNam
e string and
the specified
DataType,
Expression,
and
ColumnMap
ping
The primary properties of the DataColumn are shown in Table 7-5. They correspond
closely to the properties of data columns in most relational databases.
Table 7-5: DataColumn Properties
Property Description
AllowDbNull Determines
whether the
column can be
left empty
AutoIncrement Determines
whether the
system will
automatically
increment the
value of the
column
AutoIncrementSeed The starting
value for an
AutoIncrement
column
AutoIncrementStep The increment
by which an
AutoIncrement
column will be
increased. For
example, if the
AutoIncrementS
Microsoft ADO.Net – Step by Step 147
Table 7-5: DataColumn Properties
Property Description
eed is 1, and the
AutoIncrementS
tep is 3, the first
value will be 1,
the second 4,
the third 7, and
so on
Caption The name of the
column
displayed in
some controls,
such as the
DataGrid. The
default value is
the
ColumnName
ColumnName The name of the
table in the
DataSet’s
Tables
collection. This
is the name by
which the
column can be
referenced in
code
DataType The .NET
Framework data
type of the
column
DefaultValue The value of the
column provided
by the system if
no other value is
provided
Expression The expression
used to
calculate the
value of the
column
MaxLength The maximum
length of a text
column
ReadOnly Determines
whether the
value of the
column can be
changed after
the row
containing it has
been added to
the table
Microsoft ADO.Net – Step by Step 148
Table 7-5: DataColumn Properties
Property Description
Unique Determines
whether each
row in the table
must have a
unique value for
this column
Important There is an incompatibility between the .NET Framework
decimal data type and the Microsoft SQL Server decimal
data type. The .NET Framework decimal data type allows a
maximum of 28 significant digits, while the SQL Server
decimal data type allows 38 significant digits. If a
DataColumn is defined as System.Decimal and it is filled
from a SQL Server table, any rows containing more than 28
significant digits will cause an exception.
Create a Calculated Column
Visual Basic .NET
1. Select btnCalculate in the ControlName list, and then select Click in
the MethodName list.
Visual Studio adds the Click event handler template to the code.
2. Add the following code, which first adds an Employees table to the
dsEmployees DataSet and then uses the daEmployees
DataAdapter to create the pre-existing columns and fill them with
data:
3. Dim dcName As System.Data.DataColumn
4.
5. ‘Create the table
6. Me.dsEmployees.Tables.Add(“Employees”)
7.
8. ‘Fill the table from daEmployees
Me.daEmployees.Fill(Me.dsEmployees.Tables(0))
9. Add the following code to create the column and then add it to the
table:
10. ‘Create the column
11. dcName = New System.Data.DataColumn(“Name”)
12. dcName.DataType = System.Type.GetType(“System.String”)
13. dcName.Expression = “FirstName + ‘ ‘ + LastName”
14.
15. ‘Add the calculated column
16. Me.dsEmployees.Tables(“Employees”).Columns.Add(dcName)
17. Add the following code to bind the lbEmployees list box to the
calculated column so that we can see the results:
Important Make sure that you choose the lbEmployees list box, not the
lblEmployees label.
18. ‘Bind to the listbox
19. Me.lbEmployees.DataSource =
Me.dsEmployees.Tables(“Employees”)
20. Me.lbEmployees.DisplayMember = “Name”
Microsoft ADO.Net – Step by Step 149
21. Press F5 to run the application.
22. Click Calculate.
The application displays the full name of the employees in the list box.
23. Close the application.
Visual C# .NET
1. In the form designer, double-click the Calculate button.
Visual Studio adds the Click event handler to the code window.
2. Add the following procedure, which first adds an Employees table to
the dsEmployees DataSet, and then uses the daEmployees
DataAdapter to create the pre-existing columns and fill them with
data:
3. System.Data.DataColumn dcName;
4.
5. //Create the table
6. this.dsEmployees.Tables.Add(“Employees”);
7.
8. //Fill the data from the dataset
this.daEmployees.Fill(this.dsEmployees.Tables[0]);
9. Add the following code to create the column and then add it to the
table:
10. //Create the column
11. dcName = new System.Data.DataColumn(“Name”);
12. dcName.DataType = System.Type.GetType(“System.String”);
13. dcName.Expression = “FirstName + ‘ ‘ + LastName”;
14.
15. //Add the calculated column
this.dsEmployees.Tables[“Employees”].Columns.Add(dcName);
16. Add the following code to bind the lbEmployees list box to the
calculated column so that we can see the results:
Important Make sure that you choose the lbEmployees list box, not the
lblEmployees label.
17. //Bind to the listbox
18. this.lbEmployees.DataSource =
this.dsEmployees.Tables[“Employees”];
Microsoft ADO.Net – Step by Step 150
19. this.lbEmployees.DisplayMember = “Name”;
20. Press F5 to run the application.
21. Click Calculate.
The application displays the full name of the employees in the list box.
22. Close the application.
Rows
As we’ve seen previously, the DataTable’s Rows collection contains the actual data that
is contained in the DataTable, in the form of zero or more DataRow objects. The
structure of the DataRow is shown in Table 7-6.
Table 7-6: DataRow Properties
Property Description
HasErrors Indicates
whether
there are
any errors in
the row
Item The value of
a column in
the
DataRow
ItemArray The value of
all columns
in the
DataRow
represented
as an array
RowError The custom
error
description
for a row
RowState The
DataRowSta
te of a row
Table The
DataTable
to which the
Microsoft ADO.Net – Step by Step 151
Table 7-6: DataRow Properties
Property Description
DataRow
belongs
Because the Rows property is a collection, you can add new data to the DataTable by
using the Add method, which is available in two forms, as shown in Table 7-7.
Table 7-7: Rows.Add Methods
Method Description
Add(DataRow) Adds the
specified
DataRow to
the table
Add(dataValues()) Creates a
new
DataRow in
the table
and sets its
Item values
as specified
in the
dataValues
object array
Add a New Row to the Rows Collection
Visual Basic .NET
1. Select btnAddRow in the ControlName list, and then select Click in
the MethodName list.
Visual Studio adds the Click event handler template to the code.
2. Add the following code to create a new DataRow, and add it to the
Customers table:
3. Dim drNew As System.Data.DataRow
4.
5. ‘Create the new row
6. drNew = Me.dsMaster1.CustomerList.NewRow
7. drNew.Item(“CustomerID”) = “ANEWR”
8. drNew.Item(“CompanyName”) = “A New Row”
9.
10. ‘Add row to table
11. Me.dsMaster1.CustomerList.Rows.Add(drNew)
12.
13. ‘Refresh the display
Me.lbClients.Refresh()
14. Press F5 to run the application.
15. Click Add DataRow.
The application adds the new row to the table.
16. Scroll to the bottom of the Clients list box to confirm the addition.
Microsoft ADO.Net – Step by Step 152
17. Close the application.
Visual C# .NET
1. In the form designer, double-click the Add DataRow button.
Visual Studio adds the Click event handler to the code window.
2. Add the following procedure to create a new DataRow, and add it to
the Customers table:
3. System.Data.DataRow drNew;
4.
5. //Create the new row
6. drNew = this.dsMaster1.CustomerList.NewRow();
7. drNew[“CustomerID”] = “ANEWR”;
8. drNew[“CompanyName”] = “A New Row”;
9.
10. //Add row to table
11. this.dsMaster1.CustomerList.Rows.Add(drNew);
12.
13. //Refresh the display
14. this.lbClients.Refresh();
15. Press F5 to run the application.
16. Click Add DataRow.
The application adds the new row to the table.
17. Scroll to the bottom of the Clients list box to confirm the addition.
Microsoft ADO.Net – Step by Step 153
18. Close the application.
The RowState property of the DataRow reflects the actions that have been taken since
the DataTable was created or since the last time the AcceptChanges method was called.
The possible values for the RowState property are shown in Table 7-8.
Table 7-8: DataRowState Values
Property Description
Added The
DataRow is
new.
Deleted The
DataRow
has been
deleted from
the table.
Detached The
DataRow
has not yet
been added
to a table.
Modified The
contents of
the
DataRow
have been
changed.
Unchanged The
DataRow
has not
been
modified.
Display the Row State
Visual Basic .NET
1. Select btnVersion in the ControlName list, and then select Click in the
MethodName list.
Visual Studio adds the Click event handler template to the code.
2. Add the following code to edit a row and display its properties:
Microsoft ADO.Net – Step by Step 154
3. Dim strMessage As String
4.
5. With Me.dsMaster1.CustomerList.Rows(0)
6. .Item(“CustomerID”) = “NEWVAL”
7. strMessage = “The RowState is ” & .RowState.ToString
8. strMessage &= vbCrLf & “The original value was ”
9. strMessage &= .Item(“CustomerID”, DataRowVersion.Original)
10. strMessage &= vbCrLf & “The new value is ”
11. strMessage &= .Item(“CustomerID”,
DataRowVersion.Current)
End With
MessageBox.Show(strMessage)
12. Press F5 to run the application.
13. Click Row Version.
The application displays a message box indicating the changes.
14. Close the application.
Visual C# .NET
1. In the form designer, double-click the Row Version button.
Visual Studio adds the Click event handler to the code window.
2. Add the following procedure to edit a row and display its properties:
3. string strMessage;
4. System.Data.DataRow dr;
5.
6. dr = this.dsMaster1.CustomerList.Rows[0];
7. dr[“CustomerID”] = “NEWVAL”;
8.
9. strMessage = “The RowState is ” + dr.RowState.ToString();
10. strMessage += “\nThe original value was “;
11. strMessage += dr[“CustomerID”, DataRowVersion.Original];
12. strMessage += “\nThe new value is “;
13. strMessage += dr[“CustomerID”, DataRowVersion.Current];
14.
Microsoft ADO.Net – Step by Step 155
MessageBox.Show(strMessage);
15. Press F5 to run the application.
16. Click Row Version.
The application displays a message box indicating the changes.
17. Close the application.
Constraints
Along with the DataTable’s PrimaryKey property, the Constraints collection is used to
maintain the integrity of the data within a DataTable. The System.Data.Constraint object
has only the two properties, which are shown in Table 7-9.
Table 7-9: Constraint Properties
Property Description
ConstraintName The name of
the
constraint.
This
property is
used to
reference
the
Constraint in
code.
Table The
DataTable
to which the
constraint
belongs.
Obviously, an object that has only a name and a container is of little use when it comes
to enforcing integrity. In real applications, you will instantiate one of the objects that
inherits from Constraint, ForeignKeyConstraint, or UniqueConstraint.
The properties of the ForeignKeyConstraint object are shown in Table 7-10. This
constraint represents the rules that are enforced when a parent-child relationship exists
between tables (or between rows within a single table).
Table 7-10: ForeignKeyConstraint Properties
Property Description
AcceptRejectRule Determines
the action
Microsoft ADO.Net – Step by Step 156
Table 7-10: ForeignKeyConstraint Properties
Property Description
that should
take place
when the
AcceptChan
ges method
is called
Columns The
collection of
child
columns for
the
constraint
DeleteRule The action
that will take
place when
the row is
deleted
RelatedColumns The
collection of
parent
columns for
the
constraint
RelatedTable The parent
DataTable
for the
constraint
Table Overrides
the
Constraint.T
able property
to return the
child
DataTable
for the
constraint
UpdateRule The action
that will take
place when
the row is
updated
The actions to take place to enforce integrity are maintained by three properties of the
ForeignKeyConstraint: AcceptRejectRule, DeleteRule, and UpdateRule.
The possible values of the AcceptRejectRule property are Cascade or None. The
DeleteRule and UpdateRule properties can be set to any of the values shown in Table 7-
11. Both properties have a default value of Cascade.
Table 7-11: Action Rules
Property Description
Cascade Delete or
update the
Microsoft ADO.Net – Step by Step 157
Table 7-11: Action Rules
Property Description
related rows
None Take no
action on
the related
rules
SetDefault Set values
in the
related rows
to their
default
values
SetNull Set values
in the
related rows
to Null
Add a ForeignKeyConstraint
Visual Basic .NET
1. In the code editor, select btnForeign in the ControlName list, and then
select Click in the MethodName list.
Visual Studio adds the Click event handler template to the code.
2. Add the following code to create the ForeignKeyConstraint:
3. Dim strMessage As String
4. Dim fkNew As System.Data.ForeignKeyConstraint
5.
6. With Me.dsUntyped
7. fkNew = New System.Data.ForeignKeyConstraint(“NewFK”, _
8. .Tables(“dtMaster”).Columns(“MasterID”), _
9. .Tables(“dtChild”).Columns(“MasterLink”))
10. .Tables(“dtChild”).Constraints.Add(fkNew)
11.
12. strMessage = “The new constraint is called ”
13. strMessage &=
.Tables(“dtChild”).Constraints(0).ConstraintName.ToString
14. End With
15.
MessageBox.Show(strMessage)
16. Press F5 to run the application.
17. Click Foreign Key.
The application adds the ForeignKeyConstraint and displays its name in a
message box.
Microsoft ADO.Net – Step by Step 158
18. Close the application.
Visual C# .NET
1. In the form designer, double-click the Foreign Key button.
Visual Studio adds the Click event handler to the code window.
2. Add the following code to create the ForeignKeyConstraint:
3. string strMessage;
4. System.Data.ForeignKeyConstraint fkNew;
5. System.Data.DataSet ds = this.dsUntyped;
6.
7. fkNew = new System.Data.ForeignKeyConstraint(“NewFK”,
8. ds.Tables[“dtMaster”].Columns[“MasterID”],
9. ds.Tables[“dtChild”].Columns[“MasterLink”]);
10. ds.Tables[“dtChild”].Constraints.Add(fkNew);
11.
12. strMessage = “The new constraint is called “;
13. strMessage +=
14. ds.Tables[“dtChild”].Constraints[0].ConstraintName.ToString();
MessageBox.Show(strMessage);
15. Press F5 to run the application.
16. Click Foreign Key.
The application adds the ForeignKeyConstraint and displays its name in a
message box.
Microsoft ADO.Net – Step by Step 159
17. Close the application.
The UniqueConstraint ensures that the column or columns specified in its Columns
property are unique within the table. Its structure is much simpler than a
ForeignKeyConstraint, as shown in Table 7-12.
Table 7-12: UniqueConstraint Properties
Property Description
Columns The array of
columns
affected by
the
constraint
IsPrimaryKey Indicates
whether the
constraint is
on the
primary key
Add a UniqueConstraint
Visual Basic .NET
1. In the code editor, select btnUnique in the ControlName list, and then
select Click in the MethodName list.
Visual Studio adds the Click event handler template to the code.
2. Add the following code to create the UniqueConstraint:
3. Dim strMessage As String
4. Dim ucNew As System.Data.UniqueConstraint
5.
6. With Me.dsUntyped.Tables(“dtMaster”)
7. ucNew = New System.Data.UniqueConstraint(“NewUnique”, _
8. .Columns(“MasterValue”))
9. .Constraints.Add(ucNew)
10.
11. strMessage = “The new constraint is called ”
12. strMessage &=
.Constraints(“NewUnique”).ConstraintName.ToString
Microsoft ADO.Net – Step by Step 160
13. End With
14.
MessageBox.Show(strMessage)
15. Press F5 to run the application.
16. Click Unique.
The application adds the UniqueConstraint and displays its name in a
message box.
17. Close the application.
Visual C# .NET
1. In the form designer, double-click the Unique button.
Visual Studio adds the Click event handler to the code window.
2. Add the following code to create the UniqueConstraint:
3. string strMessage;
4. System.Data.UniqueConstraint ucNew;
5. System.Data.DataTable dt = this.dsUntyped.Tables[“dtMaster”];
6.
7. ucNew = new System.Data.UniqueConstraint(“NewUnique”,
8. dt.Columns[“MasterValue”]);
9. dt.Constraints.Add(ucNew);
10.
11. strMessage = “The new constraint is called “;
12. strMessage +=
dt.Constraints[“NewUnique”].ConstraintName.ToString();
MessageBox.Show(strMessage);
13. Press F5 to run the application.
14. Click Unique.
The application adds the UniqueConstraint and displays its name in a
message box.
Microsoft ADO.Net – Step by Step 161
15. Close the application.
DataTable Methods
The methods supported by the DataTable are shown in Table 7-13. We’ve already used
some of these, such as the Clear method, in previous exercises. We’ll examine most of
the others in Chapter 9.
Table 7-13: DataTable Methods
Method Description
AcceptChanges Commits the
pending
changes to
all
DataRows
BeginLoadData Turns off
notifications,
index
maintenanc
e, and
constraint
enforcement
while a bulk
data load is
being
performed.
Used in
conjunction
with the
LoadDataRo
w and
EndLoadDat
a methods
Clear Removes all
DataRows
from the
DataTable
Clone Copies the
structure of
a DataTable
Microsoft ADO.Net – Step by Step 162
Table 7-13: DataTable Methods
Method Description
Compute Performs an
aggregate
operation on
the
DataTable
Copy Copies the
structure
and data of
a DataTable
EndLoadData Reinstates
notifications,
index
maintenanc
e, and
constraint
enforcement
after a bulk
data load
has been
performed
ImportRow Copies a
DataRow,
including all
row values
and the row
state, into a
DataTable
LoadDataRow Used during
bulk
updating of
a DataTable
to update or
add a new
DataRow
NewRow Creates a
new
DataRow
that
matches the
DataTable
schema
RejectChanges Rolls back
all pending
changes on
the
DataTable
Select Gets an
array of
DataRow
objects
Microsoft ADO.Net – Step by Step 163
The Select Method
The Select method is used to filter and sort the rows of a DataTable at run time. The
Select method doesn’t affect the contents of the table. Instead, the method returns an
array of DataRows that match the criteria you specify.
Note The DataView, which we’ll examine in the following chapter, also
allows you to filter and sort data rows.
Use the Select Method to Display a Subset of Rows
Visual Basic .NET
1. In the code editor, select btnSelect in the ControlName list, and then
select Click in the MethodName list.
Visual Studio adds the Click event handler template to the code.
2. Add the following code to select only those Customers whose
CustomerID begins with A, and rebind the lbCustomers list box to
the array of selected rows:
3. Dim drFound() As System.Data.DataRow
4. Dim dr As System.Data.DataRow
5.
6. drFound = Me.dsMaster1.CustomerList.Select(“CustomerID
LIKE” _ & ” ‘A*'”)
7.
8. Me.lbClients.DataSource = Nothing
9. Me.lbClients.Items.Clear()
10.
11. For Each dr In drFound
12. Me.lbClients.Items.Add(dr(“CompanyName”))
13. Next
14.
Me.lbClients.Refresh()
15. Press F5 to run the application.
16. Click Select.
The application displays a subset of rows in the lbCustomers list box.
17. Close the application.
Microsoft ADO.Net – Step by Step 164
Visual C# .NET
1. In the form designer, double-click the Select button.
Visual Studio adds the Click event handler to the code window.
2. Add the following code to select only those Customers whose
CustomerID begins with A, and rebind the lbCustomers list box to
the array of selected rows:
3. System.Data.DataRow[] drFound;
4.
5. drFound = this.dsMaster1.CustomerList.Select(“CustomerID
LIKE” + ” ‘A*'”);
6.
7. this.lbClients.DataSource = null;
8. this.lbClients.Items.Clear();
9.
10. foreach (System.Data.DataRow dr in drFound)
11. {
12. this.lbClients.Items.Add(dr[“CompanyName”]);
13. }
14.
this.lbClients.Refresh();
15. Press F5 to run the application.
16. Click Select.
The application displays a subset of rows in the lbCustomers list box.
17. Close the application.
DataRow Methods
The methods supported by the DataRow object are shown in Table 7-14. The majority of
the methods are used when editing data and we’ll look at them in detail in Chapter 9.
Table 7-14: DataRow Methods
Method Description
AcceptChanges Commits all
pending
changes to
a DataRow
Microsoft ADO.Net – Step by Step 165
Table 7-14: DataRow Methods
Method Description
BeginEdit Begins an
edit
operation
CancelEdit Cancels an
edit
operation
Delete Deletes the
row
End Edit Ends an edit
operation
GetChildRows Gets all the
child rows of
a DataRow
GetParentRow Gets the
parent row
of a
DataRow
based on
the specified
DataRelatio
n
GetParentRows Gets the
parent rows
of a
DataRow
based on
the specified
DataRelatio
n
HasVersion Indicates
whether a
specified
version of a
DataRow
exists
IsNull Indicates
whether the
specified
Column is
Null
RejectChanges Rolls back
all pending
changes to
the
DataRow
SetParentRow Sets the
parent row
of a
DataRow
Microsoft ADO.Net – Step by Step 166
The GetChildRows and GetParentRows methods of the DataRow are used to navigate
the relationships you set up using the DataSet’s Relations collection. Both methods are
overloaded, allowing you to pass either a DataRelation or a string representing the name
of the DataRelation, and, optionally, a RowState value.
Use the GetChildRows Method to Retrieve Data
Visual Basic .NET
1. In the code editor, select lbClients in the ControlName list, and then
select SelectedIndexChanged in the MethodName list.
Visual Studio adds the Click event handler template to the code.
2. Add the following code to create a relation in dsMaster1, retrieve the
child rows of the current list box selection, and then display them in
the dgOrders data grid:
3. Dim drCurrent As System.Data.DataRow
4. Dim dsCustOrders As New System.Data.DataSet()
5. Dim drCustOrders() As System.Data.DataRow
6.
7. ‘Create the relation if necessary
8. If Me.dsMaster1.Relations.Count = 0 Then
9. Me.dsMaster1.Relations.Add(“CustomerOrders”, _
10. Me.dsMaster1.CustomerList.CustomerIDColumn, _
11. Me.dsMaster1.OrderTotals.CustomerIDColumn)
12. End If
13.
14. drCurrent = Me.lbClients.SelectedItem.Row
15. dsCustOrders.Merge(drCurrent.GetChildRows(“CustomerOrders”
))
16.
17. Me.dgOrders.SetDataBinding(dsCustOrders, “OrderTotals”)
Me.dgOrders.Refresh()
18. Press F5 to run the application.
19. Select different items in the Clients list.
The application displays the Client’s rows in the Orders data grid.
20. Close the application.
Microsoft ADO.Net – Step by Step 167
Visual C# .NET
1. In the form designer, double-click the Select button.
Visual Studio adds the Click event handler to the code window.
2. Add the following code to create a relation in dsMaster1, retrieve the
child rows of the current list box selection, and then display them in
the dgOrders data grid:
3. System.Data.DataRowView drCurrent;
4. System.Data.DataSet dsCustOrders;
5.
6. dsCustOrders = new System.Data.DataSet();
7. //Create the relation if necessary
8. if (this.dsMaster1.Relations.Count == 0)
9. {
10. this.dsMaster1.Relations.Add(“CustomerOrders”,
11.
this.dsMaster1.CustomerList.CustomerIDColumn,
12. this.dsMaster1.OrderTotals.CustomerIDColumn);
13. }
14.
15. drCurrent = (System.Data.DataRowView)
this.lbClients.SelectedItem;
16.
17. dsCustOrders.Merge(drCurrent.Row.GetChildRows(“C
ustomerOrders”));
18.
19. this.dgOrders.SetDataBinding(dsCustOrders,
“OrderTotals”);
this.dgOrders.Refresh();
20. Press F5 to run the application.
21. Select different items in the Clients list.
The application displays the Client’s rows in the Orders data grid.
22. Close the application.
Microsoft ADO.Net – Step by Step 168
DataTable Events
The events supported by the DataTable are shown in Table 7-15. All of the events are
used as part of data validation, and we’ll examine them in more detail in Chapter 10.
Table 7-15: DataTable Events
Event Description
ColumnChanged Raised after a DataRow item has been changed
ColumnChanging Raised before a DataRow item has been changed
RowChanged Called after a DataRow has been changed
RowChanging Called before a DataRow has been changed
RowDeleted Called after a DataRow has been deleted
RowDeleting Called before a DataRow is deleted
Chapter 7 Quick Reference
To Do this
Create an
independent
DataTable at run time
Use the New method:
myTable = New.System.Data.DataTable()
Add a DataTable to
an existing DataSet
Use the Add method of the DataSet’s Tables
collection:
myDataSet.Tables.Add(TableName)
Add a PrimaryKey
constraint based on a
table in the data
source
Use the DataAdapter’s FillSchema method:
myDA.FillSchema(mytable.
SchemaType.Source)
Create a calculated
column
Set the Expression property of the column:
MyColumn.Expression = “New ” & “Value”
Add a new DataRow Create the DataRow by using the NewRow method,
and then add it to the DataTable:
myRow = myTable.NewRow
myTable.Rows.Add(myRow)
Display a subset of
rows
Use the DataTable’s Select method:
DataRowArray =
myTable.Select(“Criteria”)
Retrieve data related
to the current
DataRow
Use the GetChildRows method:
myRow.GetChildRows(“RelationName”)
Chapter 8: The DataView
Overview
In this chapter, you’ll learn how to:
§Add a DataView to a form
§ Create a DataView at run time
§ Create calculated columns in a DataView
§ Sort DataView rows
§ Filter DataView rows
Microsoft ADO.Net – Step by Step 169
§ Search a DataView based on a primary key value
In the previous chapter, we looked at the Select method of the DataTable, which
provides a mechanism for filtering and sorting DataRows. The DataView provides
another mechanism for performing the same actions. Unlike the Select method, a
DataView is a separate object that sits on top of a DataTable.
Understanding DataViews
A DataView provides a filtered and sorted view of a single DataTable. Al-though the
DataView provides the same functionality as the DataTable’s Select method, it has a
number of advantages. Because they are distinct objects, DataViews can be created and
configured at both design time and run time, making them easier to implement in many
situations.
Furthermore, unlike the array of DataRows returned from a Select method, DataViews
can be used as the data source for bound controls. (Remember that in the previous
chapter we had to load the DataRow array returned by the Select method into a DataSet
before we could display its contents in the data grid.)
You can create multiple DataViews for any given DataTable. In fact, every DataTable
contains at least one DataView in its DefaultDataView property. The properties of the
DefaultDataView can be set at run time, but not at design time.
The rows of a DataView, although very much like DataRows, are actually DataRowView
objects that reference DataRows. The DataRowView properties are shown in Table 8-1.
Only the Item property is also exposed by the DataRow; the other properties are unique.
Table 8-1: DataRowView Properties
Property Description
DataView The DataView to which this DataRowView belongs
IsEdit Indicates whether the DataRowView is currently being
edited
IsNew Indicates whether the DataRowView is new
Item The value of a column in the DataRowView
Row The DataRow that is being viewed
RowVersion The current version of the DataRowView
DataViewManagers
Functionally, a DataViewManager is similar to a DataSet. Just as a DataSet acts as a
container for DataTables, the DataViewManager acts as a container for DataViews,
one for each DataTable in a Dat aSet.
The DataViews within the DataViewManager are accessed through the
DataViewSettings collection of the DataViewManager. It’s convenient to think of a
DataViewSetting existing for each DataTable in a DataSet. In reality, the
DataViewSetting isn’t physically created until (and unless) it is referenced in code.
DataViewManagers are most often used when the DataSet contains related tables
because they allow you to persist sorting and filtering criteria across calls to
GetChildRows . If you were to use individual DataViews on the child table, the sorting
and filtering criteria would need to be reset after each call. With a DataViewManager,
after the criteria have been established, the rows returned by GetChildRows will be
sorted and filtered automatically.
Microsoft ADO.Net – Step by Step 170
In Chapter 7, we saw that the DataSet has a DefaultViewManager property. In reality,
you’re actually binding to the default DataViewManager when you bind a control to a
DataSet. Under most circumstances, you can ignore this technicality, but it can be
useful for setting default sorting and filtering criteria.
Note, however, that the DataSet’s DefaultViewManager property is read-only—you can
set its properties, but you cannot create a new DataViewManager and assign it to the
DataSet as the default DataViewManager.
Creating DataViews
Because DataViews are independent objects, you can create and configure them at
design time using Microsoft Visual Studio. You can, of course, also create and configure
DataViews at run time in code.
Using Visual Studio
Visual Studio supports the design-time creation of DataViews through the DataView
control on the Data tab of the Toolbox. Like any other control with design-time support,
you simply drag the control onto a form and set its properties in the Properties window.
Create and Bind a DataView Using Visual Studio
1. Open the DataViews project from the Start menu or the Project menu.
2. Double-click DataViews.vb (or DataViews.cs if you’re using C#) in the
Solution Explorer.
Visual Studio .NET opens the form designer.
3. Drag a DataView control from the Data tab of the Toolbox to the form.
Visual Studio adds the control to the component designer.
4. In the Properties window, change the DataView’s name to dvOrders.
5. Change the Table property to dsMaster1.OrderTotals, and then
change the Sort property to OrderID.
Microsoft ADO.Net – Step by Step 171
6. Select the dgOrders data grid, and then change the DataSource
property to dvOrders.
7. Press F5 to run the application.
Visual Studio displays the information in the Orders data grid arranged
according to the values in the OrderID column.
Microsoft ADO.Net – Step by Step 172
8. Close the application.
Creating DataViews at Run Time
Like most of the objects in the .NET Framework Class Library, the DataView supports a
New constructor, which allows the DataView to be created in code at run time. The
DataView supports the two versions of the New constructor, which are shown in Table 8-
2.
Table 8-2: DataView Constructors
Method Description
New() Creates a
new
DataView
New(DataTable) Creates a
new
DataView
and sets its
Table
property to
the specified
DataTable
Create a DataView at Run Time
Visual Basic .NET
1. Double-click Create.
Visual Studio opens the code editor and adds the Click event handler
template.
2. Add the following code to the method:
3. Dim drCurrent As System.Data.DataRow
4. Dim dvNew As New System.Data.DataView()
5.
6. ‘retrieve the selected row in lbOrders
7. drCurrent = Me.lbClients.SelectedItem.Row
8.
9. ‘configure the dataview
10. dvNew.Table = Me.dsMaster1.OrderTotals
Microsoft ADO.Net – Step by Step 173
11. dvNew.RowFilter = “CustomerID = ‘” & drCurrent(0) & “‘”
12.
13. ‘rebind the datagrid
Me.dgOrders.DataSource = dvNew
The code first declares a DataRow variable that will contain the item selected
in the lbClients list box, and then creates a new DataView using the default
constructor. Next drCurrent is assigned to the current selection in the list box.
The Table property of the dvNew DataView is set to the OrderTotals table,
and the RowFilter property is set to show only the orders for the selected
client. Finally the dgOrders data grid is bound to the new DataView.
14. Press F5 to run the application, click in the Clients list box, and then
click Create.
The data grid displays the orders for only the selected client.
15. Close the application.
Visual C# .NET
1. Double-click Create.
Visual Studio opens the code editor and adds the Click event handler
template and the Click event delegate.
2. Add the following code to the method:
3. System.Data.DataRowView drCurrent;
4. System.Data.DataView dvNew;
5. dvNew = new System.Data.DataView();
6.
7. //retrieve the selected row in lbOrders
8. drCurrent =
(System.Data.DataRowView)this.lbClients.SelectedItem;
9.
10. //configure the dataview
11. dvNew.Table = this.dsMaster1.OrderTotals;
12. dvNew.RowFilter = “CustomerID = ‘” + drCurrent[0] +
“‘”;
13.
14. //rebind the datagrid
this.dgOrders.DataSource = dvNew;
Microsoft ADO.Net – Step by Step 174
The code first declares a DataRowView variable that will contain the item
selected in the lbClients list, and then creates a new DataView using the
default constructor. Next drCurrent is assigned to the current selection in the
list.
The Table property of the dvNew DataView is set to the OrderTotals table,
and the RowFilter property is set to show only the orders for the selected
client. Finally the dgOrders data grid is bound to the new DataView.
15. Press F5 to run the application, click in the Clients list, and then
click Create.
The data grid displays the orders for only the selected client.
16. Close the application.
DataView Properties
The properties exposed by the DataView object are shown in Table 8-3. The
AllowDelete, AllowEdit, and AllowNew properties determine whether the data reflected
by the DataView can be changed through the DataView. (Data can always be changed
by referencing the row in the underlying DataTable.)
Table 8-3: DataView Properties
Property Description
AllowDelete Determines
whether rows in
the DataView
can be deleted
AllowEdit Determines
whether rows in
the DataView
can be changed
AllowNew Determines
whether rows
can be added to
the DataView
Apply Determines
whether the
default sort
order,
determined by
Microsoft ADO.Net – Step by Step 175
Table 8-3: DataView Properties
Property Description
DefaultSort the underlying
data source, will
be used
Count The number of
DataRowViews
in the DataView
DataViewManager The
DataViewMana
ger to which
this DataView
belongs
Item(Index) The
DataRowView
at the specified
Index in the
DataView
RowFilter The expression
used to filter the
rows contained
in the DataView
RowStateFilter The
DataViewRowS
tate used to
filter the rows
contained in the
DataView
Sort The expression
used to sort the
rows contained
in the DataView
Table The DataTable
that is the
source of rows
for the
DataView
The Count property does exactly what one might expect—it returns the number of
DataRows reflected in the DataView, while the DataViewManager and Table properties
serve to connect the DataView to other objects within an application.
Finally the RowFilter, RowStateFilter, and Sort properties control the DataRows that are
reflected in the DataView and how those rows are ordered. We’ll examine each of these
properties later in this chapter.
DataColumn Expressions
Expressions, technically DataColumn Expressions, are used by the RowFilter and Sort
properties of the DataView. We’ve used DataColumn Expressions in previous chapters
when we created a calculated column in a DataTable and when we set the sort and filter
expressions for the DataTable Select method. Now it’s time to examine them more
closely.
Microsoft ADO.Net – Step by Step 176
A DataColumn Expression is a string, and you can use all the normal string handling
functions to build one. For example, you can use the & concatena-tion operator to join
two strings into a single Expression:
myExpression = “CustomerID = ‘” & strCustID & “‘”
Note that the value of strCustID will be surrounded by single quotation marks in the
resulting text. In building DataColumn Expressions, columns may be referred to directly
by using the ColumnName property, but any actual text values must be quoted.
In addition, certain special characters must be “escaped,” that is, wrapped in square
brackets. For example, if you had a column named Miles/Gallon, you would have to
surround the column name with brackets:
MyExpression = “[Miles/Gallon] > 10”
Tip You can find the complete list of special characters in the online
Help for the DataColumn.Expression property.
Numeric values in DataColumn Expressions require no special handling, as shown in the
previous example, but date values must be surrounded by hash marks:
MyExpression = “OrderDate > #01/01/2001#”
Important Dates in code must conform to US usage, that is,
month/day/year.
As we’ve seen, DataRow columns are referred to by the ColumnName prop-erty. You
can reference a column in a Child DataRow by adding “Child” before the ColumnName in
the Child row:
MyExpression = “Child.OrderTotal > 3000”
The syntax for referencing a Parent row is identical:
MyExpression = “Parent.CustomerID = ‘AFLKI'”
Parent and Child references are frequently used along with one of the aggre-gate
functions shown in Table 8-4. The aggregate functions can also be used directly, without
reference to Child or Parent rows.
Table 8-4: Aggregate Functions
Function Result
Sum Sum
Avg Average
Min Minimum
Max Maximum
Count Count
StDev Statistical
standard
deviation
Var Statistical
variance
When setting the expressions for DataViews, you will frequently be comparing values.
The .NET Framework handles the usual range of operators, as shown in Table 8-5.
Table 8-5: Comparison Operators
Operator Action
AND Logical
AND
Microsoft ADO.Net – Step by Step 177
Table 8-5: Comparison Operators
Operator Action
OR Logical OR
NOT Logical
NOT
< Less than
> Greater
than
<= Less than
or equal to
>= Greater
than or
equal to
<> Not equal
IN Determines
whether
the value
specified is
contained
in a set
LIKE Inexact
match
using a
wildcard
character
The IN operator requires that the set of values to be searched be separated by commas
and surrounded by parentheses:
MyExpression = “myColumn IN (‘A’,’B’,’C’)
The LIKE operator treats the characters * or % as interchangeable wildcards—both
replace zero or more characters. The wildcard characters can be used at the beginning
or end of a string, or at both ends, but cannot be contained within a string.
DataColumn Expressions also support the arithmetic operators shown in Table 8-6.
Table 8-6: Arithmetic Operators
Operator Action
+ Addition
– Subtraction
* Multiplication
/ Division
% Modulus
(integer
division)
The arithmetic + operator is also used for string concatenation within a DataColumn
Expression rather than the more usual & operator.
Finally DataColumn Expressions support a number of special functions, as shown in
Table 8-7.
Microsoft ADO.Net – Step by Step 178
Table 8-7: Special Functions
Function Result
Convert(Expression, Type) Converts the
value returned
by Expression
to the specified
.NET
Framework
Type
Len(String) The number of
characters in
the String
ISNULL(Expression, ReplacementValue) Determines
whether
Expression
evaluates to
Null, and if so,
it returns
ReplacementV
alue
IF(Expression, ValueIfTrue, ValueIfFalse) Returns
ValueIfTrue if
Expression
evaluates to
True; otherwise
returns
ValueIfFalse
SUBSTRING(Expression, Start, Length) Returns Length
characters of
the string
returned by
Expression,
beginning at
the zero-based
position
specified by
Start
Sort Expressions
Although the DataColumn Expressions used in the Sort property can be arbitrarily
complex, in most cases they will take the form of one or more ColumnNames separated
by commas:
myDataView.Sort = “CustomerID, OrderID”
Optionally, the ColumnNames may be followed by ASC or DESC to cause the values to
be sorted in ascending or descending order, respectively. The default sort is ascending,
so the ASC keyword isn’t strictly necessary, but it can sometimes be useful to include it
for clarity.
Change the Sorting Method
Visual Basic .NET
1. In the code editor, select btnSort in the ControlName list, and then
select Click in the MethodName list.
Visual Studio adds the Click event handler template to the code.
2. Add the following code to the method:
Microsoft ADO.Net – Step by Step 179
3. ‘Change the sort order
4. Me.dvOrders.Sort = “EmployeeID, CustomerID, OrderID DESC”
5.
6. ‘Refresh the datagrid
Me.dgOrders.Refresh()
The code sets the sort order of the dvOrders DataView to sort first by
EmployeeID, then by CustomerID, and finally by OrderID in descending order.
7. Press F5 to run the application.
8. Click Sort.
The application displays the sorted contents of the data grid.
9. Close the application.
Visual C# .NET
1. In the form designer, double-click the Create button.
Visual Studio adds the Click event handler to the code window.
2. In the code editor, add a Click event handler for the btnSort button
after the btnCreate_Click event handler that we created in the
previous exercise:
3. private void btnSort_Click (object sender, System.EventArgs e)
4. {
5.
}
6. Add the following code to the method:
7. //Change the sort order
8. this.dvOrders.Sort = “EmployeeID, CustomerID, OrderID DESC”;
9.
10. //Refresh the datagrid
this.dgOrders.Refresh();
The code sets the sort order of the dvOrders DataView to sort first by
EmployeeID, then by CustomerID, and finally by OrderID in descending order.
11. Press F5 to run the application.
12. Click Sort.
The application displays the sorted contents of the data grid.
Microsoft ADO.Net – Step by Step 180
13. Close the application.
RowStateFilter
In the previous chapter, we saw that each DataRow maintains its status in its RowState
property. The DataView’s RowStateFilter property can be used to limit the
DataRowViews within the DataView to those with a certain RowState or to return values
of a given state. The possible values for the RowStateFilter property are shown in Table
8-8.
Table 8-8: DataViewRowState Values
Member Name Description
Added Only those
rows that
have been
added
CurrentRows All current
row values
Deleted Only those
rows that
have been
deleted
ModifiedCurrent Current row
values for
rows that
have been
modified
ModifiedOriginal Original
values of
rows that
have been
modified
None No rows
OriginalRows Original
values of all
rows
Unchanged Only those
rows that
Microsoft ADO.Net – Step by Step 181
Table 8-8: DataViewRowState Values
Member Name Description
haven’t
been
modified
Display Only New Rows
Visual Basic .NET
1. In the code editor, select btnRowState in the ControlName list, and
then select Click in the MethodName list.
Visual Studio adds the Click event handler template.
2. Add the following code to the method:
3. Dim drNew As System.Data.DataRowView
4.
5. ‘Add a new order
6. drNew = Me.dvOrders.AddNew()
7. drNew(“CustomerID”) = “ALFKI”
8. drNew(“EmployeeID”) = 1
9. drNew(“OrderID”) = 0
10.
11. ‘Set the RowStateFilter
12. Me.dvOrders.RowStateFilter = DataViewRowState.Added
13.
14. ‘Refresh the datagrid
Me.dgOrders.Refresh()
The code first creates a new DataRowView (we’ll examine the AddNew
method in the following section), and then sets the RowStateFilter to display
only new (or added) rows. Finally the dgOrders data grid is refreshed to
display the changes.
15. Press F5 to run the application, and then click Row State.
The data grid shows only the new order.
16. Close the application.
Microsoft ADO.Net – Step by Step 182
Visual C# .NET
1. In the Form Designer, double-click the Row State button.
2. Visual Studio adds the Click event handler to the code window.
3. In the code editor, add a Click event handler for the btnRowState
button after the btnSort event handler that we created in the
previous exercise:
4. private void btnRowState_Click (object sender,
System.EventArgs e)
5. {
6.
}
7. Add the following code to the method:
8. System.Data.DataRowView drNew;
9.
10. //Add a new row
11. drNew = this.dvOrders.AddNew();
12. drNew[“CustomerID”] = “AFLKI”;
13. drNew[“EmployeeID”] = 1;
14. drNew[“OrderID”] = 0;
15.
16. //Set the RowStateFilter
17. this.dvOrders.RowStateFilter = DataViewRowState.Added;
18.
19. //Refresh the datagrid
this.dgOrders.Refresh();
The code first creates a new DataRowView (we’ll examine the AddNew
method in the following section), and then sets the RowStateFilter to display
only new (or added) rows. Finally the dgOrders data grid is refreshed to
display the changes.
20. Press F5 to run the application, and then click Row State.
The data grid shows only the new order.
21. Close the application.
Microsoft ADO.Net – Step by Step 183
DataView Methods
The primary methods supported by the DataView are shown in Table 8-9. The AddNew
method adds a new DataRowView to the DataView, while the Delete method deletes the
row at the specified index.
Table 8-9: DataView Methods
Method Description
AddNew Adds a new
DataRowVie
w to the
DataView
Delete Removes a
DataRowVie
w from a
DataView
Find Finds one or
more
DataRowVie
ws
containing
the primary
key value(s)
that are
specified
The Find Method
The DataView’s Find method finds one or more rows based on primary key values. If you
want to find a row based on some other column value, you must use the RowFilter
property of the DataView.
There are two versions of the Find method, allowing you to pass either a single value or
an array of values. The Find method returns the index of the row that was found (or an
array of rows if an array of primary keys is provided) or Null if the value is not found in
the DataView.
Find a Row Based on Its Primary Key Value
Visual Basic .NET
1. In the code editor, select btnFind in the ControlName list, and then
select Click in the MethodName list.
Visual Studio adds the Click event handler to the code.
2. Add the following code to the method:
3. Dim idxFound As Integer
4. Dim strMessage As String
5.
6. idxFound = Me.dvOrders.Find(10255)
7.
8. strMessage = “The OrderID is ” & _
9. Me.dvOrders(idxFound).Item(“OrderID”)
10. strMessage &= vbCrLf & “The CustomerID is ” & _
11. Me.dvOrders(idxFound).Item(“CustomerID”)
12. strMessage &= vbCrLf & “The EmployeeID is ” & _
13. Me.dvOrders(idxFound).Item(“EmployeeID”)
Microsoft ADO.Net – Step by Step 184
MessageBox.Show(strMessage)
The code uses the Find method to find Order 10255 and then displays the
results in a message box.
14. Press F5 to run the application, and then click Find.
The application displays the results.
15. Close the application.
Visual C# .NET
1. In the form designer, double-click the Find button.
Visual Studio adds the Click event handler to the code window.
2. In the code editor, add a Click event handler for the btnFind button
after the btnRowState event handler that we created in the previous
exercise:
3. private void btnFind_Click (object sender, System.EventArgs e)
4. {
5.
}
6. Add the following code to the method:
7. int idxFound;
8. string strMessage;
9.
10. idxFound = this.dvOrders.Find(10255);
11.
12. strMessage = “The OrderID is ” +
13. this.dvOrders[idxFound][“OrderID”];
14. strMessage += “\nThe CustomerID is ” +
15. this.dvOrders[idxFound][“CustomerID”];
16. strMessage += “\nThe EmployeeID is ” +
17. this.dvOrders[idxFound][“EmployeeID”];
MessageBox.Show(strMessage);
The code uses the Find method to find Order 10255 and then displays the
results in a message box.
18. Press F5 to run the application, and then click Find.
The application displays the results.
Microsoft ADO.Net – Step by Step 185
19. Close the application.
Chapter 8 Quick Reference
To Do this
Add a DataView to a form Drag a DataView control from the Data tab of
the Toolbox onto the form
Create a DataView at run
time
Use one of the New constructors. For example:
Dim myDataView as New
System.Data.DataView()
Sort DataView rows Set the Sort property of the DataView. For
example:
myDataView.Sort = “CustomerID”
Filter DataView rows Set the RowFilter or RowStateFilter property.
For example:
myDataView.RowStateFilter =
DataViewRowState.Added
Find a row in a DataView Pass the primary key value to the DataView’s
Find method. For example:
idxFound = myDataView.Find(1011)
Part IV: Using the ADO.NET Objects
Chapter 9: Editing and Updating Data
Chapter 10: ADO.NET Data-Binding in Windows Forms
Chapter 11: Using ADO.NET in Windows Forms
Chapter 12: Data-Binding in Web Forms
Chapter 13: Using ADO.NET in Web Forms
Chapter 9: Editing and Updating Data
Overview
In this chapter, you’ll learn how to:
§ Use the RowState property of a DataRow
§ Retrieve a specific version of a DataRow
Microsoft ADO.Net – Step by Step 186
§ Add a row to a DataTable
§ Delete a row from a DataTable
§ Edit a DataRow
§ Temporarily suspend enforcement of constraints during updates
§ Accept changes to data
§ Reject changes to data
In the previous few chapters, we’ve examined each of the Microsoft ADO.NET objects in
turn. Starting with this chapter, we’ll look at how these objects work together to perform
specific tasks. Specifically, in this chapter, we’ll examine the process of editing and
updating data.
Understanding Editing and Updating Data
Given the disconnected architecture of ADO.NET, there are four distinct phases to the
process of editing and updating data from a data source: data retrieval, editing, updating
the data source, and finally, updating the DataSet.
First, the data is retrieved from the data source, stored in memory, and possibly
displayed to the user. This is typically done using the Fill method of a DataAdapter to fill
the tables of a DataSet, but as we’ve seen, data may also be retrieved using a
Command and a DataReader.
Next, the data is modified as required. Values can be changed, new rows can be added,
and existing rows can be deleted. Data modification can be done under programmatic
control or by the data binding mechanisms of Windows Forms and Web Forms.
We’ll be exploring how to make changes to data under programmatic control in this
chapter. In Windows Forms, the data binding architecture handles transmitting changes
from data-bound controls to the dataset. No other action is required. In Web Forms, any
data changes must of course be submitted to the server.
Roadmap We’ll examine the data binding mechanisms of Windows
Forms and Web Forms in Chapters 10 and 11.
If the changes made to the in-memory copy of the data are to be persisted, they must be
propagated to the data source. If a DataSet is used for managing the in-memory data,
the data source propagation can be done by using the Update method of the
DataAdapter. Alternatively, Command objects may be used directly to submit the
changes. (Of course, as we saw in Chapter 3, the DataAdapter uses Command objects
to submit the changes, as well.)
Finally the DataSet can be updated to reflect the new state of the data source. This is
done by using the AcceptChanges method of the DataSet or DataTable. Both the Fill
method and the Update method of the DataAdapter call AcceptChanges automatically. If
you execute Data Commands directly, you must call AcceptChanges explicitly to update
the status of the DataSet.
Concurrency
With the disconnected methodology used by ADO.NET, there is always a chance that a
row in the data source may have been changed since the time it was loaded into the
DataSet. This is a concurrency violation.
The Update method supports a DBConcurrencyException, which one might expect to
be thrown if a concurrency violation occurs. In fact, the DBConcurrencyException is
thrown whenever the number of rows updated by a Data Command is zero. This is
typically due to a concurrency violation, but it’s important to understand that this is not
necessarily the case.
Microsoft ADO.Net – Step by Step 187
DataRow States and Versions
As we saw in Chapter 7, the DataRow maintains a RowState property that indicates
whether the row has been added, deleted, or modified. In addition, the DataTable
maintains multiple copies of each row, each reflecting a different version of the DataRow.
We’ll explore both the RowState property and row versions in this section.
RowState Properties
The RowState property of the DataRow reflects the actions that have been taken since
the DataTable was created or since the last time the AcceptChanges method was called.
The possible values for RowState, as defined by the DataRowState enumeration, are
shown in Table 9-1.
Table 9-1: DataRowStates
Property Description
Added The
DataRow is
new
Deleted The
DataRow
has been
deleted from
the table
Detached The
DataRow
has not yet
been added
to a table
Modified The
contents of
the
DataRow
have been
changed
Unchanged The
DataRow
has not
been
modified
The baseline values of the rows in a DataSet are established when the AcceptChanges
method is called, either by the Fill or Update methods of the DataAdapter or explicitly by
program code. At that time, all of the DataRows have their RowState set to Unchanged.
Not surprisingly, if the value of any column of a DataRow is changed after
AcceptChanges is called, its RowState is set to Modified. If new DataRows are added to
the DataSet by using the Add method of the DataSet’s Row collection, their RowState
will be Added. The new rows will maintain the status of Added even if their contents are
changed before the next call to AcceptChanges.
If a DataRow is deleted by using the Delete method, it isn’t actually removed from the
DataSet until the AcceptChanges method is called. Instead, their RowState is set to
Deleted and, as we’ll see, its Current values are set to Null.
DataRows don’t necessarily belong to a DataTable. These independent rows will have a
RowState of Detached until they are added to the Rows collection of a table.
Microsoft ADO.Net – Step by Step 188
Row Versions
A DataTable may maintain multiple versions of any given DataRow, depending on the
actions that have been performed on it since the last time AcceptChanges was called.
The possible DataRowVersions are shown in Table 9-2.
Table 9-2: DataRowVersions
Version Meaning
Current The
current
values of
each
column
Default The
default
values
used for
new
rows
Original The
values
set when
the row
was
created,
either by
a Fill
operation
or by
adding
the row
manually
Proposed The
values
assigned
to the
columns
in a row
after a
BeginEdi
t method
has been
called
There will always be a Current version of every row in the DataSet. The Current version
of the DataRow reflects any changes that have been made to its values since the row
was created.
Rows that existed in the DataSet when AcceptChanges was last called will have an
Original version, which contains the initial data values. Rows that are added to the
DataSet will not contain an Original version until AcceptChanges is called again.
If any of the columns of a DataTable have values assigned to its DefaultValue property,
all the DataRows in the table will have a Default version, with the values determined by
the DefaultValues of each column.
DataRows will have a Proposed version after a call to DataRow.BeginEdit and before
either EndEdit or CancelEdit is called. We’ll examine these methods, which are used to
temporarily suspend data constraints, in the next section.
Microsoft ADO.Net – Step by Step 189
Exploring DataRow States and Versions
The example application for this chapter displays the Original and Current values of a
DataSet based on the EmployeeList view in the Northwind sample database. Because
the display is based on the Windows Form BindingContext object, which we won’t be
examining until Part V, the code to display these values is already in place.
1. Open the Editing project from the Start page or from the File menu.
2. Double-click Editing.vb (or Editing.cs, if you’re using C#) in the
Solution Explorer.
Microsoft Visual Studio displays the Editing form in the form designer.
3. Press F5 to run the application.
4. Use the navigation buttons at the bottom of the form to move through
the DataSet.
Note that all the rows have identical Current and Original versions and that
the RowStatus is Unchanged.
5. Change the value of the First Name or Last Name text box of one of
the rows, and then click Save.
The Current version of the row is updated to reflect the name, and the
RowStatus changes to Modified.
Microsoft ADO.Net – Step by Step 190
6. Close the application.
Editing Data in a DataSet
Editing data after it has been loaded into a DataSet is a straightforward process of calling
methods and setting property values. In this chapter, we’ll concentrate on manipulating
the contents of the DataSet programmatically, leaving the discussion of using Windows
and Web Form controls to Parts V and VI, respectively.
Roadmap We’ll examine editing using data-bound controls in Parts V
and VI.
Adding a DataRow
There is no way to create a new row directly in a DataTable. Instead, a DataRow object
must be created independently and then added to the DataTable’s Rows collection.
The DataTable’s NewRow method returns a detached row with the same schema as the
table on which it is called. The values of the row can then be set, and the new row
appended to the DataTable.
Add a Row to a DataTable
Visual Basic .NET
1. Double-click Add in the form designer.
Visual Studio opens the code editor and adds the Click event handler.
2. Add the following code to the procedure:
3. Dim drNew As System.Data.DataRow
4.
5. drNew = Me.dsEmployeeList1.EmployeeList.NewRow()
6. drNew.Item(“FirstName”) = “New First”
7. drNew.Item(“LastName”) = “New Last”
Me.dsEmployeeList1.EmployeeList.Rows.Add(drNew)
The first line declares the DataRow variable that will contain the new row.
Then the NewRow method is called, instantiating the variable; its fields are
set; and it is added to the Rows collection of the EmployeeList table.
8. Press F5 to run the application.
9. Click Add.
The application adds a new row.
10. Move to the last row in the DataSet by clicking the >> button.
The application displays the new row.
Microsoft ADO.Net – Step by Step 191
11. Close the application.
Visual C# .NET
1. Double-click Add in the form designer.
Visual Studio opens the code editor and adds the Click event handler.
2. Add the following code to the procedure:
3. dsEmployeeList.EmployeesRow drNew;
4.
5. drNew = (dsEmployeeList.EmployeesRow)
6. this.dsEmployeeList1.Employees.NewRow();
7. drNew[“FirstName”] = “New First”;
8. drNew[“LastName”] = “New Last”;
this.dsEmployeeList1.Employees.AddEmployeesRow(drNew);
The first line declares the DataRow variable that will contain the new row.
Then the NewRow method is called, instantiating the variable; its fields are
set; and it is added to the Rows collection of the EmployeeList table.
9. Press F5 to run the application.
10. Click Add.
The application adds a new row.
11. Move to the last row in the DataSet by clicking the >> button.
The application displays the new row.
12. Close the application.
Microsoft ADO.Net – Step by Step 192
Deleting a DataRow
The DataTable’s Rows collection supports three methods to remove DataRows, as
shown in Table 9-3. Each of these methods physically removes the DataRow from the
collection.
Table 9-3: Remove Methods
Method Description
Clear() Removes all
rows from
the
DataTable
Remove(DataRow) Removes
the specified
DataRow
RemoveAt(Index) Removes
the
DataRow at
the position
specified by
the integer
Index
However, a row that has been physically removed by using one of these methods won’t
be deleted from the data source. If you need to delete the row from the data source as
well, you must use the Delete method of the DataRow object instead.
The Delete method physically removes the DataRow only if it was added to the
DataTable since the last time AcceptChanges was called. Otherwise, it sets the
RowState to Deleted and sets the current values to Null.
Delete a DataRow Using the Delete method
Visual Basic .NET
1. In the code editor, select btnDelete in the ControlName list, and then
select Click from the MethodName list.
Visual Studio adds the Click event handler to the code.
2. Add the following code to the procedure:
3. Dim dr As System.Data.DataRow
4.
5. ‘Get row currently displayed in the form
6. dr = GetRow()
7.
8. ‘Delete the row
9. dr.Delete()
10.
11. ‘Move to the next record & display
12. Me.BindingContext(Me.dsEmployeeList1,
“EmployeeList”).Position += 1
UpdateDisplay()
The GetRow and UpdateDisplay procedures, which are not intrinsic to the
.NET Framework, are contained in the Utility Functions region of the code.
13. Press F5 to run the application.
14. Use the navigation buttons to display the row for Nancy Davolio.
15. Click Delete.
Microsoft ADO.Net – Step by Step 193
The application deletes the row, displays the next row, and changes the
number of employees to 8.
16. Close the application.
Visual C# .NET
1. In the form designer, double-click the Delete button.
2. Visual Studio adds the Click event handler to the code window.
3. Add the following event handler to the code window:
4. System.Data.DataRow dr;
5.
6. //Get row currently displayed in the form
7. dr = GetRow();
8.
9. //Delete the row
10. dr.Delete();
11.
12. //Move to the next record & display
13. this.BindingContext[this.dsEmployeeList1,
“Employees”].Position += 1;
UpdateDisplay();
The GetRow and UpdateDisplay procedures, which are not intrinsic to the
.NET Framework, are contained in the Utility Functions region of the code.
14. Press F5 to run the application.
15. Use the navigation buttons to display the row for Nancy Davolio.
16. Click Delete.
The application deletes the row, displays the next row, and changes the
number of employees to 8.
Microsoft ADO.Net – Step by Step 194
17. Close the application.
Changing DataRow Values
Changing the value of a column in a DataRow couldn’t be simpler—just reference the
column using the Item property of the DataRow, and assign the new value to it by using
a simple assignment operator.
The Item property is overloaded, supporting the forms shown in Table 9-4. However, the
three forms of the property that specify a DataRowVersion are read-only and cannot be
used to change the values. The other three forms return the Current version of the value
and may be changed.
Table 9-4: DataRow Item Properties
Method Description
Item(columnName) Returns the
value of the
column with
the
ColumnNam
e property
identified by
the
columnNam
e string
Item(dataColumn) Returns the
value of the
specified
dataColumn
Item(columnIndex) Returns the
value of the
column
specified by
the
columnInde
x integer
value (the
Columns
collection is
zero-based)
Item(columnName, rowVersion) Returns the
value of the
rowVersion
Microsoft ADO.Net – Step by Step 195
Table 9-4: DataRow Item Properties
Method Description
version of
the column
with the
ColumnNam
e property
identified by
the
columnNam
e string
Item(dataColumn, rowVersion) Returns the
value of the
rowVersion
version of
the specified
dataColumn
Item(columnIndex, rowVersion) Returns the
value of the
rowVersion
version of
the column
specified by
the
columnInde
x integer
value
Edit a DataRow
Visual Basic .NET
1. In the code editor, select btnEdit in ControlName list, and then select
Click in the MethodName list.
Visual Studio adds the Click event handler to the code.
2. Add the following code to the procedure:
3. Dim drCurrent As System.Data.DataRow
4.
5. drCurrent = GetRow()
6. drCurrent.Item(“FirstName”) = “Changed ”
UpdateDisplay()
Again, the GetRow and UpdateDisplay procedures, which reference the
Windows Form data binding architecture, are not intrinsic to the .NET
Framework. They are in the Utility Functions region of the code.
7. Press F5 to run the application.
8. Click Edit.
The application changes the Current version of the FirstName column to
Changed and changes the RowStatus to Modified.
Microsoft ADO.Net – Step by Step 196
9. Close the application.
Visual C# .NET
1. In the form designer, double-click the Edit button.
Visual Studio adds the Click event handler to the code window.
2. Add the following procedure to the code window:
3. System.Data.DataRow drCurrent;
4.
5. drCurrent = GetRow();
6. drCurrent[“FirstName”] = “Changed “;
UpdateDisplay();
Again, the GetRow and UpdateDisplay procedures, which reference the
Windows Form data binding architecture, are not intrinsic to the .NET
Framework. They are in the Utility Functions region of the code.
7. Press F5 to run the application.
8. Click Edit.
The application changes the Current version of the FirstName column to
Changed and changes the RowStatus to Modified.
9. Close the application.
Microsoft ADO.Net – Step by Step 197
Deferring Changes to DataRow Values
Sometimes it’s necessary to temporarily suspend validation of data until a series of edits
have been performed, either for performance reasons or because rows will temporarily
be in violation of business or integrity constraints.
BeginEdit does just that—it suspends the Column and Row change events until either
EndEdit or CancelEdit are called. During the editing process, assignments are made to
the Proposed version of the DataRow instead of to the Current version. This is the only
time the Proposed version exists.
If the edit is completed by calling EndEdit, the Proposed column values are copied to the
Current version and the Proposed version of the DataRow is removed. If the edit is
completed by calling CancelEdit, the Proposed version of the DataRow is removed,
leaving the Current column values unchanged. In effect, EndEdit and CancelEdit commit
and rollback the changes, respectively.
Use BeginEdit to Defer Column Changes
Visual Basic .NET
1. In the code editor, select btnDefer in the ControlName list, and then
select Click in the MethodName list.
Visual Studio adds the Click event handler template to the code.
2. Add the following code to the procedure:
3. Dim drCurrent As System.Data.DataRow
4.
5. drCurrent = GetRow()
6. With drCurrent
7. .BeginEdit()
8. .Item(“FirstName”) = “Proposed Name”
9. MessageBox.Show(drCurrent.Item(“FirstName”,
DataRowVersion.Proposed))
10. .CancelEdit()
End With
11. Press F5 to run the application.
12. Click Defer.
The application displays Proposed Name in a message box.
13. Click OK to close the message box.
Because the edit was canceled, the Current value of the column and the
RowStatus remain unchanged.
Microsoft ADO.Net – Step by Step 198
14. Close the application.
Visual C# .NET
1. In the form designer, double-click the Defer button.
Visual Studio adds the Click event handler to the code window.
2. Add the following procedure to the code window:
3. System.Data.DataRow drCurrent;
4.
5. drCurrent = GetRow();
6.
7. drCurrent.BeginEdit();
8. drCurrent[“FirstName”]= “Proposed Name”;
9. MessageBox.Show(drCurrent[“First Name”,
10. System.Data.DataRowVersion.Proposed].ToString());
drCurrent.CancelEdit();
11. Press F5 to run the application.
12. Click Defer.
The application displays Proposed Name in a message box.
13. Click OK to close the message box.
Because the edit was canceled, the Current value of the column and the
RowStatus remain unchanged.
Microsoft ADO.Net – Step by Step 199
14. Close the application.
Updating Data Sources
After changes have been made to the in-memory copy of the data represented by the
DataSet, they can be propagated to the data source either by executing the appropriate
Command objects against a connection or by calling the Update method of the
DataAdapter (which, of course, executes the Command objects that it references).
Using the DataAdapter’s Update Method
The System.Data.Common.DbDataAdapter, which you will recall is the DataAdapter
class from which relational database Data Providers inherit their DataAdapters, supports
a number of versions of the Update method, as shown in Table 9-5. Neither the
SqlDataAdapter nor the OleDbDataAdapter add any additional versions.
Table 9-5: DbDataAdapter Update Methods
Update Method Description
Update(DataSet) Updates the
data source
from a
DataTable
named Table in
the specified
DataSet
Update(dataRows) Updates the
data source
from the
specified array
of dataRows
Update(DataTable) Updates the
data source
from the
specified
DataTable
Update(dataRows, DataTableMapping) Updates the
data source
from the
specified array
of dataRows,
using the
specified
Microsoft ADO.Net – Step by Step 200
Table 9-5: DbDataAdapter Update Methods
Update Method Description
DataTableMap
ping
Update(DataSet, sourceTable) Updates the
data source
from the
DataTable
specified in
sourceTable in
the specified
DataSet
The Command object exposes a property called RowUpdated that controls whether the
DataSet will be updated using any results from executing the SQL command on the data
source. The possible values for the OnRowUpdated property are shown in Table 9-6.
Table 9-6: UpdateRowSource Values
Value Description
Both Maps both
the output
parameters
and the first
returned row
to the
changed
row in the
DataSet
FirstReturnedRecord Maps the
values in the
first returned
row to the
changed
row in the
DataSet
None Ignores any
output
parameters
or returned
rows
OutputParameters Maps output
parameters
to the
changed
row in the
DataSet
By default, commands that are automatically generated for a DataAdapter will have their
UpdatedRowSource values set to None. Commands that are created by setting the
CommandText property, either in code or by using the Query Builder, will default to Both.
When the Update method is called, the following actions occur:
1. The DataAdapter examines the RowState of each row in the specified
DataSet or DataTable and executes the appropriate command—insert,
update, or delete.
2. The Parameters collection of the appropriate Command object will be
filled based on the SourceColumn and SourceVersion properties.
3. The RowUpdating event is raised.
Microsoft ADO.Net – Step by Step 201
4. The command is executed.
5. Depending on the value of the OnRowUpdated property, the
DataAdapter may update the row values in the DataSet.
6. The RowUpdated event is raised.
7. AcceptChanges is called on the DataSet or DataTable.
Update a Data Source
Visual Basic .NET
1. In the code editor, select btnUpdate in the ControlName list, and then
select Click in the MethodName list.
Visual Studio adds the Click event handler.
2. Add the following code to the procedure:
3. Me.daEmployeeList.Update(Me.dsEmployeeList1.EmployeeList)
UpdateDisplay()
4. Press F5 to run the application.
5. Type Changed after Steven in the First Name text box, and then click
Save.
The application sets the Current value of the column to Steven Changed.
6. Click Update.
The application updates the data source and then resets the contents of the
DataSet.
7. Close the application.
Microsoft ADO.Net – Step by Step 202
Visual C# .NET
1. In the form designer, double-click the Update button.
Visual Studio adds the Click event handler to the code window.
2. Add the following procedure to the code window:
3. this.daEmployeeList.Update(this.dsEmployeeList1.Employees);
UpdateDisplay();
4. Press F5 to run the application.
5. Type Changed after Steven in the First Name text box, and then click
Save.
The application sets the Current value of the column to Steven Changed.
6. Click Update.
The application updates the data source and then resets the contents of the
DataSet.
7. Close the application.
Executing Command Objects
The DataAdapter’s Update method, although very convenient, isn’t always the best
choice for persisting changes to a data source. Sometimes, of course, you won’t be
using a DataAdapter. Sometimes you’ll be using a structure other than a DataSet to
store the data. And sometimes, in order to maintain data integrity, it will be necessary to
perform operations in a particular order. In any of these situations, you can use
Command objects to control the order in which the updates are performed.
When the DataAdapter’s Update method is used to propagate changes to a data source,
it will use the SourceColumn and SourceVersion properties to fill the Parameters
Microsoft ADO.Net – Step by Step 203
collection. As we saw in Chapter 8, when executing a Command object directly, you
must explicitly set the Parameter values.
Update a Data Source Using a Data Command
Visual Basic .NET
1. In the code editor, select btnCmd in the ControlName list, and then
select Click in the MethodName list.
Visual Studio adds the Click event handler to the code.
2. Add the following code to the procedure:
3. Dim cmdUpdate As System.Data.SqlClient.SqlCommand
4. Dim drCurrent As System.Data.DataRow
5.
6. cmdUpdate = Me.daEmployeeList.UpdateCommand
7. drCurrent = GetRow()
8.
9. cmdUpdate.Parameters(“@first”).Value = drCurrent(“FirstName”)
10. cmdUpdate.Parameters(“@last”).Value =
drCurrent(“LastName”)
11. cmdUpdate.Parameters(“@empID”).Value =
drCurrent(“EmployeeID”)
12.
13. Me.cnNorthwind.Open()
14. cmdUpdate.ExecuteNonQuery()
Me.cnNorthwind.Close()
This code first creates two temporary variables, and then it sets them to the
Update command of the daEmployeeList DataAdapter and the row currently
being displayed on the form, respectively. It then sets the three parameters in
the Update command to the values of the row. Finally the connection is
opened, the command executed, and the connection closed.
15. In the code editor, select btnFill in the ControlName list, and then
select Click in the MethodName list.
Visual Studio adds the Click event handler to the code.
16. Add the following code to the procedure:
17. Me.dsEmployeeList1.EmployeeList.Clear()
18. Me.daEmployeeList.Fill(Me.dsEmployeeList1.EmployeeList)
UpdateDisplay()
This code reloads the data into the DataSet from the data source, and then it
updates the version and row status information of the form.
19. Press F5 to run the application.
20. In the First Name text box, change Steven Changed to Steven, and
then click Save.
The application updates the Current value of the DataRow.
Microsoft ADO.Net – Step by Step 204
21. Click Command.
The application updates the data source, but because executing the
command directly does not update the DataSet, the change isn’t reflected.
22. Click Fill.
The application reloads the data. Note that the First Name text box has been
changed.
23. Close the application.
Microsoft ADO.Net – Step by Step 205
Visual C# .NET
1. In the form designer, double-click the Command button.
Visual Studio adds the Click event handler to the code window.
2. Add the following procedure to the code editor:
3. System.Data.SqlClient.SqlCommand cmdUpdate;
4. System.Data.DataRow drCurrent;
5.
6. cmdUpdate = this.daEmployeeList.UpdateCommand;
7. drCurrent = GetRow();
8.
9. cmdUpdate.Parameters[“@FirstName”].Value =
drCurrent[“FirstName”];
10. cmdUpdate.Parameters[“@LastName”].Value =
drCurrent[“LastName”];
11. cmdUpdate.Parameters[“@empID”].Value =
drCurrent[“EmployeeID”];
12.
13. this.cnNorthwind.Open();
14. cmdUpdate.ExecuteNonQuery();
15. this.cnNorthwind.Close();
16.
17. this.dsEmployeeList1.AcceptChanges();
18. UpdateDisplay();
This code first creates two temporary variables, and then it sets them to the
Update command of the daEmployeeList DataAdapter and the row currently
being displayed on the form, respectively. It then sets the three parameters in
the Update command to the values of the row. Finally the connection is
opened, the command executed, and the connection closed.
19. In the form designer, double-click the Fill button.
Visual Studio adds the event handler to the code window.
20. Add the following procedure to the code window:
21. this.dsEmployeeList1.Employees.Clear();
22. this.daEmployeeList.Fill(this.dsEmployeeList1.Employees);
UpdateDisplay();
This code reloads the data into the DataSet from the data source and then
updates the version and row status information of the form.
23. Press F5 to run the application.
24. In the First Name text box, change Steven Changed to Steven, and
then click Save.
The application updates the Current value of the DataRow.
Microsoft ADO.Net – Step by Step 206
25. Click Command.
The application updates the data source, but because executing the
command directly does not update the DataSet, the change isn’t reflected.
26. Click Fill.
The application reloads the data. Note that the First Name text box has been
changed.
27. Close the application.
Microsoft ADO.Net – Step by Step 207
Accepting and Rejecting DataSet Changes
The final step in the process of updating data is to set a new baseline for the DataRows.
This is done by using the AcceptChanges method. The DataAdapter’s Update method
calls AcceptChanges automatically. If you execute a command directly, you must call
AcceptChanges to update the row state values.
If instead of accepting the changes made to the DataSet, you want to discard them, you
can call the RejectChanges method. RejectChanges returns the DataSet to the state it
was in the last time AcceptChanges was called, discard-ing all new rows, restoring
deleted rows, and returning all columns to their original values.
Important If you call AcceptChanges or RejectChanges prior to
updating the data source, you will lose the ability to persist
the changes made since the last time AcceptChanges was
called using the Update method. The DataAdapter’s Update
method uses the RowStatus property to determine which
rows to persist, and both AcceptChanges and
RejectChanges set the RowStatus of every row to
Unchanged.
Using AcceptChanges
The AcceptChanges method is supported by the DataSet, the DataTable, and the
DataRow. Under most circumstances, you need only call AcceptChangeson the DataSet
because it calls AcceptChanges for each DataTable that it contains, and the DataTable,
in turn, calls AcceptChanges for each DataRow.
When the AcceptChanges call reaches the DataRow, rows with a RowStatus of either
Added or Modified will have the Original values of each column changed to the Current
values, and their RowStatus will be set to Unchanged. Deleted rows will be removed
from the Rows collection.
Accept Changes to a DataSet
Visual Basic .NET
1. Add the following code to the end of the btnCmd_Click procedure that
you created in the previous exercise:
2. Me.dsEmployeeList1.AcceptChanges()
UpdateDisplay()
3. Press F5 to run the application.
4. In the Last Name text box, type New after Buchanan, and then click
Save.
The application updates the Current value.
5. Click Command.
Because the AcceptChanges method is called, the Version and RowStatus
information is updated.
Microsoft ADO.Net – Step by Step 208
6. In the Last Name text box, change Buchanan New back to Buchanan,
and then click Save.
The application updates the Current value and RowStatus.
7. Click Accept.
The application updates the Original value and RowStatus.
8. Click Update, and then click Fill.
Because the RowStatus of the DataRow had been reset to Unchanged, no
changes were persisted to the data source.
Microsoft ADO.Net – Step by Step 209
9. Close the application.
Visual C# .NET
1. Add the following code to the end of the btnCmd_Click procedure that
you created in the previous exercise:
2. this.dsEmployeeList1.AcceptChanges();
UpdateDisplay();
3. Press F5 to run the application.
4. In the Last Name text box, type New after Buchanan, and then click
Save.
The application updates the Current value.
5. Click Command.
Because the AcceptChanges method is called, the Version and RowStatus
information is updated.
Microsoft ADO.Net – Step by Step 210
6. In the Last Name text box, change Buchanan New back to Buchanan,
and then click Save.
The application updates the Current value and RowStatus.
7. Click Accept.
The application updates the Original value and RowStatus.
8. Click Update, and then click Fill.
Because the RowStatus of the DataRow had been reset to Unchanged, no
changes were persisted to the data source.
Microsoft ADO.Net – Step by Step 211
9. Close the application.
Using RejectChanges
Like AcceptChanges, the RejectChanges method is supported by the DataSet,
DataTable, and DataRow objects, and each object cascades the call to the objects below
it in the hierarchy.
When the RejectChanges call reaches the DataRow, rows with a RowStatus of either
Deleted or Modified will have the Original values of each column changed to the Current
values, and their RowStatus will be set to Unchanged. Added rows will be removed from
the Rows collection.
Reject the Changes to a DataRow
Visual Basic .NET
1. In the code editor, select btnReject in the ControlName list, and then
select Click in the MethodName list.
Visual Studio adds the Click event handler to the code.
2. Add the following code to the procedure:
3. Me.dsEmployeeList1.RejectChanges()
UpdateDisplay()
4. Press F5 to run the application.
5. In the First Name text box, change Stephen to Reject, and then click
Save.
The application updates the Current value and RowStatus.
6. Click Reject.
Microsoft ADO.Net – Step by Step 212
The application returns the Current version of the row to its Original values
and then resets the RowStatus to Unchanged.
7. Close the application.
Visual C# .NET
1. In the form designer, double-click the Reject button.
Visual Studio adds the Click event handler to the code window.
2. Add the following procedure to the code editor:
3. this.dsEmployeeList1.RejectChanges();
UpdateDisplay();
4. Press F5 to run the application.
5. In the First Name text box, change Stephen to Reject, and then click
Save.
The application updates the Current value and RowStatus.
6. Click Reject.
The application returns the Current version of the row to its Original values
and then resets the RowStatus to Unchanged.
Microsoft ADO.Net – Step by Step 213
7. Close the application.
Chapter 9 Quick Reference
To Do this
Add a row to a DataTable Use the NewRow method of the DataTable to
create the row, and then use the Add method of
the Rows collection:
newRow = myTable.NewRow()
myTable.Rows.Add(newRow)
Delete a row from a
DataTable
Use the Delete method of the DataRow:
myRow.Delete()
Change the values in a
DataReader
Use the DataRow’s Item property:
myRow.Item(“Row Name”) = newValue
Suspend constraint
enforcement
Use BeginEdit combined with either EndEdit or
CancelEdit:
myRow.BeginEdit()
myRow.Item(“Row Name”) = newValue
myRow.EndEdit()
Or:
myRow.BeginEdit()
myRow.Item(“Row Name”) = newValue
myRow.CancelEdit()
Accept changes to data Use the AcceptChanges method of the DataSet,
DataTable, or DataRow:
myDataSet.AcceptChanges()
Reject changes to data Use the RejectChanges method of the DataSet,
DataTable, or DataRow:
myDataSet.RejectChanges()
Chapter 10: ADO.NET Data-Binding in Windows
Forms
Overview
In this chapter, you’ll learn how to:
Microsoft ADO.Net – Step by Step 214
§ Simple-bind control properties using the Properties window
§ Simple-bind control properties using the Advanced Binding dialog box
§ Simple-bind control properties at run time
§ Complex-bind control properties using the Properties window
§ Complex-bind control properties at run time
§ Use CurrencyManager properties
§ Respond to CurrencyManager events
§ Use the Binding object’s properties
In previous chapters, we have, of course, been binding data to controls on Windows
Forms, but we haven’t really looked at the process in any detail. We’ll begin to do that in
this chapter. We’ll start by examining the underlying mechanisms used to bind Windows
Forms controls to Microsoft ADO.NET data sources. In Chapter 11, we’ll examine the
techniques used to perform some common data-binding tasks.
Understanding Data-Binding in Windows Forms
The Microsoft .NET Framework provides an extremely powerful and flexible mechanism
for binding data to properties of controls. Although in the majority of cases you will bind
to the displayed value of a control—for example, the DisplayMember property of a
ListBox control or the Text property of a TextBox control—you can bind any property of a
control to a data source.
This makes it possible, for example, to bind the background and foreground colors of a
form and the font characteristics of its controls to a row in a database table. By using this
technique, you could allow users to customize an application’s user interface without
requiring any changes to the code base.
Data Sources
Windows Forms controls can be bound to any data source, not just traditional database
tables. Technically, to qualify as a data source, an object must implement the IList,
IBindingList, or IEditableObject interface.
The IList interface, the simplest of the three, is implemented by arrays and collections.
This means that it’s possible, for example, to bind the Text property of a label to the
contents of a ListBox control’s ObjectCollection (although it’s difficult to think of a
situation in which doing so might be useful). Any object that implements both the IList
and the IComponent interfaces can be bound at design time as well as at run time.
The IBindingList interface, which is implemented by the DataView and
DataViewManager objects, supports change notification. Objects that implement this
interface raise ListChanged events to notify the application when either an item in the
list or the list itself has been changed.
Finally, the IEditableObject interface, which is implemented by the DataRowView
object, exposes the BeginEdit, EndEdit, and CancelEdit methods.
Fortunately, when you’re working within ADO.NET, you can largely ignore the details of
interface implementation. They’re really only important if you are building your own
data source objects.
Within the .NET Framework, the actual binding of data in a Windows form is
handled by a number of objects working in conjunction, as shown below.
Microsoft ADO.Net – Step by Step 215
At the highest level in the logical architecture is the BindingContext object. Any
object that inherits from the Control class can contain a BindingContext object.
In most cases, you’ll use the form’s BindingContext object, but if your form
includes a container control, such as a Panel or a GroupBox, that contains
data-bound controls, it may be easier to create a separate BindingContext
object for the container control because it saves a level of indirection when
referencing the contained controls.
The BindingContext object manages one or more BindingManagerBase
objects, one for each data source that is referenced by the form. The
BindingManagerBase is an abstract class, so instances of this object cannot be
directly instantiated. Instead, the objects managed by the BindingContext
object will actually be instances of either the PropertyManager class or the
CurrencyManager class. All of these objects are implemented in the
System.Windows.Forms namespace.
If the data source can return only a single value, the BindingManagerBase
object will be an instance of the PropertyManager class. If the data source
returns (or can return) a collection of objects, the BindingManagerBase object
will be an instance of the CurrencyManager class. ADO.NET objects will
always instantiate CurrencyManagers.
The CurrencyManager object keeps track of position in the list and
managesthe bindings to that data source. Note that the data source itself
doesn’t know which item is being displayed.
ADO The CurrencyManager’s Position property maintains the current
row in a data source. ADO.NET data sources don’t support
cursors and therefore have no knowledge of the ‘current’ row. This
may at first seem awkward, but is actually a more powerful
architecture because it’s now possible to maintain multiple
‘cursors’ in a single data source.
There is a separate instance of the CurrencyManager object for each discrete
data source. If all of the controls on a form bind to a single data source, there
will be a single CurrencyManager. For example, a form that contains text
boxes displaying fields from a single table will contain a single
CurrencyManager object. However, if there are multiple data sources, as in a
form that displays master/detail information, there will be separate
CurrencyManager objects for each data source.
Windows Forms controls contain a DataBindings collection that contains the
Binding objects for that control. The Binding object, as we’ll see, specifies the
data source, the control that is being bound, and the property of the control that
will display the data for simple-bound properties.
Microsoft ADO.Net – Step by Step 216
The CurrencyManager inherits a BindingsCollection property from the
BindingManagerBase class. The BindingsCollection contains references to the
Binding objects for each control.
Binding Controls to an ADO.NET Data Source
Windows Forms controls in the .NET Framework support two different types of data
binding: simple and complex. The distinction is really quite simple. Control properties that
contain a single value are simple-bound, while properties that contain multiple values,
such as the displayed contents of list boxes and data grids, are complex-bound.
Any given control can contain both simple-bound and complex -bound attributes. For
example, the MonthCalendar control’s MaxDate property, which determines the
maximum allowable selected date, is a simple-bound property containing a single
DateTime value, while its BoldedDates property, which contains an array of dates that
are to be displayed in bold formatting, would be complex-bound.
Simple-Binding Control Properties
In the .NET Framework, any property of a control that contains a single value can be
simple-bound to a single value in a data source.
Binding can take place either at design time or at run time. In either situation, you must
specify three values: the name of property to be bound, the data source, and a
navigation path within the data source that resolves to a single value.
The navigation path consists of a period-delimited hierarchy of names. For example, to
reference the ProductID column of the Products table, the navigation path would be
Products.ProductID.
The Microsoft Visual Studio .NET Properties window contains a Data Bindings section
that displays the properties that are most commonly data-bound. Other properties are
available through the (Advanced) section, which opens the Advanced Data Binding
dialog box. The Advanced Data Binding dialog box provides design time access to all the
simple-bound properties of the selected control.
Bind a Property Using the Properties Window
1. Open the Binding project from the Start page or by using the File
menu.
2. In the Solution Explorer, double-click Binding.vb (or Binding.cs, if
you’re using C#) to open the form.
Visual Studio displays the form in the form designer.
3. Select the tbCategoryID text box (after the Category ID label).
Microsoft ADO.Net – Step by Step 217
4. In the Properties window, expand the Data Bindings section, and then
open the drop-down list for the Text property.
5. Expand dsMaster1, expand Categories, and then select CategoryID.
Bind a Property Using the Advanced Binding Dialog Box
1. In the form designer, select the tbCategoryName text box (after the
Name label).
2. In the Properties window, expand the DataBindings section (if
necessary), and then click the Ellipsis button after the (Advanced)
property.
Visual Studio opens the Advanced Data Binding dialog box with the Text
property selected.
3. Open the drop-down list for the Text property, expand dsMaster,
expand Categories, and then select CategoryName.
4. Click Close.
Visual Studio sets the data binding. Because Text is one of the default databound
properties, its value is shown in the Properties window.
Microsoft ADO.Net – Step by Step 218
When you bind a control at design time, you simply select the appropriate column from
the drop-down list in the Properties window or the Advanced Data Binding dialog box.
When you’re binding at run time, you must specify two values separately.
The .NET Framework provides a lot of flexibility in how you specify the data source and
navigation path values when creating a binding at run time. For example, both of the
following Binding objects will refer to the ProductID column of the Products table:
bndFirst = New System.Windows.Forms.Binding(“Text”, Me.dsMaster1, _
“Products.ProductID”)
bndSecond = New System.Windows.Forms.Binding(“Text”, _
Me.dsMaster.Products, “ProductID”)
However, because the data source properties are different, the .NET Framework will
create different CurrencyManagers to manage them, and the controls on the form will not
be synchronized.
In some situations, this might be useful. For example, you might need to display two
different rows of a table on a single form, and this technique makes it easy to do so.
However, in the majority of cases, you’ll want all the controls on a form that are bound to
the same table to display information from the same row, and in order to achieve this,
you must be consistent in the way you specify the data source and navigation path
values.
Tip If you’re creating a binding at run time that you want synchronized
with design-time bindings, specify only the top-level of the hierarchy
as the data source:
bndFirst = New System.Windows.Forms.Binding(“Text”,
Me.dsMaster1, “Products.ProductID”)
Bind a Property at Run Time
Visual Basic .NET
1. In the form designer, double-click the Simple button.
Visual Studio opens the code editor and adds the btnSimple Click event
handler.
2. Add the following lines to bind the tbCategoryDescription text box to
the Categories.Description column:
3. Dim newBinding As System.Windows.Forms.Binding
4.
5. newBinding = New System.Windows.Forms.Binding(“Text”, _
6. Me.dsMaster1, “Categories.Description”)
Me.tbCategoryDescription.DataBindings.Add(newBinding)
This code first declares a new Binding object, and then instantiates it by
passing the property name (“Text”), data source (Me.dsMaster1), and
navigation path (“Categories.Description”) to the constructor. Finally, the new
Binding object is added to the DataBindings collection of the
tbCategoryDescription control by using the Add method.
7. Press F5 to run the application.
Microsoft ADO.Net – Step by Step 219
8. Click the Simple button.
The application adds the binding and displays the value in the text box.
Roadmap We’ll examine the code that implements these buttons later in
this chapter.
9. Click the Next button (“>”) at the bottom of the form.
The application displays the next category, along with its description.
Microsoft ADO.Net – Step by Step 220
Important If we had passed dsMaster1.Categories as the data source and
“Description” as the navigation path to the Binding’s constructor,
the Description field would not display data from the current row
because Visual Studio would have created a second
CurrencyManager. When creating bindings that are to be
synchronized with design-time bindings, be sure to specify only
the DataSet as the data source.
10. Close the application.
Visual C# .NET
1. In the form designer, double-click the Simple button.
Visual Studio opens the code editor and adds the btnSimple Click event
handler.
2. Add the following lines to bind the tbCategoryDescription text box to
the Categories.Description column:
3. System.Windows.Forms.Binding newBinding;
4.
5. newBinding = new System.Windows.Forms.Binding(“Text”,
6. this.dsMaster1, “Categories.Description”);
7. this.tbCategoryDescription.DataBindings.Add(newBinding);
This code fi rst declares a new Binding object, and then instantiates it by
passing the property name (“Text”), data source (Me.dsMaster1), and
navigation path (“Categories.Description”) to the constructor. Finally, the new
Binding object is added to the DataBindings collection of the
tbCategoryDescription control by using the Add method.
8. Press F5 to run the application.
Microsoft ADO.Net – Step by Step 221
9. Click the Simple button.
The application adds the binding and displays the value in the text box.
Roadmap We’ll examine the code that implements these buttons later in
this chapter.
10. Click the Next button (“>”) at the bottom of the form.
The application displays the next category, along with its description.
Microsoft ADO.Net – Step by Step 222
Important If we had passed dsMaster1.Categories as the data source and
“Description” as the navigation path to the Binding’s constructor,
the Description field would not display data from the current row
because Visual Studio would have created a second
CurrencyManager. When creating bindings that are to be
synchronized with design-time bindings, be sure to specify only
the DataSet as the data source.
11. Close the application.
Complex-Binding Control Properties
Unlike simple-bound properties, which must be bound to a single value, complex-bound
control properties contain (and possibly display) multiple items. The most common
examples of complex-bound controls are, of course, the ListBox and ComboBox, but any
control property that accepts multiple values can be complex-bound.
Although the techniques can vary somewhat depending on the specific control, most
complex-bound controls are bound by setting the DataSource property directly rather
than by adding a Binding object to the DataBindings collection.
The most common complex-bound controls, the ListBox, ComboBox, and DataGrid, also
expose a DisplayMember property, which determines what will be displayed by the
control. In the case of the ListBox and ComboBox controls, the DisplayMember property
must resolve to a single value, while the DataGrid control can display multiple values for
each row (for example, all the columns of a DataTable).
Roadmap We’ll examine the use of the ValueMember property to create
look-up tables in Chapter 11.
In addition, the ListBox and ComboBox controls expose a ValueMember property, which
allows the control to display a user-friendly name while updating an underlying DataSet
with the value of a different column.
One particularly convenient possibility when using complex-bound controls is to bind to a
relationship rather than to a DataSet, which causes the items displayed in the control to
be automatically filtered. We’ll see an example of this technique in the following exercise.
Add a Complex Data-Binding Using the Properties Window
1. In the form designer, select the lbProducts ListBox.
2. In the Properties window, select DataSource, and then select
dsMaster1 from the drop-down list.
Microsoft ADO.Net – Step by Step 223
3. In the DisplayMember drop-down list, expand Categories, expand
CategoryProducts, and then select the ProductName column.
4. Press F5 to run the application.
Visual Studio displays the products in the current category.
Roadmap We’ll examine the code that implements these buttons later in
this chapter.
5. Click the Next button (“>”) at the bottom of the form.
The application displays the next category, along with its products.
6. Close the application.
Add a Complex Data-Binding at Run Time
Visual Basic .NET
1. In the form designer, double-click the Complex button.
Visual Studio opens the code editor and adds the Click event handler for the
btnComplex button.
2. Add the following code to the event handler:
3. Me.lbOrderDates.DataSource = Me.dvOrderDates;
Microsoft ADO.Net – Step by Step 224
Me.lbOrderDates.DisplayMember = “OrderDate”;
This code simply sets the DataSource and DisplayMember properties to the
OrderDate column of the dvOrderDates DataView.
4. Press F5 to run the application, and then click the Complex button.
The OrderDates list box displays the dates for the product selected in the
Products list box.
5. Select a different product to confirm that the dates that are displayed
change.
6. Close the application.
Visual C# .NET
1. In the form designer, double-click the Complex button.
Visual Studio opens the code editor and adds the Click event handler for the
btnComplex button.
2. Add the following code to the event handler:
3. Me.lbOrderDates.DataSource = Me.dvOrderDates;
Me.lbOrderDates.DisplayMember = “OrderDate”;
Microsoft ADO.Net – Step by Step 225
This code simply sets the DataSource and DisplayMember properties to the
OrderDate column of the dvOrderDates DataView.
4. Press F5 to run the application, and then click the Complex button.
The OrderDates list box displays the dates for the product selected in the
Products list box.
5. Select a different product to confirm that the dates that are displayed
change.
6. Close the application.
Using the BindingContext Object
As we have seen, the BindingContext object is the highest level object in the binding
hierarchy and manages the BindingManagerBase objects that control the interaction
between a data source and the controls bound to it.
The BindingContext object doesn’t expose any useful methods or events, and has only a
single property, as shown in Table 10-1. The Item property is used to index into the
BindingManagerBase collection contained in the BindingContext object. The first version,
Microsoft ADO.Net – Step by Step 226
which uses only the data source as a parameter, is used if no navigation path is
required. For example, if a DataTable is specified as the data source for a DataGrid, you
could use the following syntax to retrieve the CurrencyManager that controls that
binding:
Me.myDG.DataSource = Me.myDataSet.myTable
myCurrencyManager = Me.BindingContext(me.myDataSet.myTable)
The second version of the Item property allows the specification of the navigation path.
However, the navigation path provided here must resolve to a list, not a single property.
For example, if a text box is bound to the Description column of a DataTable, the
following syntax would be used to retrieve the CurrencyManager that controls the
binding:
Me.myText.DataBindings.Add(“Text”,Me.myDataSet,”myTable.Description”)
myCurrencyManager = Me.BindingContext(Me.myDataSet.myTable)
Table 10-1: BindingContext Properties
Property Description
Item(DataSource) Returns the BindingManagerBase object
associated with the specified DataSource
Item(DataSource,
DataMember)
Returns the BindingManagerBase object
associated with the specified DataSource
and DataMember, where the DataMember
is a table or relation
Using the CurrencyManager Object
The CurrencyManager object is fundamental to the Windows Forms data-binding
architecture. Through its properties, methods, and events, the CurrencyManager object
manages the link between a data source and the controls that display data from that
source.
CurrencyManager Properties
The properties exposed by the CurrencyManager are shown in Table 10-2. With the
exception of the Position property, they are all read-only.
Table 10-2: CurrencyManager Properties
Property Description
Bindings The collection
of Binding
objects being
managed by
the
CurrencyMana
ger
Count The number of
rows managed
by the
CurrencyMana
ger
Current The value of
the current
object in the
data source
Microsoft ADO.Net – Step by Step 227
Table 10-2: CurrencyManager Properties
Property Description
List The list
managed by
the
CurrencyMana
ger
Position Gets or sets
the current
item in the list
managed by
the
CurrencyMana
ger
The Bindings and List properties define the relationship between the data source and the
controls bound to it. The Bindings property, which returns a BindingsCollection object,
contains the Binding object for each individual control property that is bound to the data
source. We’ll examine the Binding object later in this chapter.
The List property returns a reference to the data source that is managed by the
CurrencyManager. The List property returns a reference to the IList interface. To treat
the data source as its native type in code, you must explicitly cast it to that type.
As might be expected, the Count property returns the number of rows in the list managed
by the CurrencyManager. Unlike some other environments, the Count property is
immediately available—it is not necessary to move to the end of the list before the Count
property is set.
The Current property returns the value of the current row in the data source as an object.
Like the List property, if you want to treat the value returned by Current as its native type,
you must explicitly cast it.
Remember that the Current property is read-only. To change the current row in the data
source, you must use the Position property, which is the only property exposed by the
CurrencyManager that is not read-only. The Position property is an integer that
represents the zero-based index into the List property.
Use CurrencyManager Read-Only Properties
Visual Basic .NET
1. In the code editor, select btnReadOnly in the Control Name combo
box, and then select Click in the Method Name combo box.
Visual Studio adds the Click event handler to the code.
2. Add the following code to the method:
3. Dim strMsg As String
4. Dim cm As System.Windows.Forms.CurrencyManager
5. Dim dsrc As System.Data.DataView
6.
7. cm = Me.BindingContext(Me.dsMaster1, “Categories”)
8. dsrc = CType(cm.List, System.Data.DataView)
9.
10. strMsg = “There are ” & cm.Count.ToString & ” rows in ”
11. strMsg += dsrc.Table.TableName.ToString & “.”
Microsoft ADO.Net – Step by Step 228
12. strMsg += vbCrLf & “There are ” & cm.Bindings.Count.ToString
13. strMsg += ” controls bound to it.”
MessageBox.Show(strMsg)
The first three lines declare some local variables. The fourth line sets the
variable cm to the CurrencyManager for the Categories DataTable, while the
next line assigns the variable dsrc to the data source referenced by the List
property.
Note that the value returned by List is explicitly cast to a DataView.
(Remember that although Categories is a DataTable, data binding always
occurs to the default view.)
The remaining lines display the Count and Bindings.Count properties in a
message box.
14. Press F5 to run the application.
15. Click the Read-Only button.
The application displays the CurrencyManager properties, showing two bound
controls.
16. Dismiss the dialog box, and then click the Simple button.
The application adds the binding for the Description control.
17. Click the Read-Only button.
The application displays the CurrencyManager properties, showing three
bound controls.
Microsoft ADO.Net – Step by Step 229
18. Close the application.
Visual C# .NET
1. In the form designer, double-click the Read-Only button.
Visual Studio adds the event handler to the code window.
2. Add the following code to the procedure:
3. string strMsg;
4. System.Windows.Forms.CurrencyManager cm;
5. System.Data.DataView dsrc;
6.
7. cm = (System.Windows.Forms.CurrencyManager)
8. this.BindingContext[this.dsMaster1, “Categories”];
9. dsrc = (System.Data.DataView) cm.List;
10.
11. strMsg = “There are ” + cm.Count.ToString() + ” rows in “;
12. strMsg += dsrc.Table.TableName.ToString() + “.”;
13. strMsg += “\nThere are ” + cm.Bindings.Count.ToString();
14. strMsg += ” controls bound to it.”;
MessageBox.Show(strMsg);
The first three lines declare some local variables. The fourth line sets the
variable cm to the CurrencyManager for the Categories DataTable, while the
next line assigns the variable dsrc to the data source referenced by the List
property.
Note that the value returned by List is explicitly cast to a DataView.
(Remember that although Categories is a DataTable, data binding always
occurs to the default view.)
The remaining lines display the Count and Bindings.Count properties in a
message box.
15. Press F5 to run the application.
16. Click the Read-Only button.
The application displays the CurrencyManager properties, showing two bound
controls.
Microsoft ADO.Net – Step by Step 230
17. Dismiss the dialog box, and then click the Simple button.
The application adds the binding for the Description control.
18. Click the Read-Only button.
The application displays the CurrencyManager properties, showing three
bound controls.
19. Close the application.
Use the Position Property
Visual Basic .NET
1. Open the region labeled ‘Navigation Buttons.’
2. Add the following code to the btnFirst_Click event handler:
3. Me.BindingContext(Me.dsMaster1, “Categories”).Position = 0
UpdateDisplay()
This code sets the Position property of the CurrencyManager for the Categories
DataTable to the beginning (remember that Position is a zero-based
index), and then calls the UpdateDisplay function. UpdateDisplay, which is
Microsoft ADO.Net – Step by Step 231
contained in the Utility Functions region, simply displays ‘Category x of y’ in
the text box at the bottom of the form.
4. Add the following code to the btnPrevious_Click event handler:
5. With Me.BindingContext(Me.dsMaster1, “Categories”)
6. If .Position = 0 Then
7. Beep()
8. Else
9. .Position -= 1
10. UpdateDisplay()
11. End If
12. End With
This code uses Microsoft Visual Basic’s With … End With structure to simplify
the reference to the CurrencyManager. Note that it checks to see if the
Position property is already set at the beginning of the file before
decrementing the value. The Position property does not throw an exception if
it is set outside the bounds of the list.
13. The remaining navigation code is already there, so press F5 to run
the application.
14. Use the navigation buttons to move through the display.
15. Close the application.
Visual C# .NET
1. Open the region labeled ‘Navigation Buttons.’
2. Add the following code to the btnFirst_Click event handler:
3. this.BindingContext[this.dsMaster1, “Categories”].Position = 0;
UpdateDisplay();
This code sets the Position property of the CurrencyManager for the Categories
DataTable to the beginning (remember that Position is a zero-based
index), and then calls the UpdateDisplay function. UpdateDisplay, which is
contained in the Utility Functions region, simply displays ‘Category x of y’ in
the text box at the bottom of the form.
4. Add the following code to the btnPrevious_Click event handler:
5. System.Windows.Forms.BindingManagerBase bmb;
6. bmb = (System.Windows.Forms.BindingManagerBase)
7. this.BindingContext[this.dsMaster1, “Categories”];
8.
9. bmb.Position -= 1;
UpdateDisplay();
10. The remaining navigation code is already there, so press F5 to run the
application.
11. Use the navigation buttons to move through the display.
12. Close the application.
CurrencyManager Methods
The public methods exposed by the CurrencyManager object are shown in Table 10-3.
Table 10-3: CurrencyManager Methods
Method Description
AddNew Adds a new
item to the
underlying
list
Microsoft ADO.Net – Step by Step 232
Table 10-3: CurrencyManager Methods
Method Description
CancelCurrentEdit Cancels the
current edit
operation
EndCurrentEdit Commits the
current edit
operation
Refresh Redisplays
the contents
of bound
controls
RemoveAt(Index) Removes
the item at
the position
specified by
Index in the
underlying
list
ResumeBinding Resumes
data binding
and data
validation
after the
SuspendBin
ding method
has been
called
SuspendBinding Temporarily
suspends
data binding
and data
validation
The data editing methods AddNew and RemoveAt, which add and remove items from
the data source, along with the CancelCurrentEdit and EndCurrentEdit methods, are for
use only within complex-bound controls. Unless you are creating a custom version of a
complex-bound control, use the DataView’s or DataRowView’s equivalent methods.
Roadmap We’ll examine the SuspendBinding and ResumeBinding
methods in Chapter 11.
The SuspendBinding and ResumeBinding methods allow binding (and hence data
validation) to be temporarily suspended. As we’ll see in Chapter 11, these methods are
typically used when data validation requires that values be entered into multiple fields
before they are validated.
The Refresh method is used only with data sources that don’t support change
notification, such as collections and arrays.
CurrencyManager Events
The events exposed by the CurrencyManager are shown in Table 10-4.
Table 10-4: CurrencyManager Events
Event Description
CurrentChanged Occurs
when the
bound value
changes
Microsoft ADO.Net – Step by Step 233
Table 10-4: CurrencyManager Events
Event Description
ItemChanged Occurs
when the
current item
has
changed
PositionChanged Occurs
when the
Position
property has
changed
The CurrentChanged and PositionChanged events both occur whenever the current row
in the CurrencyManager’s list changes. The difference is the event arguments passed
into the event—PositionChanged receives the standard System.EventArgs, while
ItemChanged receives an argument of the type ItemChangedEventArgs, which includes
an Index property.
The ItemChanged event occurs when the underlying data is changed. Under most
circumstances, when working with ADO.NET objects, you will use the DataRow or
DataColumn Changed and Changing events because they provide greater flexibility, but
there is nothing to prevent responding to the CurrencyManager’s ItemChanged event if it
is more convenient.
Respond to an ItemChanged Event
Visual Basic .NET
1. Add the following event handler to the code editor:
2. Private Sub Position_Changed(ByVal sender As System.Object,
_
3. ByVal e As System.EventArgs)
4. Dim strMsg As String
5.
6. strMsg = “Row ” & (Me.BindingContext(Me.dsMaster1, _
7. “Categories”).Position + 1).ToString
8. MessageBox.Show(strMsg)
End Sub
The code simply displays the current row number in a message box.
9. Expand the Region labeled Windows Form Designer generated code,
and add the following code to the end of the New sub to connect the
event handler to the PositionChanged event:
AddHandler Me.BindingContext(dsMaster1, Categories”).PositionChanged,
_ AddressOf Me.Position_Changed
10. Press F5 to run the application, and then click the Next button (‘>’).
The application displays a message box showing the new row number.
Microsoft ADO.Net – Step by Step 234
11. Close the application.
Visual C# .NET
1. Add the following event handler to the code editor:
2. private void Position_Changed(object sender, System.EventArgs
e)
3. {
4. string strMsg;
5.
6. strMsg = “Row ” + (this.BindingContext[this.dsMaster1,
7. “Categories”].Position + 1).ToString();
8. MessageBox.Show(strMsg);
}
The code simply displays the current row number in a message box.
9. Add the code to bind the event handler to the bottom of the
frmBindings() sub:
10. this.BindingContext[this.dsMaster1,
“Categories”].PositionChanged
+= new EventHandler(this.Position_Changed);
11. Press F5 to run the application, and then click the Next button (‘>’).
The application displays a message box showing the new row number.
Microsoft ADO.Net – Step by Step 235
12. Close the application.
Using the Binding Object
The Binding object represents the link between a simple-bound control property and the
CurrencyManager. The control’s DataBindings collection contains a Binding object for
each bound property.
Binding Object Properties
The properties exposed by the Binding object are shown in Table 10-5. All of the
properties are read-only.
Table 10-5: Binding Properties
Property Description
BindingManagerBase The
BindingManagerB
ase that manages
this Binding object
BindingMemberInfo Returns
information
regarding this
Binding object
based on the
DataMember
specified in its
constructor
Control The control being
bound
DataSource The data source
for the binding
IsBinding Indicates whether
the binding is
active
PropertyName The control’s
data-bound
property
Microsoft ADO.Net – Step by Step 236
The BindingManagerBase, Control, and PropertyName properties define the data
binding. The BindingManagerBase property returns the CurrencyManager or
PropertyManager that manages the Binding object, while the Control and PropertyName
properties specify the control property containing the data.
The IsBinding property indicates whether the binding is active. It returns True unless
SuspendBinding has been evoked.
The DataSource property returns the data source to which the control property is bound
as an object. Note that it returns the data source only, not the navigation path. To
retrieve the Binding object’s navigation path, you must use the BindingMemberInfo
property, a complex object whose fields are shown in Table 10-6.
Table 10-6: BindingMemberInfo Properties
Field Description
BindingField The data
source
property
specified by
the Binding
object’s
navigation
path
BindingMember The
complete
navigation
path of the
Binding
object
BindingPath The
navigation
path up to,
but not
including,
the data
source
property,
specified by
the Binding
object’s
navigation
path
The BindingMember field of the BindingMemberInfo property represents the entire
navigation path of the binding, while the BindingField field represents only the final field.
The BindingPath field represents everything up to the BindingField. For example, given
the navigation path ‘Categories.CategoryProducts.ProductID,’ the BindingField is
‘ProductID,’ while the BindingPath is ‘Categories.CategoryProducts.’ Note that all three
properties return a string value, not an object reference.
Use the BindingMemberInfo Property
Visual Basic .NET
1. In the code editor, select btnBindings in the Control Name combo box,
and then select Click in the Method Name combo box.
Visual Studio adds the event handler template to the code.
2. Add the following code to the method:
3. Dim strMsg As String
4. Dim bmo As System.Windows.Forms.BindingMemberInfo
Microsoft ADO.Net – Step by Step 237
5.
6. bmo = Me.tbCategoryID.DataBindings(0).BindingMemberInfo
7. strMsg = “BindingMember: ” + bmo.BindingMember.ToString
8. strMsg += vbCrLf & “BindingPath: ” + _
9. bmo.BindingPath.ToString
10. strMsg += vbCrLf & “BindingField: ” + _
11. bmo.BindingField.ToString
MessageBox.Show(strMsg)
The first two lines declare local variables to be used in the method. The third
line assigns the BindingMemberInfo property of the first (and only) Binding
object in the tbCategoryID DataBindings collection to the bmo variable. The
remaining lines display the BindingMember, BindingPath, and BindingField
properties in a message box.
12. Press F5 to run the application, and then click the
BindingMemberInfo button.
The application displays the BindingMemberInfo fields in a dialog box.
13. Close the application.
Visual C# .NET
1. In the form designer, double-click the Bindings button.
Visual Studio adds the event handler to the code window.
2. Add the following code to the procedure:
3. string strMsg;
4. System.Windows.Forms.BindingMemberInfo bmo;
5.
6. bmo = this.tbCategoryID.DataBindings[0].BindingMemberInfo;
7.
8. strMsg = “BindingMember: ” + bmo.BindingMember.ToString();
9. strMsg += “\nBindingPath: ” + bmo.BindingPath.ToString();
10. strMsg += “\nBindingField: ” + bmo.BindingField.ToString();
MessageBox.Show(strMsg);
11. Press F5 to run the application, and then click the Bindings button.
Microsoft ADO.Net – Step by Step 238
The application displays the BindingMemberInfo fields in a dialog box.
12. Close the application.
Binding Object Events
The events exposed by the Binding object are shown in Table 10-7. The Format and
Parse events are used to control the way data is displayed to the user. We’ll examine
both of these events in detail in Chapter 11.
Table 10-7: Binding Events
Event Description
Format Occurs when data is pushed from the data source to the control
or pulled from the control to the data source
Parse Occurs when data is pulled from the control to the data source
Roadmap We’ll examine the Format and Parse events in Chapter 11.
Chapter 10 Quick Reference
To Do this
Simple-bind
control properties
at run time
Create a new Binding object, and add it to the control’s
DataBindings collection:
newBinding = New Binding(<propertyString>,
<dataSource>, <navigationPath>)
myControl.DataBindings.Add(newBinding)
Complex-bind
control properties
at run time
Set the DataSource and DisplayMember properties:
myControl.DataSource = myDataSource
myControl.DisplayMember = “field”
Use
CurrencyManage
r properties
Obtain a reference to the CurrencyManager by specifying
the data source and navigation path, and then reference
its properties in the usual way:
myCM = Me.BindingContext(<dataSource>,
<path>)
MessageBox.Show(myCM.Count.ToString())
Microsoft ADO.Net – Step by Step 239
Chapter 11: Using ADO.NET in Windows Forms
Overview
In this chapter, you’ll learn how to:
§ Format data using the Format and Parse events
§ Use specialized controls to simplify data entry
§ Use data relations to display related data
§ Find rows based on a DataSet’s Sort column
§ Find rows based on other criteria
§ Work with data change events
§ Work with validation events
§ Use the ErrorProvider component
In the previous chapter, we examined the objects that support Microsoft ADO.NET data
binding. In this chapter, we’ll explore using ADO.NET and Windows Forms to perform
some common tasks.
Formatting Data
The Binding object exposes two events, Format and Parse, which support formatting
data for an application. The Format event occurs whenever data is pushed from the data
source to the control, and when it is pulled from the control back to the data source, as
shown in the figure below.
The Format event is used to translate the data from its native format to the format you
want to display to the user, while the Parse event is used to translate it back to its
original format.
Both events receive a ConvertEventArgs argument, which has the properties shown in
Table 11-1. The Value property contains the actual data. When the event is triggered,
this property will contain the original data in its original format. To change the formatting,
you set this value to the new data or format within the event handler. The DesiredType
property is used when you are changing the data type of the value.
Table 11-1: ConvertEventArgs Properties
Property Description
DesiredType The data
type of the
desired
value
Value The data
value
Using the Format Event
Because the Format event occurs both when data is being pushed from the data source
and when it is pulled from the control, you must be sure you know which action is taking
place before performing any action. If you change the data type of the value, you can
use the DesiredType property to perform this check.
However, if the data type remains the same, you must use a method that is external to
the event to determine which way the data is being moved. Setting the Tag property of
Microsoft ADO.Net – Step by Step 240
the control is an easy way to manage this. If you’re using the Tag property for another
purpose, you can use a form-level variable or determine the direction from the value
itself.
Change the Format of Data Using the Format Event
Visual Basic .NET
1. In Microsoft Visual Studio .NET, open the UsingWindows project from
the Start page or by using the File menu.
2. Double-click the Master.vb form.
Visual Studio displays the form in the form designer.
3. Press F7 to display the code editor.
4. Add the following event handler to the code:
5. Private Sub FormatName (ByVal sender As Object, ByVal e As _
6. ConvertEventArgs)
7. If Me.tbCategoryName.Tag <> “PARSE” Then
8. e.Value = CType(e.Value, String).ToUpper
9. End If
10. Me.tbCategoryName.Tag = “FORMAT”
11. MessageBox.Show(e.Value, “Format”)
End Sub
This code first checks the tbCategoryName text box’s Tag property to see if
the value is “PARSE.” If it isn’t “PARSE,” it translates the Value property of e
to uppercase. It then sets the Tag property to “FORMAT” and displays a
message box showing the Value property.
12. Expand the Region labeled Windows Form Designer generated
code.
13. In the New sub, after the call to UpdateDisplay(), add the code to
call the procedure:
AddHandler Me.tbCategoryName.DataBindings(0).Format, _ AddressOf
Me.FormatName
This line adds the handler to the first (and only) Binding object in the
tbCategoryName text box’s DataBindings collection.
14. Press F5 to run the application. The message box is displayed twice
before the application’s form is displayed, once when the control is
bound and a second time when the data is first pushed to the
control.
15. Close both message boxes.
Microsoft ADO.Net – Step by Step 241
16. Click the Next button (“>”).
The application displays the formatted CategoryName for the next row.
17. Close the message box.
18. Close the application.
Visual C# .NET
1. In Microsoft Visual Studio .NET, open the UsingWindows project from
the Start page or by using the File menu.
2. Double-click the Master.cs form.
Microsoft ADO.Net – Step by Step 242
Visual Studio displays the form in the form designer.
3. Press F7 to display the code editor.
4. Add the following event handler to the bottom of the class definition:
5. private void FormatName(object sender, ConvertEventArgs e)
6. {
7. string eStr = (string) e.Value;
8.
9. if ((string) this.tbCategoryName.Tag != “PARSE”)
10. e.Value = eStr.ToUpper();
11. this.tbCategoryName.Tag = “FORMAT”;
12. MessageBox.Show((string)e.Value, “Format”);
}
This code first checks the tbCategoryName text box’s Tag property to see if
the value is “PARSE.” If it isn’t “PARSE,” it translates the Value property of e
to uppercase. It then sets the Tag property to “FORMAT” and displays a
message box showing the Value property.
13. In the frmMaster sub, after the call to UpdateDisplay(), add the code
to call the procedure:
14. this.tbCategoryName.DataBindings[0].Format +=
new ConvertEventHandler(this.FormatName);
This line adds the handler to the first (and only) Binding object in the
tbCategoryName text box’s DataBindings collection.
15. Press F5 to run the application. The message box is displayed twice
before the application’s form is displayed, once when the control is
bound and a second time when the data is first pushed to the
control.
16. Close both message boxes.
Microsoft ADO.Net – Step by Step 243
17. Click the Next button (“>”).
The application displays the formatted CategoryName for the next row.
18. Close the message box.
19. Close the application.
Microsoft ADO.Net – Step by Step 244
Using the Parse Event
As we have seen, the Parse event occurs when data is being pulled from a control back
to the data source, and it is typically used to “un-format” data that has been customized
for display.
Because Parse is called only once, this “un-formatting” operation should always happen,
unlike the Format operation, which should take place only when data is being pushed to
the control. However, you do need to be careful to set up any variables or properties
required to make sure that the Format event, which will always be called after Parse,
doesn’t reformat data before it is submitted to the data source.
Restore the Original Format of Data Using the Parse Event
Visual Basic .NET
1. Add the following procedure to the bottom of the code editor:
2. Private Sub ParseName(ByVal sender As Object, ByVal e As _
ConvertEventArgs)
3. Me.tbCategoryName.Tag = “PARSE”
4. e.Value = CType(e.Value, String).ToLower
5. MessageBox.Show(e.Value, “Parse”)
End Sub
Note that because the Parse event occurs only when data is being pulled
from the control, there is no need to check the Tag property.
6. Add the following handler to the New sub, after the handler from the
previous exercise:
AddHandler Me.tbCategoryName.DataBindings(0).Parse, _ AddressOf
Me.ParseName
7. Press F5 to run the application, and close both of the preliminary
Format event message boxes.
8. Add a couple of spaces after “BEVERAGES,” and then click the Next
button (“>”).
The application displays the Parse message box.
9. Close the Parse message box, and then close the application.
Important The code for this book was checked with a pre-release version of
Visual Studio .NET (build 4997). A bug in that build interfered
with the click event firing if the project had both a Parse and
Format event handler and if either of these displayed a
MessageBox.
We fully expect that this will be fixed before Visual Studio .NET is
released; however, if the project re-displays the Beverages
category, please refer to the Microsoft Press Web site for further
Microsoft ADO.Net – Step by Step 245
information.
10. Comment out the two AddHandler statements in the New sub.
(Otherwise, the message boxes will get irritating as we work through
the remaining exercises.)
Visual C# .NET
1. Add the following procedure to the bottom of the class file:
2. private void ParseName(object sender, ConvertEventArgs e)
3. {
4. string eStr = (string) e.Value;
5.
6. this.tbCategoryName.Tag = “PARSE”;
7. e.Value = eStr.ToLower();
8. MessageBox.Show((string)e.Value, “Parse”);
}
Note that because the Parse event occurs only when data is being pulled
from the control, there is no need to check the Tag property.
9. Add the following handler to the New sub, after the handler from the
previous exercise:
this.tbCategoryName.DataBindings[0].Parse += new
ConvertEventHandler(this.ParseName);
10. Press F5 to run the application, and close both of the preliminary
Format event message boxes.
11. Add a couple of spaces after “BEVERAGES,” and then click the
Next button (“>”).
The application displays the Parse message box.
12. Close the Parse message box, and then close the application.
Important When a message box is displayed, it stops code in the
application from executing until the user clicks one of the
message box buttons. Stopping the execution of code with a
message box can cause events to fire incorrectly. For example,
the Parse and Format event handlers for this sample include a
call to MessageBox.Show. When you run the sample, add a
couple of spaces in the Name text box, and click the Next button,
you might notice that the Click event for the Next button does not
fire. To ensure that the events for this sample fire correctly, you
can comment out the calls to MessageBox.Show or replace the
calls to MessageBox.Show with Console.WriteLine or
Debug.WriteLine. Console.WriteLine or Debug.WriteLine won’t
stop code from executing and will output specified text to the
Visual Studio .NET Output window so that you can see how the
events are firing.
Microsoft ADO.Net – Step by Step 246
13. Comment out the two statements that add the
ConvertEventHandlers in the frmMaster sub. (Otherwise, the
message boxes will get irritating as we work through the remaining
exercises.)
Displaying Data in Windows Controls
The Microsoft .NET Framework supports a wide variety of controls for use on Windows
forms, and as we’ve seen, any form property can be bound, directly or indirectly, to an
ADO.NET data source.
The details of each control are unfortunately outside the scope of this book, but in this
section, we’ll examine some specific techniques for data-binding.
Simplifying Data Entry
One of the reasons that so many controls are provided, of course, is to make data entry
simpler and more accurate. TextBox controls are always an easy choice, but the time
spent choosing and implementing controls that more closely match the way the user
thinks about the data will be richly rewarded.
To take a fairly simple example, it is certainly possible to use a ComboBox containing
True and False or Yes and No to represent Boolean values, but in most circumstances,
it’s far more effective to use the CheckBox control provided by the .NET Framework.
The Checked property of the CheckBox control, which determines whether the box is
selected, can be simple-bound either at design time by using the Properties window or at
run time in code by using standard techniques.
Use the CheckBox Control for Boolean Values
1. In the Solution Explorer, double-click Controls.vb (or Controls.cs, if
you’re using C#).
Visual Studio .NET opens the form in the form designer.
2. Select the Discontinued CheckBox control.
3. In the Properties window, expand the Data Bindings section (if
necessary).
4. Select the Checked property. In the drop-down list, expand
dsMaster1,and then expand ProductsExtended and select
Discontinued.
5. Press F5 to run the application.
6. Click the Controls button.
The application displays the Controls form.
Microsoft ADO.Net – Step by Step 247
7. Move through the DataTable by pressing the Next button (“>”),
confirming that only discontinued products have the field checked.
8. Close the Controls window.
9. Close the application.
In order to simplify the database schema, many tables use artificial keys—an identity
value of some type rather than a key derived from the entity’s attributes. These artificial
keys are convenient, but they don’t typically have any meaning for users. When working
with the primary table, the artificial key can often be hidden from users or simply ignored
by them. With foreign keys, however, this is rarely the case.
Fortunately, the .NET Framework controls that inherit from the ListControl class,
including both ListBox controls and ComboBox controls, make it easy to bind the control
to one column while displaying another, even a column in a different table.
The technique is reasonably straightforward. First set the DataSource and
DisplayMember properties of the list control to the user-friendly table and column. Under
most circumstances, this won’t be the table that the form is updating. Then, to set the
data binding, set the ValueMember property to the key field in the form being updated,
and finally create a Binding object linking the SelectedValue property to the field to be
updated.
For example, given the database schema shown in the figure below, if you were creating
a form to update the Relatives table, you would typically use a ComboBox control to
represent the Relationship type rather than forcing the user to remember that Type 1
means Sister, Type 2 means Father, and so on.
To implement this in the .NET Framework, you would set the ComboBox control’s
DisplayMember property to RelationshipTypes.Relationship, and then set its
ValueMember property to RelationshipTypes.RelationshipID. With these settings, the
ComboBox control will display Sister but return a SelectedValue of 1.
Once the properties have been set, either in the Properties window or in code, you must
then add a Binding object to the ComboBox control to link the SelectedValue to the
Relationship field in the Relatives table. Because SelectedValue isn’t available for databinding
at design time, you must do this in code:
[VB]
Me.RelationshipType.DataBindings.Add(“SelectedValue”, myDS, _
“Relatives.Relationship”)
Microsoft ADO.Net – Step by Step 248
[C#]
this.RelationshipType.DataBindings.Add(“SelectedValue”, myDS,
“Relatives.Relationship”);
Display Full Names in a ComboBox Control
Visual Basic .NET
1. In the form designer, select the Category combo box (cbCategory) on
the Controls form.
2. In the Properties window, select the DataSource property.
3. In the drop-down list, select dsMaster1.
4. In the Properties window, select the DisplayMember property.
5. In the drop-down list, expand Categories, and then select
CategoryName.
6. In the Properties window, select the ValueMember property.
7. In the drop-down list, expand Categories, and then select CategoryID.
8. Press F7 to open the code editor window.
9. Expand the Region labeled Windows Form Designer generated code.
10. Add the following code after the call to UpdateDisplay in the New
sub:
Me.cbCategory.DataBindings.Add(“SelectedValue”, Me.dsMaster1, _
“ProductsExtended.CategoryID”)
This code binds the ValueMember property of the control to the CategoryID
column of the ProductsExtended DataTable.
11. Press F5 to run the application.
12. Click the Controls button.
The application displays the Controls form and populates the Category combo
box.
13. Close the Controls form and the application.
Visual C# .NET
1. In the form designer, select the Category combo box (cbCategory) on
the Controls form.
2. In the Properties window, select the DataSource property.
3. In the drop-down list, select dsMaster1.
4. In the Properties window, select the DisplayMember property.
5. In the drop-down list, expand Categories, and then select
CategoryName.
6. In the Properties window, select the ValueMember property.
7. In the drop-down list, expand Categories, and then select CategoryID.
8. Press F7 to open the code editor window.
9. Add the following code after the call to UpdateDisplay in the
frmControls sub:
10. this.cbCategory.DataBindings.Add(“SelectedValue”,
Microsoft ADO.Net – Step by Step 249
this.dsMaster1, “ProductsExtended.CategoryID”);
This code binds the ValueMember property of the control to the CategoryID
column of the ProductsExtended DataTable.
11. Press F5 to run the application.
12. Click the Controls button.
The application displays the Controls form and populates the Category combo
box.
13. Close the Controls form and the application.
Numeric data is presented to the user in a text box. Unfortunately, the .NET Framework
version of the control doesn’t provide any method to constrain data entry to numeric
characters. One option is to use the NumericUpDown control. The user can type directly
into this control (numeric characters only) or use the up and down arrows to set the
value.
The NumericUpDown control can be simple-bound at design time or at run time by using
the standard techniques, and it allows a fine degree of control over the format of the
numbers—you can specify the number of decimal places, the increment by which the
value changes when the user clicks the up and down arrows, and the minimum and
maximum values.
Use NumericUpDown Controls
1. In the form designer, select the UnitPrice NumericUpDown control
(udPrice).
2. In the Properties window, expand the Data Bindings section, if
necessary, and then select the Value property.
3. In the drop-down list box, expand dsMaster, expand
ProductsExtended, and then select UnitPrice.
4. Press F5 to run the application.
5. Click the Controls button.
The application displays the Controls form and populates the UnitPrice
NumericUpDown control.
Microsoft ADO.Net – Step by Step 250
6. Close the Controls form and the application.
7. Close the Controls form designer and code editor.
Working with DataRelations
The data model implemented by ADO.NET, with its ability to specify multiple DataTables
and the relationships between them, makes it easy to represent relationships of arbitrary
depth on a single form.
By binding the control to a DataRelation rather than to a DataTable, the .NET Framework
will automatically handle synchronization of controls on a form.
Create a Nested ListBox
Visual Basic .NET
1. Select the code editor for Master.vb.
2. In the New sub, add the following data bindings below the two
commented AddHandler calls:
3. Me.lbOrders.DataSource = Me.dsMaster1
Me.lbOrders.DisplayMember = _
“Categories.CategoriesProducts.ProductOrders.OrderDate”
4. Press F5 to run the application.
Visual Studio displays the application’s main form and populates the Orders
list box.
5. Select different products in the Products list box.
The application displays the date on which each Product was ordered.
Microsoft ADO.Net – Step by Step 251
6. Close the application.
Visual C# .NET
1. Select the code editor for Master.cs.
2. In the frmMaster sub, add the following data bindings below the two
commented ConvertEventHandlers:
3. this.lbOrders.DataSource = this.dsMaster1;
4. this.lbOrders.DisplayMember =
5. “Categories.CategoriesProducts.ProductOrders.OrderDate”;
6. Press F5 to run the application.
Visual Studio displays the application’s main form and populates the Orders
list box.
7. Select different products in the Products list box.
The application displays the date on which each Product was ordered.
Microsoft ADO.Net – Step by Step 252
8. Close the application.
In the previous exercise, we used two ListBox controls to represent a hierar-chical
relationship in the data. The DataGrid control also supports the display of hierarchical
data, and it has the advantage of allowing multiple columns from the data source to be
displayed simultaneously. Unfortunately, because it can display only a single table at a
time, the DataGrid control forces the user to manually navigate the hierarchy and some
users find this confusing.
Note The DataGrid is a complex control, and details of its uses are
outside the scope of this book. The following exercise walks you
through the process of displaying two related DataTables in the
DataGrid control. For more information on using this control, refer
to the Visual Studio and .NET Framework documentation.
Displaying Hierarchical Data Using the DataGrid
1. In the Solution Explorer, double-click DataGrid.vb (or DataGrid.cs, if
you are using C#).
Visual Studio opens the form in the form designer.
2. Select the dgProductOrders DataGrid.
3. In the Properties window, select the DataSource property, expand the
drop-down list, and then select dsMaster1.
4. Select the DataMember property, expand the drop-down list, expand
Categories, and then select CategoriesProducts.
5. Click the Ellipsis button after the TableStyles property.
Visual Studio displays the DataGridTableStyle Collection Editor.
Microsoft ADO.Net – Step by Step 253
6. Click the Add button.
Visual Studio adds a DataGridTableStyle.
7. Change the Name property of the DataGridTableStyle to tsProducts.
8. Select the MappingName property, expand the drop-down list, expand
Categories, and then select CategoriesProducts.
Microsoft ADO.Net – Step by Step 254
9. Click the Add button again.
Visual Studio adds a second DataGridTableStyle.
10. Change the Name property to tsOrders and the MappingName
property to Categories.CategoriesProducts.ProductOrders.
11. Click OK to close the editor.
12. Press F5 to run the application, and then click the DataGrid button.
The application displays the DataGrid form.
Microsoft ADO.Net – Step by Step 255
13. Expand one of the rows in the DataGrid.
The application displays the name of the related table.
14. Select ProductOrders.
The application displays the selected orders.
Microsoft ADO.Net – Step by Step 256
15. Click the Back button.
The application returns to the Products display.
16. Close the window, and close the application.
17. Close the DataGrid.vb (or DataGrid.cs, if you’re using C#) form.
The DataGrid control is fairly easy to bind to multiple DataTables, but because it can
display only a single table at any time, it can be confusing for the user. The TreeView
control can also represent hierarchical data, and it does so in a way that often matches
the user’s expectations more closely.
Microsoft ADO.Net – Step by Step 257
Unfortunately, the TreeView control can’t be directly bound to a data source. Instead,
you must manually add the data by using the Add method of its Nodes collections. The
following exercise walks you through the process.
Displaying Hierarchical Data Using the TreeView
Visual Basic .NET
1. In the Solution Explorer, double-click TreeView.vb.
Visual Studio displays the form in the form designer.
2. Press F7 to display the code editor.
3. Add the following procedure to the bottom of the code editor:
4. Private Sub AddNodes(ByVal sender As Object, ByVal e As
EventArgs)
5. Dim dvCategory As System.Data.DataRowView
6. Dim arrProducts() As System.Data.DataRow
7. Dim currProduct As dsMaster.ProductsRow
8. Dim arrOrders() As System.Data.DataRow
9. Dim currOrder As dsMaster.OrderDatesRow
10. Dim root As System.Windows.Forms.TreeNode
11. With Me.tvProductOrders
12. .BeginUpdate()
13. .Nodes.Clear()
14.
15. dvCategory = _
16. Me.BindingContext(Me.dsMaster1,
“Categories”).Current
17. arrProducts = _
dvCategory.Row.GetChildRows(“CategoriesProducts”)
18. For Each currProduct In arrProducts
19. root = .Nodes.Add(currProduct.ProductName)
20. arrOrders =
currProduct.GetChildRows(“ProductOrders”)
21.
22. For Each currOrder In arrOrders
23. root.Nodes.Add(currOrder.OrderDate)
Microsoft ADO.Net – Step by Step 258
24. Next
25. Next currProduct
26.
27. .EndUpdate()
28. End With
End Sub
29. Expand the Region labeled Windows Form Designer generated
code.
30. Add the following code below the call to UpdateDisplay in the New
sub:
31. AddHandler Me.BindingContext(Me.dsMaster1, _
32. “Categories”).PositionChanged, AddressOf _
33. Me.AddNodes
AddNodes(Me, New System.EventArgs())
The first line links the AddNodes procedure to the PositionChanged event so
that it will be called each time the Category changes. The second line calls
the procedure directly to set up the initial display.
34. Press F5 to run the application, and then click the TreeView button.
Visual Studio displays the TreeView form.
35. Verify that the TreeView is updated correctly by clicking the Next
button (“>”) and expanding nodes.
36. Close the TreeView form and the application.
37. Close the TreeView form designer and code editor.
Visual C# .NET
1. In the Solution Explorer, double-click TreeView.cs.
Visual Studio displays the form in the form designer.
Microsoft ADO.Net – Step by Step 259
2. Press F7 to display the code editor.
3. Add the following procedure to the bottom of the code editor:
4. private void AddNodes(object sender, System.EventArgs e)
5. {
6. System.Data.DataRowView dvCategory;
7. System.Data.DataRow[] arrProducts;
8. System.Data.DataRow[] arrOrders;
9. System.Windows.Forms.TreeNode root;
10. System.Windows.Forms.TreeView tv;
11.
12. tv = this.tvProductOrders;
13.
14. tv.BeginUpdate();
15. tv.Nodes.Clear();
16.
17. dvCategory = (System.Data.DataRowView)
18. this.BindingContext[this.dsMaster1,
“Categories”].Current;
19. arrProducts =
dvCategory.Row.GetChildRows(“CategoriesProducts”);
20. foreach (dsMaster.ProductsRow currProduct in
arrProducts)
21. {
22. root = tv.Nodes.Add(currProduct.ProductName);
23. arrOrders =
currProduct.GetChildRows(“ProductOrders”);
24. foreach (dsMaster.OrderDatesRow currOrder in
arrOrders)
25. {
26.
root.Nodes.Add(currOrder.OrderDate.ToString());
27. }
28. }
Microsoft ADO.Net – Step by Step 260
29. tv.EndUpdate();
30. }
31. Add the following code below the call to UpdateDisplay in the
frmTreeView sub:
32. this.BindingContext[this.dsMaster1,
“Categories”].PositionChanged +=
33. new EventHandler(this.AddNodes);
34. System.EventArgs ea;
35. ea = new System.EventArgs();
AddNodes(this, ea);
The first line links the AddNodes procedure to the PositionChanged event so
that it will be called each time the Category changes. The remaining lines call
the procedure directly to set up the initial display.
36. Press F5 to run the application, and then click the TreeView button.
Visual Studio displays the TreeView form.
37. Verify that the TreeView is updated correctly by clicking the Next
button (“>”) and expanding nodes.
38. Close the TreeView form and the application.
39. Close the TreeView form designer and code editor.
Finding Data
Finding a specific row in a DataTable is a common application task. Unfor-tunately, the
BindingContext object, which controls the data displayed by the controls on a form,
doesn’t directly support a Find method. Instead, you must use either a DataView object
to find a row based on the current Sort key or use a DataTable object to find a row based
on more complex criteria.
Finding Sorted Rows
Using the DataView’s Find method is straightforward, but it can be used only to find a
row based on the row(s) currently specified in the Sort property. If your controls are
bound to a DataView, you can reference the object directly. If you bound the controls to a
DataTable, you can use the DefaultView property to obtain a reference without creating a
new object.
Once you have a reference to a DataView, you can use the Find method, which returns
the index of the row matching the specified criteria or -1 if no matching row is found. The
index of the row in the DataView will correspond directly to the same row’s index in the
BindingContext object, so it’s a simple matter of setting the BindingContext.Position
property to the value that is returned.
Microsoft ADO.Net – Step by Step 261
Find a Row Based on Its Sort Column
Visual Basic .NET
1. In the code editor for Master.vb, select btnFindCategory in the Control
Name combo box, and then select Click in the Event combo box.
Visual Studio adds an event handler to the code editor.
2. Add the following code to the event handler:
3. Dim fcForm As New frmFindCategory()
4. Dim dv As System.Data.DataView =
Me.dsMaster1.Categories.DefaultView
5. Dim id As Integer
6. Dim idx As Integer
7.
8. If fcForm.ShowDialog() = DialogResult.OK Then
9. If fcForm.GetID = 0 Then
10. Else
11. id = fcForm.GetID
12. idx = dv.Find(id)
13. If idx = -1 Then
14. MessageBox.Show(“Category ” + id.ToString + ”
not found”,
15. _ “Error”)
16. Else
17. Me.BindingContext(Me.dsMaster1, _
18. “Categories”).Position = idx
19. End If
20. End If
21. End If
22. fcForm.Dispose()
After declaring some variables and calling fcForm as a dialog box, the code
sets up an if … else statement to handle the two possible search criteria.
(We’ll complete the first section of the if statement in the following exercise.)
The variable id is set to the value of the GetID field on fcForm, and then the
code uses the Find method to locate the index of the row containing that field.
Find returns -1 if the row is not found, in which case the code displays an
error message. If the row is found, it is displayed in the Master form by setting
the BindingContext.Position property.
23. Press F5 to run the application, and click the Find Category button.
Microsoft ADO.Net – Step by Step 262
24. Type 3 in the ID field, and then click Find.
The application displays Category 3 on the Master form.
25. Close the application.
Visual C# .NET
1. In the form designer, double-click the btnFindCategory button on the
Master form.
Visual Studio adds an event handler to the code editor.
2. Add the following code to the event handler:
3. frmFindCategory fcForm = new frmFindCategory();
4. System.Data.DataView dv =
this.dsMaster1.Categories.DefaultView;
5. int id;
6. int idx;
7.
8. if (fcForm.ShowDialog() == DialogResult.OK)
9. if (fcForm.GetID == 0)
10. {
11. }
12. else
13. {
14. id = fcForm.GetID;
15. idx = dv.Find(id);
Microsoft ADO.Net – Step by Step 263
16. if (idx == -1)
17. MessageBox.Show(“Category ” + id.ToString(),
“Error”);
18. else
19. this.BindingContext[this.dsMaster1,
20. “Categories”].Position = idx;
21. }
22. fcForm.Dispose();
After declaring some variables and calling fcForm as a dialog box, the code
sets up an if … else statement to handle the two possible search criteria.
(We’ll complete the first section of the if statement in the following exercise.)
The variable id is set to the value of the GetID field on fcForm, and then the
code uses the Find method to locate the index of the row containing that field.
Find returns -1 if the row is not found, in which case the code displays an
error message. If the row is found, it is displayed in the Master form by setting
the BindingContext.Position property.
23. Press F5 to run the application, and click the Find Category button.
24. Type 3 in the ID field, and then click Find.
The application displays Category 3 on the Master form.
25. Close the application.
Finding Rows Based on Other Criteria
The DataView object’s Find method is easy to use but limited in scope. If you need to
find a row based on complex criteria, or on a single column other than the one on which
the data is sorted, you must use the DataTable’s Select method.
As we saw in Chapter 7, the Select method is easy to use, but positioning the
CurrencyManager to the correct row requires several steps. The process requires using
Microsoft ADO.Net – Step by Step 264
both the DataView and the DataTable object to perform the search, along with the
BindingContext object to display the results. In truth, the whole process is decidedly
awkward, but you’ll learn the steps by rote soon enough.
First you must execute the Select method with the required criteria against the
DataTable. Once the appropriate row is found, you obtain the Sort column value from the
array returned by the Select method and use that to perform a Find against the
DataView. Finally, you use the Position property of the BindingContext to display the
result.
Find a Row Based on an Unsorted Column
Visual Basic .NET
1. Add the following code after the line If fcForm.GetID = 0 in the
btnFindCategory_Click procedure we began in the previous
exercise:
2. Dim name As String
3. Dim dt As System.Data.DataTable = Me.dsMaster1.Categories
4. Dim dr() As System.Data.DataRow
5.
6. name = fcForm.GetName
7.
8. Try
9. dr = dt.Select(“CategoryName = ‘” & name & “‘”)
10. id = CType(dr(0),
dsMaster.CategoriesRow).CategoryID
11. idx = dv.Find(id)
12. Me.BindingContext(Me.dsMaster1,
“Categories”).Position = idx
13. Catch
14. MessageBox.Show(“Category ” + name + ” not
found”, “Error”)
End Try
This code uses the DataTable’s Select method to find the specified category
name. Select returns an array of rows, so the second line uses the CType
function to convert the first row of the array3—dr(0)—to a CategoriesRow,
and sets id to the CategoryID. It then finds the CategoryID in the DataView
and positions the Master form to the row by using the BindingContext.Position
property by using the same code from the previous exercise.
15. Press F5 to run the application, and then click the Find Category
button.
16. Type Condiments in the Name field, and then click Find.
The application displays the Condiments category in the Master form.
Microsoft ADO.Net – Step by Step 265
17. Close the application.
Visual C# .NET
1. Add the following code after the line If (fcForm.GetID == 0) in the
btnFindCategory_Click procedure we began in the previous
exercise:
2. string name;
3. System.Data.DataTable dt = this.dsMaster1.Categories;
4. dsMaster.CategoriesRow cr;
5. System.Data.DataRow[] dr;
6.
7. name = fcForm.GetName;
8.
9. try
10. {
11. dr = dt.Select(“CategoryName = ‘” + name + “‘”);
12. cr = (dsMaster.CategoriesRow) dr[0];
13. id = cr.CategoryID;
14. idx = dv.Find(id);
15. this.BindingContext[this.dsMaster1,
“Categories”].Position = idx;
16. }
17. catch
18. {
19. MessageBox.Show(“Category ” + name + ” not
found”, “Error”);
}
This code uses the DataTable’s Select method to find the specified category
name. Select returns an array of rows, so the second line uses the CType
function to convert the first row of the array—dr(0)—to a CategoriesRow, and
sets id to the CategoryID. It then finds the CategoryID in the DataView and
positions the Master form to the row by using the BindingContext.Position
property by using the same code from the previous exercise.
20. Press F5 to run the application, and then click the Find Category
button.
Microsoft ADO.Net – Step by Step 266
21. Type Condiments in the Name field, and then click Find.
The application displays the Condiments category in the Master form.
22. Close the application.
Validating Data in Windows Forms
The .NET Framework supports a number of techniques for validating data entry prior to
submitting it to a data source. First, as we’ve already seen, is the use of controls that
constrain the data entry to appropriate values.
After the data has been entered, the .NET Framework exposes a series of events at both
the control and data level to allow you to trap and manage problems.
Data Change Events
Data validation is most often implemented at the data source level. This tends to be
more efficient because the validation will occur regardless of which control or controls
are used to change the data.
As we saw in Chapter 7, the DataTable object exposes six events that can be used for
data validation. In order of occurrence, they are:
§ ColumnChanging
§ ColumnChanged
§ RowChanging
§ RowChanged
§ RowDeleting
§ RowDeleted
Note If a row is being deleted, only the RowDeleting and RowDeleted
events occur.
Microsoft ADO.Net – Step by Step 267
If you are using a Typed DataSet, you can create separate event handlers for each
column in a DataTable. If you’re using an Untyped DataSet, a single event handler must
handle all the columns in a single DataRow. You can use the Column property of the
DataColumnChangeArgs parameter, which is passed to the event to determine which
column is being changed.
Respond to a ColumnChanging Event
Visual Basic .NET
1. Add the following procedure to the bottom of the code editor:
2. Private Sub Categories_ColumnChanging(ByVal sender As
Object, _
3. ByVal e As DataColumnChangeEventArgs)
4. Dim str As String
5.
6. str = “Column: ” & e.Column.ColumnName.ToString
7. str += vbCrLf + “New Value: ” & e.ProposedValue
8. MessageBox.Show(str, “Column Changing”)
9. End Sub
10. Add the following event handler to the end of the New sub:
11. AddHandler dsMaster1.Categories.ColumnChanging, AddressOf
_
Me.Categories_ColumnChanging
12. Press F5 to run the application.
13. Change the Category Name to Beverages New, and then click the
Next button (“>”).
The application displays the column name and new value in a message box.
14. Close the message box, and then close the application.
15. Comment out the ColumnChanging event handler in the New sub.
Visual C# .NET
1. Add the following procedure to the class file:
2. private void Categories_ColumnChanging(object
3. sender, DataColumnChangeEventArgs e)
4. {
5. string str;
6.
7. str = “Column: ” + e.Column.ColumnName.ToString();
8. str += “\nNew Value: ” + e.ProposedValue;
9. MessageBox.Show(str, “Column Changing”);
}
10. Add the following event handler to the end of the frmMaster sub:
Microsoft ADO.Net – Step by Step 268
11. this.dsMaster1.Categories.ColumnChanging +=
12. new
DataColumnChangeEventHandler(this.Categories_ColumnCha
nging);
13. Press F5 to run the application.
14. Change the Category Name to Beverages New, and then click the
Next button (“>”).
The application displays the column name and new value in a message box.
15. Close the message box, and then close the application.
16. Comment out the event handler in the frmMaster sub.
The column change events are typically used for validating discrete values—for
example, if the value is within a specified range or has the correct format. For data
validation that relies on multiple column values, you can use the row change events.
Respond to a RowChanging Event
Visual Basic .NET
1. Add the following procedure to the code editor:
2. Private Sub Categories_RowChanging(ByVal sender As Object, _
3. ByVal e As DataRowChangeEventArgs)
4. Dim str As String
5.
6. str = “Action: ” & e.Action.ToString
7. str += vbCrLf + “ID: ” & e.Row(“CategoryID”)
8. MessageBox.Show(str, “Row Changing”)
9. End Sub
10. Add the following code to the end of the New sub:
11. AddHandler dsMaster1.Categories.RowChanging, AddressOf _
Me.Categories_RowChanging
12. Press F5 to run the application.
13. Change the Category Name to New, and then click Next button
(“>”). Close the Column Changing message.
The application displays the Action and Category ID.
Microsoft ADO.Net – Step by Step 269
14. Close the message, and then close the application.
15. Comment out the RowChanging event handlers in the New sub.
Visual C# .NET
1. Add the following procedure to the code editor:
2. private void Categories_RowChanging(object sender,
3. DataRowChangeEventArgs e)
4. {
5. string str;
6.
7. str = “Action: ” + e.Action.ToString();
8. str += “\nID: ” + e.Row[“CategoryID”];
9. MessageBox.Show(str, “Row Changing”);
}
10. Add the following code to the end of the frmMaster sub:
11. this.dsMaster1.Categories.RowChanging += new
12.
DataRowChangeEventHandler(this.Categories_RowChanging);
13. Press F5 to run the application.
14. Change the Category Name to New, and then click Next button
(“>”). Close the Column Changing message.
The application displays the Action and Category ID.
15. Close the message, and then close the application.
16. Comment out the ColumnChanging event handler in the frmMaster
sub.
Microsoft ADO.Net – Step by Step 270
Control Validation Events
In addition to the DataTable events, data validation can also be triggered by individual
controls. Every control supports the following events, in order:
§ Enter
§ GotFocus
§ Leave
§ Validating
§ Validated
§ LostFocus
In addition, the CurrencyManager object supports the ItemChanged event, which is
triggered before a new row becomes current.
Respond to an ItemChanged Event
Visual Basic .NET
1. Add the following procedure to the code editor:
2. Private Sub Categories_ItemChanged(ByVal sender As Object, _
3. ByVal e As ItemChangedEventArgs)
4. Dim str As String
5.
6. str = “Index into CurrencyManager List: ” &
e.Index.ToString
7. MessageBox.Show(str, “Item Changed”)
End Sub
8. Add the following code to the end of the New sub:
9. AddHandler CType(Me.BindingContext(Me.dsMaster1,
“Categories”), _
CurrencyManager).ItemChanged, AddressOf
Me.Categories_ItemChanged
10. Press F5 to run the application.
11. Delete the category description, and then click the Next button (“>”).
The application displays the index of the row that has been changed.
12. Close the message box, and then close the application.
13. Comment out the event handler in the New sub.
Visual C# .NET
1. Add the following procedure to the code editor:
2. private void Categories_ItemChanged(object sender,
3. ItemChangedEventArgs e)
4. {
Microsoft ADO.Net – Step by Step 271
5. string str;
6.
7. str = “Index into CurrencyManager List: ” + e.Index.ToString();
8. MessageBox.Show(str, “Item Changed”);
}
9. Add the following lines to the end of the frmMaster sub:
10. CurrencyManager cm = (CurrencyManager)
11. this.BindingContext[this.dsMaster1, “Categories”];
12. cm.ItemChanged += new
ItemChangedEventHandler(this.Categories_ItemChanged);
13. Press F5 to run the application.
14. Delete the category description, and then click the Next button (“>”).
The application displays the index of the row that has been changed.
15. Close the message box, and then close the application.
16. Comment out the event handler in the New sub.
For purposes of data validation, the Validating and Validated events roughly correspond
to the ColumnChanging and ColumnChanged events, but they have the advantage of
occurring as soon as the user leaves the control, rather than when the BindingContext
object is repositioned.
Respond to a Validating Event
Visual Basic .NET
1. In the code editor, select tbCategoryName in the Control Name
combo box, and then select Validating in the Method combo box.
Visual Studio adds the event handler template to the code editor.
2. Add the following code to the procedure:
3. If Me.tbCategoryName.Text = “Cancel” Then
4. MessageBox.Show(“Change the Name from ‘Cancel'”,
“Validating”)
5. e.Cancel = True
End If
6. Press F5 to run the application.
7. Change the Category Name to Cancel, and then click the Next button
(“>”).
The application cancels the change and redisplays the original row.
Microsoft ADO.Net – Step by Step 272
8. Close the application.
Visual C# .NET
1. Add the following procedure to the class file:
2. private void Categories_Validating(object sender,
CancelEventArgs e)
3. {
4. if (this.tbCategoryName.Text == “Cancel”)
5. {
6. MessageBox.Show(“Change the Name from ‘Cancel'”,
7. “Validating”);
8. e.Cancel = true;
9. }
}
10. Add the following lines to the frmMaster sub:
11. this.tbCategoryName.Validating +=
new CancelEventHandler(this.Categories_Validating);
12. Press F5 to run the application.
13. Change the Category Name to Cancel, and then click the Next
button (“>”).
The application cancels the change.
14. Close the application.
Microsoft ADO.Net – Step by Step 273
Using the ErrorProvider Component
In the previous exercises, we’ve used MessageBox controls in response to data
validation errors. This is a common technique, but it’s not a very good one from a
usability standpoint. MessageBox controls are disruptive, and after they are dismissed,
the error information contained in them also disappears.
Fortunately, the .NET Framework provides a much better mechanism for displaying
errors to the user: the ErrorProvider component. The ErrorProvider, which can be bound
to either a specific control or a data source object, dis-plays an error icon next to the
appropriate control. If the user places the mouse pointer over the icon, a ToolTip will
display the specified error message.
Use an ErrorProvider with a Form Control
Visual Basic .NET
1. In the code editor, select tbCategoryID in the Control Name combo
box, and then select Validating in the Method Name combo box.
Visual Studio adds the event handler template to the code editor.
2. Add the following code to the event handler:
3. If Me.tbCategoryID.Text = “Error” Then
4. Me.epControl.SetError(Me.tbCategoryID, _
5. “Please re-enter the CategoryID”)
6. e.Cancel = True
7. Else
8. Me.epControl.SetError(Me.tbCategoryID, “”)
End If
9. Press F5 to run the application.
10. Change the CategoryID to Error, and then click the Next button
(“>”).
The application displays a blinking error icon after the CategoryID control.
11. Place the mouse pointer over the icon.
The application displays the ToolTip.
Microsoft ADO.Net – Step by Step 274
12. Close the application.
Visual C# .NET
1. Add the following procedure to the class module:
2. private void Categories_Error(object sender, CancelEventArgs e)
3. {
4. if (this.tbCategoryID.Text == “Error”)
5. {
6. this.epControl.SetError(this.tbCategoryID, “Please re-
7. enter the CategoryID”);
8. e.Cancel = true;
9. }
10. else
11. {
12. this.epControl.SetError(this.tbCategoryID, “”);
13. }
}
14. Add the following line to the end of the frmMaster sub:
15. this.tbCategoryID.Validating +=
new CancelEventHandler(this.Categories_Error);
16. Press F5 to run the application.
17. Change the CategoryID to Error, and then click the Next button
(“>”).
The application displays a blinking error icon after the CategoryID control.
18. Place the mouse pointer over the icon.
The application displays the ToolTip.
Microsoft ADO.Net – Step by Step 275
19. Close the application.
The previous exercise demonstrated the use of the ErrorProvider from within the
Validating event of a control. But the ErrorProvider component can also be bound to a
data source, and it can display errors for any column or row containing errors.
Binding an ErrorProvider to a data source object has the advantage of allowing multiple
errors to be displayed simultaneously—a significant improvement in system usability.
Use an ErrorProvider with a DataColumn
Visual Basic .NET
1. In the form designer, select the epDataSet ErrorProvider control.
2. In the Properties window, select the DataSource property, expand the
drop-down list, and then select dsMaster1.
3. Select the DataMember property, expand the drop-down list, and then
select Categories.
4. Double-click the btnDataSet button.
Visual Studio adds the event handler template to the code editor.
5. Add the following code to the event handler:
6. Me.dsMaster1.Categories.Rows(0).SetColumnError(“Description”
, _
“Error Created Here”)
This code artificially creates an error condition for the Description column of
the second row in the Categories table.
7. Press F5 to run the application, and then click the DataSet Error
button.
Visual Studio displays an error icon after the Description text box.
Microsoft ADO.Net – Step by Step 276
8. Close the application.
Visual C# .NET
1. In the form designer, select the epDataSet ErrorProvider control.
2. In the Properties window, select the DataSource property, expand the
drop-down list, and then select dsMaster1.
3. Select the DataMember property, expand the drop-down list, and then
select Categories.
4. Double-click the btnDataSet button.
Visual Studio adds the event handler template to the code editor.
5. Add the following code to the event handler:
6. this.dsMaster1.Categories.Rows[0].SetColumnError(“Description”
,
“Error Created Here”);
This code artificially creates an error condition for the Description column of
the second row in the Categories table.
7. Press F5 to run the application, and then click the DataSet Error
button.
Visual Studio displays an error icon after the Description text box.
8. Close the application.
Chapter 11 Quick Reference
To Do this
Microsoft ADO.Net – Step by Step 277
To Do this
Use the Format
event
Create the event handler, changing the Value property of the
ConvertEventArgs parameter, and then bind it to the
control’s Format event
Use the Parse
event
Create the event handler, changing the Value property of the
ConvertEventArgs parameter, and then bind it to the
control’s Parse event
Use the
CheckBox
control to
display
Boolean values
in a DataTable
Bind the value of the control’s Checked property
Bind a
ComboBox to a
key value it
doesn’t display
Set the control’s DisplayMember property to the column to
be displayed, and set the ValueMember property to the key
value
Create a
nested ListBox
Set the ListBox’s DisplayMember property to the entire
hierarchy, including the DataRelation:
myListBox.DisplayMember =
“tblParent.drRelation.tblChild.Column”
Display
hierarchical
data using the
DataGrid
control
In the form designer, use the DataGridTableStyle Collection
editor (available from the TableStyles property in the
Properties Window) to add the related tables to the DataGrid
Display
hierarchical
data using the
TreeView
control
Use the DataRow’s GetChildRows method to manually add
the nodes to the TreeView’s Nodes array:
for each mainRow in masterTable
rootNode = _
myTreeView.Nodes.Add(mainRow.myColumn)
childArray = _
mainRow.GetChildRows(“myRelation”)
for each childRow in childArray
rootNote.Nodes.Add(childRow.myColumn)
next childRow
next mainRow
Find rows
based on the
Sort column
Use the DataView’s Find method to return the position of the
row:
rowIndex = myDataView.Find(theKey)
myBindingContext.Position = rowIndex
Find Rows
based on an
Unsorted
Column
Use the DataTable’s Select method to return the row, and
then use the DataView’s Find method to find its position:
drFound = myTable.Select(strCriteria)
rowSortKey = drFound(0).myColumn
rowIndex = myDataView.Find(rowSortKey)
myBindingContext.Position = rowIndex
Validate Data
at the
DataTable level
Respond to one of the DataTable change events:
ColumnChanging, ColumnChanged, RowChanging,
RowChanged, RowDeleting, or RowDeleted
Validate Data
at the Control
level
Respond to one of the Control validation events:
Enter, GotFocus, Leave, Validating, Validated, LostFocus
Microsoft ADO.Net – Step by Step 278
To Do this
Use an
ErrorProvider
with a Form
Control
Set the ErrorProvider’s ContainerControl property to the
control, and then, if necessary, call the SetError method to
display an error condition from within the control’s Validating
event
Chapter 12: Data-Binding in Web Forms
Overview
In this chapter, you’ll learn how to:
§ Simple-bind controls at design time
§ Simple-bind controls at run time
§ Display bound data on a page
§ Complex-bind controls at design time
§ Complex-bind controls at run time
§ Use the DataBinder object
§ Store a DataSet in the session state
§ Store a DataSet in the ViewState
§ Update a data source using a Command object
In the previous eleven chapters, we’ve examined the ADO.NET object model, using
examples in Windows forms. In this chapter, we’ll examine the way that Microsoft
ADO.NET interacts with Microsoft ASP.NET and Web forms.
Understanding Data-Binding in Web Forms
As part of the Microsoft .NET Framework, ADO.NET is independent of any application in
which it is deployed, whether it’s a Windows form, like the exercises in the previous
chapters, a Web form, or a middle-level business object. But the way that data is pushed
to and pulled from controls is a function of the control itself, not of ADO.NET, and the
Web form data-binding architecture is very different from anything we’ve seen so far.
The Web form data-binding architecture is based on two assumptions. The first
assumption is that the majority of data access is read-only—data is displayed to users,
but in most cases, it is not updated by them. The second assumption is that performance
and scalability, while not insignificant in the Microsoft Windows operating system, are of
critical importance when applications are deployed on the Internet.
To optimize performance for read-only data access, the .NET Framework Web form
data-binding architecture is also read-only—when you bind a control to a data source,
the data will only be pushed to the bound property; it will not be pulled back from the
control.
This doesn’t mean that it’s impossible, or even particularly difficult, to edit data by using
Web forms, but it has to be done manually. As a simple example, if you have a Windows
Form TextBox control bound to a column in a DataSet, and the user changes the value
of that TextBox, the new value will be automatically propagated to the DataSet by the
.NET Framework, and the Item, DataColumn, and DataRow change events will be
triggered.
If a TextBox control on a Web form is bound to a column in a DataSet, however, the user
must explicitly submit any changes to the server, and you must write the code to handle
Microsoft ADO.Net – Step by Step 279
the submission, both on the client and the server. After the changes reach the DataSet,
of course, the DataColumn and DataRow change events will still be triggered.
Most of this arises from the nature of the Internet itself. In a traditional Web programming
environment, a page is created, sent to the user’s browser, and then the user, the page,
and any information the page contains are forgotten. In other words, the Internet is, by
default, stateless—the state of a page is not maintained between round-trips to the
server.
ASP.NET, the part of the .NET Framework that supports Web development, supports a
number of mechanisms for maintaining state, where appropriate, on both the client and
server. We’ll examine some of these as they relate to data access later in this chapter.
In addition to being stateless, traditional Internet applications are also disconnected.
When working with older data object models, this can sometimes be a problem, but as
we’ve seen, ADO.NET itself uses a disconnected data model, so this poses no problem.
Data Sources
Like controls on Windows forms, Web form controls can be bound to any data source,
not only traditional database tables. Technically, to qualify as a Web form data source,
an object must implement the IEnumerable interface. Arrays, Collections,
DataReaders, DataSets, DataViews, and DataRows all implement the IEnumerable
interface, and any of them can be used as the data source for a Web form control.
Because the management of server resources and the resulting scalability
issues are critical in the Internet environment, the choice of data access
methods must be given careful consideration. In most cases, when data is read
into the page and then discarded, it’s better to use an ADO.NET DataReader
rather than a DataSet because a DataReader provides better performance and
conserves server memory. However, this isn’t always the case, and there are
situations in which using the DataSet is both easier and more efficient.
If, for example, you’re working with related data, the DataSet object, with its
support for DataRelations and its GetChildRows and GetParentRows methods,
is both easier to implement and more efficient because it requires fewer roundtrips
to the data source. Also, as we’ll see in Chapter 15, the DataSet provides
the mechanism for reading data from and writing data to an XML stream.
Finally if the data will be accessed multiple times, as it is when you’re paging
through data, it can be more efficient to store a DataSet than to re-create it
each time. This isn’t always the case, however. In some situations, the memory
that is required to store a large DataSet outweighs the performance gains from
maintaining the data. Also, if the data being stored is at all vol-tile, you run the
risk of the stored data becoming out of sync with the primary data store.
Roadmap We’ll examine binding to DataRelations in Chapter 13.
There is one other major difference in the data-binding architectures of
Windows and Web forms: Web forms do not directly support data-binding to an
ADO.NET DataRelation object. As we saw in Chapter 11, binding to a
DataRelation provides a simple and efficient method for displaying
master/detail relationships. To perform the same function in a Web form, you
must use the DataBinder property. We’ll examine binding to DataRelations in
Chapter 13.
Binding Controls to an ADO.NET Data Source
Like controls on Windows forms, Web form controls support simple-binding virtually any
property to a single value in data source and complex-binding control properties that
Microsoft ADO.Net – Step by Step 280
display multiple values. However, the binding mechanisms for Web forms are somewhat
different from those that we’ve seen and used with Windows forms.
Note In the Web form document ation, simple- and complex-binding are
referred to as single-value and multirecord binding.
Simple-Binding Control Properties
Web form controls can always be bound at run time. They can also be bound at design
time if the data source is available. (Because Web Forms applications tend to use Data
commands more often than DataSets, the data source is less often available at design
time.)
Unlike Windows forms, simple-bound Web form control properties don’t expose databinding
properties. Instead, the value is explicitly retrieved and assigned to the property
at run time by using a data-binding expression.
In Microsoft Visual Studio .NET, the Properties window supports a tool for creating databinding
expressions, or you can create them at run time. The run time data-binding
expression is delimited by <%# and %>:
propName = (<%# dataExpression %>)
The dataExpression can be any expression that resolves to a single data item—a
column of a DataRow, a property of another control on the page, or even an expression.
Note, however, that Web forms don’t support a BindingContext object or anything similar
to it, so there is no concept of a current row. You must specifically indicate which row of
a data source, such as a DataTable, will be displayed in the bound property. So, for
example, to refer to a DataColumn within a DataSet, you would need to use the following
syntax:
<%# myDataSet.myTable.DefaultView(0).myColumn %>
You can use a data-binding expression almost anywhere in a Web form page, as long as
the expression evaluates at run time to the correct data type. You can, of course, use
type-casting to coerce the value to the correct type. For example:
myTextbox.Text = <%# myDataSet.myTable.Rows.Count.ToString() %>
Simple-Bind a Control Property at Design Time
1. Open the WebForms project from the Start page or the File menu.
2. In the Solution Explorer, double-click WebForm1.aspx.
Visual Studio displays the page in the form designer.
3. Select the tbCategoryName text box.
4. In the Properties window, select (DataBindings) and click the Ellipsis
button.
Microsoft ADO.Net – Step by Step 281
Visual Studio opens the DataBindings dialog box.
5. In the Simple Binding pane, expand
dsMaster1/Categories/DefaultView/DefaultView.[0], and select
CategoryName.
6. Click OK.
Visual Studio creates the binding.
Note You can examine the syntax of the data-binding attribute on the HTML
tab of the project. Find the tag that defines the tbCategoryName text
box.
If the data source isn’t available at design time, you can bind a control property at run
time. Although it’s possible to do this in the control tag, it’s much easier to do so by using
the DataBinding event that is raised when the DataBind method is called for the control.
Simple-Bind a Control Property at Run Time
Visual Basic .NET
1. Press F7 to display WebForm1.aspx.vb.
2. Select tbCategoryDescription in the Control Name combo box, and
then select DataBinding in the Method Name combo box.
Microsoft ADO.Net – Step by Step 282
Visual Studio adds the event handler.
3. Add the following code to the procedure:
Me.tbCategoryDescription.Text = Me.dsMaster1.Categories(0).Description
Visual C# .NET
1. Select tbCategoryDescription in the form designer.
2. In the Properties Window, click the Events button, and then doubleclick
DataBinding.
Visual Studio opens the code window and adds the event handler.
3. Add the following code to the procedure:
4. this.tbCategoryDescription.Text =
this.dsMaster1.Categories[0].Description;
Just as with Windows forms, before you can display the data on your Web form, you
must explicitly load it from the data source by filling a DataAdapter or executing a Data
command. But Web forms require an additional step: You must push the data into the
control properties.
This is done by calling the DataBind method, which is implemented by all controls that
inherit from System.Web.UI.Control. A call to the DataBind method cascades to its child
controls. Thus, calling DataBind for the Page class will call the DataBind method for all
the controls contained by the Page class.
When the DataBind method is invoked for a control, either directly or by cascading, the
data expressions embedded in control tags will be resolved and the DataBinding events
for the controls will be triggered.
If you’re using a Web form to update data, you must be careful when you call the
DataBind method. Much like a DataSet’s AcceptChanges method, DataBind replaces the
values currently contained in the bound properties.
Display Bound Data in the Page
Visual Basic .NET
1. In the code editor, add the following code to the Page_Load event:
2. Me.daCategories.Fill(Me.dsMaster1.Categories)
3. Me.daProducts.Fill(Me.dsMaster1.Products)
4. Me.daOrders.Fill(Me.dsMaster1.Orders)
Me.DataBind()
This code fills the three tables in the DataSet, and then calls the DataBind
event for the page, which will push the data into each of the bound controls
that it contains.
5. Press F5 to run the application.
Visual Studio displays the page in the default browser.
6. Close the browser.
Microsoft ADO.Net – Step by Step 283
Visual C# .NET
1. In the code editor, add the following code to the Page_Load event:
2. this.daCategories.Fill(this.dsMaster1.Categories);
3. this.daProducts.Fill(this.dsMaster1.Products);
4. this.daOrders.Fill(this.dsMaster1.Orders);
this.DataBind();
5. Press F5 to run the application.
Visual Studio displays the page in the default browser.
6. Close the browser.
Complex-Binding Control Properties
The process of complex-binding Web form controls closely resembles the process for
complex-binding Windows form controls. Complex-bound controls in both environments
expose the DataSource and DataMember properties for defining the source of the data,
and Web form controls expose a DataValueField property that is equivalent to the
ValueMember property of a Windows form control.
The DataList and DataGrid controls also expose a DataKeyField property that stores the
primary key information within the data source. The DataKeyField, which populates a
DataKeyFields collection, allows you to store the primary key information without
necessarily displaying it in the control.
In addition, the ListBox, DropDownList, CheckBoxList, RadioButtonList, and HtmlSelect
controls expose a DataTextField property that defines the column to be displayed. The
DataTextField property is equivalent to the DisplayMember property of a Windows form
control.
Roadmap We’ll examine binding to DataRelations in Chapter 13.
If the DataSource property is being set to a DataSet and the DataMember property is
being set to a DataTable, you can simply set the properties directly. As we’ll see in
Chapter 13, it is also possible to bind to DataRelations, but the process is somewhat less
than straightforward.
Complex-Bind a Control at Design Time
1. Display the form designer.
2. Select the dgProducts DataGrid.
3. In the Properties window, expand the Data section (if necessary),
select the DataSource property, and then select dsMaster1 in the
drop-down list.
Note Clear the Events button if you’re working in C#.
4. Select the DataMember property, and then select Products.
5. Press F5 to run the application.
Microsoft ADO.Net – Step by Step 284
Visual Studio displays the page in the default browser, showing all the
products in the data grid.
6. Close the browser.
In this exercise, we’ll bind the lbOrders ListBox control in response to the
SelectedItemChanged event of the dgProducts DataGrid control. The
SelectedItemChanged event occurs when the user clicks one of the Orders buttons in
the DataGrid because its CommandName property has been set to Select.
Complex-Bind a Control at Run Time
Visual Basic .NET
1. In the form designer, double-click the dgProducts DataGrid control.
Visual Studio adds a SelectedIndexChanged event handler to the code editor.
2. Add the following code to the procedure:
3. Me.dvOrders.Table = Me.dsMaster1.Orders
4. Me.dvOrders.RowFilter = “ProductID = ” & _
5. Me.dgProducts.SelectedItem.Cells(1).Text
6. Me.lbOrders.DataSource = Me.dvOrders
7. Me.lbOrders.DataTextField = “OrderDate”
Me.lbOrders.DataBind()
The code sets the RowFilter property of the dvOrders DataView to the
ProductID of the row selected in the DataGrid. It then sets the DataSource
and DataMember properties of the ListBox, and then calls the DataBind
method to push the data to the control.
8. Press F5 to run the application.
Visual Studio displays the page in the default browser.
9. Click the Orders button in one of the rows in the data grid.
The page displays the order dates in the list box. Note that the browser made
a round-trip to the server to retrieve the data.
Microsoft ADO.Net – Step by Step 285
10. Close the browser.
Visual C# .NET
1. In the form designer, double-click the dgProducts DataGrid control.
Visual Studio adds a Select Click handler to the code editor.
2. Add the following code to the procedure:
3. this.dvOrders.Table = this.dsMaster1.Orders;
4. this.dvOrders.RowFilter = “ProductID = ” +
5. this.dgProducts.SelectedItem.Cells[1].Text;
6. this.lbOrders.DataSource = this.dvOrders;
7. this.lbOrders.DataTextField = “OrderDate”;
this.lbOrders.DataBind();
The code sets the RowFilter property of the dvOrders DataView to the
ProductID of the row selected in the DataGrid. It then sets the DataSource
and DataMember properties of the ListBox, and then calls the DataBind
method to push the data to the control.
8. Press F5 to run the application.
Visual Studio displays the page in the default browser.
9. Click the Orders button in one of the rows in the data grid.
The page displays the order dates in the list box. Note that the browser made
a round-trip to the server to retrieve the data.
10. Close the browser.
Microsoft ADO.Net – Step by Step 286
Using the DataBinder Object
In addition to embedding data-binding expressions directly in the HTML stream, the .NET
Framework also exposes the DataBinder object, which evaluates data-binding
expressions and optionally formats the result as a string.
The DataBinder syntax is straightforward, and it can perform type conver-sion
automatically, which greatly simplifies coding in some circumstances. This is particularly
true when working with an ADO.NET object—multiple castings are required, and the
syntax is complex. However, the DataBinder object is late-bound, and like all late-bound
objects, it does incur a performance penalty, primarily due to its type conversion.
The DataBinder object is a static object, which means that it can be used without
instantiation. It can be called either from within the HTML for the page (surrounded by
<%# and %> brackets) or in code.
The DataBinder object exposes no properties or events, and only a single method, Eval.
The Eval method is overloaded to accept an optional format string, as shown in Table
12-1.
Table 12-1: Eval Methods
Method Description
Eval(dataSource, dataExpression) Returns the
value of
dataExpress
ion in the
dataSource
at run time
Eval(dataSource, dataExpression, formatStr) Returns the
value of
dataExpress
ion in the
dataSource
at run time,
and then
formats it
according to
the
formatStr
The Eval method expects a data container object as the first parameter. When working
with ADO.NET objects, this is usually a DataSet, DataTable, or DataView object. It can
also be the Container object if the expression runs from within a List control in a
template, such as a DataList, DataGrid, or Repeater, in which case the first parameter
should always be Container.DataItem.
The second parameter of the Eval method is a string that represents the specific data
item to be returned. When working with ADO.NET objects, this parameter would typically
be the name of a DataColumn, but it can be any valid data expression.
The final, optional parameter is a format specifier identical in format to those used by the
String.Format method. If the format specifier is omitted, the Eval method returns an
object, which must be explicitly cast to the correct type.
Use the DataBinder to Bind a Control Property
Visual Basic .NET
1. In the code editor, select tbCategoryID in the Control Name combo
box, and then select DataBinding in the Method Name combo box.
Visual Studio adds the event handler to the code.
2. Add the following line to the procedure:
3. Me.tbCategoryID.Text = _
Microsoft ADO.Net – Step by Step 287
4. DataBinder.Eval(Me.dsMaster1.Categories.DefaultView(0), _
“CategoryID”)
Notice that you must explicitly record the first row of the DataTable’s
DefaultView. This is because Web forms have no CurrencyManager to handle
retrieving a current row from the DataSet.
5. Press F5 to run the application.
Visual Studio displays the page in the default browser with the CategoryID
value.
6. Close the browser.
Visual C# .NET
1. In the form designer, select tbCategoryID, display the events in the
Properties Window, and double-click DataBinding.
Visual Studio adds the event handler to the code editor window.
2. Add the following line to the procedure:
3. this.tbCategoryID.Text =
4. DataBinder.Eval(this.dsMaster1.Categories.DefaultView[0],
“CategoryID”).ToString();
Notice that you must explicitly record the first row of the DataTa ble’s
DefaultView. This is because Web forms have no CurrencyManager to handle
retrieving a current row from the DataSet.
5. Press F5 to run the application.
Visual Studio displays the page in the default browser with the CategoryID
value.
6. Close the browser.
Microsoft ADO.Net – Step by Step 288
Maintaining ADO.NET Object State
Because the Web form doesn’t maintain state between round-trips to the server, if you
want to maintain a DataSet between the time that the page is first created and the time
that it takes the user to send it back with changes, you must do so explicitly.
You can maintain a DataSet on the server by storing it in either the Application or
Session state, or you can maintain it on the client by storing it in the Page class’s
ViewState. You can also store the DataSet in a hidden field on the page, although
because this is how the Page class implements ViewState, there’s rarely any advantage
to doing so.
Whether you maintain the data on the server or the page, you must always be aware of
concurrency issues. You’re saving round-trips to the data source, and the performance
gains can be significant, particularly if the data requires calculations. However, changes
to the data source won’t be reflected in the stored data. If the data is volatile, you must
re-create the ADO.NET objects each time in order to ensure that they reflect the most
recent changes.
Maintaining ADO.NET Objects on the Server
ASP.NET provides a number of mechanisms for maintaining state within an Internet
application. On the server side, the two easiest mechanisms to use are the Application
state and the Session state. Both state structures are dictionaries that store data as
name/value pairs. The value is stored and retrieved as an object, so you must cast it to
the correct type when you restore it.
The Application and Session states are used identically; the difference is scope. The
Application state is global to all pages and all users within the application. The Session
state is specific to a single browser session. (Please refer to the ASP.NET
documentation for additional information about Application and Session states.)
The IsPostBack property of the Page class, which is False the first time a Page is loaded
for a specific browser session and True thereafter, can be used in the Page_Load event
to control when the data is created and loaded.
Store the DataSet in the Session State
Visual Basic .NET
1. Change the Page_Load event to store the DataSet in the Session
state:
2. If Me.IsPostBack Then
3. Me.dsMaster1 = CType(Session(“dsMaster”), DataSet)
4. Else
5. Me.daCategories.Fill(Me.dsMaster1.Categories)
6. Me.daProducts.Fill(Me.dsMaster1.Products)
7. Me.daOrders.Fill(Me.dsMaster1.Orders)
8. Session(“dsMaster”) = Me.dsMaster1
9. End If
Me.DataBind()
10. Press F5 to run the application.
Visual Studio displays the page in the default browser.
Microsoft ADO.Net – Step by Step 289
11. Click several items in the dgProducts data grid.
You might be able to notice a slight increase in performance.
12. Close the browser.
Visual C# .NET
1. Change the Page_Load event to store the DataSet in the Session
state:
2. if (this.IsPostBack)
3. this.dsMaster1 = (dsMaster) Session[“dsMaster”];
4. else
5. {
6. this.daCategories.Fill(this.dsMaster1.Categories);
7. this.daProducts.Fill(this.dsMaster1.Products);
8. this.daOrders.Fill(this.dsMaster1.Orders);
9. this.Session[“dsMaster”] = this.dsMaster1;
10. }
this.DataBind();
11. Press F5 to run the application.
Visual Studio displays the page in the default browser.
12. Click several items in the dgProducts data grid.
You may be able to notice a slight increase in performance.
13. Close the browser.
Maintaining ADO.NET Objects on the Page
Storing data on the server can be convenient, but it does consume server resources
which, in turn, negatively impacts application scalability. An alternative is to store the
data on the page itself. This relieves the pressure on the server, but because the data is
passed as part of the data stream, it can increase the time it requires to load and post
the page.
Microsoft ADO.Net – Step by Step 290
Data is stored on the page either in a custom hidden field or in the ViewState property of
a control. In theory, any ViewState property can be used, but the Page class’s ViewState
is the most common property.
Store the DataSet in the ViewState
Visual Basic .NET
1. Change the Page_Load event handler to store the data in the Page
class ViewState:
2. If Me.IsPostBack Then
3. Me.dsMaster1 = CType(ViewState(“dsMaster”), DataSet)
4. Else
5. Me.daCategories.Fill(Me.dsMaster1.Categories)
6. Me.daProducts.Fill(Me.dsMaster1.Products)
7. Me.daOrders.Fill(Me.dsMaster1.Orders)
8. ViewState(“dsMaster”) = Me.dsMaster1
9. End If
10. Me.DataBind()
11. Press F5 to run the application.
Visual Studio displays the page in the default browser.
12. Click several items in the dgProducts data grid.
13. Close the browser.
Visual C# .NET
1. Change the Page_Load event handler to store the data in the Page
class ViewState:
2. if (this.IsPostBack)
3. this.dsMaster1 = (dsMaster) ViewState[“dsMaster”];
4. else
5. {
6. this.daCategories.Fill(this.dsMaster1.Categories);
7. this.daProducts.Fill(this.dsMaster1.Products);
8. this.daOrders.Fill(this.dsMaster1.Orders);
9. this.ViewState[“dsMaster”] = this.dsMaster1;
10. }
11. this.DataBind();
12. Press F5 to run the application.
Visual Studio displays the page in the default browser.
Microsoft ADO.Net – Step by Step 291
13. Click several items in the dgProducts data grid.
14. Close the browser.
Updating a Data Source from a Web Form
Remember that ADO.NET objects behave in exactly the same manner when they’re
instantiated in a Web form page as when they’re used in a Windows form. Because of
this, in theory, the processes of updating a data source should be identical.
On one level, this is true. The actual update is performed by directly running a Data
command or by calling the Update method of a DataAdapter. But remember that a Web
form page doesn’t maintain its state and that data-binding architecture is one-way.
Because the Web form data-binding architecture is one-way, you must explic-itly push
the values returned by the page into the appropriate object. With a Windows form, after a
control property has been bound to a column in a DataTable, any changes that the user
makes to the value will be immediately and automatically reflected in the DataTable.
On a Web form, on the other hand, you must explicitly retrieve the value from the control
and update the ADO.NET object. You might, for example, use the control values to set
the parameters of a Data command or update a row in a DataTable.
Update a Data Source Using a Command Object
Visual Basic .NET
1. Change the Page_Load event code to read:
2. If Not IsPostBack Then
3. Me.daCategories.Fill(Me.dsMaster1.Categories)
4. Me.daProducts.Fill(Me.dsMaster1.Products)
5. Me.daOrders.Fill(Me.dsMaster1.Orders)
6. Me.DataBind()
End If
The IsPostBack property prevents the Fill and DataBind methods from being
called when the page is posted back. Remember that DataBind replaces
existing values.
7. In the code editor, select btnCommand in the Control Name combo
box, and then select Click in the Method Name combo box.
Visual Studio adds the event handler to the code.
8. Add the following code to the event handler:
9. Dim cmdUpdate As System.Data.OleDb.OleDbCommand
10. cmdUpdate = Me.daCategories.UpdateCommand
11.
12. With cmdUpdate
Microsoft ADO.Net – Step by Step 292
13. .Parameters(0).Value = Me.tbCategoryName.Text
14. .Parameters(1).Value = Me.tbCategoryDescription.Text
15. .Parameters(2).Value = Me.tbCategoryID.Text
16. End With
17.
18. Me.cnNorthwind.Open()
19. cmdUpdate.ExecuteNonQuery()
Me.cnNorthwind.Close()
The code uses the UpdateCommand of the daCategories DataAdapter to
perform the update. (This is a shortcut that wouldn’t ordinarily be available.)
The three parameters are set to the values of the relevant fields on the page,
and then the Connection is opened, the Command is executed, and the
Connection is closed.
20. Press F5 to run the application.
Visual Studio displays the page in the default browser.
21. Change the Category Name to Categories New.
22. Click Command.
The page updates the database.
23. Close the browser.
Visual C# .NET
1. Change the Page_Load event code to read:
2. if (IsPostBack == false)
3. {
4. this.daCategories.Fill(this.dsMaster1.Categories);
5. this.daProducts.Fill(this.dsMaster1.Products);
6. this.daOrders.Fill(this.dsMaster1.Orders);
7. this.DataBind();
}
The IsPostBack property prevents the Fill and DataBind methods from being
called when the page is posted back. Remember that DataBind replaces
existing values.
8. In the form designer, double-click btnCommand.
Visual Studio adds the event handler to the code.
9. Add the following code to the event handler:
10. System.Data.OleDb.OleDbCommand cmdUpdate;
Microsoft ADO.Net – Step by Step 293
11. cmdUpdate = this.daCategories.UpdateCommand;
12. cmdUpdate.Parameters[0].Value =
this.tbCategoryName.Text;
13. cmdUpdate.Parameters[1].Value =
this.tbCategoryDescription.Text;
14. cmdUpdate.Parameters[2].Value =
this.tbCategoryID.Text;
15.
16. this.cnNorthwind.Open();
17. cmdUpdate.ExecuteNonQuery();
this.cnNorthwind.Close();
The code uses the UpdateCommand of the daCategories DataAdapter to
perform the update. (This is a shortcut that wouldn’t ordinarily be available.)
The three parameters are set to the values of the relevant fields on the page,
and then the Connection is opened, the Command is executed, and the
Connection is closed.
18. Press F5 to run the application.
Visual Studio displays the page in the default browser.
19. Change the Category Name to Categories New.
20. Click Command.
The page updates the database.
21. Close the browser.
Chapter 12 Quick Reference
To Do this
Simple-bind a
control at design
time
Use the dialog displayed when you click the Ellipsis
button in the DataBindings property in the Properties
Window
Simple-bind a
control at run time
Push the data into the control in the control’s
DataBinding event:
myControl.Text = myTable[0].myColumn
Display bound data
on a page
Call the DataBind method for the Page, or individual
controls:
Me.DataBind()
Complex-bind
controls at design
time
Set the DataSource and DataMember properties in the
Properties Window
Microsoft ADO.Net – Step by Step 294
To Do this
Complex-bind
controls at run time
Set the DataSource, DataMember and, if applicable, the
DataTextField properties of the control, and call its
DataBind method
Use the DataBinder
object
Call its Eval method, passing in the container and
column values:
myControl.Text =
DataBinder.Eval(myTable[0], “myColumn”)
Store data in the
Session state
Set or retrieve the DataSet based on the IsPostBack
property:
If Me.IsPostBack Then
myTable = CType(Session(“myTable”),
DataTable)
Else
myDA.Fill(myTable)
Session(“myTable”) = myTable
EndIf
Store data in the
ViewState
Set or retrieve the DataSet based on the IsPostBack
property:
If Me.IsPostBack Then
myTable = CType(ViewState(“myTable”),
DataTable)
Else
myDA.Fill(myTable)
ViewState(“myTable”) = myTable
EndIf
Chapter 13: Using ADO.NET in Web Forms
Overview
In this chapter, you’ll learn how to:
§ Display data in a DataGrid control
§ Implement sorting in a DataGrid control
§ Display data in a DataList control
§ Display a DataList control as flowed text
§ Implement paging in a DataGrid control
§ Implement manual navigation in a Web form
§ Use validation controls to control user entry
In the previous chapter, we examined the basic data-binding architecture for Web forms.
In this chapter, we’ll examine a few common data-binding tasks in more detail.
Using Template-Based Web Controls
Microsoft ASP.NET Web Forms expose two controls that are specifically designed to
display data: the DataGrid and DataList. Both controls display the rows of a data source,
but vary in their capabilities.
Like its Windows forms equivalent, the DataGrid control displays data in a tabular format.
It provides intrinsic support for in-place editing and paging data, but it has relatively
limited formatting capabilities. The DataList control also provides intrinsic support for inplace
editing, and allows for more flexible formatting.
Microsoft ADO.Net – Step by Step 295
The Microsoft .NET Framework also supports a Repeater control that allows almost
unlimited formatting capability, but it has limited support in the Design View of the Page
Designer—the majority of the formatting must be done directly in the HTML View of the
Page Designer.
All three of these controls support templates, which are sets of controls that define the
content of each section of the control. (A template is not the same as a style, which
defines appearance, rather than content.) The template sections that are available, as
well as the precise behavior of each section, differ between controls.
The DataGrid control, for example, doesn’t support an AlternatingItemTemplate, and its
ItemTemplates define the contents of a column, while the ItemTemplate for a DataList
defines the contents of a row. We’ll examine the specific templates supported by each
control later in this chapter.
All three template-based controls can contain buttons that raise events on the server. As
we’ll see, the DataGrid and DataList controls have intrinsic support for in-place editing,
and all three controls also support user-defined buttons. When a user clicks a userdefined
button, an ItemCommand event is sent to the control that contains the template.
The ItemCommand’s event argument parameter exposes the properties required to
determine which button and which item within the control triggered the event. The three
controls expose different classes of event arguments, but all three expose the same
properties, as shown in Table 13-1.
Table 13-1: ItemCommand Event Arguments
Property Description
CommandArgument String used
as an
argument
for the
command
CommandName String used
to determine
the
command to
be
performed
CommandSource The button
that
generated
the event
Item The
selected
item in the
containing
control
The CommandArgument and CommandName properties are defined when the button is
added to the control. The CommandSource property refers to the button itself, while the
Item is the selected row in the control.
Using the DataGrid Control
As with Windows forms, the DataGrid control is bound to a data source by using the
DataSource and DataMember properties. One row will be displayed in the DataGrid for
every row in the data source. By default, a column will be displayed for each column in
the data source, but as we’ll see, this can be configured through the Property Builder.
Microsoft ADO.Net – Step by Step 296
In addition to the DataSource and DataMember properties, the DataGrid control exposes
a DataKeyField, which is roughly equivalent to the ValueMember property of the
Windows form version and can be set to the name of a column in the data source that
uniquely identifies each row. The column specified as the DataKeyField doesn’t need to
be displayed in the DataGrid. Note, however, that the DataKeyField doesn’t support
multicolumn keys.
Add a DataGrid to a Web Form
1. Open the UsingWebForms project from the Start page or the File
menu.
2. In the Solution Explorer, double-click the DataGrid.aspx file.
Microsoft Visual Studio .NET opens the page in the form designer.
3. Select the DataGrid, and then click Property Builder in the bottom
pane of the Properties window.
Visual Studio displays the dgCategories Property Builder.
4. Set dvCategories as the DataSource and CategoryID as the
DataKeyField.
Microsoft ADO.Net – Step by Step 297
The columns displayed in the DataGrid are defined on the Columns tab of the Property
Builder. Five types of columns are available, as shown in Table 13-2.
Table 13-2: DataGrid Column Types
Column Type Description
Bound A column
from the
data source
Button A button
with custom
functionality
Select An intrinsic
button that
allows a row
to be
selected
Edit, Update, Cancel Intrinsic
buttons that
support inplace
editing
Delete An intrinsic
button that
allows a row
to be
deleted
Hyperlink Displays the
data as a
hyperlink
Template Custom
combination
s of
controls,
which may
be databound
Microsoft ADO.Net – Step by Step 298
A Bound column displays a column from the data source. You can determine whether
the column is visible and whether it is read-only in the Property Builder. The Property
Builder also allows you to specify a data formatting expression to control the way the
data is displayed.
A Button column is a user-defined control. You specify fixed text for the button or bind
the text to a column in the data source by setting its TextField property.
In addition to the generic Button column, the DataGrid exposes a set of intrinsic buttons
to support in-place editing: Edit, Update, and Cancel (which work as a set), Select, and
Delete. As we’ll see, these intrinsic buttons trigger custom server-side events rather than
the generic ItemCommand. The Select and Delete buttons can be data-bound by setting
their TextField properties.
A Hyperlink column embeds an <HREF> tag in the text, allowing the user to navigate to
a different page by selecting a value in the column.
Finally the Template column allows a fine degree of formatting control by using the
Template editor. Any of the other column types can also converted to Template columns
by clicking the Link button in the Properties window. We’ll examine the use of Template
columns later in this chapter.
Add Data-Bound Columns to a DataGrid
1. Select Columns in the left pane of the Property Builder.
Visual Studio displays the Columns tab.
2. Clear the Create Column Automatically At Run Time check box.
3. In the Available Columns list, expand the Button column node, choose
the Select Column type, and then click the Add button (“>”) to move it
to the Selected Columns list.
Microsoft ADO.Net – Step by Step 299
4. Delete the Text property, and then set the TextField property to
CategoryID.
5. In the Available Columns list, expand the Data Fields node (if
necessary), and then move CategoryName and Description to the
Selected Columns list.
Microsoft ADO.Net – Step by Step 300
6. Click OK.
Visual Studio configures the DataGrid columns.
7. Press F5.
Visual Studio displays the page in the default browser.
8. Close the browser.
Unlike the other two template-based controls, the DataGrid control doesn’t require you to
specify the contents of each template. Except for columns that are explicitly declared to
be Template columns, the general formatting of the DataGrid controls the contents and
Microsoft ADO.Net – Step by Step 301
the layout of each section. You can con-vert any column to a Template column by
clicking the Link button in the Property Builder.
Template columns in the DataGrid expose the following sections:
§ HeaderTemplate
§ FooterTemplate
§ ItemTemplate
§ AlternatingItemTemplate
§ EditItemTemplate
§ Pager
The HeaderTemplate and FooterTemplate sections define the layout of the fixed top and
bottom sections of the DataGrid. The ItemTemplate and AlternatingItemTemplate
sections define the controls used to display values, while the EditItemTemplate section
defines the controls that are used to edit the values. The Pager section is used for
automatic data paging, which we’ll discuss later in this chapter.
Add a Template Column to the DataGrid
1. Select the DataGrid in the form designer, and then click Property
Builder in the bottom pane of the Properties window.
Visual Studio displays the Property Builder.
2. Select Columns in the left pane of the Property Builder.
Visual Studio displays the Columns tab.
3. In the Available Columns list, expand the Data Fields node (if
necessary), and then add Current to the Selected Columns list. Use
the up and down arrows to position the Current column between the
Button column and CategoryName.
4. Click the link labeled Convert This Column Into a Template Column.
Visual Studio displays the Template column properties.
Microsoft ADO.Net – Step by Step 302
5. Click OK.
Visual Studio adds the column to the DataGrid in the form designer.
6. Right -click the DataGrid in the form designer. On the context menu,
choose Edit Template, and then on the submenu, select Columns[1]—
Current.
Visual Studio displays the Template editor.
Microsoft ADO.Net – Step by Step 303
7. Delete the label in the ItemTemplate section, and then drag a
CheckBox control from the Web Forms tab of the Toolbox onto the
ItemTemplate section.
8. Use the same procedure to replace the TextBox control in the EditItem
section with a CheckBox control.
9. Right -click the Template editor, and then choose End Template
Editing.
Visual Studio displays the column as a CheckBox in the form designer.
10. Press F5.
Visual Studio displays the page in the default browser.
Microsoft ADO.Net – Step by Step 304
11. Close the browser.
In addition to the ItemCommand event, which is raised by custom buttons (columns of
Button type), the DataGrid also exposes the events shown in Table 13-3.
Table 13-3: DataGrid Events
Event Description
ItemCreated Occurs
when an
item in the
DataGrid is
first created
ItemDataBound Occurs after
the item is
bound to a
data value
EditCommand Occurs
when the
user clicks
the intrinsic
Edit button
DeleteCommand Occurs
when the
user clicks
the intrinsic
Delete
button
UpdateCommand Occurs
when the
user clicks
the intrinsic
Update
button
CancelCommand Occurs
when the
user clicks
the intrinsic
Cancel
button
SortCommand Occurs
when a
column is
Microsoft ADO.Net – Step by Step 305
Table 13-3: DataGrid Events
Event Description
sorted
PageIndexChanged Occurs
when a
page index
item is
clicked
The ItemCreated and ItemDataBound events occur during the initial layout of the page.
They’re typically used to format data or other elements on the page. The Edit, Delete,
Update, and Cancel commands are triggered by the intrinsic in-place editing buttons.
The SortCommand event occurs when the DataGrid is set to allow sorting and the user
clicks a column head in the DataGrid. Finally the PageIndexChanged event occurs as
part of the automatic paging of the DataGrid. We’ll discuss this event in detail later in this
chapter.
Note The use of the intrinsic in-place editing commands is
straightforward and well-documented in the Visual Studio online
Help. We won’t be discussing them in any detail here.
Implement Sorting in a DataGrid
Visual Basic .NET
1. Select the DataGrid in the form designer, and then click Property
Builder in the bottom pane of the Properties window.
Visual Studio displays the Property Builder.
2. On the General tab, select the Allow Sorting check box.
3. Click OK.
Visual Studio displays the column headings as link buttons.
Microsoft ADO.Net – Step by Step 306
4. Press F7 to open the code editor for the page.
5. Select dgCategories in the Control Name combo box, and then select
SortCommand in the Method Name combo box.
Visual Studio adds the event handler to the code.
6. Add the following lines to the event handler:
7. Me.dvCategories.Sort = e.SortExpression
8. DataBind()
9. Press F5 to run the application.
Visual Studio displays the page in the default browser.
10. Click the Description column heading.
The page is displayed with the DataGrid sorted by Description.
11. Close the browser.
12. Close the code editor and the form designer.
Visual C# .NET
1. Select the DataGrid in the form designer, and then click Property
Builder in the bottom pane of the Properties window.
Visual Studio displays the Property Builder.
2. On the General tab, select the Allow Sorting check box.
Microsoft ADO.Net – Step by Step 307
3. Click OK.
Visual Studio displays the column headings as link buttons.
4. Display the DataGrid events in the Properties Window, and doubleclick
the SortCommand property.
Visual Studio opens the code editor window and adds the event handler to the
code.
5. Add the following lines to the event handler:
6. this.dvCategories.Sort = e.SortExpression;
DataBind();
7. Press F5 to run the application.
Visual Studio displays the page in the default browser.
8. Click the Description column heading.
The page is displayed with the DataGrid sorted by Description.
Microsoft ADO.Net – Step by Step 308
9. Close the browser.
10. Close the code editor and the form designer.
Using the DataList Control
As we’ve seen, the DataGrid has a default structure. You need to use templates only
where your application requires advanced formatting. The DataList doesn’t assume any
structure and requires that you specify at least the ItemTemplate section before it can
display any data.
The DataList control is bound in the same way as the DataGrid control: by setting the
DataSource property, the DisplayMember property (if necessary), and, optionally, the
DataKeyField property.
The DataList control supports the following templates:
§ HeaderTemplate
§ FooterTemplate
§ ItemTemplate
§ AlternatingItemTemplate
§ SeparatorTemplate
§ SelectedItemTemplate
§ EditItemTemplate
The HeaderTemplate and FooterTemplate are identical to the corresponding templates
in the DataGrid. Unlike the DataGrid, the four Item templates do not necessarily
correspond to a column, only to a single row in the data source. The SeparatorTemplate
is used when the contents of the DataList are displayed as flowed text. We’ll examine
flowed text later in this chapter.
Add a DataList to a Web Form
1. In the Solution Explorer, right-click DataList.aspx, and choose Set as
Start Page.
2. Double-click the file.
Visual Studio displays the Web form in the form designer.
Microsoft ADO.Net – Step by Step 309
3. Drag a DataList control from the Web Form tab of the Toolbox onto the
form designer.
Visual Studio adds a placeholder for the DataList control.
4. In the Properties window, set the DataSource property of the DataList
to dsCategories1, and then set its DataMember property to
Categories.
5. Right -click the DataList in the form designer. On the context menu,
select Edit Template, and then on the submenu, select Item
Templates.
Visual Studio displays the Template editor.
Microsoft ADO.Net – Step by Step 310
6. Drag a Label control from the Toolbox onto the ItemTemplate section
of the Template editor.
7. In the Properties Window, select the (DataBindings) property and click
the Ellipsis button.
Visual Studio opens the DataBindings dialog box.
8. Expand the Container node and the DataItem node, and then select
CategoryName.
Microsoft ADO.Net – Step by Step 311
9. Click OK.
10. Right -click the DataList control, and then on the context menu, select
End Template Editing.
Visual Studio displays the bound item in the DataList placeholder.
11. Press F5.
Visual Studio displays the page in the default browser.
12. Close the browser.
Microsoft ADO.Net – Step by Step 312
The DataList control doesn’t presuppose a table layout, although that is the default
layout. There are two options for the layout of the data in the DataList, which is controlled
by the RepeatLayout property. If the RepeatLayout property is set to Table, the data
items are displayed as an HTML table. If the RepeatLayout property is set to Flow, the
items are included in-line as part of the document’s regular flow of text.
If the DataList values are displayed as a table, the RepeatDirection property controls the
way in which the table will be filled. A value of Vertical fills the table cells from top to
bottom, like a newspaper column, while setting the RepeatDirection property to
Horizontal fills the cells from left to right, like a calendar. The actual number of columns
is determined by the RepeatColumns property.
Display a DataList as Flowed Text
1. Select the DataList control in the form designer.
2. In the Properties window, set the RepeatLayout property to Flow, set
the RepeatColumns property to 3, and then set the RepeatDirection
property to Vertical.
3. Right -click the DataList in the form designer, select Edit Template on
the context menu, and then on the submenu, select Separator
Template.
Visual Studio displays the Template editor.
4. Add a comma and a space to the template.
5. Right -click the Template editor, and then on the context menu, select
End Template Editing.
Visual Studio displays the data items separated by the comma and a space.
6. Increase the width of the control to about the width of a browser page.
7. Press F5.
Microsoft ADO.Net – Step by Step 313
Visual Studio displays the page in the default browser.
8. Close the browser.
9. Close the form designer.
Moving Through Data
Whenever performance and scalability are issues, it’s important to limit the amount of
data displayed on a single page. For usability reasons, you should always limit the
amount of data that is displayed, no matter what the environment—users don’t
appreciate having to wade through masses of data to find the single bit of information
they require.
One common technique in the Internet environment for limiting the amount of data on a
single Web page is to display only a fixed number of rows and allow the user to move
forward and backward through the DataSet. This technique is usually referred to as
paging.
The Web form DataGrid control provides intrinsic support for paging by using the three
methods shown in Table 13-4.
Table 13-4: DataGrid Paging Methods
Method Description
Default Displays either
Next and
Previous buttons
or page
Paging/Default numbers as part
of the DataGrid;
the
CurrentPageIndex
Navigation property is
updated by the
DataGrid
Default Navigation
buttons are
outside the grid,
and the
Paging/Custom Navigation CurrentPageIndex
property is set
manually
Custom Paging Navigation
Microsoft ADO.Net – Step by Step 314
Table 13-4: DataGrid Paging Methods
Method Description
buttons are
outside the grid,
and all paging is
handled within
application code
The simplest method is, of course, to use the DataGrid control’s Default Paging/Default
Navigation method, but the custom options are only slightly more difficult to implement.
DataGrid paging is controlled by two of its properties. The PageSize property, which
defaults to 10, determines the number of items to display. The CurrentPageIndex
property determines the set of rows that will be displayed when the page is rendered.
Though it doesn’t control paging, the read-only property PageCount returns the total
number of pages of data in the data source.
When the user selects either one of the default navigation buttons, ASP.NET raises a
PageIndexChanged event. The event arguments parameter of this event includes a
NewPageIndex property. Rendering the new page in the DataGrid is as simple as setting
the DataGrid control’s CurrentPageIndex property to the value of NewPageIndex and
calling the DataBind method.
Implement Default Paging in a DataGrid Control
Visual Basic .NET
1. In the Solution Explorer, right-click DataGrid.aspx, and then on the
context menu, select Set as Start Page.
2. In the Solution Explorer, double-click DataGrid.aspx.
Visual Studio displays the page in the form designer.
3. Select the DataGrid, and then click Property Builder in the bottom
pane of the Properties window.
Visual Studio displays the Property Builder.
4. Select Paging in the left pane of the Property Builder.
Visual Studio displays the Paging properties.
5. Select the Allow Paging check box, and then set the Page Size
property to 5 rows.
Microsoft ADO.Net – Step by Step 315
6. Click OK.
7. Press F7 to display the code editor.
8. Select dgCategories in the Control Name combo box, and then select
PageIndexChanged in the Method Name combo box.
Visual Studio adds the event handler to the code.
9. Add the following lines to the procedure:
10. Me.dgCategories.CurrentPageIndex = e.NewPageIndex
DataBind()
11. Press F5.
Visual Studio displays the page in the default browser.
12. Click the Next (“>”) button.
Visual Studio displays the remaining 3 rows in the DataGrid.
13. Close the browser.
14. Close the code editor and the form designer.
Visual C# .NET
1. In the Solution Explorer, right-click DataGrid.aspx, and then on the
context menu, select Set as Start Page.
2. In the Solution Explorer, double-click DataGrid.aspx.
Visual Studio displays the page in the form designer.
3. Select the DataGrid, and then click Property Builder in the bottom
pane of the Properties window.
Visual Studio displays the Property Builder.
Microsoft ADO.Net – Step by Step 316
4. Select Paging in the left pane of the Property Builder.
Visual Studio displays the Paging properties.
5. Select the Allow Paging check box, and then set the Page Size
property to 5 rows.
6. Click OK.
7. Display the DataGrid events in the Properties Window, and doubleclick
the PageIndexChanged property.
Visual Studio opens the code editor window adds the event handler to the
code.
8. Add the following lines to the procedure:
9. this.DataGrid1.CurrentPageIndex = e.NewPageIndex;
DataBind();
10. Press F5.
Visual Studio displays the page in the default browser.
11. Click the Next (“>”) button.
Visual Studio displays the remaining 3 rows in the DataGrid.
Microsoft ADO.Net – Step by Step 317
12. Close the browser.
13. Close the code editor and the form designer.
Web forms don’t implement a BindingContext property that maintains a reference to a
current position in a data source. It’s easy enough, however, to maintain a Position
property, stored either in the Session state or in the Page object’s ViewState, and handle
the data manipulation manually.
You might use this technique, for example, if you want to display only a single row on the
Web page, but allow the user to navigate through all the rows by using the same
navigation buttons that are typically available on a Windows form.
Implement Manual Navigation on a Web Form
Visual Basic .NET
1. In the Solution Explorer, right-click Position.aspx, and then select Set
as Start Page.
2. Double-click the file.
Visual Studio displays the page in the form designer.
3. Press F7 to display the code editor.
4. Add the following global declaration to the top of the class:
5. Public Position as Integer
6. Add the following lines to the Page_Load Sub:
7. If Me.IsPostBack Then
8. Me.dsCategories1 = CType(ViewState(“dsCategories”),
DataSet)
9. Me.Position = CType(ViewState(“Position”), Integer)
Microsoft ADO.Net – Step by Step 318
10. Else
11. Me.daCategories.Fill(Me.dsCategories1.Categories)
12. ViewState(“dsCategories”) = Me.dsCategories1
13. ViewState(“Postion”) = 0
14. End If
Me.DataBind()
This code is very similar to the procedure we used in Chapter 12 to store the
DataSet with the page, but we’re also storing the value of the new variable,
Position.
15. Select (Base Class Events) in the Control Name combo box, and
then select DataBinding in the Method Name combo box.
Visual Studio adds the event handler to the code.
16. Add the following lines to the procedure:
17. Dim dr As DataRow
18.
19. dr = Me.dsCategories1.Categories.DefaultView(Position).Row
20. Me.txtCatID.Text = DataBinder.Eval(dr, “CategoryID”)
21. Me.txtName.Text = DataBinder.Eval(dr, “CategoryName”)
Me.txtDescription.Text = DataBinder.Eval(dr, “Description”)
The first two lines declare a local variable, dr, and set it to the row of the
Categories table specified by the Position variable. The next three bind the
value of columns in the row to the Text properties of the appropriate controls.
22. Select btnNext in the Control Name combo box, and then select
Click in the Method Name combo box.
Visual Studio adds the event handler to the code.
23. Add the following lines to the procedure:
24. If Me.Position < Me.dsCategories1.Categories.Count Then
25. Me.Position += 1
26. ViewState(“Position”) = Me.Position
27. DataBind()
End If
The code checks that the current value of Position is less than the number of
rows in the Categories table, and if so, it increments the value and stores it to
the ViewState.
28. Select btnPrevious in the Control Name combo box, and then select
Click in the Method Name combo box.
Visual Studio adds the event handler to the code.
29. Add the following lines to the procedure:
30. If Me.Position > 0 Then
31. Me.Position -= 1
32. ViewState(“Position”) = Me.Position
33. DataBind()
End If
34. Press F5.
Visual Studio displays the page in the default browser.
Microsoft ADO.Net – Step by Step 319
35. Click the Next button.
The page displays the next category.
36. Click the Previous button.
The page displays the previous category.
37. Close the browser.
38. Close the code editor and the form designer.
Visual C# .NET
1. In the Solution Explorer, right-click Position.aspx, and then select Set
as Start Page.
2. Double-click the file.
Visual Studio displays the page in the form designer.
Microsoft ADO.Net – Step by Step 320
3. Press F7 to display the code editor.
4. Add the following global declaration to the top of the class:
public int pagePosition;
5. Add the following lines to the Page_Load method:
6. if (this.IsPostBack == true)
7. {
8. this.dsCategories1 = (dsCategories) ViewState[“dsCategories”];
9. this.pagePosition = (int) ViewState[“pagePosition”];
10. }
11. else
12. {
13.
this.daCategories.Fill(this.dsCategories1.Categories);
14. ViewState[“dsCategories”] = this.dsCategories1;
15. ViewState[“pagePosition”] = 0;
16. }
this.DataBind();
This code is very similar to the procedure we used in Chapter 12 to store the
DataSet with the page, but we’re also storing the value of the new variable,
pagePosition.
17. In the Properties Window of the form designer, select Position from
the controls combo box. Click the Events button, and then doubleclick
the DataBinding event.
Visual Studio adds the event handler to the code.
18. Add the following lines to the Position_DataBinding procedure:
19. DataRow dr;
20.
21. dr =
this.dsCategories1.Categories.DefaultView[pagePosition].Row;
22. this.txtCatID.Text = DataBinder.Eval(dr,
“CategoryID”).ToString();
23. this.txtName.Text = (string) DataBinder.Eval(dr,
“CategoryName”);
this.txtDescription.Text = (string) DataBinder.Eval(dr, “Description”);
Microsoft ADO.Net – Step by Step 321
The first two lines declare a local variable, dr, and set it to the row of the
Categories table specified by the Position variable. The next three bind the
value of columns in the row to the Text properties of the appropriate controls.
24. In the form designer, double-click the Next button.
Visual Studio adds the event handler to the code.
25. Add the following lines to the procedure:
26. if (this.pagePosition < this.dsCategories1.Categories.Count)
27. {
28. this.pagePosition++;
29. ViewState[“pagePosition”] = this.pagePosition;
30. DataBind();
}
The code checks that the current value of Position is less than the number of
rows in the Categories table, and if so, it increments the value and stores it to
the ViewState.
31. In the Form Designer, double-click the Previous button.
Visual Studio adds the event handler to the code.
32. Add the following lines to the procedure:
33. if (this.pagePosition > 0)
34. {
35. this.pagePosition—;
36. ViewState[“pagePosition”] = this.pagePosition;
37. DataBind();
}
38. Press F5.
Visual Studio displays the page in the default browser.
39. Click the Next button.
The page displays the next category.
Microsoft ADO.Net – Step by Step 322
40. Click the Previous button.
The page displays the previous category.
41. Close the browser.
42. Close the code editor and the form designer.
Web Form Validation
The .NET Framework supports a number of validation controls which can be used to
validate data. The Web form validation controls, which are shown in Table 13-5, are
more sophisticated than the Windows Forms ErrorProvider control, which only displays
error messages. The Web form controls perform the validation checks and display any
resulting error messages.
Table 13-5: Validation Controls
Validation Control Description
RequiredFieldValidator Ensures that
the input
control
contains a
value
CompareValidator Compares
the contents
of the input
control to a
constant
value or the
contents of
another
control
Microsoft ADO.Net – Step by Step 323
Table 13-5: Validation Controls
Validation Control Description
RangeValidator Checks that
the contents
of the input
control are
between the
specified
upper and
lower
bounds,
which may
be
characters,
numbers, or
dates
RegularExpressionValidator Checks that
the contents
of the input
control
match the
pattern
specified by
a regular
expression
CustomValidator Checks that
the contents
of the input
control are
based on
custom logic
Each validation control checks for a single condition in a single control on the page,
which is known as the input control. To check for multiple conditions, multiple validation
controls can be assigned to a single input control. This is frequently the case because all
of the controls except RequiredFieldValidator consider a blank field to be valid.
The conditions specified by the validation controls assigned to a given input control will
be combined with a logical AND—all of the conditions must be met or the control will be
considered invalid. If you need to combine validation conditions with a logical OR, you
can use a CustomValidator control to manually check the value.
If the browser supports DHTML, validation will first take place on the client, and the form
will not be submitted until all conditions are met. Whether or not validation has occurred
on the client, validation will always occur on the server when a Click event is processed.
Additionally, you can manually call a control’s Validate method to validate its contents
from code.
When the page is validated, the contents of the input control are passed to the validation
control (or controls), which tests the contents and sets the control’s IsValid property to
false. If any control is invalid, the Page object’s IsValid property is also set to false. You
can check for these conditions in code and take whatever action is required.
Add a RequiredFieldValidator Control to a Form
1. In the Solution Explorer, right-click Validation.aspx, and then on the
context menu, select Set as Start Page.
2. In the Solution Explorer, double-click the Validation.aspx.
Visual Studio displays the page in the form designer.
Microsoft ADO.Net – Step by Step 324
3. Drag a RequiredFieldValidator control from the Web Forms tab of the
Toolbox to the right of the CategoryName TextBox control.
4. In the Properties window, set the RequiredFieldValidator control’s
ErrorMessage property to Name cannot be left blank , and then set its
ControlToValidate property to txtName.
5. Press F5.
Visual Studio displays the page in the default browser.
6. Click Submit.
The validation control displays the error message next to the text box.
Microsoft ADO.Net – Step by Step 325
7. Close the browser.
Chapter 13 Quick Reference
To Do this
Display data in a
DataGrid control
Set the DataSource and optionally set the
DataKeyField in the Property Builder
Control the Columns
displayed in a databound
DataGrid
In the Columns section of the Property Builder,
cancel the selection of Create columns automatically
at run time, and then select the columns to be
displayed
Implement sorting in a
DataGrid control
Bind the DataGrid to a DataView, select Allow
Sorting in the Property Builder, and then build an
event handler for the SortCommand event:
Me.myDataView.Sort = e.SortExpression
DataBind()
Display data in a
DataList control
Set the DataSource and DataMember properties of
the DataList, and the specify the data binding for
each control in the DataList control’s templates
Implement Paging in a
DataGrid control
Select a paging option from the Paging pane of the
DataGrid control’s Property Builder
Part V: ADO.NET and XML
Chapter 14: Using the XML Designer
Chapter 15: Reading and Writing XML
Chapter 16: Using ADO in the .NET Framework
Chapter 14: Using the XML Designer
Overview
In this chapter, you’ll learn how to:
§ Create an XML schema
§ Create a Typed DataSet
§ Generate a Typed DataSet from an XML schema
Microsoft ADO.Net – Step by Step 326
§ Add DataTables to an XML DataSet schema from an existing data source
§ Create DataTables in an XML DataSet schema
§ Add keys to an XML schema
§ Add relations to an XML schema
§ Create elements
§ Create simple types
§ Create complex types
§ Create attributes
In this chapter, we’ll look at the XML Designer, the Microsoft Visual Studio .NET tool that
supports the creation of XML schemas and Microsoft ADO.NET Typed DataSets.
Understanding the XML Schemas
An XML schema is a document that defines the structure of XML data. Much like a
database schema, an XML schema can also be used to validate the contents and
structure of an XML file.
An XML schema is defined using the XML Schema Definition language (XSD). XSD is
similar in structure to HTML, but whereas HTML defines the layout of a document, XSD
defines the structure and content of the data.
Note XML schemas in the Microsoft .NET Framework conform to the
World Wide Web Consortium (W3C) recommendation, as defined
at http://www.w3.org/2001/XMLSchema. Additional schema
elements that are used to support .NET Framework objects, such
as DataSets and DataRelations, conform to the schema defined at
urn:schemas-microsoft-com:xml-msdata. (Such extensions
conform to the W3C recommendation and will simply be ignored
by XML parsers that do not support them.)
XML schemas are defined in terms of elements and attributes. Elements and attributes
are very similar, and can often be used interchangeably, although there are some
distinctions:
§ Elements can contain other items; attributes are always atomic.
§ Elements can occur multiple times in the data; attributes can occur only once.
§ By using the <xs:sequence> tag, a schema can specify that elements must
occur in the order they are specified; attributes can occur in any order.
§ Only elements can be nested within <xs:choice> tags, which specify mutually
exclusive elements (that is, one and only one of the elements can occur).
§ Attributes are restricted to built-in data types; elements can be defined using
user-defined types.
By convention, elements are used for raw data, while attributes are used for metadata;
but you can use whichever best suits your purposes.
Both elements and attributes define items in terms of a type, which defines the data that
the element or attribute can validly contain. XML schemas support simple types, which
are atomic values such as string or Boolean, and complex types, which are composed of
other elements and attributes in any combination. We’ll examine types in more detail
later in this chapter.
Optionally, elements and attributes can define a name that identifies the element that is
being defined. XML element names cannot begin with a number or the letters XML, nor
can they contain spaces. Note that XML is case-sensitive, so the names MyName and
myName are considered distinct.
XML schemas are stored in text files with an XSD extension (XSD schema files). Visual
Studio provides a visual user interface for creating XML schemas, the XML Designer.
The XML tab of the XML Designer allows you to examine the contents of the XSD file
directly, while the DataSet or Schema tab provides a visual interface. Like the form
designer, the XML Designer is closely related to the XSD schema file—changes that you
make to one are reflected in the other.
Microsoft ADO.Net – Step by Step 327
Creating XML Schema and Typed DataSets
Like HTML and other markup languages descended from SGML, XML schema files are
created using tags that are delimited by angle brackets:
<tag> some text </tag>
XML schema files begin with a tag that identifies the version of XML that is being used.
.NET Framework XML schema files follow this with an <xs:schema> tag whose
targetNamespace attribute defines the namespace of all the components in this schema
and any included schemas. The <xs:schema> tag also includes references to two
namespaces—the W3C XML schema definition and the Microsoft extensions.
This standard header is created automatically by the XML Designer. If you create an
XML schema in a text editor or some other design tool, the heading has the following
structure:
<?xml version=”1.0″encoding=”utf-8″?>
<xs:schema targetNamespace=”http://tempuri.org/XMLSchema1.xsd ”
xmlns:xs=”http://www.w3.org/2001/XMLSchema”
xmlns:msdata=”urn:schemas-microsoft-com:xml-msdata”
>
The basic structure of the XML schema file created by the XML Schema Designer is:
<?xml version=”1.0″encoding=”utf-8″?>
<xs:schema id=”myDataSet” …>
<xs:element name=”myDataSet” msdata:IsDataSet=”true”>
<xs:complexType maxoccurs=”unbounded”>
<xs:choice>
</xs:choice>
</xs:complexType>
</xs:element>
</xs:schema>
The first two lines are the schema heading. (The xs:schema tag contains attributes that
aren’t shown.) The next tag, <xs:element>, represents the DataSet itself. It has two
attributes: name and msdata:IsDataSet. The first attribute specifies the name of the
DataSet; the second is a Microsoft schema extension that identifies the element as a
DataSet.
The next set of tags creates a complexType. ComplexTypes, which we’ll examine in
detail in this chapter, are elements that can contain other elements and attributes. Note
that this complexType element is not assigned a name—it’s used only for structural
purposes and not referred to elsewhere in the schema.
The final set of tags creates a choice group. Groups, which we’ll also examine later in
this chapter, define how individual elements can validly occur in the XML data. The
choice group creates a mutually exclusive set. The maxOccurs=”unbounded” attribute
specifies that the data can occur any number of times within the group, but because it is
a choice group, all of the data must be the same type.
The DataTables are defined as elements within the choice group. We’ll examine their
structure later in the chapter.
Visual Studio supports the creation of XML schemas and Typed DataSets interactively.
Both types of items use the XML Designer, but an XML schema will output only an XML
schema (XSD), while the DataSet will automatically generate both the schema and a
class file defining the Typed DataSet.
Microsoft ADO.Net – Step by Step 328
Creating Schemas
Like any other project component, XML schemas are added to a project by using the
Add New Item dialog box.
Add a Schema to the XML Designer
1. In Visual Studio .NET, open the SchemaDesigner project from the
Start page or the File menu.
2. On the Project menu, choose Add New Item.
Visual Studio displays the Add New Item dialog box.
3. Select XML Schema in the Templates pane, and then click Open.
Visual Studio adds an XML schema named XMLSchema1 to the project, and
then opens the XML Designer.
4. Close the XML Designer.
Creating DataSets
In previous chapters, we have seen how to generate a Typed DataSet based on
DataAdapters that have been added to the project. It’s also possible to add a DataSet to
a project and configure it manually, using the same technique we used in the previous
exercise to add an XML schema to the project.
Add a DataSet to the XML Designer
1. On the Project menu, choose Add New Item.
Visual Studio displays the Add New Item dialog box.
Microsoft ADO.Net – Step by Step 329
2. Select DataSet in the Templates pane, and then click Open.
Visual Studio adds a Typed DataSet named Dataset1 to the project, and
opens the XML Designer.
3. Select the XML tab of the XML Designer.
Visual Studio displays the XML schema source code.
4. Close the XML Designer.
When you specify a DataSet in the Add New Item dialog box, Visual Studio automatically
generates a class file from the XML schema to define the DataSet. If you create only an
XML schema, or if you import an XML schema from another source, the Typed DataSet
Microsoft ADO.Net – Step by Step 330
won’t automatically be added; but you can create it by using the Generate DataSet
command on the XML Designer’s Schema menu.
Generate a DataSet from a Schema
1. In the Solution Explorer, double-click XMLSchema1.xsd.
Visual Studio opens the (blank) schema in the XML Designer.
2. On the Schema menu, choose Generate Dataset.
Visual Studio creates a Typed DataSet class based on the XML schema.
3. Expand XMLSchema1 to display the class file in the Solution Explorer.
You may need to click the Show All Files button on the Solution
Explorer toolbar.
4. Close the form designer.
Understanding Schema Properties
The XML Designer exposes two sets of properties for schemas: DataSet properties,
which are available only for DataSet schemas, and miscellaneous properties that are
defined by the W3C recommendation.
The properties exposed by the Microsoft schema extensions are shown in Table 14-1.
The IsDataSet property identifies this particular element as the root of the Typed DataSet
definition. The XML Designer will generate an error if more than one element has
IsDataSet set to true.
The CaseSensitive, dataSetName, and Locale properties map directly to their DataSet
counterparts, while the key property is used internally by the .NET Framework.
Table 14-1: Microsoft Schema Extension Properties
Property Description
CaseSensitive Controls
whether the
DataSet is
casesensitive.
Note that
this affects
only the
DataSet.
The XML
Microsoft ADO.Net – Step by Step 331
Table 14-1: Microsoft Schema Extension Properties
Property Description
schema is
always
casesensitive
dataSetName The name of
the Typed
DataSet
based on
the XML
schema
IsDataSet Defines the
element as
the root of a
DataSet
key Set of
unique
constraints
defined on
the DataSet
Locale Locale
information
used to
compare
strings in
the DataSet
The Misc section of the Properties window exposes the attributes of the schema element
defined by the W3C recommendation, as shown in Table 14-2. The id,
targetNamespace, and version properties set the value of these two attributes for the
schema, while the remaining properties define the behavior of other schema
components.
Table 14-2: XML Schema Properties
Property Description
attributeFormDefault Determines
whether
attribute
names from
the target
namespace
must be
namespacequalified
blockDefault Sets the
default
value for the
block
attribute of
elements
and
complex
types in the
schema
Microsoft ADO.Net – Step by Step 332
Table 14-2: XML Schema Properties
Property Description
namespace
elementFormDefault Determines
whether
element
names from
the target
namespace
must be
namespacequalified
finalDefault Sets the
default
value for the
final
attribute of
elements
and
complex
types in the
schema
namespace
id The value of
the
element’s ID
attribute
import Collection of
imported
schemas
include Collection of
included
schemas
NameSpace Collection of
namespace
s declared
in the
schema
targetNamespace The target
namespace
of the
schema
version The value of
the
element’s
version
attribute
The attributeFormDefault and elementFormDefault properties determine whether
attribute and element names, respectively, must be preceded with a namespace
identifier and a colon (for example, name=”myDS:myName” as opposed to
name=”myName”).
Microsoft ADO.Net – Step by Step 333
The blockDefault and finalDefault properties define the default values for the block and
final attributes of elements within the namespace. We’ll examine these attributes in the
following section.
Finally the import, include, and NameSpace properties contain collections of
namespaces that are imported, included, and declared in the schema, respectively.
Examine the Namespaces Declared in an XML Schema
1. In the Solution Explorer, double-click Dataset1.xsd.
Visual Studio opens the schema in the XML Designer.
2. In the Properties window, select Namespace, and then click the
Ellipsis button.
The XML Designer displays the XMLNamesSpace Collection Editor.
3. In the Members pane, select xs.
The XMLNamesSpace Collection Editor displays the NameSpace property
and qualifier of the W3C XSD recommendation.
Working with DataTables in the XML Designer
In the previous section, we examined the structure of tags within a DataSet schema.
Remember that we said that DataTables are defined as elements within a choice group.
The DataTable itself has the following nominal structure:
<xs:element name=”myTable”>
<xs:complexType>
<xs:sequence>
<xs:element name:”Column1″ type:”xs:string” />
<xs:element name:”Column2″ type:”xs:Boolean” />
</xs:sequence>
</xs:complexType>
</xs:element>
The structure is similar to the nominal structure of a schema: an element is created and
assigned the name of the table. Within the element is an unnamed complex type, and
within that is an XML group, and within that are the column elements. The XML group
used for a schema is a choice, which makes element types mutually exclusive. The
DataTable structure uses a sequence group, which ensures that the nested elements will
be in the order specified.
Microsoft ADO.Net – Step by Step 334
Adding DataTables to the XML Designer
Visual Studio supports a number of methods for creating DataTables in the XML
Designer. We’ve been using one of them, generating a DataSet based on DataAdapters
that have been added to a form, for several chapters.
You can also drag an existing table, view, or stored procedure from the Server Explorer
to the XML Designer Schema tag, or create a DataTable from scratch. As we’ll see in
Chapter 15, you can also infer schemas from XML data at run time.
Add a Table or View to a Schema
1. In the XML Designer, open the Dataset1 schema (if necessary), and
then select the DataSet tab.
2. In the Server Explorer, expand the connection to the SQL Northwind
database, and then expand the Tables node.
3. Select the Categories table, and drag it onto the XML Designer.
Visual Studio adds the table to the schema.
4. Select the XML tag of the XML Designer.
Visual Studio displays the XML schema source code.
Create a Table from Scratch
1. In the XML Designer, select the DataSet tab.
Microsoft ADO.Net – Step by Step 335
2. In the XML Schema section of the Toolbox, drag an Element onto the
design surface.
Visual Studio adds a new Element to the schema.
3. The element name, element1, is selected on the design surface.
Change it to Products.
4. Click the first column of the first row of the element, and then expand
the drop-down list.
5. Select element from the drop-down list.
The XML Designer adds a nested element to the Products element.
Microsoft ADO.Net – Step by Step 336
6. Change the element name to ProductID.
Creating Keys
The XML Designer supports three different tags that pertain to entity and referential
integrity: primary keys, keyrefs, and unique keys. Primary keys guarantee uniqueness
within a DataSet. A <keyref> tag is essentially a foreign key reference and is used to
implement a one-to-many relationship. Unique keys guarantee uniqueness, but they are
not typically used for referential integrity.
Creating Primary Keys
The W3C recommendation supports the <key> tag, which specifies that the values of the
specified element must be unique, always present, and not null. The Microsoft schema
extensions add an attribute to this tag, msdata:PrimaryKey, which identifies the key as
being the primary key for the DataTable.
The scope of a key is the scope of the element that contains it. In a .NET Framework
DataSet schema, keys are defined at the DataSet level, which means that the key needs
to be unique, not just within a DataTable, but within the DataSet as a whole.
Primary keys are added to a DataTable by using the Edit Key dialog box, which is
displayed if you drag a key onto an element or choose Add Key from the Schema menu
or an element’s context menu. The Add Key dialog box allows you to specify multiple
fields for a key, if necessary, and also specify whether the key should accept null values
or be designated as the primary key for the DataTable.
Microsoft ADO.Net – Step by Step 337
Add a Primary Key to a DataTable
1. On the Schema menu, point to Add, and then choose New Key.
Visual Studio displays the Edit Key dialog box.
2. Change the name of the key to ProductsPK, and then select the
Dataset Primary Key check box.
Microsoft ADO.Net – Step by Step 338
3. Click OK.
The XML Designer adds the primary key to the Products element.
4. Select the XML tab of the XML Designer.
The XML Designer displays the code for the new key.
Creating Unique Keys
Primary keys are, as we’ve seen, required elements that must be unique within the
DataSet and cannot be null. There can be only one primary key defined for a DataTable.
Unique keys differ from primary keys in that they can allow nulls, and you can define
multiple unique keys for any given DataTable.
Unique keys are added by using the same Edit Key dialog box that is used to add
primary keys.
Add a Unique Key to a DataTable
1. Select the DataSet tab of the XML Designer.
2. Drag a key tag from the XML Schema tab of the Toolbox onto the
Categories element.
The XML Designer displays the Edit Key dialog box.
3. Change the name of the key to CategoryName.
4. Select CategoryID in the Fields pane, expand the drop-down list, and
then select the CategoryName field.
Microsoft ADO.Net – Step by Step 339
5. Click OK.
The XML Designer adds the new key to the Categories element.
6. Select the XML tab of the XML Designer.
Visual Studio displays the XML schema code.
Microsoft ADO.Net – Step by Step 340
Creating Relations
KeyRefs are implemented as Relations in the XML Designer. A Relation translates
directly to a DataRelation within a DataSet. Relations are added to a DataSet by using
the Edit Relation dialog box, which, like the Edit Key dialog box, can be displayed by
dragging a Relation from the Toolbox or by choosing New Relation on the Schema
menu.
In addition to the basic relationship information, the Edit Relation dialog box allows you
the option of creating a foreign key constraint only. If you select this option, the DataSet
class produced from the XML schema will be slightly more efficient, but you will not be
able to use the GetChildRows and GetParentRows methods to reference related data.
In addition, the Edit Relation dialog box allows you to specify three referential integrity
rules: Update, Delete, and Accept/Reject. These rules determine what happens when
primary key rows are updated or deleted, or when changes are accepted or rejected.
The possible values for these rules are shown in Table 14-3. The Accept/Reject rule
supports only Cascade and None.
Table 14-3: Referential Integrity Rules
Rule Description
Cascade Deletes or
updates
related rows
SetNull Sets the
foreign key
values in
related rows
to null
SetDefault Sets the
foreign key
values in
related rows
to their
default
values
None Takes no
action on
related rows
Add a Relation to a DataSet
1. Select the DataSet tab of the XML Designer.
Microsoft ADO.Net – Step by Step 341
2. Select the Categories element.
3. The XML Designer displays the Edit Relation dialog box.
4. Change the Relation name to CategoryProducts.
5. Choose Products in the Child Element combo box.
Microsoft ADO.Net – Step by Step 342
6. Click OK.
Visual Studio adds the Relation to the XML Schema Designer.
Working with Elements
Throughout this chapter, we’ve been talking about elements, and even creating them,
without examining them in any detail. We’ll correct that now. An element in a XML
schema DataSet is a description of an item of data.
At its simplest, an element consists only of the <xs:element> tag:
<xs:element />
However, most elements, unless they’re being used only as containers, contain a name
and type attribute:
<xs:element name=”productID” type=”xs:integer” />
Microsoft ADO.Net – Step by Step 343
Elements may also contain other tags. (Help states that ‘elements can contain other
elements,’ but that’s not strictly true. Specifically, ‘other elements’ doesn’t refer to
element tags.) The tags that can be nested within an element tag are:
§ <xs:annotation>
§ <xs:complexType>
§ <xs:key>
§ <xs:keyref>
§ <xs:simpleType>
§ <xs:unique>
As we saw in the previous section, the <xs:key>, <xs:keyref>, and <xs:unique> tags are
used to define constraints. The <xs:annotation> tag, as might be expected, is used to
add information to be used by applications or displayed to users.
The <xs:complexType> type is a container tag, used to group other tags. We’ve seen it
used in the structure of both schemas and DataTables in the XML Designer. The
<xs:simpleType> tag defines a data type by specifying valid values, based on other
types. We’ll examine both of these tags in detail later in this chapter.
Element Properties
As usual, the XML Designer exposes the attributes of the <xs:element> tag as
properties. The attributes exposed by the W3C recommendation are shown in Table 14-
4.
Table 14-4: XML Schema Element Properties
Property Description
abstract Indicates
whether an
instance of
the element
can appear
in a
document
block Prevents
elements of
the specified
type of
derivation
from being
used in
place of the
element
default The default
value of the
element
final The type of
derivation
fixed The
predetermin
ed,
unchangeab
le value of
the element
form The form of
the element
id The ID of
Microsoft ADO.Net – Step by Step 344
Table 14-4: XML Schema Element Properties
Property Description
the element
key The
collection of
unique keys
defined for
this element
maxOccurs The
maximum
number of
times the
element can
occur within
the
containing
element
minOccurs The
minimum
number of
times the
element can
occur within
the
containing
element
name The name of
the element
nillable Determines
whether an
explicit nil
can be
assigned to
the element
ref The name of
an element
declared in
the
namespace
substitutionGroup The name of
the element
for which
this element
can be
substituted
type The data
type of the
element
The abstract, block, final, form, ref, and substitutionGroup properties pertain to the
derivation of elements from other elements. Their use is outside the scope of this book,
but they are extensively documented in online Help and other XML documentation
sources.
Microsoft ADO.Net – Step by Step 345
The name and id properties are used to identify the element. The ID attribute must be
unique within the XML schema. The name property is also shown in the visual
representation of the element.
The remaining properties define the value of the element. Of these, the most important
property is type, which defines the data type of the element. The type of an element can
be either a built-in XML type or a simple or complex type defined elsewhere in the XML
schema. Like the name prop-erty, the type property is shown in the visual display of the
element.
The default property, not surprisingly, specifies a default value if none is specified, while
the fixed property specifies a value that the element must always contain. Both of these
properties must be of the data type specified by the type attribute, and they are mutually
exclusive. The nillable property indicates whether the value can be set to a null value or
omitted.
Finally the maxOccurs and minOccurs properties specify the maximum and minimum
number of times the element can occur, respectively. The maxOccurs property can be
set to either a non-negative integer or the string ‘unbounded,’ which indicates that there
is no limit to the number of occurrences.
In addition to the element attributes defined by the W3C recommendation, the Microsoft
schema extensions expose the properties shown in Table 14-5. All of these coincide
directly to their counterparts in the DataColumn object.
Table 14-5: Microsoft Schema Extension Element Properties
Property Description
AutoIncrement Determines
whether the
value
automaticall
y
increments
when a row
is added
AutoIncrementSeed Sets the
starting
value for an
AutoIncrem
ent element
AutoIncrementStep Determines
the step by
which
AutoIncrem
ent
elements
are
increased
Caption Specifies
the display
name for an
element
Expression A
DataColumn
expression
for the
element
Microsoft ADO.Net – Step by Step 346
Table 14-5: Microsoft Schema Extension Element Properties
Property Description
ReadOnly Determines
whether
element
values can
be modified
after the row
has been
added to the
DataTable
Define the type Property of an Element
1. Select the ProductID nested element in the XML Designer, expand the
type drop-down list, and then select int.
2. In the Properties window, select the AutoIncrement property, expand
the drop-down list, and then choose true.
3. Save and close DataSet1.
Working with Types
As we’ve seen, the type property of an element defines the data type of an element or
attribute. XML schemas support two kinds of data types: simple and complex. A simple
type resolves to an atomic value, while a complex type contains other complex types,
elements, or attributes.
Microsoft ADO.Net – Step by Step 347
The W3C recommendation allows XML schemas to define user-defined types. As we’ve
seen, the nominal structure of a .NET Framework DataSet XML schema uses userdefined
complex types to define the columns of a table.
The XML Designer supports the creation of user-defined types as well. User-defined
types are useful for encapsulating business rules. For example, if a ShipMethod element
is limited to the values USPS or 2nd Day Air, a user-defined enumeration can be used to
restrict the values rather than adding another DataTable to the schema.
Simple Types
The XML schema recommendation supports two different kinds of simple types (primitive
and derived) and supports the creation of new, user-defined simple types. Primitive types
are the fundamental types. Examples of primi-tive types include string, float, and
Boolean. Derived types are defined by limiting the valid range of values for a primitive
type. An example of a built-in derived type is positiveInteger, which is an integer that
allows only values greater than zero.
Like derived types, user-defined simple types restrict the values of existing simple types
by limiting the valid range of values. User-defined simple types can be derived from base
types by using any of the methods shown in Table 14-6.
Table 14-6: Simple Type Derivation Methods
Method Description
restriction Restricts the
range of
values to a
subset of
those
allowed by
the base
type
list Defines a
list of values
of the base
type that are
valid for the
type
union Defines a
type by
combining
the values
of two or
more other
simple types
Of the available derivation methods, restriction is the most common. The valid range of
values of a simple type is restricted by applying facets to the type. A facet is much like an
attribute, but it specifically limits the valid range of values for a user-defined type. Table
14-7 describes the various facets available for restriction of values.
Table 14-7: Data Type Facets
Facet Description
enumeration Constrains data
to the specified
set of values.
fractionDigits Specifies the
maximum
number of
Microsoft ADO.Net – Step by Step 348
Table 14-7: Data Type Facets
Facet Description
decimal digits.
length Specifies the
nonNegativeInte
ger length of the
value. The
exact meaning
is determined
by the data
type.
maxExclusive Specifies the
exclusive upperbound
value—
all values must
be less than this
value.
maxInclusive Specifies the
inclusive upperbound
value—
all values must
be equal to or
less than this
value.
maxLength Specifies the
nonNegativeInte
ger maximum
length of the
value. The
exact meaning
is determined
by the data
type.
minExclusive Specifies the
exclusive lowerbound
value—
all values must
be greater than
this value.
minInclusive Specifies the
inclusive lowerbound
value—
all values must
be equal to or
greater than this
value.
minLength Specifies the
nonNegativeInte
ger minimum
length of the
value. The
exact meaning
is determined
by the data
Microsoft ADO.Net – Step by Step 349
Table 14-7: Data Type Facets
Facet Description
type.
pattern A regular
expression
specifying a
pattern that the
value must
match.
totalDigits Specifies the
nonNegativeInte
ger maximum
number of
decimal digits
for the value.
whiteSpace Specifies how
white space in
the value is to
be handled.
Create a simpleType Using the length Facet
1. In the Solution Explorer, double-click XMLSchema1.
Visual Studio opens the schema in the XML Designer.
2. Drag a simpleType control from the XML Schema tab of the Toolbox
onto the design surface.
The XML Designer adds a simple type to the schema.
3. Change the name of the type to IDString.
4. Click the first column of the first row of the type, and then expand the
drop-down list.
5. From the drop-down list, select facet.
6. From the drop-down list in the second column, select length.
Microsoft ADO.Net – Step by Step 350
7. In the third column, type 2.
The XML Designer creates a user-defined simpleType that limits the length of
a string to two characters.
8. Select the XML tab of the XML Designer.
The XML Schema Designer displays the XML code for the simpleType
definition.
Complex Types
Complex types are user-defined types that contain elements, attributes, and group
declarations. The elements of a complex type can be other complex types, allowing
infinite nesting.
We’ve already seen unnamed complex types used to define the columns of an ADO.NET
DataTable. A DataTable uses a sequence group to specify that the elements contained
within the group must occur in a particular order. The W3C XML schema
recommendation supports two other types of element groups, choice and all, as shown
in Table 14-8.
Microsoft ADO.Net – Step by Step 351
Table 14-8: Element Group Types
Type Description
sequence Elements
must occur
in the order
specified
choice Only one of
the
elements
specified
can occur
all Either all of
the
elements
specified
must occur,
or none of
them can
occur
Create a complexType Containing a Choice Group
1. Drag a complexType control from the XML Schema tab of the Toolbox
onto the design surface.
The XML Designer adds a complex type to the schema.
2. Change the name of the type to ChoiceGroup.
3. Click the first column of the first row of the type, and then expand the
drop-down list.
Microsoft ADO.Net – Step by Step 352
4. Select choice from the drop-down list.
The XML Designer adds a choice group to the type.
5. Add two elements, Value1 and Value2, to the choice group.
6. Select the XML tab of the XML Designer.
The XML Designer displays the XML code for the complex type.
Microsoft ADO.Net – Step by Step 353
Working with Attributes
Attributes are similar to elements, with some restrictions. Attributes cannot contain other
tags, they cannot be used to derive simple types, and they cannot be included in element
groups. They do, however, require slightly less storage than elements, and for that
reason, they can be useful if you’re working outside the context of ADO.NET objects.
Attribute Properties
Attributes expose the same extensions to the W3C recommendation as elements. The
W3C properties exposed by attributes are shown in Table 14-9. The attribute property
set is a subset of the properties exposed by the element. Because attributes cannot be
used to derive types, the properties that control derivation are not exposed.
Table 14-9: Attribute Properties
Property Description
default The default
value of the
element
fixed The
predetermin
ed,
unchangeab
le value of
the element
form The form of
the element,
either
qualified or
unqualified
id The ID of
the element;
must be
unique
within the
document
Name The name
(NCName)
of the
element
Ref The name of
an element
declared in
the
namespace
Type The data
type of the
element
Use Specifies
how the
attribute is
used
Attributes expose one property, use, that is not exposed by elements. The use property
determines how the attribute can be used when it is included in elements and complex
Microsoft ADO.Net – Step by Step 354
types. The use property can be assigned to one of three values: optional, prohibited, or
required.
The meanings of optional and required are self-evident. Prohibited is used to exclude the
attribute from user-defined types based on a complex type that includes the attribute.
Create an Attribute
1. Drag an Attribute control from the XML Schema tab of the Toolbox
onto the design surface.
The XML Designer adds an attribute to the schema.
2. Change the name of the attribute to companyName.
3. In the Properties window, set the fixed property to XML, Inc.
The attribute, which will always have the value XML, Inc., is added to the
schema.
4. Select the XML tab of the XML Designer.
Visual Studio displays the XML source code for the attribute.
Chapter 14 Quick Reference
To Do this
Create an XML
schema
Choose XML Schema in the Add New Item dialog box
Create a Typed
DataSet
Choose DataSet in the Add New Item dialog box
Microsoft ADO.Net – Step by Step 355
To Do this
Generate a
Typed DataSet
from an XML
schema
Choose Generate DataSet on the Schema menu of the
XML Designer
Add DataTables
from an existing
data source
Drag the table, view, or stored procedure from the Solution
Explorer to the XML Designer
Create
DataTables
Add an element to the XML Designer, and create columns
as nested elements
Add keys to an
XML schema
Select the DataTable and then choose New Key on the
Schema menu, or drag a Key control from the XML
Schema tab of the Toolbox onto the element
Add relations to
an XML schema
Select the DataTable, and then choose New Relation on
the Schema menu, or drag a Relation control from the
XML Schema tab of the Toolbox onto the element
Create elements Drag an element control from the XML Schema tab of the
Toolbox onto the design surface
Create simple
types
Drag a simpleType control from the XML Schema tab of
the Toolbox onto the design surface
Create complex
types
Drag a complexType control from the XML Schema tab of
the Toolbox onto the design surface
Create attributes Drag an attribute control from the XML Schema tab of the
Toolbox onto the design surface
Chapter 15: Reading and Writing XML
Overview
In this chapter, you’ll learn how to:
§ Retrieve an XML Schema from a DataSet
§ Create a DataSet Schema using ReadXmlSchema
§ Infer the Schema of an XML Document
§ Load XML Data using ReadXml
§ Create an XML Schema using WriteXmlSchema
§ Write Data to an XML Document
§ Create a synchronized XML View of a DataSet
In the previous chapter, we looked at the XML Schema Designer, the Microsoft Visual
Studio .NET tool that supports the creation of XML schemas and Typed DataSets. In this
chapter, we’ll look at the DataSet methods that support reading and writing data from an
XML data stream.
The Microsoft .NET Framework provides extensive support for manipulating XML, most
of which is outside the scope of this book. In this chapter, we’ll examine only the
interface between XML and Microsoft ADO.NET DataSets.
Microsoft ADO.Net – Step by Step 356
Understanding ADO.NET and XML
The .NET Framework provides a complete set of classes for manipulating XML
documents and data. The XmlReader and XmlWriter objects, and the classes that
descend from them, provide the ability to read and optionally validate XML. The
XmlDocument and XmlSchema objects and their related classes represent the XML
itself, while the XslTransform and XPathNavigator classes support XSL Transformations
(XSLT) and apply XML Path Language (XPath) queries, respectively.
In addition to providing the ability to manipulate XML data, the XML standard is
fundamental to data transfer and serialization in the .NET Framework. For the most part,
this happens behind the scenes, but we’ve already seen that ADO.NET Typed DataSets
are represented using XML schemas.
Additionally, the ADO.NET DataSet class provides direct support for reading and writing
XML data and schemas, and the XmlDataDocument provides the ability to synchronize
XML data and a relational ADO.NET DataSet, allowing you to manipulate a single set of
data using both XML and relational tools. We’ll explore these techniques in this chapter.
Using the DataSet XML Methods
As we’ve seen, the .NET Framework exposes a set of classes that allow you to
manipulate XML data directly. However, if you need to use relational operations such as
sorting, filtering, or retrieving related rows, the DataSet provides an easier mechanism.
Furthermore, the XML classes don’t support data binding, so if you intend to display the
data to users, you must use the DataSet XML methods.
Fortunately, the choice between treating any given set of data as an XML hierarchy or
relational DataSet isn’t mutually exclusive. As we’ll see later in this chapter, the
XmlDataDocument allows you to manipulate a single set of data by using either or both
sets of tools.
The GetXml and GetXmlSchema Methods
Perhaps the most straightforward of the XML methods supported by the DataSet are
GetXml and GetXmlSchema, which simply return the XML data or XSD schema as a
string value.
Retrieve a DataSet Schema Using GetXmlSchema
Visual Basic .NET
1. Open the XML project from the Start page or the File menu.
2. In the Solution Explorer, double-click GetXml.vb.
Visual Studio displays the form in the form designer.
Microsoft ADO.Net – Step by Step 357
3. Double-click Show Schema.
Visual Studio opens the code editor and adds the Click event handler.
4. Add the following code to the handler:
5. Dim xmlStr As String
6.
7. xmlStr = Me.dsMaster1.GetXmlSchema()
Me.tbResult.Text = xmlStr
8. Press F5 to run the application.
Visual Studio displays the application window.
9. Click GetXml.
Visual Studio displays the GetXml form.
Microsoft ADO.Net – Step by Step 358
10. Click Show Schema.
The application displays the DataSet schema in the text box.
11. Close the GetXml form and the application.
Visual C# .NET
1. Open the XML project from the Start page or the File menu.
2. In the Solution Explorer, double-click GetXml.cs.
Visual Studio displays the form in the form designer.
Microsoft ADO.Net – Step by Step 359
3. Double-click Show Schema.
Visual Studio opens the code editor and adds the Click event handler.
4. Add the following code to the handler:
5. string xmlStr;
6.
7. xmlStr = this.dsMaster1.GetXmlSchema();
this.tbResult.Text = xmlStr;
8. Press F5 to run the application.
Visual Studio displays the application window.
9. Click GetXml.
Visual Studio displays the GetXml form.
Microsoft ADO.Net – Step by Step 360
10. Click Show Schema.
The application displays the DataSet schema in the text box.
11. Close the GetXml form and the application.
Retrieve a DataSet’s Data Using GetXml
Visual Basic .NET
1. In the code editor, select btnData in the Control Name combo box,
and then select Click in the Method Name combo box.
Visual Studio adds the Click event handler to the code.
2. Add the following code to the handler:
3. Dim xmlStr As String
Microsoft ADO.Net – Step by Step 361
4.
5. xmlStr = Me.dsMaster1.GetXml
Me.tbResult.Text = xmlStr
6. Press F5 to run the application.
Visual Studio displays the application window.
7. Click GetXml.
Visual Studio displays the GetXml form.
8. Click Show Data.
Visual Studio displays the XML data in the text box.
9. Close the GetXml form and the application.
10. Close the GetXml form designer and code editor window.
Visual C# .NET
1. In the form designer, double-click Show Data.
Visual Studio displays the code editor window and adds the Click event
handler to the code.
2. Add the following code to the handler:
3. string xmlStr;
4.
5. xmlStr = this.dsMaster1.GetXml();
this.tbResult.Text = xmlStr;
6. Press F5 to run the application.
Visual Studio displays the application window.
7. Click GetXml.
Visual Studio displays the GetXml form.
8. Click Show Data.
Visual Studio displays the XML data in the text box.
Microsoft ADO.Net – Step by Step 362
9. Close the GetXml form and the application.
10. Close the GetXml form designer and code editor window.
The ReadXmlSchema Method
The DataSet’s ReadXmlSchema method loads a DataSet schema definition either from
the XSD schema definition or from XML. ReadXmlSchema supports four versions, as
shown in Table 15-1. You can pass the method a stream, a string identifying a file name,
a TextReader, or an XmlReader object.
Table 15-1: ReadXmlSchema Methods
Method Description
ReadXmlSchema(stream) Reads an
XML
schema
from the
specified
stream
ReadXmlSchema(string) Reads an
XML
schema
from the
files
specified in
the string
parameter
ReadXmlSchema(TextReader) Reads an
XML
schema
from the
specified
TextReader
ReadXmlSchema(XmlReader) Reads an
XML
schema
from the
Microsoft ADO.Net – Step by Step 363
Table 15-1: ReadXmlSchema Methods
Method Description
specified
XmlReader
ReadXmlSchema does not load any data; it loads only tables, columns, and constraints
(keys and relations). If the DataSet already contains schema information, new tables,
columns, and constraints will be added to the existing schema, as necessary. If an object
defined in the schema being read conflicts with the existing DataSet schema, the
ReadXmlSchema method will throw an exception.
Note If the ReadXmlSchema method is passed XML that does not
contain inline schema information, the method will infer the
schema according to the rules discussed in the following section.
Create a DataSet Schema Using ReadXmlSchema
Visual Basic .NET
1. In the Solution Explorer, double-click XML.vb.
Visual Studio displays the form in the form designer.
2. Double-click Read Schema.
Visual Studio opens the code editor and adds a Click event handler.
3. Add the following code to the handler:
4. Dim newDS As New System.Data.DataSet()
5. newDS.ReadXmlSchema(“masterSchema.xsd”)
6.
7. Me.daCategories.Fill(newDS.Tables(“Categories”))
8. Me.daProducts.Fill(newDS.Tables(“Products”))
9. SetBindings(newDS)
The first two lines declare a new DataSet and configure it by using the
ReadXmlSchema method based on the XSD schema that is defined in the
masterSchema.xsd file, which is in the bin folder of the project directory.
The remaining three lines fill the new DataSet and then call the SetBindings
function, passing it to the DataSet object. SetBindings, which is in the Utility
Functions region of the code editor, binds the controls on the XML form to the
DataSet provided.
10. Press F5 to run the application.
11. Click Read Schema.
Microsoft ADO.Net – Step by Step 364
The application displays the data from the new DataSet in the form’s controls.
(Note that the navigation buttons will not work because they are specifically
bound to the dsMaster1 DataSet.)
12. Close the application.
Visual C# .NET
1. In the Solution Explorer, double-click XML.cs.
Visual Studio displays the form in the form designer.
2. Double-click Read Schema.
Visual Studio opens the code editor and adds a Click event handler.
3. Add the following code to the handler:
4. System.Data.DataSet newDS = new System.Data.DataSet();
5. newDS.ReadXmlSchema(“masterSchema.xsd”);
6.
7. this.daCategories.Fill(newDS.Tables[“Categories”]);
8. this.daProducts.Fill(newDS.Tables[“Products”]);
SetBindings(newDS);
The first two lines declare a new DataSet and configure it by using the
ReadXmlSchema method based on the XSD schema that is defined in the
masterSchema.xsd file, which is in the Debug folder, in the bin folder of the
project directory.
Microsoft ADO.Net – Step by Step 365
The remaining three lines fill the new DataSet and then call the SetBindings
function, passing it to the DataSet object. SetBindings, which is in the Utility
Functions region of the code editor, binds the controls on the XML form to the
DataSet provided.
9. Press F5 to run the application.
10. Click Read Schema.
The application displays the data from the new DataSet in the form’s controls.
(Note that the navigation buttons will not work because they are specifically
bound to the dsMaster1 DataSet.)
11. Close the application.
The InferXmlSchema Method
The DataSet’s InferXmlSchema method derives a DataSet schema from the structure of
the XML data passed to it. As shown in Table 15-2, InferXmlSchema has the same input
sources as the ReadXmlSchema method we examined in the previous section.
Additionally, the InferXmlSchema method accepts an array of strings representing the
namespaces that should be ignored when generating the DataSet schema.
Table 15-2: InferXmlSchema Methods
Method Description
InferXmlSchema (stream, namespaces()) Reads a
schema
from the
specified
stream,
ignoring the
namespace
s identified
in the
namespace
s string
array
InferXmlSchema (file, namespaces()) Reads a
schema
from the file
specified in
the file
parameter,
ignoring the
namespace
Microsoft ADO.Net – Step by Step 366
Table 15-2: InferXmlSchema Methods
Method Description
s identified
in the
namespace
s string
array
InferXmlSchema (textReader, namespaces()) Reads a
schema
from the
specified
textReader,
ignoring the
namespace
s identified
in the
namespace
s string
array
InferXmlSchema (XmlReader, namespaces()) Reads a
schema
from the
specified
XmlReader,
ignoring the
namespace
s identified
in the
namespace
s string
array
InferXmlSchema follows a fixed set of rules when generating a DataSet schema:
§ If the root element in the XML has no attributes and no child elements
that would otherwise be inferred as columns, it is inferred as a DataSet.
Otherwise, the root element is inferred as a table.
§ Elements that have attributes are inferred as tables.
§ Elements that have child elements are inferred as tables.
§ Elements that repeat are inferred as a single table.
§ Attributes are inferred as columns.
§ Elements that have no attributes or child elements and do not repeat are
inferred as columns.
§ If elements that are inferred as tables are nested within other elements
also inferred as tables, a DataRelation is created between the two tables.
A new, primary key column named “TableName_Id” is added to both
tables and used by the DataRelation. A ForeignKeyConstraint is created
between the two tables by using the “TableName_Id” column as the
foreign key.
§ If elements that are inferred as tables contain text but have no child
elements, a new column named “TableName_Text” is created for the text
of each of the elements. If an element is inferred as a table and has text
but also has child elements, the text is ignored.
Note Only nested (hierarchical) data will result in the creation of a
DataRelation. By default, the XML that is created by the DataSet’s
WriteXml method doesn’t create nested data, so a round-trip won’t
result in the same DataSet schema. As we’ll see, however, this
can be controlled by setting the Nested property of the
DataRelation object.
Microsoft ADO.Net – Step by Step 367
Infer the Schema of an XML Document
Visual Basic .NET
1. In the code editor, select btnInferSchema in the Control Name combo
box, and then select Click in the Method Name combo box.
Visual Studio adds the event handler to the code.
2. Add the following code to the event handler:
3. Dim newDS As New System.Data.DataSet()
4. Dim nsStr() As String
5.
6. newDS.InferXmlSchema(“dataOnly.xml”, nsStr)
7.
8. Me.daCategories.Fill(newDS.Tables(“Categories”))
9. Me.daProducts.Fill(newDS.Tables(“Products”))
10. newDS.Relations.Add(“CategoriesProducts”, _
11. newDS.Tables(“Categories”).Columns(“CategoryID”), _
newDS.Tables(“Products”).Columns(“CategoryID”))
The first two lines declare DataSet and String array variables, while the third
line passes them to the InferXmlSchema method. The remaining code adds a
new DataRelation to the new DataSet, fills it, and then calls the SetBindings
utility function that binds the XML form controls to the DataSet.
12. Press F5 to run the application.
13. Click Infer Schema.
The application displays the data in the form controls.
14. Close the application.
Visual C# .NET
1. In the form designer, double-click Infer Schema.
Visual Studio adds the event handler to the code.
2. Add the following code to the event handler:
3. System.Data.DataSet newDS = new System.Data.DataSet();
4. string[] nsStr = {};
5.
6. newDS.InferXmlSchema(“dataonly.xml”, nsStr);
Microsoft ADO.Net – Step by Step 368
7.
8. newDS.Relations.Add(“CategoriesProducts”,
9. newDS.Tables[“Categories”].Columns[“CategoryID”],
10. newDS.Tables[“Products”].Columns[“CategoryID”]);
11. this.daCategories.Fill(newDS.Tables[“Categories”]);
12. this.daProducts.Fill(newDS.Tables[“Products”]);
SetBindings(newDS);
The first two lines declare DataSet and String array variables, while the third
line passes them to the InferXmlSchema method. The remaining code adds a
new DataRelation to the new DataSet, fills it, and then calls the SetBindings
utility function that binds the XML form controls to the DataSet.
13. Press F5 to run the application.
14. Click Infer Schema.
The application displays the data in the form controls.
15. Close the application.
The ReadXml Method
The DataSet’s ReadXml method reads XML data into a DataSet. Optionally, it may also
create or modify the DataSet schema. As shown in Table 15-3, the ReadXml method
supports the same input sources as the other DataSet XML methods we’ve examined.
Table 15-3: ReadXml Methods
Method Description
ReadXml(Stream) Reads an
XML
schema and
data to the
specified
stream
ReadXml(String) Reads an
XML
schema and
data to the
file specified
in the string
parameter
ReadXml(TextReader) Reads an
Microsoft ADO.Net – Step by Step 369
Table 15-3: ReadXml Methods
Method Description
XML
schema and
data to the
specified
TextReader
ReadXml(XmlReader) Reads an
XML
schema and
data to the
specified
XmlReader
ReadXml(Stream, XmlReadMode) Reads an
XML
schema,
data, or both
to the
specified
stream, as
determined
by the
XmlReadMo
de
ReadXml(String, XmlReadMode) Reads an
XML
schema,
data, or both
to the file
specified in
the string
parameter,
as
determined
by the
XmlReadMo
de
ReadXml(TextReader, XmlReadMode) Reads an
XML
schema,
data, or both
to the
specified
TextReader,
as
determined
by the
XmlReadMo
de
ReadXml(XmlReader, XmlReadMode) Reads an
XML
schema,
data, or both
to the
specified
XmlReader,
as
Microsoft ADO.Net – Step by Step 370
Table 15-3: ReadXml Methods
Method Description
determined
by the
XmlReadMo
de
The ReadXml method exposes an optional XmlReadMode parameter that determines
how the XML is interpreted. The possible values for XmlReadMode are shown in Table
15-4.
Table 15-4: ReadXMLMode Values
Value Description
Auto Chooses a
ReadMode
based on
the contents
of the XML
ReadSchema Reads an
inline
schema and
then loads
the data,
adding
DataTables
as
necessary
IgnoreSchema Loads data
into an
existing
DataSet,
ignoring any
schema
information
in the XML
InferSchema Infers a
DataSet
schema to
the XML,
ignoring any
inline
schema
information
DiffGram Reads
DiffGram
information
into an
existing
DataSet
schema
Fragment Adds XML
fragments
that match
the existing
DataSet
Microsoft ADO.Net – Step by Step 371
Table 15-4: ReadXMLMode Values
Value Description
schema to
the DataSet
and ignores
those that
do not
Unless the ReadXml method is passed an XmlReadMode parameter of DiffGram, it does
not merge the data that it reads with existing rows in the DataSet. If a row is read with
the same primary key as an existing row, the method will throw an exception.
A DiffGram is an XML format that encapsulates the current and original versions of an
element, along with any DataRow errors. The nominal structure of a DiffGram is shown
here:
<diffgr:diffgram
xmlns:msdata=”urn:schemas-microsoft -com:xml-msdata”
xmlns:diffgr=”urn:schemas-microsoft-com:xml-diffgram-v1″
xmlns:xsd=”http://www.w3.org/2001/XMLSchema”>
<ElementName>
</ElementName>
<diffgr:before>
</diffgr:before>
<diffgr:errors>
</diffgr:errors>
</diffgr:diffgram>
In the real DiffGram, the first section (shown as <ElementName> </ElementName> in
the example) will have the name of the complexType defining the DataRow. The section
contains the current version of the contents of the DataRow. The <diffgr:before> section
contains the original version, while the <diffgr:errors> section contains error information
for the row.
In order for DiffGram to be passed as the XmlReadMode parameter, the data must be in
DiffGram format. If you need to merge XML that is written in standard XML format with
existing data, create a new DataSet and then call the DataSet.Merge method to merge
the two sets of data.
Load XML Data Using ReadXml
Visual Basic .NET
1. In the code editor, select btnReadData in the Control Name combo
box, and then select Click in the Method Name combo box.
Visual Studio adds the event handler to the code.
2. Add the following code to the event handler:
3. Dim newDS As New System.Data.DataSet()
4. Dim nsStr() As String
5.
6. newDS.ReadXml(“data.xml”, XmlReadMode.ReadSchema)
SetBindings(newDS)
Microsoft ADO.Net – Step by Step 372
The data.xml file contains an inline schema definition, so by passing the
ReadSchema XmlReadMode parameter to the ReadXml method, the code
instructs the DataSet to first create the DataSet schema and then load the
data.
7. Press F5 to run the application.
8. Click Read Data.
The application displays the data retrieved from the file.
9. Close the application.
Visual C# .NET
1. In the form designer, double-click Read Data.
Visual Studio adds the event handler to the code.
2. Add the following code to the event handler:
3. System.Data.DataSet newDS = new System.Data.DataSet();
4. string[] nsStr ={};
5.
6. newDS.ReadXml(“data.xml”, XmlReadMode.ReadSchema);
SetBindings(newDS);
The data.xml file contains an inline schema definition, so by passing the
ReadSchema XmlReadMode parameter to the ReadXml method, the code
instructs the DataSet to first create the DataSet schema and then load the
data.
7. Press F5 to run the application.
8. Click Read Data.
The application displays the data retrieved from the file.
Microsoft ADO.Net – Step by Step 373
9. Close the application.
The WriteXmlSchema Method
As might be expected, the WriteXmlSchema method writes the schema of the DataSet,
including tables, columns, and constraints, to the specified output. The versions of the
method, which accept the same output parameters as the other XML methods, are
shown in Table 15-5.
Table 15-5: WriteXmlSchema Methods
Method Description
WriteXml(stream) Writes an
XML
schema to
the specified
stream
WriteXml(string) Writes an
XML
schema to
the files
specified in
the string
parameter
WriteXml(TextReader) Writes an
XML
schema to
the specified
TextReader
WriteXml(XmlReader) Writes an
XML
schema to
the specified
XmlReader
Create an XML Schema Using WriteXmlSchema
Visual Basic .NET
1. In the code editor, select btnWriteSchema in the Control Name combo
box, and then select Click in the Method Name combo box.
Visual Studio adds the event handler to the code.
Microsoft ADO.Net – Step by Step 374
2. Add the following lines to the event handler:
3. Me.dsMaster1.WriteXmlSchema(“testSchema.xsd”)
Messagebox.Show(“Finished”, “WriteXmlSchema”)
Because no path is passed to the method, the file will be written to the bin
subdirectory of the project directory.
4. Press F5 to run the application.
5. Click Write Schema.
The application displays a message box after the file has been written.
6. Close the message box, and then close the application.
7. Open Microsoft Windows Explorer, navigate to the XML/bin project
directory, right-click the testSchema.xsd file, and then select Open
with Notepad.
Windows displays the schema file.
8. Close Microsoft Notepad, and return to Visual Studio.
Visual C# .NET
1. In the form designer, double-click Write Schema.
Visual Studio adds the event handler to the code.
2. Add the following lines to the event handler:
3. this.dsMaster1.WriteXmlSchema(“testSchema.xsd”);
MessageBox.Show(“Finished”, “WriteXmlSchema”);
Microsoft ADO.Net – Step by Step 375
Because no path is passed to the method, the file will be written to the bin
subdirectory of the project directory.
4. Press F5 to run the application.
5. Click Write Schema.
The application displays a message box after the file has been written.
6. Close the message box, and then close the application.
7. Open Microsoft Windows Explorer, navigate to the XML/bin/Debug
project directory, right-click the testSchema.xsd file, and then select
Open with Notepad.
Windows displays the schema file.
8. Close Microsoft Notepad, and return to Visual Studio.
The WriteXml Method
Like the ReadXml method, the DataSet’s WriteXml method writes XML data and,
optionally, DataSet schema information, to a specified output, as shown in Table 15-6.
As we’ll see in the following section, the structure of the XML resulting from the WriteXml
method is controlled by DataSet property settings.
Table 15-6: WriteXml Methods
Method Description
WriteXml(Stream) Writes an
XML
schema and
data to the
Microsoft ADO.Net – Step by Step 376
Table 15-6: WriteXml Methods
Method Description
specified
stream
WriteXml(String) Writes an
XML
schema and
data to the
file specified
in the string
parameter
WriteXml(TextReader) Writes an
XML
schema and
data to the
specified
TextReader
WriteXml(XmlReader) Writes an
XML
schema and
data to the
specified
XmlReader
WriteXml(Stream, XmlWriteMode) Writes an
XML
schema,
data, or both
to the
specified
stream, as
determined
by the
XmlWriteMo
de
WriteXml(String, XmlWriteMode) Writes an
XML
schema,
data, or both
to the file
specified in
the string
parameter,
as
determined
by the
XmlWriteMo
de
WriteXml(TextReader, XmlWriteMode) Writes an
XML
schema,
data, or both
to the
specified
TextReader,
as
determined
by the
Microsoft ADO.Net – Step by Step 377
Table 15-6: WriteXml Methods
Method Description
XmlWriteMo
de
WriteXml(XmlReader, XmlWriteMode) Writes an
XML
schema,
data, or both
to the
specified
XmlReader,
as
determined
by the
XmlWriteMo
de
The valid XmlWriteMode parameters are shown in Table 15-7. The DiffGram parameter
causes the output to be written in DiffGram format. If no XmlWriteMode parameter is
specified, WriteSchema is assumed.
Table 15-7: WriteXMLMode Values
Value Description
IgnoreSchema Writes the
data without
a schema
WriteSchema Writes the
data with an
inline
schema
DiffGram Writes the
entire
DataSet in
DiffGram
format
Write Data to a File in XML Format
Visual Basic .NET
1. In the code editor, select btnWriteData in the Control Name combo
box, and then select Click in the Method Name combo box.
Visual Studio adds the event handler to the code.
2. Add the following lines to the event handler:
3. Me.daCategories.Fill(Me.dsMaster1.Categories)
4. Me.daProducts.Fill(Me.dsMaster1.Products)
5.
6. Me.dsMaster1.WriteXml(“newData.xml”,
XmlWriteMode.IgnoreSchema)
MessageBox.Show(“Finished”, “WriteXml”)
Because no path is passed to the method, the file will be written to the bin
subdirectory of the project directory.
7. Press F5 to run the application.
8. Click Write Data.
The application displays a message box after the file has been written.
Microsoft ADO.Net – Step by Step 378
9. Close the message box, and then close the application.
10. Open Windows Explorer, navigate to the XML/bin project directory,
and double-click the data.xml file.
The XML file opens in Microsoft Internet Explorer.
11. Close Internet Explorer, and return to Visual Studio.
Visual C# .NET
1. In the form designer, double-click Write Data.
Visual Studio adds the event handler to the code.
2. Add the following lines to the event handler:
3. this.daCategories.Fill(this.dsMaster1.Categories);
4. this.daProducts.Fill(this.dsMaster1.Products);
5.
6. this.dsMaster1.WriteXml(“newData.xml”,
XmlWriteMode.IgnoreSchema);
MessageBox.Show(“Finished”, “WriteXml”);
Because no path is passed to the method, the file will be written to the bin
subdirectory of the project directory.
7. Press F5 to run the application.
8. Click Write Data.
The application displays a message box after the file has been written.
Microsoft ADO.Net – Step by Step 379
9. Close the message box, and then close the application.
10. Open Windows Explorer, navigate to the XML/bin/Debug project
directory, and double-click the data.xml file.
The XML file opens in Microsoft Internet Explorer.
11. Close Internet Explorer, and return to Visual Studio.
Controlling How the XML Is Written
By default, the WriteXml method generates XML that is formatted according to the
nominal structure we examined in Chapter 14, with DataTables structured as
complexTypes and DataColumns as elements within them.
This isn’t necessarily what you want the output to be. If, for example, you want to read
the data back into a DataSet, ADO.NET won’t create relationships correctly unless the
schema is present, which is an unnecessary overhead in many situations, or the related
data is nested hierarchically in the XML.
In other situations, you may need to control whether individual columns are written as
elements, attributes, or simple text, or even prevent some columns from being written at
all. This might be the case, for example, if you’re interchanging data with another
application.
Microsoft ADO.Net – Step by Step 380
Using the Nested Property of the DataRelation
By convention, XML data is usually represented hierarchically—related rows are nested
inside their parent rows.
The Nested property of DataRelation causes the XML to be written so that the child rows
are nested within the parent rows.
Write Related Data Hierarchically
Visual Basic .NET
1. In the code editor, select btnWriteNested in the Control Name combo
box, and then select Click in the Method Name combo box.
Visual Studio adds the event handler to the code.
2. Add the following lines to the event handler:
3. Me.daCategories.Fill(Me.dsMaster1.Categories)
4. Me.daProducts.Fill(Me.dsMaster1.Products)
5.
6. Me.dsMaster1.Relations(“CategoriesProducts”).Nested = True
7. Me.dsMaster1.WriteXml(“nestedData.xml”,
XmlWriteMode.IgnoreSchema)
MessageBox.Show(“Finished”, “WriteXml Nested”)
The code sets the Nested property to True before writing it to the
nestData.xml file.
8. Press F5 to run the application.
9. Click Write Nested.
The application displays a message box after the file has been written.
10. Close the message box, and then close the application.
11. Open Windows Explorer, navigate to the XML/bin project directory,
and double-click the nestedData.xml file.
The XML file opens in Internet Explorer.
Microsoft ADO.Net – Step by Step 381
12. Close Internet Explorer, and return to Visual Studio.
Visual C# .NET
1. In the form designer, double-click Write Nested.
Visual Studio adds the event handler to the code.
2. Add the following lines to the event handler:
3. this.daCategories.Fill(this.dsMaster1.Categories);
4. this.daProducts.Fill(this.dsMaster1.Products);
5.
6. this.dsMaster1.Relations[“CategoriesProducts”].Nested = true;
7. this.dsMaster1.WriteXml(“nestedData.xml”,
XmlWriteMode.IgnoreSchema);
MessageBox.Show(“Finished”, “WriteXml Nested”);
The code sets the Nested property to true before writing it to the nestData.xml
file.
8. Press F5 to run the application.
9. Click Write Nested.
The application displays a message box after the file has been written.
10. Close the message box, and then close the application.
11. Open Windows Explorer, navigate to the XML/bin/Debug project
directory, and double-click the nestedData.xml file.
The XML file opens in Internet Explorer.
Microsoft ADO.Net – Step by Step 382
12. Close Internet Explorer, and return to Visual Studio.
Using the ColumnMapping Property of the DataColumn
The DataColumn’s ColumnMapping property controls how the column will be written by
the WriteXml method. The possible values for the ColumnMapping property are shown in
Table 15-8.
Element, the default value, writes the column as a nested element within the
complexType representing the DataTable, while Attribute writes the column as one of its
attributes. These two values can be freely mixed within any given DataTable. The
Hidden value prevents the column from being written at all.
SimpleContent, which writes the column as a simple text value, cannot be combined with
columns that are written as elements or attributes, nor can it be used if the Nested
property of a DataRelation referencing the table has its Nested property set to true.
Table 15-8: Column MappingType Values
Value Description
Element The column
is written as
an XML
element
Attribute The column
is written as
an XML
attribute
SimpleContent The
contents of
the column
are written
as text
Hidden The column
will not be
included in
the XML
output
Write Columns as Attributes
Visual Basic .NET
1. In the code editor, select btnAttributes in the Control Name combo
box, and then select Click in the Method Name combo box.
Visual Studio adds the event handler to the code.
Microsoft ADO.Net – Step by Step 383
2. Add the following lines to the event handler:
3. Me.daCategories.Fill(Me.dsMaster1.Categories)
4.
5. With Me.dsMaster1.Categories
6. .Columns(“CategoryID”).ColumnMapping =
MappingType.Attribute
7. .Columns(“CategoryName”).ColumnMapping =
MappingType.Attribute
8. .Columns(“Description”).ColumnMapping =
MappingType.Attribute
9. End With
10. Me.dsMaster1.WriteXml(“attributes.xml”,
XmlWriteMode.IgnoreSchema)
MessageBox.Show(“Finished”, “Write Attributes”)
11. Press F5 to run the application.
12. Click Attributes.
The application displays a message box after the file has been written.
13. Close the message box, and then close the application.
14. Open Windows Explorer, navigate to the XML/bin project directory,
and double-click the attributes.xml file.
The XML file opens in Internet Explorer.
15. Close Internet Explorer, and return to Visual Studio.
Microsoft ADO.Net – Step by Step 384
Visual C# .NET
1. In the form designer, double-click Attributes.
Visual Studio adds the event handler to the code.
2. Add the following lines to the event handler:
3. System.Data.DataTable cat = this.dsMaster1.Categories;
4. this.daCategories.Fill(cat);
5.
6. cat.Columns[“CategoryID”].ColumnMapping =
MappingType.Attribute;
7. cat.Columns[“CategoryName”].ColumnMapping =
MappingType.Attribute;
8. cat.Columns[“Description”].ColumnMapping =
MappingType.Attribute;
9.
10. this.dsMaster1.WriteXml(“attributes.xml”,
XmlWriteMode.IgnoreSchema);
MessageBox.Show(“Finished”, “Write Attributes”);
11. Press F5 to run the application.
12. Click Attributes.
The application displays a message box after the file has been written.
13. Close the message box, and then close the application.
14. Open Windows Explorer, navigate to the XML/bin project directory,
and double-click the attributes.xml file.
The XML file opens in Internet Explorer.
Microsoft ADO.Net – Step by Step 385
15. Close Internet Explorer, and return to Visual Studio.
The XmlDataDocument Object
Although the relational data model is efficient, there are times when it is convenient to
manipulate a set of data by using the tools provided by XML—the Extensible Stylesheet
Language (XSL), XSLT, and XPath.
The .NET Framework’s XmlDataDocument makes that possible. The XmlDataDocument
allows XML-structured data to be manipulated as a DataSet. It doesn’t create a new set
of data, but rather it creates a DataSet that references all or part of the XML data.
Because there’s only one set of data, changes made in one view will automatically be
reflected in the other view, and of course, memory resources are conserved because
only one copy of the data is being maintained.
Depending on the initial source of your data, you can create an XmlDataDocument
based on the schema and contents of a DataSet, or you can create a DataSet based on
the contents of an XmlDataDocument. In either case, changes made to the data stored
in one view will be reflected in the other view.
To create an XmlDataDocument based on an existing DataSet, pass the DataSet to the
XmlDataDocument constructor:
myXDD = New XmlDataDocument(myDS)
If the DataSet schema has not been established prior to creating the XmlDataDocument,
both schemas must be established manually—schema changes made to one object will
not be propagated to the other object.
Alternatively, to begin with an XML document and create a DataSet, you can use the
default XmlDataDocument constructor and then reference its DataSet property:
myXDD = New XmlDataDocument()
myDS = myXDD.DataSet
If you use this method, you must create the DataSet schema manually by adding objects
to the DataSet’s Tables collection and the DataTable’s Columns collection. In order for
the data in the XmlDataDocument to be available through the DataSet, the DataTable
and DataColumn names must match those in the XmlDataDocument. The matching is
case-sensitive.
The second method, while it requires slightly more code, provides a mecha-nism for
creating a partial relational view of the XML data. There is no requirement to duplicate
the entire XML schema in the DataSet. Any DataTables or DataColumns that are not in
the DataSet will simply be ignored during DataSet operations.
Microsoft ADO.Net – Step by Step 386
Data can be loaded into either document at any time, before or after synchro-nization.
Any data changes made to one object, including adding, deleting, or changing values,
will automatically be reflected in the other object.
Create a Synchronized XML View of a DataSet
Visual Basic .NET
1. In the code editor, select btnDocument in the Control Name combo
box, and then select Click in the Method Name combo box.
Visual Studio adds the event handler to the code.
2. Add the following lines to the event handler:
3. Dim myXDD As System.Xml.XmlDataDocument
4.
5. myXDD = New System.Xml.XmlDataDocument(Me.dsMaster1)
6. myXDD.Load(“dataOnly.xml”)
7.
SetBindings(Me.dsMaster1)
The first line declares the XmlDataDocument variable, while the second line
synchronizes it with the dsMaster1 DataSet. The third line loads data into the
XmlDataDocument.
The final line binds the form controls to dsMaster1. Because the DataSet has
been synchronized with the myXDD XmlDataDocument, the data loaded into
myXDD will be available in dsMaster1.
8. Press F5 to run the application.
9. Click Documents.
The application displays the data in the form.
10. Close the application.
Visual C# .NET
1. In the form designer, double-click Document.
Visual Studio adds the event handler to the code.
2. Add the following lines to the event handler:
3. System.Xml.XmlDataDocument myXDD;
4.
5. myXDD = new System.Xml.XmlDataDocument(this.dsMaster1);
Microsoft ADO.Net – Step by Step 387
6. myXDD.Load(“dataOnly.xml”);
7.
SetBindings(this.dsMaster1);
The first line declares the XmlDataDocument variable, while the second line
synchronizes it with the dsMaster1 DataSet. The third line loads data into the
XmlDataDocument.
The final line binds the form controls to dsMaster1. Because the DataSet has
been synchronized with the myXDD XmlDataDocument, the data loaded into
myXDD will be available in dsMaster1.
8. Press F5 to run the application.
9. Click Documents.
The application displays the data in the form.
10. Close the application.
Chapter 15 Quick Reference
To Do this
Retrieve an
XML
schema
from a
DataSet
Use the DataSet’s GetXmlSchema method:
XmlSchemaString = myDataSet.GetXmlSchema()
Retrieve
data from a
DataSet in
XML format
Use the DataSet’s GetXml method:
XmlDataString = myDataSet.GetXml()
Create a
DataSet
schema
from an
XML
schema
Use the DataSet’s ReadXmlSchema method:
myDataSet.ReadXmlSchema(“schema.xsd”)
Infer the
schema of
an XML
document
Use the DataSet’s InferXmlSchema method:
myDataSet.InferXmlSchema(“data.xml”, string[])
Microsoft ADO.Net – Step by Step 388
To Do this
Load XML
data into a
DataSet
Use the DataSet’s ReadXml method:
myDataSet.ReadXml(“data.xml”)
Create an
XML
schema
from a
DataSet
Use the DataSet’s WriteXmlSchema method:
myDataSet.WriteXmlSchema(“schema.xsd”)
Write data
to an XML
document
Use the DataSet’s WriteXml method:
myDataSet.WriteXml(“data.xml”)
Create a
synchroniz
ed XML
view of a
DataSet
Create an instance of an XmlDataDocument that
references the DataSet:
Dim myXDD As System.Xml.XmlDataDocument
myXDD = New
System.Xml.XmlDataDocument(myDataSet)
Chapter 16: Using ADO in the .NET Framework
Overview
In this chapter, you’ll learn how to:
§ Establish a reference to the ADO and ADOX COM libraries
§ Create an ADO connection
§ Retrieve data from an ADO Recordset
§ Update an ADO Recordset
§ Create a database using ADOX
§ Add a table to a database using ADOX
In the previous two chapters, we examined using XML data with Microsoft ADO.NET
objects. In this chapter, we’ll look at the interface to another type of data, legacy data
objects created by using previous versions of ADO.
We’ll also examine the ADOX library, which provides the ability to create database
objects under programmatic control. This functionality is not available in ADO.NET,
although you can execute DDL statements such as CREATE TABLE on servers that
support them.
Understanding COM Interoperability
Maintaining interoperability with COM components was one of the design goals of the
Microsoft .NET Framework, and this achievement extends to previous versions of ADO.
By using the COM Interop functions provided by the .NET Framework, you can gain
access to all the objects, methods, and events that are exposed by any COM object
simply by establishing a reference to it. This includes previous versions of ADO and
COM objects that you’ve developed using them.
After the reference has been established, the COM objects behave just as though they
were .NET Framework classes. What happens behind the scenes, of course, is more
complicated. When a reference to any COM object, including ADO or ADOX, is declared,
Microsoft ADO.Net – Step by Step 389
the .NET Framework creates an interop assembly that handles communication between
the .NET Framework and COM.
The interop assembly handles a number of tasks, but the most important is data type
marshaling. Table 16-1 shows the type conversion performed by the interop assembly
for standard COM value types.
Table 16-1: COM Data Type Marshaling
Com Data Type .NET
Framew
ork Type
bool Int32
char, small SByte
Short Int16
long, int Int32
hyper Int64
unsigned char, byte Byte
wchar_t, unsigned short UInt16
unsigned long, unsigned int UInt32
unsigned hyper UInt64
float Single
double Double
VARIANT_BOOL Boolean
void * IntPtr
HRESULT Int16 or
IntPtr
SCODE Int32
BSTR String
LPSTR String
LPWSTR String
VARIANT Object
DECIMAL Decimal
DATE DateTime
GUID Guid
CURRENCY Decimal
IUnknown * Object
IDispatch * Object
SAFEARRAY(type) type[]
Microsoft ADO.Net – Step by Step 390
Using ADO in the .NET Framework
In addition to the generic COM interoperability and data type marshaling provided by the
.NET Framework for all COM objects, the .NET Framework provides specific support for
the ADO and ADOX libraries, and COM objects built using them.
This additional support includes data marshaling for core ADO data types. The .NET
Framework equivalents for core ADO types are shown in Table 16-2. Of course, after a
reference to ADO is established, complex types such as Recordset and ADO Connection
become available through the ADO component.
Table 16-2: ADO Data Type Marshaling
ADO Data Type .NET Framework
Type
adEmpty null
adBoolean Int16
adTinyInt SByte
adSmallInt Int16
adInteger Int32
adBigInt Int64
adUnsignedTinyInt promoted to Int16
adUnsignedSmallInt promoted to Int32
adUnsignedInt promoted to Int64
adUnsignedBigInt promoted to
Decimal
adSingle Single
adDouble Double
adCurrency Decimal
adDecimal Decimal
adNumeric Decimal
adDate DateTime
adDBDate DateTime
adDBTime DateTime
adDBTimeStamp DateTime
adFileTime DateTime
adGUID Guid
adError ExternalException
adIUnknown object
adIDispatch object
adVariant object
adPropVariant object
adBinary byte[]
Microsoft ADO.Net – Step by Step 391
Table 16-2: ADO Data Type Marshaling
ADO Data Type .NET Framework
Type
adChar string
adWChar string
adBSTR string
adChapter not supported
adUserDefined not supported
adVarNumeric not supported
Establishing a Reference to ADO
The first step in using a previous version of ADO, or a COM component that references a
previous version, is to set a reference to the component. There are several methods for
exposing the ADO component, but the most convenient is to simply add the reference
within Microsoft Visual Studio .NET.
Add References to the ADO and ADOX Libraries
1. In Visual Studio, open the ADOInterop project from the Start page or
the File menu.
2. In the Solution Explorer, double-click ADOInterop.vb (or
ADOInterop.cs if you’re using C#).
Visual Studio displays the form in the form designer.
3. On the Project menu, select Add Reference.
Visual Studio opens the Add Reference dialog box.
Microsoft ADO.Net – Step by Step 392
4. On the COM tab, select the component named Microsoft ActiveX Data
Objects 2.1 Library, and then click Select.
5. Select the component named Microsoft ADO Ext. 2.7 for DDL and
Security, and then click Select.
6. Click OK.
Visual Studio closes the dialog box and adds the references to the project.
7. In the Solution Explorer, expand the references node.
Microsoft ADO.Net – Step by Step 393
Visual Studio displays the new references.
Creating ADO Objects
After the references to the ADO components have been established, ADO objects can
be created and their properties set just like any object exposed by the .NET Framework
class library.
Like ADO.NET, ADO uses a Connection object to represent a unique session with a data
source. The most important property of an ADO connection, just like an ADO.NET
connection, is the ConnectionString, which establishes the Data Provider, the database
information, and, if appropriate, the user information.
Create an ADO Connection
Visual Basic .NET
1. Press F7 to open the code editor.
2. Add the following procedure, specifying the complete path for the
dsStr text value:
3. Private Function create_connection() As ADODB.Connection
4. Dim dsStr As String
5. Dim dsCn As String
6. Dim cn As New ADODB.Connection()
7.
8. dsStr = “<<Specify the path to the Access nwind sample db
here>>”
9. dsCn = “Provider=Microsoft.Jet.OLEDB.4.0;Data Source=” & _
10. dsStr & “;”
11. cn.ConnectionString = dsCn
Microsoft ADO.Net – Step by Step 394
12.
13. Return cn
14.
End Function
Visual C# .NET
1. Press F7 to open the code editor.
2. Add the following procedure, specifying the complete path for the
dsStr text value:
3. private ADODB.Connection create_connection()
4. {
5. string dsStr;
6. string dsCn;
7.
8. ADODB.Connection cn = new ADODB.Connection();
9. dsStr = “<<Specify the path to the Access nwind sample db
here>>”;
10. dsCn = “Provider=Microsoft.Jet.OLEDB.4.0;Data
Source=” +
11. dsStr + “;”;
12. cn.ConnectionString = dsCn;
13.
14. return cn;
}
This function simply creates an ADO connection and returns it to the caller.
We’ll use the function to simplify creating connections in later exercises.
(ConnectionStrings can be tedious to type.)
In addition to support for ADO data types, the OleDbDataAdapter provides direct support
for ADO Recordsets by exposing the Fill method that accepts an ADO Recordset as a
parameter. There are two versions of the method, as shown in Table 16-3.
Table 16-3: OleDbDataAdapter Fill Methods
Method Description
Fill(DataTable, Recordset) Adds or
refreshes
rows in the
DataTable
to match
those in the
Recordset
Fill(DataSet, Recordset, Adds or
refreshes
rows in the
DataTable
in
DataTable) the specified
DataSet to
match those
in the
Recordset
If the DataTable passed to the Fill method doesn’t exist in the DataSet, it is created
based on the schema of the ADO Recordset. Unless primary key information exists, the
Microsoft ADO.Net – Step by Step 395
rows in the ADO Recordset will simply be added to the DataTable. If primary key
information does exist, matching rows in the ADO Recordset will be merged with those in
the DataTable.
Retrieve Data from an ADO Recordset
Visual Basic .NET
1. In the code editor, select btnOpen in the Control Name combo box,
and then select Click in the Method Name combo box.
Visual Studio adds the event handler to the code.
2. Add the following lines to the event handler:
3. Dim rs As New ADODB.Recordset()
4. Dim cnADO As ADODB.Connection
5. Dim daTemp As New OleDb.OleDbDataAdapter()
6.
7. cnADO = create_connection()
8. cnADO.Open()
9.
10. rs.Open(“Select * From CategoriesByName”, cnADO)
11. daTemp.Fill(Me.dsCategories1.Categories, rs)
12. cnADO.Close()
13.
SetBindings(Me.dsCategories1)
The first three lines declare an ADO Recordset, an ADO Connection, and an
OleDbDataAdapter. The next two lines call the create_connection function
that we created in the previous exercise to create the ADO Connection object,
and then open the connection.
The next three lines open the ADO Recordset, load the rows into the
DataAdapter, and then close the ADO Recordset, while the final line calls a
function (in the Utility Functions region of the code editor) that binds the
form’s text boxes to the specified DataSet.
14. Press F5 to run the application.
15. Click Open ADO.
The application loads the data from ADO and displays it in the form’s text
boxes.
16. Close the application.
Microsoft ADO.Net – Step by Step 396
Visual C# .NET
1. In the form designer, double-click Open ADO.
Visual Studio adds the event handler to the code.
2. Add the following lines to the event handler:
3. ADODB.Recordset rs = new ADODB.Recordset();
4. ADODB.Connection cnADO;
5.
6. System.Data.OleDb.OleDbDataAdapter daTemp =
7. new System.Data.OleDb.OleDbDataAdapter();
8. cnADO = create_connection();
9.
10. cnADO.Open(cnADO.ConnectionString, “”, “”, -1);
11. rs.Open(“Select * From CategoriesByName”,
12. cnADO, ADODB.CursorTypeEnum.adOpenForwardOnly,
13. ADODB.LockTypeEnum.adLockOptimistic, 1);
14. daTemp.Fill(Me.dsCategories1.Categories, rs);
15.
16. cnADO.Close();
17. SetBindings(Me.dsCategories1);
The first three lines declare an ADO Recordset, an ADO Connection, and an
OleDbDataAdapter. The next two lines call the create_connection function
that we created in the previous exercise to create the ADO Connection object,
and then open the connection.
The next three lines open the ADO Recordset, load the rows into the
DataAdapter, and then close the ADO Recordset, while the final line calls a
function (in the Utility Functions region of the code editor) that binds the
form’s text boxes to the specified DataSet.
18. Press F5 to run the application.
19. Click Open ADO.
The application loads the data from ADO and displays it in the form’s text
boxes.
20. Close the application.
The OleDbDataAdapter’s Fill method provides a convenient mechanism for loading data
from an ADO Recordset into a .NET Framework DataTable, but unfortunately, the
communication is one-way. The .NET Framework doesn’t provide a direct method for
updating an ADO Recordset based on ADO.NET data.
Microsoft ADO.Net – Step by Step 397
Fortunately, it isn’t difficult to update an ADO data source from within the .NET
Framework—simply copy the data values from the appropriate source and use the
intrinsic ADO functions to do the update.
Update an ADO Recordset
Visual Basic .NET
1. In the code editor, select btnUpdate in the Control Name combo box,
and then select Click in the Method Name combo box.
Visual Studio adds the event handler to the code.
2. Add the following lines to the event handler:
3. Dim rsADO As New ADODB.Recordset()
4. Dim cnADO As ADODB.Connection
5.
6. cnADO = create_connection()
7. cnADO.Open()
8. rsADO.ActiveConnection = cnADO
9. rsADO.Open(“Select * From CategoriesByName”, cnADO, _
10. ADODB.CursorTypeEnum.adOpenDynamic, _
11. ADODB.LockTypeEnum.adLockOptimistic)
12.
13. rsADO.AddNew()
14. rsADO.Fields(“CategoryName”).Value = “Test”
15. rsADO.Fields(“Description”).Value = “Description”
16. rsADO.Update()
17.
18. rsADO.Close()
19. cnADO.Close()
MessageBox.Show(“Finished”, “Update”)
As always, the first few lines declare some local values. The next five lines
create a connection and an ADO Recordset. The next four lines use ADO’s
AddNew and Update methods to create a new row and set its values. Finally,
the Recordset and ADO Connection are closed, and a message box is
displayed.
20. Press F5 to run the application.
21. Click Update ADO.
The application adds the row to the DataTable, and then displays amessage
box telling you that the new row has been added.
22. Close the message box.
23. Click Open ADO to load the data into the form, and then click the
Last (“>|”) button to display the last row.
The application displays the new row.
Microsoft ADO.Net – Step by Step 398
24. Close the application.
25. If you have Microsoft Access, open the nwind database and confirm
that the row has been added.
Visual C# .NET
1. In the form designer, double-click Update ADO.
Visual Studio adds the event handler to the code.
2. Add the following lines to the event handler:
3. ADODB.Recordset rsADO = new ADODB.Recordset();
4. ADODB.Connection cnADO;
5.
6. cnADO = create_connection();
7. cnADO.Open(cnADO.ConnectionString,””,””,-1);
8.
9. rsADO.ActiveConnection = cnADO;
10. rsADO.Open(“Select * From CategoriesByName”, cnADO,
11. ADODB.CursorTypeEnum.adOpenDynamic,
12. ADODB.LockTypeEnum.adLockOptimistic, -1);
13.
14. rsADO.AddNew(Type.Missing, Type.Missing);
15. rsADO.Fields[1].Value = “Test”;
16. rsADO.Fields[2].Value = “Description”;
17. rsADO.Update(Type.Missing, Type.Missing);
18.
19. rsADO.Close();
20. cnADO.Close();
MessageBox.Show(“Finished”, “Update”);
Microsoft ADO.Net – Step by Step 399
As always, the first few lines declare some local values. The next five lines
create a connection and an ADO recordset. The next four lines use ADO’s
AddNew and Update methods to create a new row and set its values. Finally,
the recordset and ADO connection are closed, and a message box is
displayed.
21. Press F5 to run the application.
22. Click Update ADO.
The application adds the row to the DataTable, and then displays a message
box telling you that the new row has been added.
23. Close the message box.
24. Click Open ADO to load the data into the form, and then click the
Last (“>|”) button to display the last row.
The application displays the new row.
25. Close the application.
26. If you have Access, open the nwind database and confirm that the
row has been added.
Using ADOX in the .NET Framework
ADOX, more formally the “Microsoft ADO Extensions for DDL and Security,” exposes an
object model that allows data source objects to be created and manipulated.
The ADOX object model is shown in the following figure. Not all data sources support all
of the objects in the model; this is determined by the specific OleDb Data Provider.
Microsoft ADO.Net – Step by Step 400
The top-level object, Catalog, equates to a specific data source. This will almost always
be a database, but specific OleDb Data Providers might expose different objects. The
Groups and Users collections control access security for those data sources that
implement it.
The Tables object represents the tables within the database. Each table contains a
Columns collection, which represents individual fields in the table; an Indexes collection,
which represents physical indexes; and a Keys collection, which is used to define
unique, primary, and foreign keys.
The Procedures collection represents stored procedures on the data source, while the
Views collection represents Views or Queries. This model doesn’t always match the
object model of the data source. For example, Microsoft Jet (the underlying data source
for Access) represents both Views and Procedures as Query objects. When mapped to
an ADOX Catalog, any query that updates or inserts rows, along with any query that
contains parameters, is mapped to a Procedure object. Queries that consist solely of
SELECT statements are mapped to Views.
Creating Database Objects Using ADOX
As we’ve seen, ADOX provides a mechanism for creating data source objects
programmatically. ADO.NET doesn’t support this functionality. You can, of course,
execute a CREATE <object> SQL statement using an ADO.NET DataCommand, but
data definition syntax varies wildly between data sources, so it will often be more
convenient to use ADOX and let the OleDb Data Provider handle the operation.
The Catalog object supports a Create method that creates a new database, while the
Tables and Columns collections support Append methods that are used to create new
schema objects.
Create a Database Using ADOX
Visual Basic .NET
1. In the code editor, select btnMakeDB in the Control Name combo box,
and then select Click in the Method Name combo box.
Microsoft ADO.Net – Step by Step 401
Visual Studio adds the event handler to the code.
2. Add the following lines to the event handler, specifying the path to the
Sample DBs directory on your system where indicated:
3. Dim dsStr, dsCN As String
4. Dim cnADO As New ADODB.Connection()
5. Dim mdb As New ADOX.Catalog()
6.
7. dsStr = “<<specify the path to the Sample DBs directory>>” _
8. + “\test.mdb”
9. dsCN = “Provider=Microsoft.Jet.OLEDB.4.0;Data Source=” &
dsStr & “;”
10. cnADO.ConnectionString = dsCN
11.
12. mdb.Create(dsCN)
13.
14. mdb.ActiveConnection.Close()
MessageBox.Show(“Finished”, “Make DB”)
15. Press F5 to run the application, and then click Make DB.
The application creates a Jet database named Test in the Sample DBs
directory and then displays a finished method.
16. Close the dialog box, and then close the application.
17. Verify that the new database has been added using Microsoft
Windows Explorer.
Microsoft ADO.Net – Step by Step 402
Visual C# .NET
1. In the form designer, double-click Make DB.
Visual Studio adds the event handler to the code.
2. Add the following lines to the event handler, specifying the path to the
Sample DBs directory on your system where indicated:
3. string dsStr, dsCN;
4. ADODB.Connection cnADO = new ADODB.Connection();
5. ADOX.Catalog mdb = new ADOX.Catalog();
6.
7. dsStr = “<<specify the path to the Sample DBs directory>>” _
8. + “\\test.mdb”;
9. dsCN = “Provider=Microsoft.Jet.OLEDB.4.0;Data Source=” +
dsStr + “;”;
10. cnADO.ConnectionString = dsCN;
11.
12. mdb.Create(dsCN);
13.
14. MessageBox.Show(“Finished”, “Make DB”);
15. Press F5 to run the application, and then click Make DB.
The application creates a Jet database named Test in the Sample DBs
directory and then displays a finished method.
Microsoft ADO.Net – Step by Step 403
16. Close the dialog box, and then close the application.
17. Verify that the new database has been added using Microsoft
Windows Explorer.
Add a Table to a Database Using ADOX
Visual Basic .NET
1. In the code editor, select btnMakeTable in the Control Name combo
box, and then select Click in the Method Name combo box.
Visual Studio adds the event handler to the code.
2. Add the following code to the event handler:
3. Dim cnADO As ADODB.Connection
4. Dim mdb As New ADOX.Catalog()
5. Dim dt As New ADOX.Table()
6.
7. cnADO = create_connection()
8. cnADO.Open()
9. mdb.ActiveConnection = cnADO
10.
11. With dt
12. .Name = “New Table”
13. .Columns.Append(“TableID”,
ADOX.DataTypeEnum.adWChar, 5)
14. .Columns.Append(“Value”,
ADOX.DataTypeEnum.adWChar, 20)
15. .Keys.Append(“PK_NewTable”,
ADOX.KeyTypeEnum.adKeyPrimary, _
Microsoft ADO.Net – Step by Step 404
16. “TableID”)
17. End With
18. mdb.Tables.Append(dt)
19.
20. mdb.ActiveConnection.Close()
MessageBox.Show(“Finished”, “Make Table”)
21. Press F5 to run the application, and then click Make Table.
The application adds the table to the nwind database and displays a message
box telling you that the new table has been added.
22. Close the message box, and then close the application.
23. If you have Access, open the nwind database and confirm that the
new table has been added.
Visual C# .NET
1. In the form designer, double-click Make Table.
Visual Studio adds the event handler to the code.
2. Add the following code to the event handler:
3. ADODB.Connection cnADO;
4. ADOX.Catalog mdb = new ADOX.Catalog();
5. ADOX.Table dt = new ADOX.Table();
6.
7. cnADO = create_connection();
8. cnADO.Open(cnADO.ConnectionString, “”, “”, -1);
9. mdb.ActiveConnection = cnADO;
10.
11. dt.Name = “New Table”;
12. dt.Columns.Append(“TableID”,
ADOX.DataTypeEnum.adWChar, 5);
Microsoft ADO.Net – Step by Step 405
13. dt.Columns.Append(“Value”,
ADOX.DataTypeEnum.adWChar, 20);
14. dt.Keys.Append(“PK_NewTable”,
ADOX.KeyTypeEnum.adKeyPrimary, “TableID”);
15. mdb. Tables.Append(dt);
16.
17. MessageBox.Show(“Finished”, “Make Table”);
18. Press F5 to run the application, and then click Make Table.
The application adds the table to the nwind database and displays a message
box telling you that the new table has been added.
19. Close the message box, and then close the application.
20. If you have Access, open the nwind database and confirm that the
new table has been added.
Chapter 16 Quick Reference
To Do this
Establish a reference to an
ADO or ADOX library
On the Projects menu, choose Add Reference,
select the library from the COM tab of the Add
Reference dialog box, click Select, and then
click OK
Create an ADO object Reference the ADO COM library, and then use
the usual .NET Framework object creation
commands
Load data from an ADO
Recordset to a ADO.NET
DataSet
Use the DataAdapter’s Fill method:
myDataAdapter.Fill(DataTable,
ADORecordset)
Update an ADO Recordset Open the ADO Connection and ADO Recordset,
and then use the AddNew or Update methods
Microsoft ADO.Net – Step by Step 406
To Do this
Create a database using
ADOX
Use the ADOX Catalog object’s Create method:
adoxCatalog.Create
Add a table to a database
using ADOX
Use the Append method of the ADO Catalog
object’s Tables collection:
adoxCatalog.Tables.Append(adoxTable)
List of Tables
Chapter 2: Creating Connections
Table 2-1: Connection Constructors
Table 2-2: OleDbConnection Properties
Table 2-3: SqlConnection Properties
Table 2-4: Connection Methods
Table 2-5: Connection States
Chapter 3: Data Commands and the DataReader
Table 3-1: Command Constructors
Table 3-2: Data Command Properties
Table 3-3: CommandType Values
Table 3-4: UpdatedRowSource Values
Table 3-5: Parameters Collection Methods
Table 3-6: Command Methods
Table 3-7: CommandBehavior Values
Table 3-8: DataReader Properties
Table 3-9: DataReader Methods
Table 3-10: GetType Methods
Chapter 4: The DataAdapter
Table 4-1: DataAdapter Properties
Table 4-2: MissingMappingAction Values
Table 4-3: MissingSchemaAction Values
Table 4-4: DbDataAdapter Fill Methods
Table 4-5: OleDbDataAdapter Fill Methods
Table 4-6: DbDataAdapter Update Methods
Table 4-7: RowUpdatingEventArgs Properties
Chapter 5: Transaction Processing in ADO.NET
Table 5-1: Connection BeginTransaction Methods
Table 5-2: Additional SQL BeginTransaction Methods
Table 5-3: Isolation Levels
Table 5-4: Transaction BeginTransaction Methods
Chapter 6: The DataSet
Table 6-1: DataSet Constructors
Table 6-2: DataSet Properties
Table 6-3: Primary DataSet Methods
Chapter 7: The DataTable
Table 7-1: DataTable Constructors
Table 7-2: DataSet Add Table Methods
Table 7-3: DataTable Properties
Table 7-4: DataColumn Constructors
Table 7-5: DataColumn Properties
Table 7-6: DataRow Properties
Table 7-7: Rows.Add Methods
Table 7-8: DataRowState Values
Table 7-9: Constraint Properties
Table 7-10: ForeignKeyConstraint Properties
Table 7-11: Action Rules
Microsoft ADO.Net – Step by Step 407
Table 7-12: UniqueConstraint Properties
Table 7-13: DataTable Methods
Table 7-14: DataRow Methods
Table 7-15: DataTable Events
Chapter 8: The DataView
Table 8-1: DataRowView Properties
Table 8-2: DataView Constructors
Table 8-3: DataView Properties
Table 8-4: Aggregate Functions
Table 8-5: Comparison Operators
Table 8-6: Arithmetic Operators
Table 8-7: Special Functions
Table 8-8: DataViewRowState Values
Table 8-9: DataView Methods
Chapter 9: Editing and Updating Data
Table 9-1: DataRowStates
Table 9-2: DataRowVersions
Table 9-3: Remove Methods
Table 9-4: DataRow Item Properties
Table 9-5: DbDataAdapter Update Methods
Table 9-6: UpdateRowSource Values
Chapter 10: ADO.NET Data-Binding in Windows Forms
Table 10-1: BindingContext Properties
Table 10-2: CurrencyManager Properties
Table 10-3: CurrencyManager Methods
Table 10-4: CurrencyManager Events
Table 10-5: Binding Properties
Table 10-6: BindingMemberInfo Properties
Table 10-7: Binding Events
Chapter 11: Using ADO.NET in Windows Forms
Table 11-1: ConvertEventArgs Properties
Chapter 12: Data-Binding in Web Forms
Table 12-1: Eval Methods
Chapter 13: Using ADO.NET in Web Forms
Table 13-1: ItemCommand Event Arguments
Table 13-2: DataGrid Column Types
Table 13-3: DataGrid Events
Table 13-4: DataGrid Paging Methods
Table 13-5: Validation Controls
Chapter 14: Using the XML Designer
Table 14-1: Microsoft Schema Extension Properties
Table 14-2: XML Schema Properties
Table 14-3: Referential Integrity Rules
Table 14-4: XML Schema Element Properties
Table 14-5: Microsoft Schema Extension Element Properties
Table 14-6: Simple Type Derivation Methods
Table 14-7: Data Type Facets
Table 14-8: Element Group Types
Table 14-9: Attribute Properties
Chapter 15: Reading and Writing XML
Table 15-1: ReadXmlSchema Methods
Table 15-2: InferXmlSchema Methods
Table 15-3: ReadXml Methods
Table 15-4: ReadXMLMode Values
Table 15-5: WriteXmlSchema Methods
Table 15-6: WriteXml Methods
Table 15-7: WriteXMLMode Values
Microsoft ADO.Net – Step by Step 408
Table 15-8: Column MappingType Values
Chapter 16: Using ADO in the .NET Framework
Table 16-1: COM Data Type Marshaling
Table 16-2: ADO Data Type Marshaling
Table 16-3: OleDbDataAdapter Fill Methods
List of Sidebars
Chapter 2: Creating Connections
Database References
Using Dynamic Properties
Connection Pooling
Chapter 8: The DataView
DataViewManagers
Chapter 9: Editing and Updating Data
Concurrency
Chapter 10: ADO.NET Data-Binding in Windows Forms
Data Sources
Chapter 12: Data-Binding in Web Forms
Data Sources
Microsoft ADO.Net – Step by Step 409

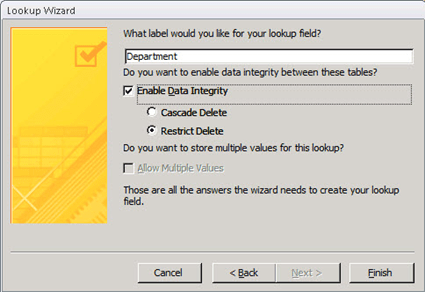


 Note
Note  Important


 According to Gartner, cloud computing is defined as a “style of computing where massively scalable IT-enabled capabilities are delivered ‘as a service’ to external customers using Internet technologies.” The significant words in this definition are scalable, service, and Internet. In short, cloud computing can be defined as IT services that are deployed and delivered over the Internet and are scalable on demand.


 SharePoint 2010 flexibly supports most of the workloads in a Windows Azure Virtual Machines deployment. Windows Azure Virtual Machines are an optimal fit for FIS (SharePoint Server for Internet Sites) and development scenarios. Likewise, core SharePoint workloads are also supported. If an organization wants to manage and control its own SharePoint 2010 implementation while capitalizing on options for virtualization in the cloud, Windows Azure Virtual Machines are ideal for deployment.


 Under the MS Project Solution Starters Deployment download, open the Workflow Visualization Webpart folder.


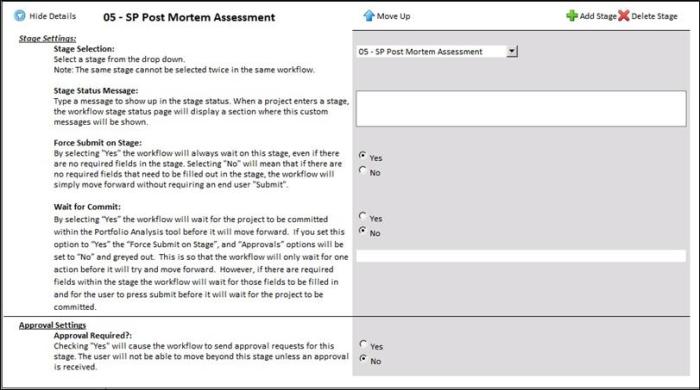


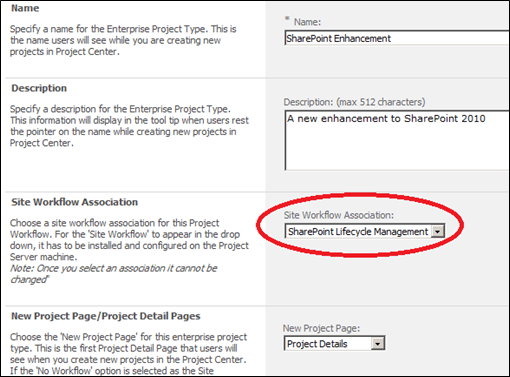


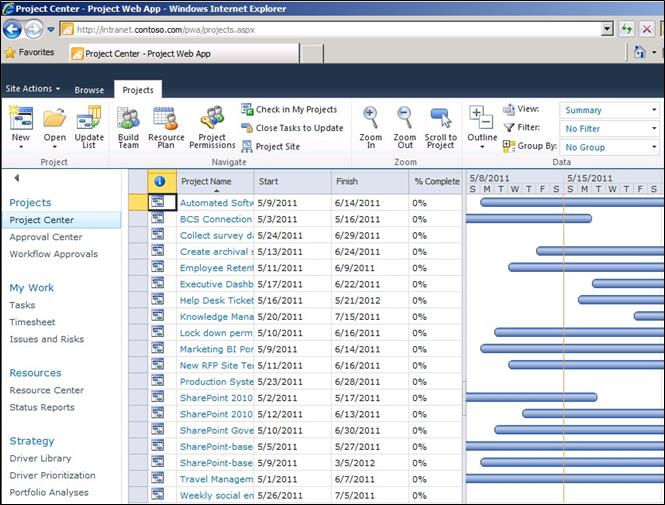
 In the Initial Proposal form that displays, enter a name and description for the proposal. This information will assist the SharePoint Analyst in determining the requirements of the project and creating the initial scope.


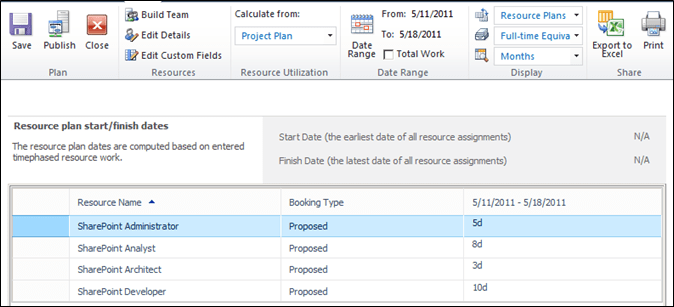

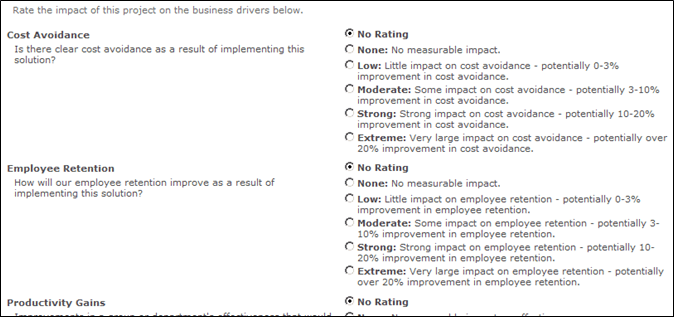

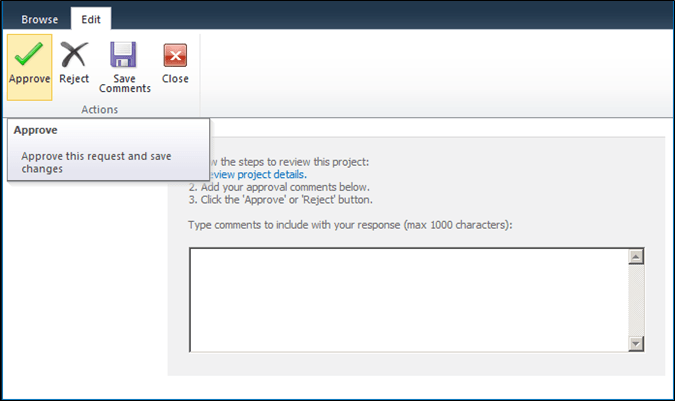

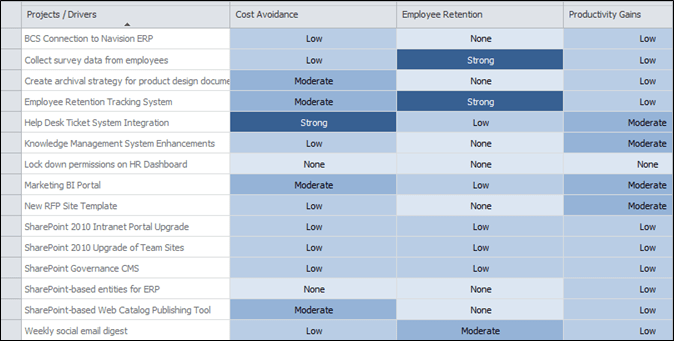


